

Anasazi37
-
Posts
2026 -
Joined
-
Last visited
Content Type
Profiles
Forums
Events
Gallery
Posts posted by Anasazi37
-
-
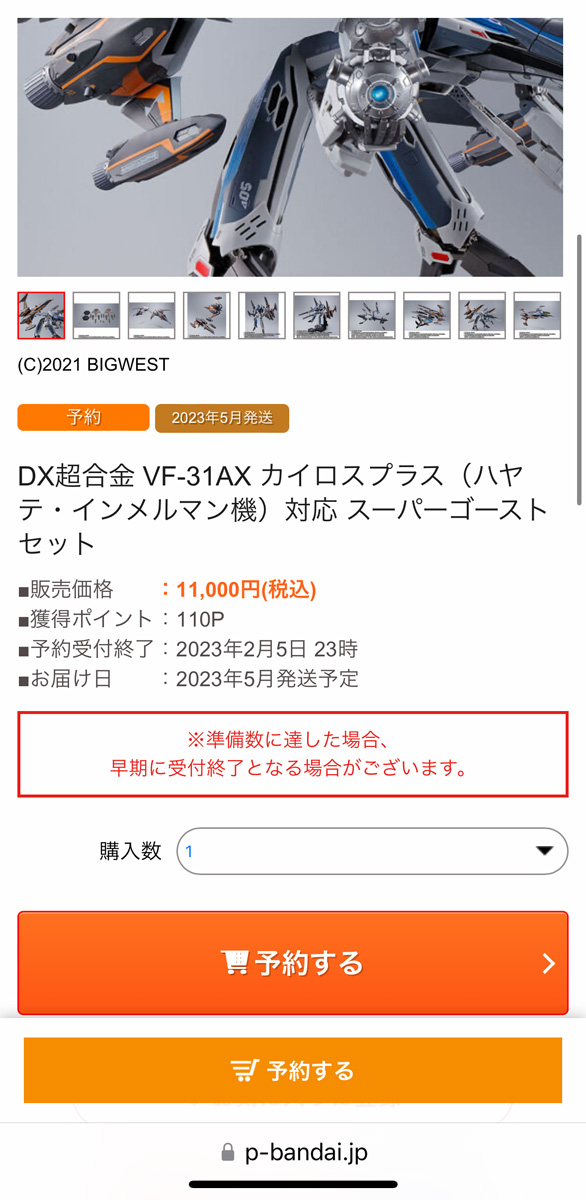
8 hours ago, no3Ljm said:
I got the news from Facebook Macross Group. I recently checked P-Bandai site and it looks like what it says on the listing is the last day to preorder the set is on Feb 5, 2023, 11pm JST.
A longer PO window for the initial release makes a lot more sense (it might have even closed and reopened?
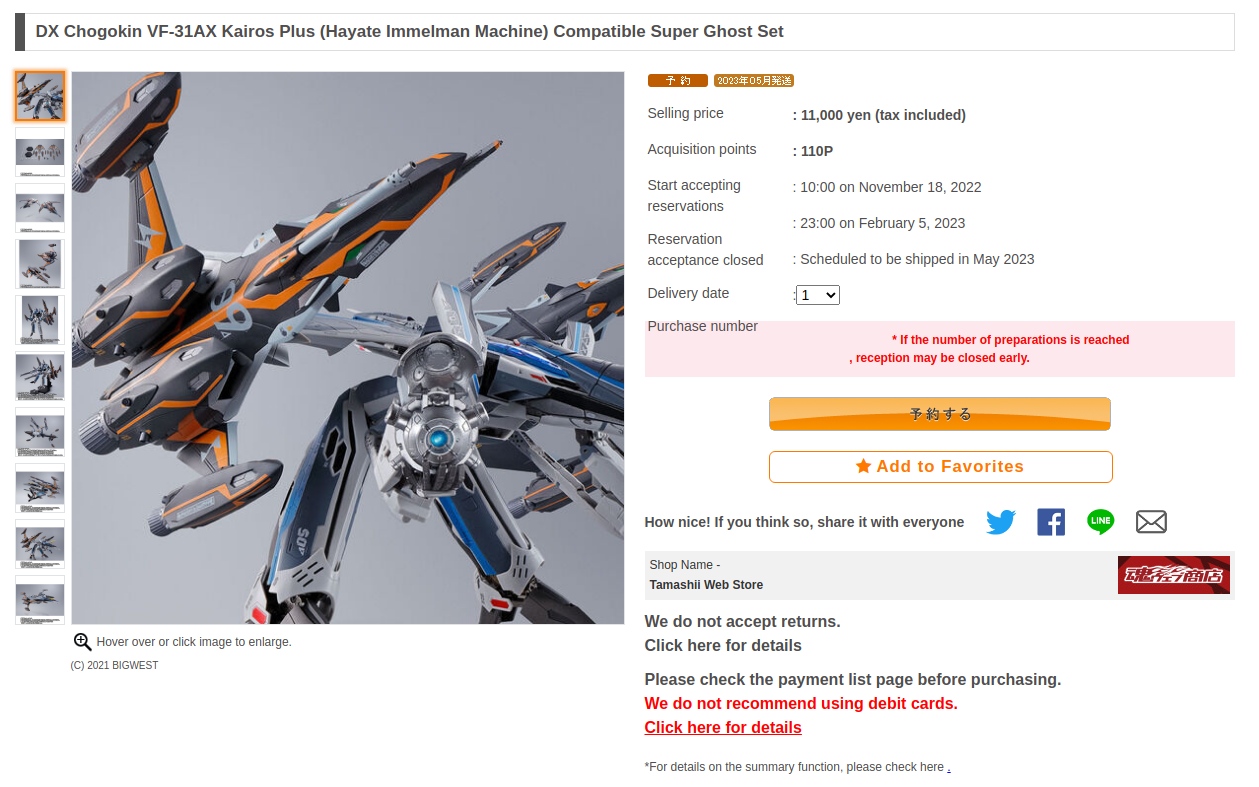
 ). I just checked the purchase page as well and am seeing the same thing:
-
So...Bandai showed at least 35 new Macross items at the Tamashii Nations event in November and they choose to spend time, money, and precious production slots on two Delta reissues instead of the new stuff. I already have both. Awesome. Thanks, Bandai.

-
5 hours ago, Rein+ said:
Need to pay upfront, and only 1 per customer.
Otherwise known as the "anti-scalper" maneuver. I've managed to get several items from them since they switched to that policy, which used to be almost impossible. Sucks to fork out the money up front, but it seems to level the playing field a bit. This time around HLJ got their posting up first, which was unusual, so I went with them. Looks like AE still has stock. They're only a few dollars more than what AmiAmi will be charging when the posting goes live later today.
-
12 hours ago, Shawn said:
I want painting of that kit that looks like a painting of the painting

-
Good points, everyone. Yeah, it's a weird self-inflicted wound on the part of Plamax. The idea that they were trying to replicate what Bandai does for Gundam kits makes the most sense to me, but they failed on two fronts: (1) you can get away with stickers on a Gundam model far more easily than you can on an aircraft model (smaller designs covering smaller areas) and (2) you should produce decals alongside the stickers because this is a highly detailed aircraft model and that's been the industry standard for decades (even Bandai recognizes this fact).
-
5 hours ago, Urashiman said:
then comes the largest decal sheet I ever had with a 1/72 kit.
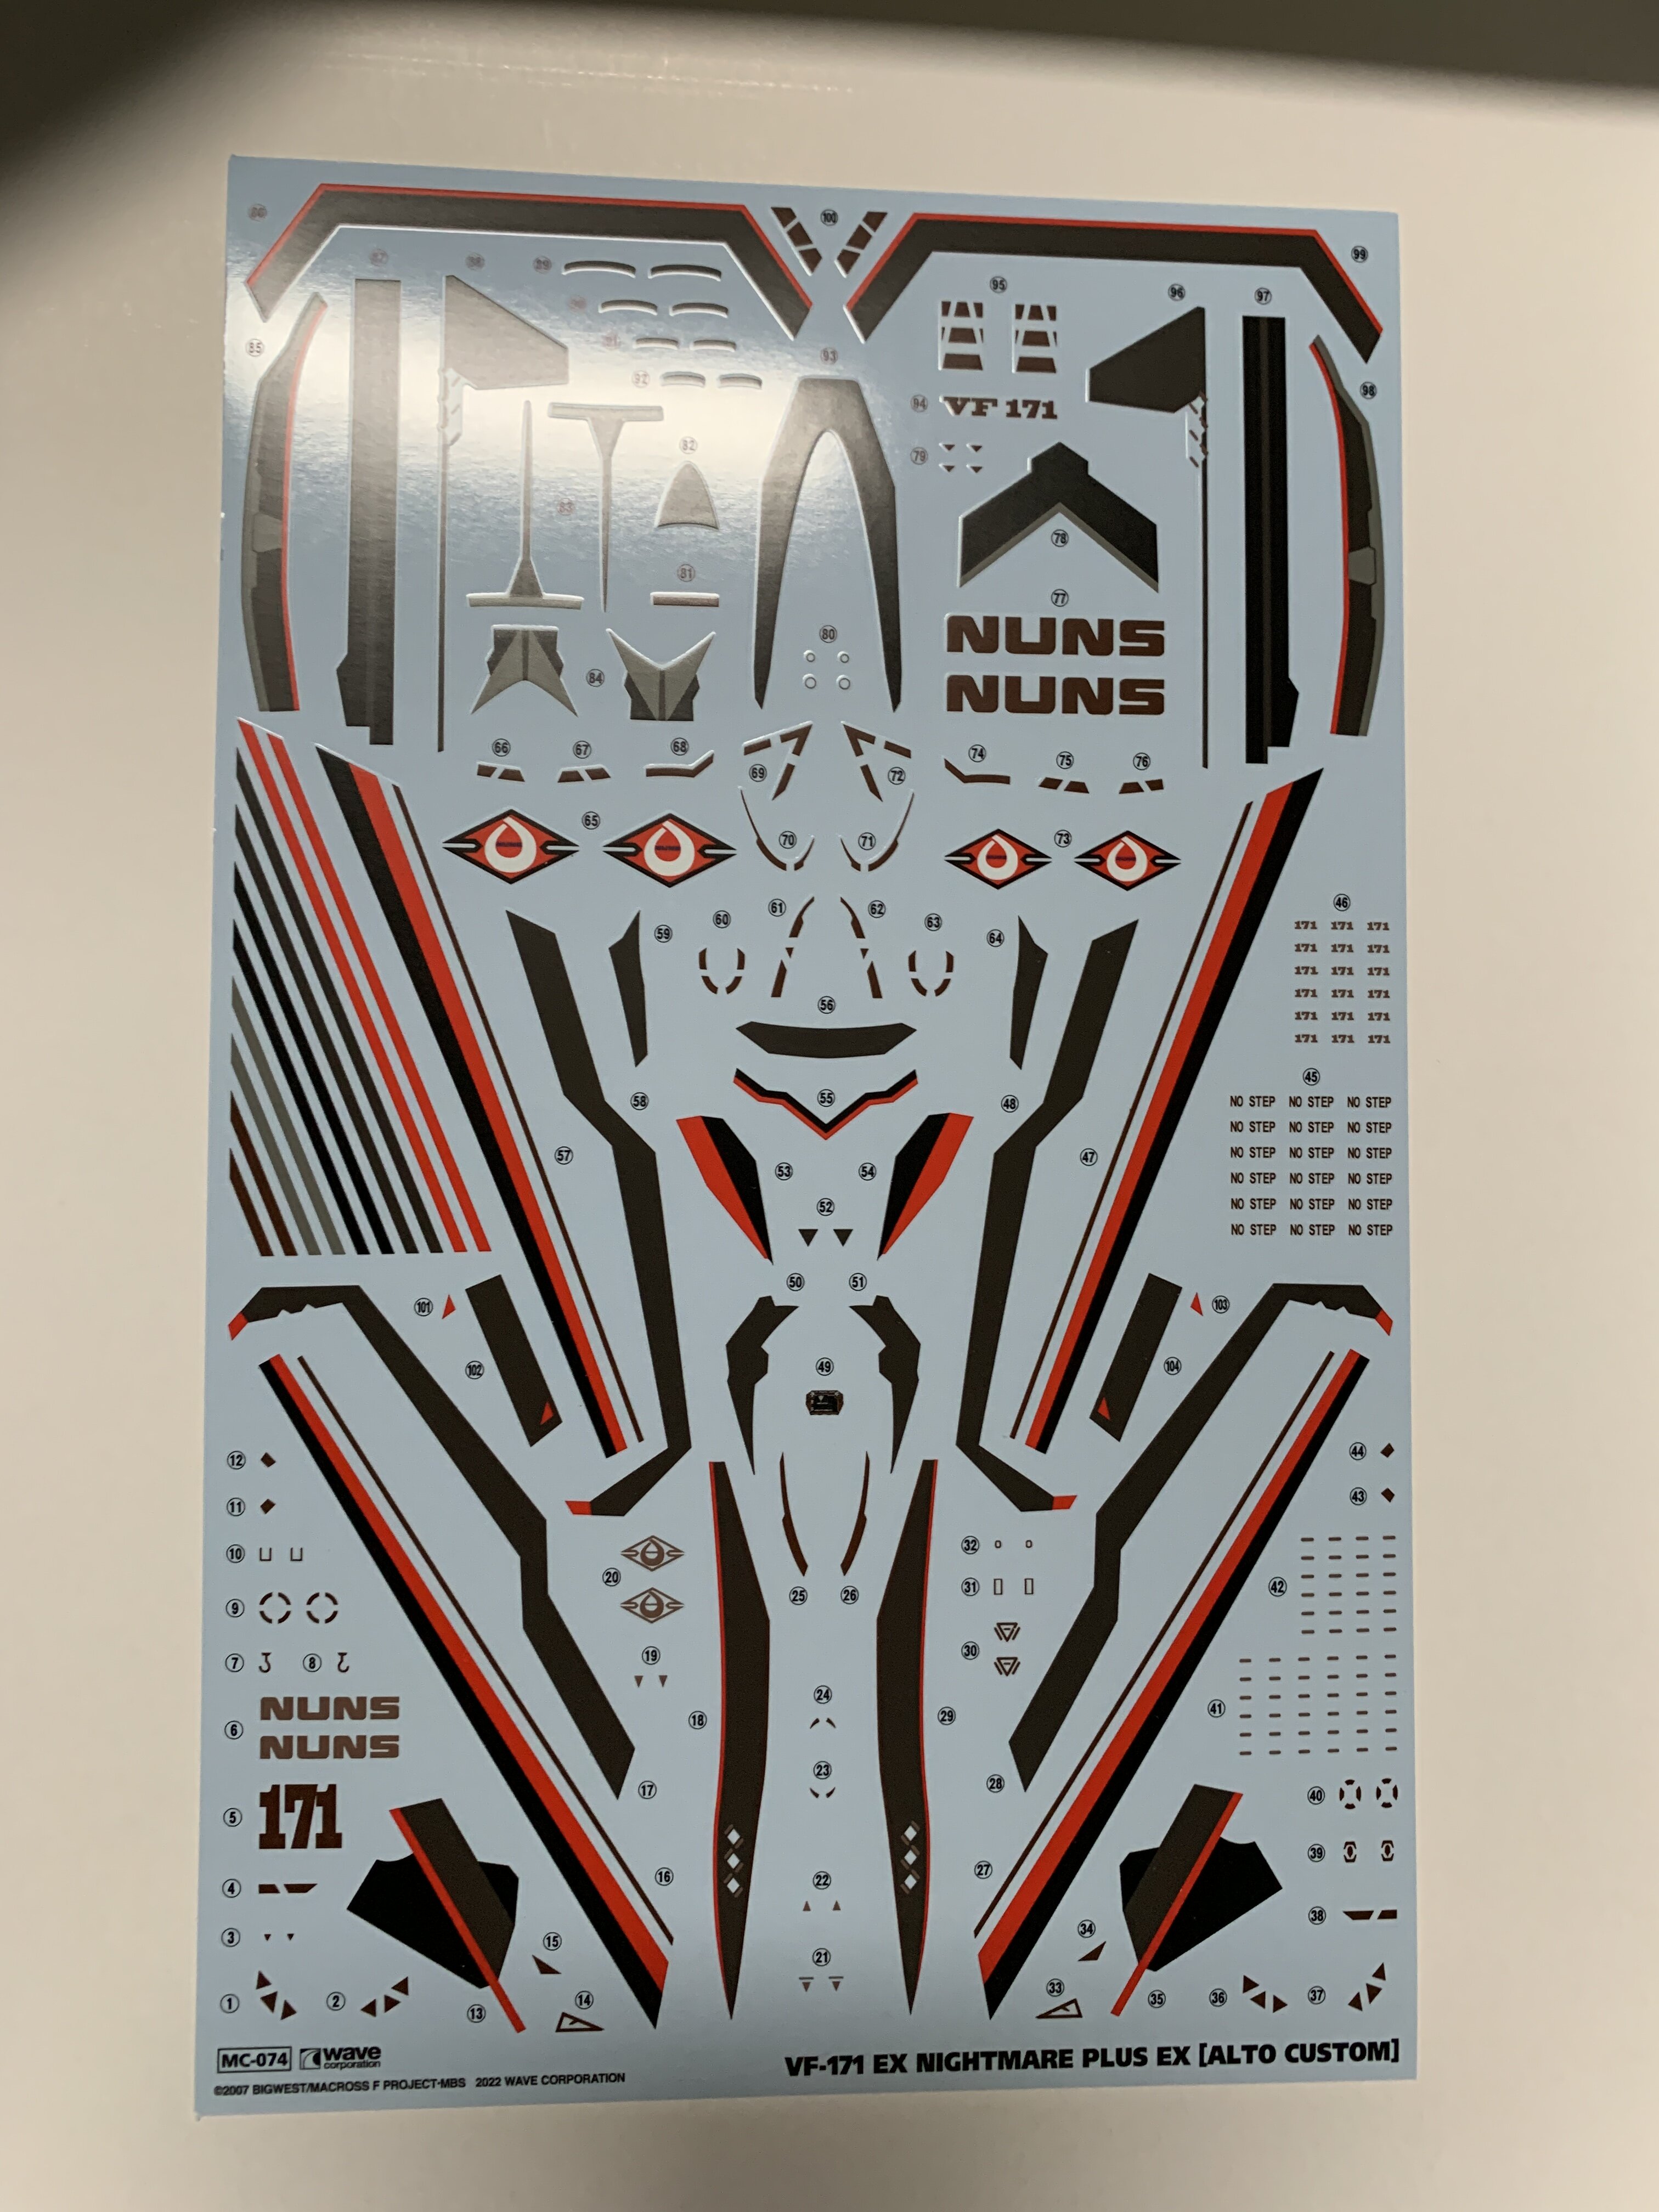
the decals are nice and crisp.
I‘ll start building this when done with the plamax vf-1.
Why can't Plamax do this for their VF kits? It's not like they have to solve a complex multidimensional physics problem, they just have to remember that people who build detailed models don't want to work with crappy stickers.
-
8 hours ago, sh9000 said:

Merry Christmas to all the people I've had a positive encounter with on this forum or in person @Shawn @nightmareB4macross @jvmacross @Slave IV @Bolt @Thom @Big s @Golden Arms @PROVOST @ChristopherB @Anasazi37 @ArchieNov @spanner @Operator7G @ScrambledValkyrie @Convectuoso @mikeszekely @M'Kyuun @arcoregon @Ignacio Ocamica @chyll2@apptt4 @wmkjr @derex3592 and anybody else I've left out.
Merry Christmas to you as well! I always enjoy reading your posts.

-
19 minutes ago, Thom said:
Looks like the table is straining under that load!
That was my first thought as well, then I realized the picture was probably taken with a wide-angle lens or with panorama mode turned on. That is also impressive because otherwise it wouldn't have all fit in the frame without stepping back about ten feet!

-
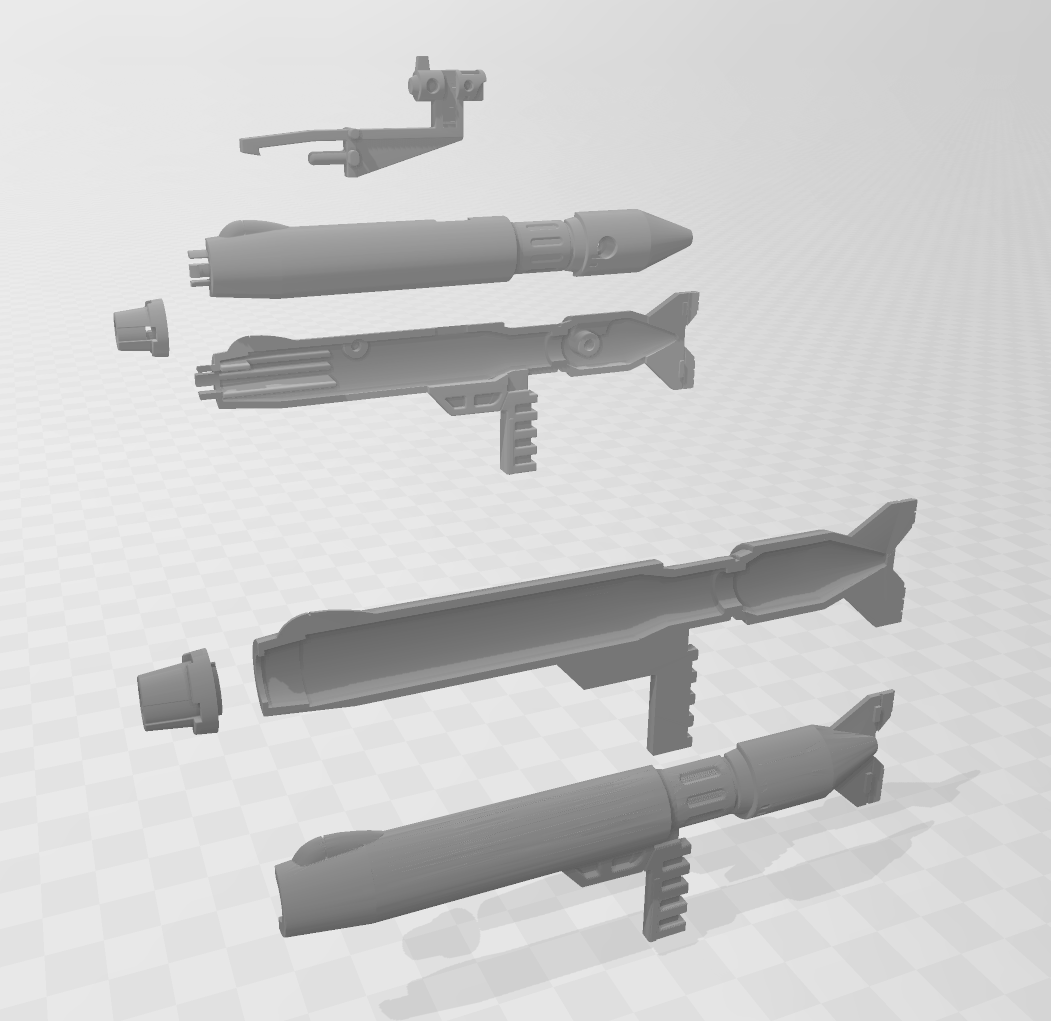
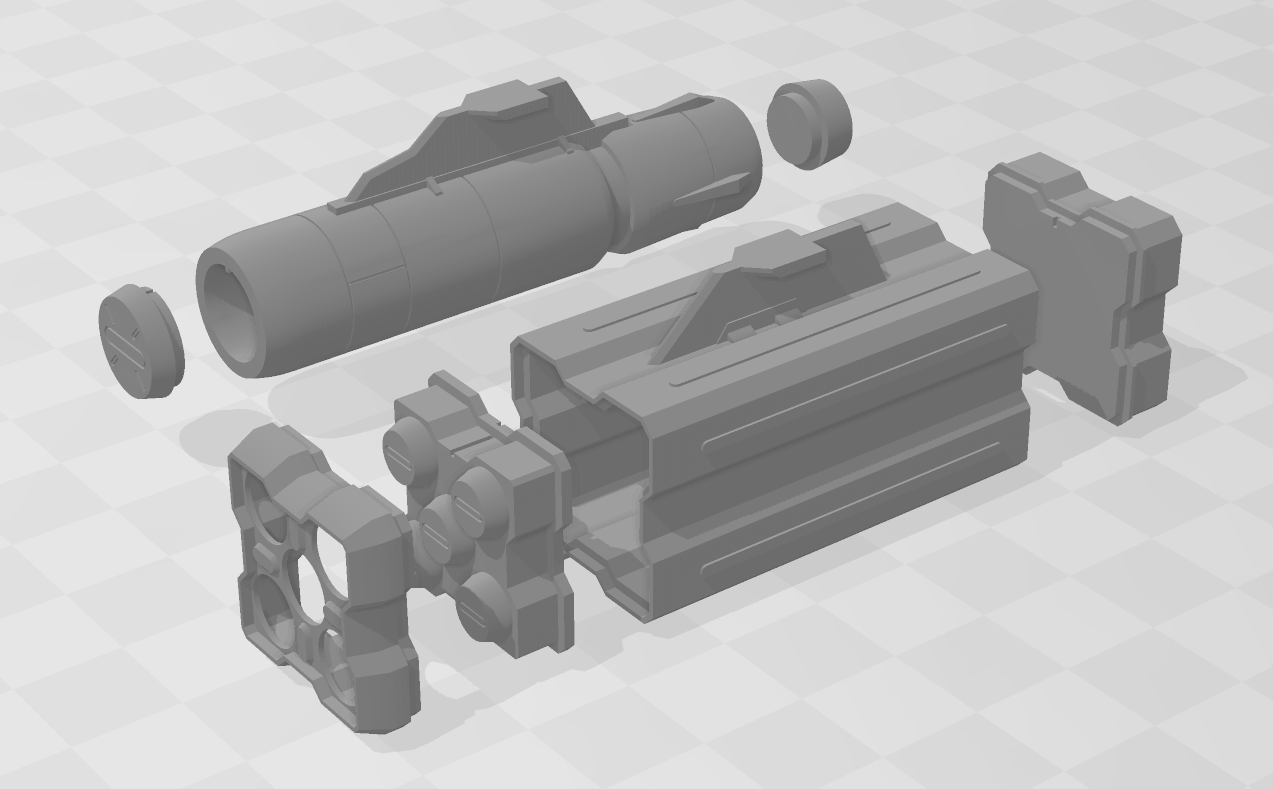
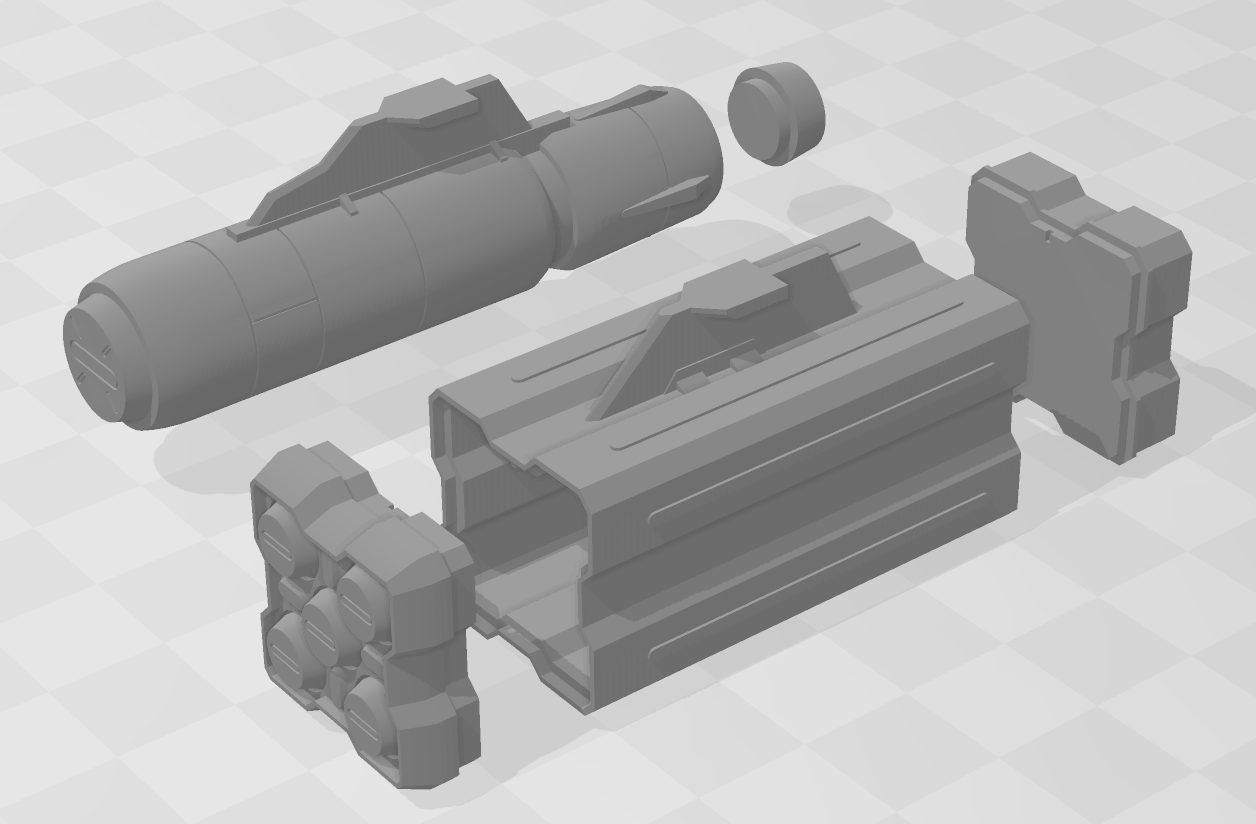
I'm right in the middle of test printing the RMS-1 and UUM-7 designs, and so far they look great, but I still have to remove them from their supports, do some additional cleaning, and then cure them before I'll know for sure that they're done. In the interim I decided to rework the gunpod, which I finished last night. From the outside it looks pretty much the same as my last version, but I did *a lot* more work to hollow out the inside so it will be light and easy to clean after printing. I also redesigned the front portion of the barrel so you don't have to worry about the little clips breaking and made the various hole fillers more smooth. I'm much happier with this version. Original parts from armamentfactory in the background, my new version in the foreground. The main section actually prints as one piece, but I split it in half for this image so you can see the interior.
-
No words....

-
2 hours ago, Bolt said:
Models like this , aside from our ongoing customs, illustrate the ongoing demand for a good quality and reliable printing solution..I know I'm just talking into the wind, but why hasn't this technology gotten cheaper and easier.?

I get the feeling that the commercial options have become more affordable and easier to use, which has led to things like on-demand t-shirt printing sites and all sorts of other custom merchandise (mugs, stickers, etc.), but the technology is still out of reach of hobbyists. My best guess is that the technology could be scaled down to an affordable desktop option, but then the manufacturers would have to convince consumers that they need it. Since most white+color printing needs can be taken care of by the on-demand sites, that leaves niche communities, like ones who print decals, out in the cold. Just my $0.02 on the topic. It's frustrating.
-
Appreciate the kind words. I've been inspired by the work of Robert James, who designs these truly incredible 3D-printable kits for a variety of starships--at really large sizes. Seeing how he breaks down all of the parts into components that are easy to print and fit together well is both impressive and humbling.

https://cults3d.com/en/users/RobertJamesModels/creations
After some additional tweaks this morning, I think the new designs are ready for a test print. I made the front section of the RMS-1 removable and also split the front section of the UUM-7 into two pieces so you can paint the missiles separate from everything else.
-
11 minutes ago, Thom said:
If you don't have a printer that prints in white, you could use white decal paper.
That is always an option, but generally only works for simple geometric designs where you can very carefully trim away the excess film before application. You also have to be okay with a white background on everything. Another semi-popular option is getting white toner for a laser printer, which allows you to create designs like the white "UN SPACY" text on clear paper. I've seen some people use white toner to print what I would call the "background layer" in ALPS, which consists of all-white versions of each design, and then they print the regular color layer. That is done on different sheets of paper, so you would first apply the white decal and then the color one on top of it. You have to do that because if you try to take the white-printed sheet and run it through the printer again to put color on top of it, which is how ALPS works, the results are terrible. You need very precise layer registration to pull it off, which can only be done by a printer that hangs onto the sheet for both print runs. The only "affordable" printer that can do it is ALPS. Everything else is high-end commercial and extremely pricey. If you can find a commercial printing service that is willing to do one-off or small batch runs of a sheet for a reasonable price, that's awesome. There might be a few out there.
-
Finally had some time to work on the armaments again. Ended up redoing them, but from the outside you wouldn't be able to tell the difference. Original versions were solid, meaning that after printing they'd be a bit heavy and could bend the wings. New versions are hollow and break down into multiple pieces for easy printing and assembly. I got a little smarter about 3D design over the past month.

-
On 12/9/2022 at 9:02 AM, seti88 said:
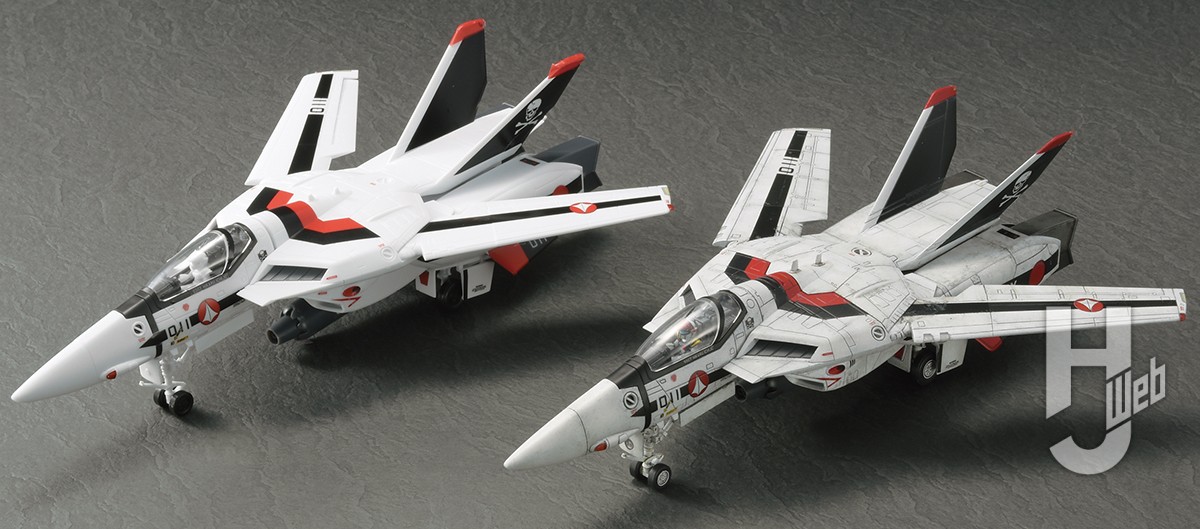
All better to see the nice box art!
didnt notice this b4, but is he also showing off his shoes in the color of alto’s??! Can anyone id his shoes? 😆
I was eyeing his apron and wondering how I can get my hands on one.
-
3 hours ago, pengbuzz said:
I looked up replacement parts just on a lark on Picclick.com (ebay aggregate site); dunno if any of this is useful, but I thought I'd take a look for ya:
Appreciate the gesture. Part of owning an ALPS printer is having a large list of links to stores, auction sites, etc. for replacement parts and ink cartridges. Feels a lot like maintaining a classic car, but way more niche.
-
On 12/9/2022 at 2:42 AM, pengbuzz said:
I do it quite a bit, but I don't have an ALPS printer (one that can print in white). As for my regular printer, I'm so low on ink, just printing stuff on draft is coming out all lines.
@Anasazi37 would be the one to talk to, but last I checked, he's backed up and ALPS carts are rarer than hens' teeth about now. Also not sure if his is even working, but you can try asking him.
Yep, I'm backed up and every time I use my printer I'm gambling that it won't break. Had a very close call recently, but was able to repair it. A replacement printer, like the ink cartridges, has to be imported from Japan. Really expensive, even with the strong dollar these days.
-
On 12/9/2022 at 12:02 PM, Chronocidal said:
Yeah, this is no surprise. Given the issues I've seen coming from other manufacturers in China, I do not want them to rush to release this.
An electronic component for one of my projects was scheduled to arrive from China in early January, but that ETA was just bumped out three months to early March. The manufacturing issues are impacting multiple industries and I think it's going to get worse before it gets better.
-
30 minutes ago, no3Ljm said:
"On the right is what we think our customers can do with this kit right out of the box, even if they have no model building experience. On the left is what they actually get. Note how well the red stickers adhere to the vertical stabilizers. Great job, everyone. High fives all around."
- Plamax
-
8 hours ago, sketchley said:
That's similar to the technique used by Japanese modellers to put stickers on:
- using tweezers, touch the sticky side on water (to pick up a couple of small droplets)
- place the sticker in the right place
- roll out (and suck up) the excess water with a Q-tip, releasing the tweezers in the process when the sticker is sufficiently affixed.
Interesting. Perhaps one advantage of the LEGO method is that window cleaner is engineered to evaporate quickly and that might not happen with water, but both should work in roughly the same way. Brushing a little bit of the cleaner on the backside of the sticker before application would eliminate a lot of potential mess. I sometimes brush setting solution on the backside of a decal before application, instead of brushing the target surface.
-
2 hours ago, Chunky001 said:
Nope, I have crickets from them too.
To compound maters my tracking from BIJ showed it hitting the Chicago customs center three days ago......then showing that the label had been created and it hasn't even shipped yet. Apparently mine teleported back to JP. Is it lost somewhere in the system now? Who knows.


My best guess is that it's sitting in Customs at the Chicago airport mail facility. I wouldn't trust the "Origin Post" entry from USPS. I can take a week or more to clear Customs, regardless of entry point. In my limited experience, Chicago tends to be faster than Los Angeles, but who knows these days.
-
9 hours ago, kajnrig said:
Yeah, definitely would recommend the old standby, paint and decals. Don't do like I do and trick yourself into thinking, "Oh, let's just try following the manual to a tee. They did such a good job on the molding and details and everything. There's NO WAY they would do that and then not pay the same attention to detail to the stickers."
A friend of mine who collects and builds LEGO sets swears by this method:
"Our designers have shared this trick for applying decals: lightly spray a window cleaner on the surface of the parts to be decorated. This will allow you to adjust the decal without damaging it. Once you have the decal in the right place, use a flat edge to smooth out any bubbles and let it dry."
I prefer paint and decals as well, but if you're stuck with stickers, this method might be worth considering. You could also use a small brush and just lightly apply the cleaner. That way you're not blasting the entire part with liquid. I've never tried this approach, but I can see how it might work decently well. Rubbing alcohol might work, too. Neither one should be used on a painted surface, though.
-
9 hours ago, twich said:
I bought a 3D printer for my wife, a Creality Ender 3 S1 Pro. I was wondering if anyone could provide some help/links or anything to a place where I could download .stl files for stands for Macross Jets. I found a stand on Thingaverse, that was a copy of the stand that Arcadia boxed with the Arcadia 1/60 VF-1J 30th Anniversario release, and that worked very well for my Arcadia 1/60 VF-1J 35th Anniversary edition, but I also have a Arcadia 1/60 VF-4A Hikaru use and a Bandai DX Chogokin VF-27Beta V1. I know that the flightpose and yeti stands are not available, and I cannot find a stand that bandai put out for the VF-27 V1 and I know that Arcadia has the simple stand for 1/60, but $60 plus shipping from Japan is a bit steep for me. I am not trying to rip anyone off, but I would like to maybe have some suggestions as to a good direction to look.
Thank You,
Twich
What about modifying this stand on Thingiverse to meet your needs?
https://www.thingiverse.com/thing:2889235
I realize that it looks an awful lot like a Flightpose stand, but since those stands are unavailable, it's an option worth considering. From eyeballing the design, I think the main thing you'd need to modify in a free software program like 3D Builder is the length of the three rods.
And maybe this is the one you already found:
https://www.thingiverse.com/thing:3229798
Which I think could work for a variety of valks if you print appropriate adapters.
-
9 hours ago, Vifam7 said:
The chest area is the biggest hurdle when it comes to the VF-1. For the most part, a waterslide decal is the way to go on that area. But still... it's always been a major pain to get the chest decal to conform over the airbrake. Both on the Hasegawa and Bandai, I had to resort to some touchup painting.
This is why I invested in a vinyl cutter about two years ago. I now make my own masks for airbrushing. If you get the design right, the masks will conform to the curved surface of the chestplate. Definitely takes some practice to get the technique down.
Bandai DX Chogokin 1/48 VF-1
in Toys
Posted
I was very much looking forward to this release when it was first announced, but I just couldn't get past the horrible logo they stamped on the left wing and legs, so I ended up skipping this one. Still feel the same way, unfortunately. Bandai tampo is generally horrendous, and I usually just put up with it because the awesomeness of the toy outweighs their preschool-level graphic design choices, but I just couldn't do that here. It's such a massive eyesore. For folks who can look past it, I'm happy this will soon be in your collections. Anyone get five to complete the squadron?