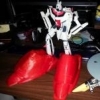
bry Posted October 7, 2013 Share Posted October 7, 2013 (edited) Started a 1/60 custom... so far only the right foot is done, but that alone is almost as big as a 1/60 valk! I'm going to have to find someplace bigger to display this thing. Edited October 7, 2013 by bry Quote Link to comment Share on other sites More sharing options...
MILKAUTICO Posted October 7, 2013 Share Posted October 7, 2013 WOW!!! please tell me which is the foot of the monster? Quote Link to comment Share on other sites More sharing options...
bry Posted October 7, 2013 Author Share Posted October 7, 2013 (edited) Yep, I'm trying out a Monster in 1/60. Left foot is printing as I type this. I still have to get most of the upper body finished up; I started with a decent model but want to make it articulated. I really had no idea how huge they were until I saw the first few layers go down. I just scaled the whole model to full-size spec and then divided by 60, but there's a huge difference between seeing some numbers on your screen and actually looking at the finished print. All done she'll be 15" tall and more than 2 feet from cannon to back. Edited October 7, 2013 by bry Quote Link to comment Share on other sites More sharing options...
MILKAUTICO Posted October 7, 2013 Share Posted October 7, 2013 (edited) Men, you are amazing, I really think that one has a mental picture of how it should be big this beast, but seeing that foot next to a VF-1 is indescribable. On what material you're doing? if I may ask. Edited October 7, 2013 by MILKAUTICO Quote Link to comment Share on other sites More sharing options...
bry Posted October 7, 2013 Author Share Posted October 7, 2013 The feet are PLA as the model doesn't need to be that strong and PLA prints fastest, plus it smells like waffles. I'll probably do most of the rest in PLA as well but was entertaining the notion of making the joints in nylon instead, for wear resistance and flexibility. Quote Link to comment Share on other sites More sharing options...
Benson13 Posted October 7, 2013 Share Posted October 7, 2013 I love Monster Waffles. Quote Link to comment Share on other sites More sharing options...
MILKAUTICO Posted October 7, 2013 Share Posted October 7, 2013 The feet are PLA as the model doesn't need to be that strong and PLA prints fastest, plus it smells like waffles. I'll probably do most of the rest in PLA as well but was entertaining the notion of making the joints in nylon instead, for wear resistance and flexibility. Thanks, I hope to more pics. Quote Link to comment Share on other sites More sharing options...
bry Posted October 7, 2013 Author Share Posted October 7, 2013 I'll keep posting as the build progresses. Lower legs are next; I'm working my way up. Quote Link to comment Share on other sites More sharing options...
Jasonc Posted October 7, 2013 Share Posted October 7, 2013 I would love to eventually have the Monster in 1/60. Looking great so far. Keep up the good work. Quote Link to comment Share on other sites More sharing options...
bry Posted October 7, 2013 Author Share Posted October 7, 2013 (edited) If it turns out OK I could probably make a few extra. It's not difficult to hit "print" again once the model is proven to work. I've already refined the model a good amount; the right foot didn't print all that well and had to be split into halves, and if you look closely there are errors all over from support material and the top is essentially collapsing in on itself. The left foot printed perfectly and in 1 piece, so it's definitely getting better. I'll probably reprint the right foot just to have both looking perfect... unfortunately I broke the glass build plate pulling the last foot off (stuck really well: should have just froze it off) so no more big pieces until the replacement arrives; gotta print on half a build plate for now. Edited October 7, 2013 by bry Quote Link to comment Share on other sites More sharing options...
Hikaru1234567890 Posted October 8, 2013 Share Posted October 8, 2013 Cant wait to see this!!! Quote Link to comment Share on other sites More sharing options...
bry Posted October 8, 2013 Author Share Posted October 8, 2013 (edited) Right ankle done. Not happy with the fit and articulation is limited, so I'm going to redesign this a bit. It's too tight which makes it difficult to swivel in the joint, and getting it into place was difficult so I'm going to redesign the foot to make ankle installation better. Seeing this snap into place also gave me an idea for the rest of the joints, so hopefully the rest will just click into their sockets and articulate without as much friction. Edited October 8, 2013 by bry Quote Link to comment Share on other sites More sharing options...
Mommar Posted October 8, 2013 Share Posted October 8, 2013 You know at the ankle and legs you might want it more tight. This thing is going to be heavy. Quote Link to comment Share on other sites More sharing options...
bry Posted October 8, 2013 Author Share Posted October 8, 2013 (edited) That's what I was thinking, but I made it too tight and now it pops out of place at the ankle hinge rather than running in the groove, and just getting it into place is an exercise in careful application of force without breaking anything. It may not be as heavy as expected. The right foot lower portion is only 10% solid, and the upper is a completely hollow shell... both were too weak which lead to some errors, and I actually poked a hole in the foot with a finger by accident. The left foot was printed as 1-piece and is 25% solid inside, as is the ankle - and both are substantially stronger that the first foot but not that much more heavy. Of course, there's still a *lot* more monster yet to be piled onto these parts. ***EDIT*** I was hoping to get one part posted per day, but my printer chose to melt down last night and it looks like it may have fried the motherboard, which will cost me several hundred dollars to fix... so I'll get a bit ahead on the modeling for now but more pics of finished pieces are on hold for at least a few days. Edited October 9, 2013 by bry Quote Link to comment Share on other sites More sharing options...
bry Posted October 11, 2013 Author Share Posted October 11, 2013 (edited) OK, got a little done. Fit isn't quite right, so the "knee" is loose and I'll need to split the difference in tolerances between the last piece was and this latest one. Started shopping paints, and think I'll go with the classic olive drab green. I'm conflicted on whether I'll go with the "eye" graphic on the nose or the tiger mouth though. Leaning to the eye for more accuracy, though, as this is a classic Monster and not the variable Koenig. Edited October 11, 2013 by bry Quote Link to comment Share on other sites More sharing options...
MILKAUTICO Posted October 11, 2013 Share Posted October 11, 2013 (edited) OK, got a little done. Fit isn't quite right, so the "knee" is loose and I'll need to split the difference in tolerances between the last piece was and this latest one. Started shopping paints, and think I'll go with the classic olive drab green. I'm conflicted on whether I'll go with the "eye" graphic on the nose or the tiger mouth though. Leaning to the eye for more accuracy, though, as this is a classic Monster and not the variable Koenig. I think there is no point of comparison with mecha I've seen, the biggest I've seen was the HY2M MS-09RS Char Custom Rickdom Extra Finish Ver. 1/60 And should be viewed as a toy compared to a monster, I bow to you sir. try one with papercraft and I came out so ugly that I did not want to do it again to not disappoint. Edited October 11, 2013 by MILKAUTICO Quote Link to comment Share on other sites More sharing options...
Valkyrie Posted October 13, 2013 Share Posted October 13, 2013 Wow, that's pretty awesome! Which printer are you using? And where did you get the 3d model? Quote Link to comment Share on other sites More sharing options...
bry Posted October 13, 2013 Author Share Posted October 13, 2013 The model came from Google Sketchup 3D Warehouse. The actual modeling is top-notch, but sketchup does not export good geometries for 3D printing, and the original model was not geared toward printing or articulation so a lot of fixing has been necessary. I've been printing most of these parts of a rostock delta printer, but will be printing from an older prusa while the delta is under maintenance. Quote Link to comment Share on other sites More sharing options...
Mommar Posted October 14, 2013 Share Posted October 14, 2013 I guess I never realized the Monster's legs alone were as big as a Valk. Quote Link to comment Share on other sites More sharing options...
MechTech Posted October 14, 2013 Share Posted October 14, 2013 Being offline for a week I missed a lot! This is looking great! A word to the wise, I scratchbuilt one in 1/100 and it had joint problems due to the weight. I reccomend building as heavy duty joints as you can and using screws to keep the tension on them. Your model will want to "bow" when it's done due to cannon weight and the arms. I had to reinforce my joints with brass. I used thick styrene tubes, but they couldn't hang. The bowing is a big problem. Lighter tubes like styrene or thin aluminum will help and they won't warp downward with age. Awesome idea and I'm glad to see someone doing some SERIOUS 3D modeling! Looking great so far! - MT Quote Link to comment Share on other sites More sharing options...
bry Posted October 14, 2013 Author Share Posted October 14, 2013 (edited) Thanks! Your massive-scale project is inspiring. The 'knees' are feeling too weak to support much weight already, so I think I'll need to go back to the ankle joint design I had started with, which was over-tight but holds its position well once you manage to wrestle them into place. I'm currently still fighting my backup printer, but here's a joint test from a failed thigh print (thigh-to-knee feels too loose, but the thigh-to-calf gearing meshes well and I think should help hold the final mecha's position when posed, so at least I got some of it right and can leave that little portion alone). You'd be amazed at how lightweight you can 3D print these models. Both feet added together weigh substantially less than the valk behind them - it's mostly hollow inside. I definitely need to reinforce these joints though; the redesigned knee articulation I went with after feeling how tight the ankles were is barely tight enough to support the knee on its own. I still don't know how I'll get the arms and cannons to hold position; most of their weight will be unsupported several feet in front of the model... Edited October 14, 2013 by bry Quote Link to comment Share on other sites More sharing options...
bry Posted October 15, 2013 Author Share Posted October 15, 2013 A mostly-complete thigh. Tuning is a little better but this is obviously still a placeholder part Quote Link to comment Share on other sites More sharing options...
Chronocidal Posted October 15, 2013 Share Posted October 15, 2013 You know.. you mentioned "gearing" in one of the joints, and I don't know if you meant that literally, but for models this size, some inner mechanisms to help hold poses could have some real potential. I did the same thing with a Lego 1/18 VF-1 I started once (never got to finish, the legs were just not possible with the parts I had). The arms were entirely full of gears to position them, and while cranking little knobs to pose something isn't the fastest process, it definitely works. Quote Link to comment Share on other sites More sharing options...
bry Posted October 15, 2013 Author Share Posted October 15, 2013 (edited) There's actual meshed gears in there, yeah. You can see them in the failed white knee piece above, but the more recent 'completed' knee was far too blobby in that area to get any real detail so it has no gear teeth. Still tuning temperatures and feedrates so the white pieces are far from decent quality prints. I'm also thinking a pin-system to lock a pose into place might be useful, considering the amount of stresses that will be placed on the arm joints. Researching the Monster for better detail, I found that Yamato had actually prototyped a 1/60 Monster at one time. Their completed prototype really shows how big this thing will be once it's all done. I just wish somebody had taken up-close pics of the joints... then again, theirs was propped up so maybe they had issues there as well. Edited October 15, 2013 by bry Quote Link to comment Share on other sites More sharing options...
Knight26 Posted October 15, 2013 Share Posted October 15, 2013 I remember that beast, back in the day Graham commented on it that the joints were a serious issue, at least with the resin proto and the cost made it prohibitive to make. Quote Link to comment Share on other sites More sharing options...
bry Posted October 15, 2013 Author Share Posted October 15, 2013 Well, printing takes most of the weight and cost issues away, but I'm definitely recognizing the problems they ran into, and I don't stand a chance of attaining Yamato's level of articulation. I'm surprised Yamato didn't print the Monster; I know they printed their valk prototypes. Quote Link to comment Share on other sites More sharing options...
MILKAUTICO Posted October 16, 2013 Share Posted October 16, 2013 wow and + wow!! Quote Link to comment Share on other sites More sharing options...
bry Posted October 16, 2013 Author Share Posted October 16, 2013 (edited) Slowed the print time waaaay down and actually got a decent print this time. 11 hours later.... Two knees! Drawing up the hip assembly now. Thinking a ball-joint is best, but may need some keyed alignment nubs so it doesn't just freely rotate. I may print the femur ball slightly oversize and just sand it down until it just barely fits snugly without being too big, but also without moving easily. Next update might be a fews days off; I'm still drawing this up and want to print the body in as close to 1-piece as can be managed, so I'll be conceptualizing this for a while. Edited October 16, 2013 by bry Quote Link to comment Share on other sites More sharing options...
DarrinG Posted October 16, 2013 Share Posted October 16, 2013 . . . Quote Link to comment Share on other sites More sharing options...
MechTech Posted October 16, 2013 Share Posted October 16, 2013 I'll have to get you photos later, but how about a ratchet design? I'll post photos when I can. - MT Quote Link to comment Share on other sites More sharing options...
bry Posted October 17, 2013 Author Share Posted October 17, 2013 That's not a bad idea. I think I might be able to put together a simple ratchet mechanism that would be friendly to print, and still have a reasonable amount of load-bearing strength. No update today; still drawing up the hip / balljoint area and printing up more printers. Quote Link to comment Share on other sites More sharing options...
miriya Posted October 17, 2013 Share Posted October 17, 2013 Wow! This is an ambitious project! Keep up the great work! Quote Link to comment Share on other sites More sharing options...
Ignacio Ocamica Posted October 17, 2013 Share Posted October 17, 2013 Wow, great progress so far!!!! Quote Link to comment Share on other sites More sharing options...
MechTech Posted October 17, 2013 Share Posted October 17, 2013 I wasn't gonna leak it out yet, but this is part of some upcoming 1/350th stuff... I hated how my 1/100th Monster bowed, so this one will be an improvement over the other. I hope this helps! - MT Quote Link to comment Share on other sites More sharing options...
bry Posted October 18, 2013 Author Share Posted October 18, 2013 Extremely helpful, thanks! Quote Link to comment Share on other sites More sharing options...
Recommended Posts
Join the conversation
You can post now and register later. If you have an account, sign in now to post with your account.