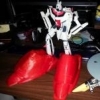
bry Posted October 23, 2013 Author Share Posted October 23, 2013 Right hip done. Fit is tight. This one audibly clicks when the joint is rotated, and that sound is incredibly satisfying, exactly like a toy should sound. I must have played with the hip-thigh joint for an hour last night, just click-click-clicking it up and down. Holds position very well also, so ratcheting mechanisms are definitely the way to go, and I'll need to redo the rest of the legs with these improvements. Loving it. Quote Link to comment Share on other sites More sharing options...
bry Posted October 23, 2013 Author Share Posted October 23, 2013 Whoops, no pic: Here ya go! Quote Link to comment Share on other sites More sharing options...
MILKAUTICO Posted October 26, 2013 Share Posted October 26, 2013 (edited) Whoops, no pic: Here ya go! It's huge that knee, I envy you, I really would like to have a model paper even this monster Edited October 26, 2013 by MILKAUTICO Quote Link to comment Share on other sites More sharing options...
bry Posted October 27, 2013 Author Share Posted October 27, 2013 (edited) Thanks! Other hip done. I'm really falling behind on my 1-part-per-day personal goal. Next up is some of the smaller parts; I'm avoiding the mostrously big (pun intended) torso and I'll hold that off off for last. Edited October 27, 2013 by bry Quote Link to comment Share on other sites More sharing options...
MILKAUTICO Posted October 27, 2013 Share Posted October 27, 2013 This model you're doing it to sell later? forgive the question but it is really amazing. Quote Link to comment Share on other sites More sharing options...
bry Posted October 27, 2013 Author Share Posted October 27, 2013 I could sell a few I suppose. It takes up too much printer time to mass-produce, but once I have working files I could easily crank out more with the push of a button. I was already thinking of selling off this one, as it's turning into a lot more Destroid than I have the room to actually display. Quote Link to comment Share on other sites More sharing options...
bry Posted October 30, 2013 Author Share Posted October 30, 2013 (edited) 1st cannon done. Had to split in halves as I don't have a printer with a 2-foot print volume. The front end of the barrel has some definite artifacts and came out pretty ugly. The buttstock half printed much cleaner but there was one band of a few bad layers in the middle that's pretty obvious as I was playing with settings on the fly trying to figure out what had made the first half print so poorly. Long story short I have some delta arm issues that lead to weird oscillating effects when printing circles at high speed, coupled to a loose skate and possibly another loose belt. Printers are a full-time hobby on their own, but at least I should have most of this sorted out now, and will make some new delta arms as I thing these are too tight leading to a bit of the wobble/oscillation. I'm going to completely reprint the front of the cannon after a few smaller calibration test prints before I move on to be sure the machine is OK; I don't have another machine that can print this big so I have to get the one running 100% for the cannons, arms, and torso.In the interim I should work on the smaller arm bits on another machine. I hope to update again in the next day or two... Sorry about the delay! I swear I'm trying to get back to that 1-part-per-day goal. Edited October 30, 2013 by bry Quote Link to comment Share on other sites More sharing options...
bry Posted October 31, 2013 Author Share Posted October 31, 2013 Milkautico - If you want your own copy of this print now, it's on Shapeways! http://shpws.me/pAVo I kid of course, $75,000 is enough to buy your own top-of-the-line professional printer; I was just curious what Shapeways would charge for a job this big. They're doing their best to push people into buying home printers! Quote Link to comment Share on other sites More sharing options...
MILKAUTICO Posted October 31, 2013 Share Posted October 31, 2013 Chan!chan! uff of course I want a copy, just to get that amount of money eeee I'll have to become a woman. LOL I think I told you it's amazing the work you're doing. really leave me speechless when you post something BRY. Quote Link to comment Share on other sites More sharing options...
MILKAUTICO Posted October 31, 2013 Share Posted October 31, 2013 (edited) Here in my country, printers are selling the almost four times its value to the U.S., are crazy. I'm trying to see how to buy one or at least try to build one, but it's a nightmare. for now I'm playing with paper models, is what I can get. Edited October 31, 2013 by MILKAUTICO Quote Link to comment Share on other sites More sharing options...
bry Posted October 31, 2013 Author Share Posted October 31, 2013 (edited) Thanks! Look into building a Reprap, check out the reprap.org forums - right now the Prusa i3 is probably the best frame to start with, and there's well-priced kits out there with all the necessary parts. Once you have your first printer, you can print more, and source locally for the parts that you can't print. I don't recommend buying a pre-assembled printer ever... not only are they far more expensive, but you'll still need to fix it and maintain it constantly - as you may have noticed just from this project. Nothing will teach you about your printer quite as well as assembling it yourself. Edited October 31, 2013 by bry Quote Link to comment Share on other sites More sharing options...
Major Focker Posted October 31, 2013 Share Posted October 31, 2013 I wasn't gonna leak it out yet, but this is part of some upcoming 1/350th stuff... I hated how my 1/100th Monster bowed, so this one will be an improvement over the other. I hope this helps! - MT ooh, when will you be taking orders? i'm in for a 1/350, and if you do 1/700 i'd want a couple as well. Quote Link to comment Share on other sites More sharing options...
MechTech Posted October 31, 2013 Share Posted October 31, 2013 Bry, have you considered aluminum tubing with a printed rifling insert at the muzzle? The cannons don't have much taper so you could probablt get by with it. It's coming along nicely! Hey Focker, I've got to finish the Daedalus first. The humidity had me indoors working on this until fall hit. The good new is my big baby should be done soon and I'll be back on this. - MT Quote Link to comment Share on other sites More sharing options...
bry Posted October 31, 2013 Author Share Posted October 31, 2013 (edited) Thanks! Aluminum would probably triple the weight; I'm mostly concerned with weight on these pieces as they need to be self-supported. The cannon front is too hollow - it was printed with 0.5mm walls and 10% infill so it's incredibly light but broke into 3 pieces in a drop-test. The butt section was printed with 2mm perimiter walls and 40% solid infill and survived the drop-test but is also heavier. I think a 1.5mm / 20% combination should deliver featherweight and still be strong, but we'll see. I have no idea when I'll be done or taking orders - and at 1/60 I wouldn't be able to print many anyway without building a new printer dedicated just to this model - but a 1/350 version would only be 110mm long from cannon to back and 63mm tall, and a 1/700 model would be half that. These are sizes that Shapeways would be able to handle and I could get those uploaded immediately if you aren't worried about articulation. Edited October 31, 2013 by bry Quote Link to comment Share on other sites More sharing options...
FireBat01 Posted October 31, 2013 Share Posted October 31, 2013 holy cow this is awesome. i was wondering if anyone would be 3d printing macross stuff lol. my main reason for wanting a 3d printer sadly. Quote Link to comment Share on other sites More sharing options...
MILKAUTICO Posted November 30, 2013 Share Posted November 30, 2013 (edited) Bry any updated? I look forward to your project do not miss! Edited November 30, 2013 by MILKAUTICO Quote Link to comment Share on other sites More sharing options...
Mechapilot77 Posted December 4, 2013 Share Posted December 4, 2013 wow...are you goign to 3D print the entire model? you have a makerbot yourself or something like that? They use PLA if i'm not mistaken. Quote Link to comment Share on other sites More sharing options...
bry Posted February 5, 2014 Author Share Posted February 5, 2014 (edited) Update update update!Just a small one though; I haven't had any time at all lately; pretty much every waking moment is scheduled for three different things and none of them are hobbies, and too much of the not-supposed-to-be-awake time is also too busy! I have put the spare minutes I find to use, though. Here's a few quick shots of some of the things I've printed off: This is the left arm (or, the rear half, anyway) and ratcheting assembly, with a handful of test prints. The arm assembly has an integrated ratchet that has worked well in testing. It's rather large, but uses BBs as bearings and allows nice locking unidirectional movement with substantial weight handling. The ratchet is countersunk completely into the arm and connects to the elbow assembly with a hex key. A similar assembly connects the shoulder to the body. This allows for free movement in one direction with absolutely no movement in the other. Not great as a 'toy' but for a display unit it allows posing without worry of any sag. Motion for the "elbow" link between body and arm is simple pinholes holding metal rods that are press-fit and hold position with friction alone. Edited February 5, 2014 by bry Quote Link to comment Share on other sites More sharing options...
MILKAUTICO Posted February 5, 2014 Share Posted February 5, 2014 Update update update! Just a small one though; I haven't had any time at all lately; pretty much every waking moment is scheduled for three different things and none of them are hobbies, and too much of the not-supposed-to-be-awake time is also too busy! I have put the spare minutes I find to use, though. Here's a few quick shots of some of the things I've printed off: This is the left arm (or, the rear half, anyway) and ratcheting assembly, with a handful of test prints. parts2.jpg parts1.jpg The arm assembly has an integrated ratchet that has worked well in testing. It's rather large, but uses BBs as bearings and allows nice locking unidirectional movement with substantial weight handling. The ratchet is countersunk completely into the arm and connects to the elbow assembly with a hex key. A similar assembly connects the shoulder to the body. This allows for free movement in one direction with absolutely no movement in the other. Not great as a 'toy' but for a display unit it allows posing without worry of any sag. Motion for the "elbow" link between body and arm is simple pinholes holding metal rods that are press-fit and hold position with friction alone. Ratchet_Installed.jpg No-ratchet.jpg BRY this is awesome!!!! thanks for update!! Quote Link to comment Share on other sites More sharing options...
bry Posted February 5, 2014 Author Share Posted February 5, 2014 (edited) Mechapilot77 - Yes, I'm printing this on my personal printers. These are homebuilt reprap printers - a prusa and a delta - not Makerbot, so they're much faster and higher resolution machines than the commercially made prebuilt ones, not to mention substantially cheaper. You are correct, most of the pieces are PLA, but the knees are ABS and I have a few test pieces printed in nylon that I decided not to use because of the higher cost for material, when the additional strength wasn't needed. The majority of the Monster is printed, but I do have a few metal BBs and steel rods for the arm articulation. Edited February 5, 2014 by bry Quote Link to comment Share on other sites More sharing options...
Valkyrie addict Posted February 6, 2014 Share Posted February 6, 2014 Monstrous ordeal, I think I bump into your shapeways account where you put the Monster to see how much it would cost, 72k, LOL! Great project Quote Link to comment Share on other sites More sharing options...
bry Posted February 6, 2014 Author Share Posted February 6, 2014 (edited) Yeah, Shapeways is astoundingly poor pricing compared to home printing. Part of that ridiculous price is I uploaded the model as 1 piece, so the only printer they have large enough to print a 3 foot tall model is the metal printers, so you can divide the cost by 10 for their cheapest plastic option, but $7000 is still dumb. I have less than $30 or so into this Monster so far. I was really hoping to get it done a long time ago, but wow did this holiday season get busy and the post-holiday isn't letting up yet. Edited February 6, 2014 by bry Quote Link to comment Share on other sites More sharing options...
Valkyrie addict Posted February 6, 2014 Share Posted February 6, 2014 I was really hoping to get it done a long time ago, but wow did this holiday season get busy and the post-holiday isn't letting up yet. Same here. As long as you don't allow this project to die we're all happy Quote Link to comment Share on other sites More sharing options...
bry Posted February 27, 2014 Author Share Posted February 27, 2014 More updates. Printers have been running full time, and a lot of that time has been dedicated to this project. Most of the pieces come from the delta due to the size... getting close to the end now! Quote Link to comment Share on other sites More sharing options...
Ignacio Ocamica Posted February 27, 2014 Share Posted February 27, 2014 Wow, a true monster!!!! Quote Link to comment Share on other sites More sharing options...
MILKAUTICO Posted February 27, 2014 Share Posted February 27, 2014 Wow,wow and wow!!!!!!!! Amazing!! Quote Link to comment Share on other sites More sharing options...
Knight26 Posted February 27, 2014 Share Posted February 27, 2014 very cool, can't wait to see the whole thing put together Quote Link to comment Share on other sites More sharing options...
bry Posted March 4, 2014 Author Share Posted March 4, 2014 Quote Link to comment Share on other sites More sharing options...
505thAirborne Posted March 4, 2014 Share Posted March 4, 2014 Holy Schnikes that suckers big!! Can't wait to see this Monster in its correct colors, outstanding job bry!! Quote Link to comment Share on other sites More sharing options...
DarrinG Posted March 4, 2014 Share Posted March 4, 2014 Very cool to see an actual 1/60 Monster - awesome . . . Quote Link to comment Share on other sites More sharing options...
MechTech Posted March 5, 2014 Share Posted March 5, 2014 This looks AWESOME! My eyes hurt from all the differnt colors, but the sculpt looks great! I'm glad the ratchets worked out for you. That's what I hate about my other monster kits, they all bow or "reach for the sky!" Get some paint on that puppy! - MT Quote Link to comment Share on other sites More sharing options...
bry Posted March 5, 2014 Author Share Posted March 5, 2014 (edited) Thanks! It feels good to finally start putting the pieces together. I think I'll be re-doing the legs a bit. The ball joints in the hips are nice and tight, but one of the knee joints has too much slop, and since I mirrored them this happens on both sides. It's fairly stable at the moment but this is definitely a heavy model - even with 90% empty space inside! - and in the last 2 photos it's actually kind of squatting down, which was the only way I could get it to stand in a convincingly menacing pose without doing exactly as you say: 'bow or reach for the sky.' With the cannons on, it topples forward on its nose so some weights will need to be placed in the bottom of the feet, too. I could probably sell off a scratch-and-dent copy with all of the parts I've redone! I don't know what everybody's talking about with the colors; this is an authentic clown-squadron Monster Edited March 5, 2014 by bry Quote Link to comment Share on other sites More sharing options...
Valkyrie addict Posted March 9, 2014 Share Posted March 9, 2014 Holy sh!t!! How much is it weighting by now? Quote Link to comment Share on other sites More sharing options...
MechTech Posted March 9, 2014 Share Posted March 9, 2014 A spring with a washer against the ball joint might work (if there's room). I've done that before to pretty good effect. Plus as the plastic wears, the spring keeps tension on it. - MT Quote Link to comment Share on other sites More sharing options...
bry Posted March 10, 2014 Author Share Posted March 10, 2014 (edited) Heh! I had a similar reaction as I first stood it up all together. I hadn't weighed it until you asked, but she's coming in at just over 6 pounds at the moment with about 95% of the parts printed. Not too bad for this size, and only ~ $100 in plastic at that weight, but I was aiming to keep it lighter. Oh well. For now, I'm keeping the hips as-is. The ball joints are solid even with the cannons mounted; I didn't resize the sockets at all so they already fit very tight, and I also printed them very low resolution, as well as the lower hip socket part (you can see this in the pictures - the layer lines are clearly visible) so the layer lines tend to interlock like tiny teeth; it moved with effort but you have to pick up the Monster to pose the hips - they're that tight. I just need to redo the lower knee joints with equal strength; I made them far too loose to hold up the body. Shoulder-elbow-wrist assemblies are about done. They might be a little loose as well, on the initial print. Still need to tap some metal hinge pins to see if that tightens them up enough. Paint arrived; I went with flat olive drab but it looks more like actual military paint... it would probably be perfect if I wanted a perfect scale model with weathering, etc, but I think I'd prefer a bit lighter to give it more of a 1980s toy feel. I'll hit some of my test-print parts to see how it looks. Edited March 10, 2014 by bry Quote Link to comment Share on other sites More sharing options...
Recommended Posts
Join the conversation
You can post now and register later. If you have an account, sign in now to post with your account.