
MechTech
-
Posts
4679 -
Joined
-
Last visited
2 Followers


Recent Profile Visitors
21336 profile views


MechTech's Achievements
")
SMS Squadron Leader (11/15)
1.2k
Reputation
-
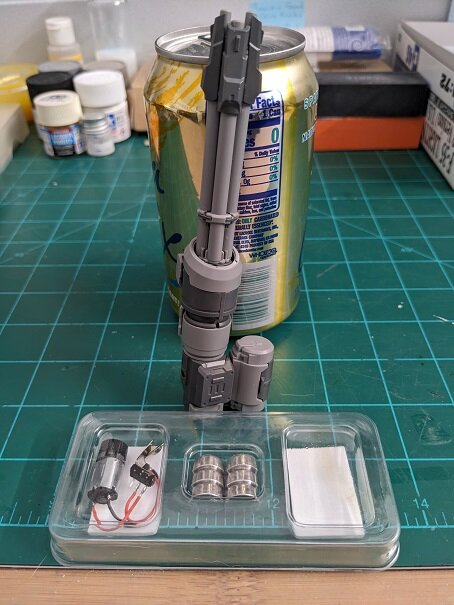
@pengbuzz That stand looks awesome, helps tell the story, and put the whole display together! I see a lot of good models that people just stick on a pole attached to an unsanded, ugly piece of unfinished timber. @Cheese3 I haven't seen one of those Nichimo kits actually attached to the suction "stand" in decades - I think. It's cool to see one done so nicely. The Gwazine came out great too! @Nyankodevice That Zenith print looks cool! I always loved how their designs are more realistic. ALCON, If anyone is interested, here's one of the roughly completed models of the Gatling cannon. I haven't added any of the handles on to it since I won't be using them. Also pictured is the motor, switch and batteries. The parts are molded in ABS according to the sprues. The good news, most parts are molded in undergated sprues, so cleanup is easy with little signs of nubs left over. I don't know if I did something wrong, but the battery fit is too tight. I've seen multiple videos where they were not, so maybe it was just me inserting the battery tabs wrong. I'm not worried because I'm not using them either. Here's one leaning against a standard 12oz American sized can. The COOL news, it runs awesome and the action is quiet! It doesn't sound like a servo running. The recoil looks cool, but of course, it's not "canon". Like I said earlier, those gear motors are awesome and compact. I got some more work done on the F-35B. The driveshaft connecting the LiftFan unit is to narrow, so I had to make a thicker one. Hasegawa completely left any detail out of the rear engine bay! It's totally visible too! So I had to find some decent photos (which was tough) and add some semi-accurate details in. Thanks for checking in! - MT
.jpg.121c6ac869304fb8f3dfb2b8d24a2590.jpg)
.jpg.25883cb7640abd9ee2fd3e7374430f06.jpg)
-
Hey everyone, quick post! I don't know if you have seen these before, but it is an AWESOME add-on to your mecha builds! This is a mechanical Gatling cannon that has ROTATION AND RECOIL action!!! TOTALLY COOL! They can be hard to find and sell out fast, but Hobby Search has them (at this time) for only $13.00 (plus about the same price for shipping registered mail to the U.S.). This version COMES WITH the motor, batteries and switch: https://www.1999.co.jp/eng/11182826 I just got mine in the mail and have yet to build it. If you're not familiar, Hobby Search is another great place to get stuff, especially if you're used to HLJ and them being out of stuff all the time. I've been buying from them for years. They seem to ship out faster than HLJ too. The motor is a compact gear motor and they are excellent for other projects too! I bought a bunch a while back. You'll see them in high end toys and kits. The small "ammo container" on the side holds three small 357 batteries - that come with the kit! I hear they don't last long, but adding in an external battery pack would be easy. The Hobby Mio logo is cool too, a cat with a wrench!😻 Here's a decent review minus the motor kit that the link above DOES have. The last video shows it in action. Enjoy! - MT https://www.youtube.com/watch?v=yV9pNTma73o
-
@SteveTheFish That's sad. Marking down for "not weathered enough" is not cool. That choice is up to the modeller. That can also be fixed by noting what you did on the judging sheet and why. A lot of people don't know that they SHOULD make special notes. The last contest I judged, someone did some Gundams with a wood finish to them. We didn't mark them down because that's not what a Gundam looks like, but the wood effect was very bad. Like @woodsider said, things are changing A LOT! VERY rarely are models made out of wood anymore. They are now plastic. That's a paradigm shift. Sci-fi becoming VERY popular is the latest shift. Allowing 3D printed models in Gundam competitions is the next one. 😉 @pengbuzz Judges Pengbuzz's model and notes, "Left masking tape on model." 🤣 - MT
-
@Papa Rat That Monster is looking good! Lots of love and attention. Some seams you may be able to fix before-hand. When you can, if you sand the edges flat, like on a piece of sand paper mounted to a board, they'll join better. Then use a ton of glue to make the seams "wet". Then put them together. It will take a day or two to dry, but you may be able to eliminate some puttying (which also requires waiting time). Plus the seam is stronger. @SteveTheFish and ALCON: Still to this day, a lot of the IPMS founders are stuck in their ways. I've heard fellow club members who read their literature complain about it. That includes techniques too. Don't get them started on 3D printing either! But like Big S said, there is a big group of Sci-fi modellers, mostly Gunpla modellers who are forcing them to change. Our last convention had A LOT of sci-fi kits. Even our die-hard aircraft guys are getting a Gundam just to see what they're all about and understand them better. The last two shows/conventions I was at even had a large group of Gunpla club members en force representing and taking photos together. The downside, the judges know how easy they can be made to look good. So they get more attention in judging now😉 - MT
-
@pengbuzz THE Masking Tape Master!!! @Cheese3 Cool to see those ole' tiny kits being built! I like the highlighting on the Defender. @woodsider That 1J looks beautiful! I think you'll win some medal with that one! ALCON - Here are International Plastic Modeler's Society (IPMS) judging guidelines (there is a Gundam section): - MT https://ipmsusa.org/about/competition-information/ipmsusa-competition-handbook-2024
-
@pengbuzz Your Shuttle looks GREAT! I love the protective coating on the lab module. It looks realistic! @Papa Rat No problem! Winning something at a con is cool too! Maybe fewer entrants? - MT
-
@Papa Rat Good call on the magnets for your Monster! By the way, if you're careful, they will still work just under the surface. That way you don't have to cover them with anything. Concerning your Talgeese: As a Sci-Fi judge for my club's last show, we dinged stuff like seam lines, rough paint, decals that were not blended well into the finish, or silvered decals (air gets underneath and it looks silvery). Stuff that will help you, adding detail bits, adding more scribing details/panel lines, and being consistent with your paint scheme (wear should be even across the model or rust, just not here and there). You should be able to get a a hold of the judging rules. If not, I'll see if I can find ours. Honestly, you should be able to walk into a show and have a good idea of where you stand. You know if you did a good job or not. At the very least, it's a lot of fun and a GREAT learning experience. You will see A LOT of awesome models and good ideas to borrow from. Who's hosting the show? If they are IPMS based, their rules are pretty much the same across the board. @Cheese3 Your paint shading looks good on that model and helps build size (for something so small). @derex3592 Good help is hard to find; I'm glad you got some! 😄 Sorry your Seymour-Johnson decal got jacked up. That squadron must of had a special deployment to Australia or something, maybe with a special paint scheme it sounds like? - MT
-
That's awesome she did that! I wanna say, "Sneaky wife, happy life" but that can go bad too.😁
-
@pengbuzz That's AWESOME man! Thank God for your wife and finding an ORIGINAL 80's kit! I remember that kit too - pretty cool! It's also great you got your starship nacelles sorted out too! Things are looking up! - MT
-
@Chas I think I used Super Lube (liquid) last time I stripped my old airbrush down. It has Teflon in it and coats nicely. @derex3592 Congrats on moving indoors! I lived in TX for a short bit and the heat and humidity can get bad! The Eagle looks good too! @Papa Rat Cool! Those will be a BIG improvement over the stock butcher block hands. - MT
-
@nightmareB4macross Thank you, but you're doing some awesome work! A lot of what I'm doing is because of the lathe and mill making up for my lack dexterity. GREAT detail work and funny pose for your not-so-Chunky Monkey. @Papa Rat Thank you! Congratulations on your anniversary! Doesn't seem that long! Are you making a glass cockpit for that VF-1 (another dad joke back at you)? For the Monster, you may want to look at some after market joints to put in that. The stock setup, while cool and articulated, just doesn't hold like Big S said. I checked USA Gundam Store and Newtype, but they are out of most of them right now. @Thom Thank you, Thom, I appreciate it! - MT
-
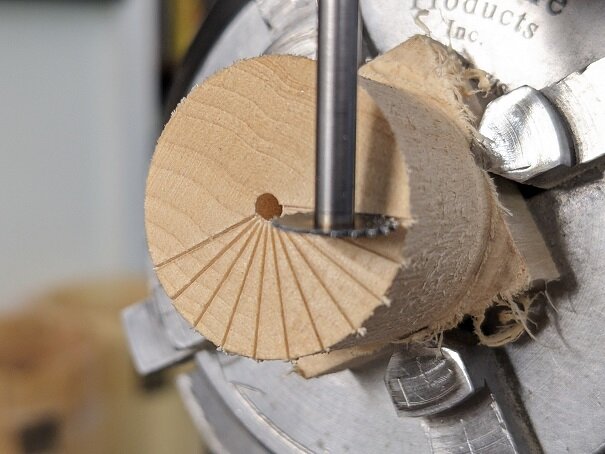
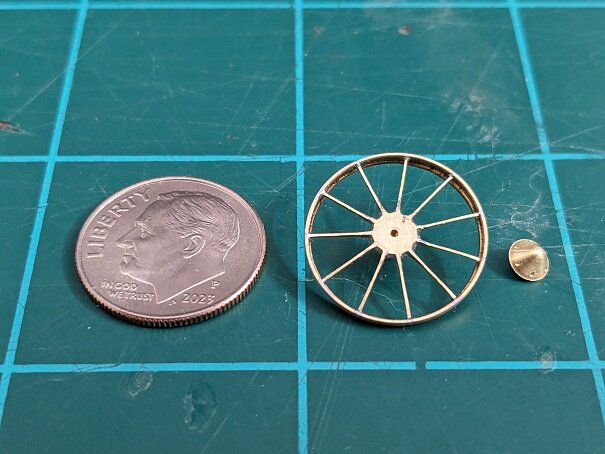
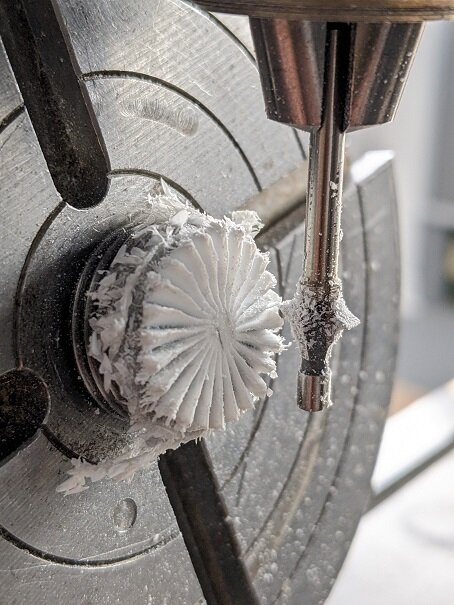
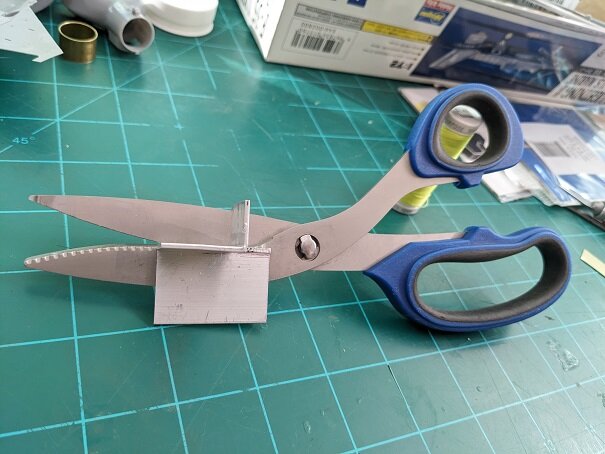
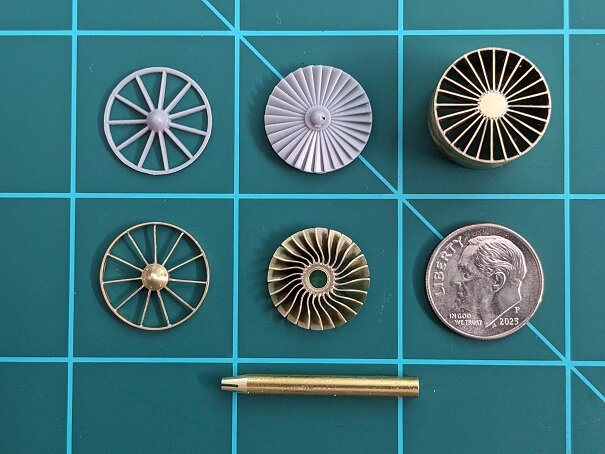
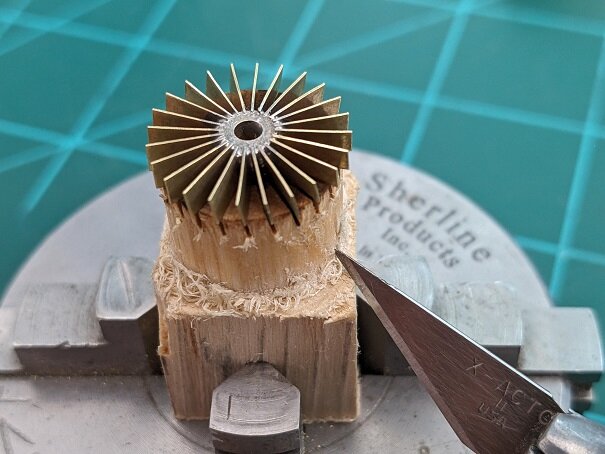
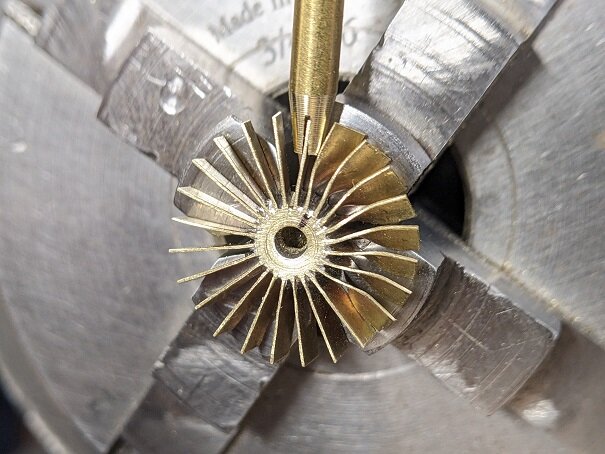
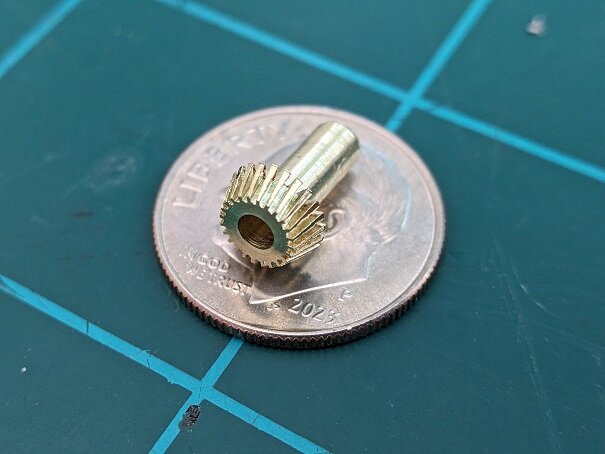
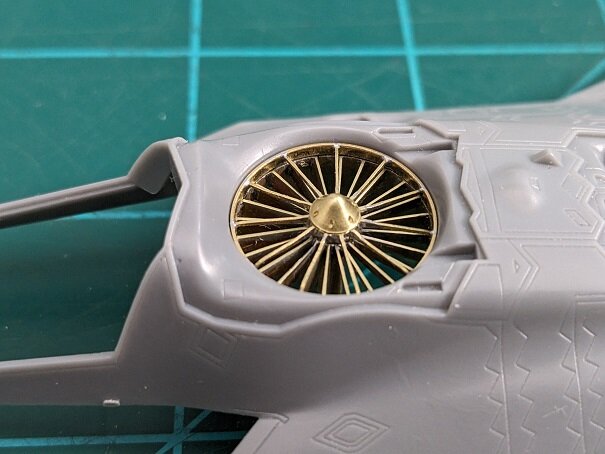
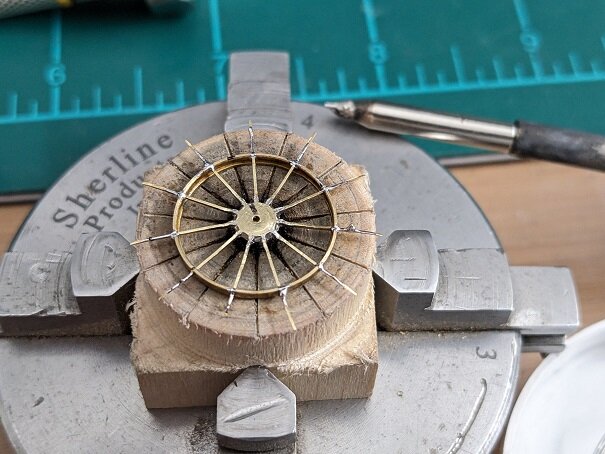
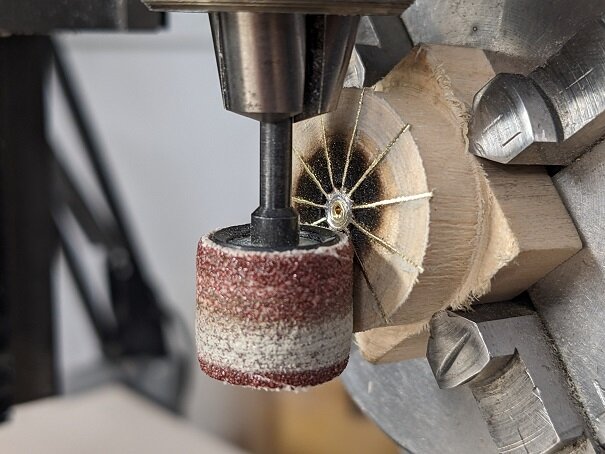
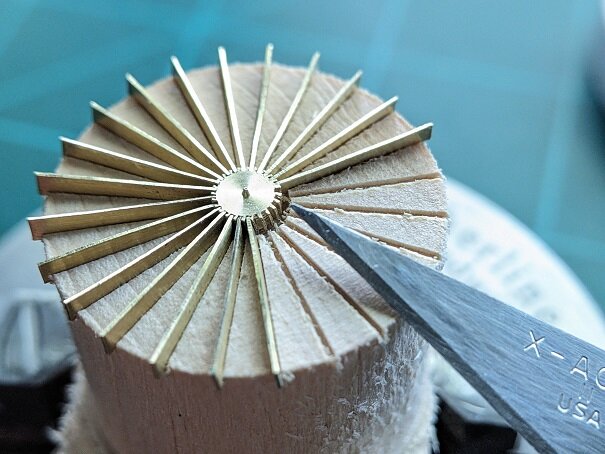
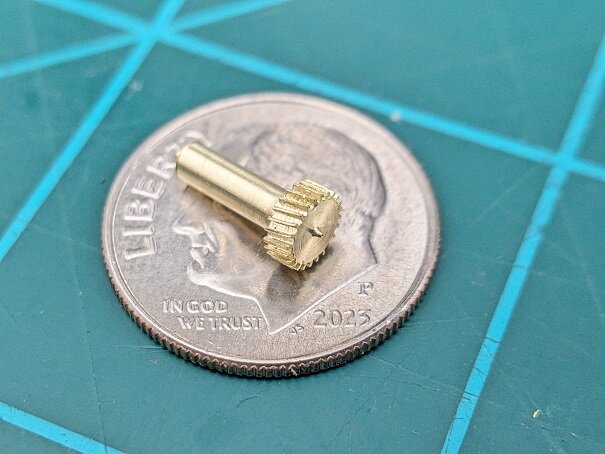
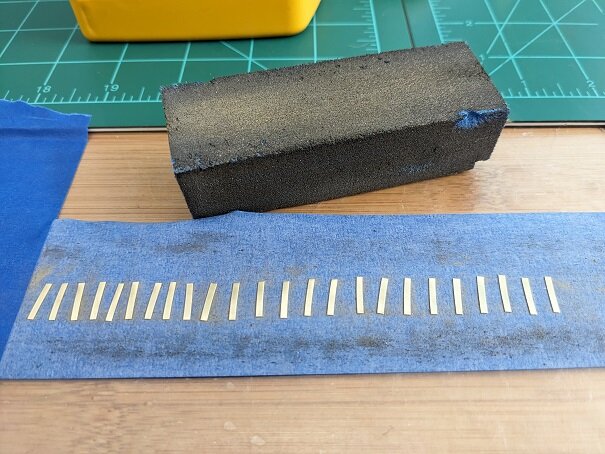
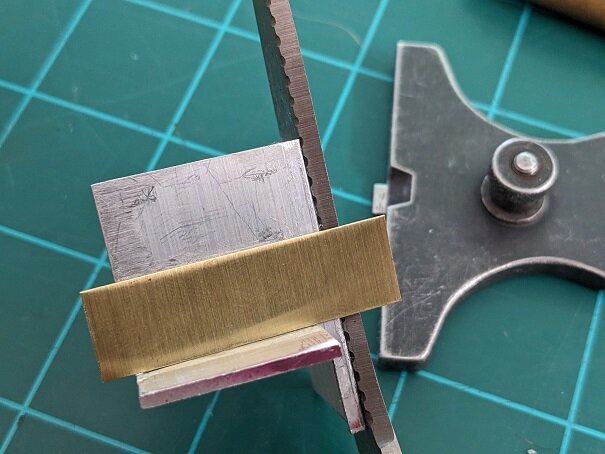
@Papa Rat That M.Lover looks GREAT! I love that Mr. Super Clear. It makes a lot of finishes just meld together. You're VF is coming along cool too! @nightmareB4macross Dude! Put your top back on, this is a family site!🤣 The Valk spread out reminds me of the old Imai cartoons where one of the girls has her Valks on display as insects with pins in them!😁 @Chas The paint looks SMOOTH on your SDF-1. The mods do too! ALRIGHT, so, my apologies for all the photos. I thought some of you might wonder how I did what I did and how it may help you (as I learn from you guys doing stuff too). Somebody I know wanted an F-35 for a temporary display. I mentioned I have an F-35B and they can borrow it after I build it. So I've been asked to build it, while forcing me to get it out of storage and building it. So, win-win! Back in 2018, I got the Hasegawa F-35B when it was new. Probably one of the best 1/72nd iterations of that airframe. Downsides, no ordnance and the decals are now outdated. The RAM tape that shows up as lighter colored lines all around the plane are now dated. It's all now the same color except for some hatches and stuff. The first thing people do when they look at an F-35B is look into the giant LiftFan behind the pilot. Hasegawa just has the top guard and a 1950's looking turbine blade under it, so I decided to make it more accurate. I think the F-35B is a cool plane design and I wanted to put the effort into it. The LiftFan has three sections you can see from the top. 1. The top guard with 11 spokes (and small sensor tubes all around). 2. Variable vanes that look similar to fan blades, but they're not. They're variable guides to adjust air flow. 3. The actual lift fan. In fact, there are two lift fans (counter-rotating) and other stators inside the fan housing, but you won't see them on the kit looking down, so I left them out here and on the model. First I tried making about seven turbine fans in styrene. All but one failed, and that one was shaped wrong, so I dropped that. This was about a week of wasted effort! So I'm showing you the bad with the good.😉 Next step was to build everything from soldered brass. That worked much better, but is A LOT more work. I used a pair of scissors and super-glued an angle piece onto it to act as a guide. - This is now how the "variable" vanes section went together: Then a depth gauge was used to keep the thicknesses the same when cutting all those tiny strips. Next, I needed a jig to hold the brass blades while soldering and doing other stuff, so I lathed and milled a block of bass wood. Next, all those little blades were sanded smooth to help with the finish and solder adhesion. Then the center piece was milled. This took a couple of tries. You can see there is hardly any material on the splines sticking up. This was the delicate part. They could easily break off - even in brass. The center piece and blades getting fit together. Then they were soldered. Note there is a slight angle to the left in the blades. - This is the top "Guard" piece. This is a similar piece, but it is for the guard that goes over the top. This is how I figured out how to shape it without busting up the delicate parts. The pieces stayed in the wood while I CAREFULLY sanded them to an angle. Soldered onto a piece of K&S metals tube. An iron was used because the mini-torch was too hot for this thin metal. And after A LOT of cleaning up, filing, and the center piece milled out... The top guard and vanes fit in place. The K&S tube was a God send, PERFECT fit after I cut out the center tub that came in the kit for the fan. The turbine center hub similar to above. This is also canted and tapered like the actual fan. The actual turbine was made similar to the vanes above. Just shorter, stockier blades. This is AFTER all the solder flux was cleaned off. I tried to think of how to put the twist in the blades. The answer was in front of me. I did opposite of the milling. I made a "reverse" screw driver blade with a taper. Then put it in the mill like I was going to make cuts. Instead, I manually twisted the bit just a little. Raised the bit, rotated the rotary table, lowered it onto another blade, and repeat - 24 times! I had to REALLY resist turning the motor on each time. This is similar to how I mill stuff in rotary increments. AND FINALLY, everything together. You can see Hasegawa's two pieces. Then (top right to lower left) came the LiftFan casing with the vanes in it, the top guard assembled, and the turbine - polished up and sized to fit inside the tube. The brass rod is the special tool used to twist the blades. It was fun, but A LOT of work to finally make a turbine. I'll have to remember this process for future models. Thanks for checking in! - MT
-
@GMK AWESOME sculpt and a radical looking design! - MT
-
@Papa Rat Nice fixes to the rear. By the way, use Milliput when it is still wet. It smooths down great with water and your fingers saving sanding, and trim it with blades while still semi-cured. It is good stuff. It just needs practice like any tool. @Urashiman Cool! Getting all electronicy too! I looked through my dad's old Lionel train stuff. There was this glob of aluminum with fins about the size of a small matchbox. I asked him what it was. He said, "A diode"! Technology sure has changed! 😁- MT
-
@Papa Rat Cool! I haven't built one of those in decades! Looking forward to it! @nightmareB4macross Thanks for sharing that! I forgot about that awkward designed head! - MT
