big F
-
Posts
4597 -
Joined
-
Last visited
Content Type
Profiles
Forums
Events
Gallery
Everything posted by big F
-
O.K have set up a new thread for my custom. Covering some old ground that I have posted here but also theres alot more that I have done since. Check my sig for the link.
-
Ahh we think alike !!!
-
I think with a C6-7 it will go bang.
-
maybe hes just lurking, like on reconasance or somthing.
-
Great find shame about the price though. They have done what so many manufacturers do just change the $ sign to a £ sign so they are like the equivalent ot nearly $60 over here. Would be cheaper to get them posted from the U.S. Hell I could DHL them and still be in pocket. O.K so how longs it gonna be until the more adventurous MW members build their own VF1 fighter versions or may be a Hikaru fan jet.
-
Make small accessory packs with these in so I can put them on my VF1 as the standard non Clown type are not that good. Other than that I agree with all thge points raised.
-
The gundam hands were recasted by NightmareB4Macross. From what I understand on these, they are from the Zabe kit (probably didn't spell that right). They are posable and are on a ball joint. You just have to find a joint to put it in after you cut off the hands on the valk, and you have a perfectly new hand. I will also create the retracted hand shield when it's done, but gotta keep the slides because of the armor pieces. 422284[/snapback] The hands are from the Bandai Sazabi Kit. They are re-casted with all the individual parts, 11 peices per hand. Great job on that Elint!!!! 422456[/snapback] Are you still making them or should I just go out and parts rape some gundam kits. HLJ have gundam hands like those but as far as I can remeber they are all fixed ones
-
Definately one for the collector who has em all.
-
Oh I remember them. the toy shop that wwas near me sold em all off cheap when the Macross/Rowboattrash fad was over. Even by 1980`s prices they were cheap, and some one bought up all of em in one go (several dozen Imaii and Revel and Arii kits) Dam them I probably have some of those I got from eBay in all their over priced collectors rareness.
-
Good luck !!
-
LOL a simple slip of the keyboard and you can get into so much trouble.
-
I guess it's unanimous! I'll post some more pics when the paint stripping on the legs is done. I think the intake covers will need to get the gunmetal paint treatment - that ghastly DYRL green-gray just doesn't work. In the meantime, that crappy clear eyepiece had to go.... 422503[/snapback] Yeah the green grey just shouldnt be allowed on the intakes. The eye looks much better now.
-
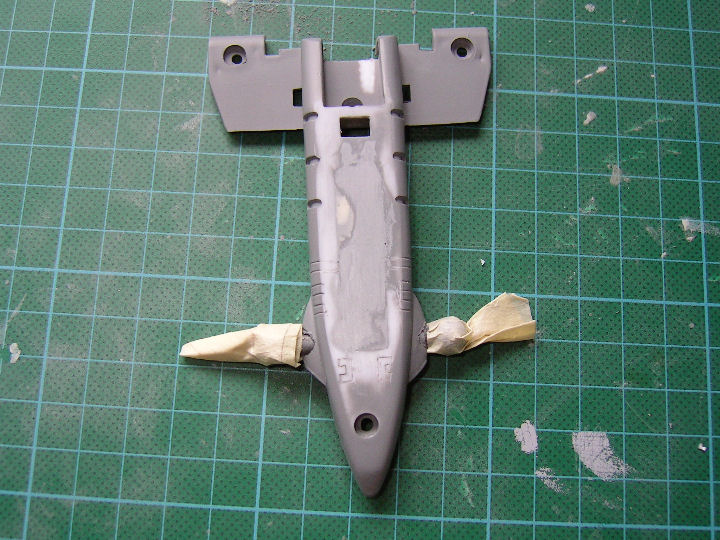
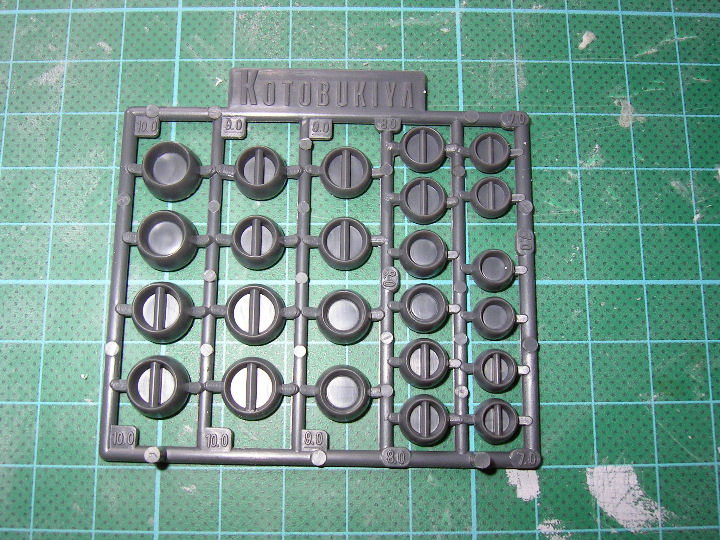
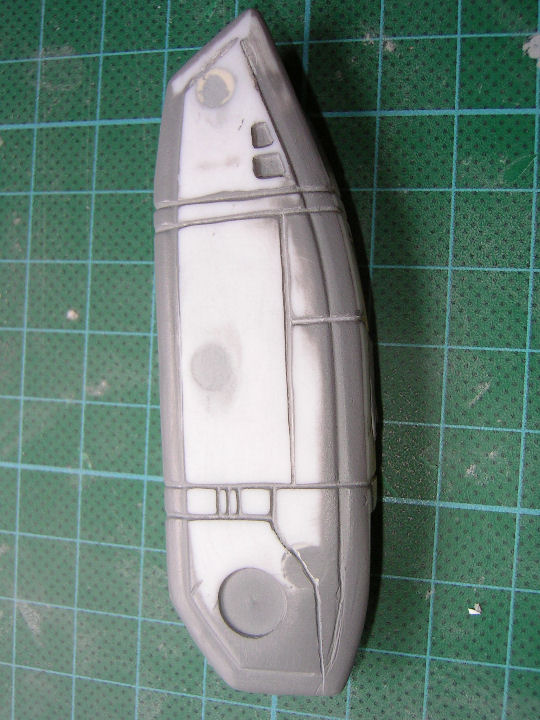
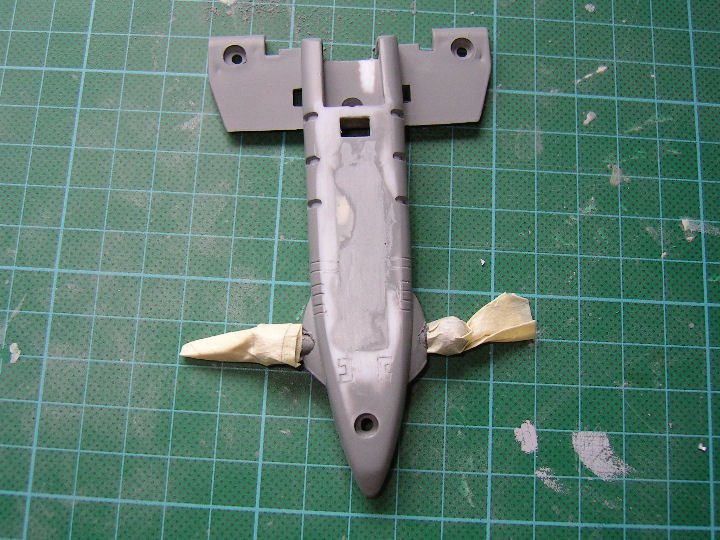
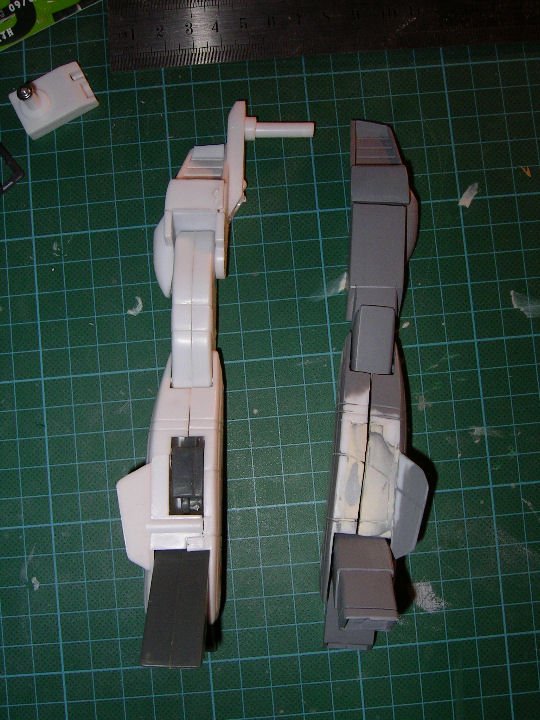
Well now the first leg is finnished what would I do different next time Well next time I may not do the ball joint at the top of the leg as it cant move all that much so I could get away with out it. next time i may do a hollow foot instead to make it more like the Hasegawa models feet. Next time im going to do it slightly different on the landing gear hatch to make it more easy for me. I may yet put the inspection hatch removal turn thingies ( the little round circles with the line in the middle) that you have on the inside of the legs Shin/calf area. Otherwise onto the next bit without boring you with another identical leg build. I had forgotten about the front landing gear hatch so I filled it and re panellined it. next I started to look at the chestplate This is one of those areas the really stands out on the Vf1. It`s one of those bits thats instantly recognised. I have always thought it was one of thre better bits on the 1/55. But there`s still room for improverment. I hate the little intakes that are just stickers or tampo print. I love the ones on the 1/48 and Hasegawa efforts. So I decided to do some. So far so good easy when you have the right tools. I next noticed the lack of hatch turn thingies (someone tell me what they are actually called). So out came my Kotobukiya and Wave spares box and I found these guys. The smallest one (7mm) are just right. I measured out and drilled a 6.2mm hole and they sit in slightly proud of the surface. Once glued in I sanded off the excess. now they look flush. I added primer and took a look. I needed to fill in load of scratches and blemishes on the is part (as with most bits) after all you cant complain about it for a $5 bootleg. It was then I got thinking about the nosecone it to has the thingies and so I repeated the process for it too. You can see here this is in between primer filler sand stages trying to get out the blemishes. Heres the leg so far compaired to the original one for an idea of what the differences are. the new legs will make the valk about 2cm taller than stock due to the more correct hip positioning Next stop finish the intakes on the chest plate and Im looking at the sholders as well.

-
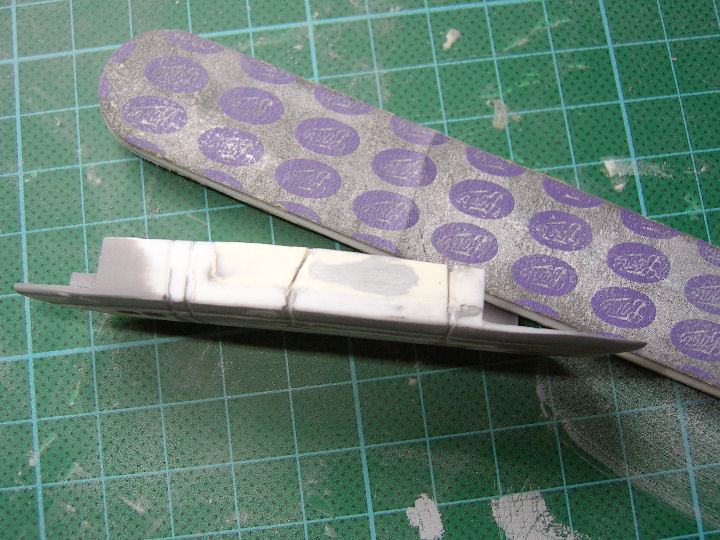
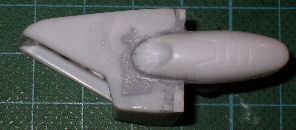
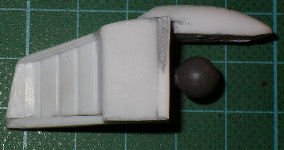
The foot I thought of just filling the screw holes like I did on my Miria custom but as that was supposed to be a custom take on the Bandai one I didnt go overboard with the mods. I figured as this was going to be a Battloid and would never need to be closed I bonded them open I added a Balljoint to the middle where the locating screw usually goes then ground down the old screw post and fitted a ball joint there the foot now has more mobility and to a degree some more side movement due to my taking about 2mm out of it`s width. I then added the stepped area to the front part of the foot from some 1mm styrene and put the pannel line into the bottom of the front part. Sorry for the picture I just couldnt get very good shots of this. It shows it in final sand prep before I shot it with primer
-
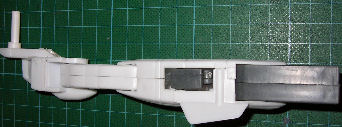
On to the bottom of the leg the shin and calf area I supose you could call it. I was fairly happy with the way this area is there were a few things I would have done but I didnt fancy my chances at getting both legs to look the same so I didnt bother. First up was to get rid of theose horible bootleg wheels. they are nbot that good on the Taka and Bandai ones but compared to the bootlegs EWWWW!!!!. split the leg in half by unscrewing it took out the undercaridge wheel and chopped out the fiddly bits, I also removed some of the hatch area to allow better filling. I added a 1mm styrene part to help give the filler more strength. filled and leveled and panellined to show the landing gear hatches they look much better. I took the opertunity to cut the top of the leg to allow better move ment of the knee as per others Gerwalk mods like Fulcy and other such pioneers of Chunkyness . While i was at it I realised I woul have to shave a few mm off the back of the leg where the foot is to allow my modeed foot to work. Heres the outer side with its final coat of Mr putty sanded ready for panellines and primer. And the innerside with the pannellines already done. While I was at it I filled the screw holes over as I plan to Glue the halves together when Im done.

-
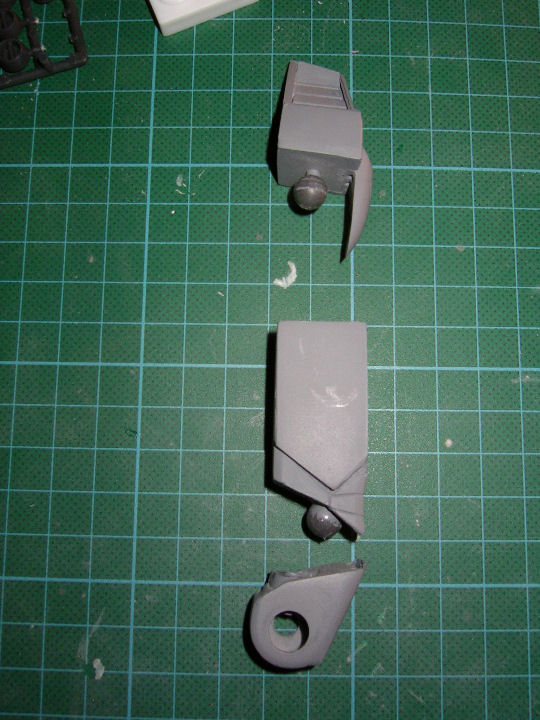
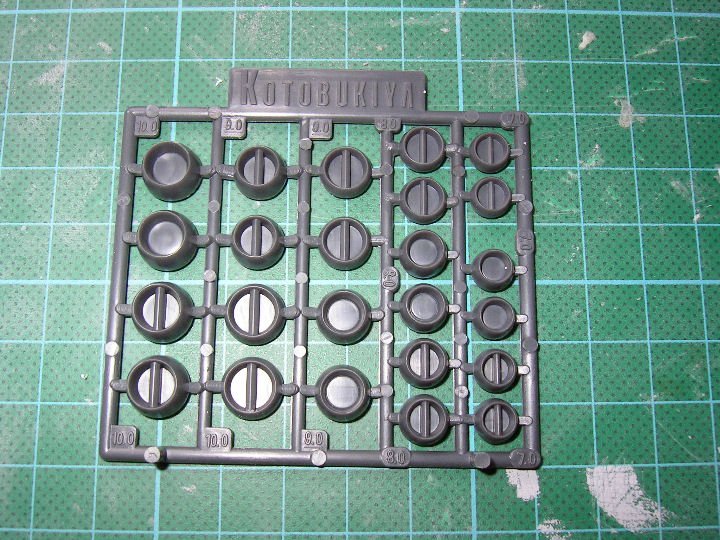
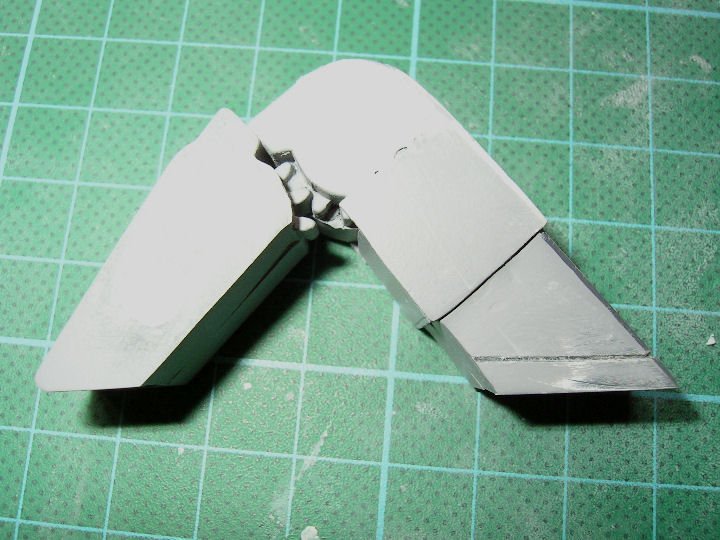
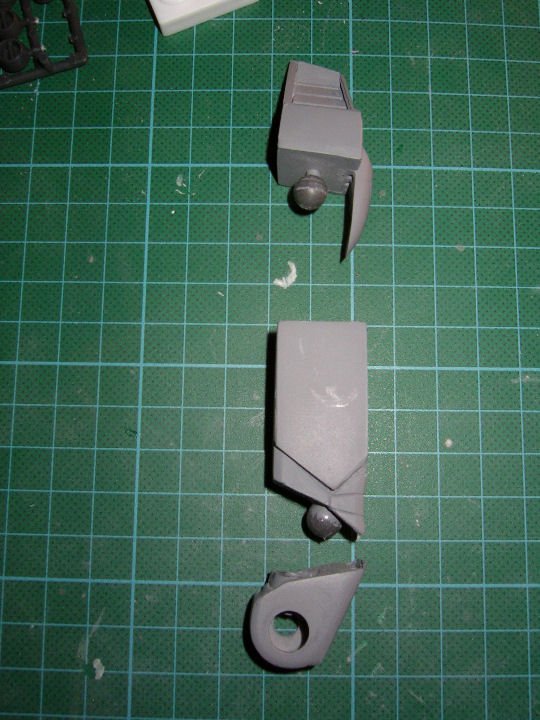
Next up the hip joints The next step was to add the ballsocket for the hip joints These have been located in the acurate position for the anime. I drilled holes into the middle of the blisters as where the articulations would be. Once positioned I used 5 min epoxy on the inside of the nose to hold them in place along with two small screws. they are now rock solid. They are now really solid and have been poped in and out of joint dozens of times and are still as fresh as the first time. This was one area of the mod that I was worried about as I didnt want something like the floppy joints on some of my Yamato 1/60 Valks. Luckly It is rock solid. So Far. The next step was to add the ballsocket for the hip joints This was held in place and bonded in with 5 min epoxy again. it wont come out at all now. Once this was done I filled down the original leg inner ( the bit with the bar on) and then cut it to size. This would have taken ages if it was a metal one. Next time I will probably just make new ones out of 2mm styrene. Once added to an actual leg part the hips mod was proven to be strong and not at all floppy. I was really happy about that. Next up was the thigh mod I didnt want to change the overall lenght of the leg as I think it is in proportion with the Valk the only thing about the legs appearance Ive never been happy with is the top joint that screws through the metal and plastic parts at the bottom of the intake part of the leg. I checked out some line drawings had a look at my Hasegawa kits and some of my Kaiyoda and Bandai Gashapons, I finally came up with a plan. I had already decided that the top of the leg would have a ball joint to attach it to the intake part. This would allow it to move subtle ammounts to help in posing and stability much in the same way the leg move in the Hasegawa models. I cut the top of the thigh part off to allow the seating of the ball joint cup ant then cut out of 2mm styrene some new side that were more anime acurate and that would be as long as the original joint was. The added bonus would be they were as wide as the intake part of the leg, and thus would look better IMO. These were then bonde on and the gap filled with auto filler sanded and finnished to fit to the leg top. Once I had this done I set to the new thigh with the saw once more and cut off the bottom part that is the Knee cap. Ive always like the way they are on the 1/48 and in the Anime they stick out and give the leg more substance so I did this to mine. 1mm foam backed styrene was cut to size and glued to the front of the kneecap to give it more stickingoutness ( if there such a word) After that it was just a matter of adding the ball joint part and filling in arround it to make it really strong. Here you see the whole of top of the leg in primer and semi finished state.

-
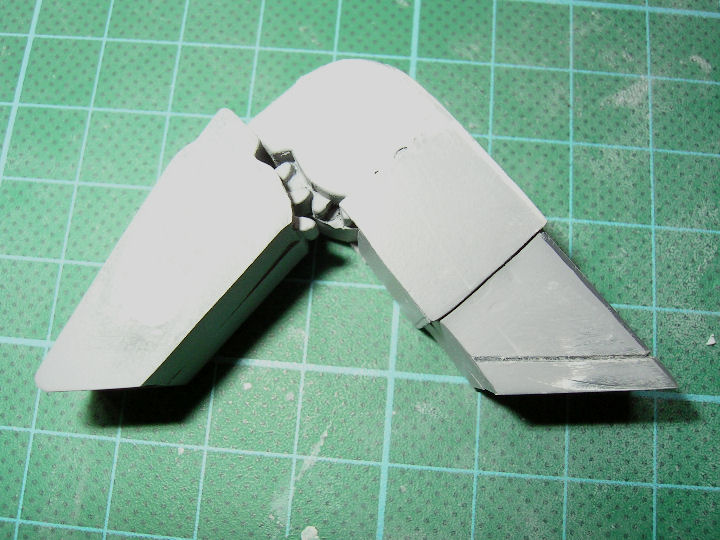
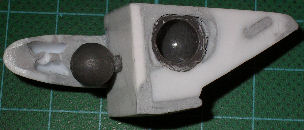
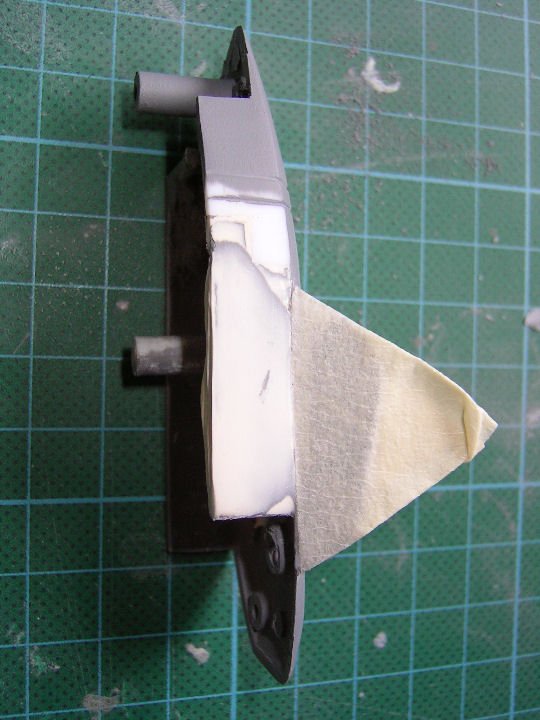
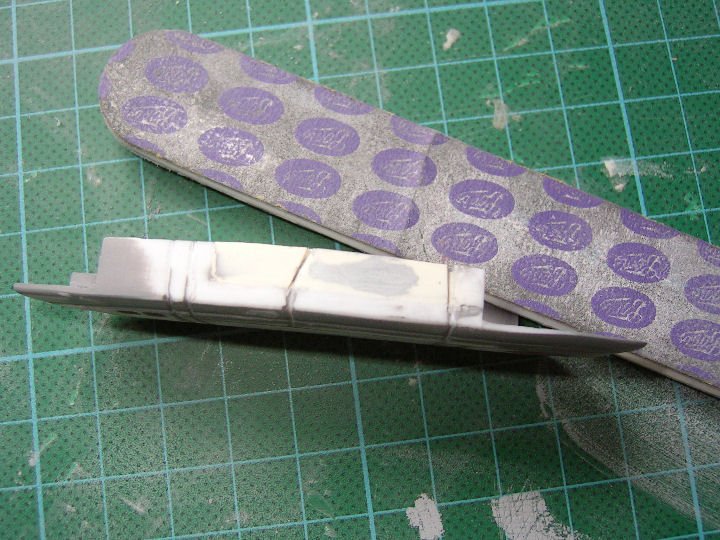
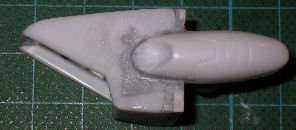
Well some of you chunky lovers will remember some of this from my post in Skulls-1`s thread But I didnt want to steal the limelight away from what has turned out to be an excellent mod. So here goes My own take on the whole chunky mod scene. Well the object of my modding was to achive a more anime realistic 1/55. I was not bothered about it being able to transform so I got a bit more creative shall we say.... We`ve all seen a bootleg 1/55 but just in case here goes. My starting point. The leg in unmodded condition First thing to do make the intake part more accurate. This took longer than I thought it would as I ended up remodeling it twice. I have even moved the blister forward to be more acurate. I cut away the whole bottom part with my trusty Exacto saw. then I bonded on a peice of 2mm styrene cut to size and mounted a bal joint I got from HLJ. This will attach to the new thigh when I finish it.

-
Where did you get your Gundam posable hands from? Thats one part I want to do for mine.
-
These are great for a bit of fun. I want one. Anyone know if you can get em in the U.K ?
-
Dont worry I know someone who knows how to make it but he`s the sort of person who`d burn it too.
-
Show off !! Just kiddin Great work guys
-
LOL
-
I think that would work.
-
Yeah someone here I think once had one. A T.V Max as I recall saw it on eBay for about $1000 sometime ago
-
Watch out you may get too good at this. A certain Minmay sculpting MW member has a bit of competition, I think.