big F
-
Posts
4597 -
Joined
-
Last visited
Content Type
Profiles
Forums
Events
Gallery
Everything posted by big F
-
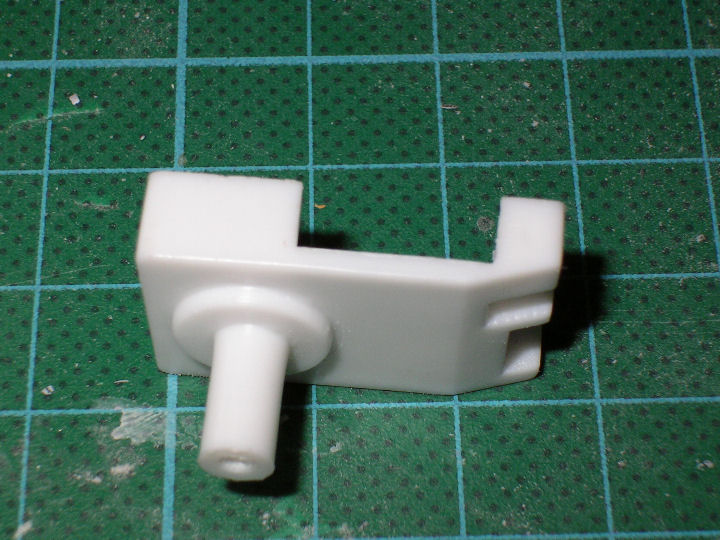
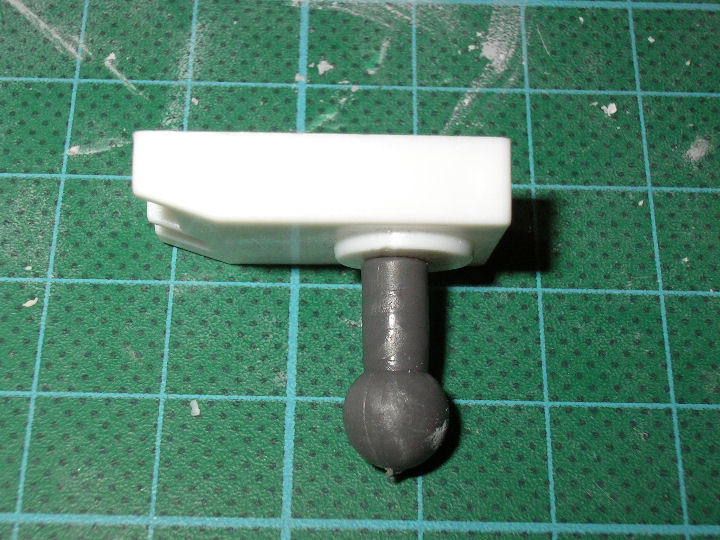
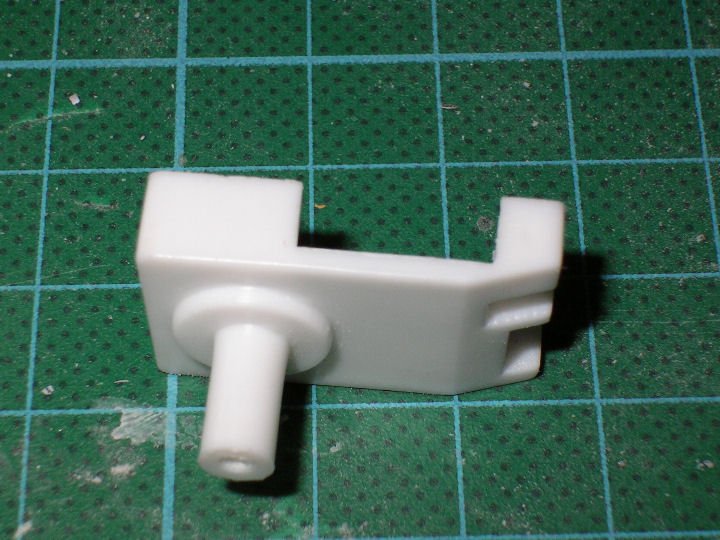
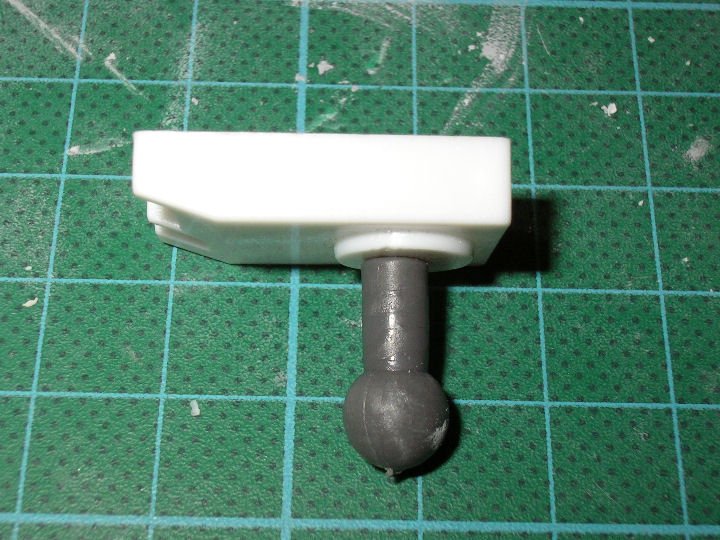
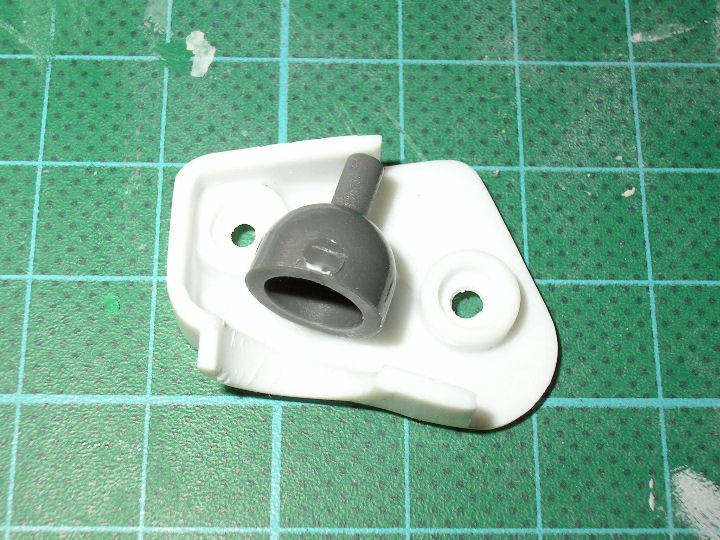
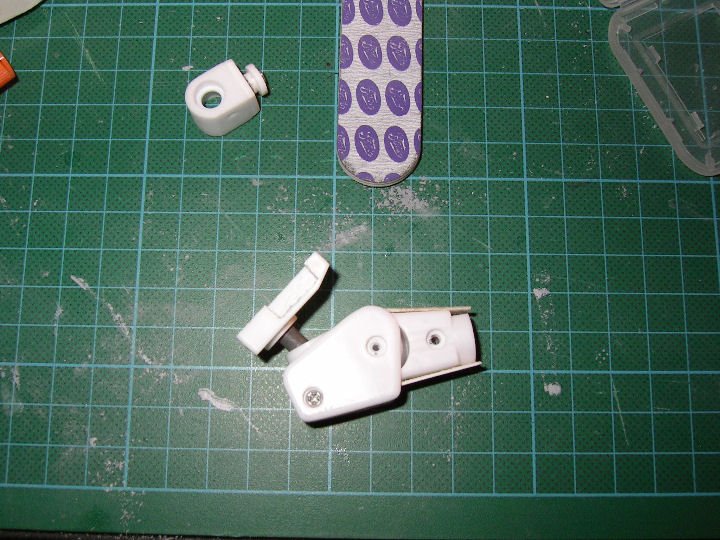
Durring our imposed exile I did do some work on the leg stretch and feet. I have also worked on the shoulders and forearms. I had to do a bit of reworking as one of them fell apart. At least now thought they are as strong as the originals and look a whole lot better. Here we go. The leg stretch is fairly well coverd here already so I wont post picture of that. Teh only thing I will say is that I will be putting the RCS thrusters onto the lower legs as they kinda missed that in the Bandai sculpt I am also going to be putting the landing lights on now I have more room. The next area that got my attention was the shoulders, this was an area that I wanted to do originaly. The 1/55 has always suffered with crap posability on the arms mostly due to it`s lack of mobility in the shoulders. Solution add ball joints. Turn this into this I cut off the post and drilled out the center of its root point then screwed a ball joint post the the spot using a spare 1/55 screw. Next stop is the shoulder point. First off I marked out where the bicep part would track back and forth in the shoulder to make sure I didnt interfear with its`s working. Once that was established a small ammount of trimming was done to the plastic lugs inside and a bit of test line up. When I was happy I mixed up some Devcon and splerged it into place. It held fast and just needed a bit of filling to allow the two halves to close properly. The finnished article. Youll notice the post is quite long on the shoulder this will not be a problem as I intend to sit it slightly in on the chest from where it would originaly sit on a 1/55 You can also see the attachment to the Bicep area that I made using 1mm styrene. this was to allow me to get rid of the rounded end and make them more Anime correct. They have been filled and the chamfer lines put back in.
-
Mmm not so sure about the box. Definatley one to display and put the box in a dark cupboard.
-
I recommend a test in the bath just in case its clean and not to deep in case you need to wade in there quick.
-
Nice kit. With only about 20 in the world I`d be scared to make it and thus detract the value of such a rare find. Personal recast is the only option I would use. I feel bad about building some of my stuff and a lot of it is still in production, or available on eBay by the ton. Just proves that; If you look hard enough then you can find anything.
-
One thing I was thinking the other day while talking to my boss (he`s sort of into rockets for his kids) has anyone ever made or flown a multistage rocket. By that I mean sort of like the ICBM or moon shot type system burn dump stage burn etc ? And no before you ask I dont want to fly rockets with my boss, it`s bad enough working with him and besides have you met his kids.
-
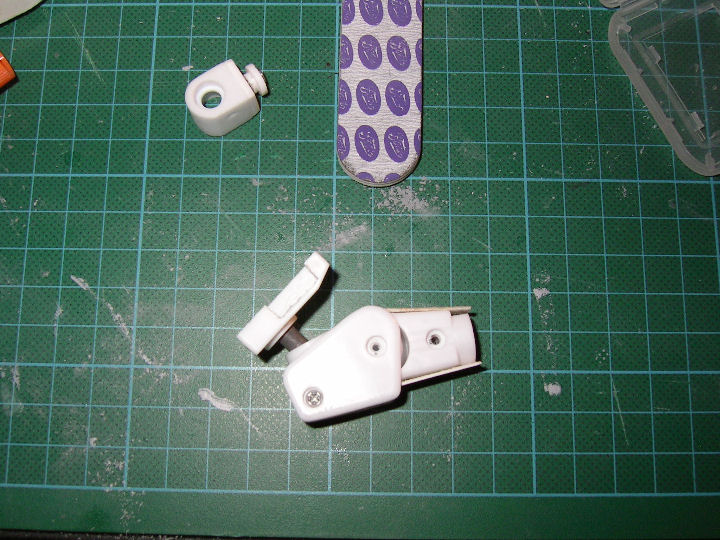
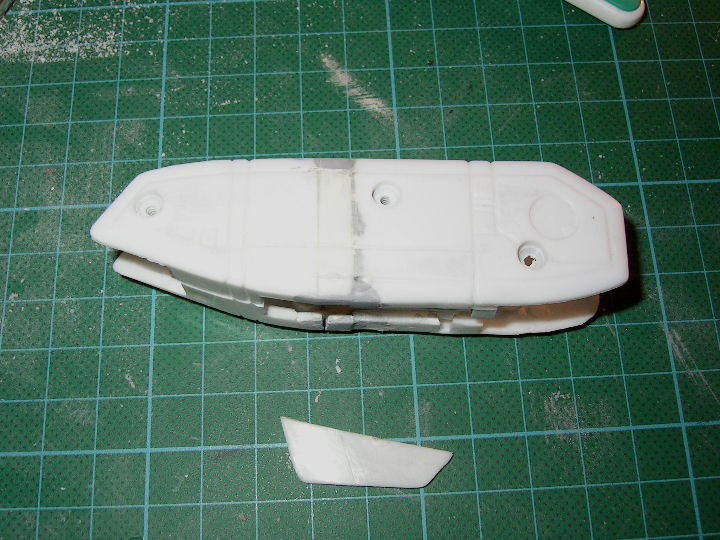
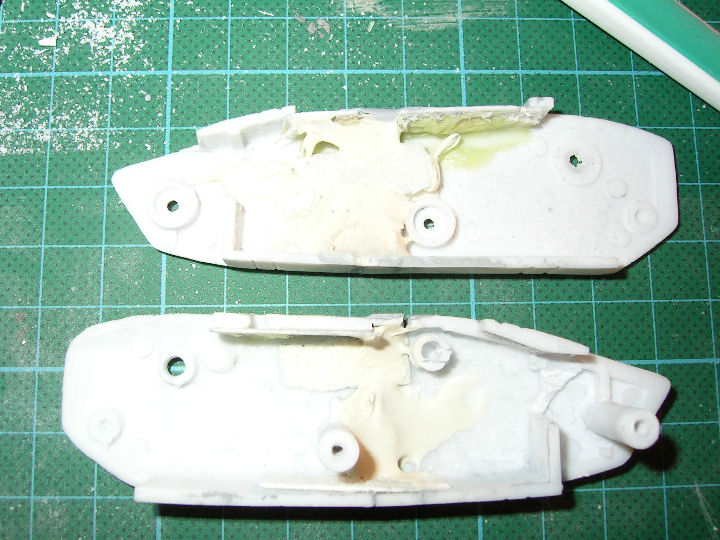
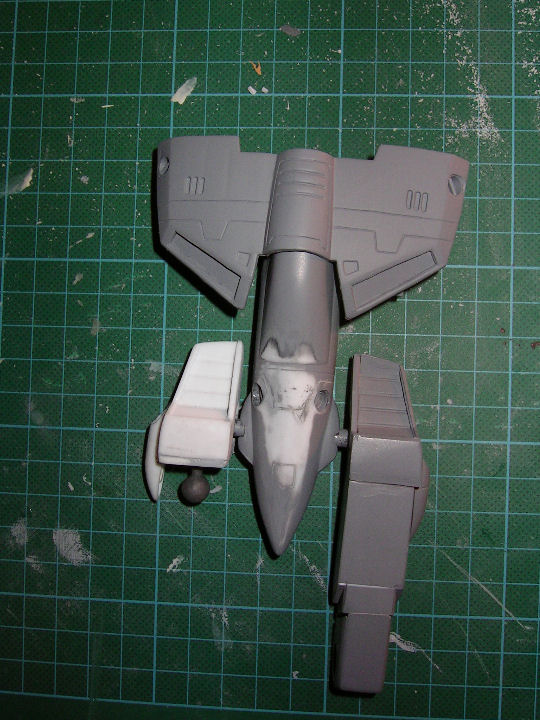
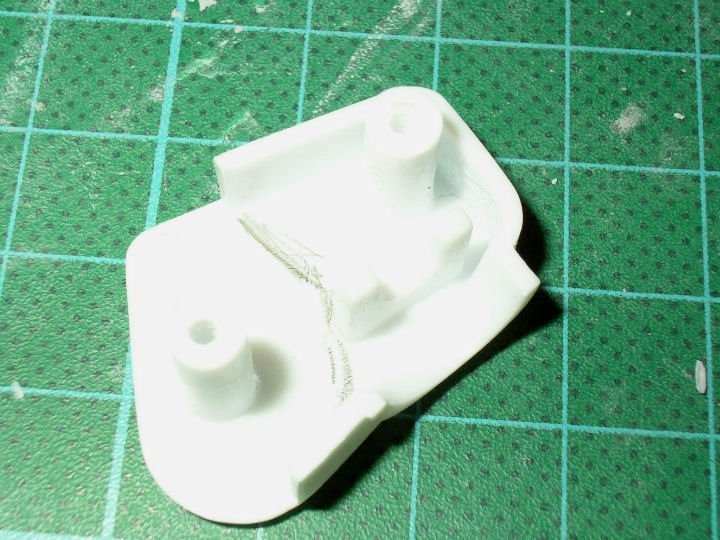
O.k here is some progress pictures for all those who are waiting for my updates. Here you can see the almost finnished side, you can see the two different colours of plastics used in these bootlegs, Yamato would never get away with that lol. You can see also the small blemishes and the small stabaliser wing which I removed to help in the stretch operation, besides it is fixed too low when compared with the lineart and Yammies and Hasegawa works of art. I'll fix back in its mew proper location when I'm done. This gives you an idea of the insides. First I attached some strips of 1mm styrene with super glue and then strenghtened it with two part epoxy. You can also see the 1mm shuttering I placed into where the landing gear sits, this will help when filling this area later. Just to show you the completed hip joints and a look at the breast plate with its modified ducts and RCS thruster ports which have still to have some very fine putty placed roun the edges of the holes to smooth them in completely. the sanded area just below the cockpit area is where I had to correct a panelline, it looks bad but is smooth so I just have to re do the line and ad primer. Well thats if for now folks untill next time hopefully finished leg/legs and some finnished shoulders and forearms for you all to look at.


-
Sorry I have been fixing the legs as per my new extender mod. You`d think it was just a case of slice right through and add 6mm from your donor leg glue in place and paint. MMMM. Well one thing I found the legs are not exactly straight and you have to plan where to cut depending on where it is safe and convenient to cut then add this to the fact that you have got to plan where your donor leg has to be cut to ad the right amount. The problem is not as simple as cut them both in the same place and then cut the donor again at 6mm, as when you do this it dosent line up so well. The legs curve slightly. I have done the best I can It is structurally sound as there is plenty of reinforcement behind it on the inside of the leg parts, but ad this to my trying to cut a straight line on something that gently curves and you get gaps. Filling the gaps is time consuming, everytime I think I`ve done it I sand down the excess and I can still see the gap. Ah the joys of modeling and toy customization. On the plus I have completed one side and apart from a couple of small blemishes which can be got rid of before I paint it. I will post some in progress pictures later on just to show you where im at. I have found that you can make 1/55 Super deformed legs with the left overs, oh no here comes another project :0
-
Please do. I bet Skullsix is pleased his is one of the most posted to threads at the moment.
-
The master has spoken. He makes sense, about the vents. I wish i'd done that to the vents instead of spendin hours trying to get them all even.
-
Ermm isnt it like 6 foot.... Oh yes that is small for the Daedalus.
-
That said then i suppose you could make one bonded directly to the helmet and then although it probably wouldnt be road legal, wear it.
-
Whoah I didnt realise there were so many problems for you guys over the other side of the pond. Over here they want you to be insured and a member of the UKRA otherwise the authorities can stand on you if they think you have broken the law. IIRC you also have to ask the Cilvil Aviation Authority for permission to fly If you go more than 1500 feet. I did a little search on the net for Rocket clubs in the U.K. There are a few but mostly they are a few hours drive from me. There is one in Southampton which is only about an hour. I will have to check them out. The only problem is they only allow shop bought stuff to be used. Me being the engineer that I am could quickly grow out of this and want to use home grown stuff like motors and my own build rockets, then I guess I would have to bite the bullet and travel to use them. Apollo how long did it take you to go from shop bought to make your own ?
-
I really like the way you have laid out the weapons and pannels in the same style as the Macross plus This is animation Special. Great work. Did you get the brass tag specially made ?
-
lol
-
I guess this isnt you then Ebay page
-
Sounds good to me. I think there needs to be a 1/55 custom thread on this forum. Thanks for the info for the joints
-
Hey I remember imaginations all kids had them in the 70`s and 80`s So true !!
-
Wow thats nice.
-
That would be funny " Yamato VF1 Roy flown in space once, never under combat conditions, never raced or rallied" eBay would love that.
-
You could try I asked in one of the Yodabashi camera stores in Shinjuku, the sales guy was cool about it even offered to open the case to reduce the flash...... But the manager was not so cool shall we say. He just said No.. Sorry No camera Please, and then shouted at the sales guy in Japanese so fast I couldnt tell what he was saying. Agent GHQ Did you just get recently your self a mint in box 1/55 Super O by chance ?
-
Heh heh I have another one that is red and white. In Battroid mode from a distance 10 feet or more they look really good. I have them sitting in the space above the Bedroom wardrobe in my office. They do have a sort of kitch charm about them. I got the Roy one in around 1986 in a sort smaller than 1/55 but more playable than my model kits way. In 1986 we didnt know any better. I was only 14 at the time. £2.50 was half my paper route money fo the week. The other two missfits were part of a large Macross/ Roblowgoats auction from some time ago. I just couldnt throw em out although the Rowblowgoats figures my just have to be melted even if they are MOC. That gold plated thing is Bleerch!! Theres a matchbox VF1 on eBlag at the moment (no bids as I write). Graham we need to set up a Macross toy Rouges Gallery for this stuff
-
Yes they are something to behold (excuse the unintended pun). I still have more 1/55`s than 1/48`s though as space is an issue at the moment.
-
OMG!! You can fully understand why NASA is running scared about the whole Civilian space program.
-
Hey thanks for sharing your mod pictures. I did look at using Bionicles but they are a bit pricey in the toy shops round here, plus I wasnt shure how many in a kit and which kit to get. Im glad Im not the only one mad enough to do this to a harmless $5 bootleg. Thanks Skull I knew someone would know what to call them. I did think they might be like release catches for pannels like Dzuz (think I splet it right) catches you get on the bonnets of racing cars etc. Leg sawing has begun for those who care. So far it hasnt hurt "much".
-
Looks like the display cases in ABC to me. They always have a nice display on in there. Your right about the stern looks. They gave me evils just coz I had my camera in my pocket and had to get it out to find my wallet.