Valkyrie addict
-
Posts
3757 -
Joined
-
Last visited
Content Type
Profiles
Forums
Events
Gallery
Everything posted by Valkyrie addict
-
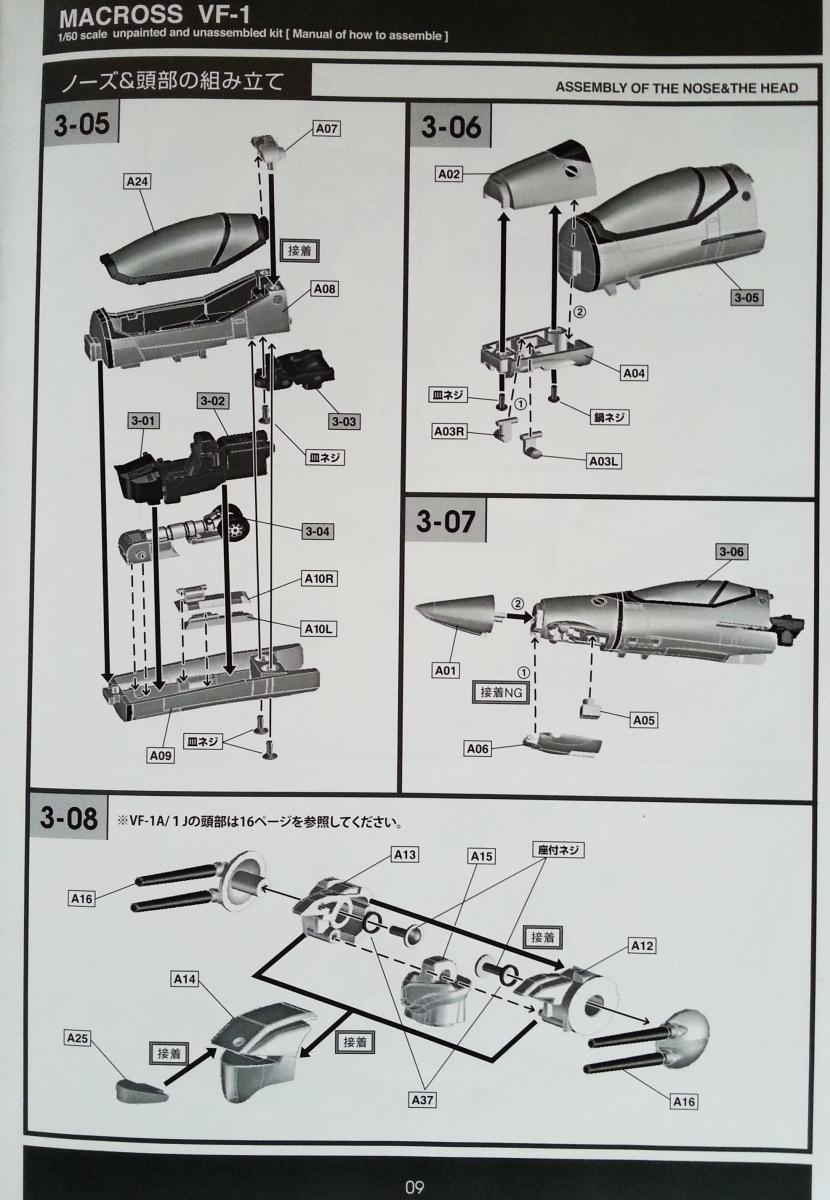
Yep, piece A07 that holds the canopy has to be glued to keep it in place, sorry. The screws that are direcly underneath the piece are to join part A08/09 of the cockpit.

-
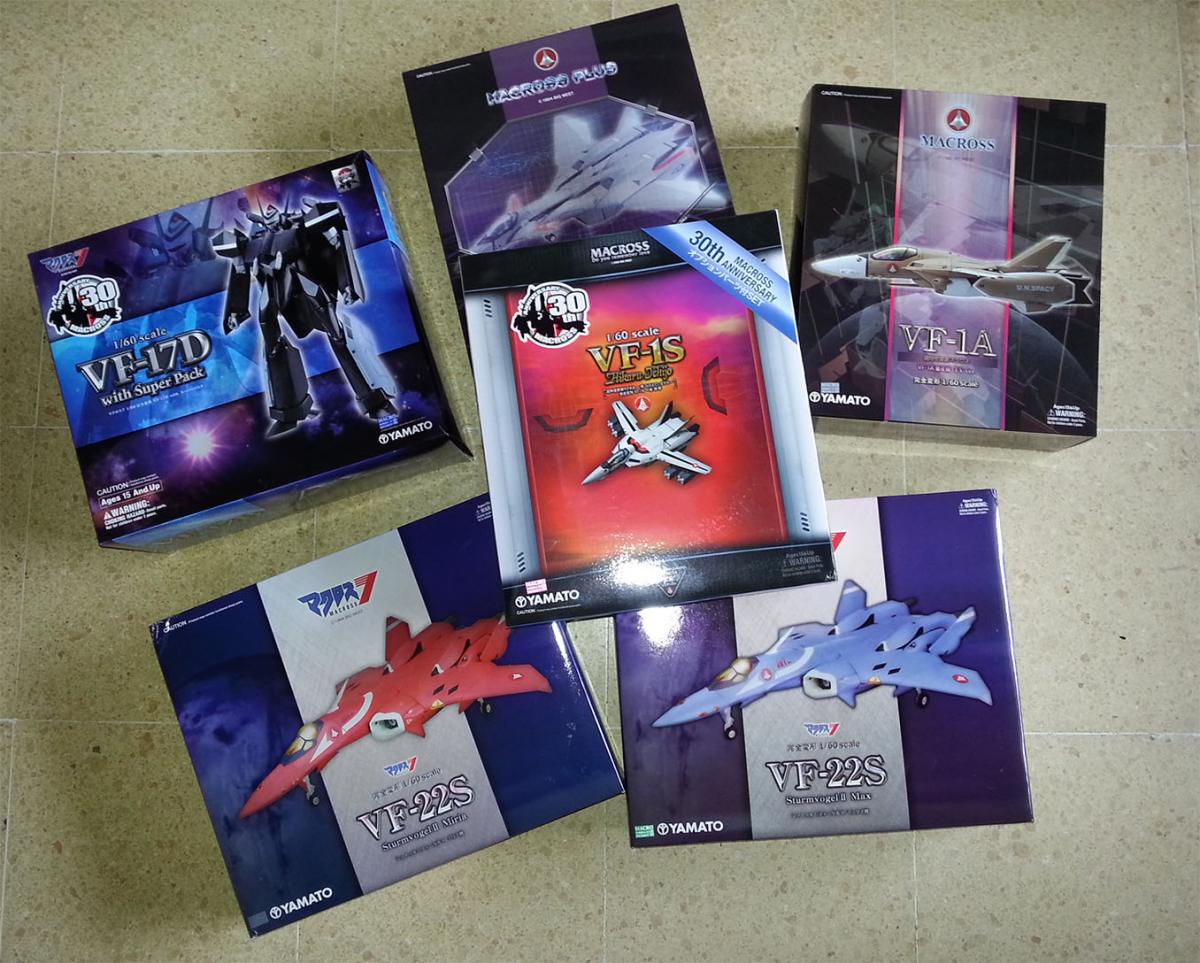
Seems whenever I get into this game there's a panic, I remember when I found MWF about 7 years ago the 1/48 were at their peak, the 1/48 but stock were scarce, VF-1J M&M had a limited run and everyone was begging for a reissue with scalpers commanding similar prices as the 1/60's now, the v1 VF-1D, VT-1 and VE-1 where as rare as the 1/55's. I really want the VF-1J M&M I do remember at those times Yamato was sorta structuring itself with the coming Zero line and v2 YF-19, after they were a hit despite their QC floppiness, came the YF-21, v2 1/60's, VF-11B, Destroids, HDP Regult, SDF-1 resin kits, Macross 7, etc. and now back to nothing. I really hope history repeats itself and Arcadia brings back the Macross glory days before I disappear again. Anyway, latest Buying frenzy arrived.

-
If Arcadia wants to make the mold apart from Yamato a propose deeper panel lining.
-
I have to pay import tax, plus added "toy" tax which adds to almost a 25% tax Luckily the guys at post company help me to avoid the tax, but I have to get the item marked as a gift or of much lower value to make it easier.
-
 Thanks for sharing EXO The more I look at the scheme the less sense it makes, what is it supposed to represent?
 -
Got mine, great stuff!! thanks VF5SS But...the ball joint is too slim, had to add a small rubber piece around half the ball joint to get proper friction.
-
Bandai 1/72 fully transform able VF-1 plastic kit for Macross 30th Ann
Valkyrie addict replied to Vi-RS's topic in Model kits
Those chicken legs!!!! How could they screw up so badly? everything is just wrong, very gimmicky but wrong. -
Yamato 1/60 VF-1 Kit Custom/Detailing by Kye
Valkyrie addict replied to kyekye's topic in The Workshop!
mind blowned!! truly amazing I believe the canopy itself from the kit has does fitting issues. -
Very interesting!
-
oh crap!! not this again, time to check the 19S/F
-
Help with Alaska Base Custom 1:60 Ver.2
Valkyrie addict replied to derex3592's topic in The Workshop!
3M masking tape is very good also. Great job! -
Great collection and display!, most certainly a good talking piece when people visit.
-
Maybe it was a knockoff jetfire?
-
Great job!!! love it!! You can use a gray Gundam marker to paint the head laser housing gray. Just pointing out also you're missing the red triangles on the shoulder pads. Have you transform it?
-
So what will be the first Arcadia branded Macross offering?
Valkyrie addict replied to jvmacross's topic in Toys
Black VF-14 was shown in Macross Plus and Macross 7. It was obviously based on the SR-71 Blackbird. For some awfully stupid reason, the VF-14 was retcon into that blue monstrosity for the Macross M3 dreamcast game. Since Macross 7 was aired in 1995 and then Macross M3 game in 2001 I think the blue version from the game is considered official status. Eventought, the events in M3 game chronologically happen before Macross 7 events. Anyway, you can see the VF-14 Vampire in a Macross 7 Plus episode: And you can see the blue VF-14 fighting bugs in the game intro + Max blue VF-4 and Millia VF-5000 action: -
Macross Collectibles Market Watch - Current Auction/Store SOLD prices
Valkyrie addict replied to jvmacross's topic in Toys
it sold for 12,000 yen??? that's a freakin' bargain!!!!! -
Custom General Galaxy VF -171 Nightmare Plus DX
Valkyrie addict replied to physioguy's topic in Toys
Oh man that looks sexy!!! Please post more of your stuff -
I used Tamiya racing green TS-45 spray can. Vi-RS Good catch, after I snapped E03/04 along with most of the leg assemble I saw that I had to paint part E05 and was not able to pry it open. Didn't notice the little laps on E03/04 had to be painted, oops! Erik-Elvis There is clear coat on the whole valk, I had to apply it as thin as I could cause I was loosing panel line detail , in fact, the clear coats is chipped in friction parts, luckily not much. Since this kit is made to perfect fit for tightness, every coat of paint/clear coat you add causes unwanted friction and chipping during transformation. You can't even put the slightest coat of paint in the male/female snap on or it will not snap tight leaving a gap. Agent-GHQ Most of the kit can be snapped on, even the clear lenses, but can fall off by rough handling, few parts require glue. Lenses, head, forearms, inner leg assembly and the part that covers the canopy hinge, the rest is hold by screws and knurled pins....so many knurled pins....I hate knurled pins! master of macross, I also want to do a mass production VF-1D hence my signature.
-
WOA!! lots of Macross 7 love. Busy two months you had there, hehe, congratz, great haul!
-
Thanks dapro Took me about 6-7 weeks to assemble and paint, mostly cause I made a LOT of mistakes and could work on weekends only. (Damn Job ) derex3592, I noticed also after I painted the tail fins and had to repaint them to, was very pissed. I'm watching closely your Kakizaki into Alaska built, it's looking good. The kit is fun to built until you start painting, It's great that Yamato gave it with waterslide decals but the decals are incomplete, vernier trusters decals are missing, the canopy decal is not a perfect fit and the decal instruction sheet is missing some angles. You must be sure some parts are painted before assembling, some pieces once assembled, eventough you don't glue them are next to impossible to pry apart and repaint.
-
You already got your answer, but I hope this clears things more for you. v1 on the right. Since there's so much armor....Arcadia, I would pay horribly scalp prices for a 1/60 VF-0S Reactive armor and VF-11C Full Armored 1/72 Hasegawa Reactive Armor, 1/144 TECT VF-11C Full Armor
-
So, after Yamato went bust and I was left with a need for an Alaska base VF-1A, I took it into myself to make myself one. We all know the Yamato prototype. After watching SDFM for the two 1 seconds scenes, I noticed Yamato made some mistakes. The green is meant to be darker, the tails green accent go on the rudder only and not on top, the white circle on the legs is not meant to be there. Of course, it's SDFM and there will always be inconsistencies by the budget it had. Check it out: Since Alaska post is pretty derelict place to be stationed, I wanted to do a pretty beat up and worn out appearance to the valk. sadly I failed miserable. The assembly kit is not easy at all to build and every part is pretty much a tight fit, everything rubs, so adding extra layers of paints and clear coats causes a lot of paint wear while transformation and the panel lines detail were almost lost completely. I also made the mistake of making it more like a model than a toy and for some reason the dull coat chips by just looking at it. I'm satisfied with the results, mostly cause I finally finished, but not happy. I think I'll be getting another kit to give it another try later. On to the pics, hope you guys enjoy it. EDIT: LINK TO PHOTOBUCKET ALBUM HERE: http://s139.photobucket.com/user/cyclosporine/slideshow/Macross/Yamato/VF-1A%20Alaska%20Base Thanks for looking, it's not perfect but I tough you guys would like it. BTW, could someone tell me a way to snap out the two...errr... orange lights on the shoulders, when transforming to fighter it rubbed out the color coat I added, I did not glued them.
-
Thanks guys, Mechinyun, I noticed it after I took the pictures and was putting away everything. It's clicked in place now. jcmacross, since it wasn't a very technical custom, I omited priming and stuff, just got some Krylon spray can for plastic that supposedly adheres better to plastics. Just mask and spray paint, I did 3 light coats. One more thing I forgot to mention, the reactive warheads are first tampoed red and then yellow on top by Yamato because the middle is red. *facepalm* Sure I can peter, hope this pictures are ok for you. The combo looks quite good. TV ROY w/ TV FP Look at link first post DYRL ROY w/ DYRL FP Look at link first post DYRL ROY w/ TV FP Look at link first post Roy hanging out Look at link first post
-
Damn David, you're making me like the Ostrich!!! Awesome pics!! dapro, Joe Montana sign helmet!! B))
-
Macross Collectibles Market Watch - Current Auction/Store SOLD prices
Valkyrie addict replied to jvmacross's topic in Toys
Ooops, my bad.