
MechTech
-
Posts
4701 -
Joined
-
Last visited
Content Type
Profiles
Forums
Events
Gallery
Everything posted by MechTech
-
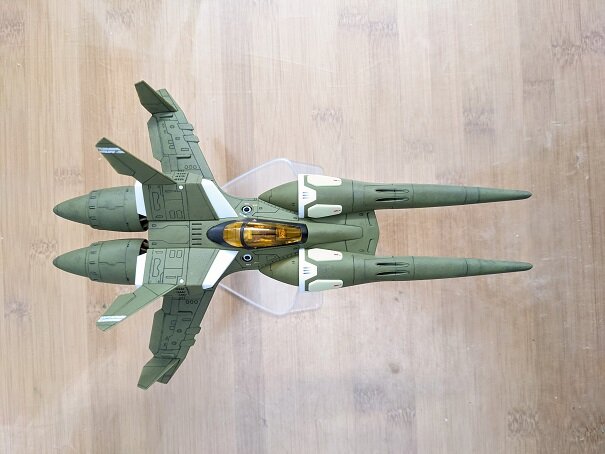
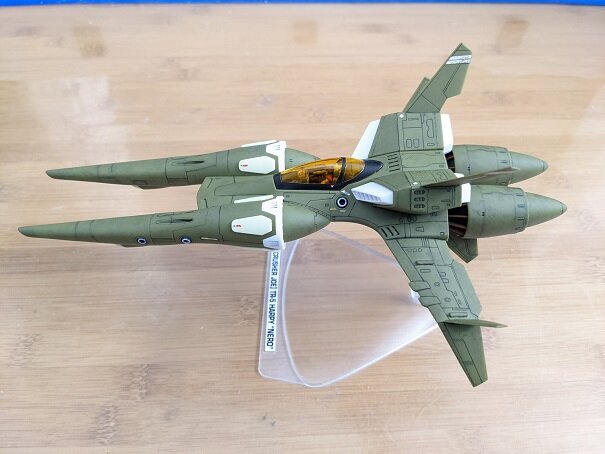
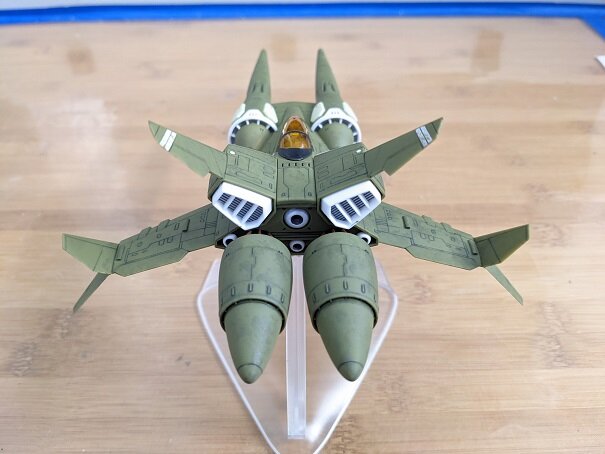
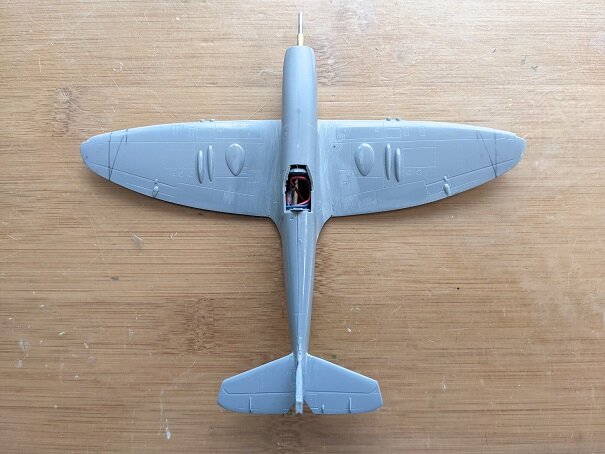
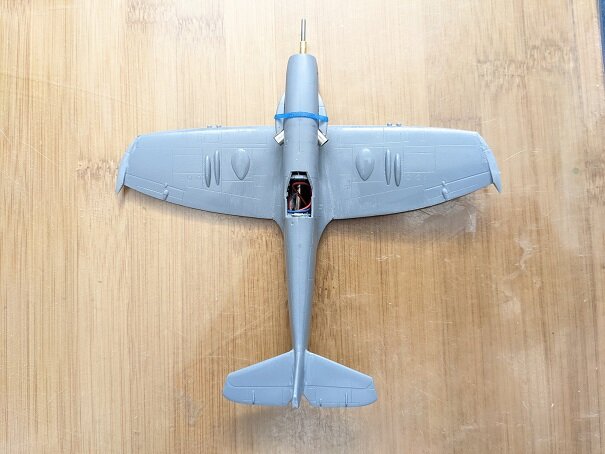
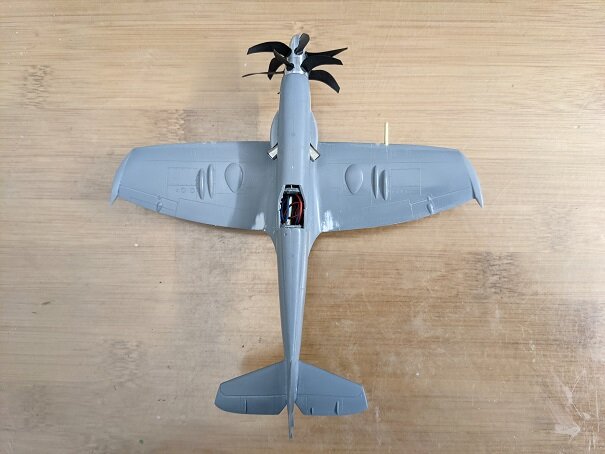
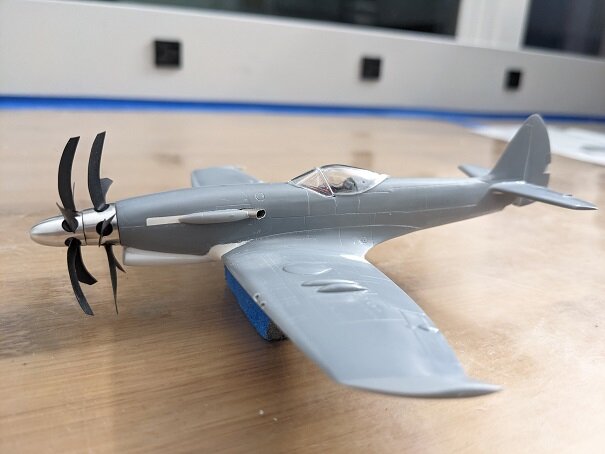
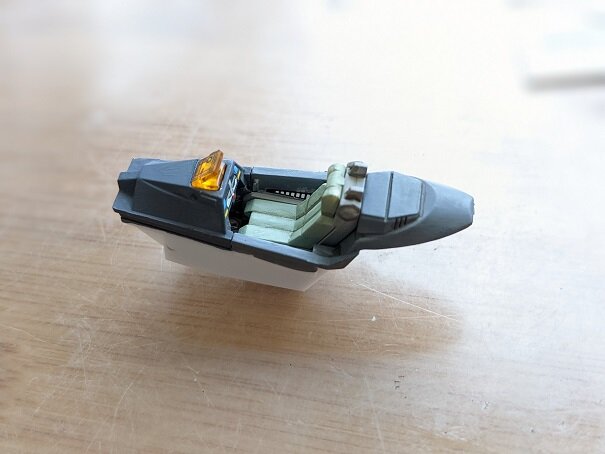
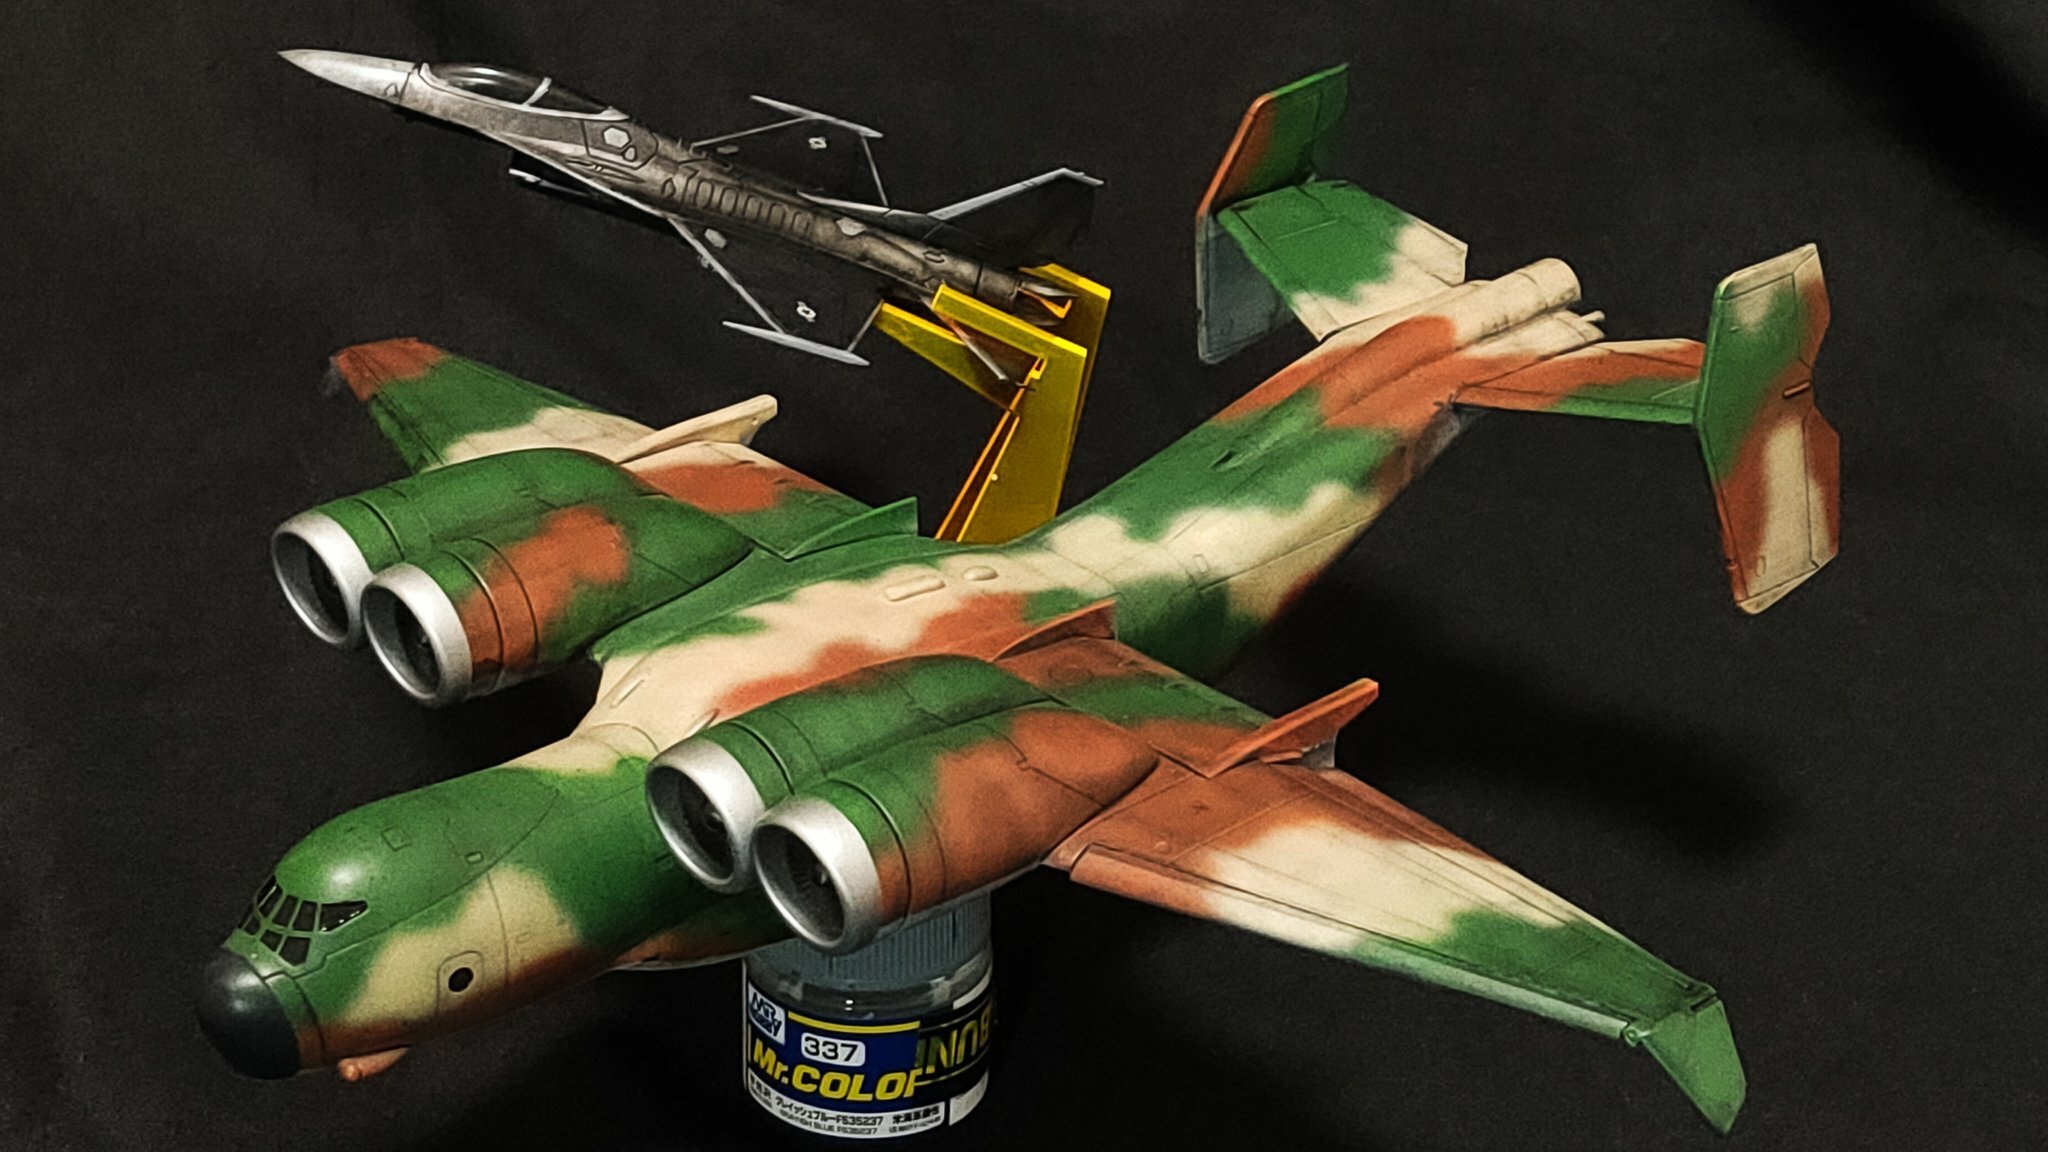
I'm just catching up on two pages of threads! Lots of stuff guys! @Big s Great looking pod build! What size drill did you use for the clear red sensors. I might steal your idea - if that's OK. @Photogirl Your SDF-1 came out great! Nice-n-clean finish! I can't undo what Pengbuzz said about the end of the Beetlejuice movie with the shrunken head!😄 @pengbuzz Your SDF-1 mods are looking good!!! I'm glad you decided to make the Daedalus with all the "goodies" on it. All of that effort, I would go the distance on that too. By the way, happy birthday Sunday (according to the last page)! @derex3592 Your ship is looking great! Some reflective shiny foils may help with directing the light around too. That Testors window maker works great too in case you want to go that far. What a coincidence! Here's some more "Capital J" stuff: This Harpy was a fun build! I didn't put a lot into it. The canopy gave me issues. The black paint I used did this - with the window completely cleaned. Something must have gone wrong with the paint. It orange-peeled by melting the plastic like this! I had to sand it down, remask and paint. The canopy is awesome! Nice color and it has grooves around the frame that your X-acto can easily follow. The cockpit is great with a HUD and decals to go on it to simulate it. The BEST part - the canopy AND cockpit can go in last. Nice-n-easy! I DID NOT paint this. The colors are as molded with only minor trim painting on the engine parts. I panel lined it (Gundam marker-they're cool), weathered it and put a matt coat on it. This is how it came out: Then on to the "Turbo-fire" (that I might call the "Battle Axe" as a step up from "Spitfire" 😁 Here's the plane with modified tail and plane wings. And then a little wing work... And nearly done with the "body-work" for the mod. The exhaust is stainless steel tube that was "squashed" a bit to make it streamlined. I'm going to try heating it up for that heated exhaust look. The white is Milliput that thankfully I decided to crack open. Its starting to go off, so it needs to be used up. That's it for now. Thanks for checking in everyone! - MT
-

The 'Hey look at this really cool model build I saw' post
MechTech replied to Shawn's topic in Model kits
Some REALLY AWESOME paint jobs!!! - MT -
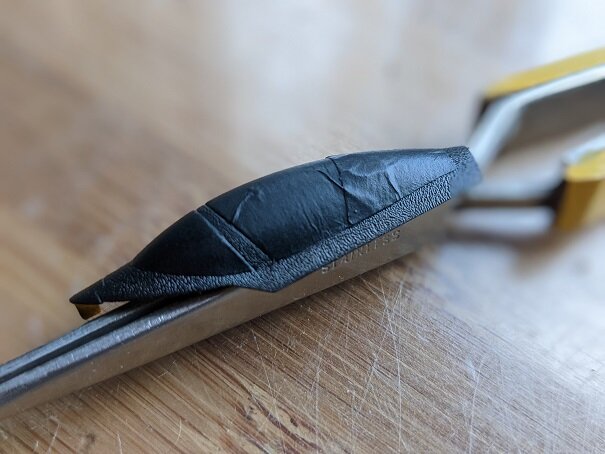
Milliput is GREAT stuff and you can shape it with water. It ALSO makes a great gap filler too. It sounds like what you have is OLD! If its new, get your money back. BOTH rolls should be fine and not like what you described. With the new stuff, keep the plastic rolls separate and cut each roll with a separate knife. You don't want to cross-contaminate the rolls and cause them to cure slowly. I hope that helps. - MT
-
Cool articulated fingers! - MT
-
Beautiful execution overall! Nice colors and shading too! - MT
-
I was glad to FINALLY see an injection kit coming out for this!!! It's been how many decades? Cool stuff coming out this year! The parts do look kinda rough, but like Big S said, they are 3D printed. At least we're looking at the print instead of 3D artwork guessing what the dimensions will look like. By the way, no butt armor means you don't get swamp butt from sitting in it all day!😄 - MT
-
Thanks a MILLION @electric indigo!!! I don't have time for social media, so I appreciate the update! They did a REALLY good job at interpreting the drawings! I wish they had progress photos for the build. I'm curious to see what they did. This might be the only C-4 model somebody has done so far. - MT
-
@electric indigo Your build is looking good - even out of focus (shooting models is tough)! @Thom "Building" a continent, now that's different! It looks great! - MT
-
Thanks @pengbuzz ! The second works great! The first needs an add blocker and quick clicking to close out the second webpage that keeps popping up when you hit "play". - MT
-
Thank you @arbit I was afraid you would say that. I did find a similar named channel on You Tube, but its mostly music videos from the series. I'll have to hunt for it some more. Its great to teach your children other languages and cultures. It will help them a lot when they're out on their own. - MT
-
@arbit Ha! I almost totally guessed that one! Regarding the Ingram model, save yourself the headache and use the legs to hold the batteries or circuit boards in. They have plenty of space and you can remove the leg sides to access batteries or the circuit board. The cockpit just happened to be purple when I took the photo. The LED changes colors randomly and at different speeds. So it looks like a CRT running video or something. Your figure looks great! I would have thought you bought it from a store if I didn't know better. Regarding World Masterpiece Theater, when are you watching it from? That sounds cool. My wife keeps buying anime at the store that is boring. I also have to watch "Future Boy Conan". - MT
-
@electric indigo THANK YOU for the link!!! That model looks great! I'm guessing its 1/144th scale. I was hoping for more photos, but that is the only one I saw. I'm still mulling it over as a build. I'm adding the photo in case the link breaks some day. - MT
-
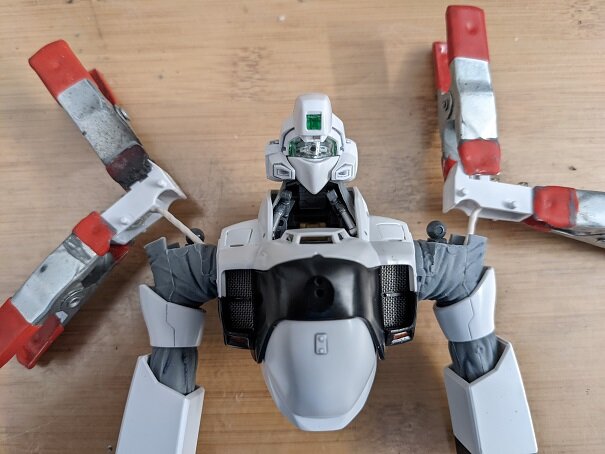
@Bolt The Spider bug is looking ready for service soon! I look forward to your pod build too! @arbit I was thinking "Laputa", but that's 80's. "Future Boy"? I never saw it, just the models. Cool sculpt though! The Ingram is getting there! I tried to post a GIF of the lights chasing on the shoulders. It looks like the lights aren't even on in the GIF creator software! So scrub showing you that. Here's the head and cockpit lit up. The cockpit LED is one of those annoying multi-color changing LEDs like in toys. It looks like a CRT flashing images though in the cockpit. It happened to be purple when I took the shot. Still more work to do! Thanks for checking in! - MT
.jpg.808767b6ee4e4ea654fbb74f71d36a59.jpg)
.jpg.efc01e758db792e48c70dca1b716f2de.jpg)
.jpg.34082c7c4de5bcba93ac9cf283602938.jpg)
.jpg.ef52cb373aae1d6a5adcaa98af648d5c.jpg)
-
@Lolicon Great looking refit! You gotta watch those cat-ons. They don't abide by Federation treaties - unless there's a can of tuna involved! @pengbuzz CONGRATS on bagging a rare ans classic item! Are you trying to outdo Peter with the most hardware used in a build😄 You're fix to the joint looks GREAT and you'll never have to worry about it again either. Great save too with heating the plastic, I've never heard of that. I wonder if heating it re-aligns the molecules too like steel when it is heat treated? I also know most things get brittle with age, even glass. I wonder if boiling it adds water back to the plastic? Inquiring minds want to know. By the way, if you ever need to glue the plastic (which I believe is ABS), use a bit of straight acetone. It also worked on the Patlabor model that had ABS to styrene joints. @Bolt That is a nice and clean fix to the intakes. I doubt it will yellow again in our lifetimes! - MT
-
The 'Hey look at this really cool model build I saw' post
MechTech replied to Shawn's topic in Model kits
That is TOOOOoooooo funny! Somebody actually did it! I don't think it was in a magazine (not that I saw). But we sure have thrown it around here on the forums a lot over the years! I'm going to have to do this one day myself! - MT -
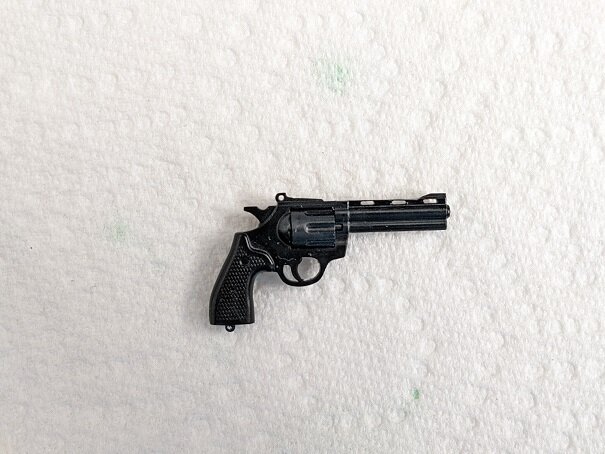
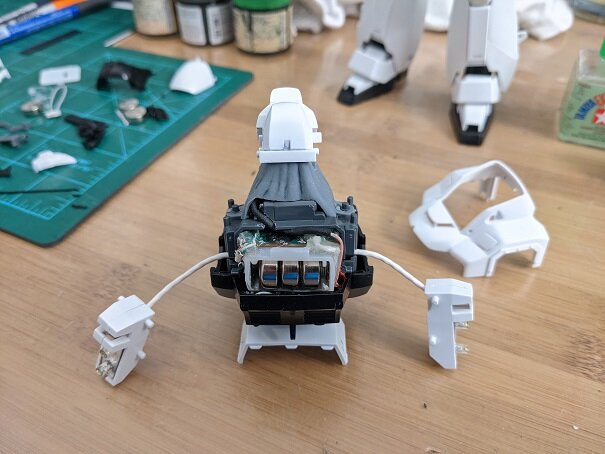
@anubis20 Great job on the mud! It looks muddy alright! I got some more work done on the Ingram. The pistol looks cool, but I thought the frame would look better with the rails and other parts actually cut out. The barrel was also bored larger too. The original slide molded muzzle was cool, but too small to go with the cylinder hole sizes. Here's the back with everything installed. It's a tight squeeze, but its all there. Now you know why I'm NOT a surgeon! The black cable going up to the head is for the LED in the "eye". That's new too. I actually lathed an LED to fit in the "eye" socket. A few things. I had a BEAUTIFULLY green tinted visor for the head. I used Mop N Glo with some Tamiya paint in it and dipped the visor in it a few times. Looked just like tinted glass. Then it got scratched during assembly. So I re-tinted it again. Its much lighter, but does have a slight tint to it. The top head sensor maintains its green tint. The shoulder lights are finally glued together. I used cement to hopefully get no seam lines when sanded. The "eye" piece is coated in chromed paint and the eye socket hollowed out to take an LED. The LED was covered with scrap Bandai decal foil to light-proof it. The windows in the chest were carefully cut out and opened up. All the details on this kit and they made them solid? That's it for now! Hopefully this will be assembled soon. The Spitfire should be fully cured by now. Thanks for checking in! - MT
-
Hasegawa is REALLY stepping up their game! I was VERY impressed to see how they have taken a bunch of their newer kits and basically made them like gun-pla. It will help bring in more model builders to the hobby and it makes building easier on those who have been doing it for years. I'm also loving the various color parts sprues. The parts fit, even on weird shaped parts is incredible too. Unless you guys miss all that puttying and sanding! - MT
-
The 'Hey look at this really cool model build I saw' post
MechTech replied to Shawn's topic in Model kits
DYRL is definitely getting some love here! Great scratch builds and original sculpts too! - MT -
That looks great! It's a nice way to take something fictional and bring it into the real world. All those details made a difference. - MT
-
@electric indigo That looks realistic! I keep looking for the exhaust plumes coming out of the rear exhaust, but there is none! - MT
-
@derex3592 Now that's a "Golden Spoon"! The deck detail adds a lot of realism to the model. - MT
-
Thank you guys! @Big s is correct, I was merely joking. In fact, I was kidding and encouraging @pengbuzz to press on with his build. I have NEVER put down or discredited someone's modeling skills or build and never will. For everyone that thinks they are better than someone else, there will be someone to come along and put them in their place. The problem with written words is that they are easy to be misunderstood. So if anyone ever reads my comments as negative or a put-down, please correct your thoughts. I am in a modelling club full of people that kick my butt in builds! It helps keep me humble and encourages me to do better.😁 @electric indigo Your Harrier is looking great! It keeps reminding me of my time in the UK when they were still in service and flying. @Big s Your Zaku doesn't look like a lazy build at all! I wouldn't have known it if you didn't say anything😄 I decided to press on with the Ingram since the Spitfire is too late for a club project. OK, this IS lazy, a quick painting of the interior, even though it's hardly seen. I made the rear bulkhead white to help reflect the flashing lights. The chrome marker is alcohol based. So when I put the clear green on it, things didn't come out great. But it will hardly be seen, so I let it go as is, The winch looked very plain so I decided to detail it up some. The stock piece, and then with actual steel cable and a hook made from the spares box. Steel cable is TOUGH to wind and glue down - in case anyone ever tries it. The mesh molded into the cooling inlets is TOUGH to paint. I did it once before, and I forgot how I did it! So I chiseled the details out and trimmed some fine mesh to go in its place. Then carefully trimmed some sprue to go partially through the middle like the stock part. I got smart this time and left the parts on the sprues to work with. It was better than a vice! Most of this weekend was spent doing household chores. That's my work so far - humbly - submitted for your review! 😁 Have a good weeks guys! - MT
.jpg.55eafcc9397e3124f13a51f3a03c86ca.jpg)
.jpg.2ebaf1108f7d0452a7d609a0acb26d92.jpg)
.jpg.709b3a1ea4532bbb8c549b096421602d.jpg)
.jpg.cbebda3f5585b50910b0cd01fdf8fac9.jpg)
-
I HATE painting an entire model - unless I have to. The paint gets scratched or wears off as I'm working on parts of it. What I do like to do, when I can, is cover over seams and areas with a similar colored paint in matt. It looks like dirt and it negates priming and painting the whole thing. By the way, there is no such thing as a clean build unless its gunpla right out of the box with no paint or glue😁. That's called beginner or lazy😄. - MT
-
@pengbuzz If the area is tiny, you can also use a chisel and roll it side to side to etch too. I rarely have the right size chisel, so I'll sharpen an old Xacto knife blade with a file or sandpaper. I've used other softer scrap metals too like from can lids. That's the cool part about styrene, it's soft and blades last a while. @derex3592 Thanks for sharing! That paint has been around for decades!!! I remember my mom using that stuff back in the 70's. I always see it and ignore it because I don't do anything gold for some reason - always chrome colored if anything at all. - MT
-
That's looking cool! A little air tot air protection. - MT
