

Rock
-
Posts
401 -
Joined
-
Last visited
Content Type
Profiles
Forums
Events
Gallery
Everything posted by Rock
-
So something you can also do is airbrush dish soap onto the walls of the booth in a few layers. Let it dry up and reapply. You'll get a film that will catch the overspray. When your ready you can just rinse off the parts under warm water and repeat the process for the next time.
-
 That is the Nu Gundam featured in the movie Char's Counterattack. The movie is streamavle on Netflix and the gundam.info YouTube page. The funnel count is 6 shown mounted unsymetricl on the unit's left side. A popular variation not shown un the movie add 6 additional funnels the the other side. The wiki should get you up to speed. https://gundam.fandom.com/wiki/RX-93_ν_Gundam The Hi-Nu gundam the above poster mentioned is a variation/different take of the original design featured in the novel/manga that the movie draws some of it's plot from. It is the white and purple/blue metal build design shown a few posts ahead of yours.
- 8846 replies
-
- 1
-

-
- gainax
- evangelion
- (and 14 more)
-
MegaHouse has Macross Frontier listed in the series for a new item reveal during their next MegaHobbyExpo event on 2/4/22. Would love a Labrynth of Time figure or a Frontier Bridge like the Arch Angel on they just announced. https://megahobbyexpo.jp/plus-2022winter/ Edit: it is a Lucrea PVC or Ranka Lee from the recent short.
-
-
Just happy to be back to an episode without overdrawn flashbacks!
-
Out of curiosity, did you use the LP premium service that has the 'upgraded packaging' ?
-
Saw that a few of the VF-31 Walkurie versions were restocked last month. Can anyone confirm that the idol versions of the kits included the original waterslides with the kit? I still need Arad/Chuck's kits to complete delta squadron. Buying it at msrp for $35 sounds much better than an original kit 2nd hand prices which are above double the cost $$$
-
Yep. I like it and dislike it just as much. While the application is a huge plus, my results vary and I usually end up regretting it. For me when doing small surface corrections I like to brush on some Mr. Surfacer. The putty takes it well most of the time but occasionally I run into the issue of it not being fully dried before application (deep in on thicker seams) or the putty rewetting due to the thinners in the primer. It creates a big headache with shrinkage after the fact or staying wet when sealed which you only find once you run sandpaper across it. My rushed planning in this project due to the trial and error nature of kitbashing really showed up after the fact. PPP's success is much greater if you don't go cooking your kits to al dente midway through the build too. That's on me but, I cannot pretend like I'm ready to be past gap filling and onto the fun(er) parts of the project and on to the next. As always! I have a few more rounds of filler work and primer before I'll bother retouching the panel lines and working on the final finish... well on the topside. The underside is receiving some parts simplification at the moment as I'm tired of fighting gaps for removable sub assemblies. Just don't go thinking it is a waste of time.
- 30 replies
-
- 3
-
-
- yf-29 durandal
- hasegawa
- (and 1 more)
-
A good preview of how the Plamax Mirage might fit in her VF-31. *1/20 Minimum Factory Mirage shown has Sheryl's head swapped on*
-
It's interesting how the canopy tint's application can make the finished build's feel swing towards model kit or a more toy-like appearance. Diorama concept?
-
Water-based fillers really help when your sanding fatigued. Deep into the mindless gap fillings when hours become days and days become torture. Still will get sanded after surfacer but, it helps.
- 30 replies
-
- 1
-
-
- yf-29 durandal
- hasegawa
- (and 1 more)
-
The 'Hey look at this really cool model build I saw' post
Rock replied to Shawn's topic in Model kits
-
https://www.animenewsnetwork.com/news/2022-01-14/macross-7-basara-explosion-2022-concert-streams-globally/.181500 https://otakumode.com/news/61e15424bed7bb0020d4feea/First-Official-Tour-Report-from-MACROSS-7-BASARA-EXPLOSION-2022! The completely sold out Macross 7 Basara Explosion 2022 concert to be streamed globally from Zepp DiverCity (Tokyo) on the 28th. Tickets have already went onsale. Concert Merch is up on the store. I'd love to grab a shirt and guitar pick set if I can! https://otakumode.com/shop/pickup/macross

-
While waiting for the underside's filler to cure from my blunder earlier... I tackled the head. First up, I took off a few mm of the antenna's base and angled it backwards for a bit more of a streamlined appearance. Next up the head cannons or 'ears' were reportioned lengthening the rear instead of the front this time. I matched the length to the VF-25s' pair. I'll beef up the connection to the head and call it good given that the rest will remain hidden in fighter mode.
- 30 replies
-
- 1
-
-
- yf-29 durandal
- hasegawa
- (and 1 more)
-
The good fix. ...and the bad side-effects. >_<
-
The 'Hey look at this really cool model build I saw' post
Rock replied to Shawn's topic in Model kits
I think so. -
The 'Hey look at this really cool model build I saw' post
Rock replied to Shawn's topic in Model kits
-
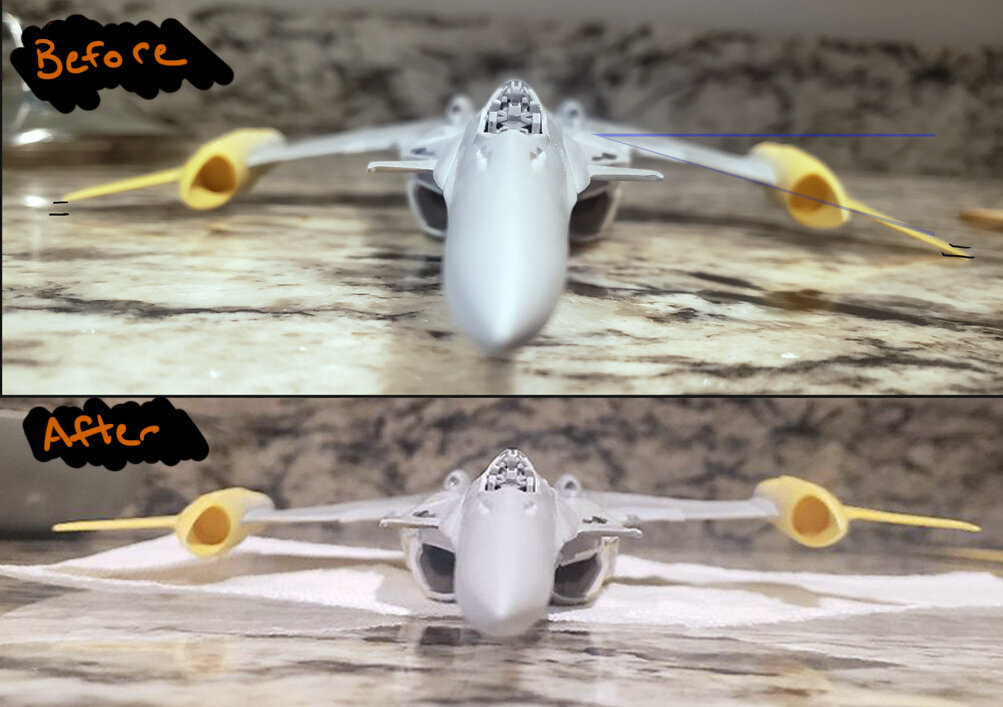
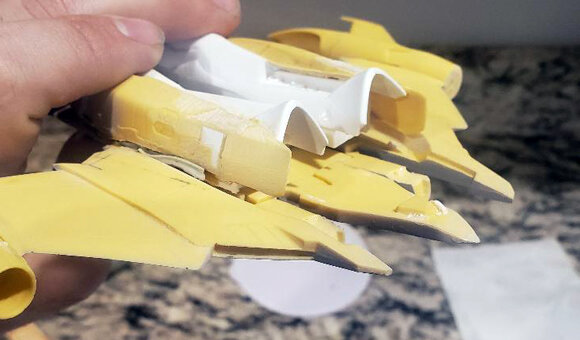
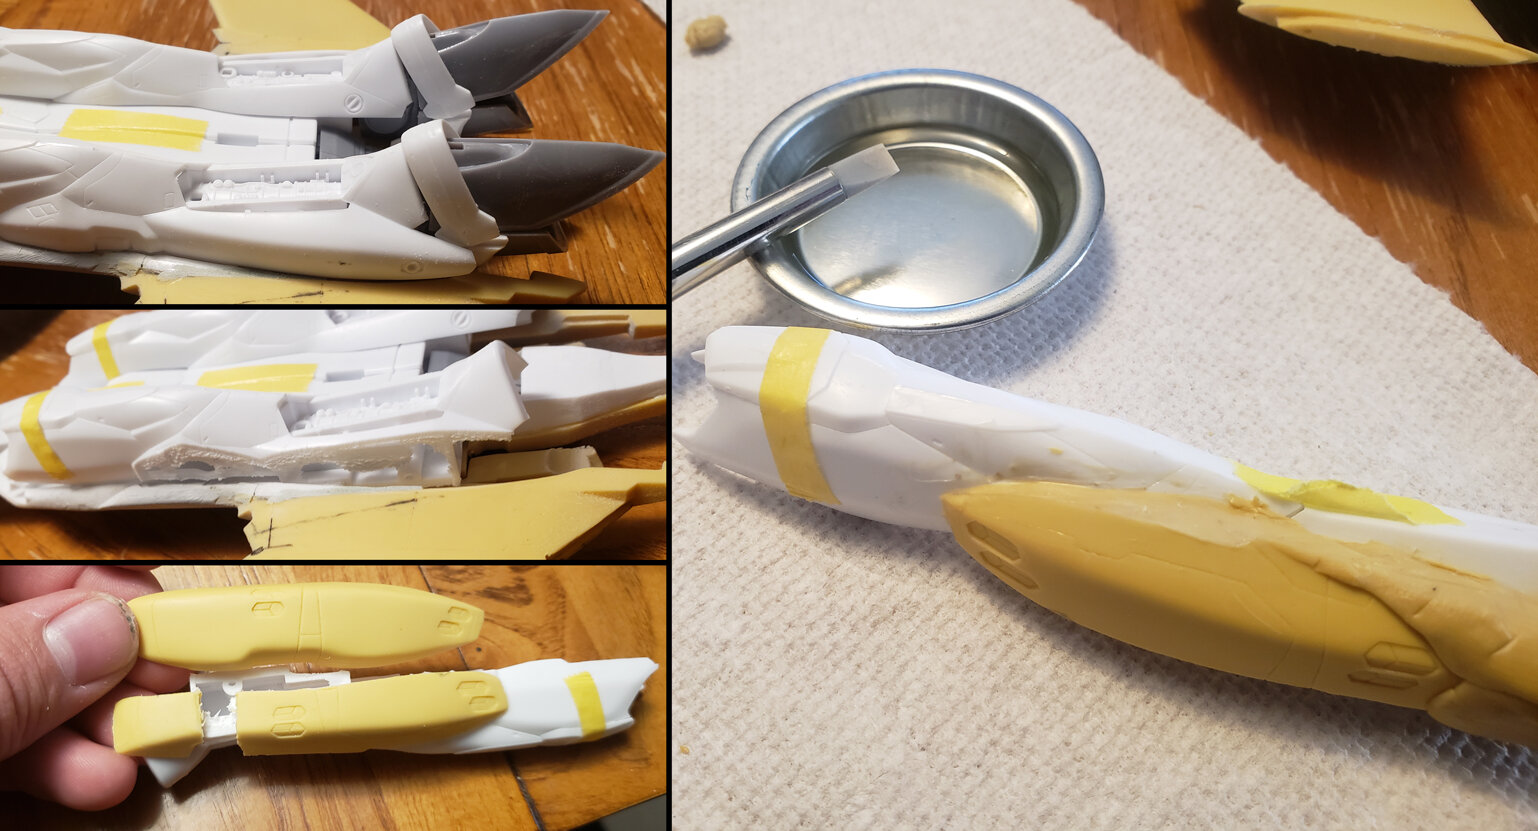
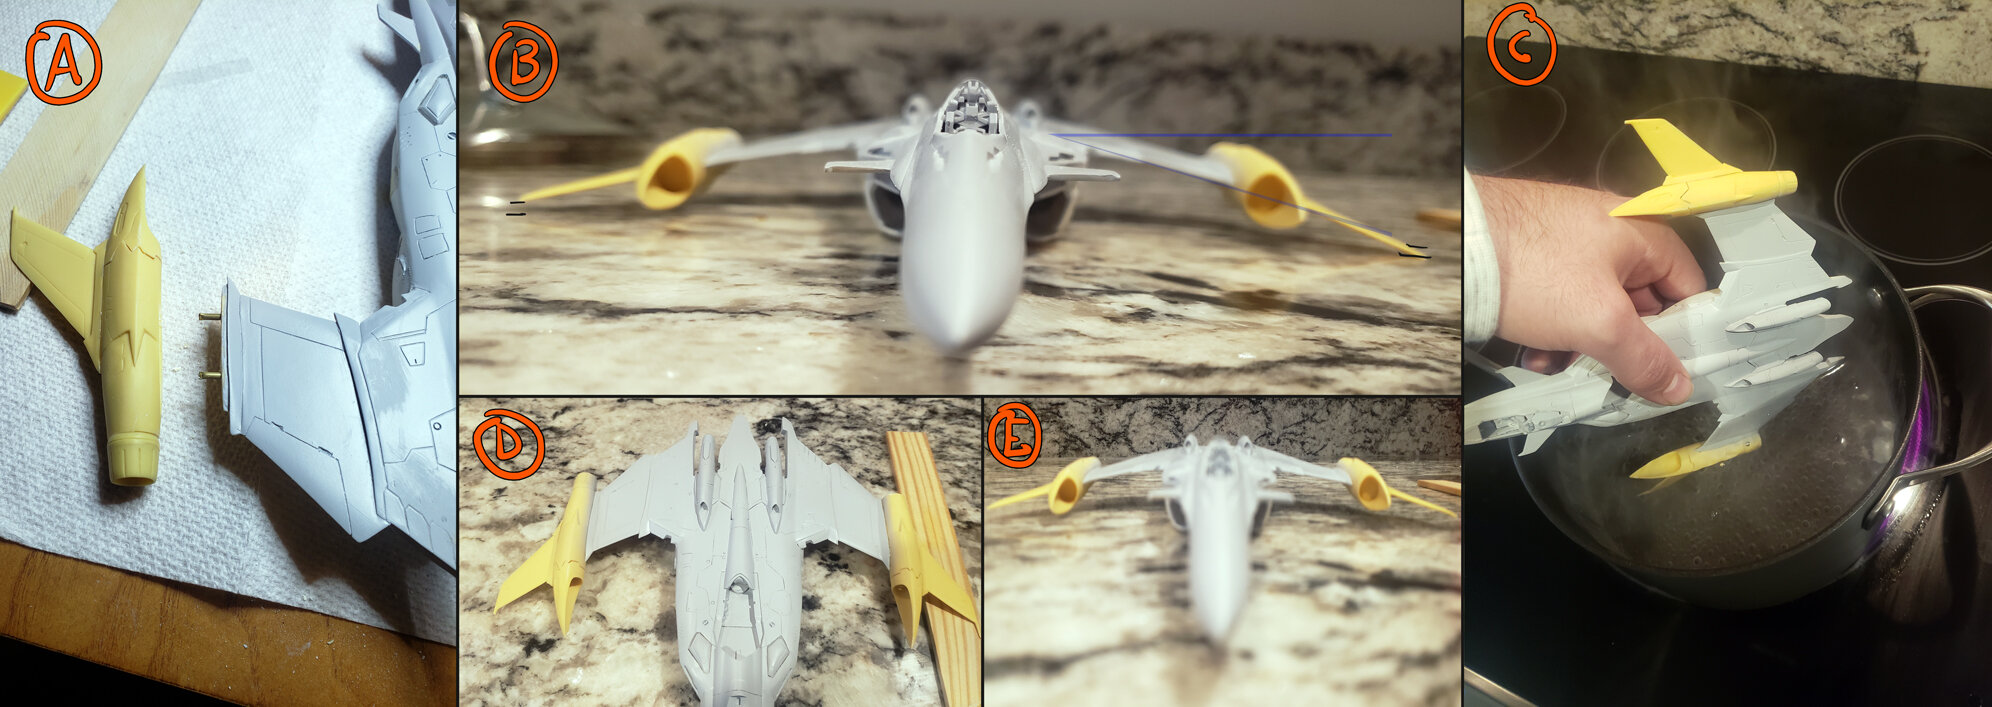
For the legs I had to do quite a bit or work to get the additional armor fitted. This time I grabbed the belt sander and setup outside and just went to town on the Hasegawa leg and the resin parts. After getting them to sit where I wanted then a dremel was used to hollow out a cavity in the body/wing so things could sit where they are supposed to. This isn't technically correct (based off the 1/100 Bandai kit) but will work with minimal gaps. I lengthened the additional leg armor to match the 1/60 DX's starting and stopping points. The hole was filled with some scrap plaplate before everything was covered in Tamiya epoxy putty. For the putty I also tried a few new silicone clay sculpting tools dipped in 91% rubbing alcohol with the goal being to save myself some sanding time later. It worked ok but, against the epoxy putty I felt the tool's tip had too much give and not enough strength to hold shape. I then turned my attention back the body. There is one large issue that has prevented me from moving forward. I haven't fixed it but, I have started. And that is best shown in image B. Even without the weight the wings droop downward like a Cylon Raider. I ground away and at the connections to try to improve this but, no avail. My next step was to force a correction by pinning the parts (A) instead of using their alignment tabs but that didn't help either. Normally I'd use heat but, seeing as the body is already finished, puttied and primed I wanted to avoid that as much as possible. I choose to try quickly submerging the body into boiling water (C) and then slowly correct the parts by supporting them in place as they cooled (D.) So far I was able to get the parts from the engines outward matching so that they at least are not still resting on my kitchen top. I need to take this further up the wings to the body but, that is very difficult to do without damaging the model so I've yet to commit and in the meantime snuck in an F-15 to take my mind off of it. I knew they had a slight slope but, until the legs were mocked up I didn't see just how bad it was. My next step is creating a makeshift jig so that once the parts are softened I can set the kit into place and have everything supported where it need so be (aka horizontal.) I've went ahead and choose to epoxy my pinned wings into place so that I can do this as a whole and rip the band-aid off quickly as possible.
- 30 replies
-
- 1
-
-
- yf-29 durandal
- hasegawa
- (and 1 more)
-
Interesting comparison. Really shows Hase's vintage style.
-
-
- 30 replies
-
- 2
-
-
- yf-29 durandal
- hasegawa
- (and 1 more)
-
Edit. this shot

- 30 replies
-
- 1
-
-
- yf-29 durandal
- hasegawa
- (and 1 more)
-
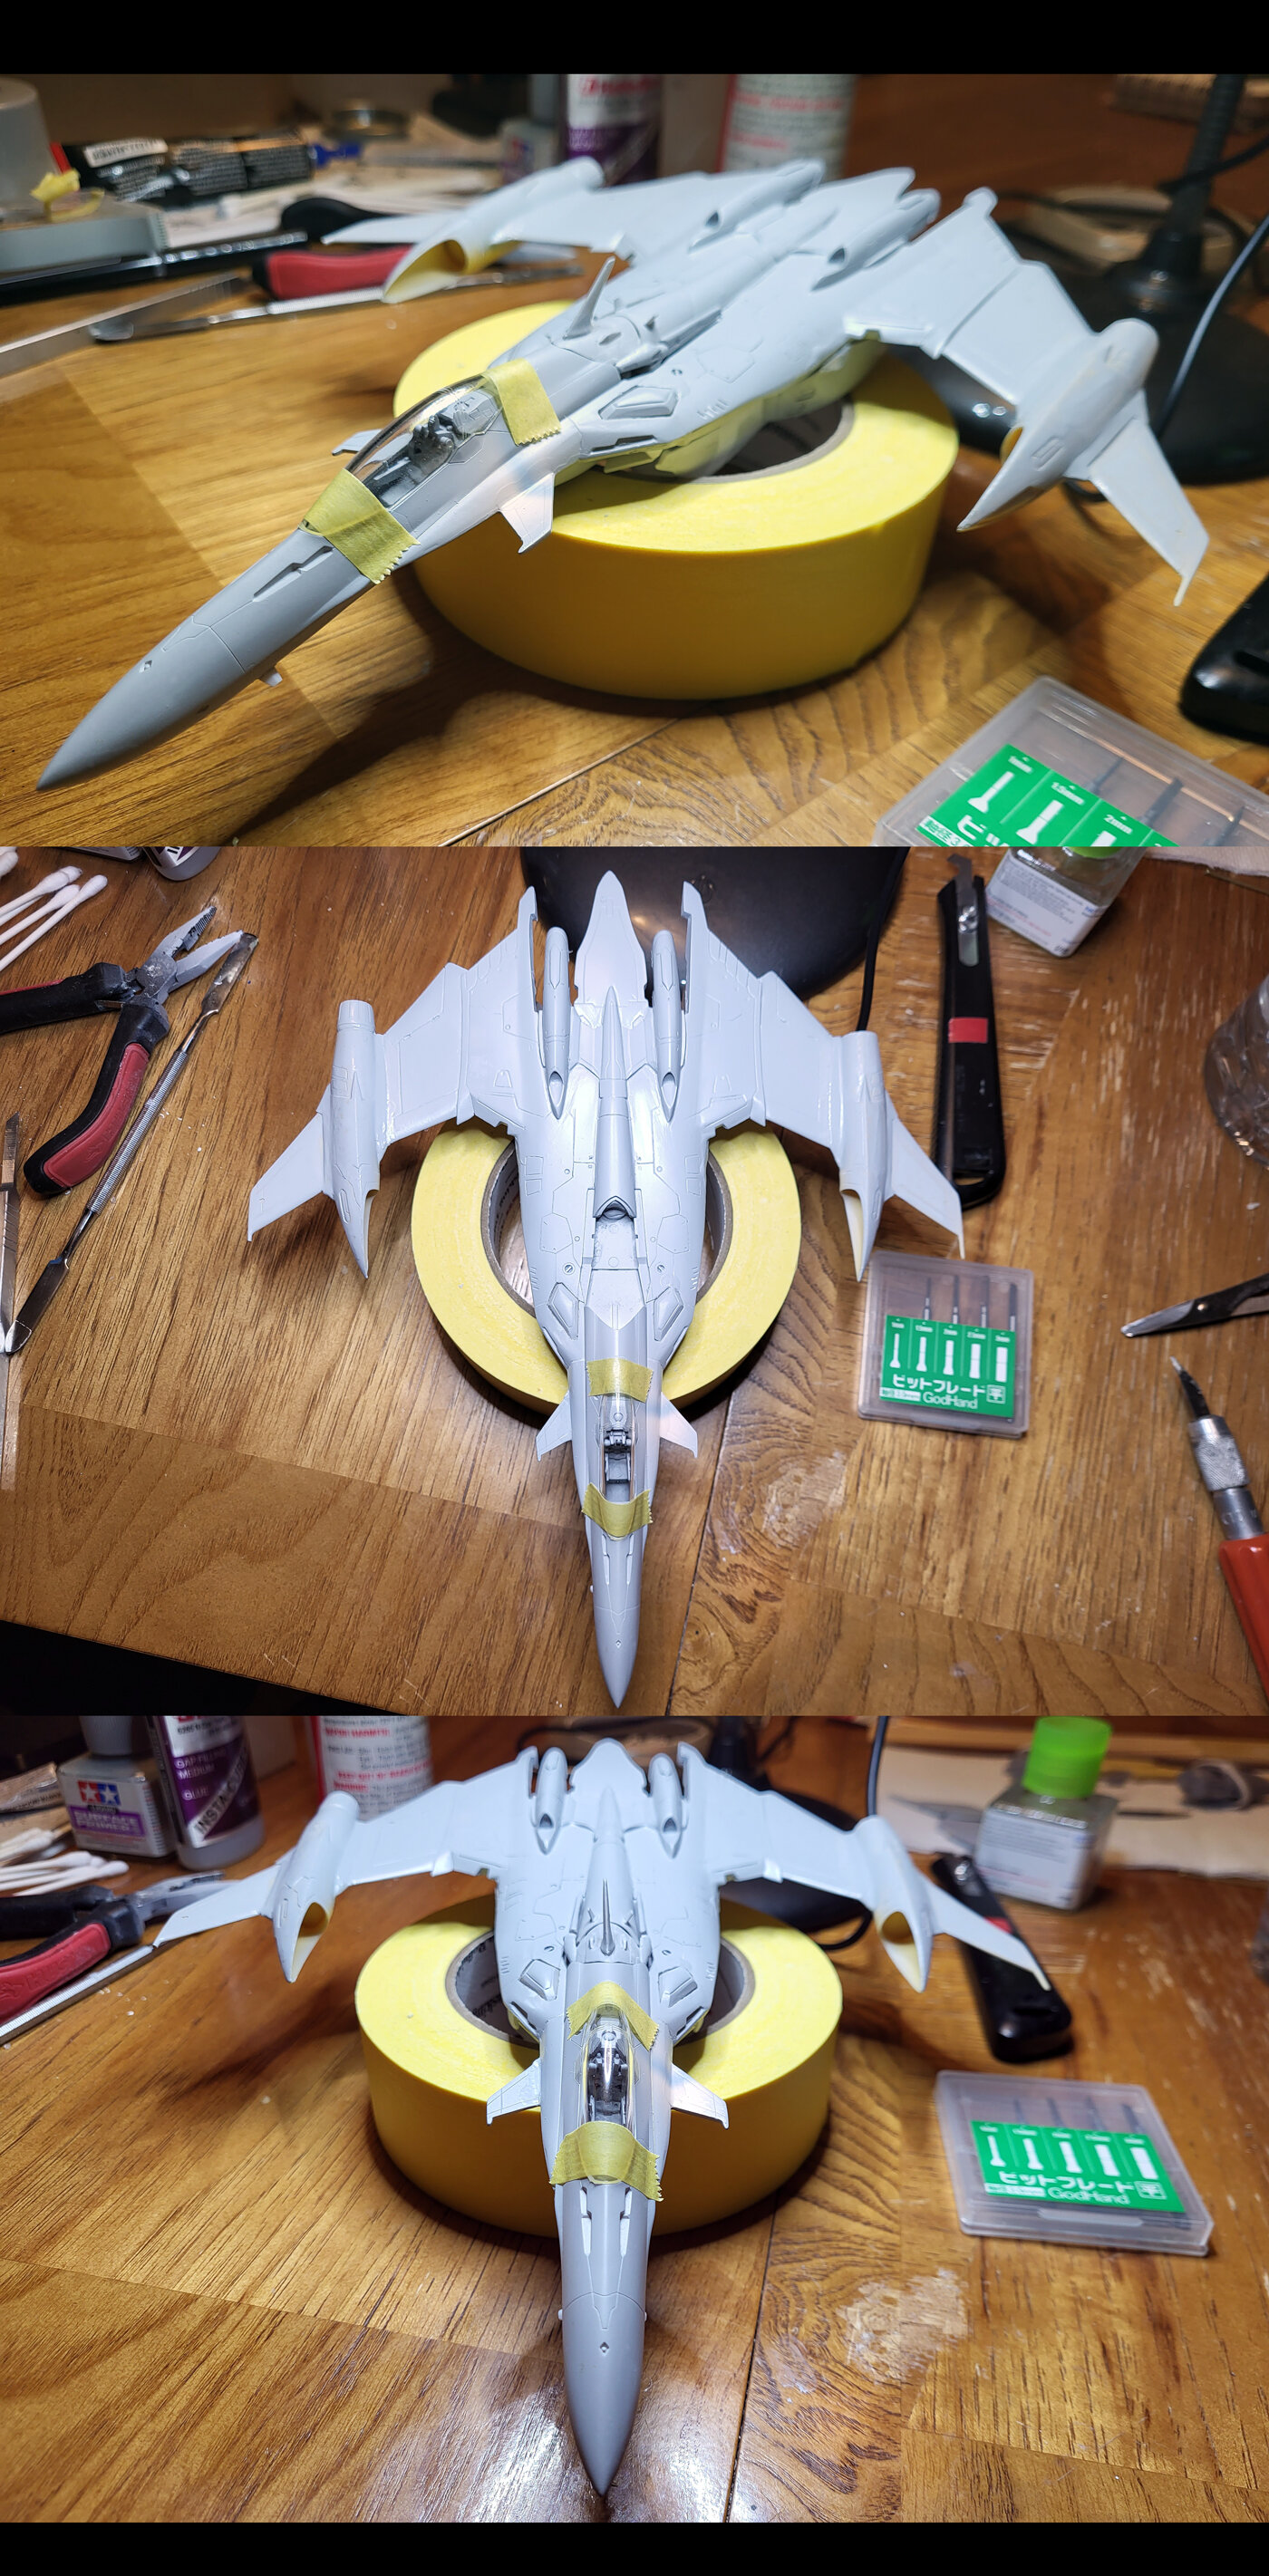
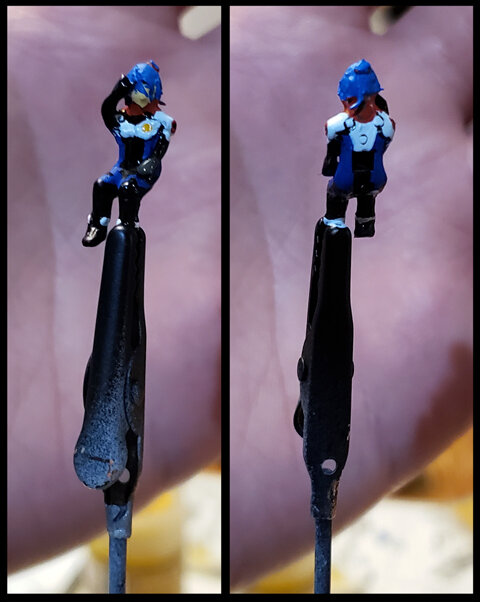
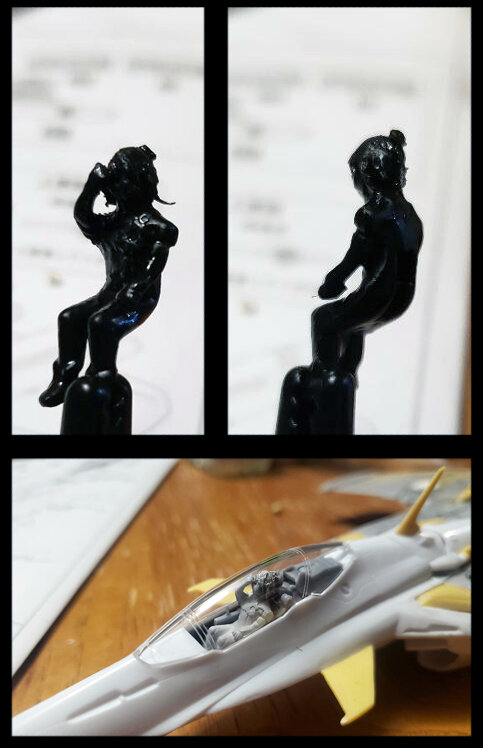
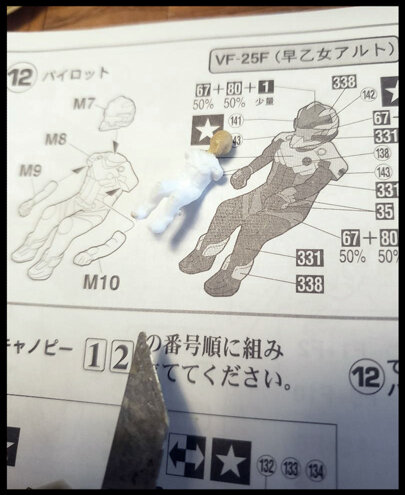
Spent a few minutes trying to figure out if the Durandal was in the 1 or 2 seat config when Alto was flying it in the Sayonara no Tsubasa. In a few scenes, (such as when he removes his helmet in the final attack,) he appears to throw it behind him into the backseat. But, in the ending scene you can clearly see it wasn't a 2 seater configuration. I'll go for this look I think. Depending on how the cockpit turns out I might try to throw the helmet back there but, I got a feeling it won't look right. Alto Satome on standby. Quickly realized I was a trying to detail him too much for a 1/72 pilot. After looking at other builders works I realized I just needed to get the basic shapes right and let the mind and following colors fill in the blanks. Smoothed off and hit with some black Mr. Surfacer 1500. I'll probably paint him shortly as I need a break from all the putty/gap filling work.
- 30 replies
-
- 1
-
-
- yf-29 durandal
- hasegawa
- (and 1 more)
-
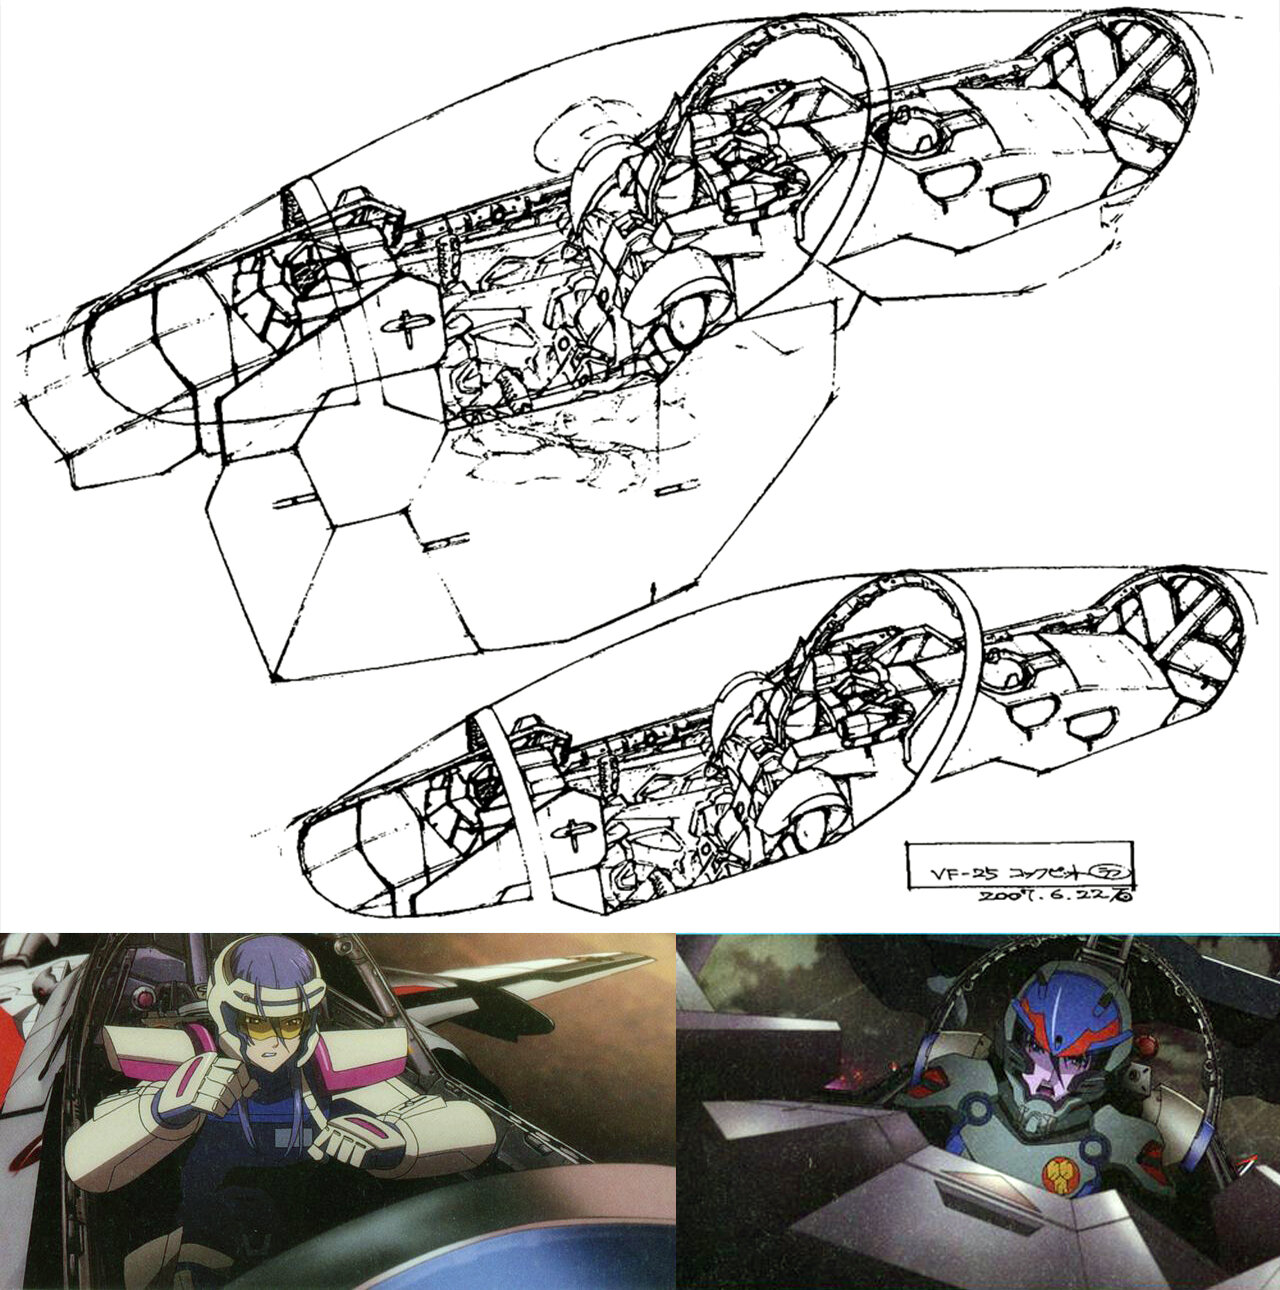
I kind feel they missed the mark on everything but the Landing gear and the EX-Gear pilot seat. The rest of the interior is blank and there is nothing for detailing on the 1-piece canopy. Guess that leave work for us modelers but, still a bit annoying given the cost of the kit.
-
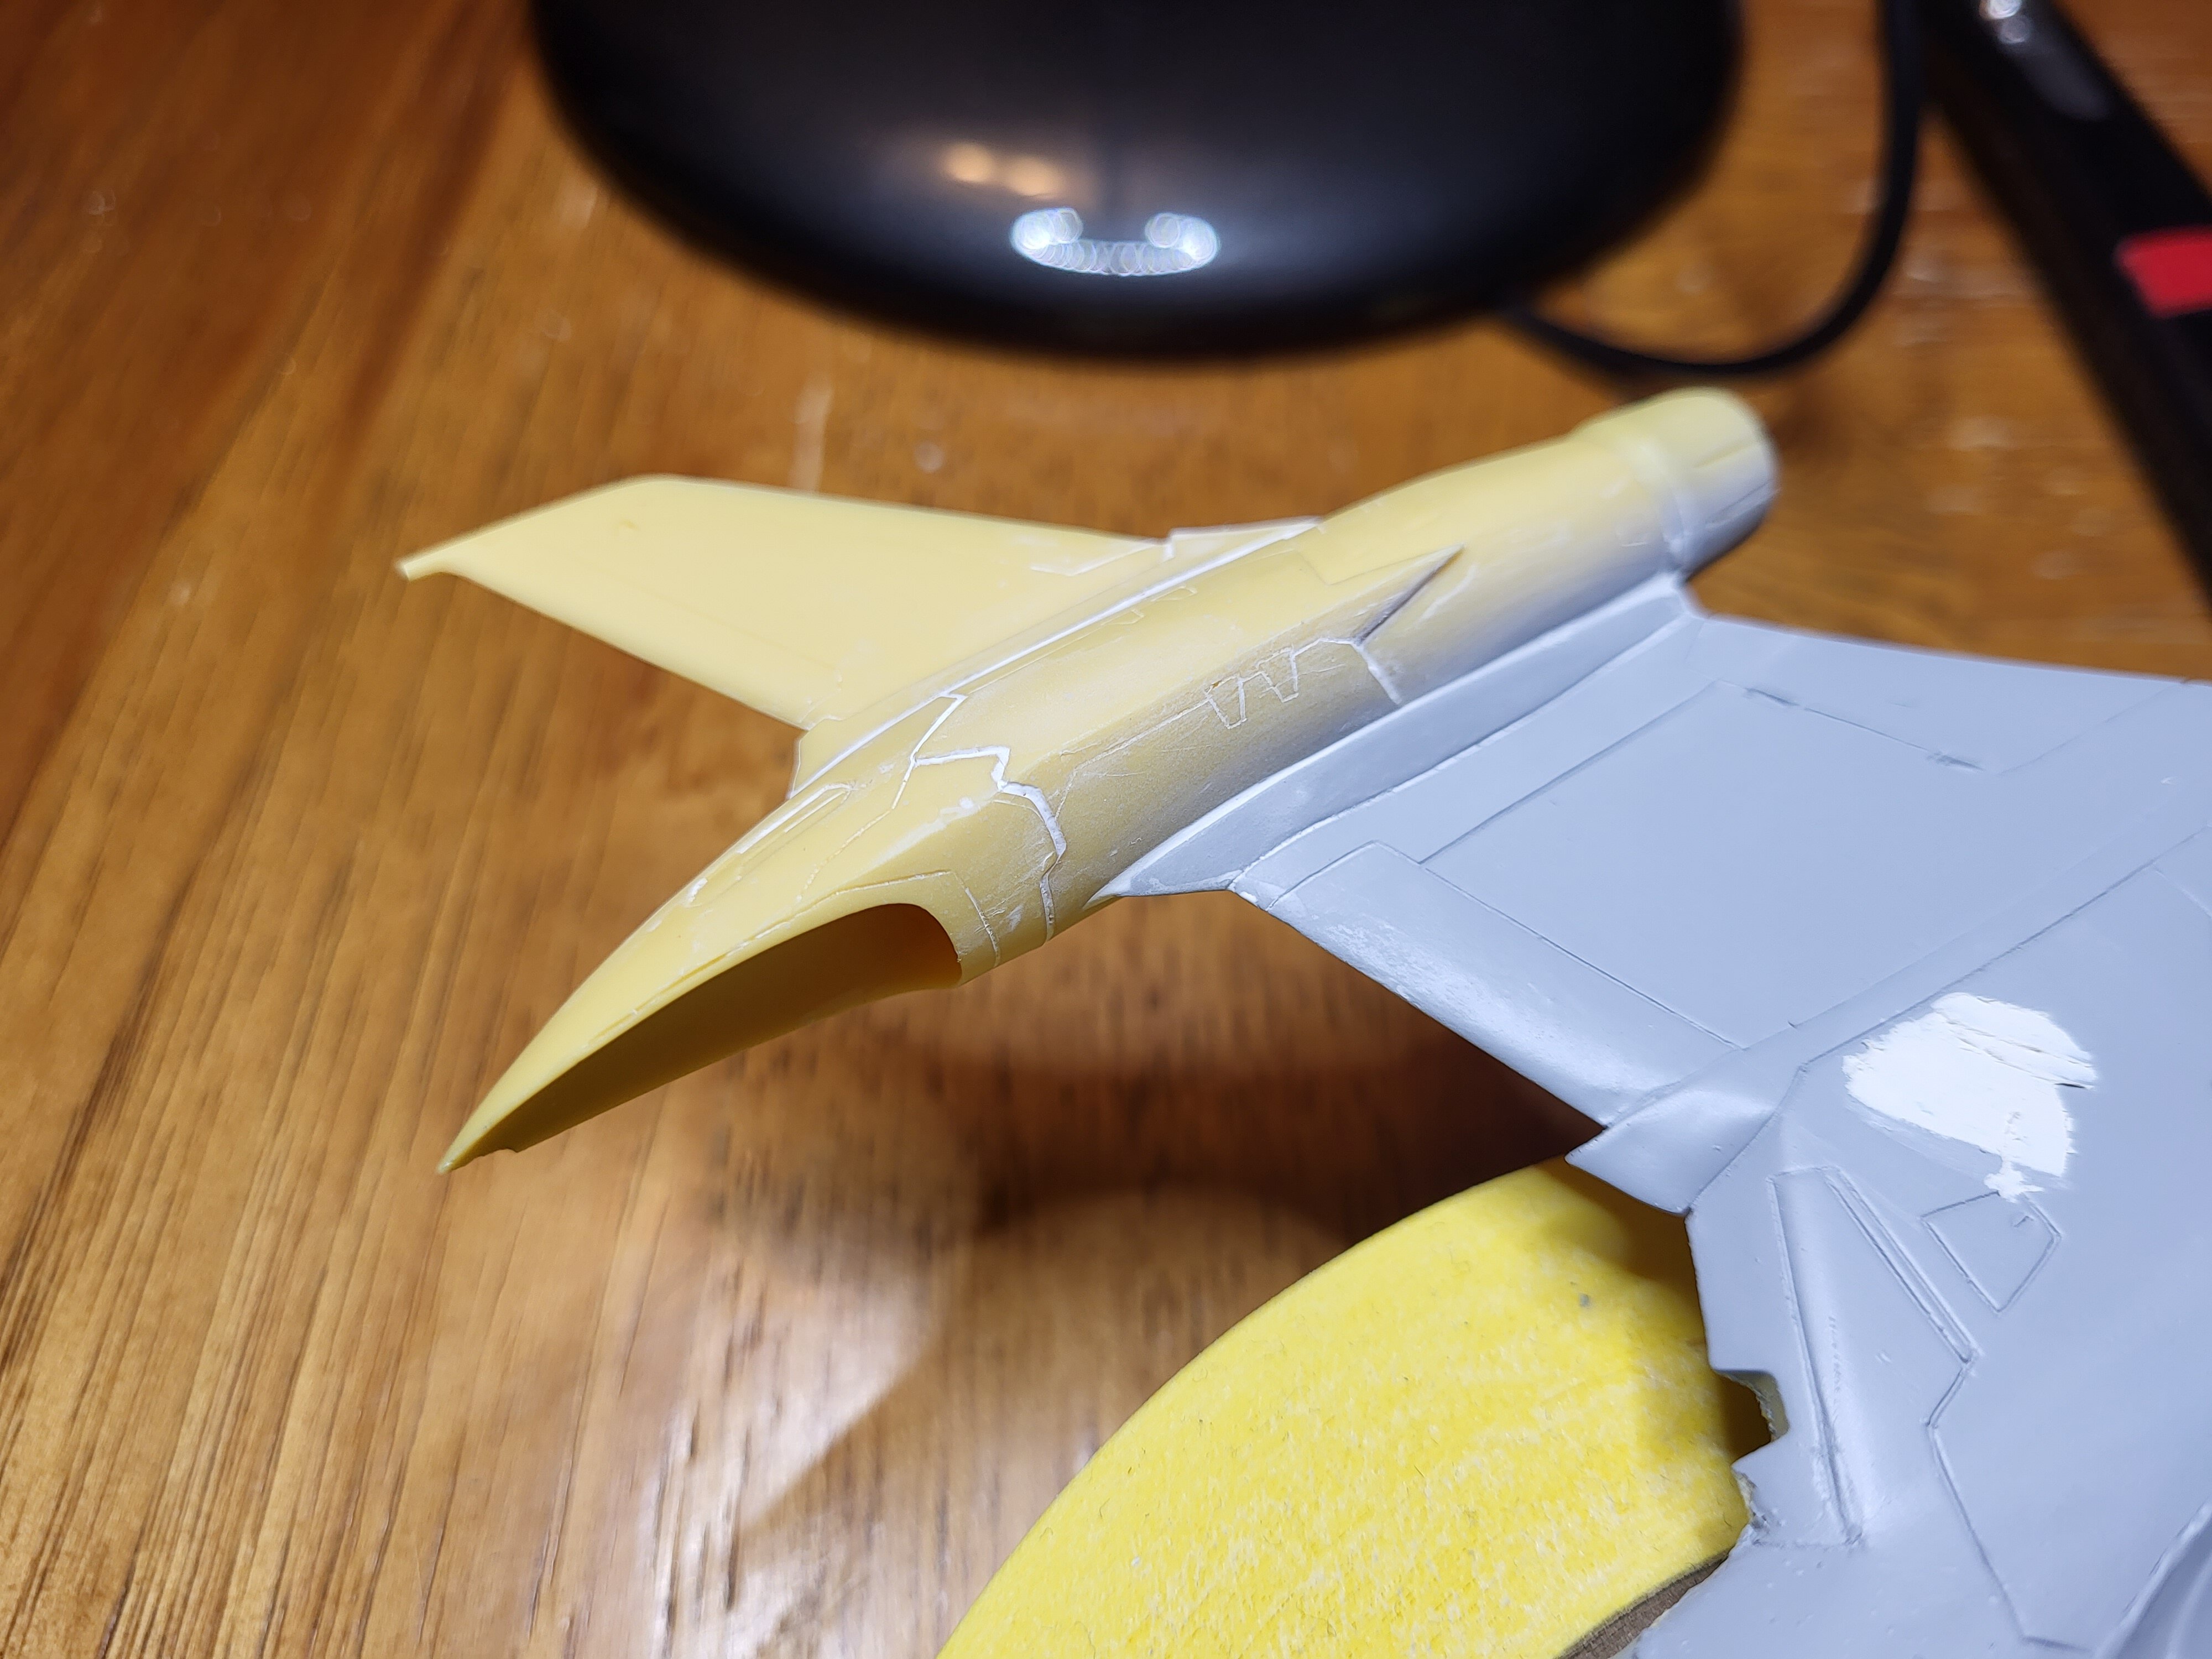
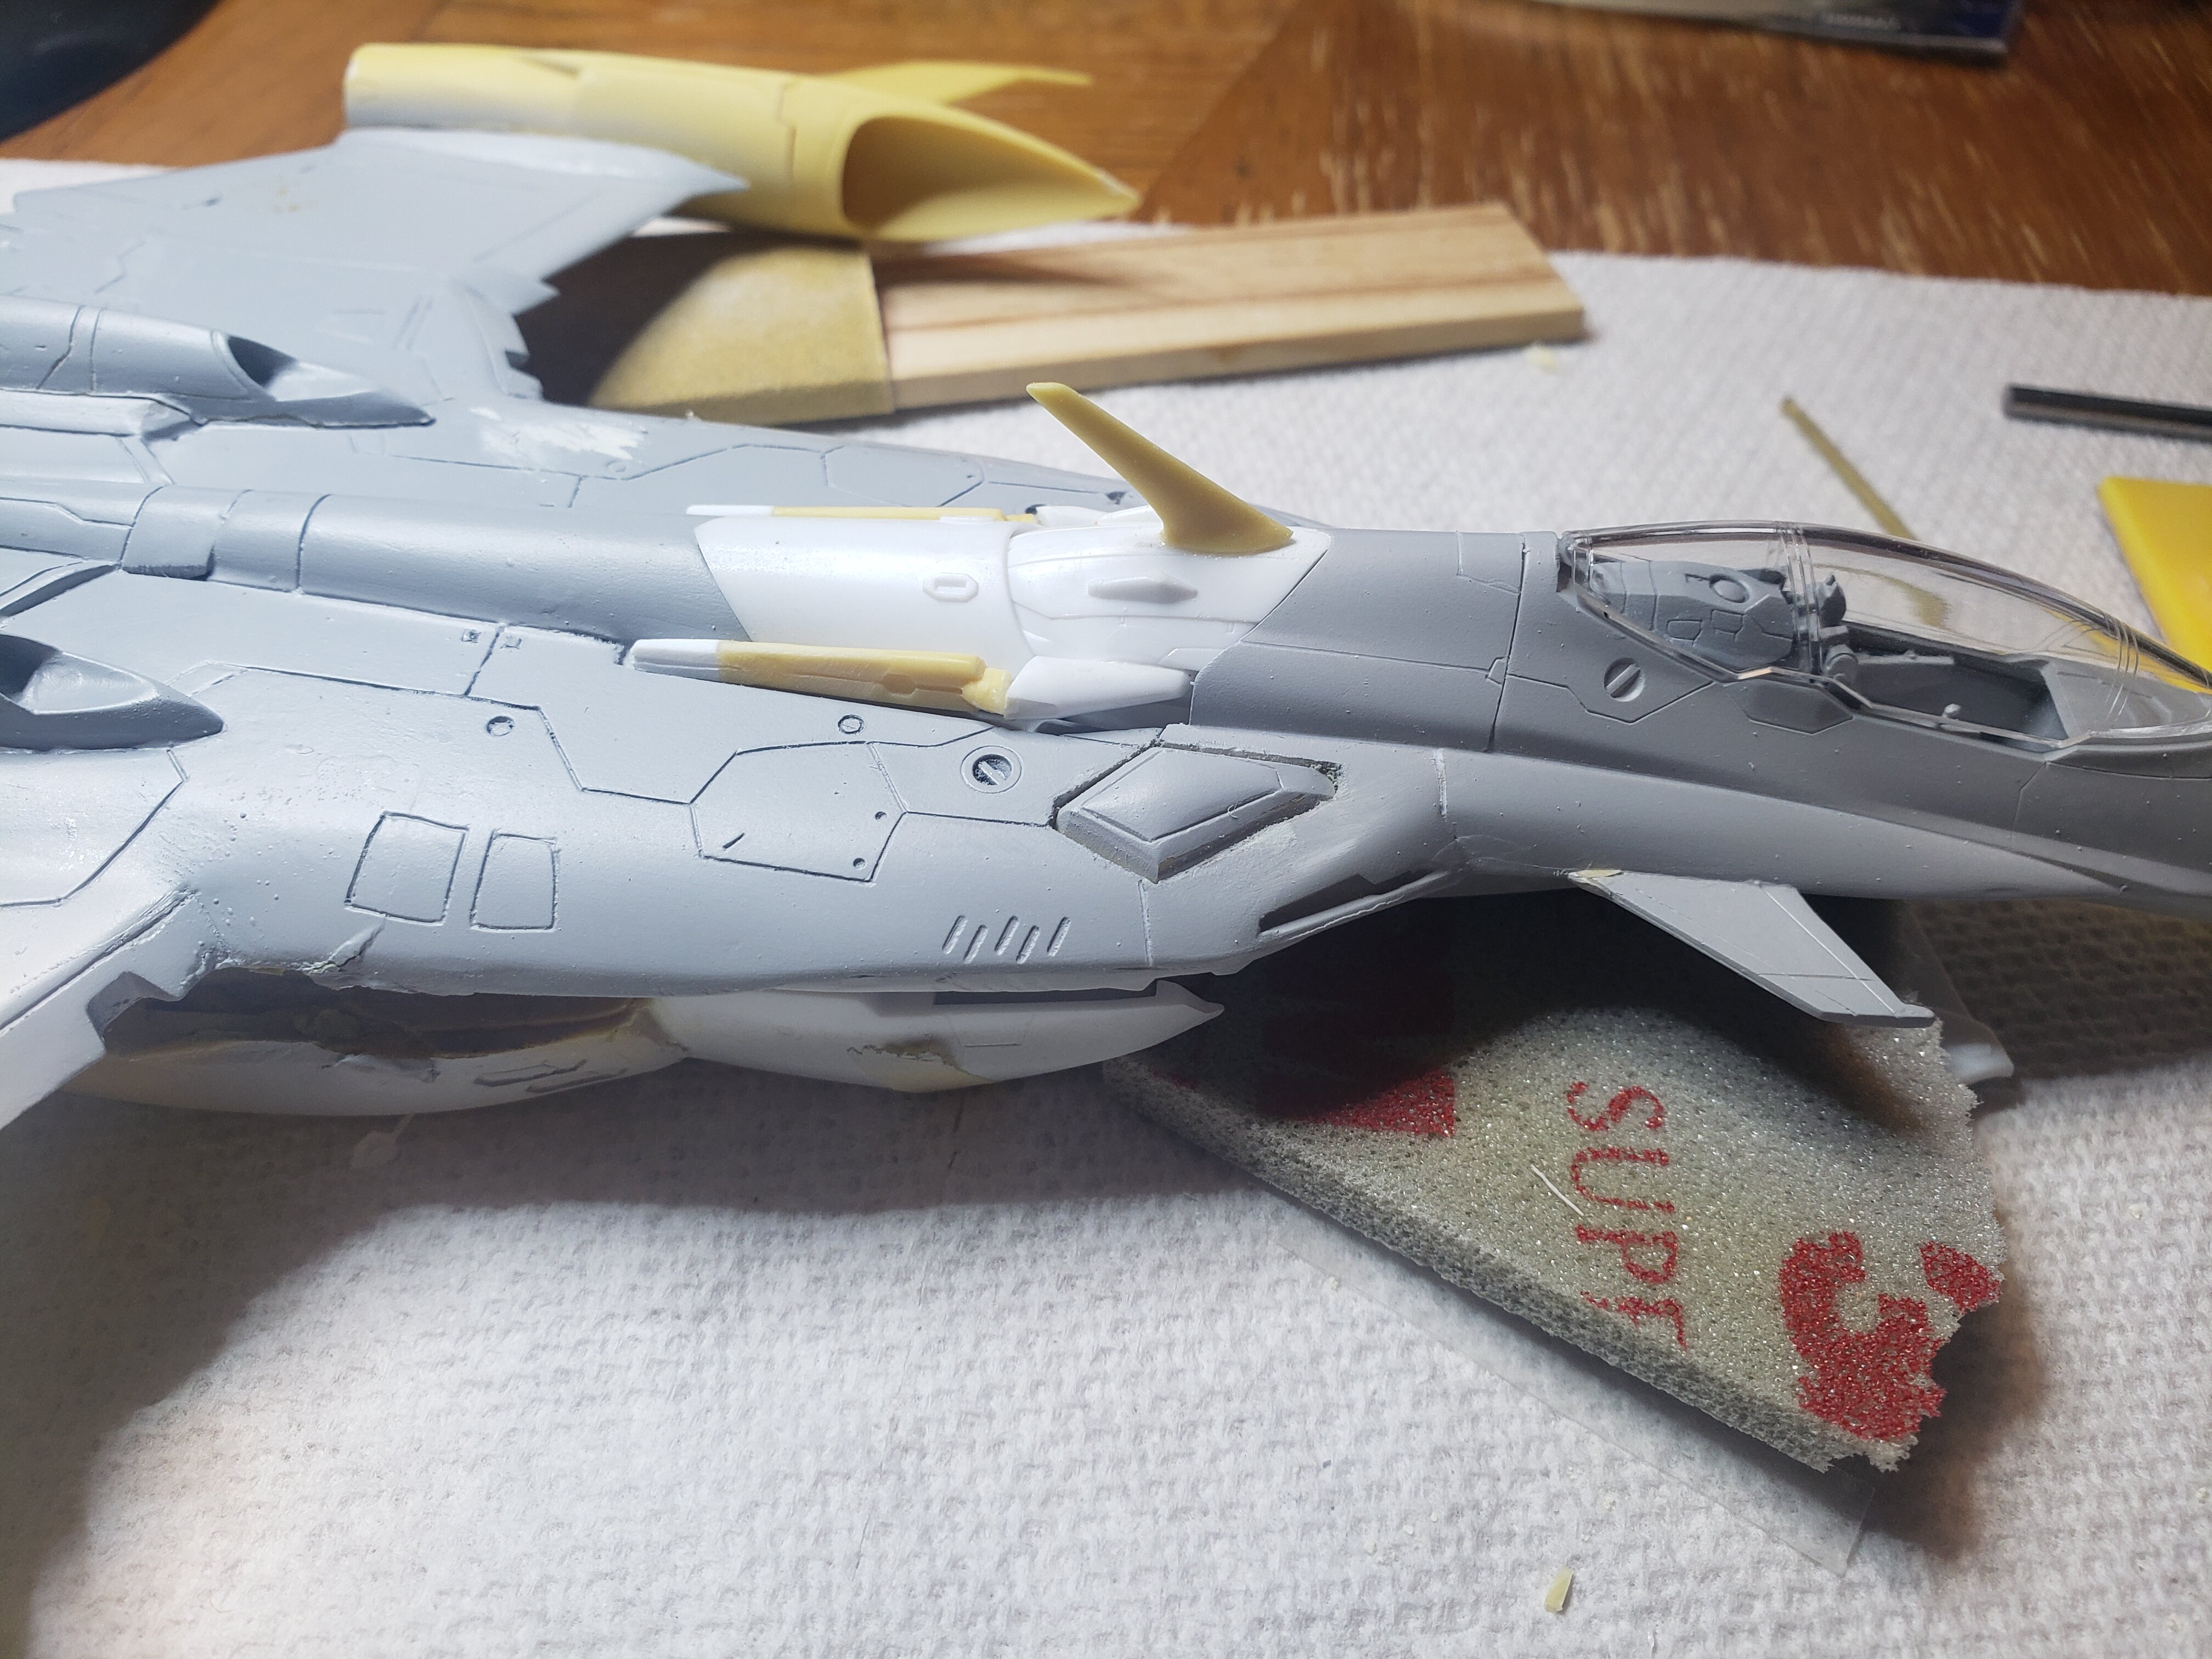
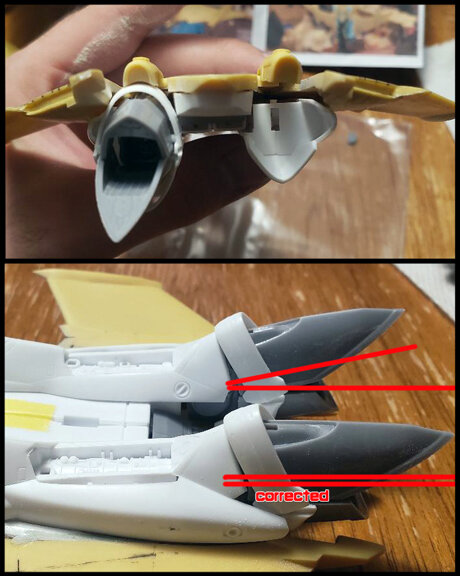
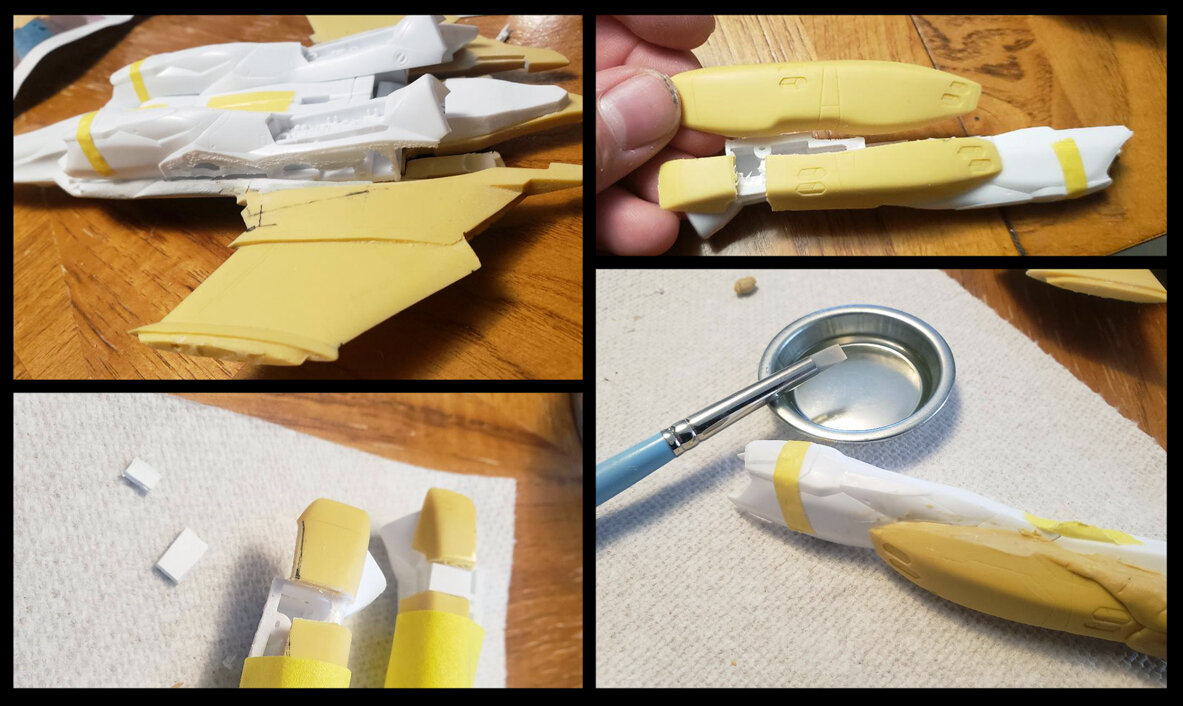
Correcting the Feet/Thrusters. I was able to round the backside of the topside's twin cannon to get the parts to fit better. It still isn't perfectly horizontal but much better compared to the start. I might be able to move the attachment peg a bit to fudge it the rest of the way but that can wait. Working on the final headache part of the build. Attaching the Durandal's additional leg armor. I took a grinder to the Hasegawa leg and did some serious plastic removal stopping just in front of where the VF-25's lower fins attach. This lets me bring in the armor so it doesn't appear to be on top of another part, keeping the sleekness. It is almost correct and only a few MM wider than the topside armor... I'm not going to correct this as I really don't want to widen the body for the sliver that will show. To match the kit's legs I had to lengthen the armor too. A bit of plaplate was used to fill the gap, provide structure and cut down on the amount of epoxy that will be needed to fill the cavity. Once the epoxy is on (Tamiya Basic) I used some 91% ISO Alcohol and a rubber clay tool to smooth and shape the areas of the putty to match the leg. I do this for areas I won't be able to easily sand later. The shin armor is just placed on the leg to keep the epoxy out during work. I don't know if I'll be displaying this kit in-flight or in a hanger dio yet. Lastly little Alto Satome. To differentiate this cockpit from the other 2-3 VF-25F's I have I want to try to sculpt a helmetless pilot, possibly doing a Salute. I cut the pilot off the Tree and leave a bit of spure/nub on the bit where the helmet goes. I then shaped some epoxy on top. Once it firms up I'll do a bit of shaping and try to form the rest via carving. I'm also looking into options to replace the ugly wing verniers included with the conversion kit. If anyone has ideas please share. They dome inward at the tip making most of my extra parts unusable.
- 30 replies
-
- 1
-
-
- yf-29 durandal
- hasegawa
- (and 1 more)
-
I am enjoying it. I do wish theu would do more variation in the magic than the light wing ribbons effect though. Really liked the ghost city ruins episode. kind of reminded my of Dr Who!