Rock
-
Posts
401 -
Joined
-
Last visited
Content Type
Profiles
Forums
Events
Gallery
Everything posted by Rock
-
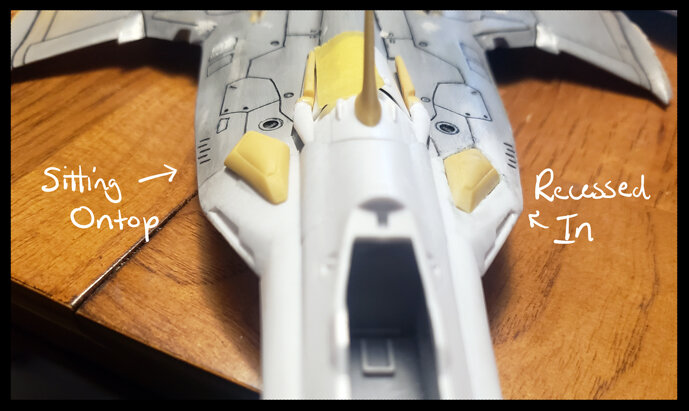
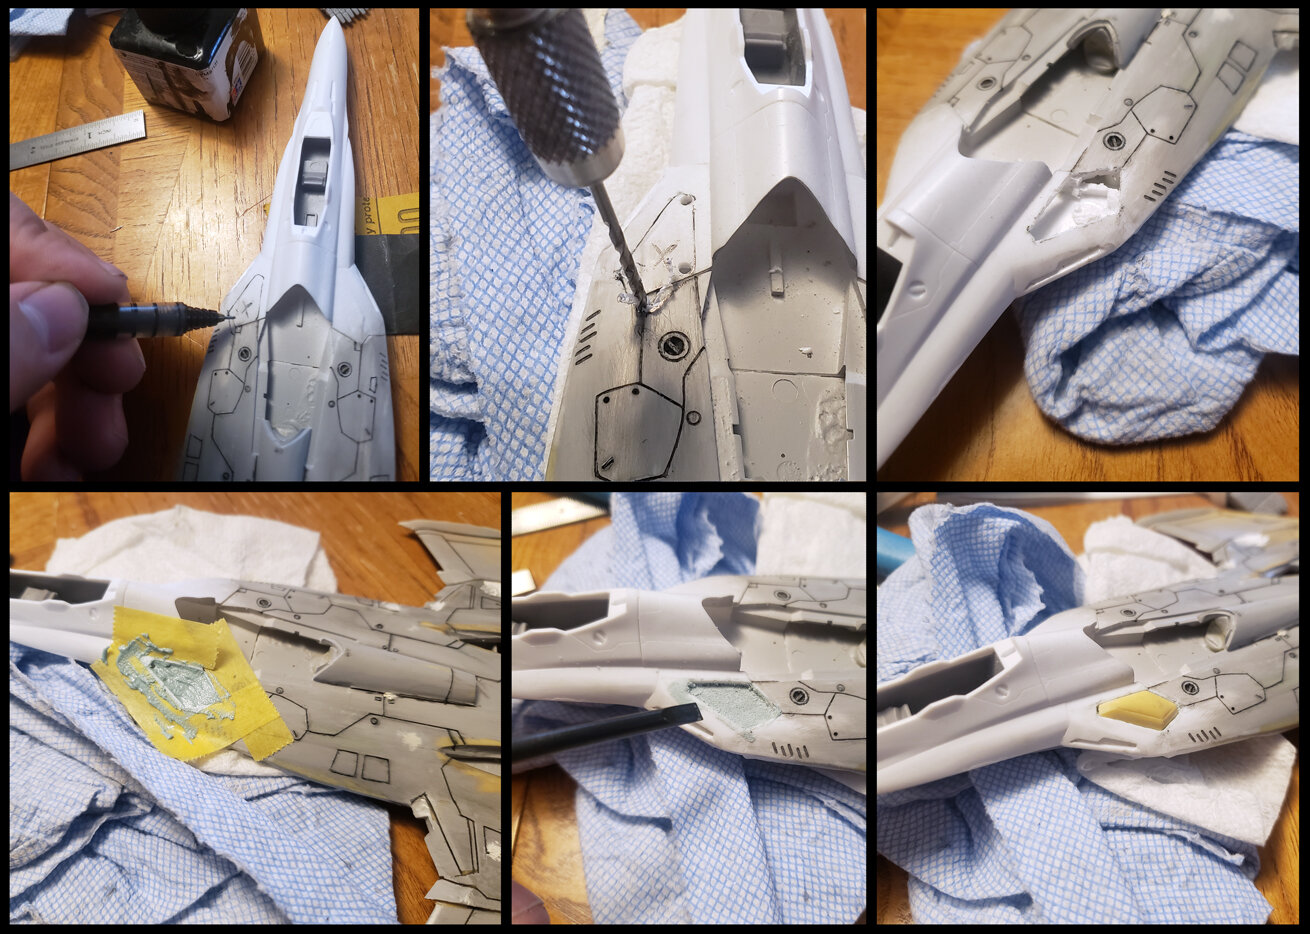
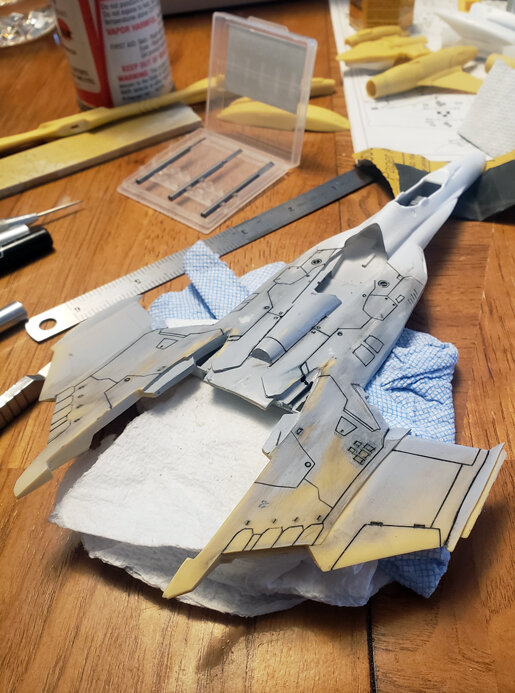
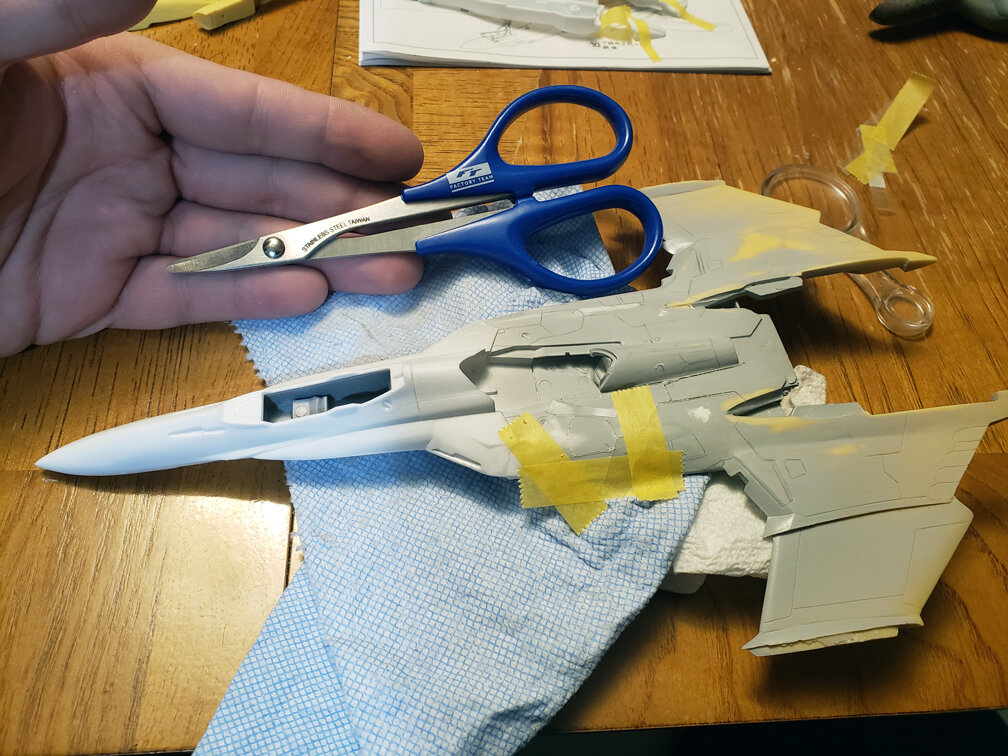
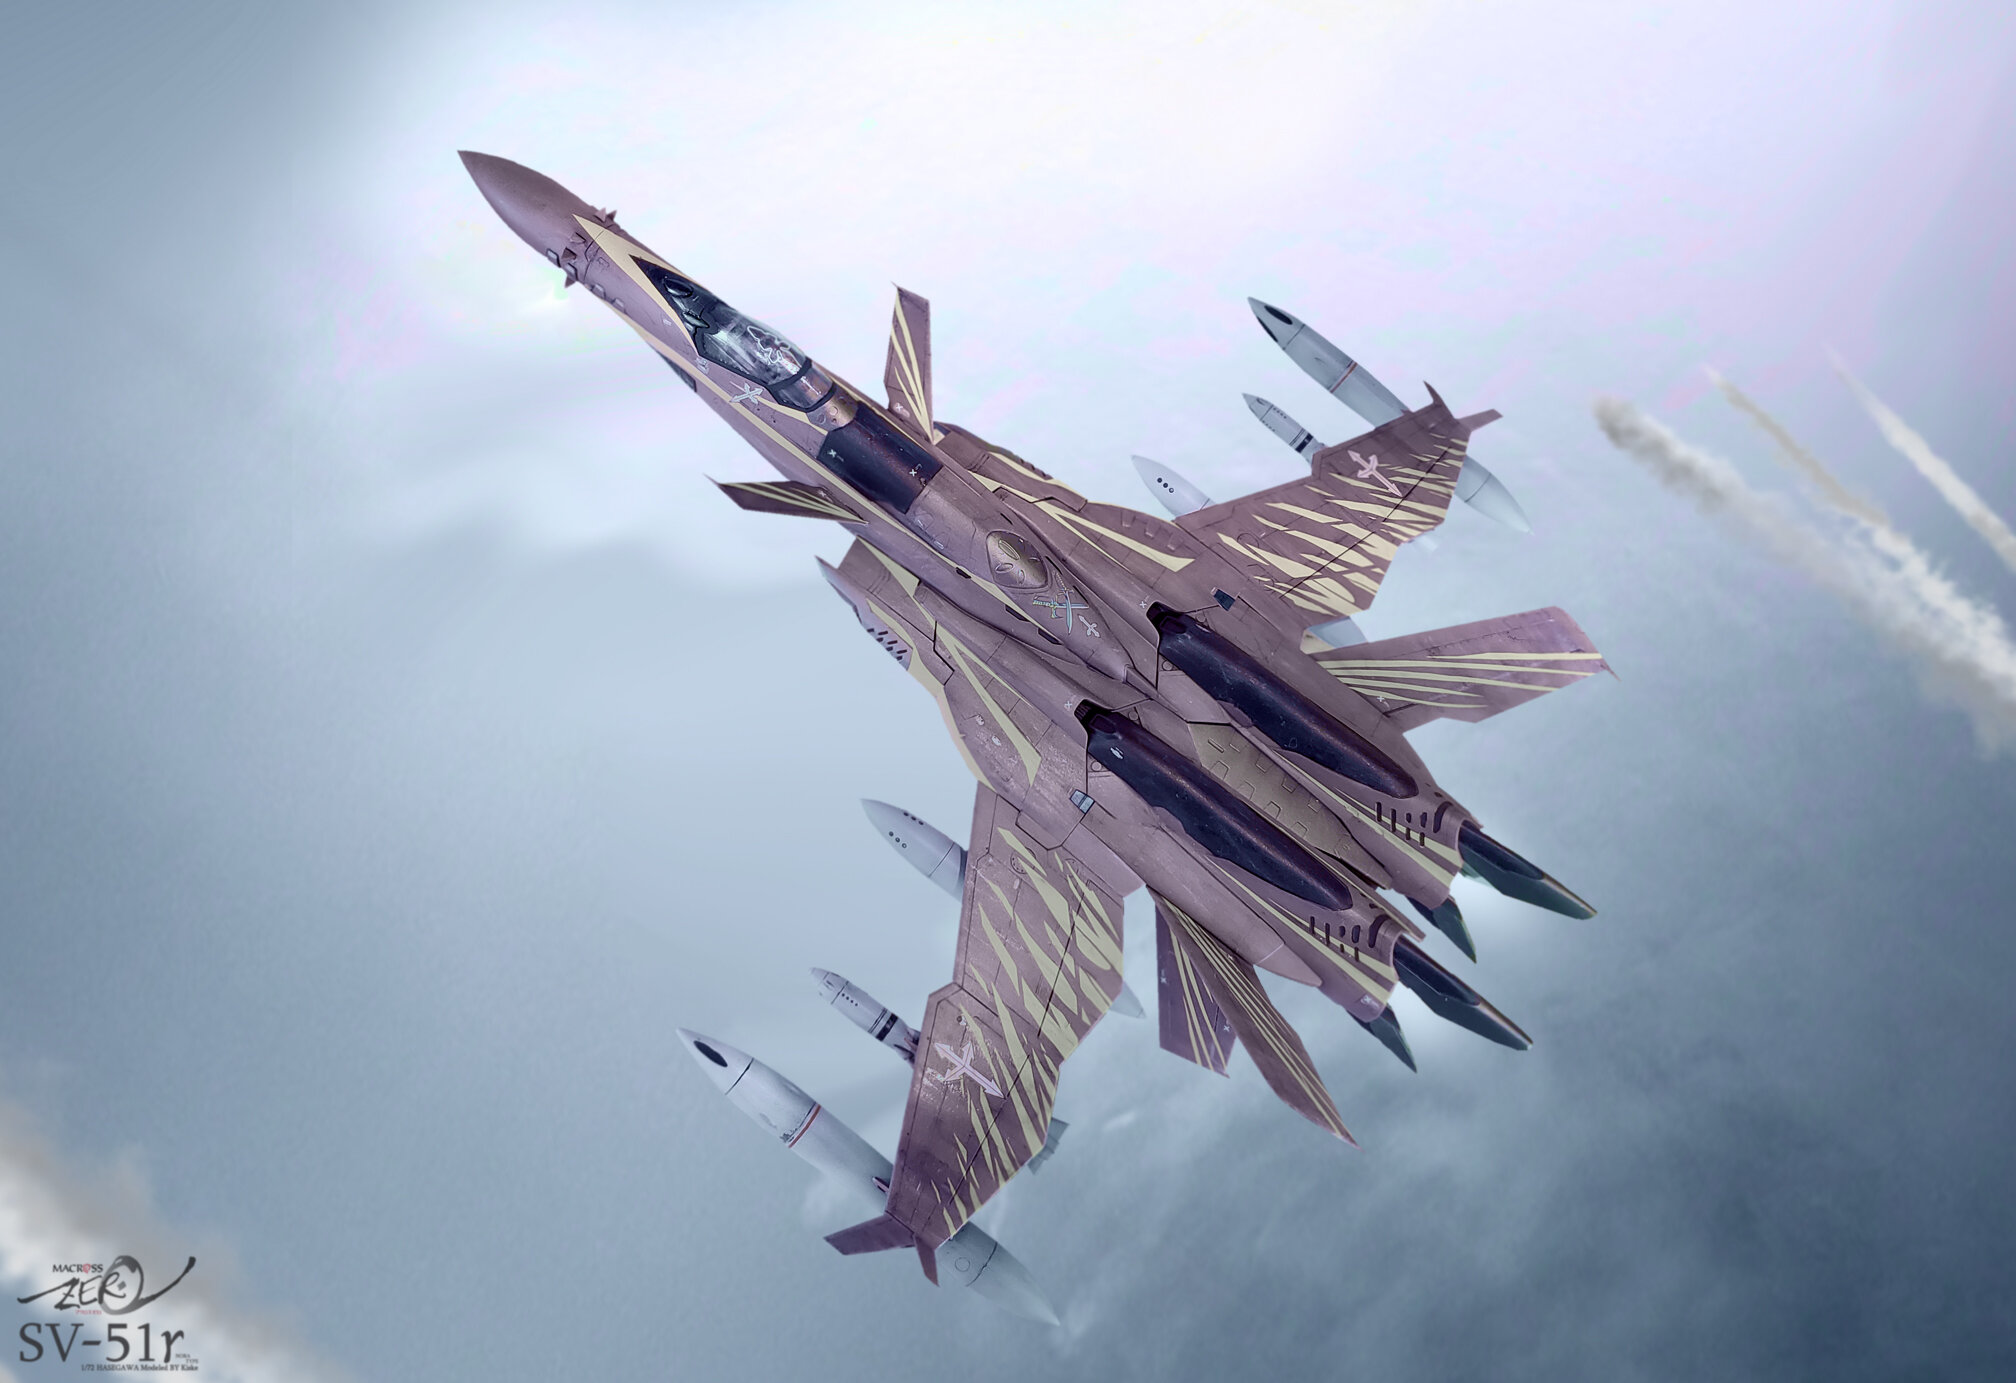
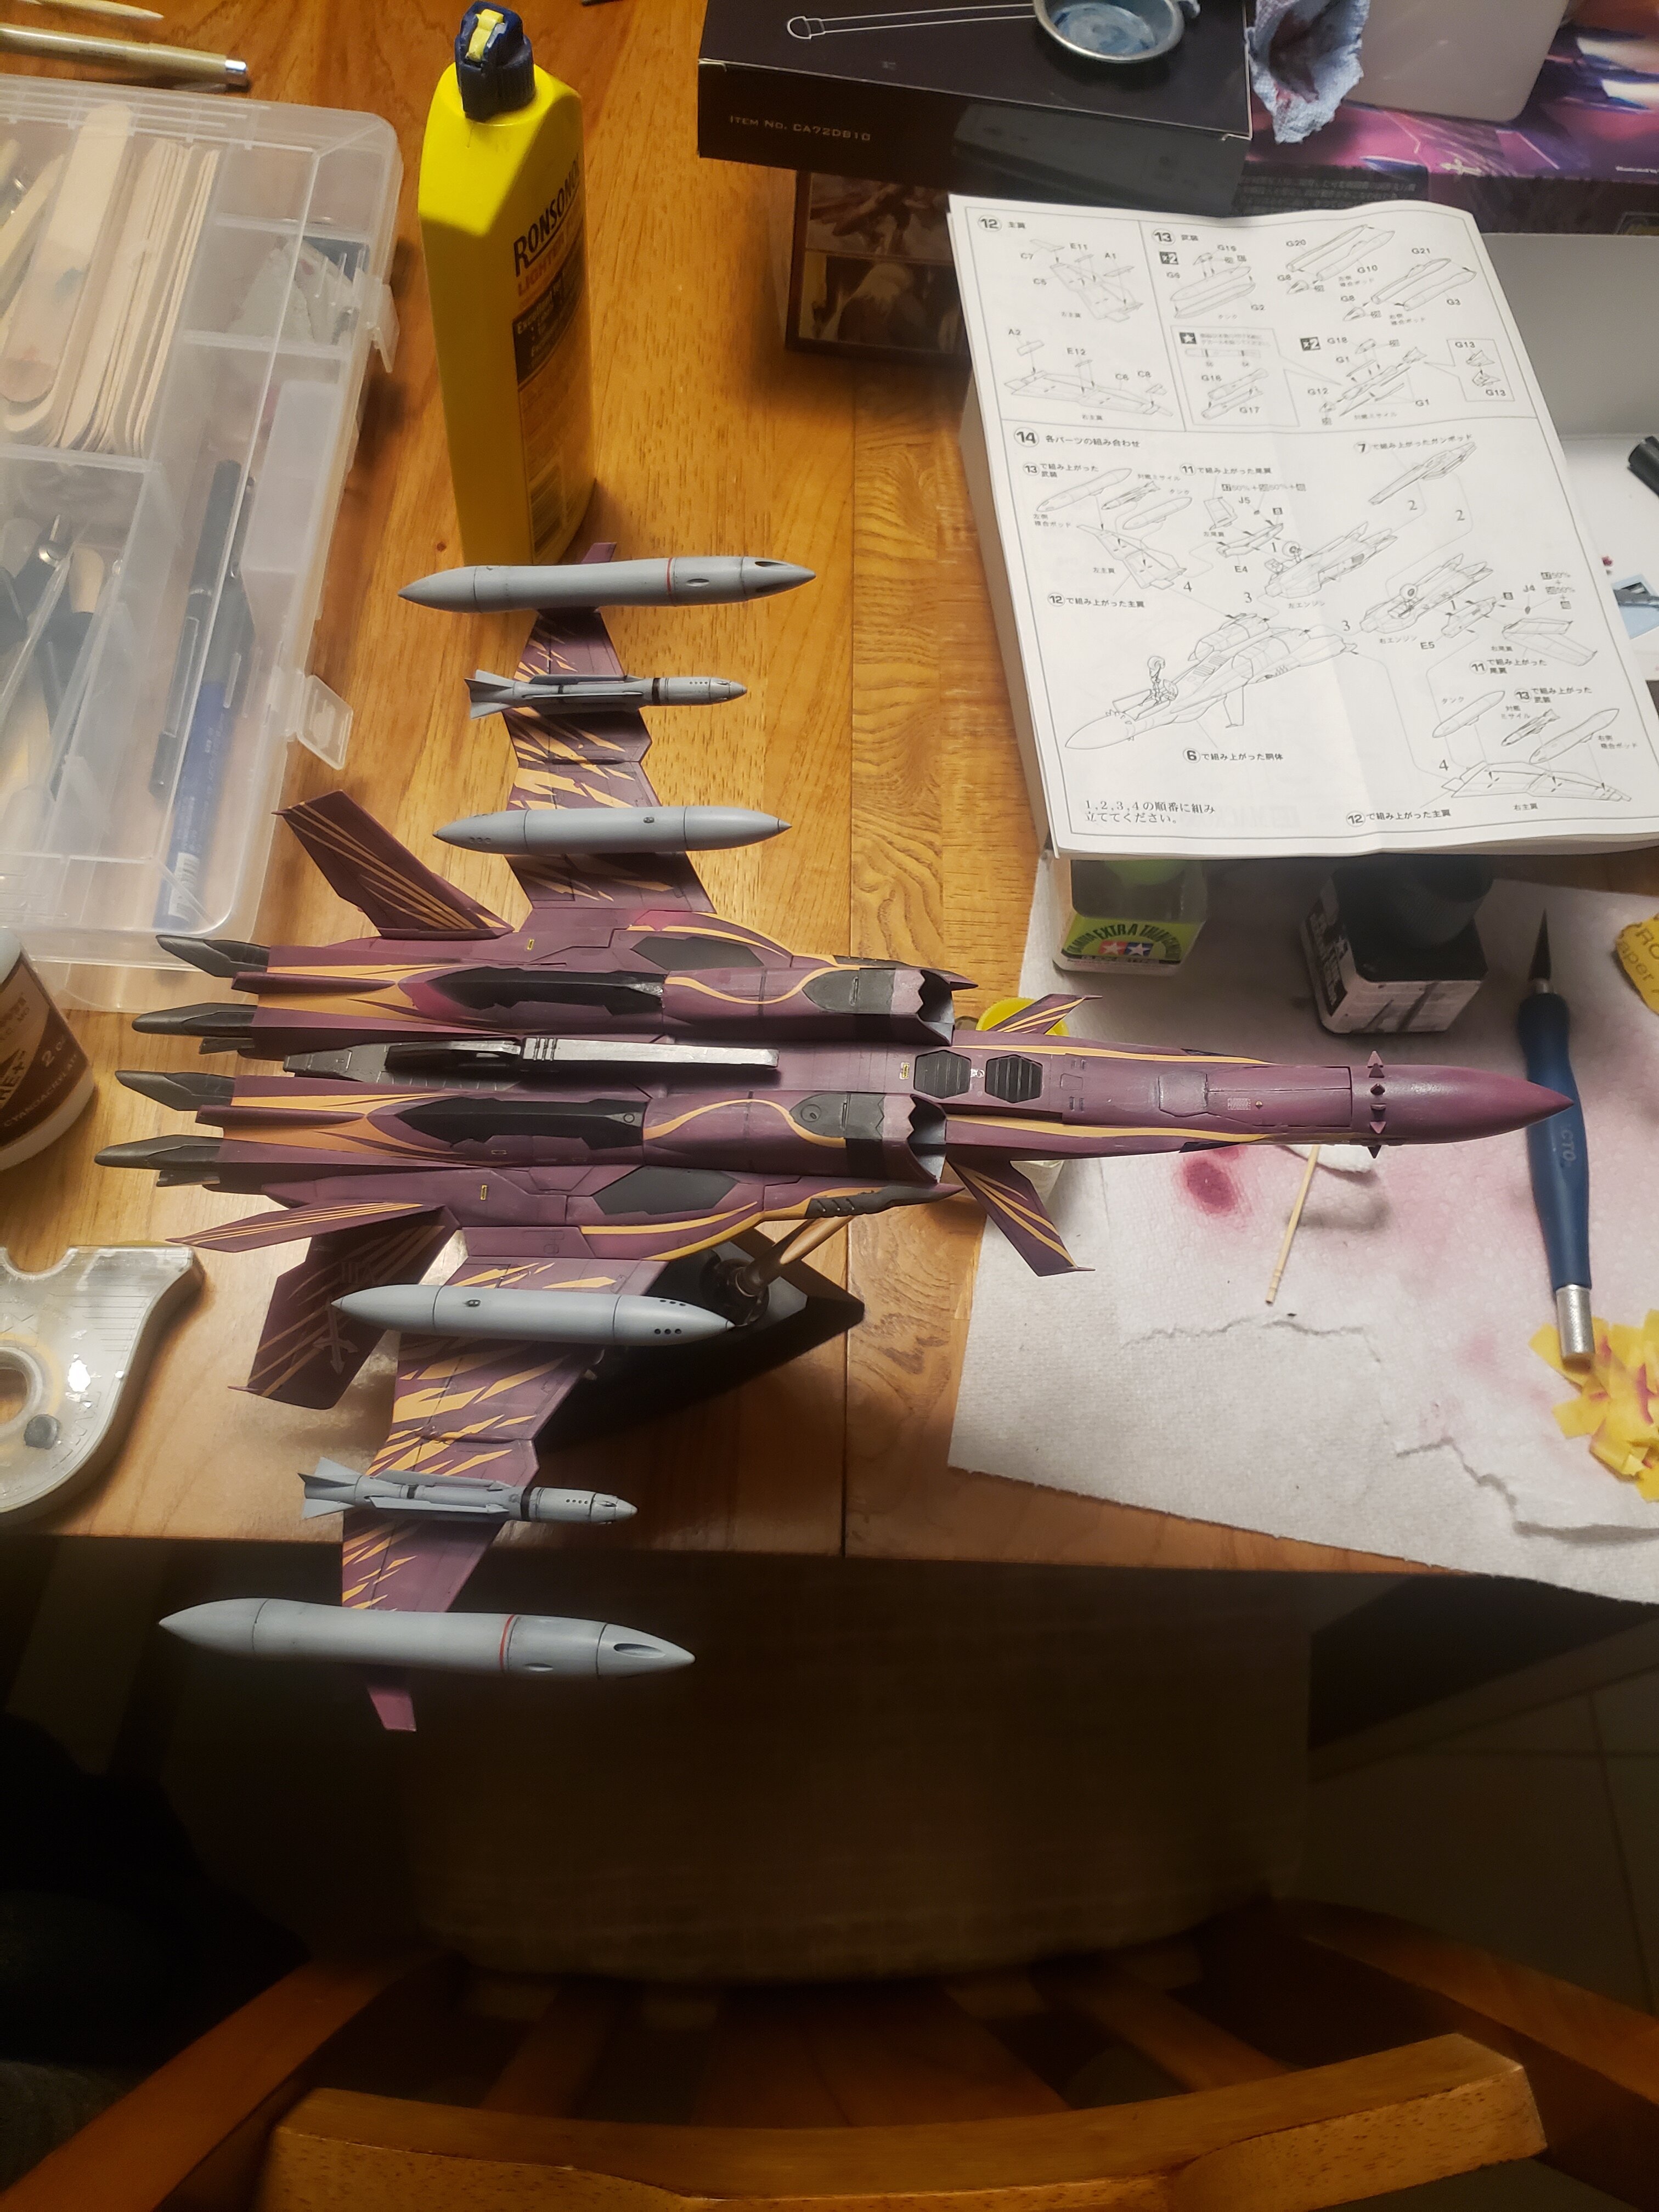
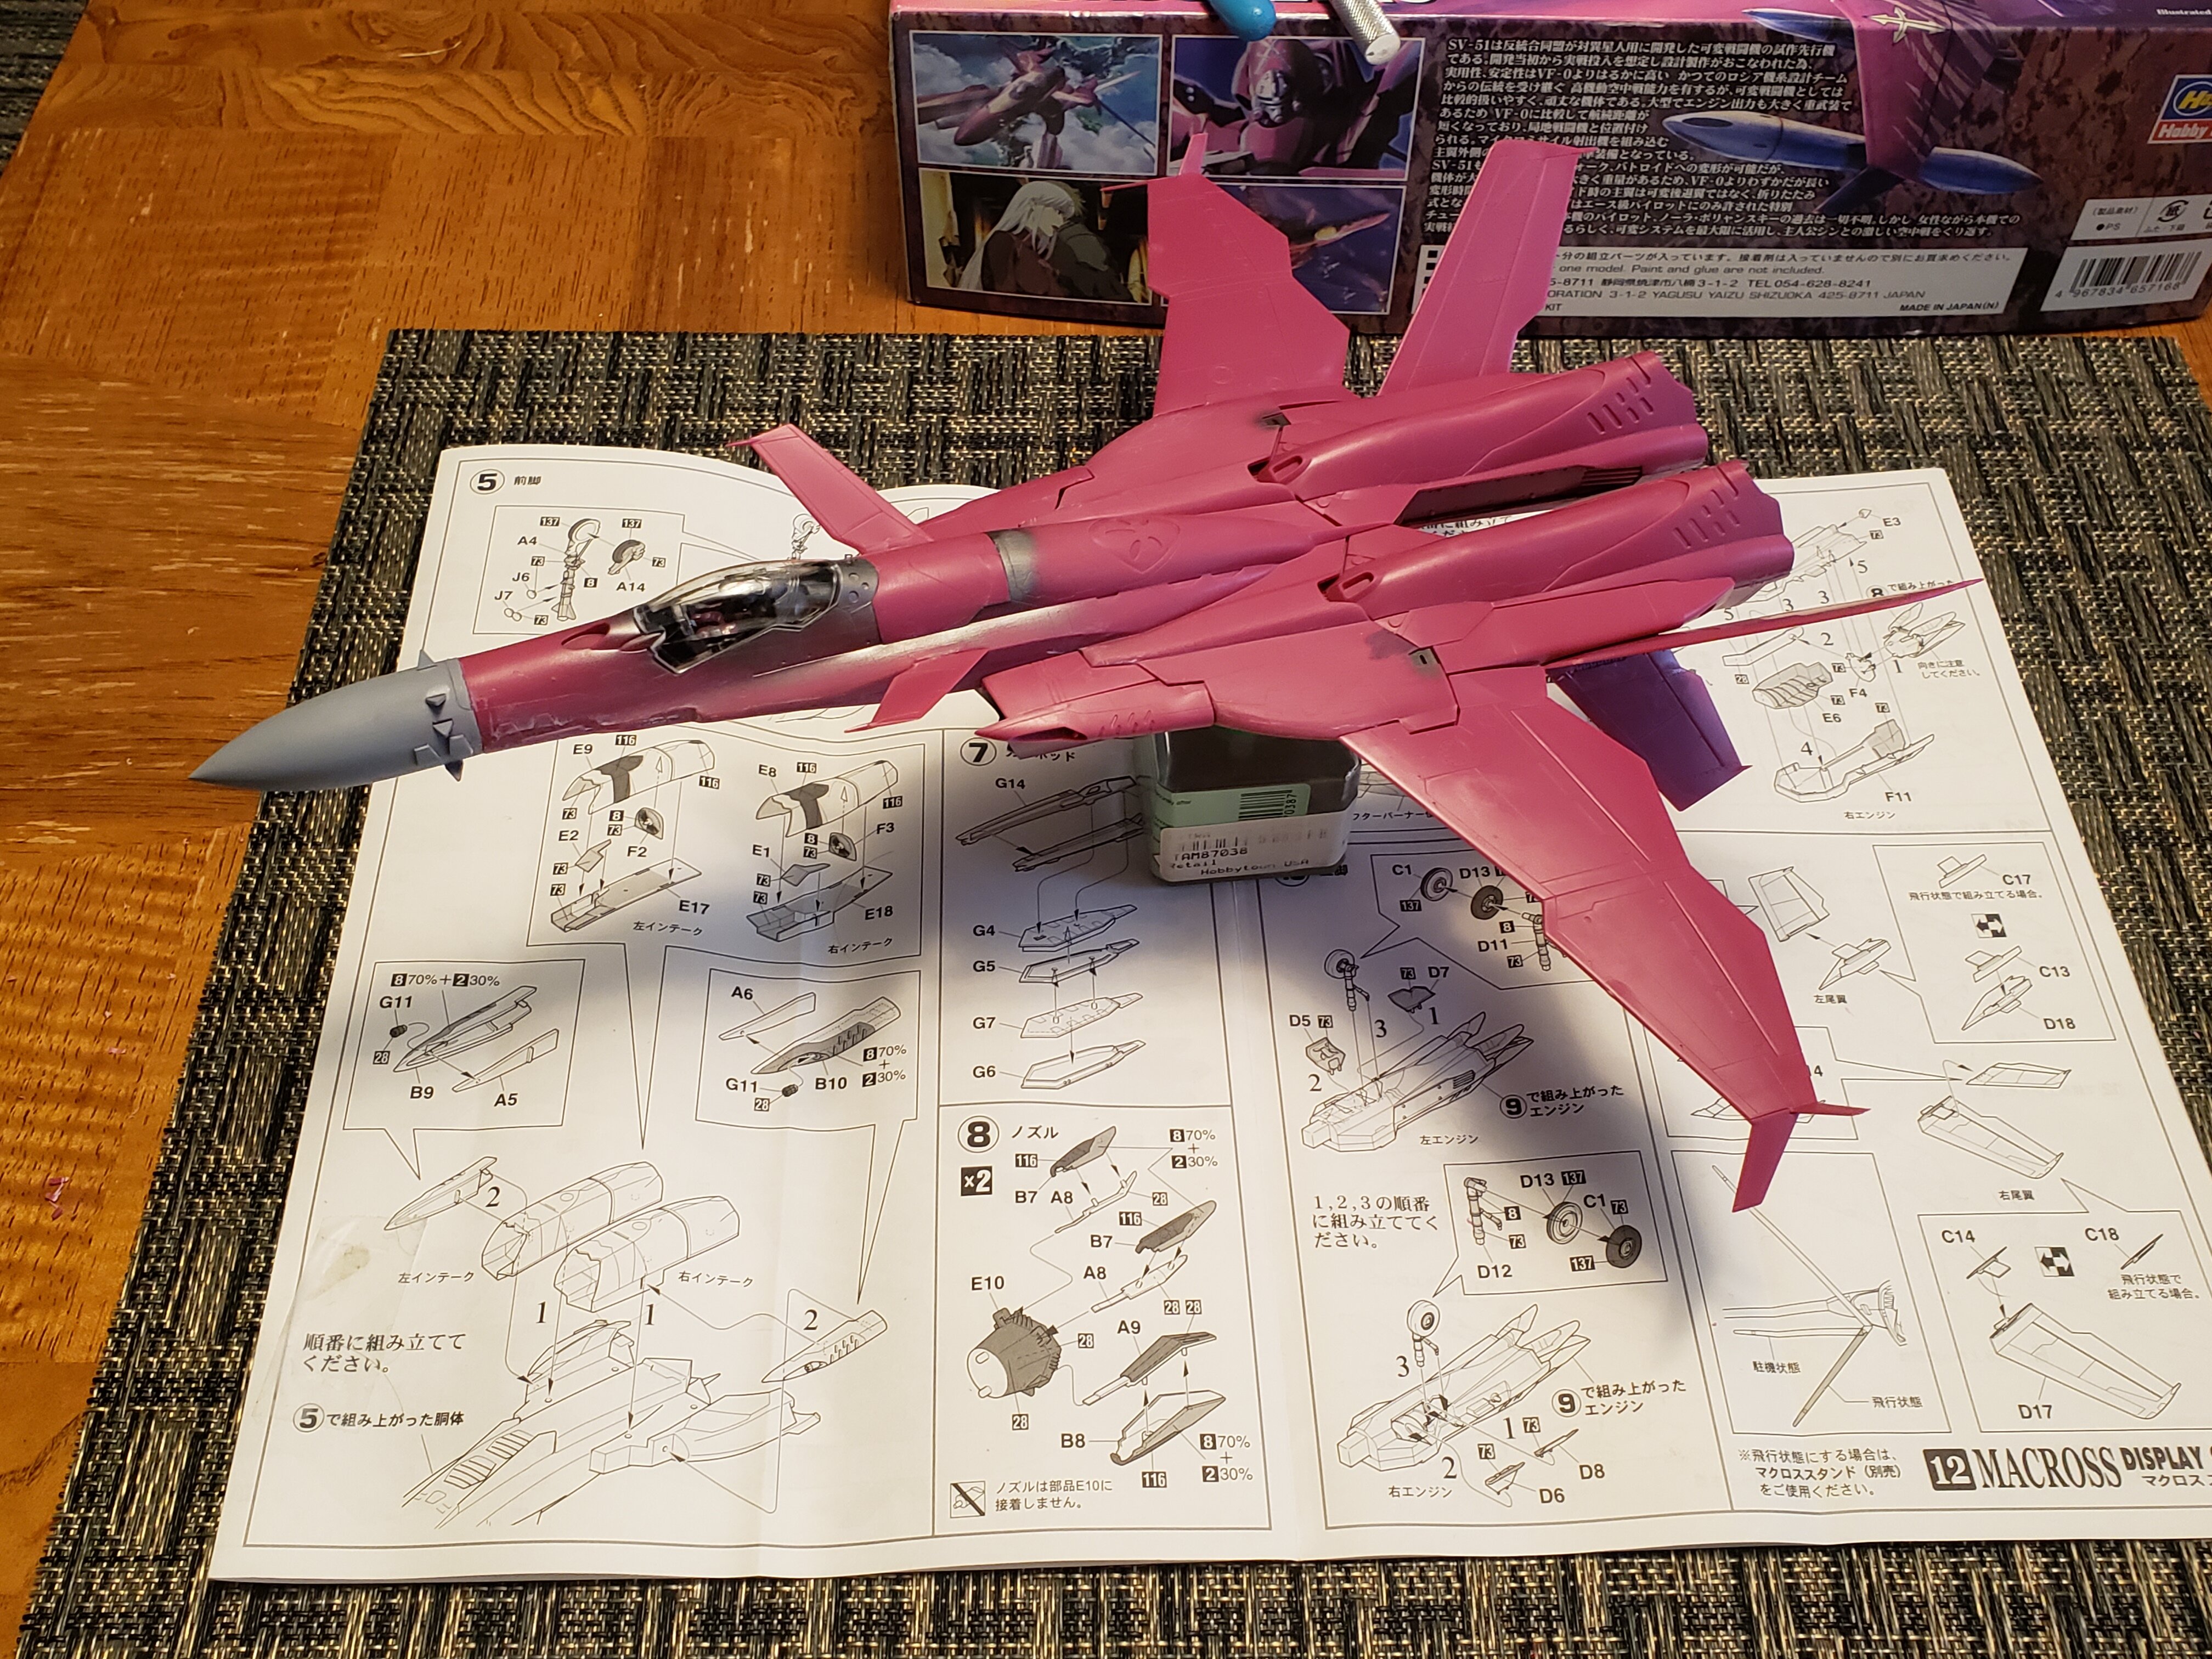
^ That's what they say about all my builds. I don't think hase is going to build anything with movable guns on the dorsal section. I'd love to be wrong though. I'm just happy to use up 3 kits, 2 of the backlog. These fighters are a nice quick break from the other projects I normally work on. Here is how I tackled the fold quartz pods. I decided to use the resin bits which look pretty good to me. I do wish they were clear resin... I don't want to bother with recasting them myself so for now they stay solid. How it was done. -I placed the part with some CA glue to hold it. I then traced the outline with pen followed by a few passes with a scribing needle. -I remove the part and check my placement. -I use a small pin drill and drill along the inside of my line work. -Use a blade and/or nippers and cut out the area. The part fell right on the male/female peg so it took some work to break through everything. Clean up the edges with a fresh blade and file. -After confirming the parts fitment I needed a raised surface to hold the part just below the surrounding surface. I mixed some poly putty and filled the cavity. -When poly putty is partially cured, (about 2min after mixing,) I scrape it using a small sharpened screwdriver. This lets me quickly level the surface roughly and easily. Keep in mind the resin part's underside isn't flat. Thus, I the surface it sits on also needed the same contours. -Wait for the putty to finish curing and then test fit and on to finish work. I'll leave them removable for now for easier painting later. Note: This can also be done with epoxy putty. 2 part polyester putty is just much faster and lets me finish the task in a half hour instead of a waiting overnight for the epoxy to fully cure. I got the 2nd round of scribing almost done. I started adding in the little square details the 1/100 kit has but didn't like the result with all of them. It kinda cheapened the look. Will have to remove them moving forward. I keep forgetting the Durandal has also got a busy pain scheme. I then move on to the 2nd fitting or the tail and the Twin MDE beam cannons. Tons of carving and dremel work was needed on the underside to get the parts fitting pretty good. I almost got a great look from the topside however when you look from the inside there is a 2mm x 8mm wide gap to fill. The result is much better than the crooked, raised, and thick mess they were. (Scroll up at the 3rd pic in this thread for a before image.) A bit of base work to make the rear solid and then It will also get a little detailing.

- 30 replies
-
- 3
-

-
- yf-29 durandal
- hasegawa
- (and 1 more)
-

Macross 40th Anniversary Thread. What are you expecting?
Rock replied to Gerli's topic in Movies and TV Series
That logo gives me Yukikaze vibes. -
Echo'ing the Vicious and Julia statements. Less was way more. Not only does Vicious seem less of a badguy but, they kinda duped Julia into a poor damsel role and out of the bad ass blond who later gives Faye a run in the bounty game. I'm also a bit annoyed that some of my favorite episodes have been butchered up into quick bits like the Teddy Bomber being an after thought of the episode. In a 24min anime we see him bombing 4-5 places and 2-3 interactions with Spike/Jet. In the live action it was just a clip on a tv, a 2 second chase down one hall and then the location of the final bit which was just background for Spike and Jet's argument and syndicate drama. Still glad we have the show though. Sure it's hard to accept it but, it is still fun in it's own campy way. They really nailed the mood, atmosphere music and space themes.
- 303 replies
-
- 1
-
-
- netflix
- cowboy bebop
- (and 11 more)
-
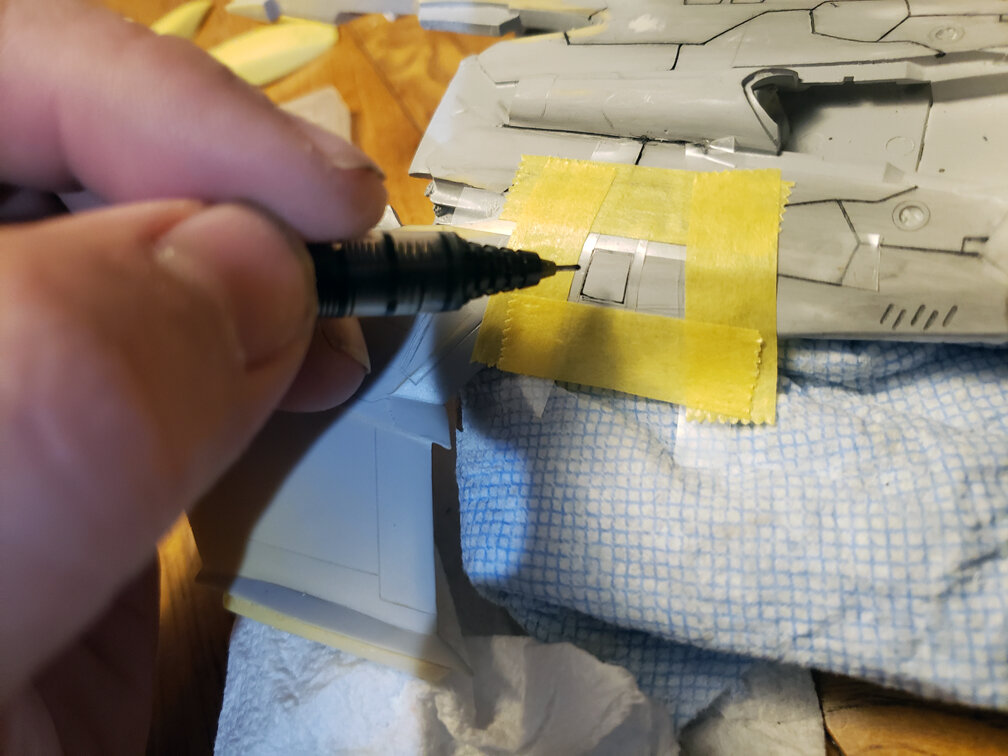
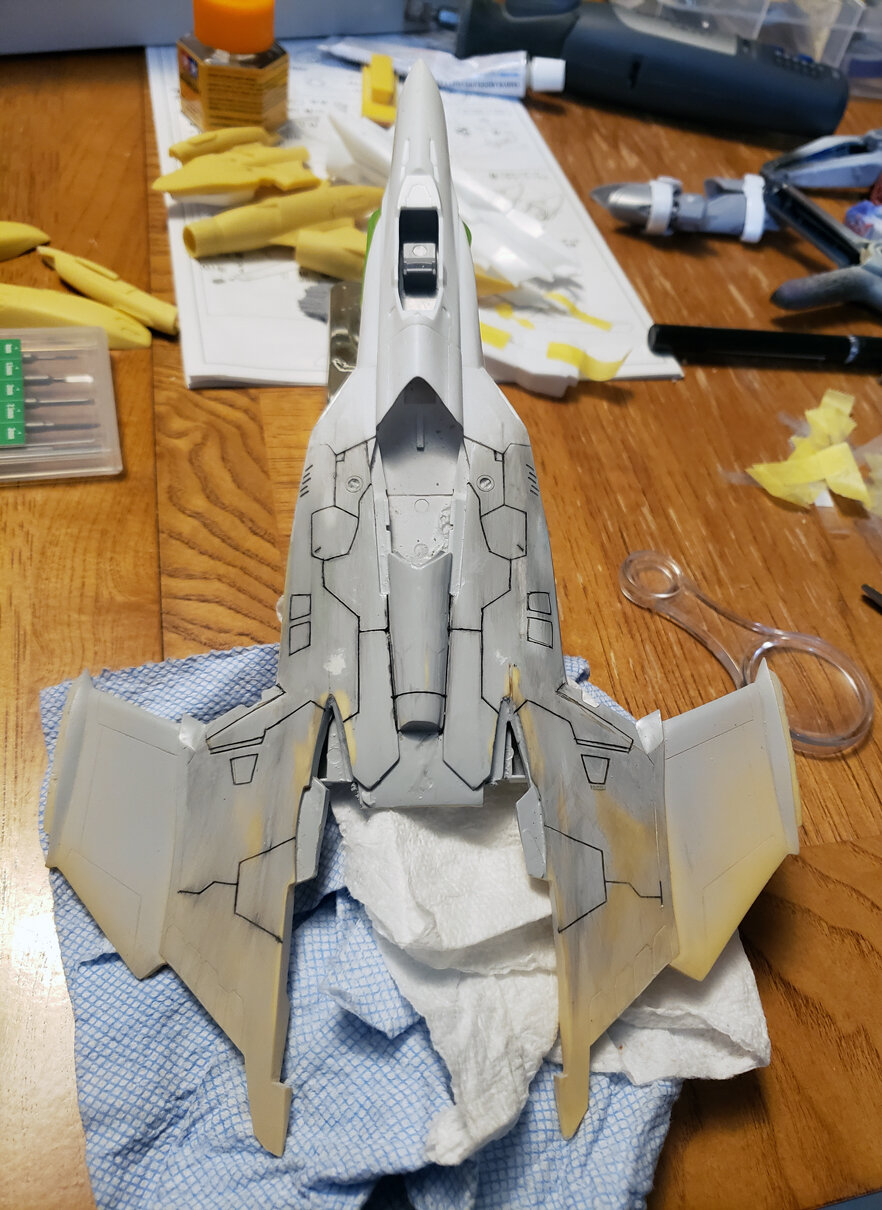
Live action Bebop, burbon and modeling! A great cold-weather Friday night combo. I think there may need to be another Swordfish II build in my future! Anyways... Gotta clear the backlog first so 3. 2. 1. Lets Jam! 1. Broke her back up for easier work. Also a few tips. a) A big wad of 3-4 paper towels is your best friend with working on odd bird that doesn't like to lay well. When resting the kit on the big pile you can manipulate and easily hold the kit at various with one hand. This really helps when scribing curved surfaces that need to be a various angles to work on. Try it next time! b) Curved scissors, (in this case a pair for cutting lexan RC car parts,) works great for cutting your dymo/carving guide tape into repeatable slight curves. c) Tape the edges/borders around you scribing tape with regular masking tape. There is nothing worse than a guide accidentally moving mid pass. You'll use a bit more tape but, it will save you so much headache a frustration trying to fix bad work. 2. I'm using MAD's 6mm guide tape which is clear and made scribing so much smoother for me than using dymo tape. However, this tape can be really hard to see. After laying a piece I use an water soluble ink pen to trace where I want to scribe. This also mark where to work so not to accidentally scribe the wrong side of the tape. When you scribe over the ink it will be removed helping you verify your work. 3. Quick wash and panel line and I've got progress! Not too terrible of a result given that I'm carving lines over 5 different materials, (Polystyrene, Resin, CA/Super Glue, Epoxy Putty, and Polyester Finishing Putty.) I have a few section to redo as I didn't mirror them correctly before proceeding though... For design I'm using the Master file and Bandai's 1:100 fixed YF-29 kits as a reference. Of course things aren't exact so judgement and artistic liberty had to be used along with a desire to keep the style closer to Hasegawa's lovely work. After the fiasco I went through on my Hasegawa Tornado Pack build rescribing it, I learned about 6-8 VERY light passes with a 0.15 scribe match the kit's existing kit's very well. Thus far I've only lined the section that were erased via my putty work/blending.. I didn't do much on the 'backbone' of the fighter (behind where the head would be) as I need to modify the head's design and potentially be sanding away any work added there. The line work on the resin wings looks pretty solid so far. I expect I'll keep what is there and just add a bit onto it. Anyways, after corrections are made I'll go into round two of carving all the small details adding some variation to the surface's height too! Then I can look to adding some of the missing bits to the front half of the nose.
- 30 replies
-
- 1
-
-
- yf-29 durandal
- hasegawa
- (and 1 more)
-
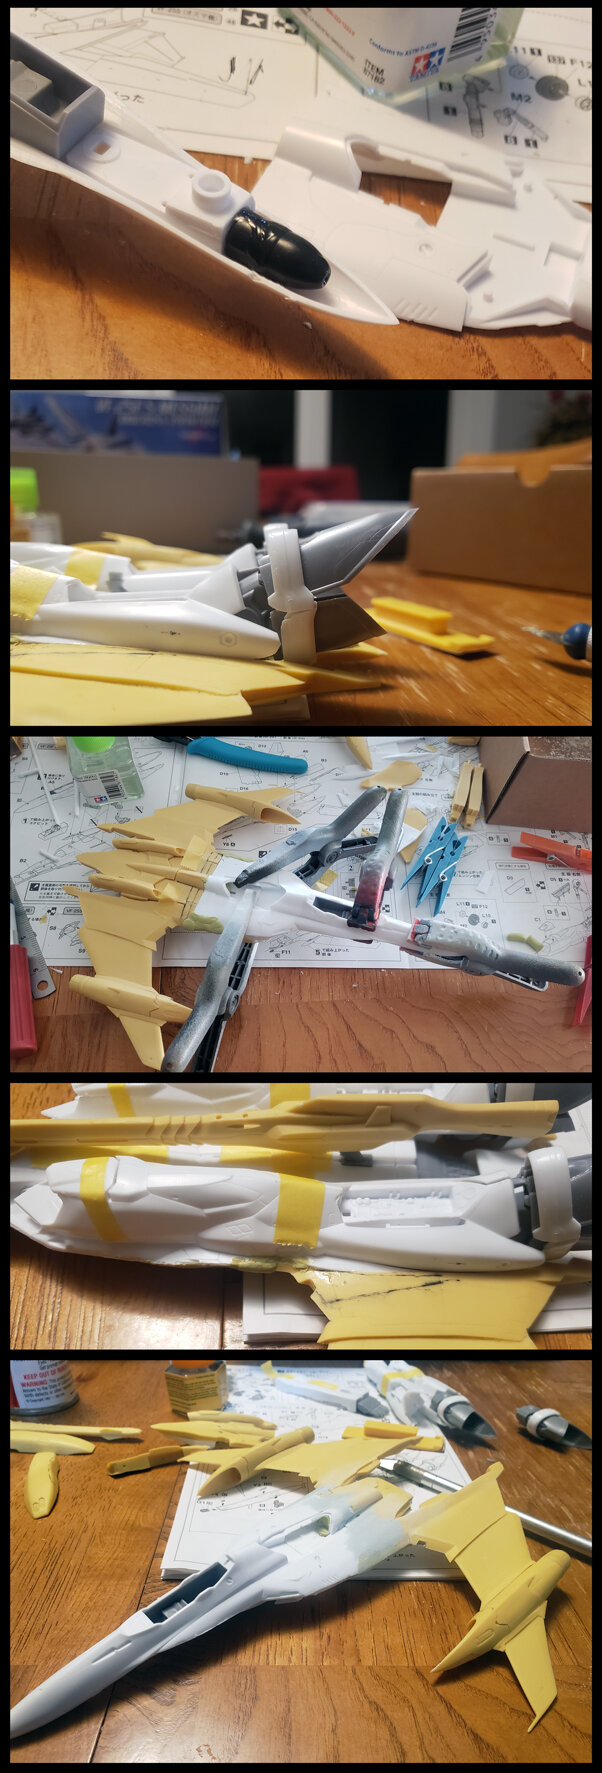
1. Adding coated led sinker fishing weights to the nose cone and behind the cockpit to help balance the heavy resin rear. 2. Feel mocked up. Almost the right spot. Just need to move them backwards a couple mm and then work on hollowing out the topside armor so they can sit straight. 3. We are one. Closed up with CA and Tamiya glues. Milliput was placed inside to help reinforce the joint and fill some gaps. 4. I had to carve out the wings a bit to get the legs to sink in where they need to be. 5. The body is joined. Another quick skim coat to smooth things and she'll see primer!
- 30 replies
-
- 1
-
-
- yf-29 durandal
- hasegawa
- (and 1 more)
-
...measure twice
- 30 replies
-
- 4
-
-
- yf-29 durandal
- hasegawa
- (and 1 more)
-
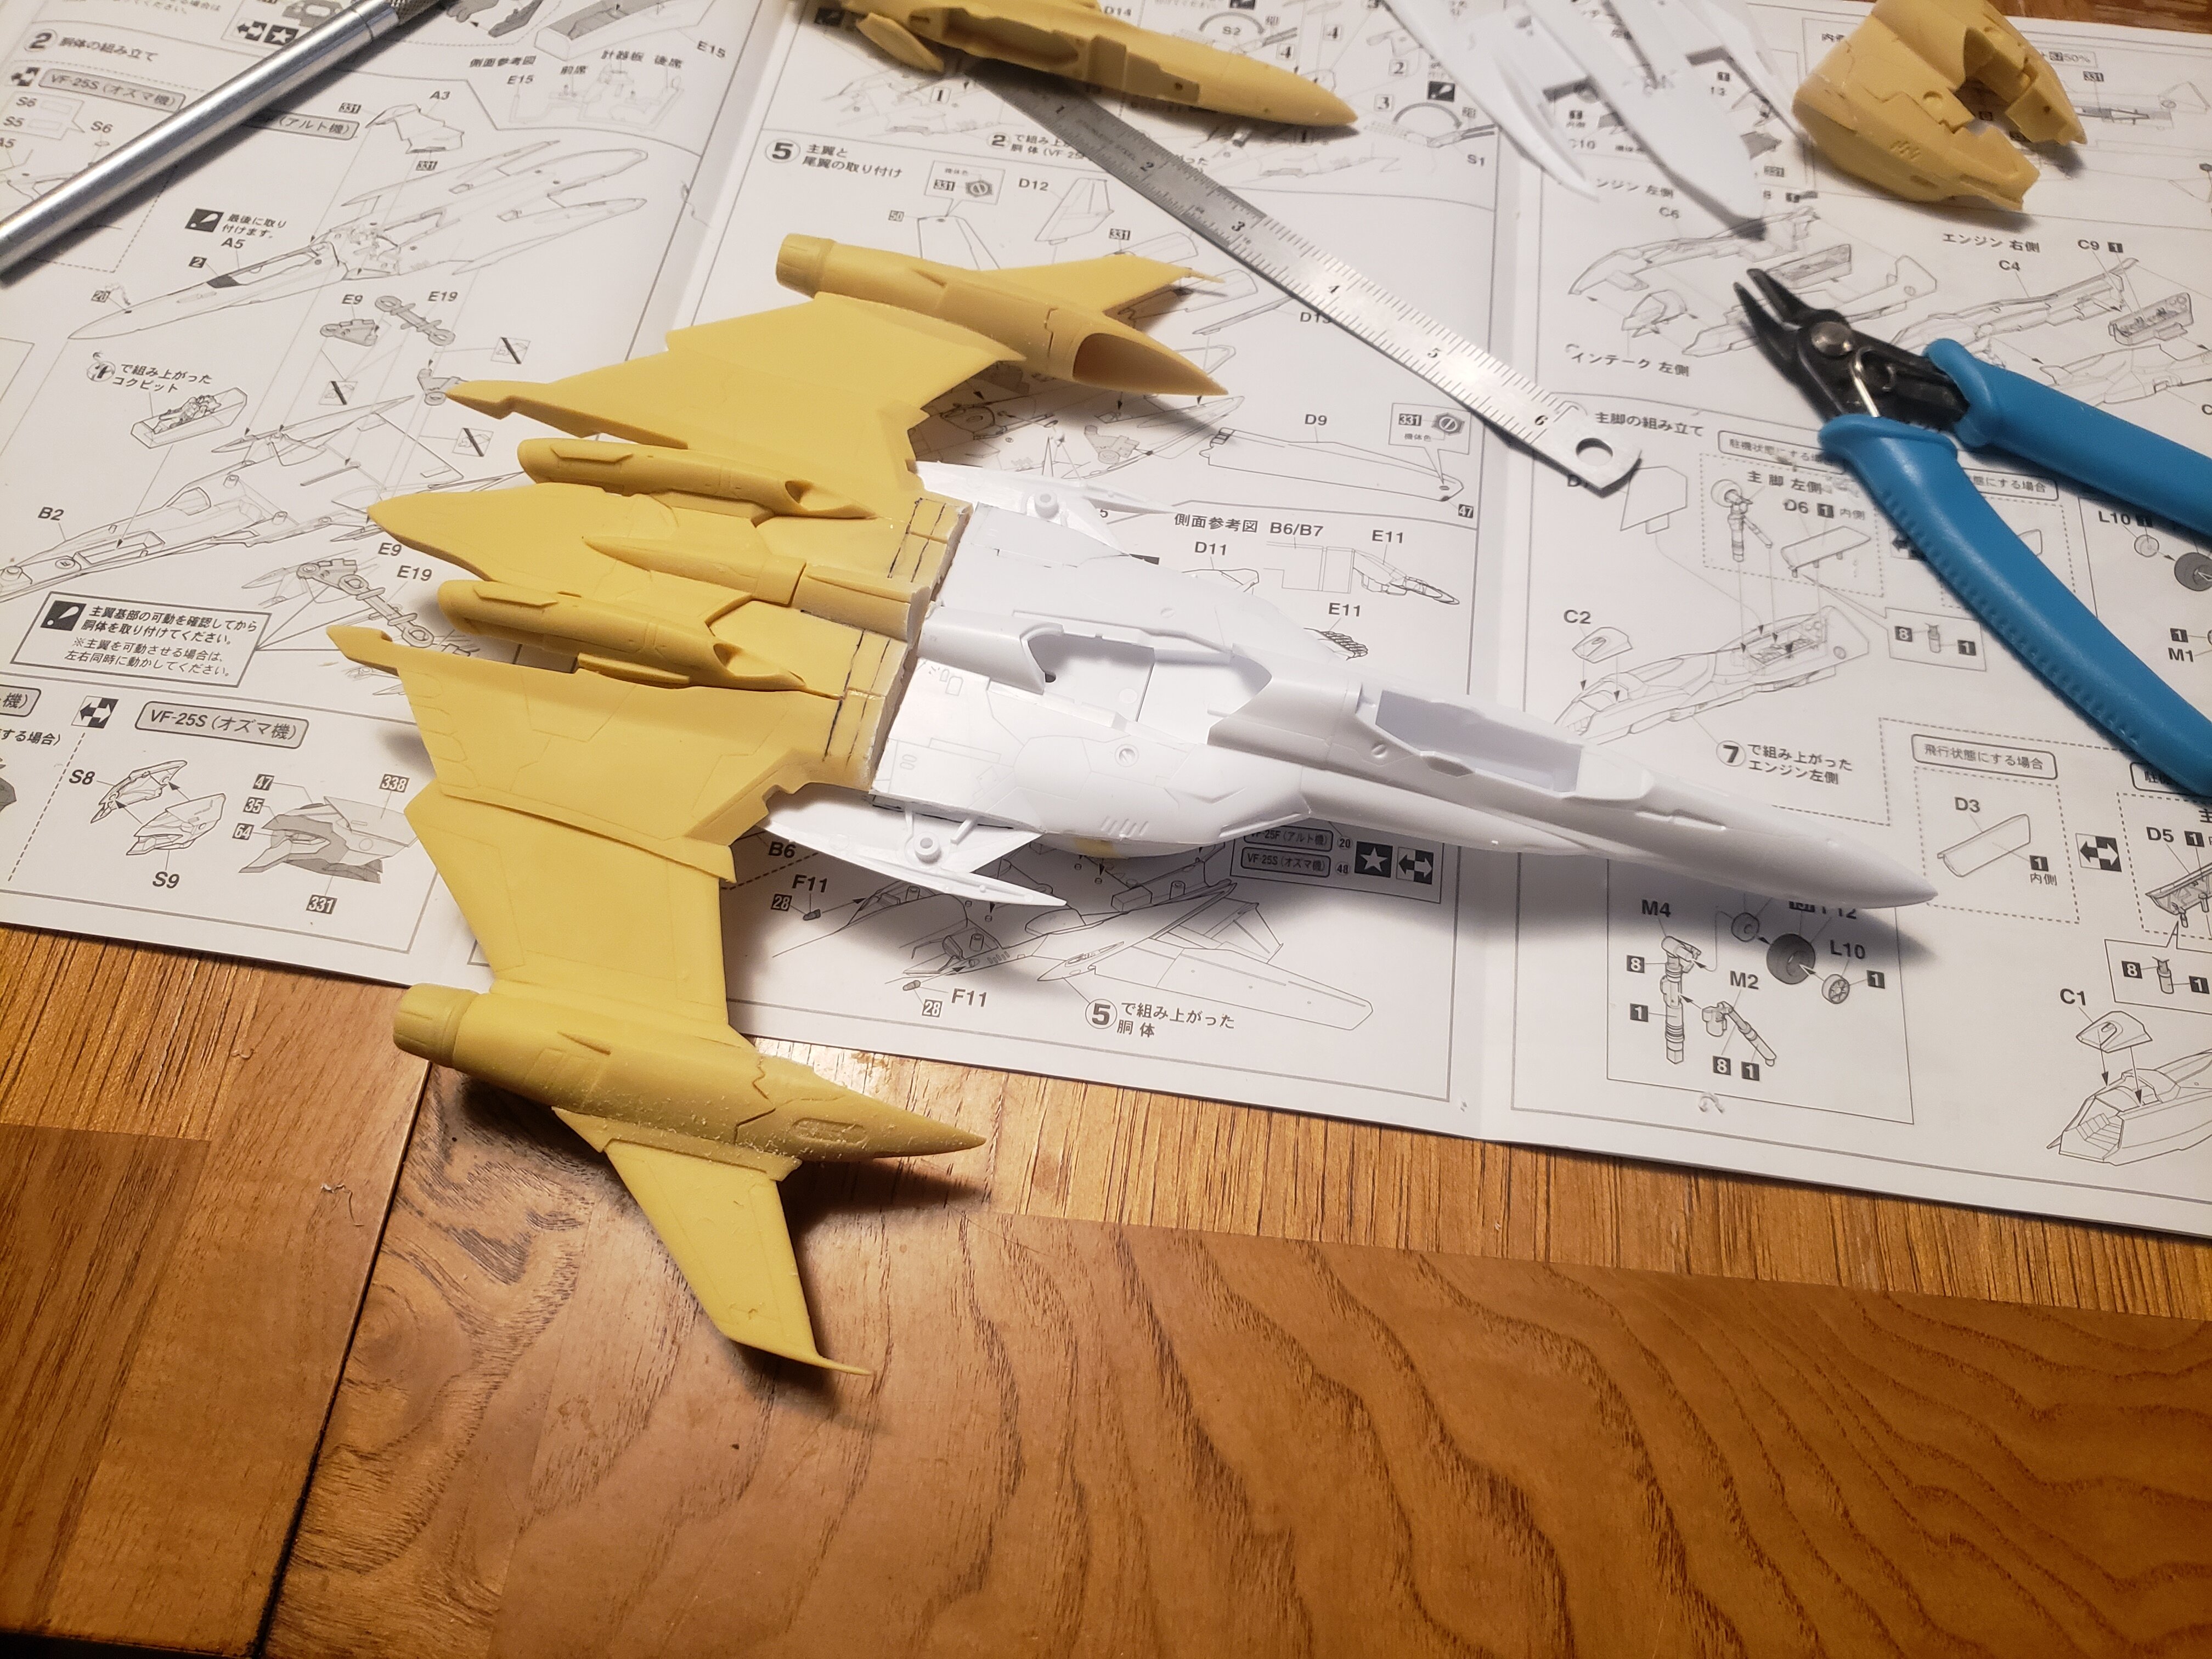
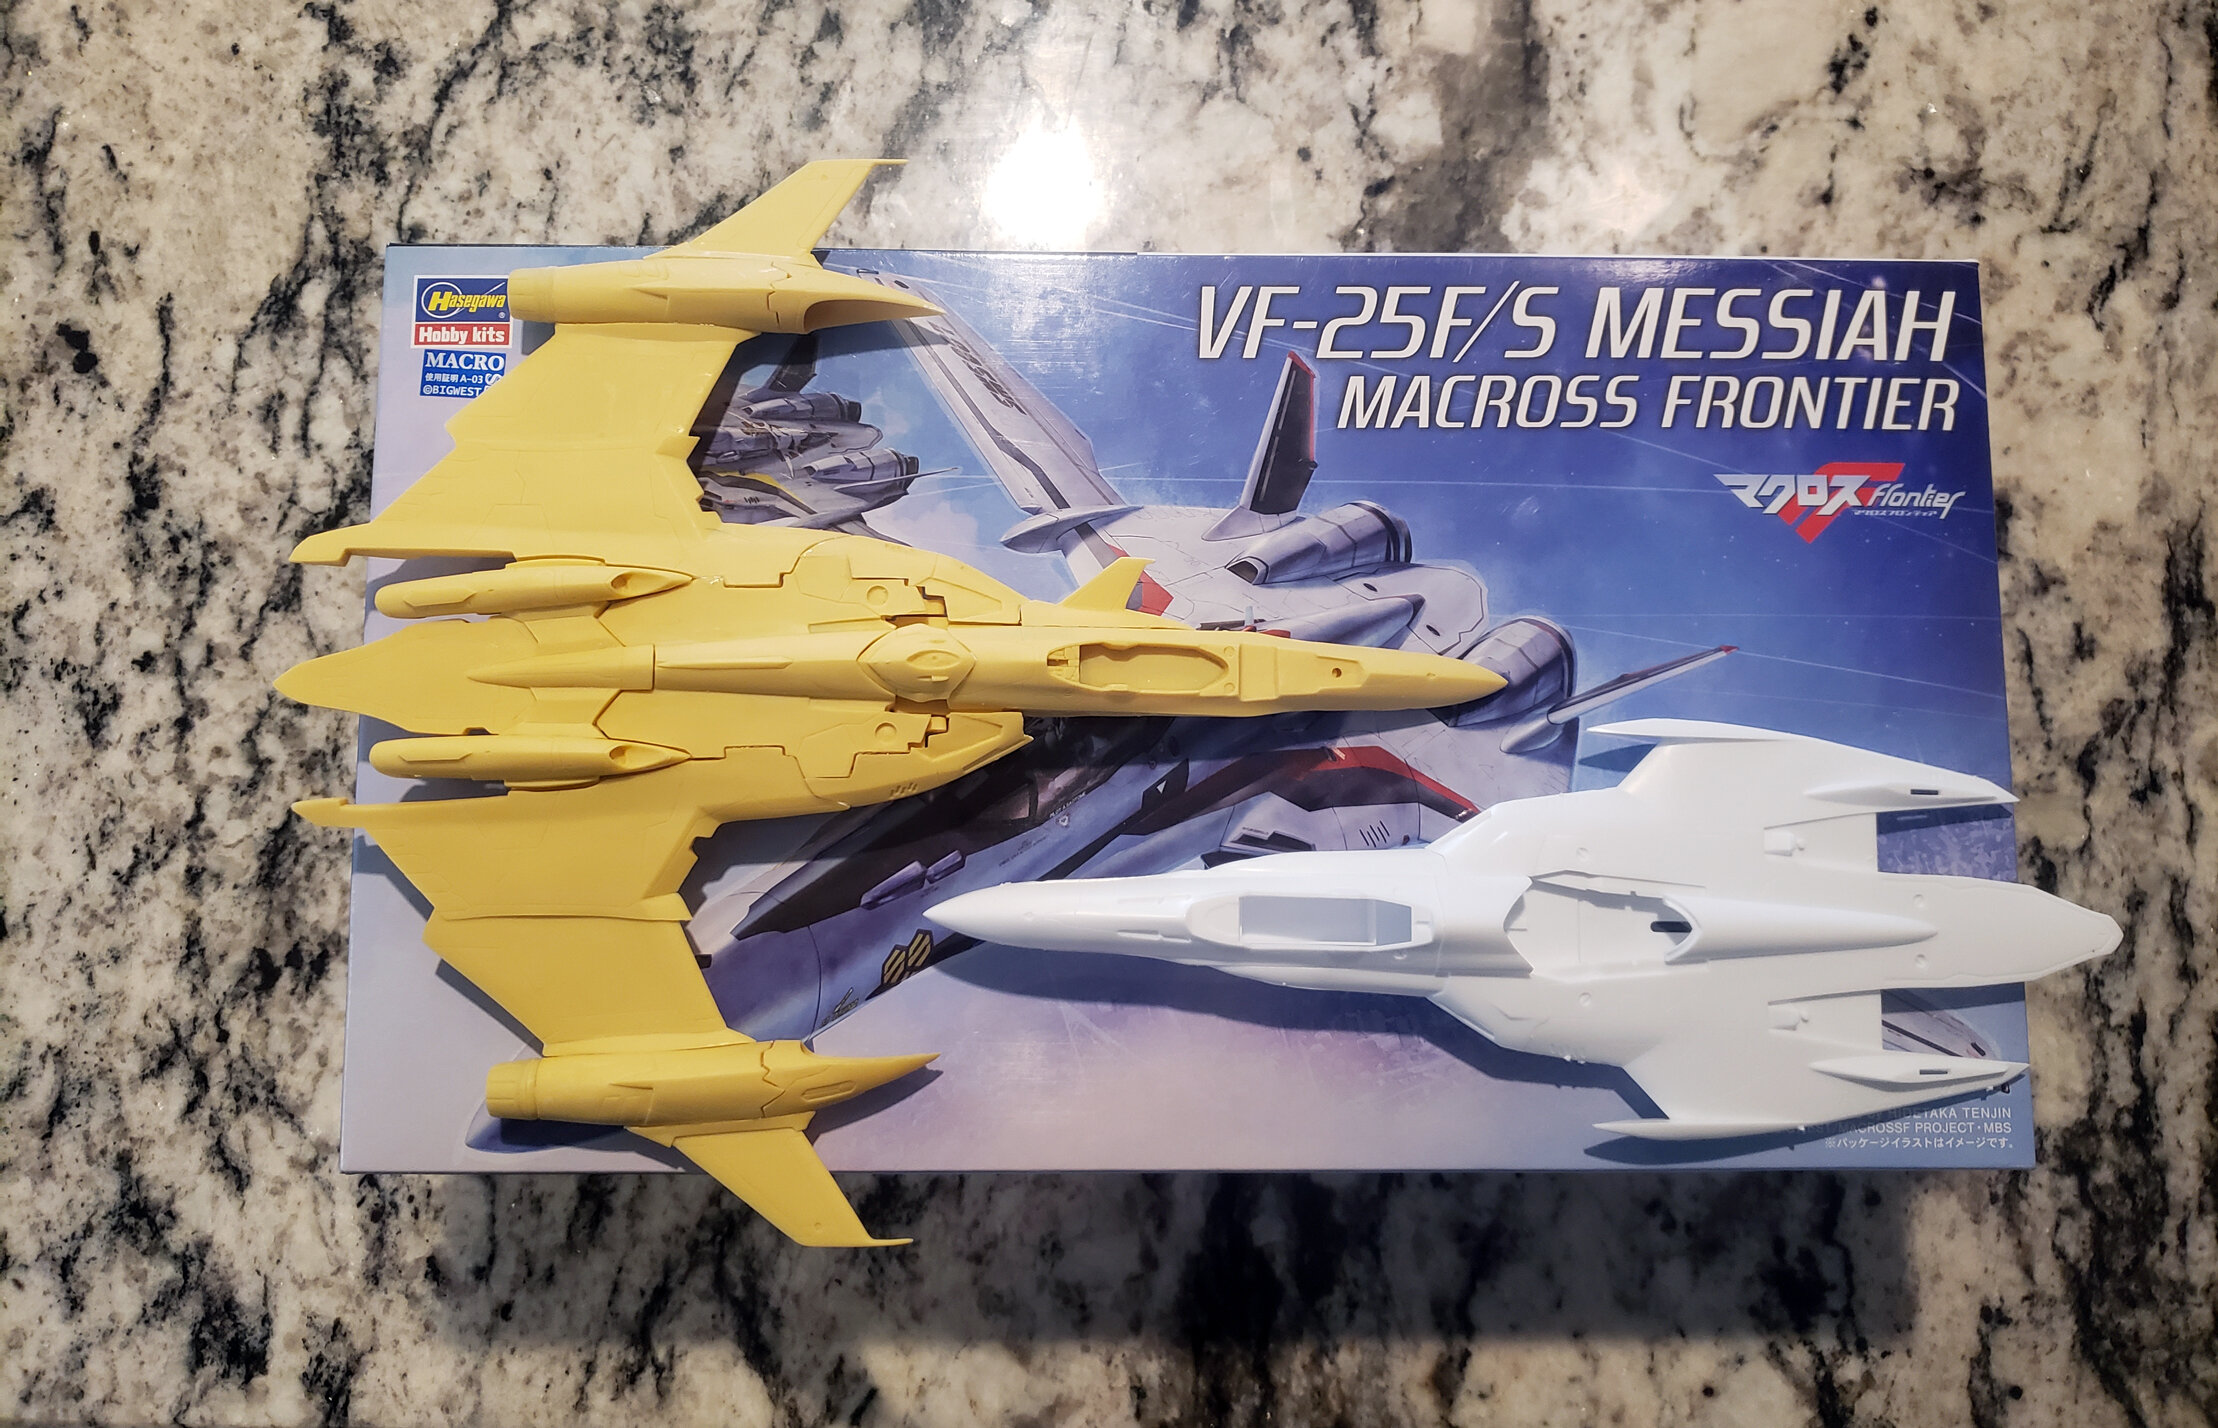
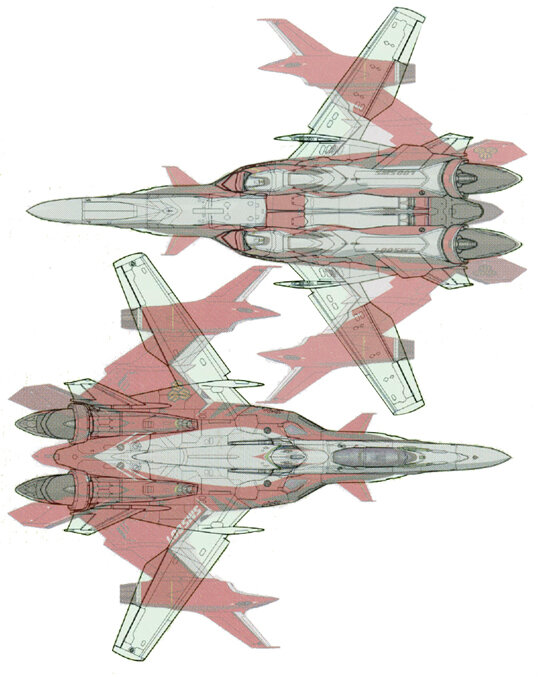
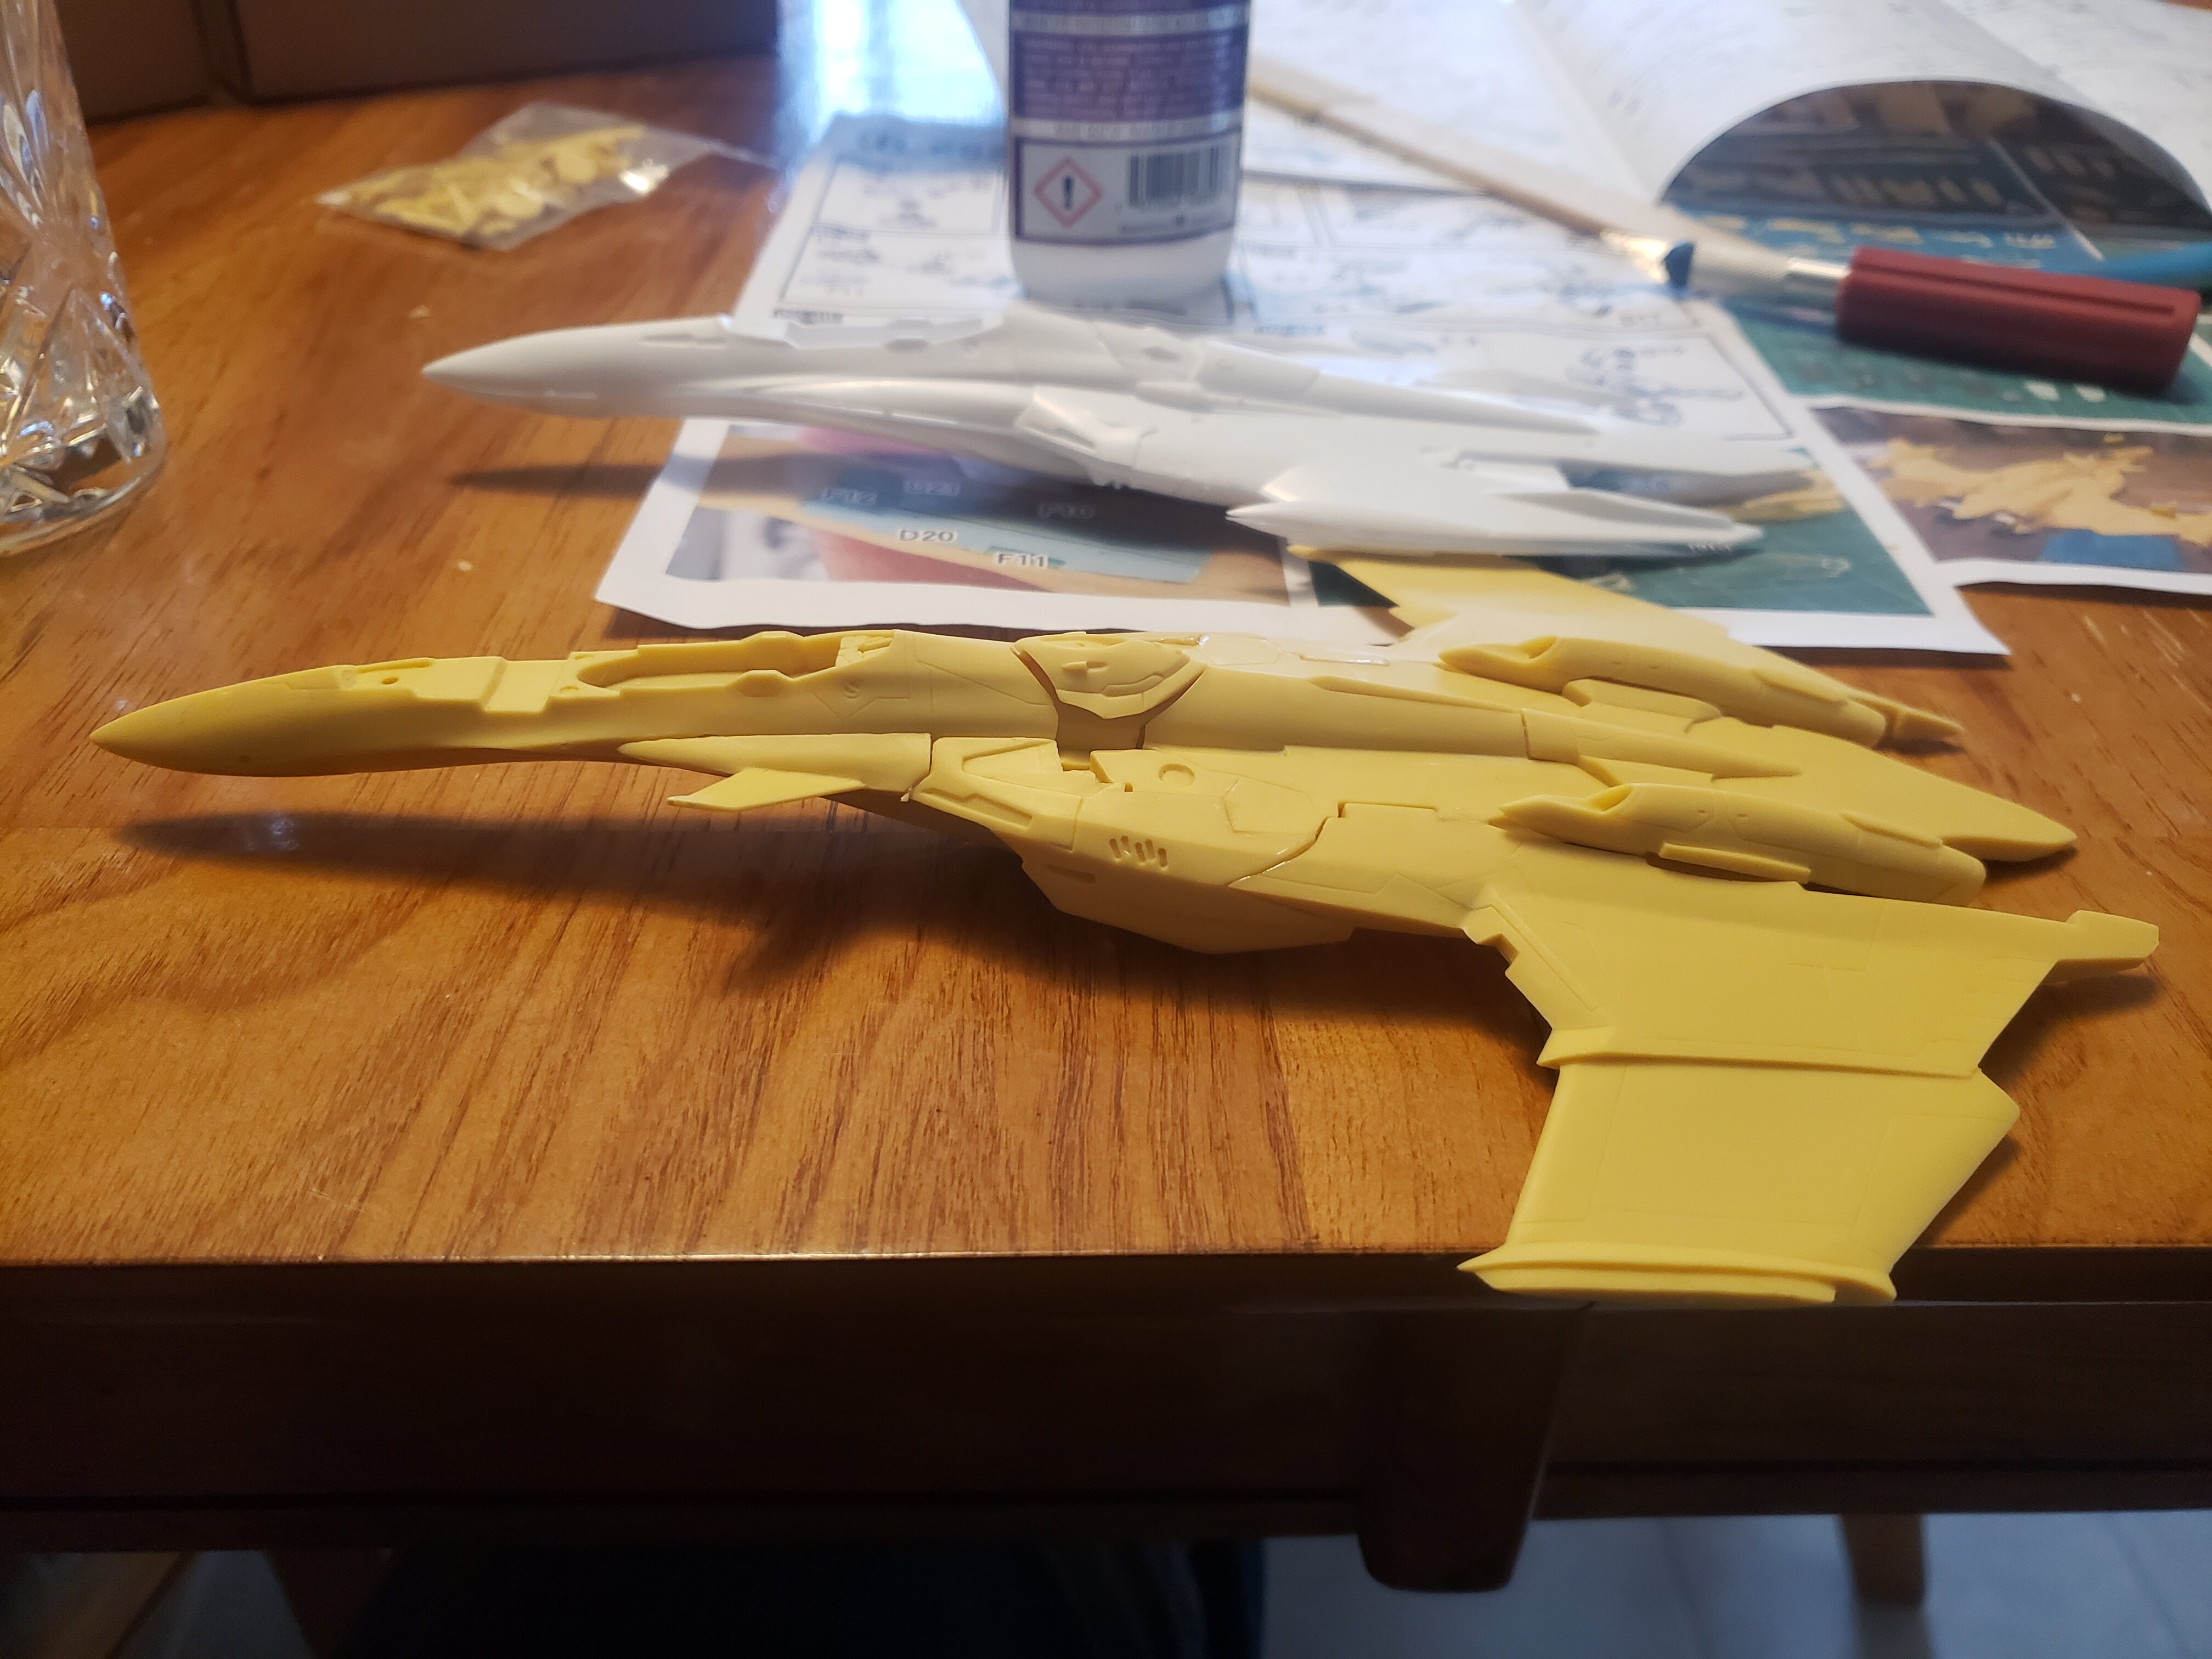
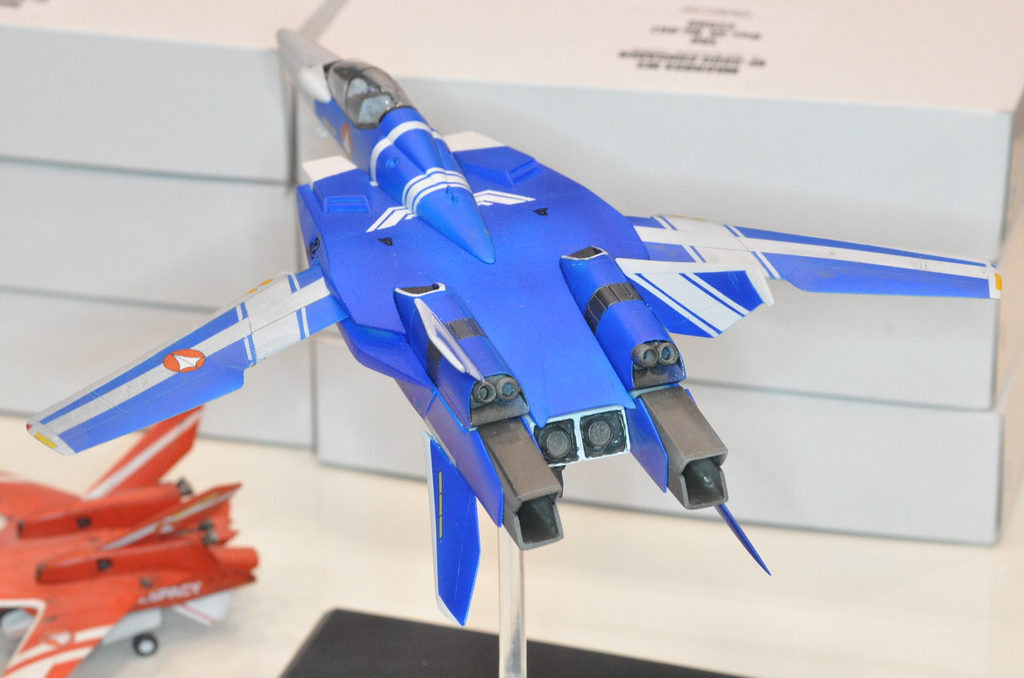
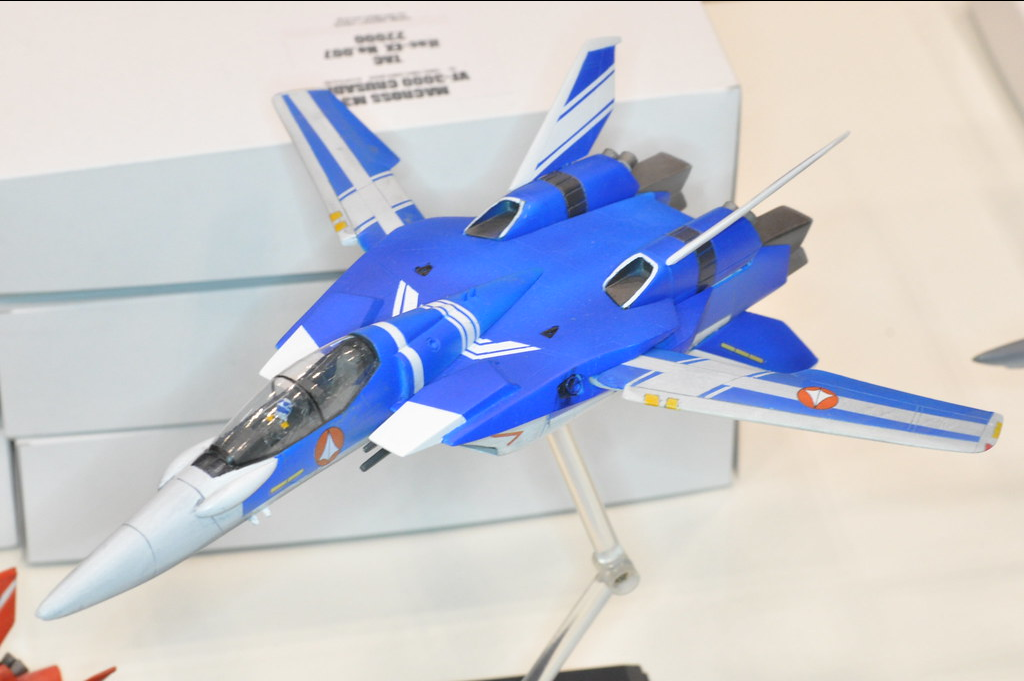
Planning this ~ デュランダル I've had the conversion ever since Bandai dupped us by going 1/100 instead of 1/72. It was shelved due to the bad (IMO) quality and aggravating proportions which give it an even more toy-like feel on top of it being a conversion for the Bandai VF-25f kitformers and a poor recast. Having scored a couple of Hasegawa Messiah's on ebay for real cheap I decided to put this project back on the table. Playing in PS with the VF-25's Master File linework and artwork from MacrossF Sayonara no Tsubasa's data book I think I figured it out what bothered me so much about the sculpt. -First I figured out a large portion of the VF-25f is usable in the conversion. Given the Hase kit dominates the Bandai intricate kit in details (like the engine and cockpit) AND the fact the conversion kit itself delete Bandai's details further... this is great! I should be able to use the cockpit/nose section, intake, and the legs in full. This makes me really happy. -Secondly I figured out just what exactly I hated about the conversion kit's sculpt. The main issue if everything topside from the intake vents/head forward is simply too small for the body of the kit. Comparing the resin kit's nose to the Bandai kit you can see it is visually sleeker looking. You then compare the Bandai and Hase kit any you realize it is shorter. So smaller and shorter and droopy. This is really visible comparing the kit on top of the movie's artwork. I expect I will try to use everything from the battroid head forward to fix this. Right now I'm still test fitting everything and need to get more of the Hase kit built. This will require careful planning for a complex cut to splice the kits together. It is very easy to rush the hacking and make more work like I learned with my Tornado Pack build.

- 30 replies
-
- 1
-
-
- yf-29 durandal
- hasegawa
- (and 1 more)
-
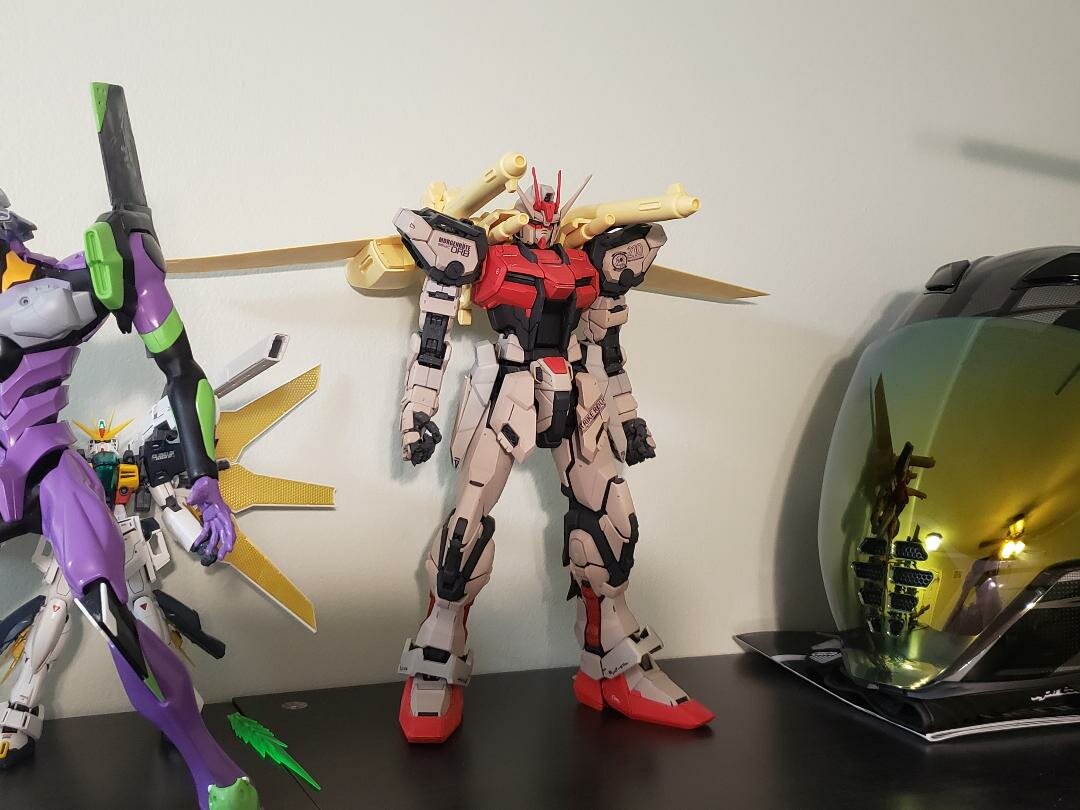
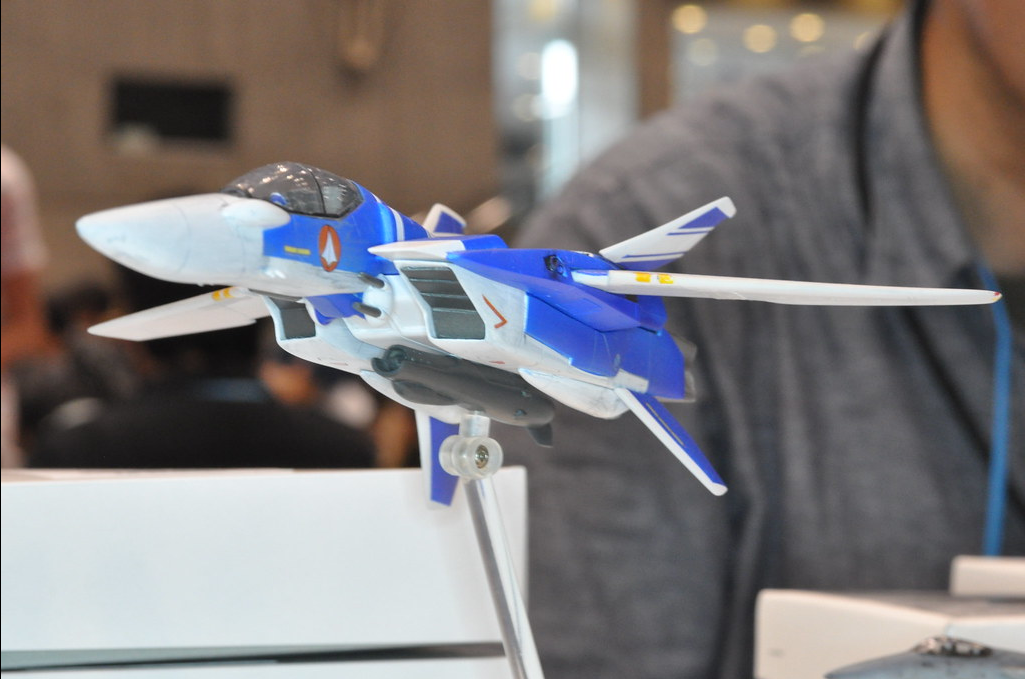
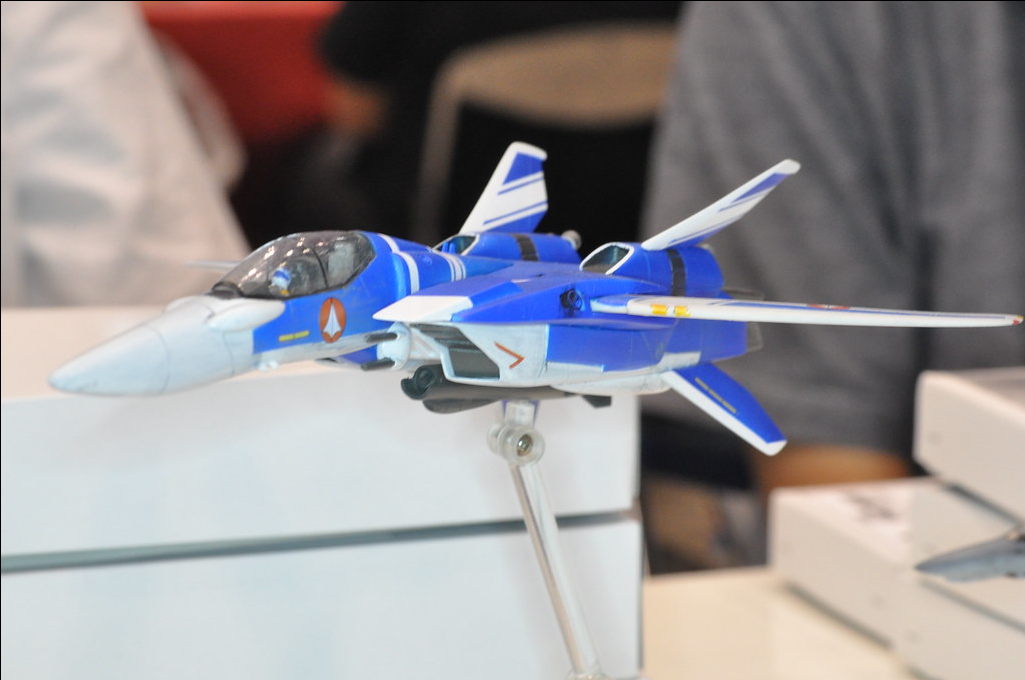
Officially OFF the workbench! Many defect but, I think I did alright in blending them together with the weathering. See if you can find the 30+ painted yellow touchup on the decals I had to do after chipping them when removing my masking. 😮 Difficulty in making the canopy clear on this on after the decal's application. Tried the Testors "Wet Look" Lacquer... had horrible issues with bubbles forming on the parts during curing. Back to poly urethane clears for the next one.
-
Just a random unnamed pinup character from the cover of chapter 069. R, you did a great job with the colors even if the skin tone is too light for the tanned beauty. 😛
-
The 'Hey look at this really cool model build I saw' post
Rock replied to Shawn's topic in Model kits
Insane! -
Few personal weeks off. Back at it. Ordnance on. One big mistake I didn't catch it until mounting... oh well. Canopy is all that is left, then onto touchups.
-
Macross Delta Zettai Live!!!!!! - Available on Blu-ray Sept 28, 2022
Rock replied to Marzan's topic in Movies and TV Series
Macross F Labyrinth of Time Question -
The 'Hey look at this really cool model build I saw' post
Rock replied to Shawn's topic in Model kits
Max's YF-29 repaint. -
Has anyone seen the 1/72 pop up recently? (Well... post WF2013) Doesn't seem Experten is doing much these days. Need some more M3 in my life.
-
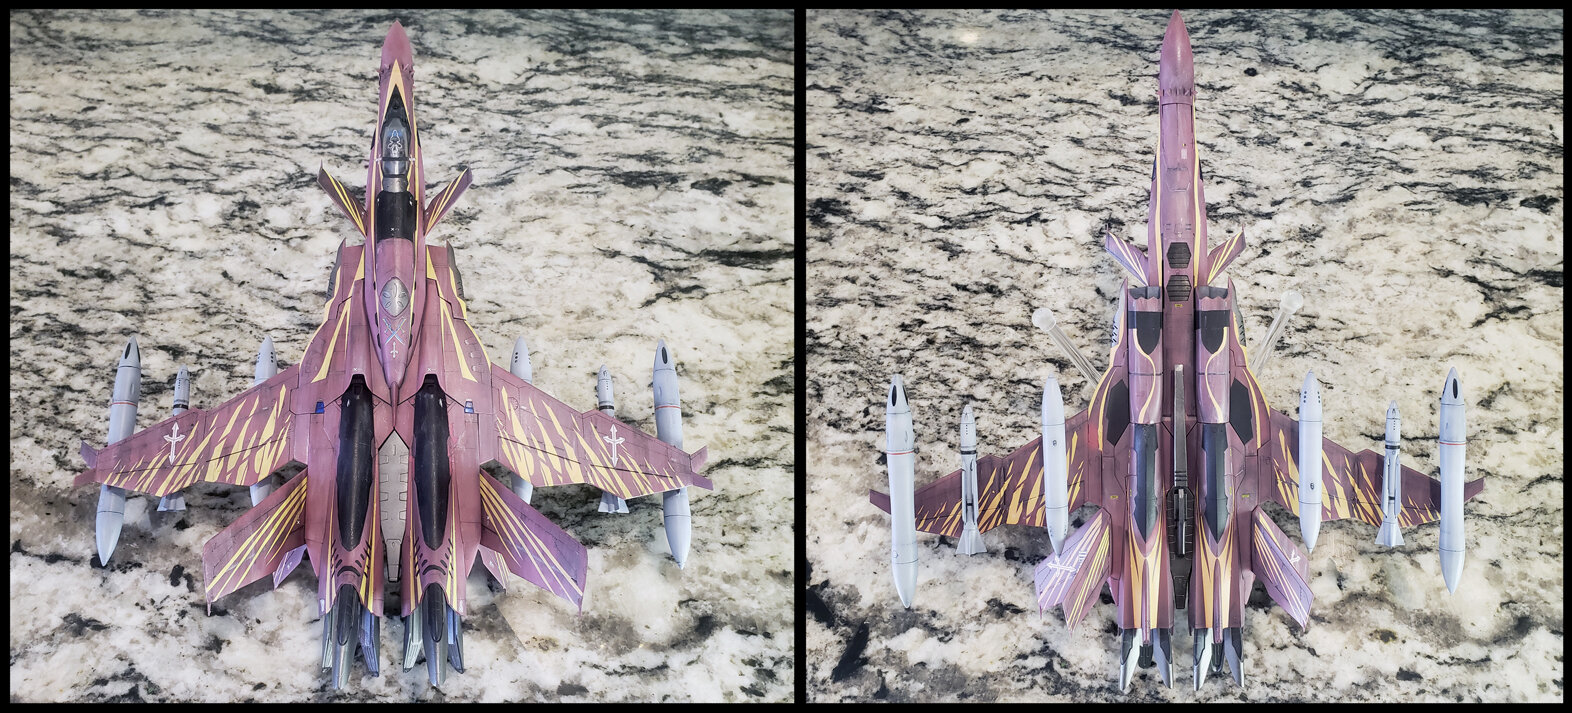
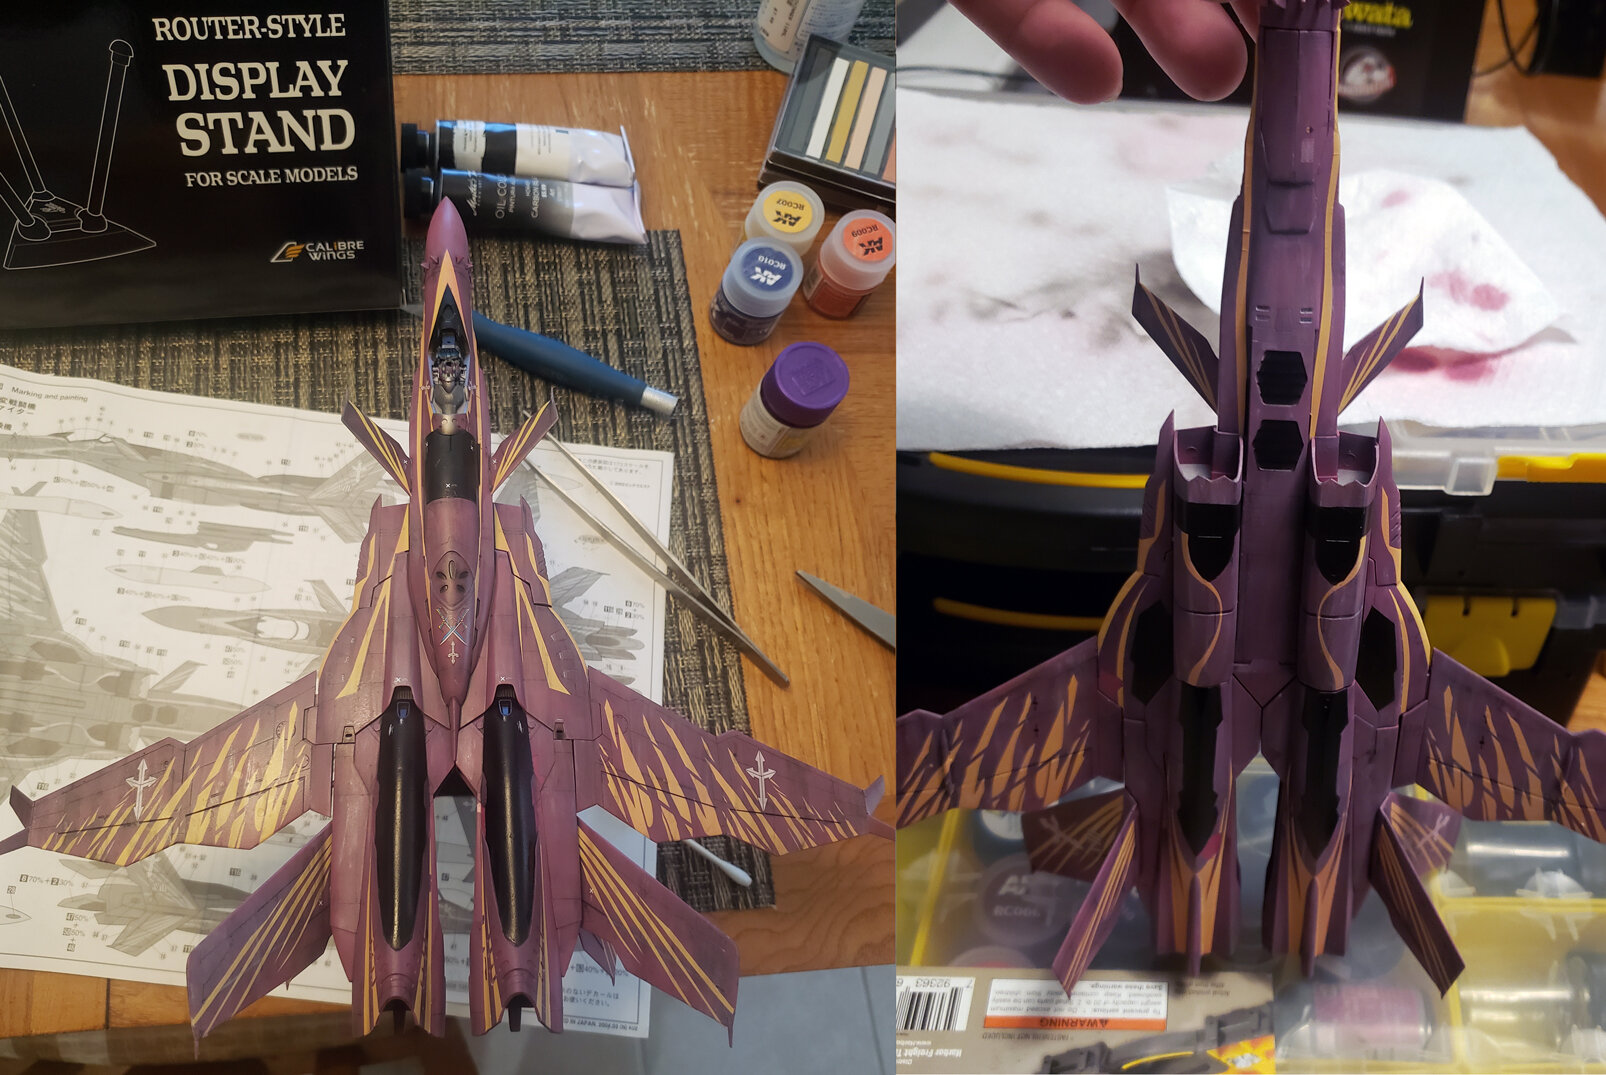
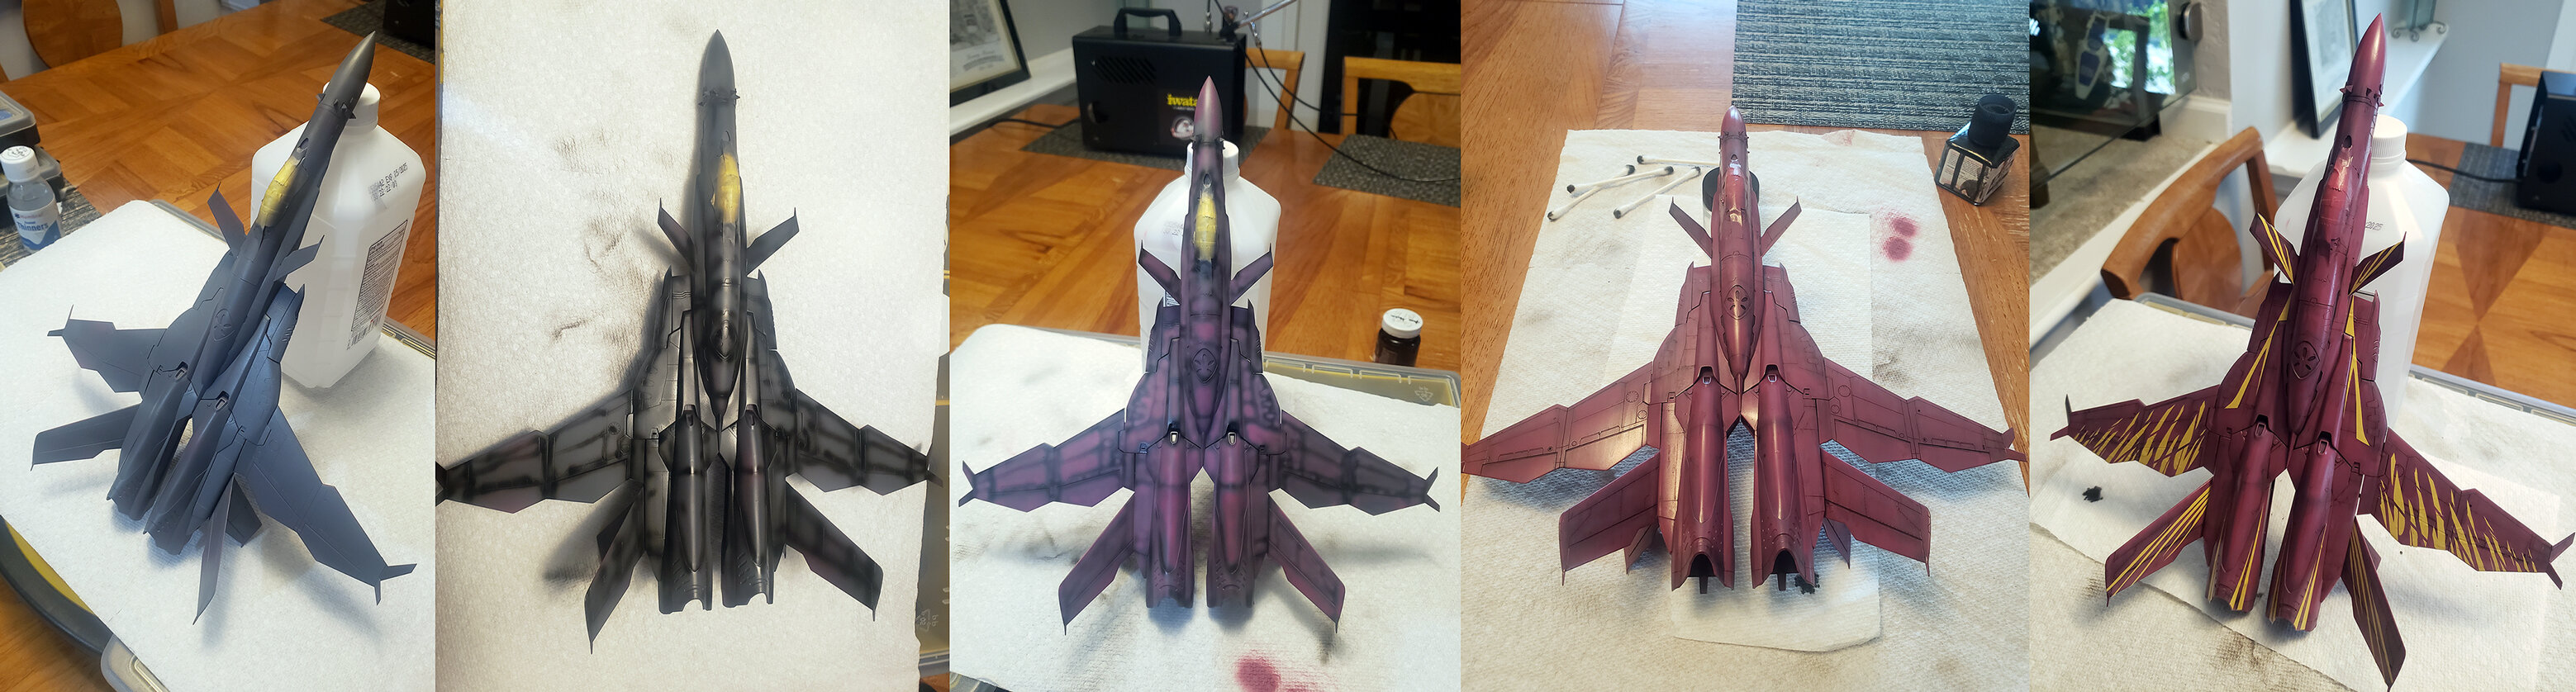
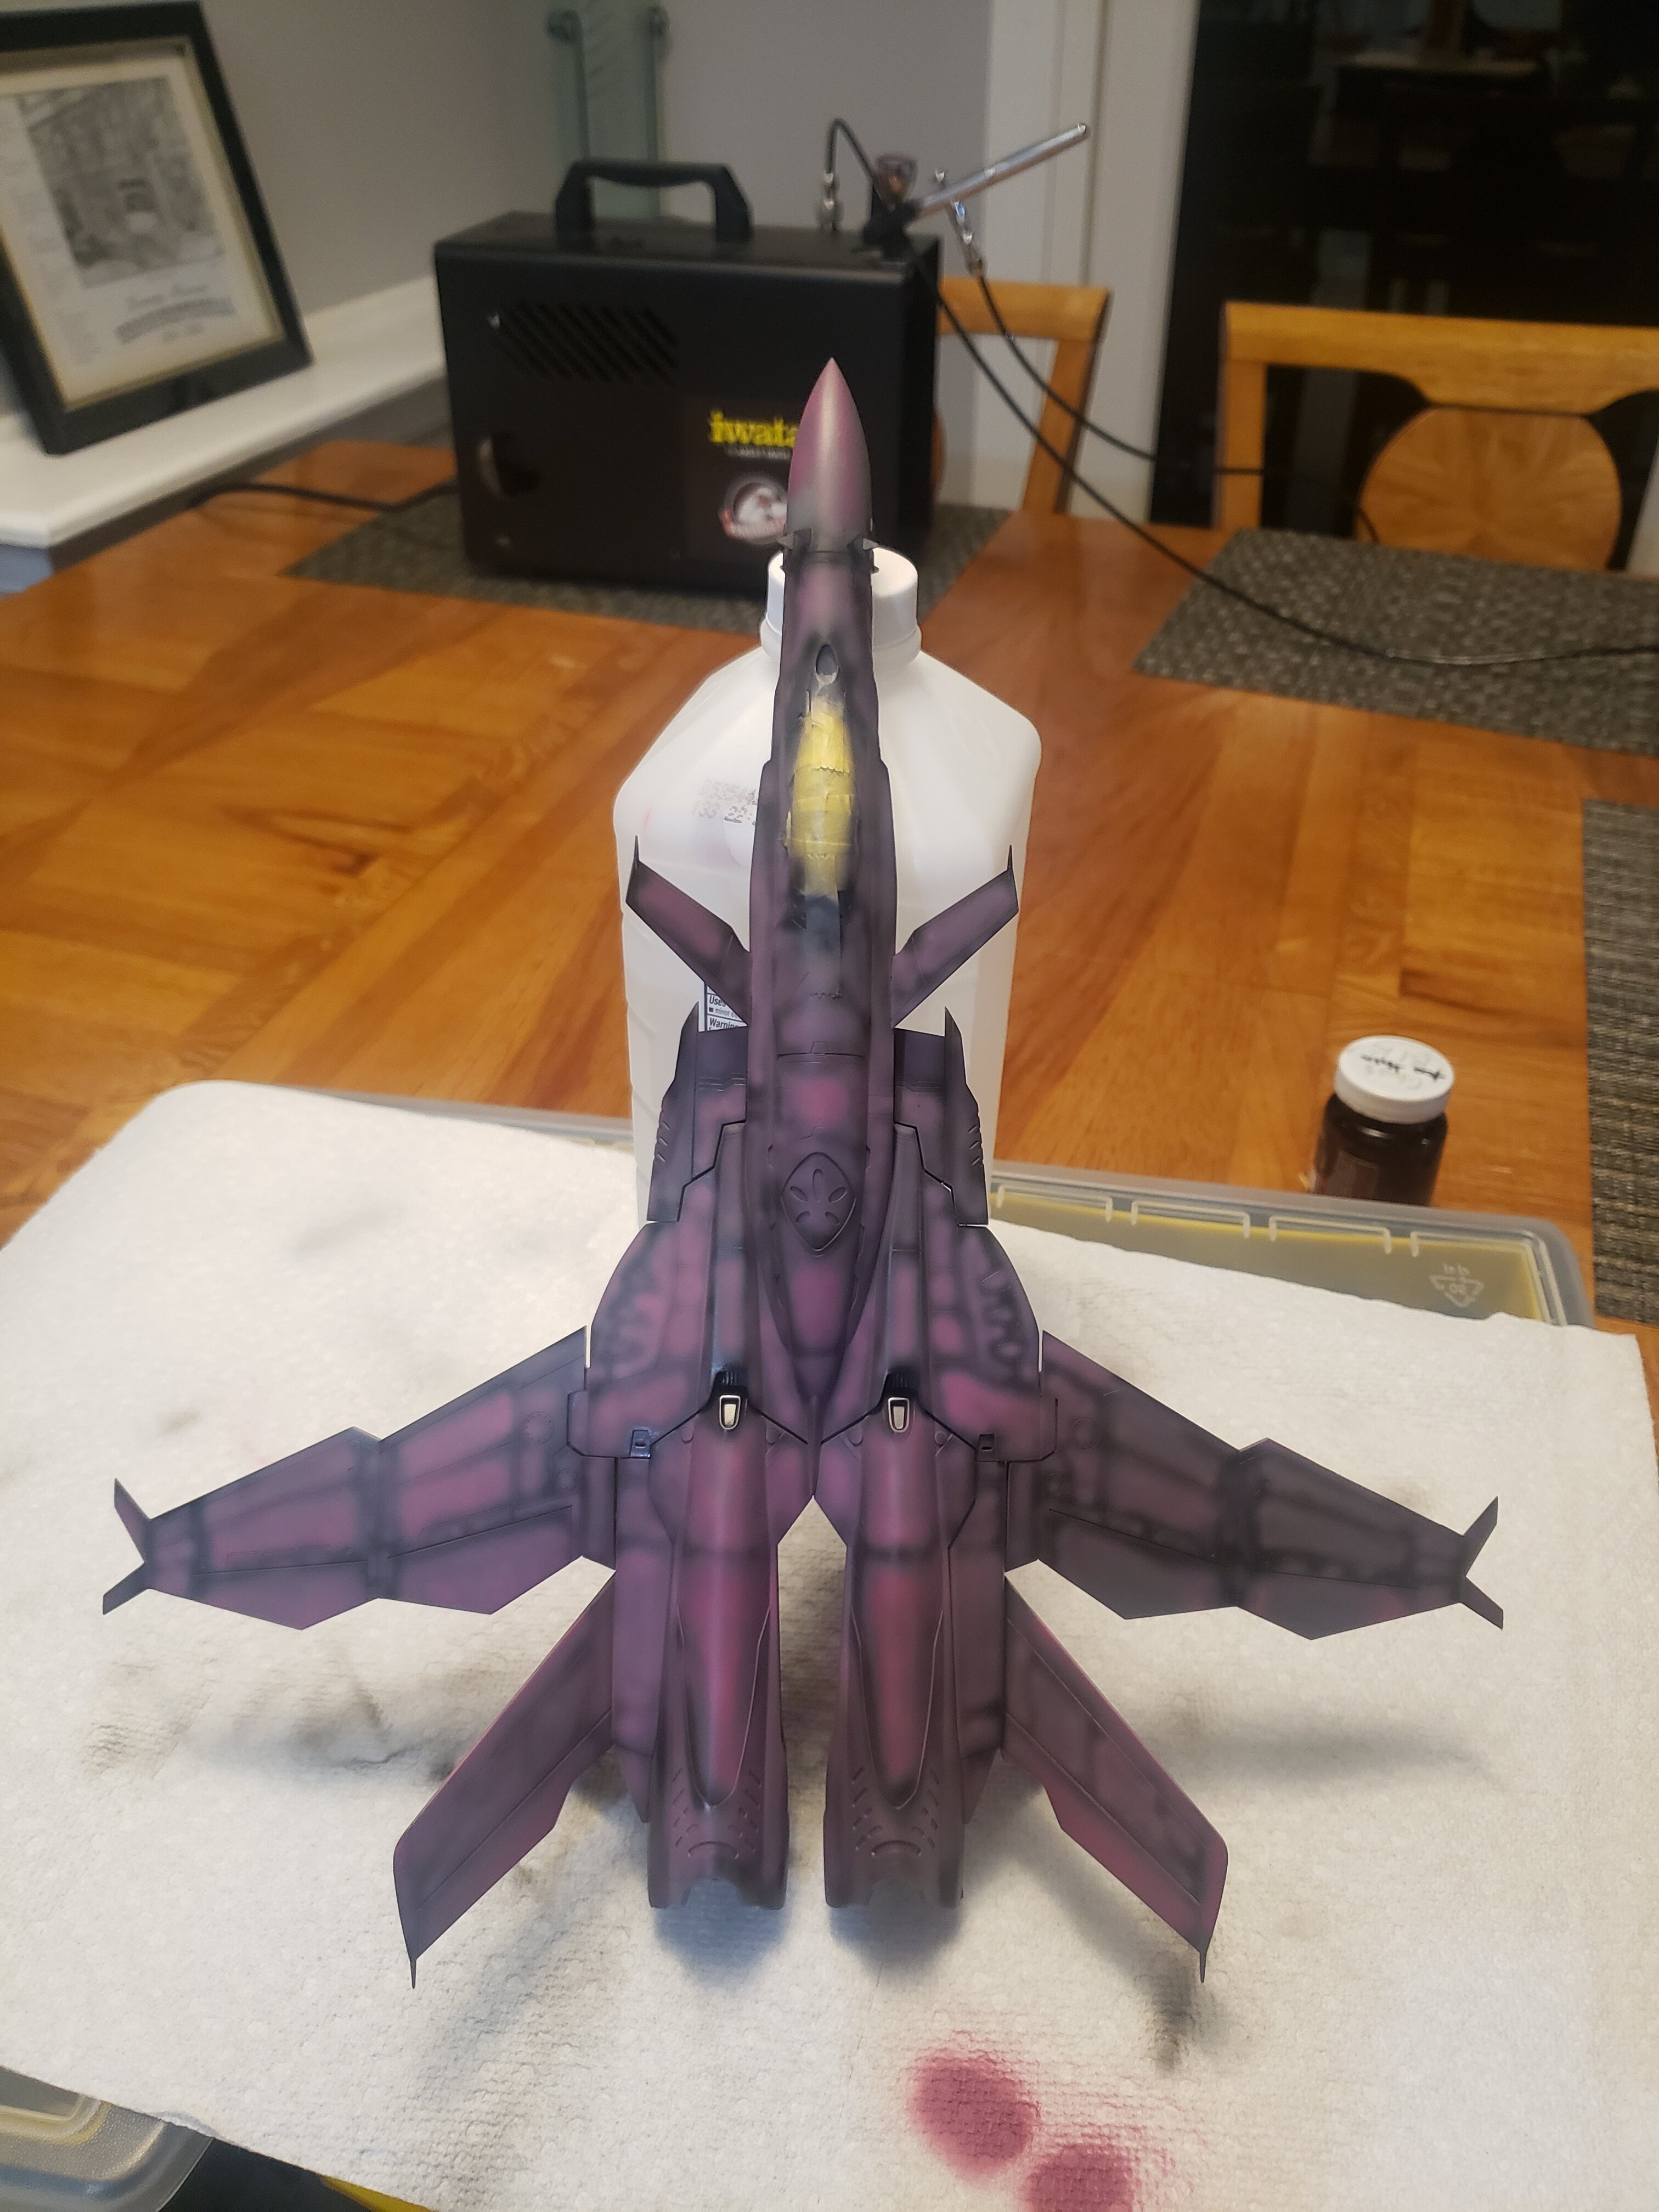
They had one, just not as much. I expected the next round of weathering to make a big contrasting impact that may need to be toned down again with another dusting, so I left them a bit clean as with the crosses. Anyways. Few mishaps. Some of the microsol didn't play well so some of the streaking was messed up with bleeding. Not end of the world but pretty annoying. Mess up 2 was as I expected. I had some paint/decals pulled off when masking, repairing that should be fun. Thankfully it is all pretty minor and in places that aren't too visible (top inside stripes on the legs.) Despite pre-tacking the tape and also 3-4 round of clear sealing in weathering effects it still happened. As far as weathering. Since the last round. I tried AK Weathering Pencils. They weren't very good and didn't seem to want to transfer onto the Alclad flat topcoat very well. I expect they might work better on white paint for a focused chipping effect. I ended up just switching back to some artist pastels (tan, brown and white) I had and then using a dry brushing esq technique to blend them in a bit. After that another topcoat and an old fashion dot filter was done with artist oils/cold wax (titanium white). I dotted the surface using a tooth pick and let it sit for a minute. I then used lighter fluid and a still brush to blend in the effect a bit. Didn't turn out quite how I wanted it but the pink-maroon color and yellow are far from my normal color pallet range. Following that was another maroon dusting and a semi-gloss sealing in preparation for painting the black parts and doing all the mind-numbing warning decals. Once they dry it is back to a flat coat for weathering the black parts, sealer and then I can paint the parts that will stay metallic. Also picked up a new stand. Pretty cool. Would recommend if it was around half the cost. It's just hard to swallow at $22usd for what it is. Contrast of the fresh black and the rest is quite something.
-
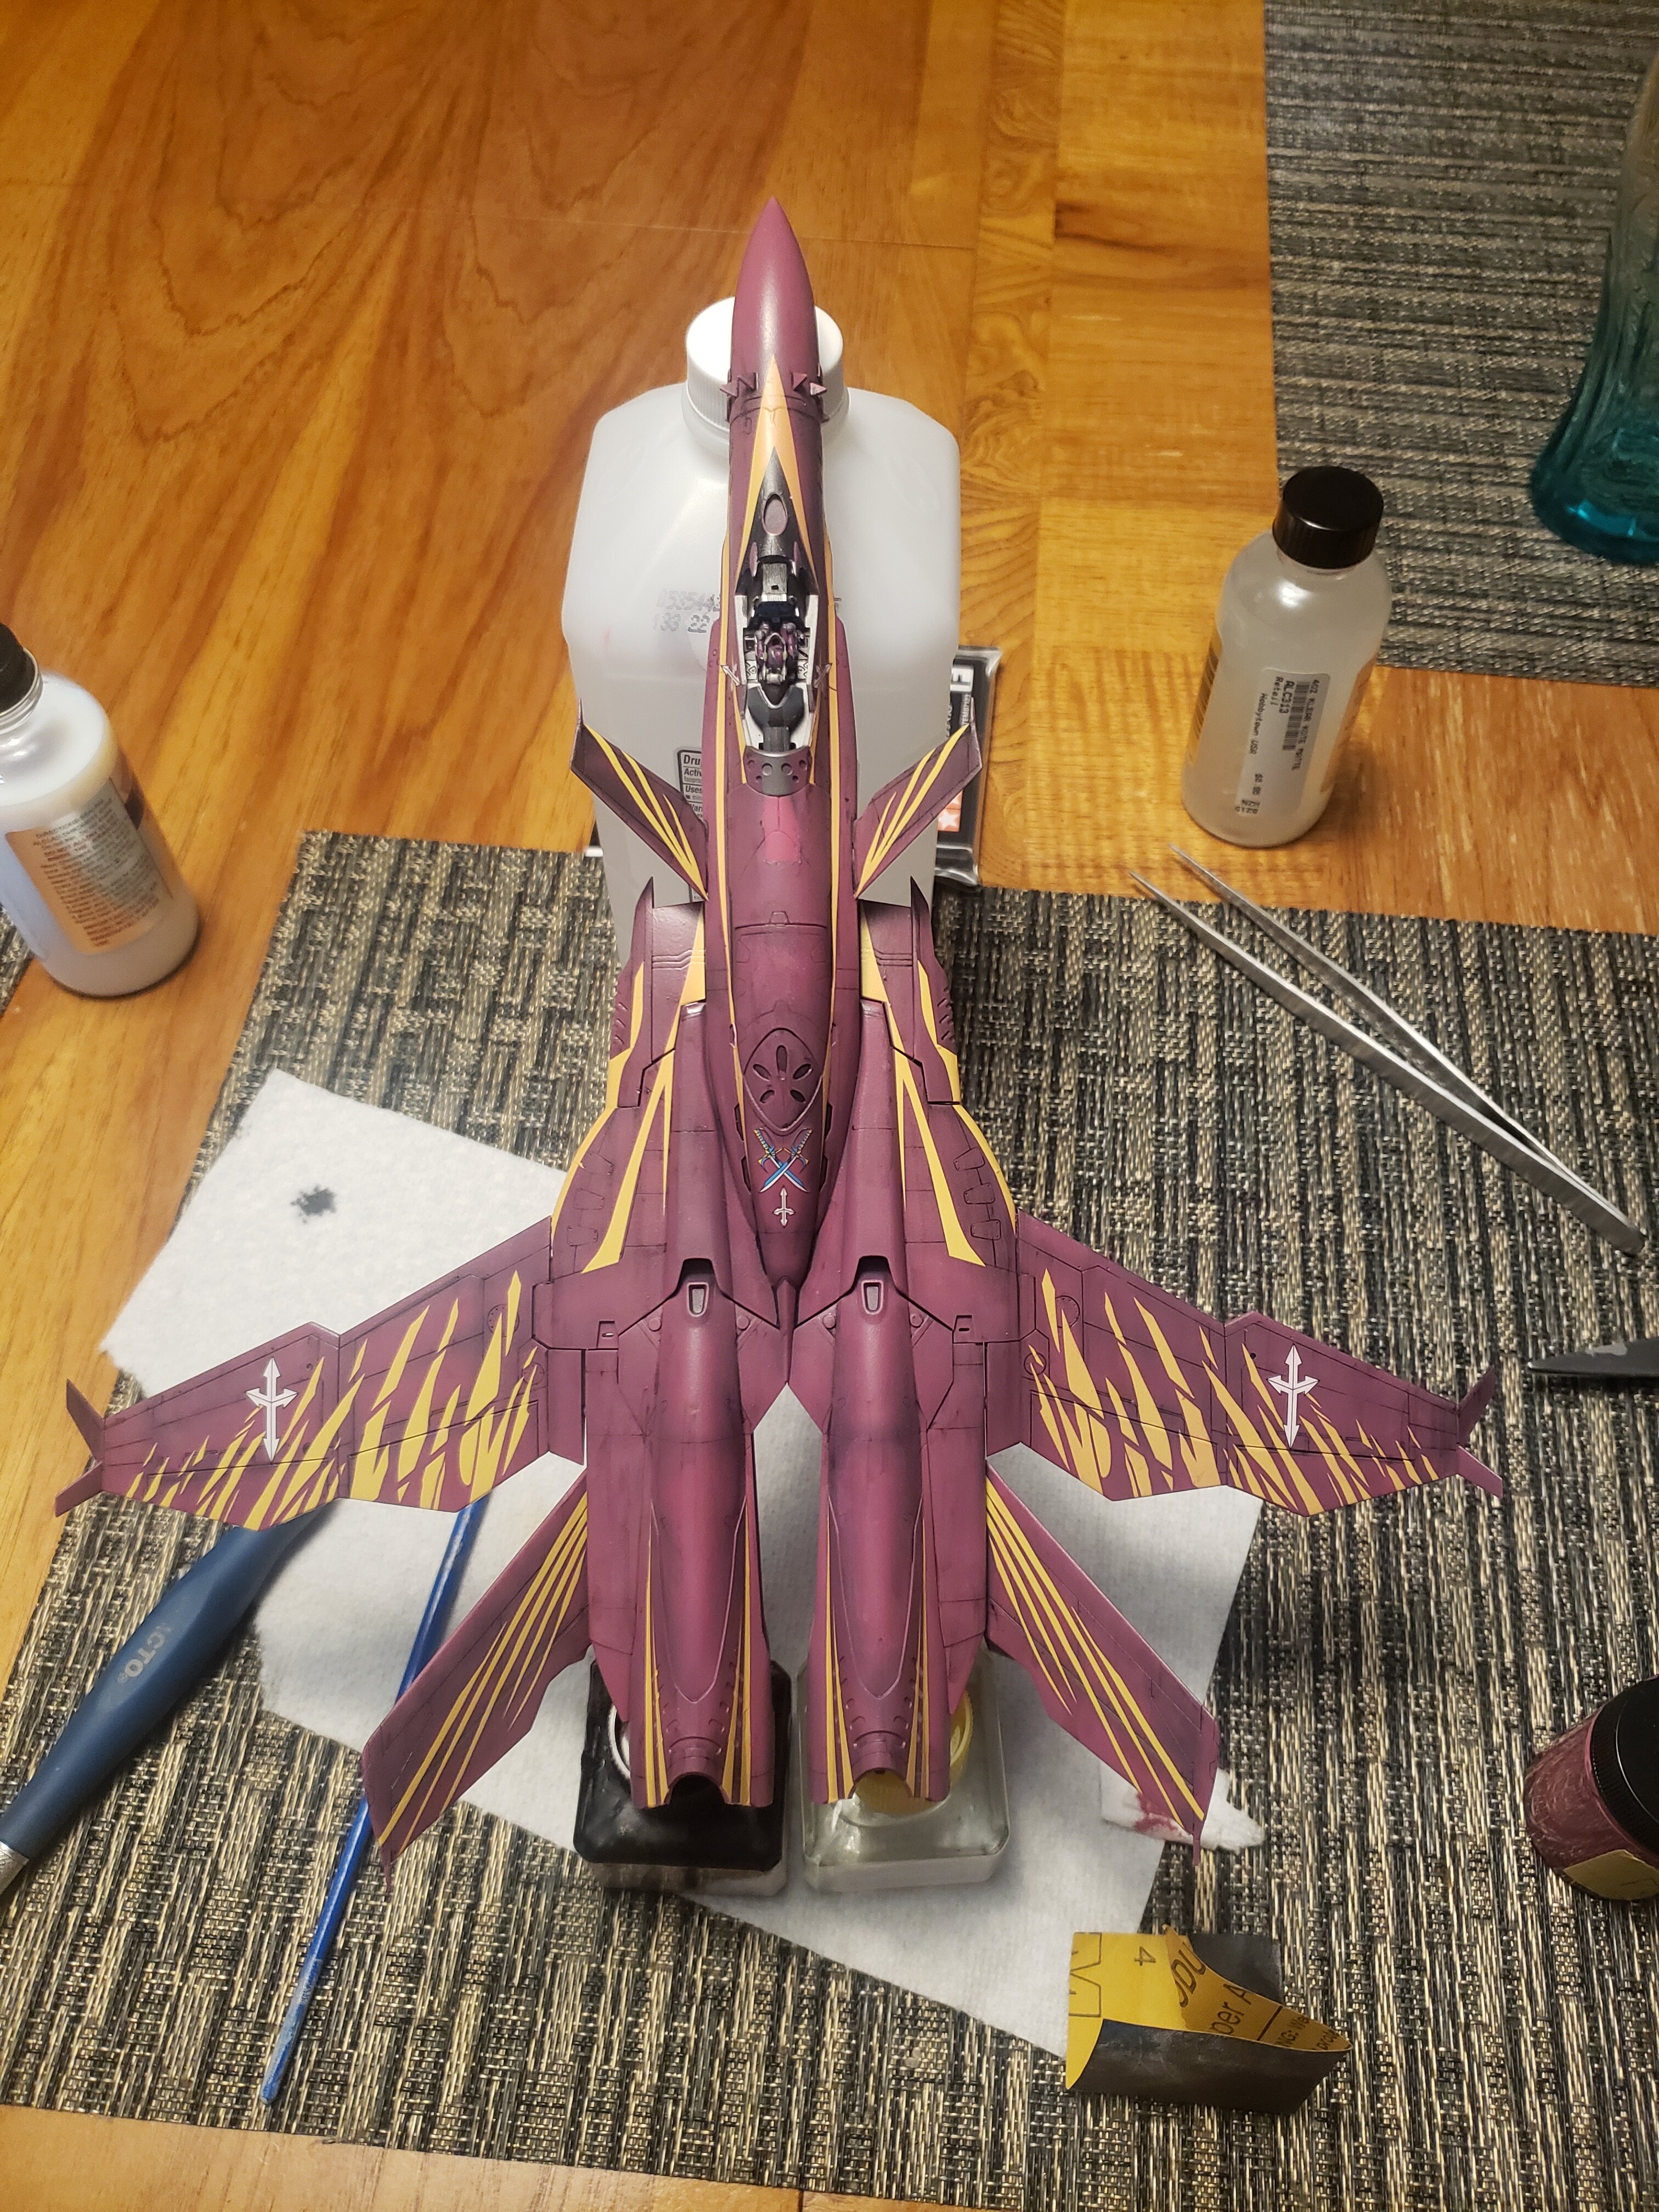
Survived the decals. Hit it with some gloss clear followed by a dusting of the body color that was overthinned. First time trying this. The thought process is it would help tone down/fade the contrast of the fresh yellow decals against the weathered body. Sealed with matte clear and ready for some more weathering before the black and grey accents are added. Going to pick up some weathering pencils to try out for panel highlights instead of dry brushing this time.
-
Macross Delta Zettai Live!!!!!! - Available on Blu-ray Sept 28, 2022
Rock replied to Marzan's topic in Movies and TV Series
Gold Visor over gray hair IMO. FWIW His actor is credited for the film, sadly seems Milla's isn't. -
Macross Delta Zettai Live!!!!!! - Available on Blu-ray Sept 28, 2022
Rock replied to Marzan's topic in Movies and TV Series
Walkure wa Akiramenai full version. https://www.bilibili.com/video/BV1yL411x7pu -
Macross Delta Zettai Live!!!!!! - Available on Blu-ray Sept 28, 2022
Rock replied to Marzan's topic in Movies and TV Series
Is the Hot Topic Walkurie a digital idol group like Sharron Apple? -
Cannonball run last night into the morning. Gotta love the ability to work fast with lacquer paints! Gray 1500 Surfacer+Mr. Color Black Shaded with Alclad II Gloss Black Base Preshaded with an AK Paint mix of my color + white Dropcoated with my AK Interactive Paint mix color. (Red06+Blue11+RotRed66+White04) Topcoated with Alclad II Aqua Gloss Dirty Washed with Tamiya Panel Line Accents + Black Artist Oils. Topcoated with Alcadd Aqua Gloss Decals!
-
zzinto
-
Not unless the decals become a disaster, (it's an old kit that has been sitting.) I wouldn't mind trying to airbrush some candy orange over the top of them to give it some variation opposed to flat yellow. I haven't had much luck lately trying to mask over decals that have been sandwiched in between clear coat. Even pre-tacking the tape, I've manage to pull them off on the last few builds. So far she's primed. The hurricane blowout from the east has given me nothing but rain today to work in... 😕
-
Hope for in paint this weekend.
-
Yup from WF 2014-15 from Frameout Models. Haven't seen an original on YJA in years and the webshop has been closed for some time. FWIW I'm pretty sure the GKM recast doesn't require the Bandai kit if you go that route. I do know the conversion kit could (with a little bit or work.) Homes (http://inventive.web.fc2.com/index.html) did an amazing job modeling the kit and is one of the only few examples I know of outside of the resin kit.
-
In an attempt to clear out some big boxes in the basement I brought these old kits back into the daylight after 10+ years to finish them. Just need that "I finished a kit" high to ride into my next clear valk project which will be a first time experience! Trying to match the paints to what I mixed long ago should prove interesting...