
NZEOD
-
Posts
1955 -
Joined
-
Last visited
Content Type
Profiles
Forums
Events
Gallery
Everything posted by NZEOD
-
Who's going to be the first to do THAT I wonder?
-
you can have what ever I have left after I finish mine
-
Got my first VF-31 for the Hall Display and DAMN thats a big box! What a ton of wasted space!! These will all be permanently glued into fighter only mode.
-
Just need some Photoetch ferns and maybe a wee beastie in the bushes I'll post up a pic of us messing round in the jungle in Timor... cowboy instructor on the roof.
-
naa... send me a rough idea of the effects you want and the timing and cycles and I'll help you write a sketch program for them and the wiring and resistors. use the Neos for the main guns and engines, standards for the deck lighting and any nav lights.
-

Anybody have a 1/72 vf-1 bandai kit to throw away? Need
NZEOD replied to Gatsu's topic in Model kits
Yeah, White toothpaste is the one with the granules in it. No idea on the tamiya ones, havent used them. Guessing the have a course grade which you'd use first to get off the worst marks, then a finishing or fine grade for final polishing. -
Anybody have a 1/72 vf-1 bandai kit to throw away? Need
NZEOD replied to Gatsu's topic in Model kits
You use it like sandpaper. Its an abrasive paste. Apply it with a cloth on the outside and the qtip on the inside. You have to rub constantly with it. Then wash it off -
Instructors tend to ride on the outside when doing crew commander initial training
-
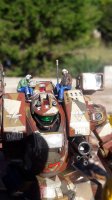
I dremeled off the excess board material that doesn't carry the circuit. One fits in each Floodlight One in the Tomahawk Floodlight, one each in the Beam Cannon barrels. For the Phalanx I used just the SMD chips in the 3 Floodlights I also made resin lens over the LEDs and in the ends of the Beam Cannons
-
WW2 Japanese pusher prop fighter... play Warthunder and they pop up from time to time. The Americans have a crap version of it, the XP-55 Ascender... BUTT UGLY
-
Anybody have a 1/72 vf-1 bandai kit to throw away? Need
NZEOD replied to Gatsu's topic in Model kits
if its wax... no you want acrylic the floor stuff is called wax and polish but its neither. Its a water based Acrylic gloss clear coat. YOu want it because once you see how simple it is you'll NEVER use anything else. Every clear part gets dipped... literally dipped in it and left to dry. Glass smooth clear finish 24hrs later. Models get a spray over of it after painting base coats to get a smooth finish to apply washes and decals too. Its a life saver. -
no no, for the test sequence it uses the ONBOARD led built into the Trinket. The red SMD LED shown below at Pin #1 The program will blink this. If you get this to blink we can go through some simple code changes to make it blink faster, slower, longer, shorter, brighter etc. That will teach you the basics on what values to change to make things happen without needed to string any LEDS together yet. They are both Neopixels so 4K colour. What you see on the SMD face, with the little chip built in, it also in the the Diffuse LED. I ground a few right back to the face to fit them into wingtips and found the driver chips once all the plastic was removed. For learning I'd get a pack on 5mm Diffuse. The SMD ones need a board to run on the breadboard.
-
Nice... VF-22/MiG21 Silbervogel huh...
-
Did you get the inboard LED to blink as per the tutorial?
-
Anybody have a 1/72 vf-1 bandai kit to throw away? Need
NZEOD replied to Gatsu's topic in Model kits
Which country are you in, I'll find it for you. -
Anybody have a 1/72 vf-1 bandai kit to throw away? Need
NZEOD replied to Gatsu's topic in Model kits
We arent here to battle you. Just go try the sanding method. Its worked on the piece I messed up to test it on. It will work for you. It just takes time. TO get to the inner surface use a polishing compound and a box of q-tips or what ever they call them in your end of the planet. Just change them out BEFORE the pad wears down to the plastic stick or you'll end up gouging the canopy. You may go through more than 25 of them doing this. Wet them and apply the polish and start rubbing. As you get further along and have removed most of the haze, start reducing how hard you are pushing against the qtips. Its a bit like how we spit polish our parade boots to a mirror shine. TAKES FOREVER! Even with the illegal use of a flame. After that dip it in the Floor Clear. You can test the progress of the polishing by dipping the canopy in water and seeing how clear it looks when you take it out. Thats basically how it will look after the Clear is applied. -
Looks real good Some inspiration for you...
-
any news?
-
Make a quick plug mold of the canopies so you can vac form a replacement if needed. Sculpting clay with a stick to hold it by, spray some non stick baking spray in the canopy insides, push in the clay, remove, set... done. Then if you DO screw it you just clamp some sheet between some picture frames, toss it in the over for 20secs on grill to soften it to sagging point then ram your clay plug through it using the stick. Let cool then trim. TO do it even better, make a quick box with a tube to hook up a vacuum cleaner. cut out the top plate of the box, fit in some mesh or perforated sheet. run some foam or rubber seal round the edge the same size and shape as the picture frames holding the clear film. Fit the clay plug into the centre of the mesh frame, hook up and turn on the vac cleaner, drop the sagged heated film frame down hard and fast over the clay plug until the frame seals to the foam box seal... you'll see the film suck down into the mesh... let it cool... trim... Poor mans Clear plastic.... coke bottles...
-
Yeah the G is more refined in the nose, less blade antenna, the A has a nose mounted targetter. EDIT... nope... I got that totally wrong! Thats the 4E not 4A
-
Yeah it does.... Who ever made this GIF... genius! We need more like it!... Project Sketchley?
-
Lots of info in that link is way off though. Even the hardpoints are wrong and no mention is made of the 12 built in missiles carried all over the body and engine nacelles.
-
Try having a wife and a Mistress!... actually... don't. Even with both in agreement and harmony is chaos.
-
Yes it can. Different pinouts though but thats just one more line out.
-
The shot of the two 4Gs from behind, engines lit? Love that one! Wow... dual wield Gun pods under the wings! And missiles WAY beyond the 12 already built into the body! And the AEW version.... and the ARMD-8 Unit with the big 02!!!!