
MechTech
-
Posts
4701 -
Joined
-
Last visited
Content Type
Profiles
Forums
Events
Gallery
Everything posted by MechTech
-
About 28 years ago when I was on a 1/100 scale Macross building spree, I built a 1/100 scale Monster. Some of you may remember it and the BAD photos taken of it later on. The barrels actually curved down from the bad camera lens. Our model club actually had a "Macross Mania" themed night this month. I recently dug this out of the ammo can it was stored in and dusted it off. It sat in my case for awhile and thought it should be cleaned up and brought in to share with the club. It still needs a lot of work, but I decided not to redo it. Too many other models I'd like to build and I'll chalk this one up to learning from your mistakes. This was also free-hand; no machines were used to make this except a Dremel for cutting . It was also the first time I made custom decals. I had to rely on an office store to do it. I also used toner based decals. I'll never do either again! They are chunky and not thin at all. Now the toner is flaking off the white base coating and a lot of the white has also yellowed as you'll see. Since I didn't have a model case to store this monster in originally, I finished it with a clear gloss coat so dust would come off rather than stick to it. The repairs. First, the antenna got all bent and damaged. So I turned a new base and added springs to the top antenna piece. The springs already paid off multiple times allowing the antenna to bend rather than break off. They're not quite canon, but they're not broken either!😉 The left side had moving damage and the Milliput (there's like two boxes in this model) didn't cure all the way in one part. It probably wasn't fully mixed together because the rest if fine. So it had to be redone. I originally used Tamiya spray paint for this special build. I couldn't remember what color for the body, so I mixed some acrylics and hand painted it to repair it. The fixed model was clear coated with Mr. Super Clear Matt - the best top coat in my humble opinion. The original "silver" windows don't look canon or cool. So I took an old chrome Automobile Club decal (junk mail isn't always bad) and coated part with Tamiya clear red. Then carefully trimmed the windows since it will chip off. Hint: if you do chip it, a red Sharpie marker fixes it. I originally made a shell from styrene parts. It doesn't look so hot today and the eye lug on the nose broke off. So I milled a new one from steel and posed it with one of the decals from the 1/200 Daedlaus build. So like I said, it's not going to win any IPMS contests, but at least it has a new lease on life. Thank you everyone for your comments in advance! - MT
.jpg.987a8ec21f93425a4c2c7341823e8b4e.jpg)
.jpg.dcf32ab11df03aff0dd9747231252b1a.jpg)
.jpg.580e015d39046f7d13deeec1ef5bf0dc.jpg)
.jpg.a0d4c08d0d8baa6352d47313fa987999.jpg)
.jpg.d3b7e99833ed0731d3b7429963065213.jpg)
.jpg.c61033f9dd15fdcd150e5b2a6be9e9a0.jpg)
.jpg.fc6d397ac1e7feca44647b4f34cd8198.jpg)
.jpg.a2d660105d1b5c37455cf6a454609934.jpg)
.jpg.c63ccbee40904a40edd7355badb95c52.jpg)
.jpg.5e81772aaa50658c75a9842bda34c4f6.jpg)
-

The 'Hey look at this really cool model build I saw' post
MechTech replied to Shawn's topic in Model kits
I've heard of cursed gun images. But, someone was "clowning" around with that Gundam and that Regult. I know it took them a long time to make them - but why?🥲 - MT -
WOW! This one will be out of my scale and budget, but AWESOME looking kit! I'll be following along. - MT
-
It's cool to see a couple of rare designs get to see the light of day! Looking good! - MT
-
I like the shell casing flying everywhere - cool! Though most gatling cannon have a closed loop system. It still makes for a dynamic pose. - MT
-
@Urashiman Your X-29 looks great! I'm glad to see an old model get some new love.😁 Your VF-1 looks great! Your decal work looks well worth it despite the other problems you've had. The gold paint looks cool too. The Tomcat is coming along great too!. Your extra effort on them all DEFINITELY shows. - MT @arbit Your MinMei sculpt looks accurate and cool! She just needs an embarrassed Hikaru figure.🤣 @ahiachris Your Rabbit model and mods are coming along great! It's cool to see such a rare subject being built. - MT
-
Cool in 1/35th! The Bandai line did pretty good. Maybe these too. - MT
-
@joscasle Those models look great! @derex3592 "NOT actually starting this kit" I'd hate to see what happens when you DO start the kit!😁 It's a great kit for the age. That PE makes it look that much better. @pengbuzz Another Starfleet ship being salvaged! Great save! Is there a big invasion by some cube shaped ships we should know about?😉 - MT
-
Cool! Thanks for sharing! - MT
-
@derex3592 Your sub looks great! If only the REAL LA looked that good these days. - MT
-
@pengbuzz Your Enterprise and the custom comm badge stand looks terrific! Cool idea! That sucks about your hands! If you DON'T use your hands, they get stiff and won't work right. Use them too much and the arthritis kicks in. I don't know what to say! - MT
-
@derex3592 Congrats on not only making a BEAUTIFUL model, but actually getting it to its final destination in one piece too! The case makes it stand out and add that much more professionalism to it too! Your in-laws have some cool decor too! - MT
-
@arbit BEAUTIFUL print! Looks like the anime minus the paint! @Thom You making a mirror image base for your ship😁 That's some heavy hardware!\ @foundshaian My recommendation, get a box big enough that if it is crushed a bit, won't touch your model. Then use soft, spongy type foam to cradle it. I've moved MANY times with my models. In the end, what worked best was ammo cans (they don't crush easily) and then soft packaging. Assume the box will be crushed, and then hope for the best. - MT
-
That's cool! thanks for sharing! - MT
-
Thanks for sharing; that's cool! - MT
-
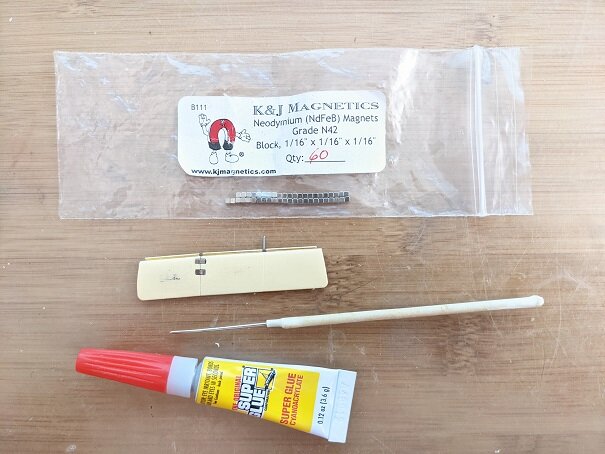
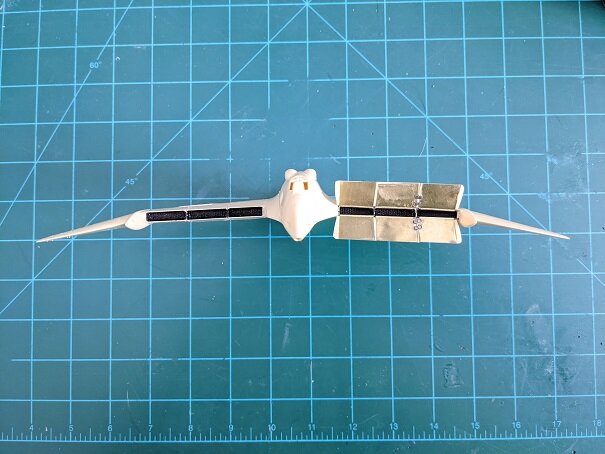
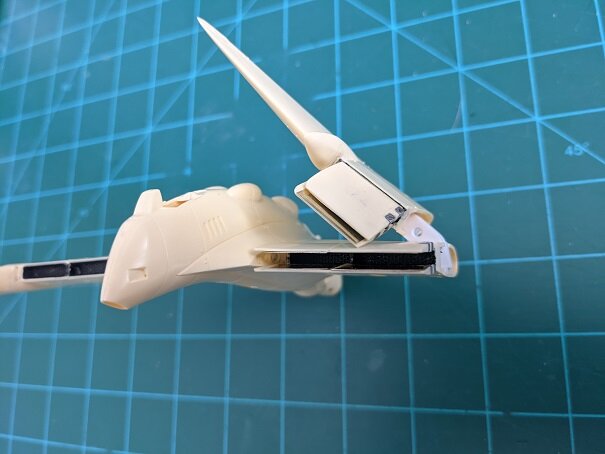
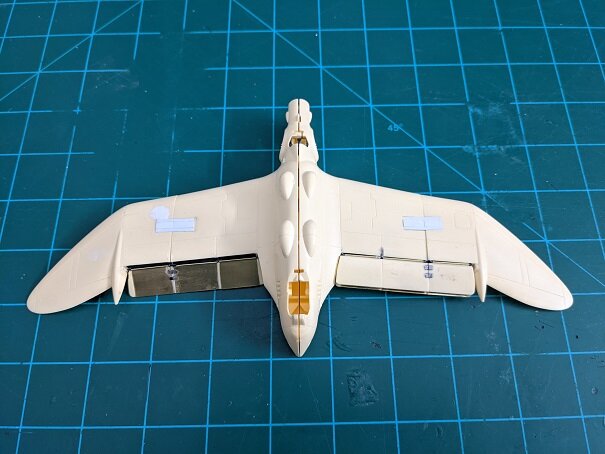
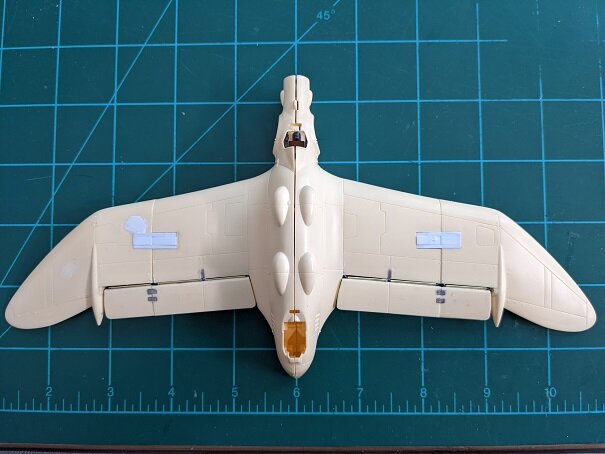
@electric indigo Great looking pilot! @Urashiman EXCELLENT save! Plane is looking great too! @derex3592 The Derex shipyards keep rolling (or floating) them out! Great looking finish and detailing work! Nausicaa's people of the Valley of the Wind are having to wait extra long for their gunship. This is taking longer than expected, but coming along alright. The problem, how do you make full length flaps/engine exhaust plates break and come together like magic? Magnets! The cool part, the flaps almost line up perfectly when opening or closing the wings. I didn't plan on that, but it's cool. I'll have to post a video. Now I have to cover over the magnets and clean up all the seams over them. Thanks for checking in! - MT
-
@derex3592 They're there to help you loose build your model assemblies. You should be honored😁 Ha ha! - MT
-
That's cool! Thank you for sharing! - MT
-
@pengbuzz Looking good! Hikaru's ride is almost ready! @Urashiman Cool! You gonna paint the Chuck Yeager figure that comes with the kit? - MT
-
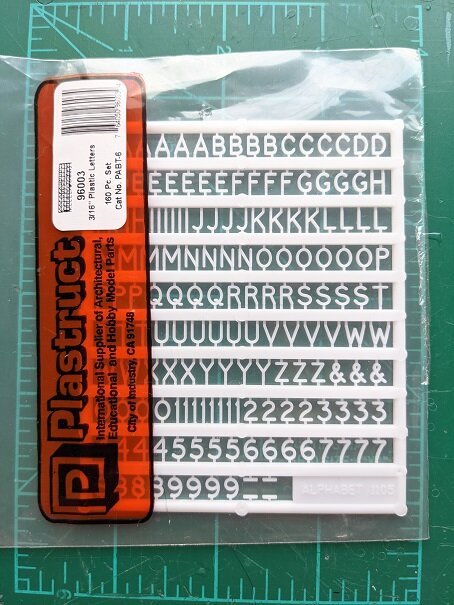
Thank you guys for the positive comments! By the way, did you guys know Plastruct has tiny letters in multiple sizes? Just found this out myself recently. They have multiple tiny sizes too! Cool for plaques (or names on your ship😉) - MT
-
@Shawn Thank you for trying to contact Ron! I think a lot of us would like to say "thank you" to him at the very least - if you can get a hold of him. Especially if his health is bad. Many people never know how they were a positive influence in people's lives. He needs to know. - MT
-
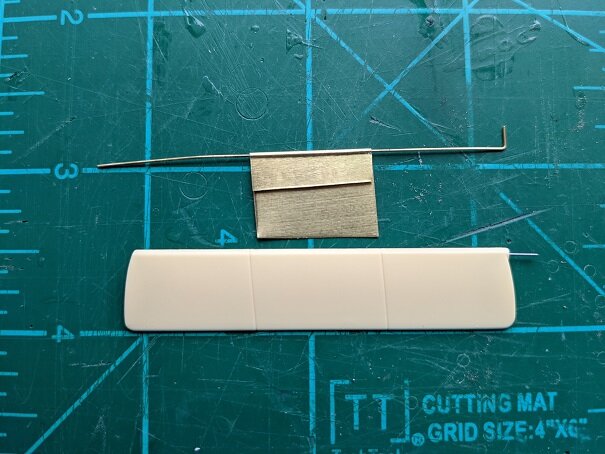
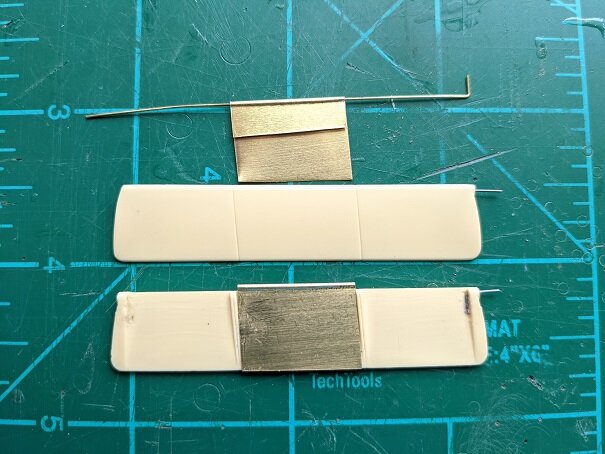
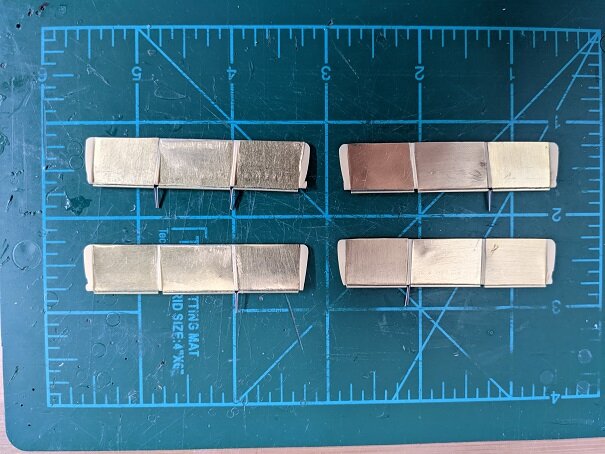
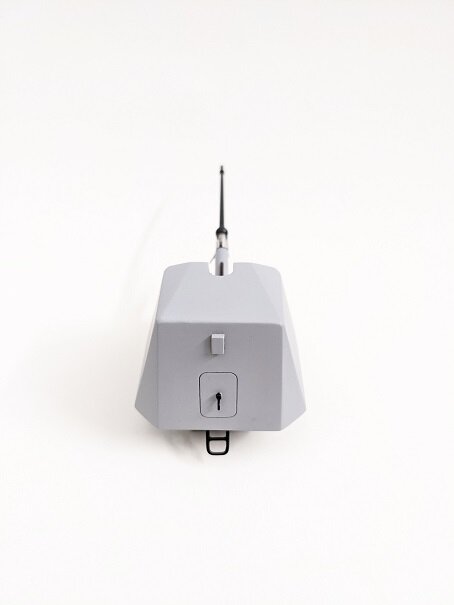
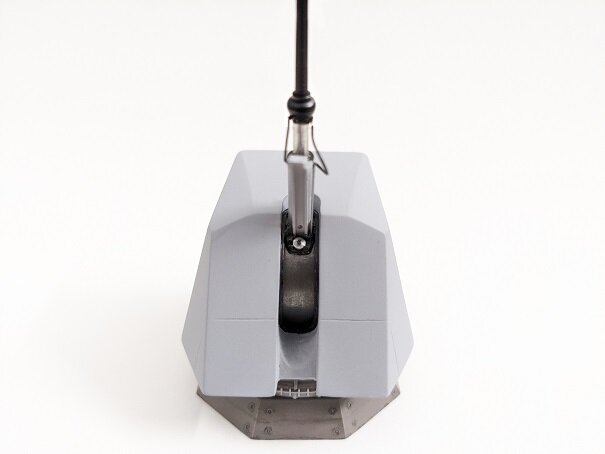
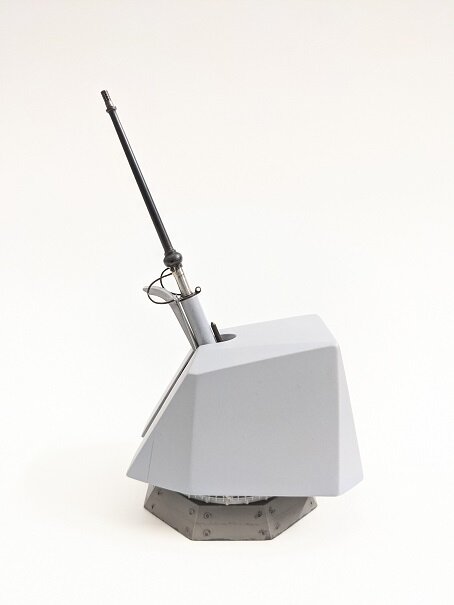
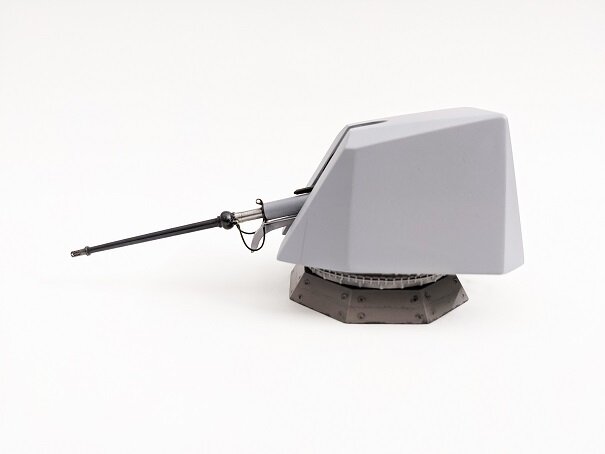
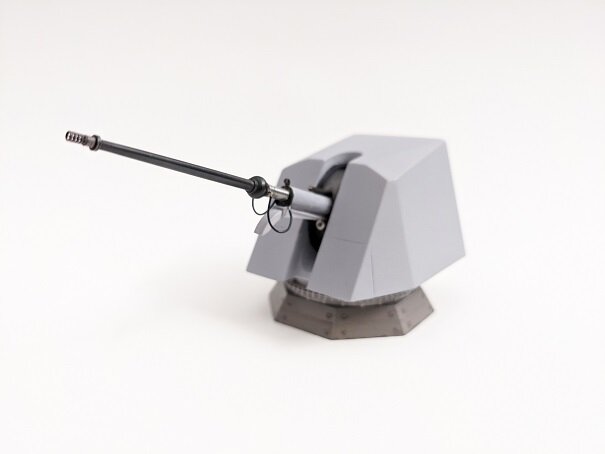
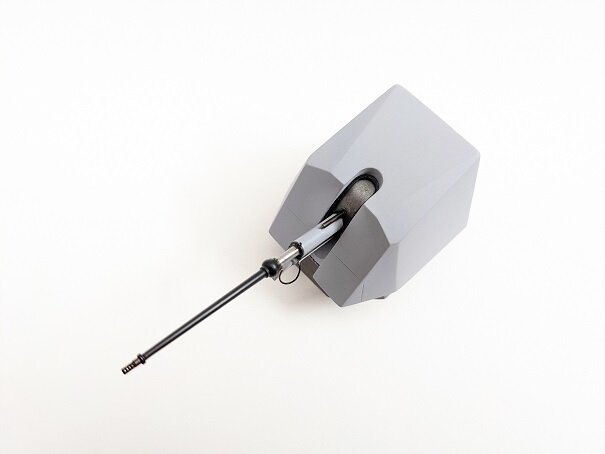
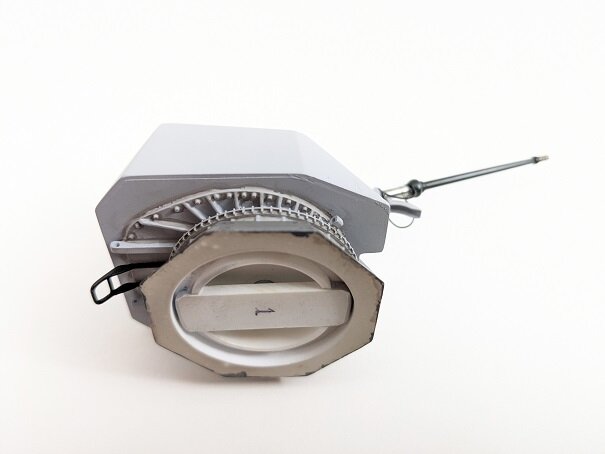
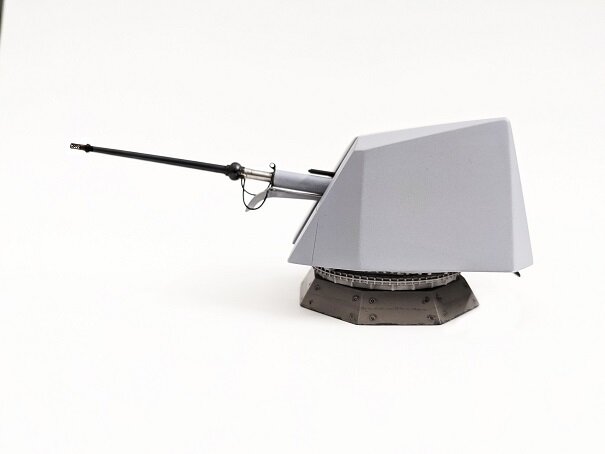
@derex3592 Your sub mottling is looking good! Especially for free-hand work. @electric indigo That dessert hornet looks SMOOTH! So does your cockpit and pilot detailing too. @pengbuzz Your VF-1J DOES live again! Its looking good! @Thom Your Akagi fixes are looking good! It will look great when done! @arbit Your sculpts look superb! I'll have to get a Patreo account just to download them and save them for a printer some day. Two projects going on simultaneously this weekend. First, the Naussica gunship. I used .005" thick brass and folded it over .015 wire. Then crimped the brass around the wire to make it snug. The pieces were then cut to shape and CA glued to the flaps. The brass was made to the width of the flaps to help hide the hinge and when done, will be acid treated with brass black to give it a cool sheen (the flap brass still needs cleaning up). And last but not least, the 76mm Oto Melara gun turrets are COMPLETED! Now the ship is about 1/3 done. These are the first finished pieces of the ship. They will be weathered more with the ship to match. later. Only Turret 1 is shown here (I took a few minutes to get fast photos). You can see the seam on the turret bottom, but it will not be visible when mounted aboard ship. The toughest part was probably making the water cooling lines and grounding strap that goes to the turret barrel. Thanks for checking in! - MT

-
@gtc_fan Thanks for sharing! I think my story is similar. Though mine started with the Revell Robotech kits and getting to see the first episode because my track training was canceled that day. I learned how to program a VCR just for that. Then learning what Macross REALLY was on its own. @Shawn Oh man! I remember seeing the "1/170 HEWAT" in the catalog and Ron saying it had larger weapons. I said "cool!" and ordered one! - MT
-
Thanks! Yeah, its time to get this one done, hopefully soon. @pengbuzz Your factory and Valk are looking great! I'm glad you can tackle the cannon fodder scheme. Too much masking for me!😁 - MT
-
Taking a pause from the Oto Melara gun turrets for a short bit to do the Nausicaa Gunship. That's this upcoming month's theme "Any kind of gunship." The first two photos are from a couple of years ago or so. I've picked the model back up and redid the massive guns in the cockpit with smaller ones (still needing detailing). And the hing pieces are self explanatory. They are kinda toy-like, but heavy duty and there should be no seams if all goes well. You can already see my screw-ups and fixes😁. Thanks for checking in! -MT
.jpg.4d17d4a0b06fbdcd5ead159ae96869ce.jpg)
.jpg.b0a49947a13ba37fc0f7a77205cfa910.jpg)
.jpg.b57216e15b9032e4f4cc2eac3155b2bf.jpg)
.jpg.741f9ec63ce7644cb58365e1e66b9eb0.jpg)
.jpg.1e393d1bf27623275aa5def01ac11be5.jpg)
.jpg.e2f5280c9f3d19fa269debbc814d8abd.jpg)
.jpg.0898612ce3fc71293216d9ef7c002ab8.jpg)
