mickyg
-
Posts
2632 -
Joined
-
Last visited
Content Type
Profiles
Forums
Events
Gallery
Everything posted by mickyg
-
That and there's a bit less black in front of the cockpit on the nose (anti-glare paint).
-

Bandai 1/72 Scale Macross Frontier Model Kit Thread Ver.3
mickyg replied to azrael's topic in Hall Of The Super Topics
My VF-27y (gamma) arrived today! First impressions are good but that cockpit choice has been bugging me. I don't understand why there are two. And translating the build that's been linked to by Regult, it's no clearer. The box pics show what I think is a painted transparent green cockpit, as the green is way too transparenty (yeah, I just invented a new word ). So they've included a decal for the front, but I don't see one for the back of the cockpit. If you use the body coloured (non-transparent) one, it's not an issue, except that the green doesn't look as cool and bright. What to do? EDIT: Why is it my posts always require editing to make sense? I swear when I write them, they make perfect sense to me but when I submit them, it's another matter... To translate: In order to use the green cockpit, which gives you cooler looking (IMO) greens, you've got to paint it. You can't use the decal, because the green is already printed. So I guess that means the one on the box was painted. No decal. So I've answered my own question! I still want to know why they give you the choice though. The Japanese build article mentions something about energy converting armour, so I wonder if that's something mentioned in the movie (or demonstrated). -
Do you still need replacement shoulder hinges for your V.2 VF-1?
mickyg replied to David Hingtgen's topic in Toys
My Hikaru VF-1A Super edition has had stress marks on both shoulders since new. I'm very careful so it may never actually split, but it's definitely stressed and weak. -
What's wrong with my Yamato, Bandai, etc.
mickyg replied to UN Spacy's topic in Hall Of The Super Topics
DOH! Beat me to it! -
What's wrong with my Yamato, Bandai, etc.
mickyg replied to UN Spacy's topic in Hall Of The Super Topics
TIP: Insert the booster from the bottom - the holes go all the way through and that'll push the plug out. -
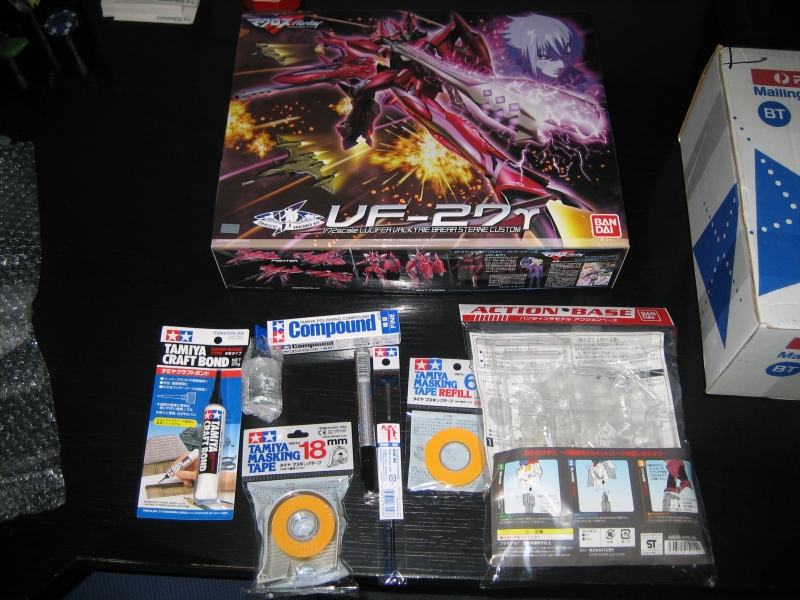
Look what just arrived! Goodies: I finally got a chrome silver paint marker, after seeing the results of WM Cheng's builds. It looked like a good tool to have. That's one empty bottle for mixing paints (I was meaning to order 6 but forgot to update the quantity), more tape, a very fine brush, some fine polishing compound to compliment the very fine stuff I have (should be good for canopy seam lines and general touch ups), some glue for canopy/clear parts, stand. ...And, ta-da! Brera's VF27!

-
Hah, thanks! It's part stubbornness, really. I did actually lose patience and toss a decal for the intake plugs on the super parts (that was a few pages/months ago)! They were so bad that I gave up. I really tried the decals this time around just to keep me from having to paint. You might recall they were painted at one point and were beautiful. That was just before my clearcoating snafu destroyed the paint job. Anyway, this should be sufficient for the size of the part. I really don't think it'll be obvious that it's a decal and not painted. My next challenge is color co-ordinating the blue of the decals with the blue on the aforementioned intake plugs, as well as the missile covers. Just for kicks, I tried using the stickers (why Bandia didn't include decals for the missile covers is beyond me) - what a freaking joke! They don't even remotely fit! I even cut the sides off to try to ease up on the bending and folding that would otherwise be required. Not even close. So you like the not quite super flat finish, eh? I have to admit, it's not a bad look. I keep thinking that in terms of scale, it's possible a flat finish on a part this big in real life, would probably have some reflectiveness to it. That and who's to say armor parts have to be totally flat, right?
-
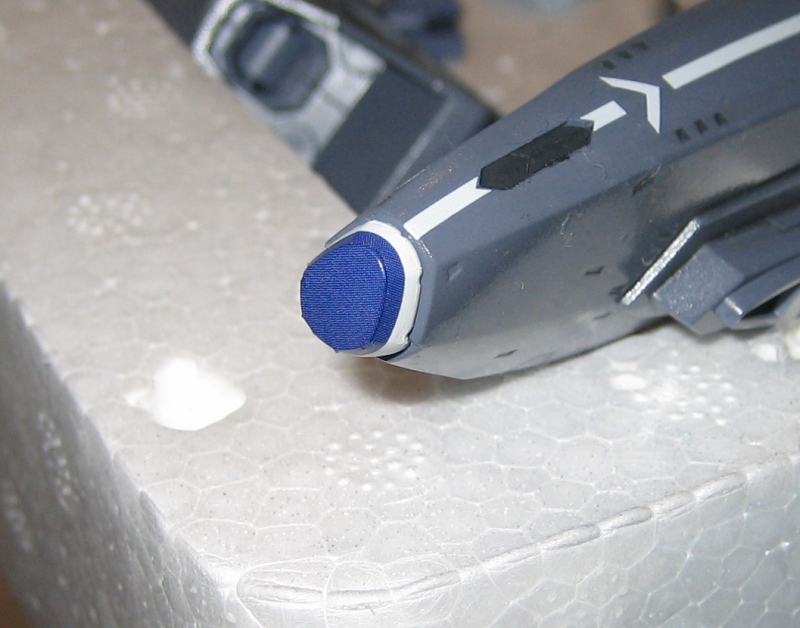
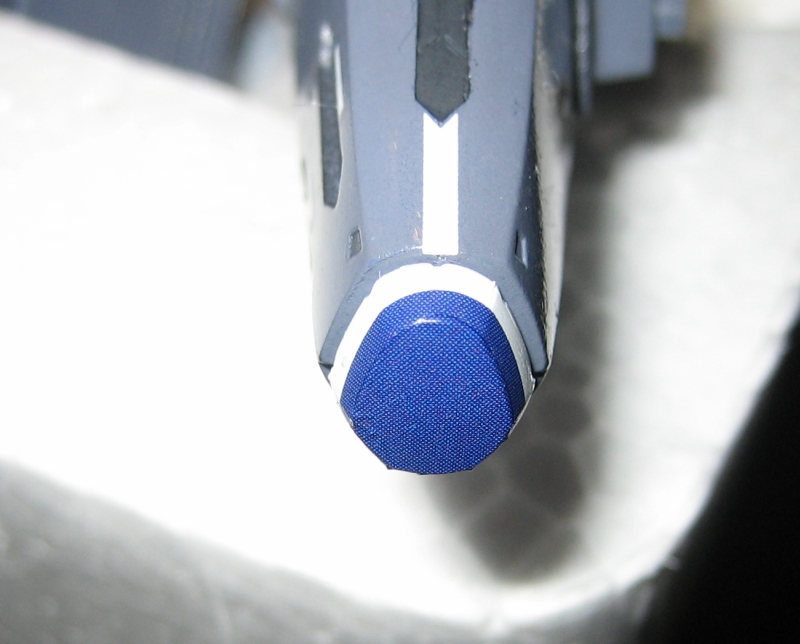
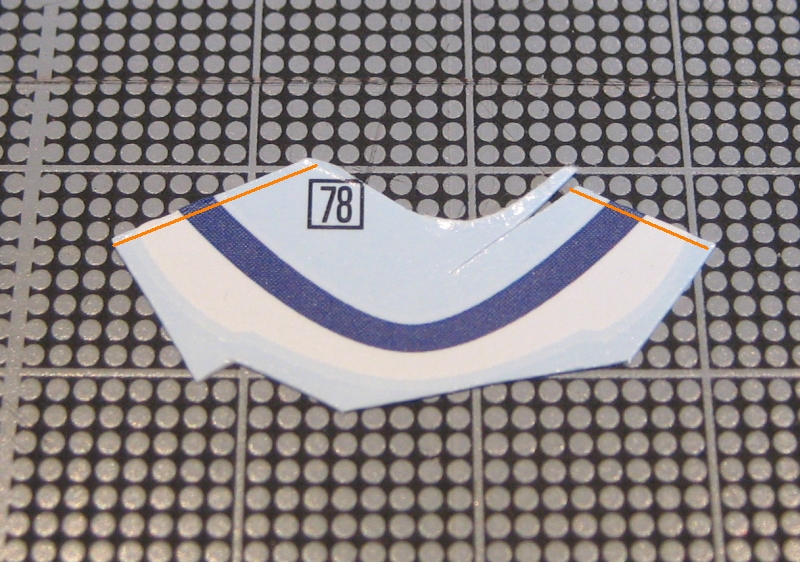
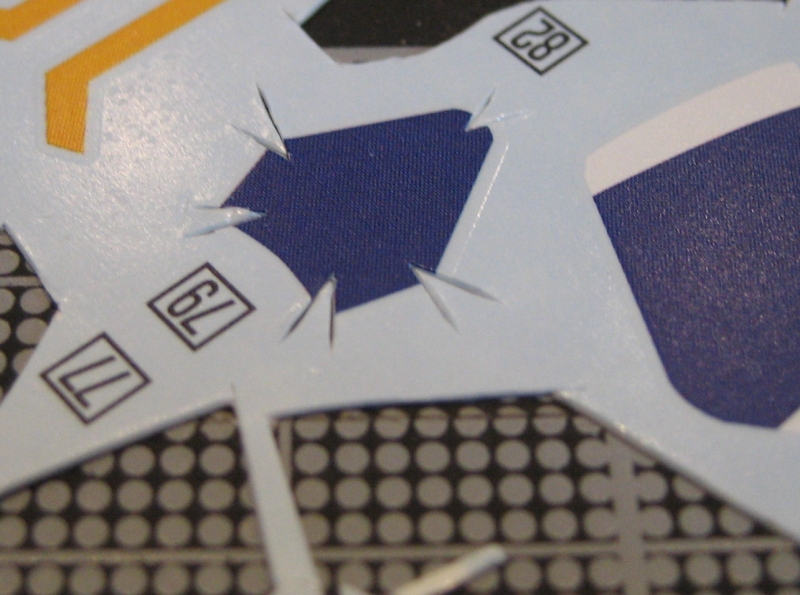
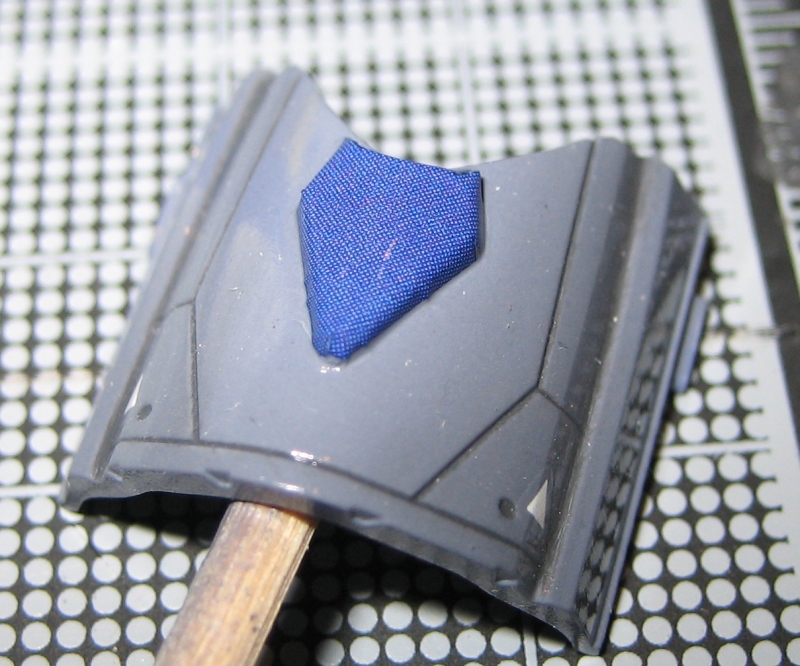
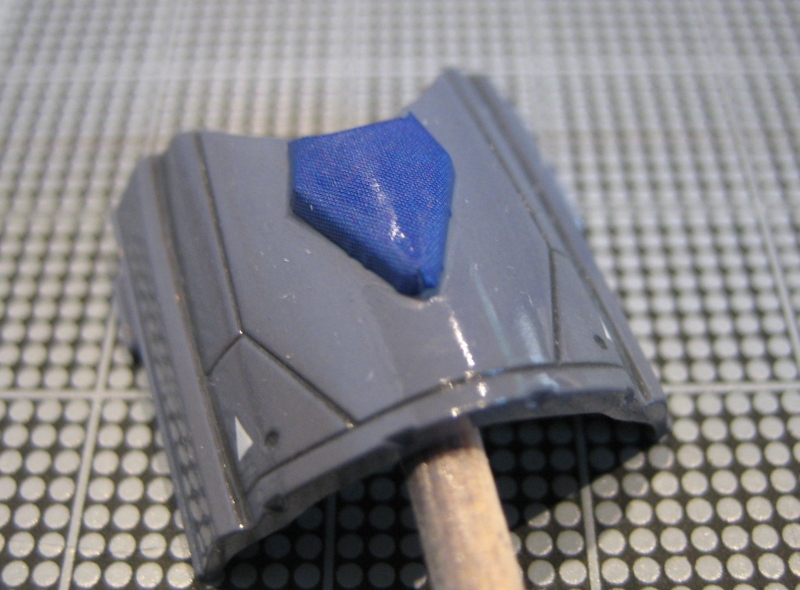
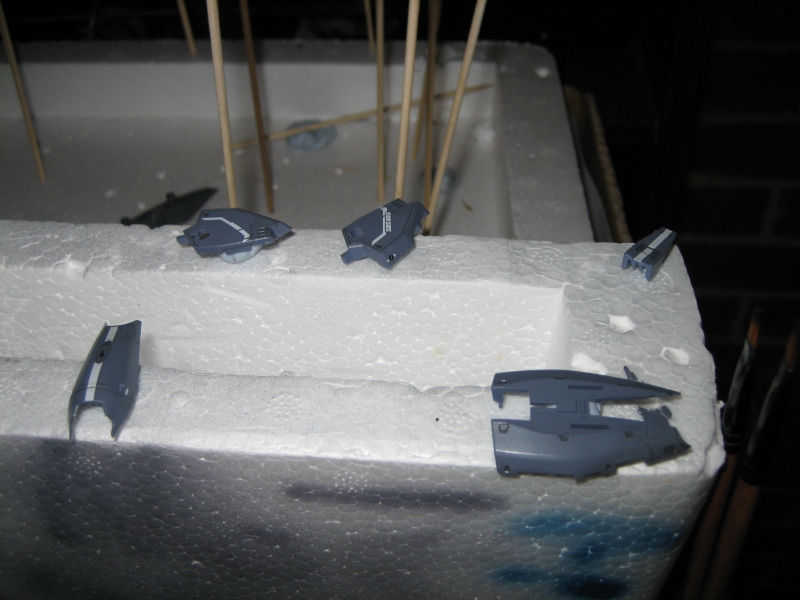
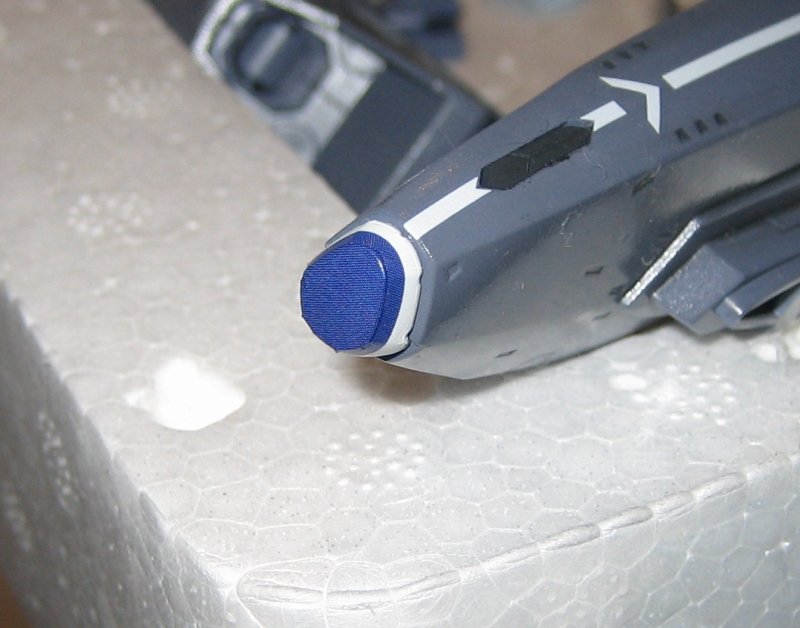
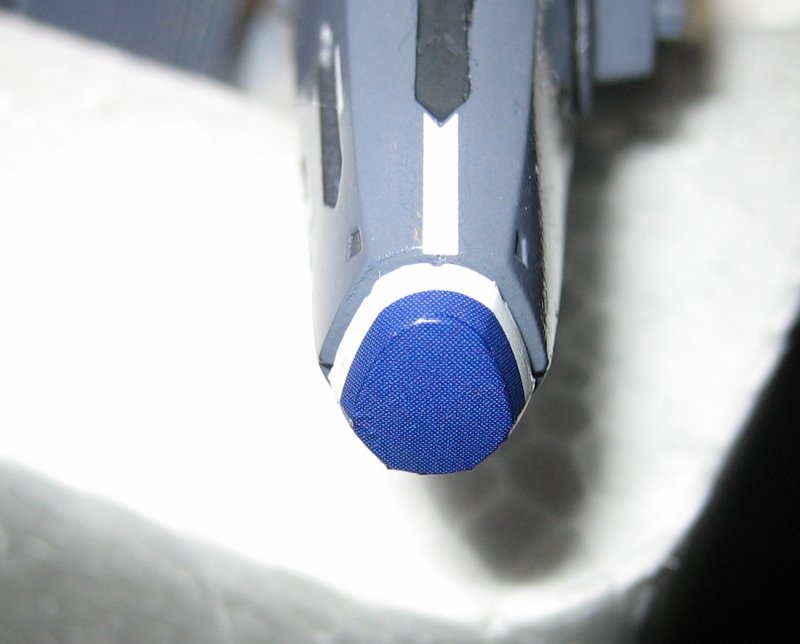
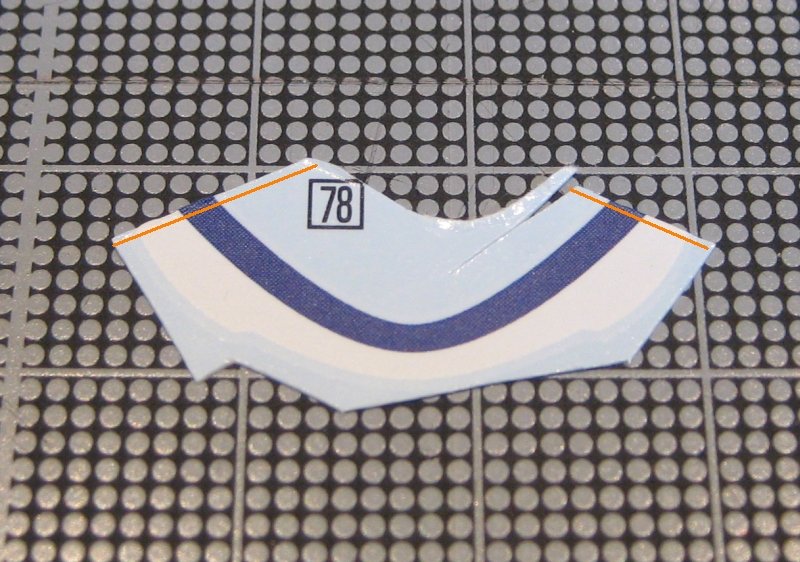
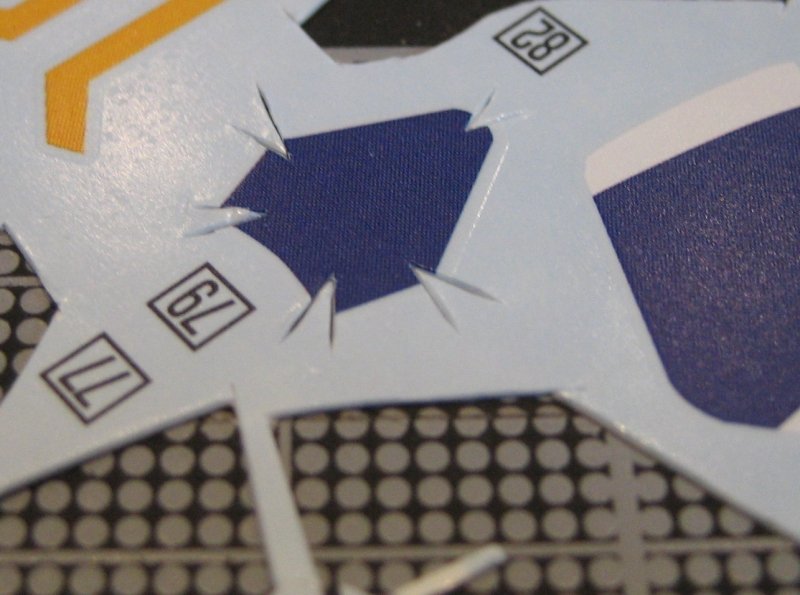
Happy New Year! One week off, no progress. That was before Christmas though. I had another week off after Christmas and finally managed to get some things done. The good: I scored a small(ish) air compressor for Christmas that actually works (small 1hp, 6 liter tank, home use type - noisy though!). This means I no longer have any excuse to paint and so far, it's so much more convenient than my portable air tank/12v compressor setup. It is loud though so I've got to be careful during late night sessions. Now, for the bad: I broke my pride and joy camera, not a month into having it! My little boy knocked it over on the tripod. The lens was damaged and something internally as well. I fixed the lens and thought that was it but then discovered the Auto Focus system wasn't working. So I figured I'd open it up and repair it. I couldn't find any broken parts inside so decided to break on of the fragile connecting ribbon cables, just to make life interesting! So the camera is off to be repaired (if it's cost effective) and I'm back to the little point and shoot for now. So, I think I mentioned progress. I managed to get a bit more decaling done and finally got a flat coat on to the super parts. I think the coat soaked into the underlying gloss coat because the flat is somewhat closer to semi-gloss. So another flat coat should flatten it out. The decals were very challenging - I decided to use the super booster "tips" just for a bit of a challenge. These are two parts, one for the wrap around section, the other for the flat surface on the top, or front of the part. I haven't decided yet which is the proper order to put these one, as they're pros and cons for each. If you put the wrap around part on first, you might have better luck sanding any wrinkles off after the decal dries. But if you put the top on first, you might be able to see the line were the decal ends, under the wrap around part. In the end, I did one of each and can't really say either was better. I managed to get the top part on first with the second part and it went on so smoothly I though my eyes were deceiving me! Chalk that up to the Mr Mark Softer/Setter combo I used I guess. A word of advice on the wrap around decal: trim the ends about a mm or 2, as there's tons of overlap otherwise. I've marked where to trim in the pic below. The next tricky decal (again, doing this more because I was being lazy and didn't want to mask and paint these) was the top of the fuselage armor. There's a triangular color piece for each variant and mine is blue. This is a very tricky decal because of its size and shape, and the notches that need to be cut out to get it to conform correctly. Again, the Mr Mark Softer/Setter combo worked great here. I'm glad I've used this enough to be comfortable with it now, as it's an invaluable tool for getting decals to fit correctly. The rule is to apply it, let it soak in, and then blot away any excess with a damp cotton swab. You want it to be damp with the solution, not wet. If it's wet it reacts with the acrylic paint a bit too much and can really break down the decal as well. Some pics showing the decal before it was cut out completely, and various stages of drying after applying solvent (last shot is flat coated): And a couple of shots after flat clear coating the super parts. I used about 2.6ml of gunze flat klear (as they call it) acrylic, along with 1.3ml of Tamiya Acrylic Thinner. I use a 2:1 ratio of paint to thinner and it seems to work pretty well. This was a surprisingly large amount of paint based on the area I estimated. Again, it's amazing how much more detail a camera captures, compared to my eyes. Some of the dot patterns on the decals look awful in the pictures (well, all of them actually!) but they look fine with the naked eye. I keep having to remind myself that this is a model that is actually quite small, and the likelihood that I'm going to notice all the imperfections in it when it's sitting on my desk are pretty slim. Not that I'm advocating doing a crappy build, mind you.


-
Great stuff! Thanks for posting and welcome to the forums! I'll be using this when mine comes in in a week.
-
Bandai 1/72 Scale Macross Frontier Model Kit Thread Ver.3
mickyg replied to azrael's topic in Hall Of The Super Topics
I most certainly will. Thanks for your efforts! Some good reading there on a lot of different kits, too. Wow! That is an awesome build. For anyone who hasn't checked out the blog, there's a lot of very nice pics of this 25G over there. Foot thrusters! Very nicely done. Any tips on painting those micro missles? -
Thanks Erick (hah, now I know your name! )! That timing should be about perfect. I wonder why there's been such a big lag in production?
-
Bandai 1/72 Scale Macross Frontier Model Kit Thread Ver.3
mickyg replied to azrael's topic in Hall Of The Super Topics
I'm running this buildup that was linked to before, via babelfish and there's some interesting info there. I'm only on the first page and already I'm a bit excited about the "spare" parts that are common to the VF-25. I broke a few joints during painting (yeah, I must be really rough when I paint, right? ) and it looks like there will be some spares in the new kit. Excellent! I'll report back any other snippits I think might be valuable to anyone else interested in building this. My kit should be here tomorrow (hopefully). Otherwise I'll get it on the 4th of Jan. -
LOL for real here! Southpaw - the head sculpt on the v1 1/60 is atrocious. I think you'll get that if you have a look at Jenius' excellent review he linked to. Jenius, those reviews of yours are amazing and very much appreciated!
-
Seconded. I don't know why but my VF-25G has some of the most fragile pivoting pieces I've ever seen. I've broken about 4 of them now by doing nothing more than positioning them in the correct way to get painted. This is before the model has even been assembled. Mine might be an extreme case but I'm certainly thinking they aren't designed to be durable. Still, the engineering in the new Macross Frontier kits is amazing!
-
Bandai 1/72 Scale Macross Frontier Model Kit Thread Ver.3
mickyg replied to azrael's topic in Hall Of The Super Topics
You make a very good point Regult. As much as I love to mask, airbrush, apply various coats, clearcoat, etc... And by that, I mean not at all! This build you linked to has a lot going for it! At the very worst, if the colour mismatch really annoyed me, I could try to paint those areas. That would be infinitely less effort than what I'm putting into my current build (well in my opinion, at least ). -
Bandai 1/72 Scale Macross Frontier Model Kit Thread Ver.3
mickyg replied to azrael's topic in Hall Of The Super Topics
[slaps forehead] I don't know how I missed that! It's plain as day! -
Bandai 1/72 Scale Macross Frontier Model Kit Thread Ver.3
mickyg replied to azrael's topic in Hall Of The Super Topics
It doesn't look like it. But I haven't compared them side by side yet so anything is possible. It looks like it'd be a battroid only sort of thing though (well maybe gerwalk). I doubt they would fit in fighter mode. But you probably aren't interested in fighter mode since you aren't looking at shoulders in that mode anyway! You know, after studying all those pictures, I'm amazed he used stickers! They look a lot thinner than what I've got for my model. But then again, I haven't used them so maybe they're thinner than they look. On closer inspection, it also looks like he might have used a clear coat in some of those photos. There's that tell tail slight orange peel look in some shots. That could be the texture of the plastic though. Here's what I'm talking about: My first gripe based on the pics are the colour matching for the stickers on some parts. I guess you're going to get that though. Example (the maroon-y sort of colour on one of the "puzzle piece" parts should match the rest of the main colour but it's too light): And finally, Regult, your definition of minimal paint is not the same as mine! There's paint all over the place on this build! And it's all really, really detailed paint! But I love it and I would probably do well to study it and see if I can do something approaching this level on my build. Those Hasegawa kits I bought over the last few months are never going to get built! -
Bandai 1/72 Scale Macross Frontier Model Kit Thread Ver.3
mickyg replied to azrael's topic in Hall Of The Super Topics
Just looking at how long my 25G is taking, I might go this route on the 27. I'll use decals instead of stickers (can't stand how much they stick out - no pun intended). But might be happy with a clearcoat and no painting. It'll be quicker and from the look of this build, will still look pretty good. -
Bandai 1/72 Scale Macross Frontier Model Kit Thread Ver.3
mickyg replied to azrael's topic in Hall Of The Super Topics
Mostly because I've used them in the past and they were fast (with regular air shipping, not EMS) and they had a lot of the tools and supplies I needed too. Had it just been the model, I'd have tried amiami or HW Japan. Good tip for the future! Thanks heaps for translating Gunny! Much appreciated! -
Advice wanted: What's the best way to mask the canopy?
mickyg replied to Vifam7's topic in The Workshop!
Vifam, did you mean masking the canopy to allow you to paint the frames, or masking the cockpit so you don't get paint in the areas you've just meticulously painted inside the cockpit? If it's the former, that's possibly covered. If it's the latter, I think people tend to do one of two things. Either, use the natural "frame" colour that often times extends into the fusalage section just under the cockpit and mask around that (over the canopy too). Or they'll carefully glue the canopy on, before or after painting the actual canopy frame, then mask over the top of that and carefully cut around where it meets the fusalage for cases when there's a frame that's a different colour to the area just under the canopy. Hope that make sense and is helpful! -
Bandai 1/72 Scale Macross Frontier Model Kit Thread Ver.3
mickyg replied to azrael's topic in Hall Of The Super Topics
Sorry Lolicon, I forgot you gave us a translation of the first column a few pages back. I'll have to have a look at the rest of the colours to see how different they are from the other models. -
Bandai 1/72 Scale Macross Frontier Model Kit Thread Ver.3
mickyg replied to azrael's topic in Hall Of The Super Topics
Aurgh... Can't... Resist... Any... Longer! That does it, buying from Rainbow 10! I don't suppose we've got any translations for colours yet? -
Thanks for clarifying, and for not slamming me on my spelling of Wolverine, too! I was meaning to look the spelling up and forgot before posting - rookie mistake! That is a really interesting take on things actually - I kind of asked that question jokingly but thought perhaps there'd be a good reason floating around out there. And Gubaba, thanks for the timeline of Plus and 7 - that makes things a little more interesting in my mind.
-
Those are my personal votes. I also second the option of good, water slide decals.
-
Seconded! I love my SV-51 (it sorta grows on you) but I'd be all over a VF-0 if they marked it down like they have the '51.