mickyg
-
Posts
2632 -
Joined
-
Last visited
Content Type
Profiles
Forums
Events
Gallery
Everything posted by mickyg
-
Close, but not quite about the printers not being made anymore. Actually, they are still being made (well, as of 6 months ago when I looked into doing this myself) but only in Japan. So any new machines have to be shipped out of Japan, so shipping prices aren't cheap and the retail cost of the unit also goes up. So yeah, the cost of ownership for Anasazi went up so high that it just became more than what made sense for him to continue. Oh, and since all servicing and parts tend to be either heavily specialised or needing to be done in Japan, that price goes through the roof too. So anyone wanting to do this, needs to weigh up all the costs and benefits and decide if it's worth it in the end. I'm hoping someone makes that jump! In the meantime, the fact that the VF-1S kits are coming with standard decals, that means Yamato's found someone to do at least that much. I'm still holding out hope that they'll release some special sets for popular customs (of which the Minmay guards, surely are). Who knows? Maybe we'll get something in the not too distant future.
-
When you mentioned this a few months ago, it got me interested in how you'd modify yours. And of course, I started inspecting my set too. Yes, there's definitely a need for a cutout on the booster, it just doesn't fit well otherwise. Anyway, I was planning on hacking into my set back when you first brought this up but I've been busy. Glad to see you got it done and, more importantly, that it worked! I don't think you're being unreasonable or paranoid at all! Well, maybe paranoid about it breaking. I've had my Hikaru 1A with super packs on since I bought it about 7 months ago and it's not showing any signs of stress. But the not sitting level and bent tails definitely drives me nuts! So I'm completely with you on that count. I've got a dremel that I'm sure would make short work of the modification required. Thanks for diving in first!
-
Wow! Night and day difference between a Paasche VL and an Iwata HP-C Plus (no idea about the other Iwatas but I'm sure they're all good too). Paint atomization was better, paint usage was better, control was better, precision is better, cleanup was easier. This really is an amazing tool! And the Paasche wasn't terrible, mind you! Anyway, if there's anyone reading this and wanting some ideas about airbrushes, I wouldn't hesitate to recommend an Iwata. Now that my little promo for Iwata is finished here's what I got done in the last hour. Firstly, I didn't like the glossy finish I got on the main parts of the valk. There's something to be said for high gloss on exhibition aircraft but for some reason, I just think it looks a little too "flashy" on a valk. I know, I know, I'm talking about a blue painted aircraft! Still, it just didn't look quite right to me. So I thought a semi-gloss would work better. I don't have a semi-gloss clear available to me in a bottle so I mixed GSI gloss clear acrylic with GSI flat base. I checked all over the place for the proper ratio and couldn't find anything for GSI and ended up using a ratio for Tamiya flat base mixed with future, in a 1-15 ratio. It's hard measuring out the flat base - it's very thick and almost like a gel. I used my trusty medical syringe and measured out .1cc (at least I think it's in CC, the markings have worn off from paint solvents), then 1.5cc of gloss clear, and 1.5cc of tamiya thinner. So what's that, about 3cc of paint in total? That covered the whole model with 2 coats and I had about a 3rd left over! See what I mean by paint usage? Did I mention I'm impressed? No pics yet, as semi-gloss is hard to photograph and I want to wait till I have some parts assembled before I take more photos. Thanks for stopping by!
-
Finally got my Iwata HP-C Plus yesterday! Whoo hoo! After spending the better part of the morning trying to find a solution for a hose, I finally made something work (long story but I thought it came with an adaptor to make my Paasche hose work and instead it was just a barbed end for a hose so it could attach to the airbrush). Anyway, I did a quick test with some windex to make sure it was clean and also to figure out what to expect in terms of coverage. I was a bit concerned it'd be too narrow to do base coats. I was wrong. If you pull it away from your work and let more paint out, it'll cover almost 2 inches. That's not bad at all! And if you're up close and only let a small amount of paint flow, it's down to fine lines that I could never get with my Paasche. My only complaint is it has no preset for the paint flow. The Paasche allowed you to "lock" the needle in a paint flowing setting so you didn't have to pull the lever to get paint to flow. Of course it wasn't as smooth as the Iwata and I might not miss that feature. And it's also possible I could put the needle in "loose" so that even with the lever all the forward, I could still get paint flow. I imagine this would be messy though and probably not the way the brush is designed to work. Next up - satin coat on all the parts, some assembly and some burn marks/weathering on the feet.
-
Someone get these photos over to Yamato so they can forward them on to Kawamori-san! Graham? Seriously, these are incredible pictures and an incredible effort by you! I'm seriously jealous of your skills, but in a good way! WOW
-

Scratch Building/Model Modification Archive Thread
mickyg replied to Dax415's topic in The Workshop!
I can't say I've done an exhaustive search but does anyone know if anyone's been successful in modifying the Hasegawa VF-1 legs/engines? By that, I mean, the part after the "knee" where on the Hasegawa models, it slopes down a bit. It didn't bother me, all those years looking at other people's amazing models, but now that I've got my own, it's driving me nuts! The joint is very strong as it is, so modifying it is sure to weaken it somewhat. Just wondered if this was irritating to anyone else as it is to me? -
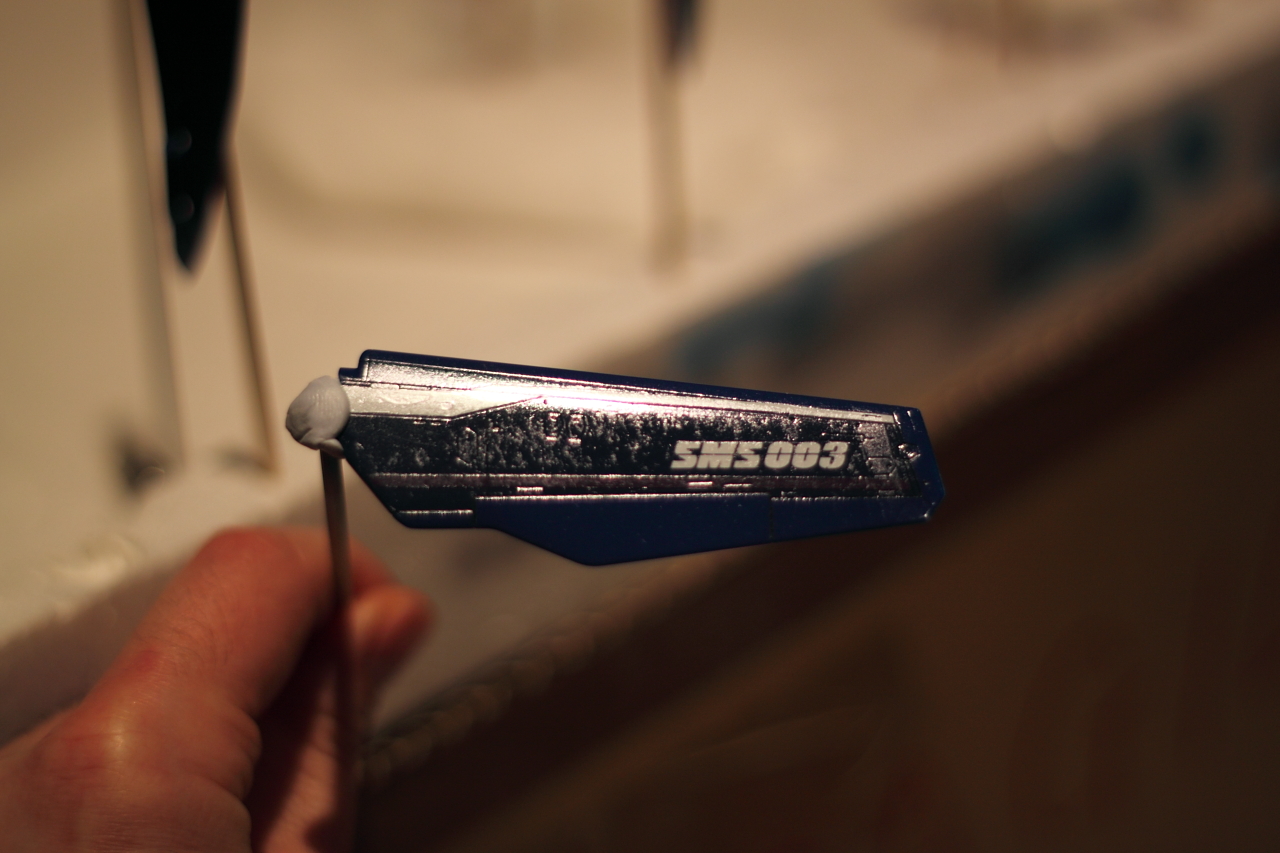
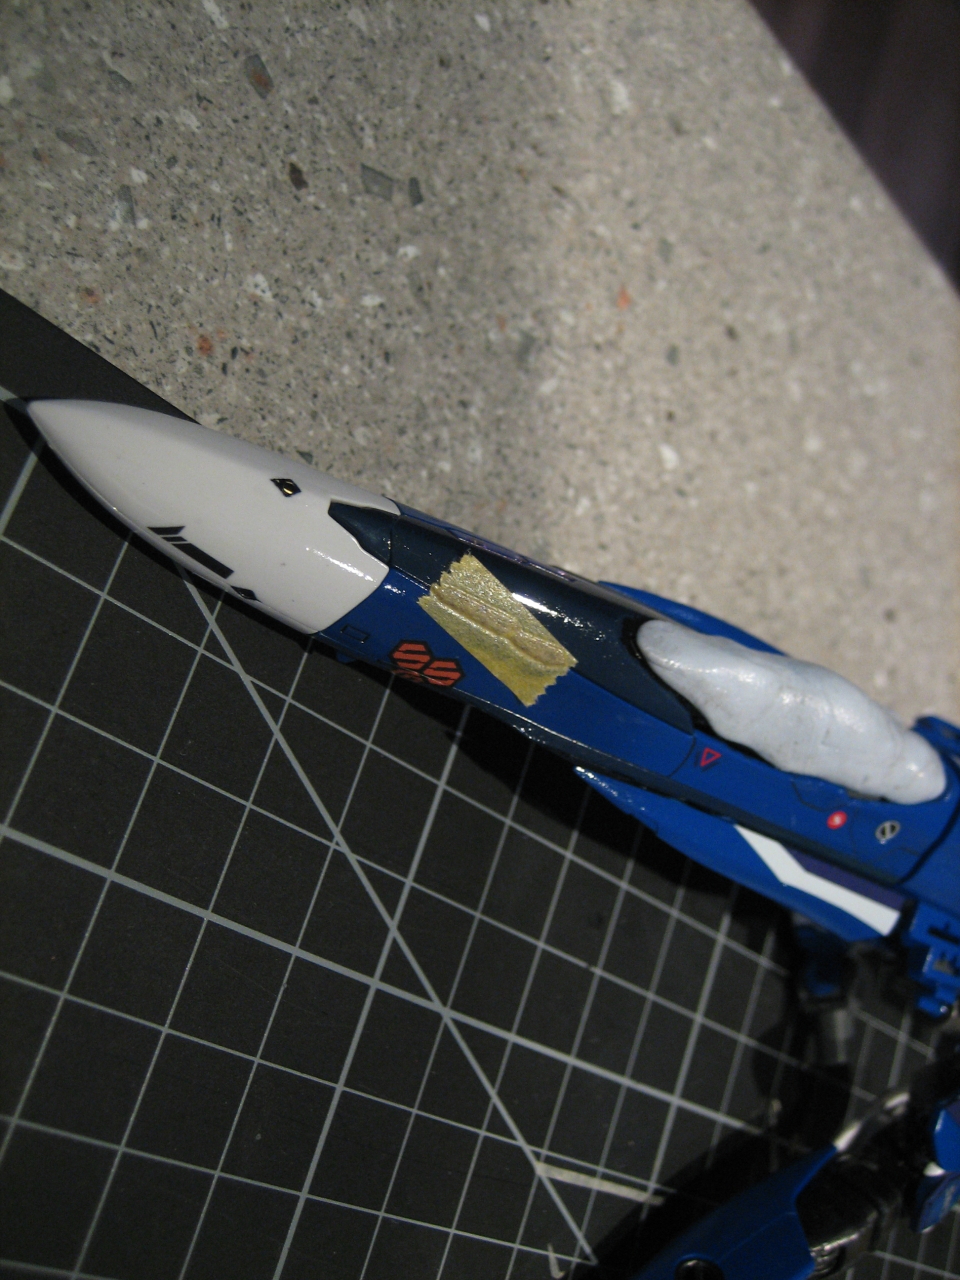
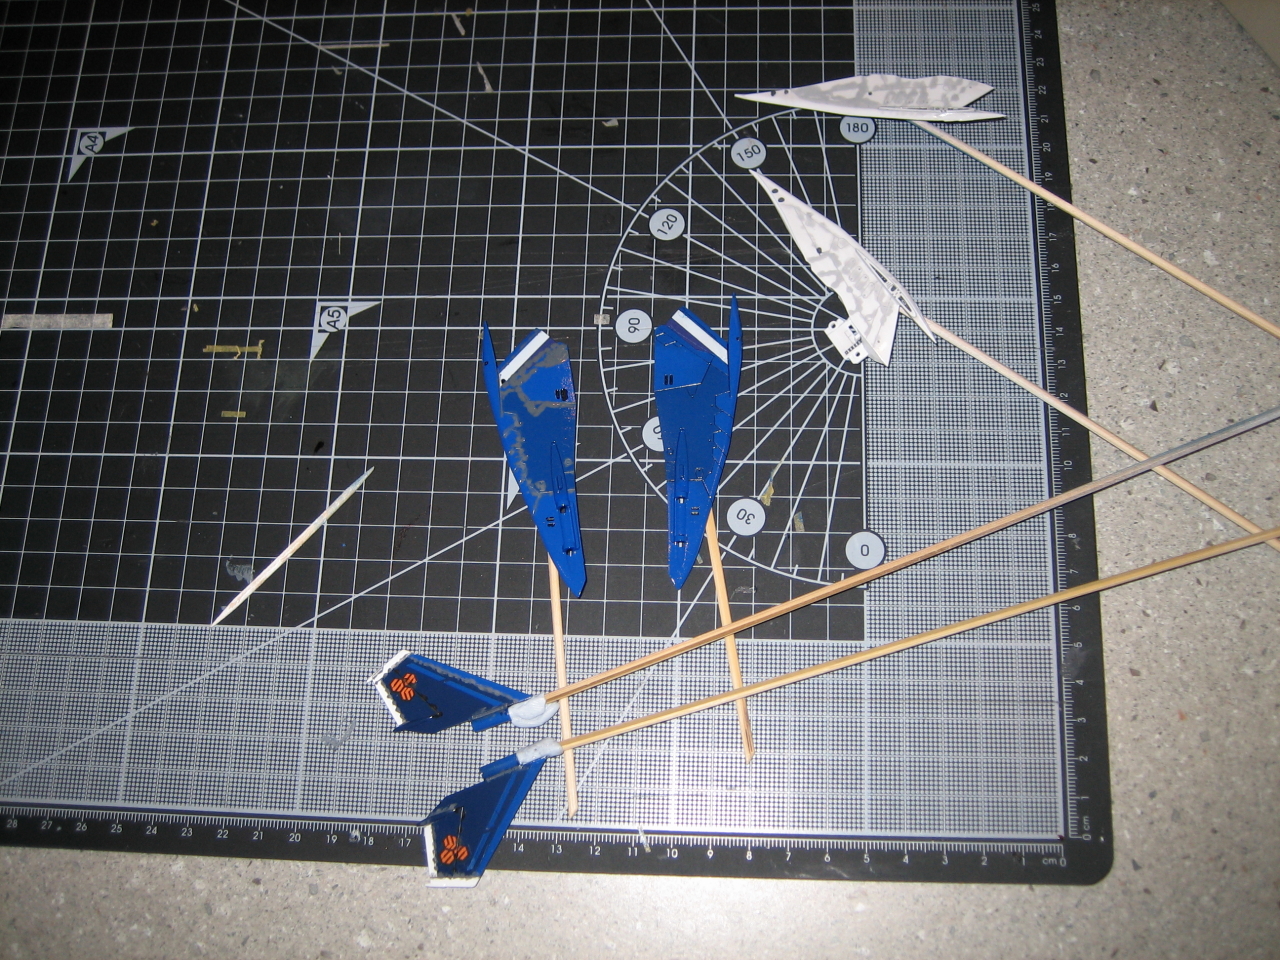
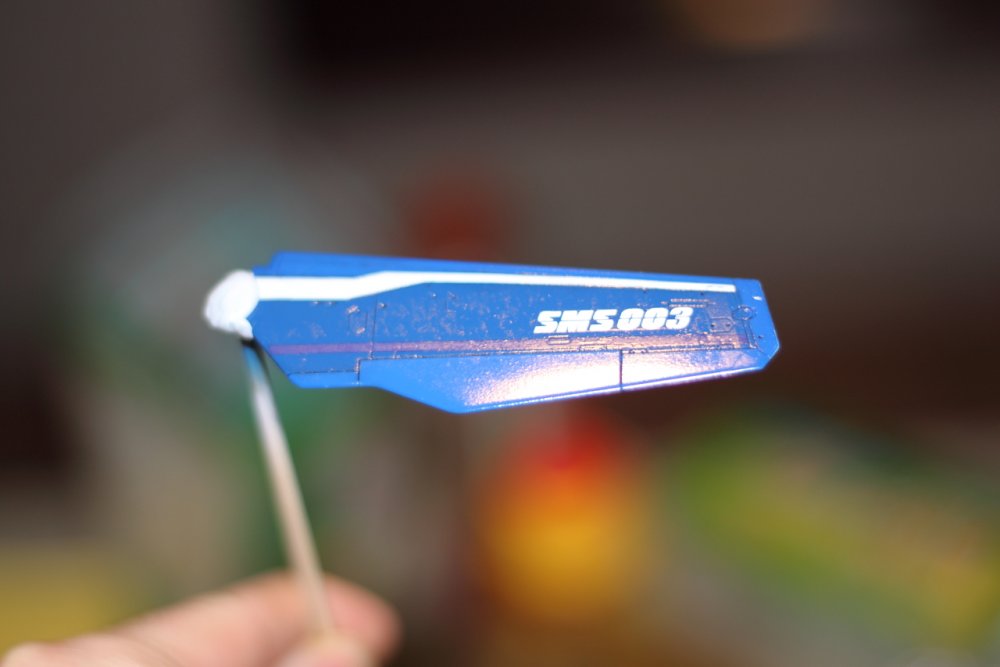
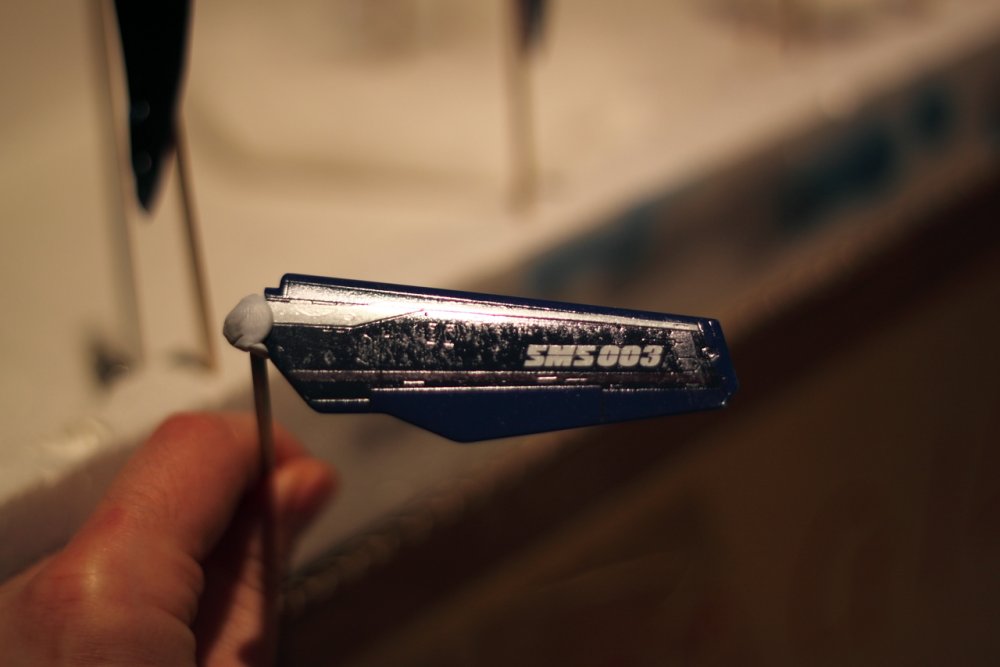
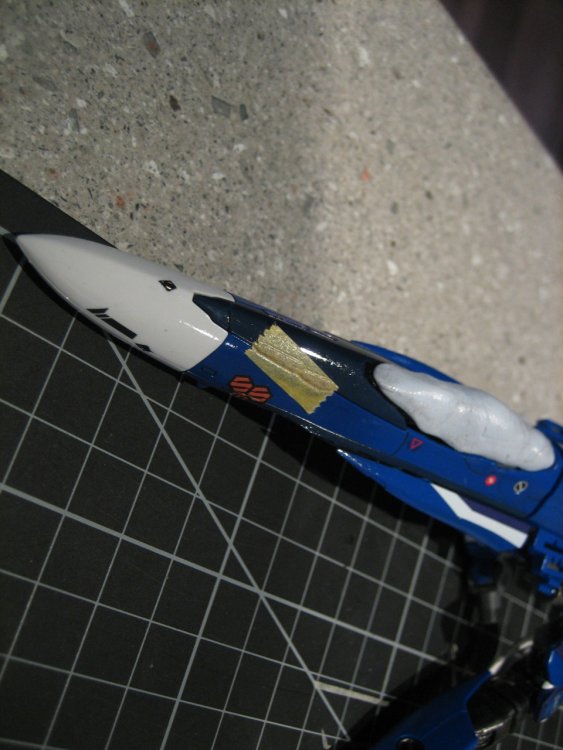
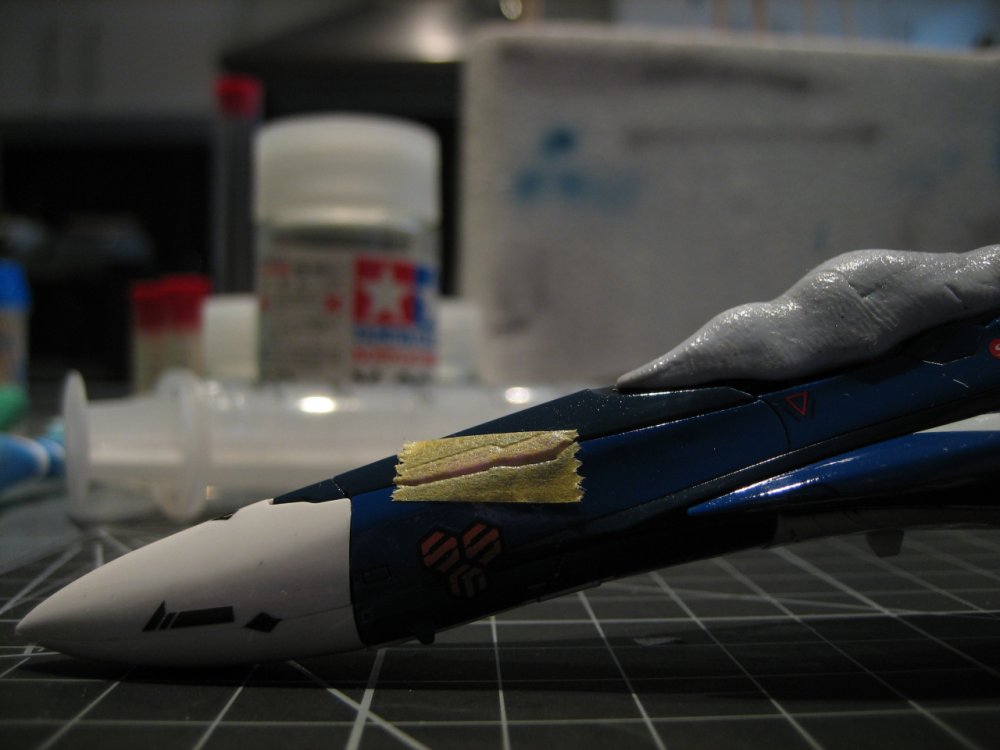
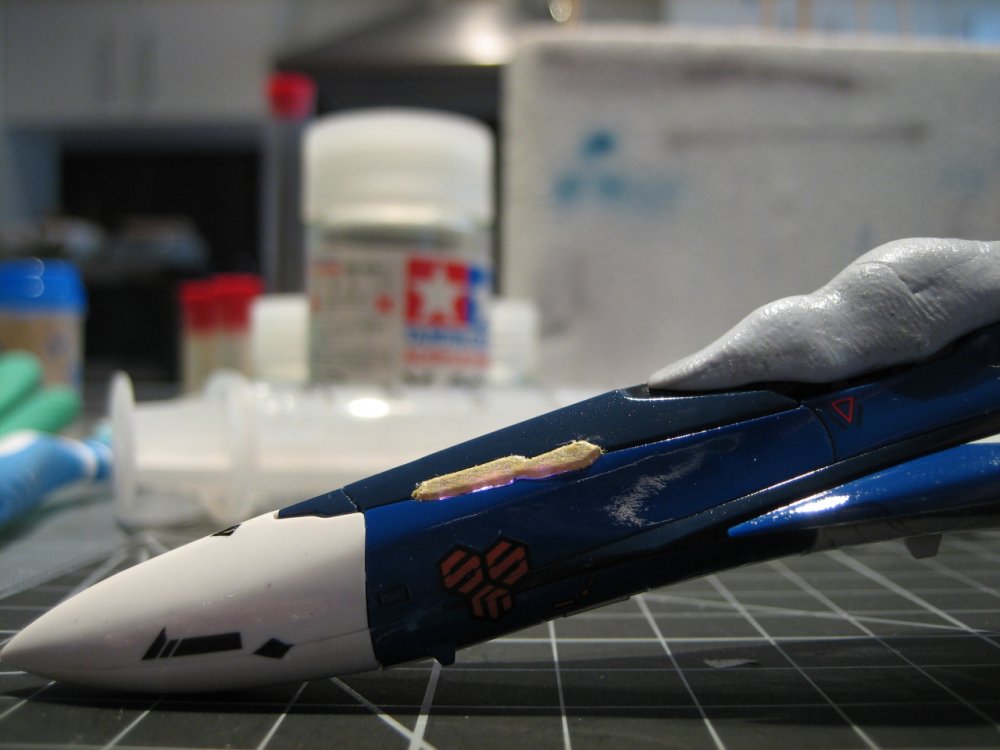
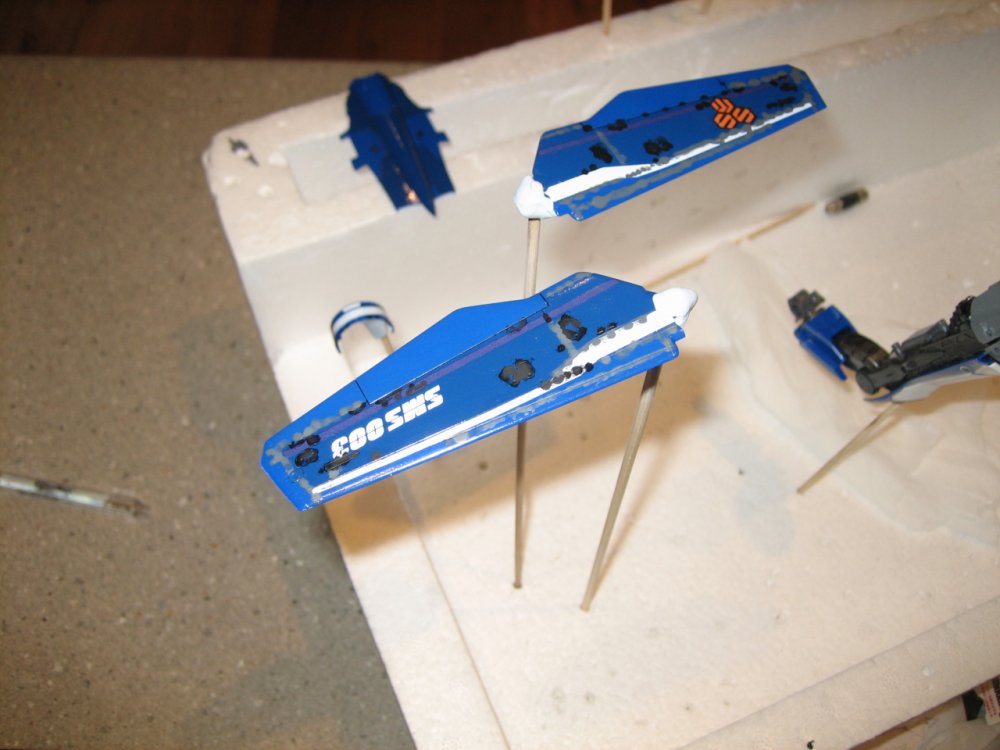
I mentioned in a previous thread about airbrushes, that I'd post up some pics of why I'm frustrated with mine. I forgot all about doing that. So here's that, plus some progress I made yesterday and today. This was mostly due to some tape marks after masking that little white part on the wingtip (underside). I resprayed it with clear gloss and thought I had good coverage. Turns out I didn't. Not sure why this ended up so bad either, as previous coats, while orange peely in texture, certainly wheren't this bad. Note: this settled down a bit over the next few days. Almost like that coat softened before completely hardening. I later rubbed it down with some Tamiya polishing compound (fine type) and an old T-shirt. That helped a bit and with the final semi-gloss coat, will hopefully hide it enough to be acceptable. Yesterday did above mentioned polishing (came up very smoot on the stabilisers, no idea why that worked when the rest is so bumpy) and masked the jewel "sensors" on the nose, as I want them to stay glossy: You start by laying a piece of tape over the part, then using a toothpick, carefully "draw" with the pointed tip around the shape, making sure you press down hard enough to get the tape to completely conform. Then just cut the outside with a sharp hobby knife. Today, I decided I wasn't happy with the previous wash I applied to the white parts (or the blue, for that matter). So I went over it again with a lighter colour. I also found I hadn't washed the left wing and wing glove - at all! Oops. So I went over them with a slightly different approach. Which meant I had to redo the other side too. I don't know how this dark grey, vs black wash is going to look. It looks a bit iffy at this point and a bit lighter than I'd planned. The white parts though, they look great. I used a white oil, with a tiny amount of the grey for the rest. So it's a very light grey but looks pretty dark against the pure white parts.

-
MickyG's Yamato VF-1S Unpainted, Unassembled Kit Build
mickyg replied to mickyg's topic in The Workshop!
No problem - those are screws! -
I got one recently with the sale on at HLJ. Mine's got broken shoulders, right out of the box. But it hasn't affected it in the slightest. It still transforms fine and still feels pretty sturdy. That said, if I'd known it had broken shoulders, I'd have been less excited about buying it, certainly.
-
And so it begs the question (and I've looked into this with no clear direction yet): How does one apply any sort of tint to a canopy on a model (or toy) and have it look like anything approaching reality? I'm tempted to try various shades of yellow and gold mixed with a clear coat but the problem with metallics is the size of the "metal" in the paint. I'm just not convinced there's any readily available paint that can be applied to the canopy and look "real" enough to do the trick. What do you people that build military aircraft use?
-
Thanks for all the comments guys. Maxtype, I hope this is as helpful to you as it has been for me!
-
Better than the HP-C - What?!! Seriously though, just had a 15 minute session this evening and I was very annoyed with it. Part of that's me, part of it's the weather (it was pretty cold and wet outside and I do my painting in the garage) and part of it could be air pressure or paint mixture. Either way the application this time around sucked (Hah!). It went on very orange peely, the underlying tape marks didn't get covered at all, etc... There will be some pics on my build thread. This is Maxtype's and I'm derailing it enough already... The fact is, the mess, the fiddly air pressure action in the dual action of the button (it's not very smooth) and the inconsistency of the spray quality, all make me think the Iwata certainly can't be worse! Anyway, thanks for the advice, it's good to hear from someone who's used both and can recommend the Iwata.
-
I don't need to, no. But when money's tight and I'm trying to scrounge up cash for a new lens for my camera, every bit helps! And I can't see needing the second one for broader coverage, but then again, I haven't used the Iwata yet (don't even have it yet) and don't know how broad its coverage is. So who knows...
-
Why is this valk shown with DYRL style hands? I only recently rewatched the whole SDF Macross series and was surprised by how few episodes Max's 1J was in. And even fewer for Miria's! Shows how nostalgia can sometimes deceive. Still very iconic, none the less.
-
Love it man! Don't worry about the length at all (as far as I'm concerned). It's only "long" because you've got pics in a column. If you put them side by side, it'd look shorter. But don't change it on my account, I like the vertical scroll that the pics force. This size is really tempting... Might have to get one of these in my next hobby order (after I start on some of my Has kits).
-
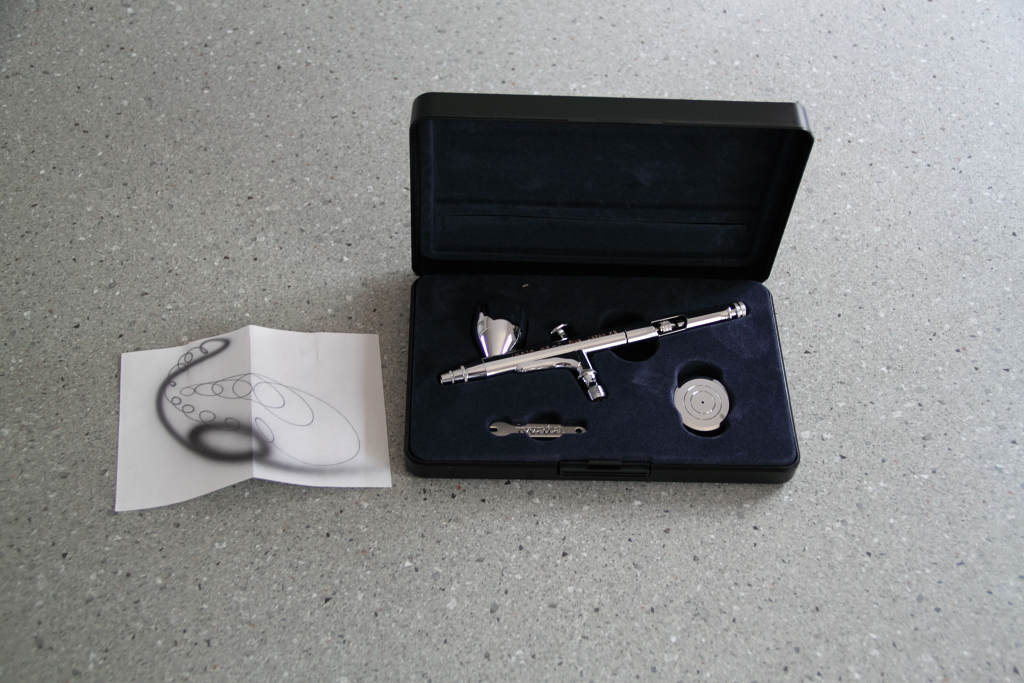
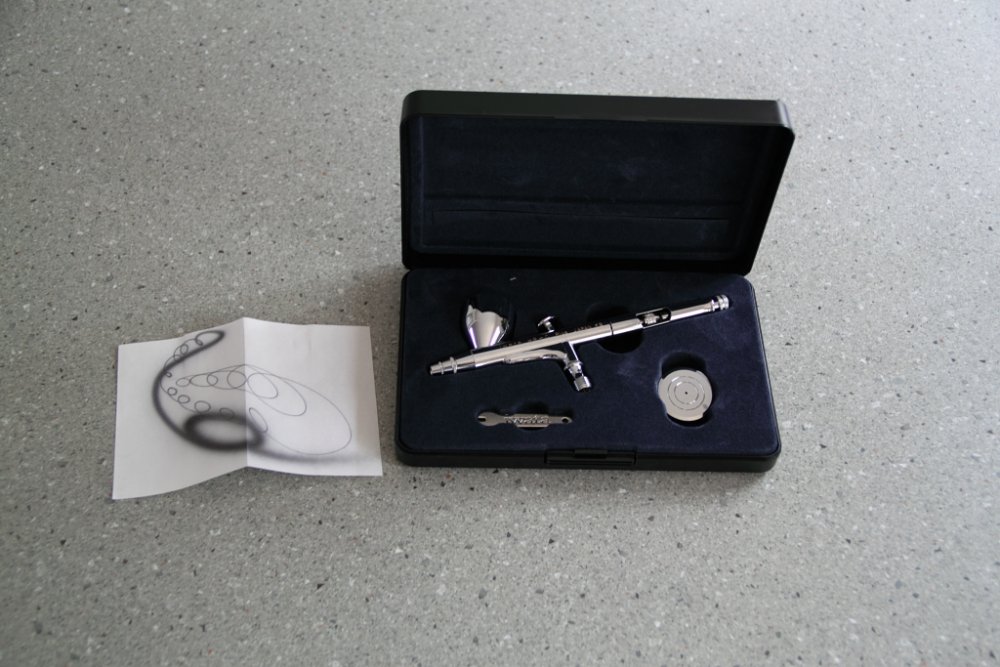
Maxtype, even if this thread has been done in different ways over the last 6 months (I can think of 3) for whatever reason, yours tipped me over the edge! I purchased an Iwata HP-C plus and it's on its way in the next few weeks! Petar/Grayson you both are to blame (and numerous others who've sung the praises of Iwata). I'm really looking forward to this new tool. My VL will be retired and likely ebay'd. It's been a good tool too but I think the ease of cleanup and the ability to use small amounts of paint are what finally made my mind up. I can't stand mixing up paint and thinking I've got plenty, then running out mid piece, only to find there's enough paint left in the feed tube to have finished the job but gravity prevented me from using it! Couple that with the paint I get all over my hands when I remove the cup and it leaks all out of said feed tube...
-
But technically those pushers remain attached until the legs are locked into the nose. Or is it shown differently in the cartoon vs the drawn diagram I'm thinking of?
-
Try over-drive-inc.com - that one got me too (several times).
-
Excellent! I'll be watching closely. I've often wondered why the Wave kits are not as popular as the Hasegawa or even Bandai kits. Maybe it's the lack of a "firm" scale? Some sites sell them and mention the scale as not accurate or something, if I recall correctly. Anyway, these look pretty good, quality wise! If you haven't already been welcomed - Welcome! This is a great place to hang out. And the community is always happy to share ideas and experiences. I look forward to seeing your progress!
-
Please, do tell. What if you're not?
-
MickyG's Yamato VF-1S Unpainted, Unassembled Kit Build
mickyg replied to mickyg's topic in The Workshop!
Heh, so do I! I thought I was going to get started on it but got suckered into working on someone's car yesterday (I dabble in auto mechanics in my spare time - yeah, as if I had any of that!). To top it off, they never showed up so yesterday was pretty much a write off! So annoying... -
I knew this was small but I can't believe how small 1/100 actually is! Look at the size of it in that person's hands! I'm more impressed than ever at the level of detail and engineering that must've gone into this.
-
MickyG's Yamato VF-1S Unpainted, Unassembled Kit Build
mickyg replied to mickyg's topic in The Workshop!
(Chronocidal beat me to it!) Ah, but this scheme is just plain grey on the bottom - that's the beauty of it! Iceblue: Thanks for that link. Much appreciated! -
That's for the model kit - he's asking for the DX toy. I haven't seen those sold seperately either.
-
I've got a T1i (500D over here) and love it! But you're right, it's not exactly convenient for carrying around in your pocket and can sometimes be a bit inconvenient for doing the "oh, I'd like to snap a quick shot of my model build and not have to set it up on a tripod" shots. However, most of my shots are done with that camera and very few are tripod'd (yes, I made up a word). The included kit lens (18-55mm) is actually pretty good for close up photos. I replaced mine with a step up 18-135mm and the quality is definitely better across the board, but it does sacrifice close up photos. For really close up stuff, I have to crop it - which works OK but has it's limits (15megapixels is good but stuff tends to get noisy the more you crop it to make stuff bigger). That said, a fair few of my photos, I actually do on my little Canon Digital Ixis 55 (no idea what it's called in the states except that it's a digital Elph). It's 5 megapixels and has a really close macro focus distance. I don't have to crop that much and for my typical web uploads of 1280 x 960, 5mp is plenty. I haven't thoroughly checked out your powershot link yet but the thing to look at is minimum focus distance. If it's a few inches, you're usually set. Compare that to typical kit lenses on a dSLR and they're usually a foot or more. So you can see the advantage of having something that can focus up close. I'm sure the rest of the guys will chime in but what you don't get with a small point and shoot is decent background blur for normal photos (you'll get some ok blur for up close "macro-setting" shots but when you're at normal distance, it's not usually that impressive). If you like that background blur, or to put it another way, the ability to isolate your subject from the rest of the photo, a dSLR is going to give you that and a point and shoot won't. Weigh that up and make a decision based on what you prefer. By the way, the XS would be a great camera to get if you want to start cheaply. And you can always upgrade lenses later if you decide you want to broaden your horizons. Just my two cents! EDIT Just had a look at your powershot link and my friend has a camera very similar to that one (maybe the year before or something). In my opinion, it's not that much smaller than the "small" canon digital rebels and the picture quality isn't worth the slightly smaller size, in my opinion. Go down to a brick and mortar store and compare them to see if the size difference is a priority for you. The swivel screen is nice, as you've mentioned, so consider that as well.