Jasonc
-
Posts
6319 -
Joined
-
Last visited
Content Type
Profiles
Forums
Events
Gallery
Everything posted by Jasonc
-

Macross Δ BD/DVD Thread (now with delicious English subs).
Jasonc replied to UN Spacy's topic in Movies and TV Series
It seems in general, that most of us here are just older, and expect these to be shows about war and battle, which has never been the focus of Macross. Delta really isn't anything new or different than what has been shown before, and if you point a number of things out in the series, there's most likely a direct reference to it in a previous show. It feels different than previous ones, that's for certain, but it's successful no doubt. At this point, there's no point in being upset at it. There's a target audience, and you're not in it. Many of us aren't supposed to be in it, but trying to make it seem like this is something way out of left field and totally foreign to what the franchise has always been is not really true. Besides, I believe they did try to appeal to their older fan base with Zero, and that didn't turn out so well. That said, I'm totally OK with that. I don't like everything about Delta either, but I pick and choose what I like. Hell, there is stuff about every series they've done that I didn't like. SDF Macross wasn't my golden ship to sail on, but there was stuff I liked that kept me from jumping onto other things. I can make the same comparisons with Delta. In any case, I don't see a point in getting so seriously upset over it. If it isn't for you, it isn't. There's hundreds of thousands it is for, and by seeing the masses of fans myself in concerts, events, and the audience it commands overseas, they did something right. -
I've come to the conclusion that if I really want one, either my preorder will become available, or it won't and I'll get one down the line once this madness settles down. I may be pissed about NY and their handling, but I'm not about to fly off the handle and spend that much on a toy that is so overpriced due to panic. If it stays at that price for a long time after all this, then I guess I'll be taking sack lunches to work for awhile.
-
There are several others that I'm aware of, but just never really used because I "had" my trusted few. Now that NY is out for me, I'll probably start using the others. I haven't heard any bad things with CD Japan, and use them regularly, HLJ is OK, Mandarake, and so on. It's sad for them though. I order a lot of stuff, so they'll be losing my money. Not sorry about that, though.
-
I hate to say it, but this is probably going to be my last time ordering from NY ever again. I'm sure I can fight the "store credit" thing, but the fact that I even have to consider it, without them being proactive on their part is extremely shady business. If it ships, that's great, but this will still be my last order from them. I have one other thing that is already paid for on their site, and one that isn't paid for yet, but once I get my pre-bought stuff, they can sit on my remaining orders. I've already made those orders through other places recently, and therefore, I won't have to worry about their crap next time around.
-
What scale will this be in? If it's in 1/60, I'm in.
-
Much, much better. I'm going to try to see if I can make some directions with the new parts, but it's fairly easy to do them. I started work on this today, as I caught a bit of a nasty cold this week, and had to call in the last two days. I'm hoping to have this part done over the weekend, but I seriously doubt I'll get it done. Too many things to do, but here's the first stages with the newer designed parts...
-
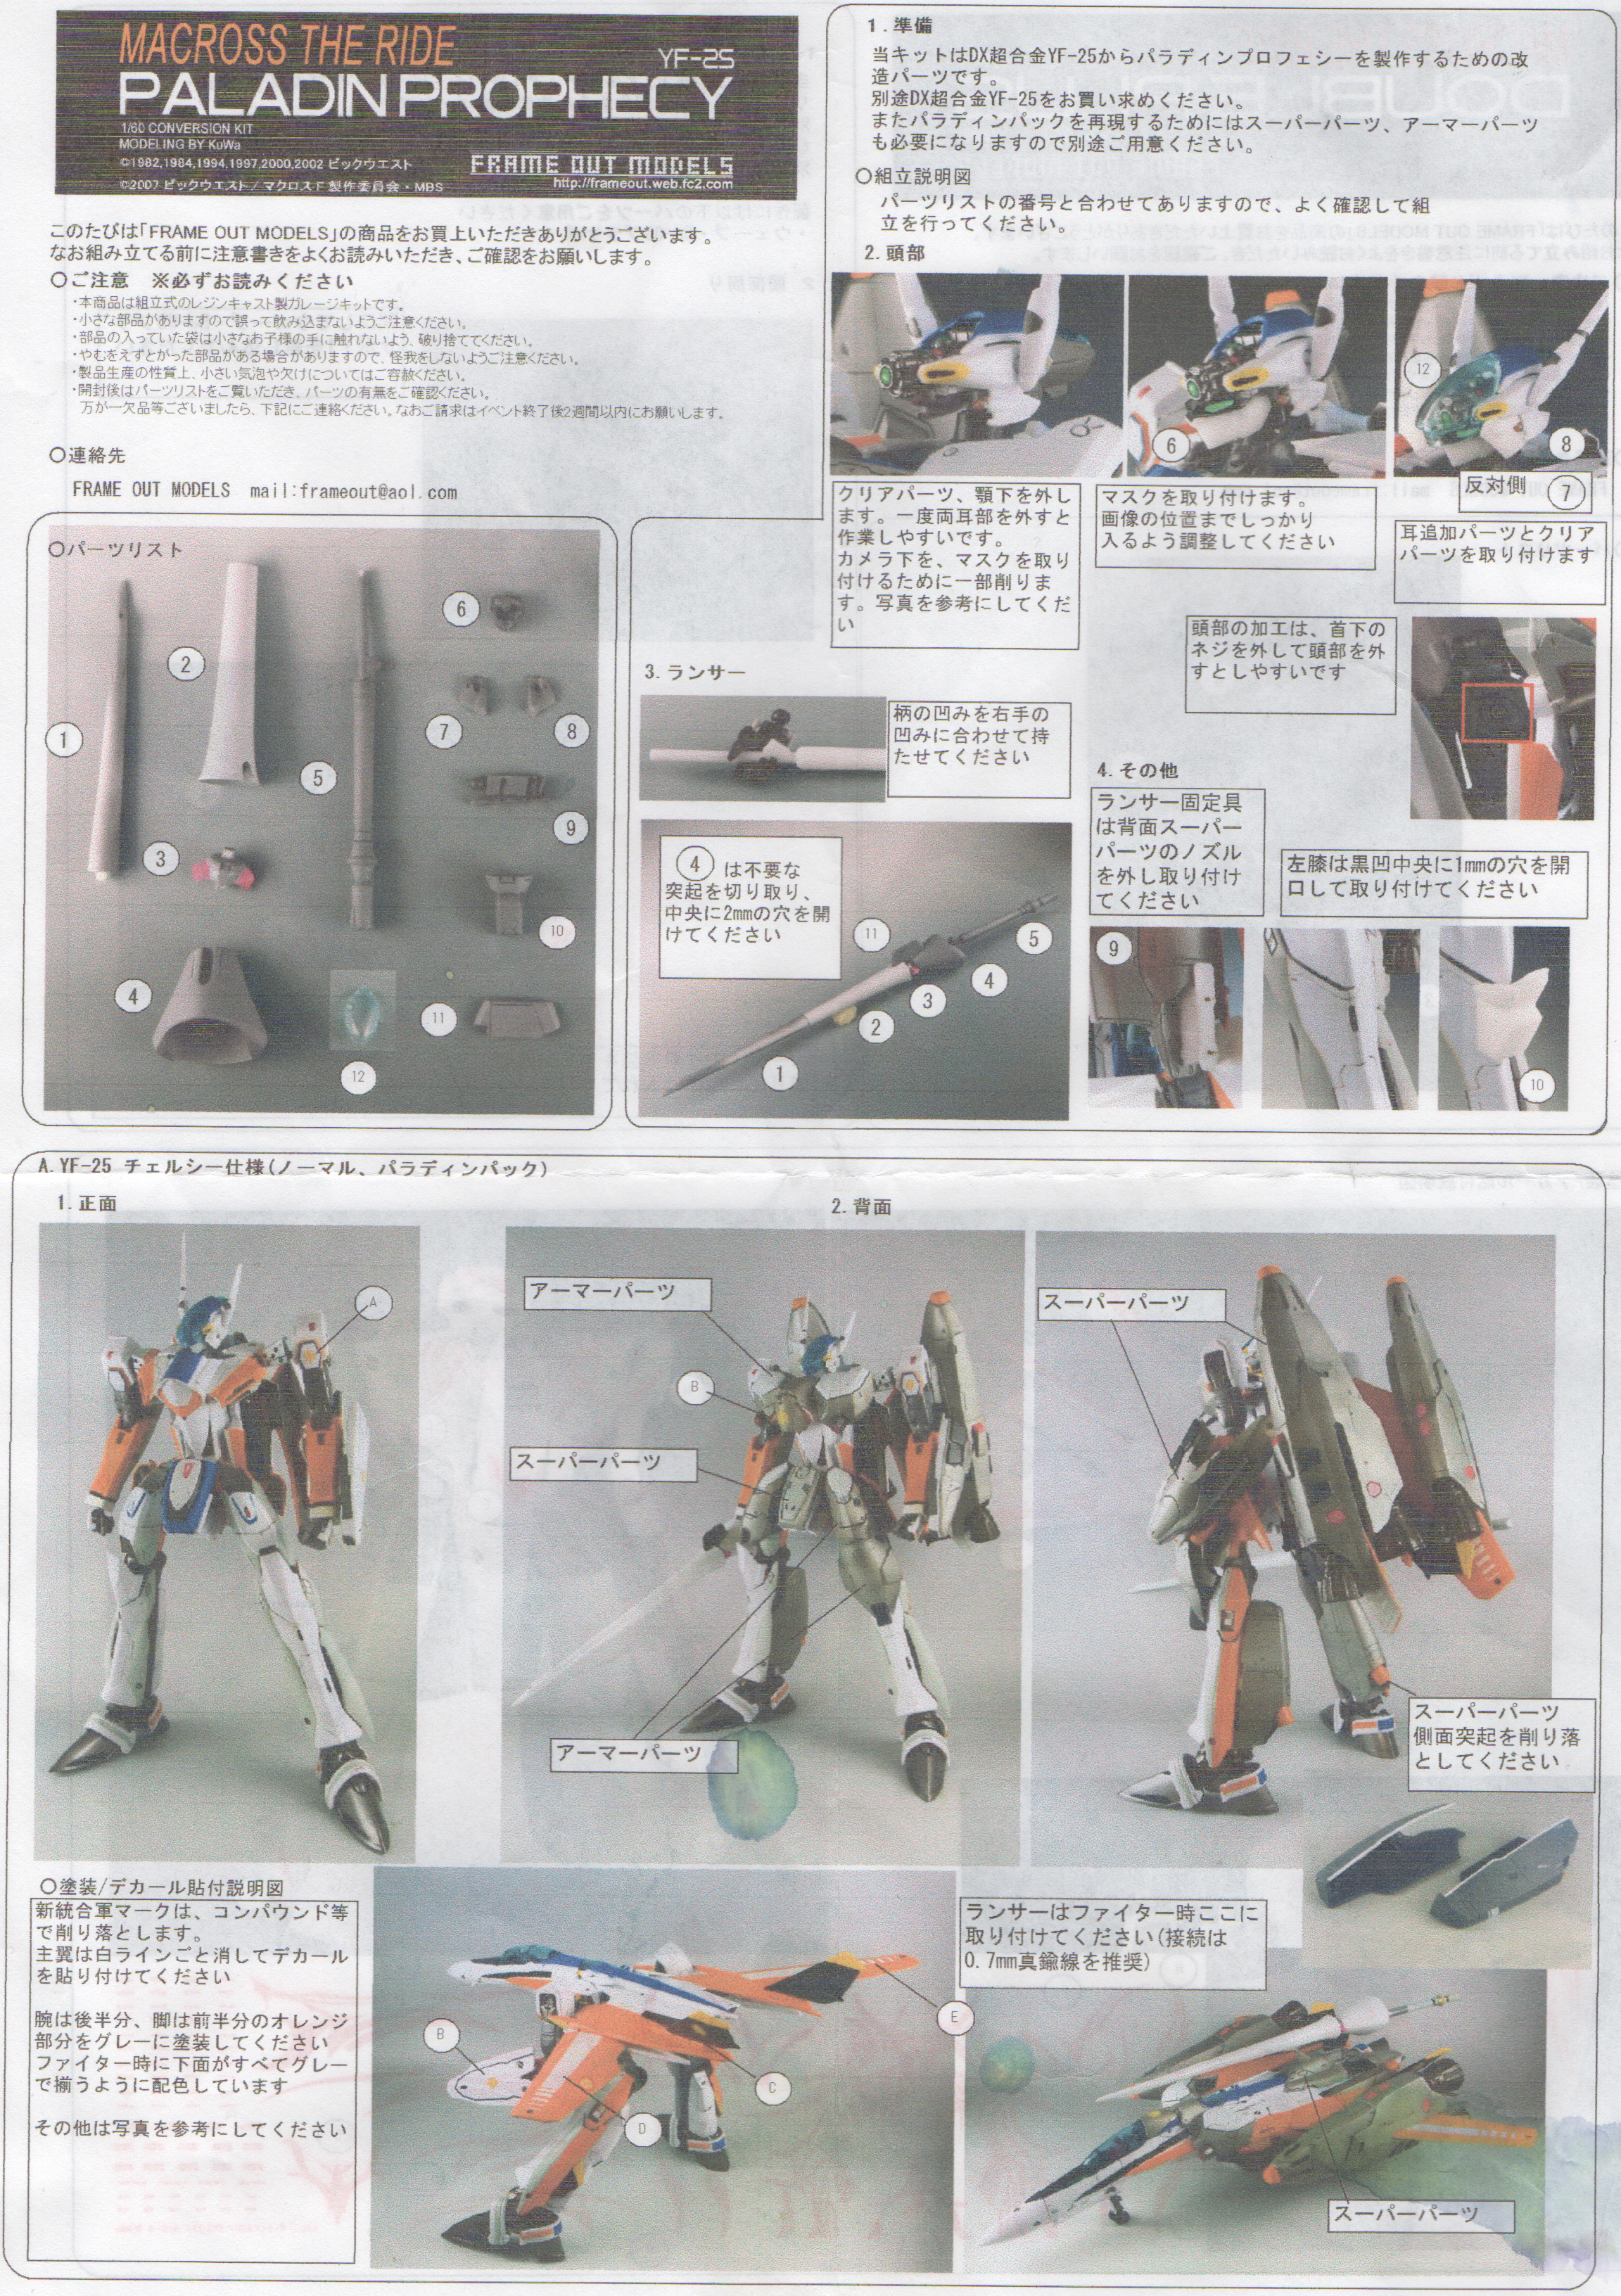
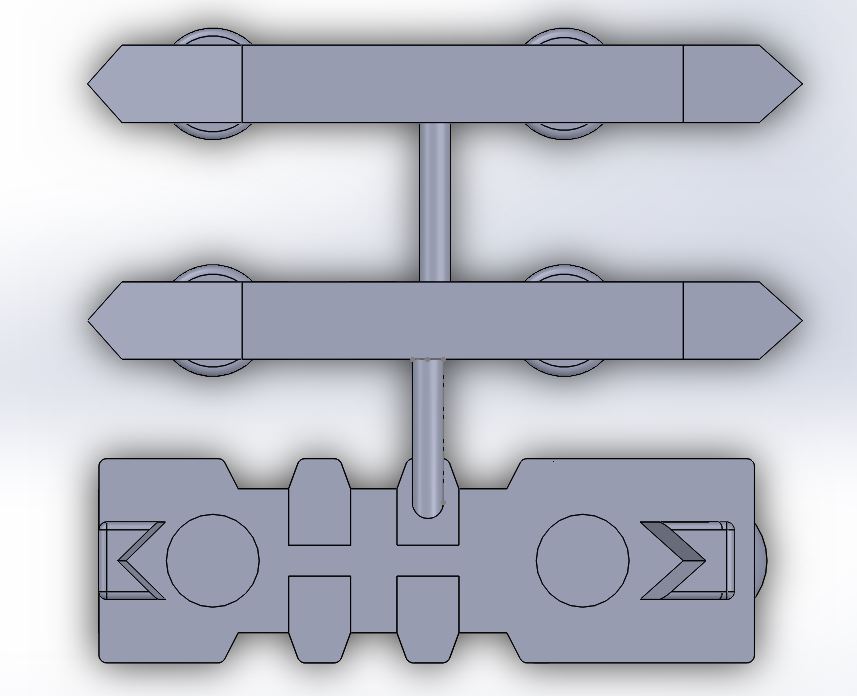
OK, I will be putting these up for sale in another thread, but for those of you who have already purchased them, here are the origin instructions. The kit is put together the same way basically. Aside from slight aesthetic designs being redone, I did change the backpack hinge and there are steel metal pins that fit and need to be cut on the part of the lance that connects to the backpack. I have also added two 2mm magnets that can be added to the backpack connector. They are optional to help secure the lance in fighter a little better, but aren't necessary. The sect should stay secure quite well without it. As I've mentioned earlier, there is also an optional knee connector I created that IMO, works better than the one that was designed originally. The link is in one of my previous comments here, but I have also sent a version just like the original if you want to keep that original. In any case, here's the original instructions.
-
Thanks. So, that kinda leaves me in a bad spot, being that I preordered mine on the 10/13/17.
-
OK, back to the topic of NY for the Kairos. What was the last batch of these that have been shipped from them? Are they at least shipping any of them out as far as we know, or are we all just waiting for some type of miracle to drop?
-
I'm on the bandwagon for asking for my refund from NY. I get uncomfortable waiting for a month after something has been released, and it's been paid for, for quite sometime now. I am worried about not getting a toy, and then them not giving a refund because they've had my payment for so long. If I really want this, which I really, really do, then I'll pay more elsewhere.
-
Boxes should be in this week to send them out. Hoping tomorrow. Got all your addresses. I was able to make more kits with some remaining trial size Task 2 resin I had, and was able to make about 10 kits total. It's more than I expected, but there are more available.
-
I'm already saving up for at least the Sheryl version. My guess, based on the cost of other lifesize statues, may be upwards of at least $5K. That's not including shipping, and then having it shipped to the U.S. That's going to be a small fortune in and of iteself.
-
Alright guys, a couple sets are done, and I'm testing some of the connectors to them, to make sure they work as I intended. I'll be sending out a few orders this week, as they are now ready to go. I will be attaching a copy of the Frameout directions, as they are exactly the same for putting it together, just with my designed version. I will have a short instruction here soon with the extra parts to put together, and will get a list of the armor and fast pack parts you'll need to make the kit complete.
-
Macross Δ (Delta) Movie Gekijō no Walkūre (Passionate Walkure)
Jasonc replied to no3Ljm's topic in Movies and TV Series
So, I've had a chance to finally come back from Japan, and had a chance to reflect on the movie. It does seem to fix a lot of the fight scene issues that I think a number of us had, where there is barely any battroid fighting. The fight scenes seem extended a bit, well, at least because it's a movie, they are filled within it. While there are some scenes that have scenery changes, they aren't so jarring when it comes across. Are there a few parts that seem a little dis-jointed, to a new viewer, it's probably a little more so, but there is a part where the concert is redoing Freyja's first performance with Walkure. The song that is sung is one of the new songs, and it is done in CG, similar to what was done in the Frontier movies with Sheryl Nome. The difference is that the girls in what is shown are also CG. I took it from the view as someone who was viewing the projection in the air, and it isn't as bad as one would think. There are some things missing, and a lot that is cut out, but the core of the story is there. It's actually a bit more solid of a movie, but there isn't much of any explanation as to why there is a war. That was probably the main thing I had to consolidate while watching it. In reflecting on most other Macross movies, there's always been a sense of needing to know the full story to fill in the missing gaps. If I were watching the movie as a first time Delta viewer, it would be hard to understand every single reference and why certain characters are doing what, but it wouldn't destroy the story of the movie. There is enough to understand as a new viewer I believe, but as all Macross movies have gone, this does feel like a complete extra for the fans that are already familiar with the characters and the story. I do feel that the review the article gave was pretty well written and portrays what a new viewer would feel. The movie is fun. It isn't the quality of DYRL by any means, and I think it falls just under the second Frontier movie. That said, I am happy with how the movie turned out. I will get the bluray and I hope (hint) that some people we know get to do the subtitles. I give it a B. -
It's is Alumilite clear resin. It's a little difficult to get it super clear. The process starts by "baking" the mold in about 200 degree oven temp for an hour to heat the rubber so that the clear resin can run through the mold easy and get rid of bubbles. Then once the resin is mixed, it's slowly poured in the hot hold and then put in a pressure tank and cures for 2 eays.
-
Last batch of rubber for the molds has arrived today, and that means that the last couple parts to recast can begin this weekend, as long as the molds are up to par. The kits sold should be going out next week, and I hope to have a diagram or copy of instructions to put up soon after.
-
So, just a quick update. I have to order more rubber for the molds, and everything is taking slightly longer to set, now that it's been colder. I have placed the order for the extra rubber, and it will come in beginning of next week, which is perfect since I'll be in Japan. I have 5 sets done, and just need to recast the lance attachment pieces. I should have these out soon. I have 2 or 3 paid orders already, and as I said, I may only be making 5 of these. If you want one, but haven't inquired or paid, shoot me a pm.
-
Macross Δ (Delta) Movie Gekijō no Walkūre (Passionate Walkure)
Jasonc replied to no3Ljm's topic in Movies and TV Series
I had a chance to read the review, and it appears her grade of B- is not a bad review at all. Because of this thread, I actually (against what I planned) listened to the Speaker Podcast in which she is a guest on. Between that and her written review, her two views seem to be that it is a good film to watch. In not watching the series, it does seem to be that there were some aspects of it that she would have needed to know from the series that would've helped the movie make a lot more sense, but that one can still get the overall meaning of what is going on. Without it, some things do seem a bit jarring, but to fans who have seen the series, it should be a lot less. Overall, the reviews seem genuinely good from multiple sources. Now, I've also heard some of the criticisms, and they seem to be a little of what I expected. I wouldn't go as far as say the writing is pure crap, because it simply isn't. If that were the case, the overwhelming support of fans here in the U.S. (macrossworld is not a good indicator of the general anime fandom, mind you) would probably reflect that. In what I do with the convention, and in going to multiple conventions as part of being one of Super Dimension Con's "ambassadors" as we go to various conventions, I meet with a lot of fans of this series, Macross in general, and those that don't know much about it at all. There are different aspects of Delta that each like, but out of many of the newer fans, one criticism I haven't heard, is the writing, story, or anything in that realm. Even after bringing that up, it doesn't seem to be something that is a major issue at all. Every Macross Movie has had some pieces that seem a bit jarring to people not familiar with its previous counterpart. Of course, it may seem strange to hear amongst us fans who know these stories better than most, but I've come across this in showing past girlfriends DYRL, people I've shown the Plus movie to, and as of late, the last two Frontier movies. There always seems to be some explaining I have to do afterwards, or during, but when one takes into consideration the fact that this particular review was from someone who fits that type of viewer, some of those criticisms are in fact, par for the course. I'll be seeing the movie next week, so maybe I'll have more to add in this thread, and I do intend to view the movie from a more objective POV.- 810 replies
-
- 2
-

-
- macross delta
- shoji kawamori
- (and 4 more)
-
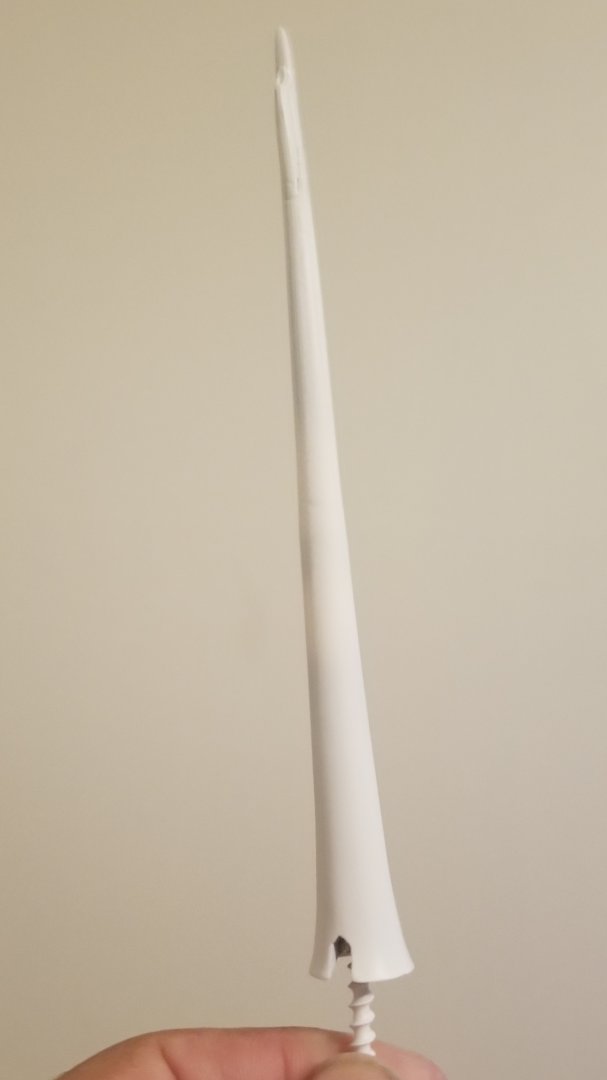
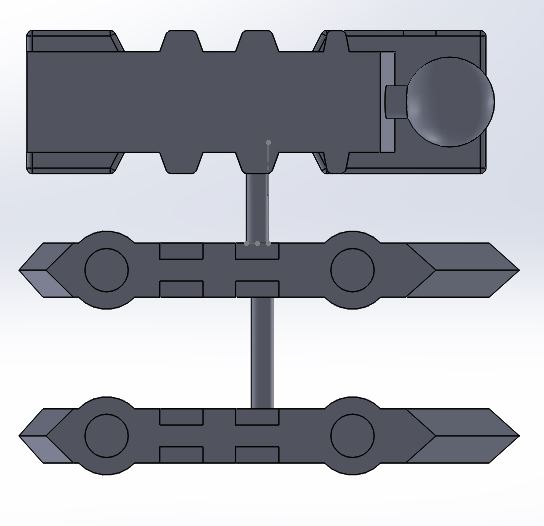
Just as I typed this, I came home today, to see the parts I designed sitting on my doorstep. I made an attempt to put the two pieces together to see how well the part that is attached to the lance would hold on the harness, and it is a perfect fit. I'm still going to put in magnets and the 2 2mm steel rods in both pieces for extra security, but they are not needed. I do need to adjust the ball that holds to the armor piece, as the ball is slightly too big and a little high. Other than that, the pieces are looking pretty good. The new lance connection pieces are already on a piece of clay for molds, so those will be done this weekend as well. I'm really happy with how the new pieces look.
-
Last piece to produce and recast is in the process of mold making, and once that's done, I'll be sending out kits. If you're interested in a kit, pm me, and I can send one out. I've only made 5, and that might be all I make, so if you're interested, let me know. I don't know if I put the price out for the kit, but it is everything needed for the Paladin parts only. I will have another knee part available for sale on Shapeways, and here's the link... https://www.shapeways.com/product/F5XJ55ENM/paladin-knee-fix?key=c91eefab72da950120309da379cf8a03 I will be sending out in the kit all optional parts, including parts that appear like the original offerings from Frameout. The set is $50. I'll probably add a for sale thread in the for sale section, but this is my trial and error ramblings as I move along.
-
Looks great, Xigfrid. I'm sure this has been asked already, but where did you get the mini figures at?
-
I'm going to be recasting parts, so crucial parts have been enlarged to account for resin shrinkage, but using fxd will save on cleanup, and the resin will make these pretty solid pieces. I do need to keep in consideration once I makeparts for a store though. It's why I tried to order two material versions. I'll readjust the model for way premium.
-
Exactly. I think they took some of what they did for the model kit, and just didn't care about the adaptability in a toy that transforms. In any case, this will hopefully fix it, and with two tiny magnets, along with the support structure, provide what's needed. I think it'll work and if it does, these will be included with the magnets for people buying it if they so wish to use the new structures I've made that are, well, vastly different than the original redesigns. On another note, the way I designed the entire set can't be made in WSF premium due to the small supports that I made to attach all the parts together. However, it looks like Extreme Detail passed A-OK.
-
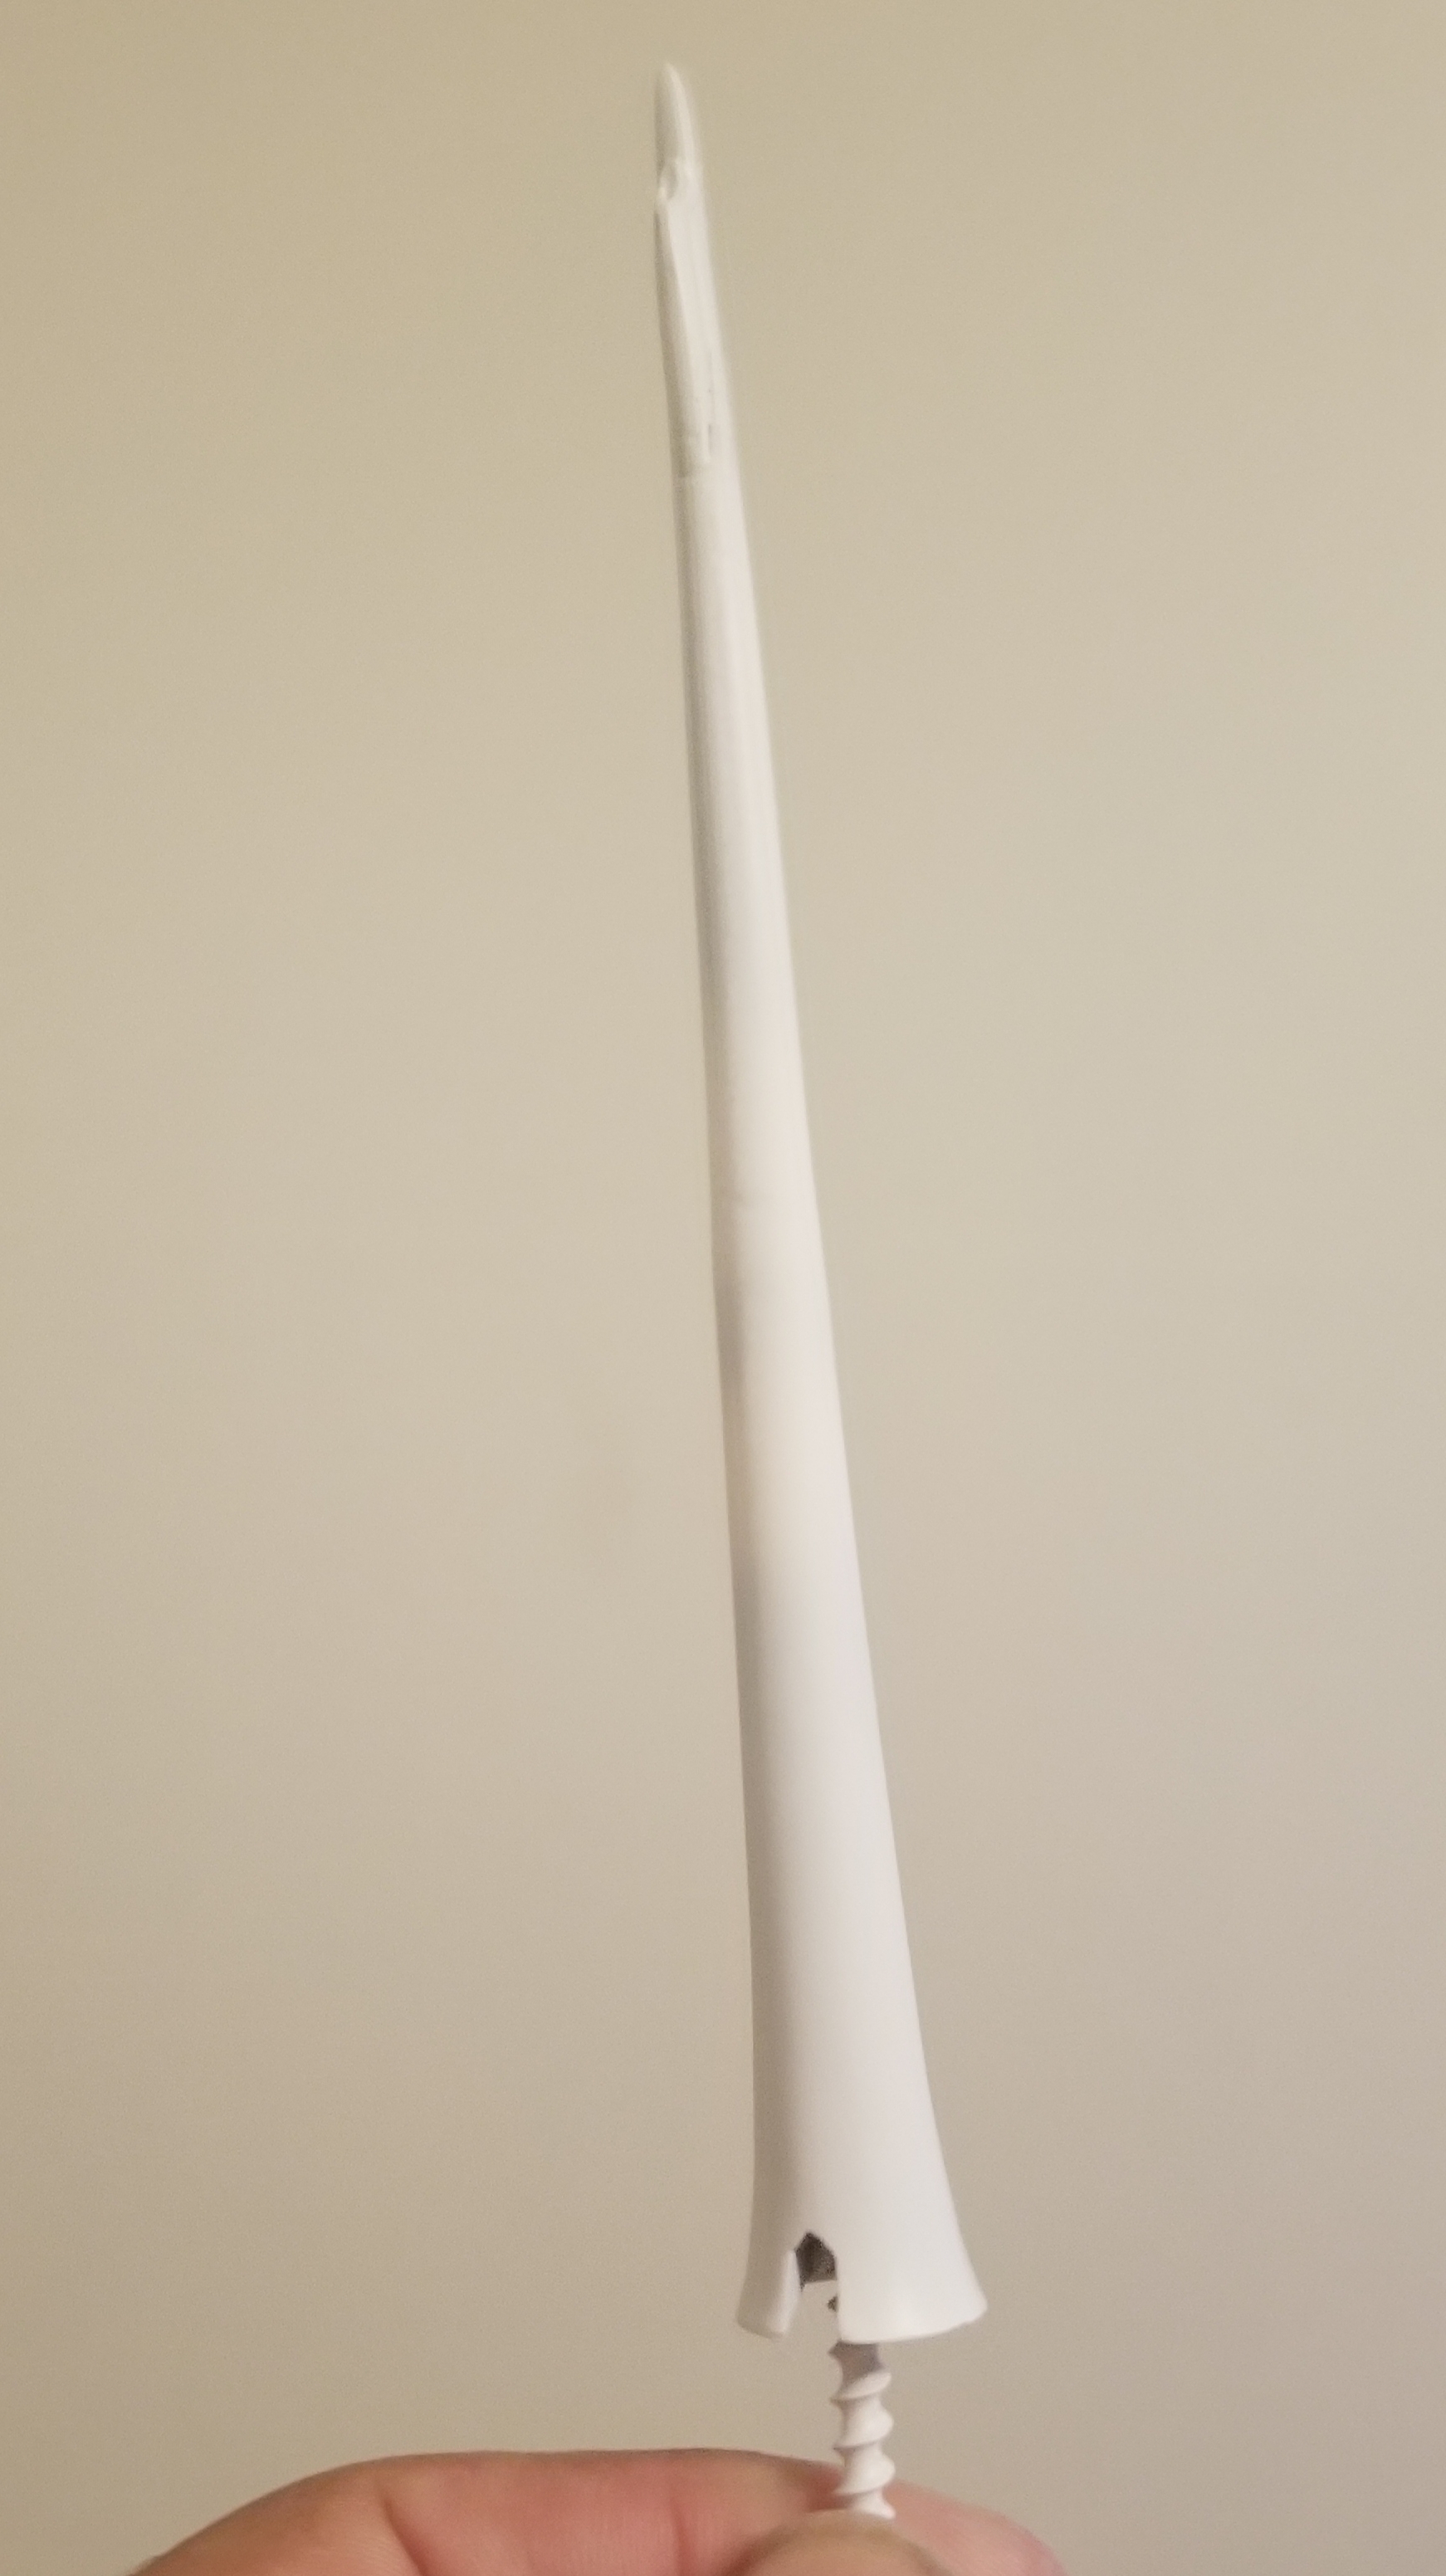
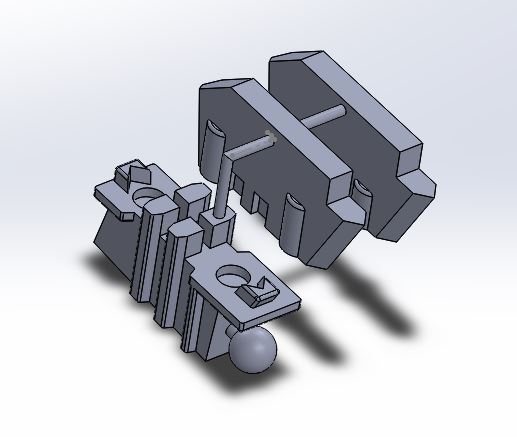
In working on the parts, I realized that the lance being mounted on the top of the fighter isn't designed to hold without any glue. Because of this, I have spent some time redoing the top part of the lance and the backpack harness so that it can hold for both modes. you'll notice there are some indents on the harness, and on the lance piece that connects. I have designed some guides on the harness, as well as indents for 1mm x 3mm magnets to be placed inside it, as well as two 2mm thick steel rods to go in the lance piece that will help keep it down. I don't know how strong it will be, but if all works out, it might be able to provide some swooshing in fighter. I also made two different sized steel harnesses on two different lance pieces. I will try both, and whichever one is better, I'll obviously use that. I was about to send out a set to someone, but after dry fitting them, I was just really unhappy that the original set had two little nubs smaller than 1mm to hold the entire thing. It wasn't designed to hold properly, so let's hope this works better and I hope this design will be worth it for you all who want this.
-
You may need to get a resin to get that put back on, if you don't want to take it apart. You can use a product called Pro-create, but I don't know how well it'd work. It's a small piece. I have extra that I can send, but you would need to take it apart. If you do that, you'll definitely need to do some touch up work, but it would be worth it, IMO.