PsYcHoDyNaMiX
-
Posts
1296 -
Joined
-
Last visited
Content Type
Profiles
Forums
Events
Gallery
Everything posted by PsYcHoDyNaMiX
-
FYI... the first run is not OOP: http://www.hlj.com/product/YMT00041
-
Display Your Collections...
PsYcHoDyNaMiX replied to bryan_f_davis@yahoo.com's topic in Hall Of The Super Topics
Nice collection, but I think it's a little too repetitious for me -
HEY!!! There's something wrong about the list... Where is Nora's SV-51?
-
Both you guys are missing a step. Go back to the manual. The dark grey tab that's inserted into the shoulder needs to be repositioned and then everything else should just fall into place when transforming it to fighter.
-
My Shin is holding up really nicely. -=] It's got nice tight joints and no stress marks (I even loosened the shoulders up too).
-
I'd say if they took the Hasegawa schemes and put them on the Yamato VF-1J and YF-19 they would've had a better fighting chance... hmmmm metallic purple-blue with gold trim variable YF-19.
-
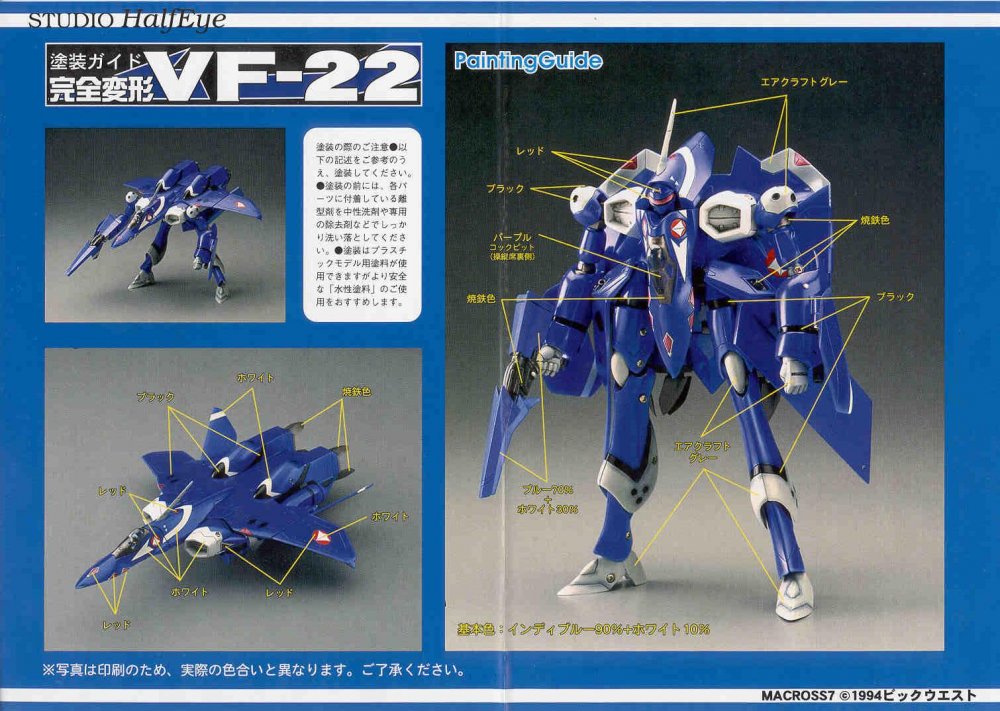
Hmm... well not exacty sure which 22 SHE based their painting scheme off of... however, I'm not building my 22 until I get more time to dedicate towards it.
-
Something like this you mean? The shoulders are just a shade darker. I would say the visor is more orange than yellow. Even from the anime if I remember correctly. Black gunpod? Was it really? hmm... Good thing I guess that I didn't start building this one yet.
-
Nope... Never got the chance to. I got the first one, but never got the second one. Yea I know what Max's blue is.
-
Yea... I know what I posted. ***EDIT*** I kind of like that blue. I gives Max a meaner feel.
-
Sorry... never played the VF-X2, so I did't know what they used in it. I do recall reading the game review somewhere here and now that you mention it that the VF-22 was in there somewhere.... I think. ***EDIT*** I would also think that Yamato would logically produce the 21 first, then follow up a bit later one with the 22. Just to get all the people to buy the 21 because "there isn't going to be a 22..." then everyone who wanted a 22 would be like o damn time to get the 21... gets the 21 and then Yamato goes oooo what do we have here... 22 bling* bling*... then 22 fans go noooooo.... buy like nine 22s....
-
Yea I sense a first batch of broken SV-51 to go with the first batch of broken VF-0S(s). I've pre-ordered one already, but just like my VF-0S that came from the first wave... the SV-51 is going to stay in the box. I'll just order spare parts if possible in the future when I order a second one with less QC probs. Eventually one of them is going to get modded. L.E.D. LIGHTS!!!! YOU HEAR THAT YAMATO!!! YOU NEED L.E.D.s!!!!! IN THE EYES!!!!!
-
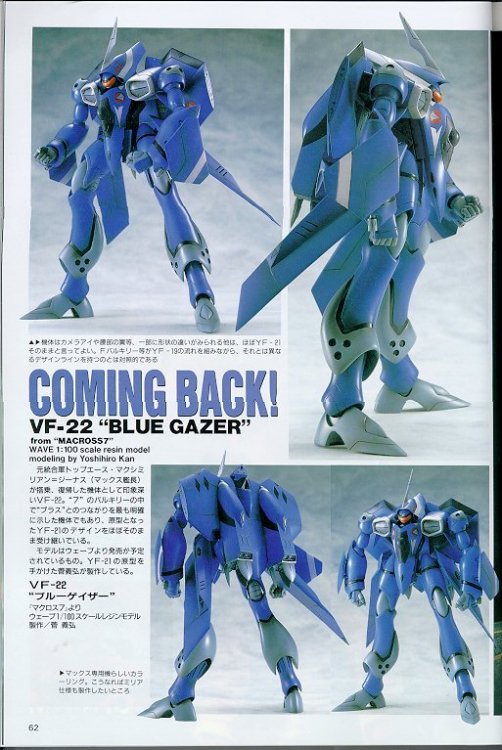
I don't think yamato has the rights to the Macross 7 line. ***EDIT*** But yes... I would prefer the 22 over the 21 But alas... this is the only thing that I have that is a variable and comes closest to the 22... It's sitting in a box along with four or so more of its variable brethren from SHE. Oh yes... and thank you Graham/Shawn for sending me the scan, so many years ago (Mine didn't come with the coloring sheet).
-
Geez... That's nothing... If it were cracked open another three degrees then I would understand.
-
YF-19 1/60 Possible Fix for under nose stress marks/breaking
PsYcHoDyNaMiX replied to ZeroOmegaZX's topic in Toys
I'm pretty sure no one has tried that yet. But even if you were to use small washers wouldn't you have to mod both the washes or shave off a side of each washer; so the swing hinge has clearance? I would figure the washers would still require modifications because the screws are so close to the edge of the plastic U pieces (even if you were to use small washers). If the washers are so small then there might not be any point of using the washers at all. Also with the use of the washers and their thickness you would still have to mod/shave off the plastic around the area to gain clearance when transforming it into all three modes mainly fighter/gerwalk. Oh yea, you may want to post your fixes/results on this page: http://macrossworld.com/mwf/index.php?showtopic=21130 -
DARKWIND... If you mod it the way I have it in the picture it will not mess with the arm positioning in fighter mode, but if you decide to take the entire two (2) mm of material off then you may have to fidget with the arms a little when transforming it back into fighter mode. If you've already taken off all of the two (2) mm of material (like what I originally did) and don't want to bother with the fidgeting; no worries just go get some epoxy... apply and reshape as neccessary. ***EDIT*** Thanks for the comments guys!
-
That's some sweet work... -=]
-
Yamato 1/60 scale YF-19 Fix/Modification Thread
PsYcHoDyNaMiX replied to Wicked Ace's topic in The Workshop!
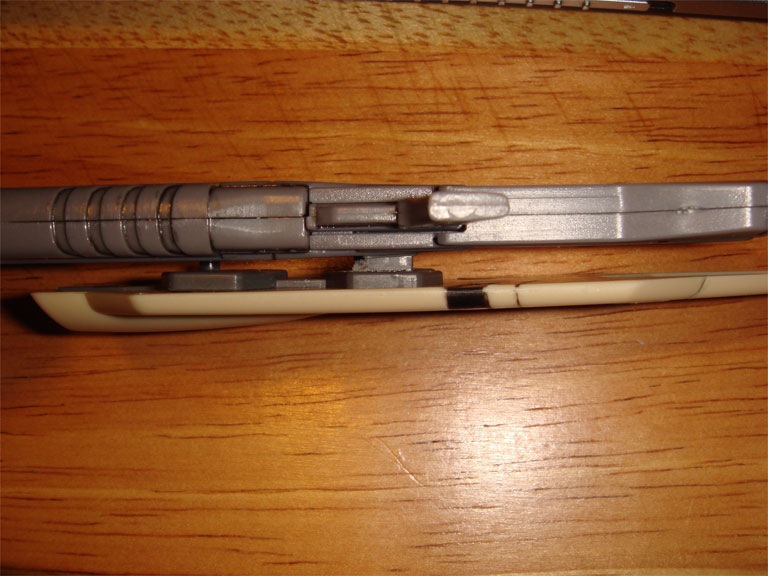
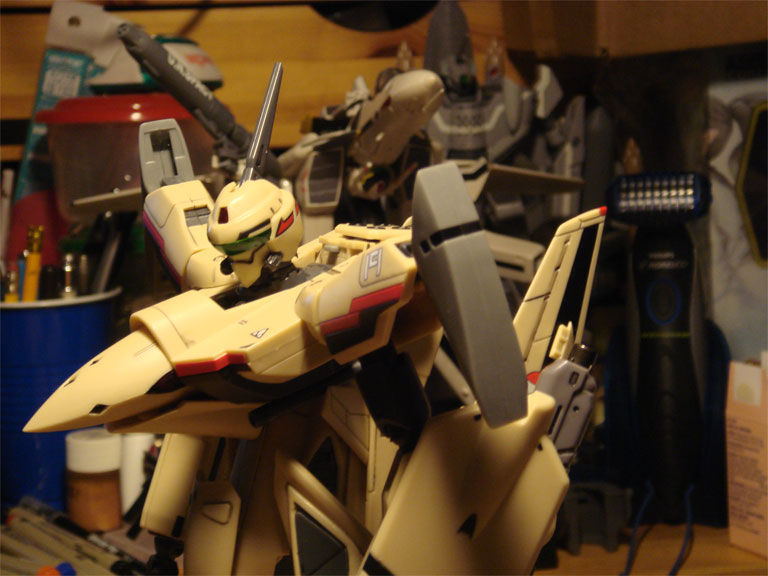
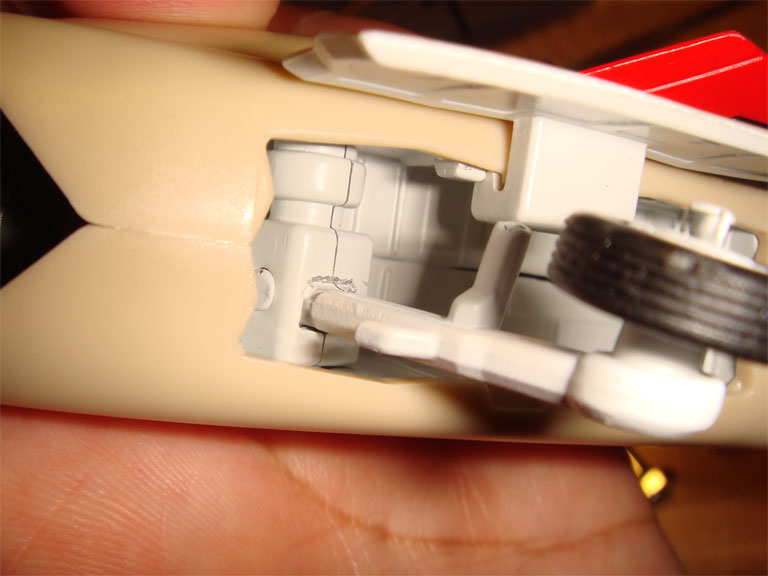
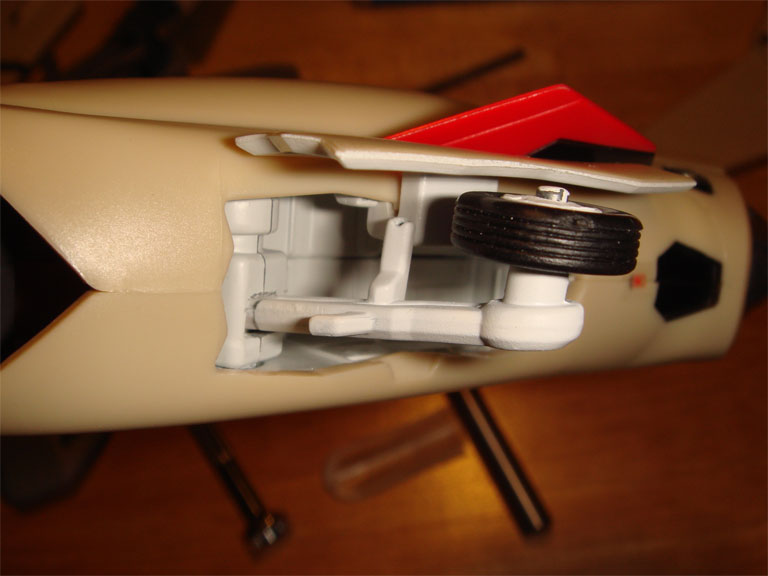
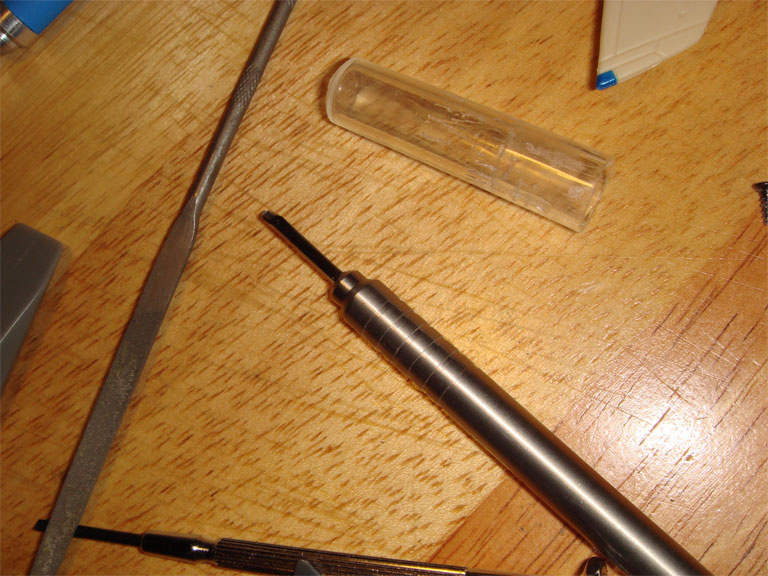
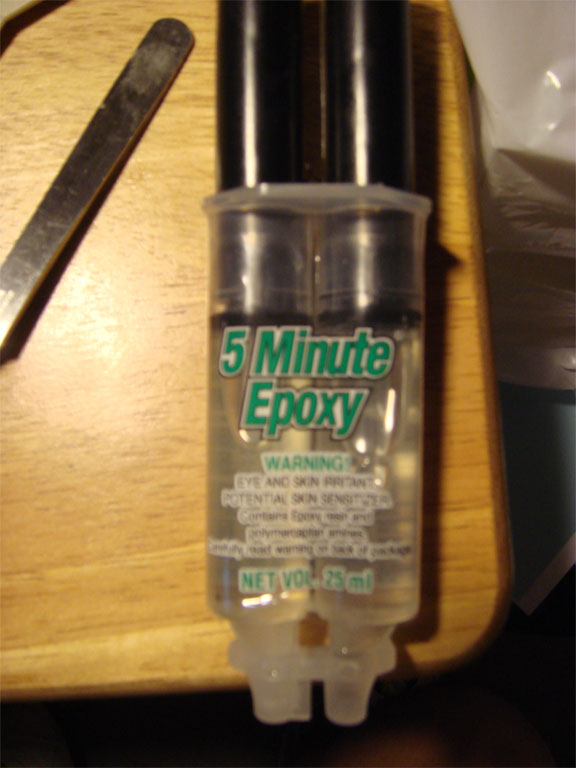
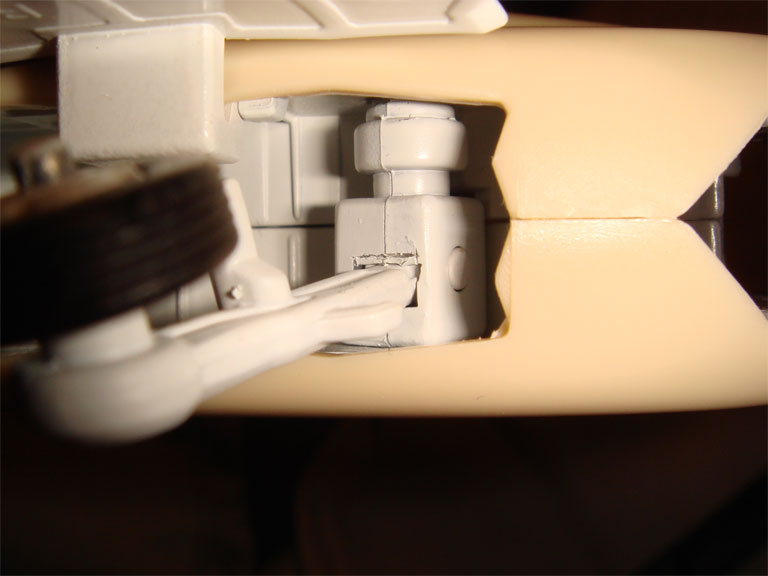
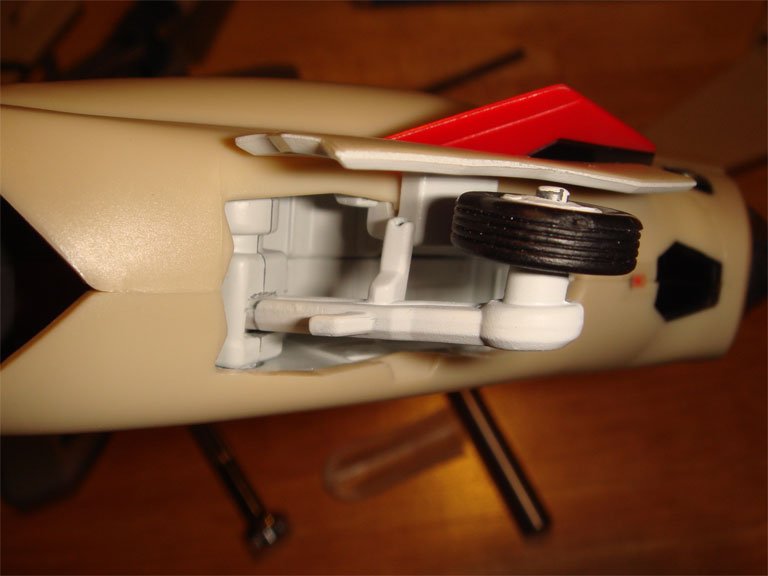
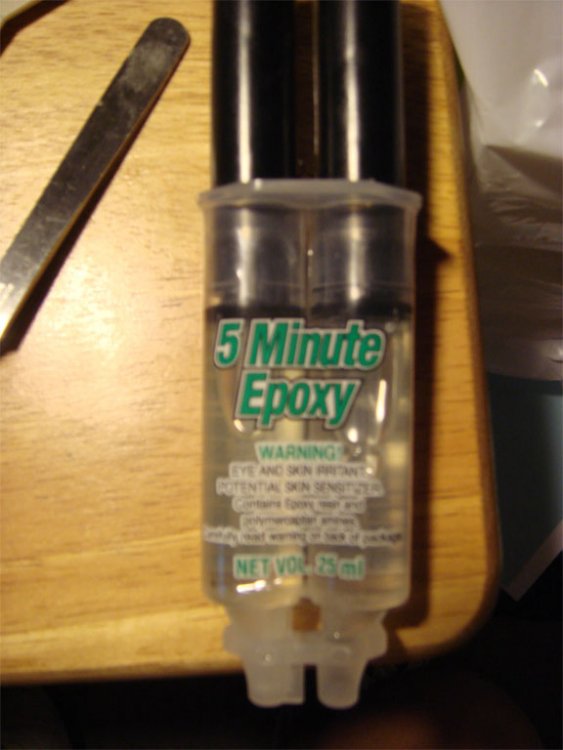
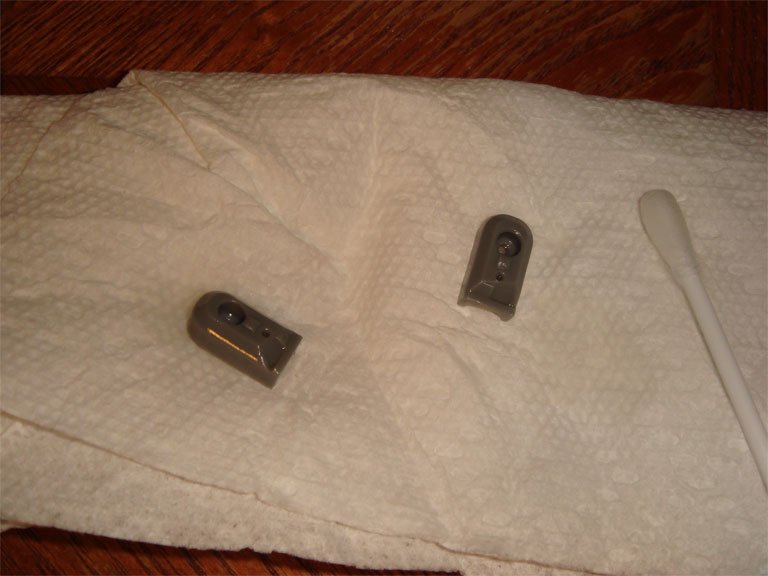
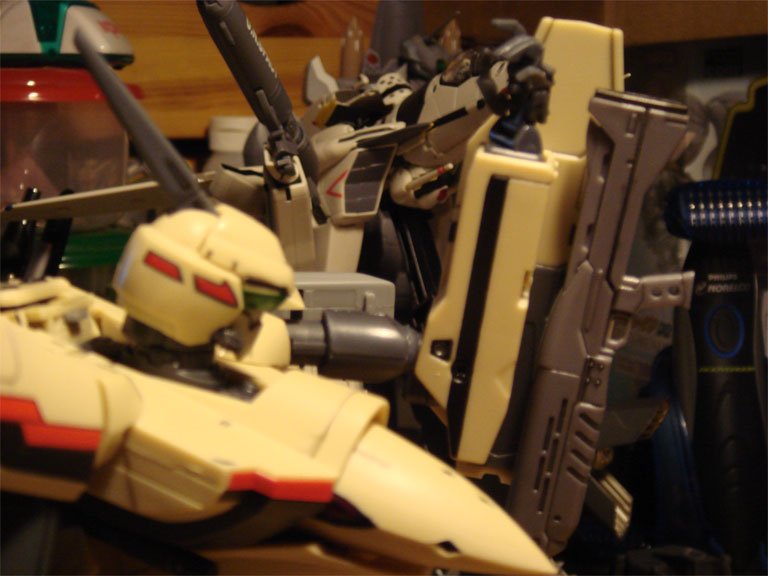
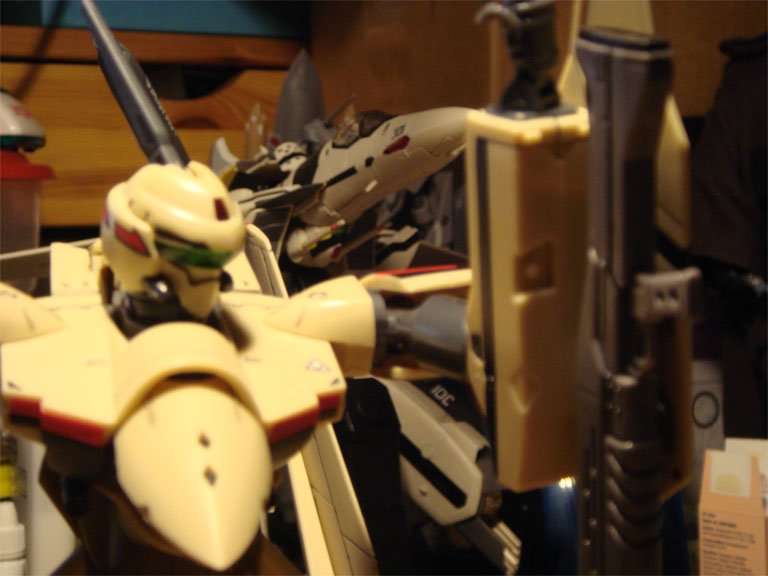
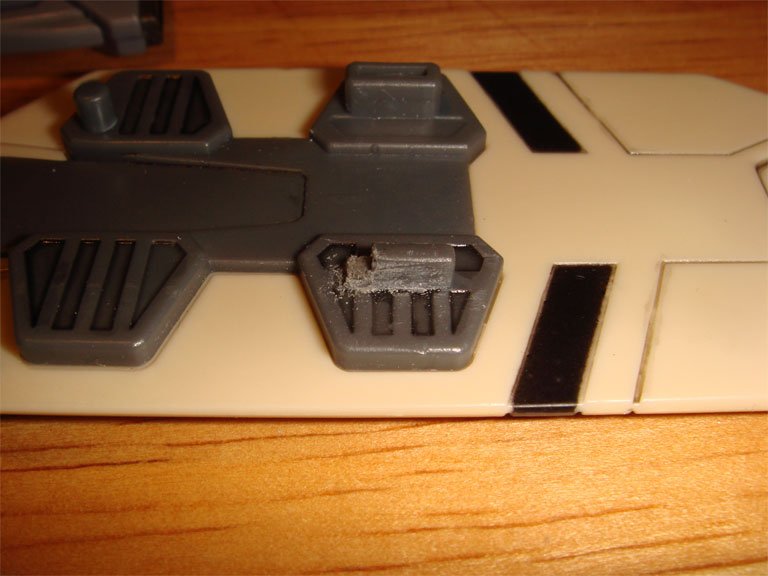
Okay... First off credit goes to eugimon for putting the idea in my head (or that I stole). The rectangular peg on the shield that attaches to the right arm in fighter mode is about seven (7) and 1 1/2 mm in dimension. The shell port on the gun pod is about five (5) and just barely 1 1/2 mm in dimension. I took my Hasegawa Carving Knife U (http://www.hlj.com/product/HSGTT-17) and chiseled about two (2) mm off the rectangular peg on the shield via the top end of the shield. This can also be done with an exacto knife as well, but the plastic is abs and is quite strong. You can take the two (2) mm off the bottom end of the shield instead of the top. I chose to take it off the top because it allows the gunpod to sit more behind the shield. There maybe an arm positioning issue (in fighter mode) if you completely take off the two (2) mm off the rectangular peg. I did this at first but then realized I could've just taken off half because the entire rectangular peg would not fit into the gunpods shell port. I fixed that problem by adding some five (5) minute epoxy and molding it to the existing rectangular shape. I also took a file and thinned out the rectangular peg on the shield because I found it a bit difficult to get the right arm off when transforming it from fighter to gerwalk or battroid mode. This also helped with attaching the gunpod to the shield via the shell port (reducing any tension on the gunpod that may be produced from fitting). I also used the Hasegawa Carving Knife U to help with the landing gear issue instead of disassembling the leg. I tightened the hip by disassembling the grey fixtures that are attached to the ball joint and after cleaning the lower half I triple layered it in Future floor finish. As well as using the five (5) minute epoxy to try solving the wing over swing issue, but to no avail I would have to take that idea back to the drawing board. As for panel lines I used small paint brush and a mixture of Future floor finish, Tamiya Smoke (X-19), a little bit of Chaos Black (citadel), Tamiya thinner and just a little bit of water. Any excess paint around the panel lines was removed lightly and carefully with alcohol (in the pics I did not get to clean up all panel lines with the alcohol... WIP). ***EDIT*** I apologize for all the excess stuff that ended up in the shots. My space is quite limited and my room is completely cluttered.


-
Done... Credit goes to eugimon for the idea (in which I stole) Mods will be posted in the respected thread: http://macrossworld.com/mwf/index.php?show...0&start=120 ***EDIT*** I apologize for all the excess stuff that ended up in the shots. My space is quite limited and my room is completely cluttered.


-
That's a nice idea eugimon. I may just try that out. I think I'll end up shaving the rectangular peg down on the shield. Since I find the two arms are kind of hard to separate when transforming it from fighter to gerwalk mode. ***EDIT*** Okay... I measured the rectangular peg on the shield and its about seven (7) and 1 1/2 mm big. The shell port is about five (5) and just barely 1 1/2 mm big.
-
Nice render. Looking forward to seeing the finished model.
-
Vinyl Model Kits....Acrylic Paint Ok to use on them?
PsYcHoDyNaMiX replied to Dax415's topic in The Workshop!
Here you go... http://www.starshipmodeler.com/basics/lj_vinyl.htm Scroll somewhere near the bottom of the page. The author talks about priming and painting. -
Nice... Look alot better than I thought.
-
Not in its own respectable thread... http://macrossworld.com/mwf/index.php?show...22566&st=60
-
Recently purchased 1/60 YF-19 with fold booster A few QC problems
PsYcHoDyNaMiX replied to SuperHobo's topic in Toys
Yea. If you've dealt with them for that long the prior was probably not the case, since they're helping you with the parts.