MechTech
-
Posts
4680 -
Joined
-
Last visited
Content Type
Profiles
Forums
Events
Gallery
Everything posted by MechTech
-
Good work Mowe. I think you chose wisely for Misato's current "configuration. The "F" cups would have thrown the mecha's center of gravity off . The mecha came out great too. - MT
-

Hasegawa Reactive Armor Macross Zero problem...
MechTech replied to Ichiban's topic in The Workshop!
More than likely, the "brilliant white" will turn to "retro yellow" like the 1/55 valks. All my other kits that had natural white in them faded to yellow too. More so where glue or other chemicals hit them. Paint can be your friend . I'm actually having to go back and fix some stuff from a decade ago or so. - MT -
That stinks man. IF there aren't any white or other fadable colors, some time in direct sunlight might bleach them out believe it or not (not too hot to melt or warp the plastic). That's what you do with old decal sheets, hang them in the sun to bleach them out. It takes a few days. - MT
-
Looking awesome as always guys! My phone line is supposed to be down, but I'm here and talked to my whole family this weekend!? I can't wait to see what happens when they "fix" my line!? My workbench is on my workbench; pictures later. I jave a smaller work area so my wife was nice neough tolet me get more shelving units/workbench area. Now the Daedalus has a table that the whole thin can sit on - at one time. Keep it up the great work guys. By the way, the cool part about 1/200 scale - no paint chips!!! - MT
-
In all honesty, do a search. I think we've talked about EVERYTHING on this site. It's here somewhere! Here's a 1/72nd transformable valk (evilbay): http://cgi.ebay.com/Bandai-1-72-Scale-VF-1...8QQcmdZViewItem Other than private stocks, they're hard to find! PM Ranger565. He still sells old classic kits. They harder to build, but a lot of fun. - MT
-
Neptunesurvey, I just had a good laugh! I was like, "hey!" in referance to your build (one in particular). They ALL look well built. I need to get me a ghost one of these days. - MT
-
Thanks guys! You're worthy; if you weren't, I wouldn't post here . I'm moving and won't have any internet until the 20th. Don't do anything exciting without me . - MT
-
I actually got one for my son. It seems to just be ABS. I don't know about inter-compatabilitiy between parts, but I will agree with the preperations required for painting. Wash the parts with hand dishwashing soap and water first and then let them dry. ABS is semi-absorbent so dry sand it or wet sand and let it dry thoroughly. Like Skull-1 said, sand the parts in friction areas. Paint with Krylon Fusion or other enamels. Normally I agree with priming, except on plastic moving parts. The top coat wears and reveals the primer. If you can get simular colored primer, then I'm all for it. Primer picks up surface flaws and makes paint stick better, so it definitely has it's place with models/custom toys. Primer is also designed to fill minor flaws, and so some of your fine detail will get covered gradually too. US Plastics sells ABS sheet if you feel confident and want to make your own custom parts US Plastics - ABS Styrene cement is alright for ABS, BUT, Plastruct Weld is much stronger. Just use it with GREAT ventilation, the same as spray paint requires. There's nothing stronger I've found. That's my two cents (two pence). - MT
-
You guys have me bustin' up ! I will definitely have aircraft on the top flight deck! And yes, we should all donate a built up 1/200 Nichimo kit to Mechtech . Not like he has 60 kits already . The bottle rockets would be an awesome idea! I did it once to another ship. The superstructure opened upward and was lined with a thin steel plate. Then bottlerocket away! It worked great and was stealthy since you could not tell it was armed until it opened at the last minute. The metal protected it from the couple of times the rocket stuck ! The whisteling ones were that much better. I CAN get a soft air pellet down the barrel of a 1/200 Monster (hint -hint). The model is too small to put the firing mechanism in all by itself, but if there was a "loading truck"behind it...you get the picture. Yes I'm considering it. I'm still trying to figure out where to locate the two water guns. The spring snakes are an awesome idea! Rocket propelled spring snakes would really destroy fellow warships! Hhhmmm...na; too psycho . Carrier takeoffs will be possible, but the bridge would make landings a little rough! Thank you again for all the compliments. You all help keep egging me on to finish this off! - MT
-
Like Rune said, somebody share the love! - MT
-
Welcome by the way! Rowboat tech doesn't get much love around here, but for those of us old farts, it was how we were introduced to Macross, even if it wasn't a proper intro. Go to the main web page and look under "Art." There's stuff there in various sections. Let me know if you need more and specifically what you're looking for. - MT
-
I intend to give them the ride of their lives! Could you imagine a modern carrier doing 30 knot spins! I'll stick to land! - MT
-
Thanks guys! It should run better with all four motors now! I was surprised at how little bow wake it has for being as broad as it is. The high speed pass clip got dropped so I re-added it back. The hard work has paid off Isamu! I just have to do the anchor and hook up the stabilizers to the receiver and the bottom is done! On to the top soon! Hopefully it won't take a year too:D! Thanks again! - MT
-
Welcome! Looks great so far! Keep up the good work and be inspired by others here, not intimidated! - MT
-
Thanks guys! It was a blast! Hardly any rock at full throttle spin. I just went back to edit that the fourth motor was frozen up. Probably rusted after the last trials. It's as good as the others now. Note to self: lubricate after each run!!! That's testiment to how good the MCD speed controllers are. One motor was frozen up and the other still ran (both on the same controller) and didn't blow it (or the fuse). - MT
-
UPDATE 3 FEB 06 FIRST UNDERWAY TRIALS - FINALLY! First off, I had to pilot and film all by myself - at the same time (my wife wasn't interested in going to the reservoir ). That means not all of the manuevers were spot on and some shots shaky. I couldn't show off all the manueverability. Second, one of the motors failed. I'll have to troubleshoot the cause. I hope I don't have to rip one of the pods apart . That means reduced overall speed by 1/4. She handles great with or without the stabilizers out. The stabilizers out just looked cooler . Overall I had over an hour of fun putting her through tests and checking performance. My little boat doesn't run anywhere near as good as this "big boat." I'm singing "I like big boats" to the tune of "big butts." Third, the videos are short and some edited (lower quality) to be able to post here (500k and under). Sorry but better than my last posting. She runs VERY quiet! The bow thruster sounds like an outboard motor though. Enjoy the movies. [attachmentid=40182] "High Speed" pass (stabilizers extended). It's a scale warship, not a speedboat. [attachmentid=40145] The bow thruster close up (it's noisy, but powerful)! [attachmentid=40146] A quick swing around. [attachmentid=40151] Going sideways! This was hard to do with one hand! [attachmentid=40152] 360 Spin [attachmentid=40155] Bow thruster stering EDIT: I fixed the fourth motor. It's seal leaked a little and I had to oil it. No sweat! I'm about to move house 10 miles this upcoming week and I have some job related studies to do. That means I'll probably be out of circulation for a while - but not if I can help it! Take care! - MT Bow_Thruster_Close_Up.MPG Swingin.MPG Sideways_1.WMV 360_Spin.WMV Bow_Thruster_Steer.WMV High_Speed_Pass_II.MPG
-
If the cannon misses you, they'll "stick it to you" with that bottle of super glue! - MT
-
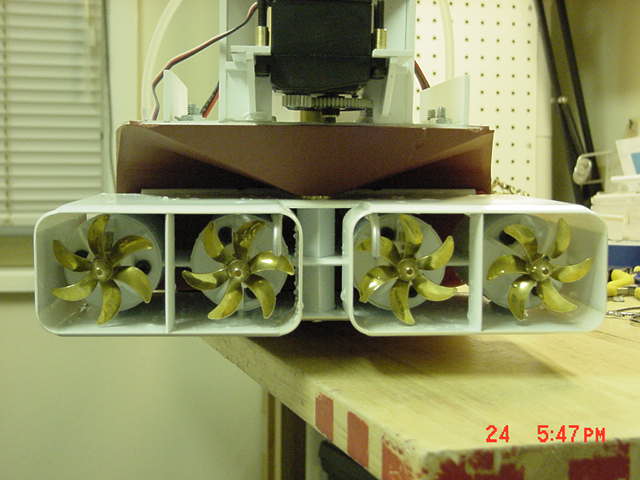
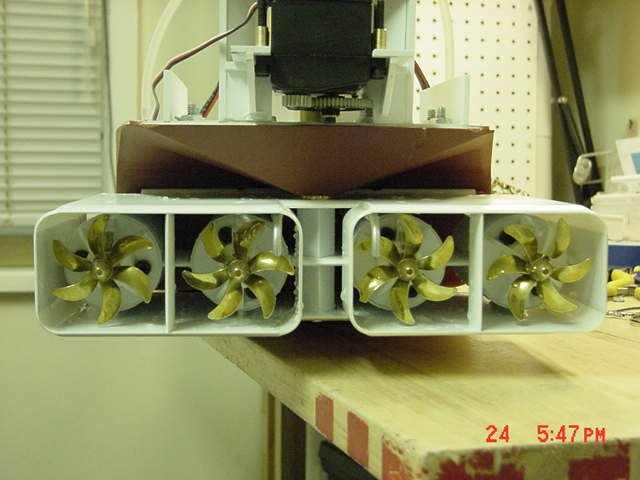
HAPPY ANNIVERSARY!? How'd this double post ! UPDATE 24 JAN 07 It's now been one year since I laid down the keel and got to what you see today. I'll let the picture and MPEG's say the rest... [attachmentid=39864] Note the wet props (also note their scewed directions). [attachmentid=39866] A quick pan of the stern section tempoararily wired up for testing (throttle is on low and very quiet). Oh man! I can't post the MPEG of the bow swinging around side to side in the tub or the slow speed of the props (they counter rotate)!!! The file sizes are just a bit too big! It looks cool though. The only problems I had were blowing a fuse (it was underated anyhow for safety reasons), and one cooling line wasn't passing water through. The one that worked was ice cold on the heat sink! And oh yeah, my bathroom is too small. The first two are easy to fix . I just have to run the conduit and wires for the bow section and it's off to the reservoir! Of course with it being 30 something degrees (F) outside I might wait a bit . - MT Stern_Pan_View.MPG
-
HAPPY ANNIVERSARY!? UPDATE 24 JAN 07 It's now been one year since I laid down the keel and got to what you see today. I'll let the picture and MPEG's say the rest... [attachmentid=39864] Note the wet props (also note their scewed directions).
-
If anyone wants to mess with filled epoxy resin, that's great stuff! I've actually got some rare 1/200 models made out of that stuff and the only thing that has been a threat to it is hot water (fixed some warped areas). I'm considering fixing my yellowed 1/55 Elint. The top fast packs are missing. I'm also considering trading it for a 1/60 valk too??? Still thinking... - MT
-
I had an '83 Celica that I took the celica medalion off and redid it as a skull squadron logo. So what happens, somebody stole it!!! Is nothing sacred!? - MT
-
It's like the lost puppy that follows you home. Cute, but annoying after a while - MT
-
It's a pain, but the more detail, the more convincing your model will be. Also, if a "clueless" person comes along and sees your model, they'll have a point of referance for size. I've only talked to one person here who even knows what Macross is, let alone the Daedalus (next to you guys here on line of course). - MT
-
Looks great! I whish I coulda had one for my marriage! (In my case I got "Lisa though"). - MT
-
Looks awesome man! I just checked back in this section after a while. Your work looks great! The movie didn't seem to work for the SDF!?. I know both drawing and building. I REALLY appreciate all the work you've gone through so far! I'm nearly almost done with just the BOTTOM of the Daedalus. Keep up the GREAT work! - MT