MechTech
-
Posts
4701 -
Joined
-
Last visited
Content Type
Profiles
Forums
Events
Gallery
Everything posted by MechTech
-
I ordered the Mospeada TREAD/Legios kit and it took about three months or so. I did get it though! - MT
-
I'm seeing the colors correctly. They look good too. Smooth finish. You know, the funny part is my wife keeps using my workbench (it's really a workbench) and puts stuff on it. I keep telling her to get stuff off it. Sounds like it's time to invest in a workbench! - MT
-
Great work! Some can draw, some can't (I'm in the can't category outside a PC). - MT
-
OK, SORRY no updates. I'm having serious issues with the height dimensions for the hanger deck area (outside dimensions) and getting on the computer to do the drawings and check my calculations. Gotta keep the wife happy and share the computer with her too! It's either going to be 7.5" or 8.25." The latter gives it a full third deck for maintenance in the drawings, the first looks better! Stupid anime magic! - MT
-

1/72 Scale U.S.S. Enterprise
MechTech replied to Valkyrie addict's topic in Anime or Science Fiction
Yeah, rock the boat baby! I stopped subscribing because I was getting used to the same subjects too. Of course now I pay the newstand price (or my wife who's sweet enough to think of me and pick me one up when she's out)!? When I finish the Daedalus (one of these days), I'll submit a photos spread and article. We'll see if that makes it in. Here that brothas', submit your work to FSM and save us from boredom! - MT -
Mechleader is right, you're a liar! Either for saying it's your first model - or - for saying it's not very good! It looks great! Paint is smooth and clean as are other tough to do details. The work put into it shows. Congratulations! - MT
-
The Falke looks awesome Kylwell. You FINALLY finished it! With a spare engine too. That'll usually get you brownie points with the judges. The stands and other details really make it look more realistic! Congrats! - MT
-
Thnaks Mr. March! Those work perfectly!!!? I don't know why, but they do! Nothing is blocked and my PC is clean. The humor stuff is just too funny. Keep it up and thank you again! - MT
-
Thanks guys, but I just get [attachmentid=42127]and then[attachmentid=42129]. Maybe it's a firewall thang? None of the text on the second page links to anything either Refresh was a no go too. I do IT work as a job, but I'm stumped. This is the only site I can't see!??? Thanks for your help! - MT

-
Alright, it's the wierdest thing, your link takes me to the manual, and I see nothing but soem text. I click on "don't forget main page" and still nothing but your updates. Yet I clicked on a couple of peoples links on stuff they liked and pages came up!?? From what I saw it looks awesome! Just can't get to the rest!? - MT
-
1/72 Scale U.S.S. Enterprise
MechTech replied to Valkyrie addict's topic in Anime or Science Fiction
Thanks Thor! I've only been buying/subscribing to FSM on and off since '90. I wouldn't have dreamed they would do a valk review. I've never seen any other anime in there articles (not including galleries) for years. - MT -
ALL of the details look great!!! Sounds like you better cast some copies! It wouldn't be too bad if hollow cast on a rotocaster. Can't wait to see it done! - MT
-
Thanks for the photos. It's got models in it, so I'd say it's in the right spot . - MT
-
1/72 Scale U.S.S. Enterprise
MechTech replied to Valkyrie addict's topic in Anime or Science Fiction
Now I have more inspsiration to get on with my build! Thanks man! - MT -
So do the skirts go on the viper? It does look busy! - MT
-
Welcome Cazzalora! Great work on the Legos. Best thing you can do with them! - MT
-
Kylwell, how'd you get all that fur to stick to it? - MT
-
Congrats on the free supplies! I waited months before strating on the Daedalus. I wanted to finish my work area and new table saw table before working. It was well worth it! Patience my friend, it'll pay off . No rain probably for a while too. - MT
-
I drive a Nissan Quest Minivan (more like the DYRL shuttle than a Valk). I use Devcon 2 ton epoxy (that's what I'm gluing the carbon fiber Daedalus bits with). I've seen it in several hobby shops, so you should be able to get it. - MT
-
Don't forget Silly Putty! Cheap and a lot of people swear by it! No sticky residue from the tape leftover either. - MT
-
Looks great! It's the details that make the difference! - MT
-
You've all been busy since I've been gone the last week! Everyone's work looks awesome! We even got shot at on you tube! You miss a lot in a week's time. - MT
-
The model looks great! The paint and decaling look realistic. (I'm staying out of the other conversation ) - MT
-
Funny! Sorry, just a minivan! I can dream can't I - MT
-
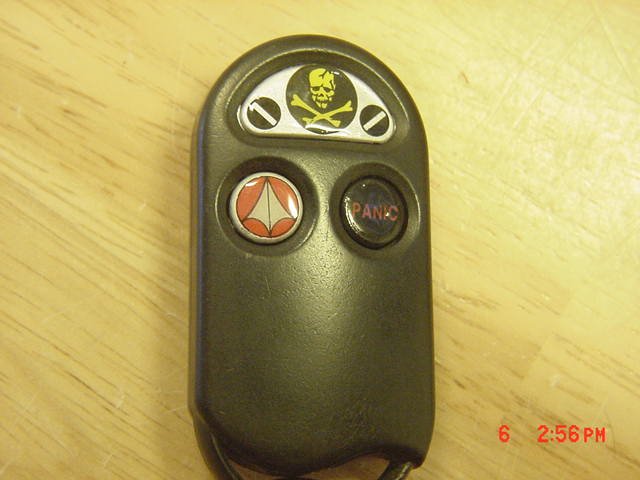
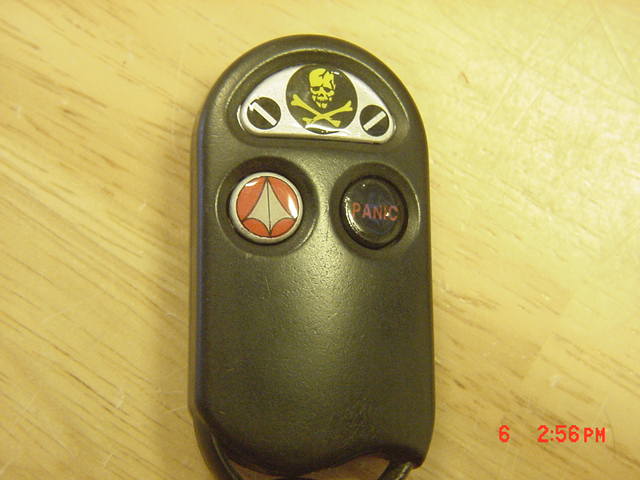
This is a customization, so I thought I'd post it here... I had to step back from the Daedalus floorplan drawings, so I did this. I'm also taking a weeks vacation tomorrow so I didn't want to start anything big right now. [attachmentid=41777] Customized Buttons for my "Valks" keyless entry. Got some leftover decals? Clean up the buttons on whatever electronics device you want to mod (has to be hard plastic), cover in silver or other backing color, slide on your decals, and cover with 5min or other epoxy resin. A thin coat should last a long time. The old printing on the buttons wore off anyhow except "Panic," but a good valk pilot shouldn't use "Panic" much anyhow . I whish I had a decal that said "Easy" for an easy button! That would be cool! - MT