
MechTech
-
Posts
4677 -
Joined
-
Last visited
Content Type
Profiles
Forums
Events
Gallery
Posts posted by MechTech
-
-
@Papa Rat That Monster is looking good! Lots of love and attention. Some seams you may be able to fix before-hand. When you can, if you sand the edges flat, like on a piece of sand paper mounted to a board, they'll join better. Then use a ton of glue to make the seams "wet". Then put them together. It will take a day or two to dry, but you may be able to eliminate some puttying (which also requires waiting time). Plus the seam is stronger.
@SteveTheFish and ALCON: Still to this day, a lot of the IPMS founders are stuck in their ways. I've heard fellow club members who read their literature complain about it. That includes techniques too. Don't get them started on 3D printing either! But like Big S said, there is a big group of Sci-fi modellers, mostly Gunpla modellers who are forcing them to change. Our last convention had A LOT of sci-fi kits. Even our die-hard aircraft guys are getting a Gundam just to see what they're all about and understand them better. The last two shows/conventions I was at even had a large group of Gunpla club members en force representing and taking photos together.
The downside, the judges know how easy they can be made to look good. So they get more attention in judging now😉 - MT
-
@pengbuzz THE Masking Tape Master!!!
@Cheese3 Cool to see those ole' tiny kits being built! I like the highlighting on the Defender.
@woodsider That 1J looks beautiful! I think you'll win some medal with that one!
ALCON - Here are International Plastic Modeler's Society (IPMS) judging guidelines (there is a Gundam section): - MT
https://ipmsusa.org/about/competition-information/ipmsusa-competition-handbook-2024
-
-
@Papa Rat Good call on the magnets for your Monster! By the way, if you're careful, they will still work just under the surface. That way you don't have to cover them with anything.
Concerning your Talgeese: As a Sci-Fi judge for my club's last show, we dinged stuff like seam lines, rough paint, decals that were not blended well into the finish, or silvered decals (air gets underneath and it looks silvery). Stuff that will help you, adding detail bits, adding more scribing details/panel lines, and being consistent with your paint scheme (wear should be even across the model or rust, just not here and there). You should be able to get a a hold of the judging rules. If not, I'll see if I can find ours. Honestly, you should be able to walk into a show and have a good idea of where you stand. You know if you did a good job or not. At the very least, it's a lot of fun and a GREAT learning experience. You will see A LOT of awesome models and good ideas to borrow from.
Who's hosting the show? If they are IPMS based, their rules are pretty much the same across the board.
@Cheese3 Your paint shading looks good on that model and helps build size (for something so small).
@derex3592 Good help is hard to find; I'm glad you got some! 😄 Sorry your Seymour-Johnson decal got jacked up. That squadron must of had a special deployment to Australia or something, maybe with a special paint scheme it sounds like? - MT
-
That's awesome she did that! I wanna say, "Sneaky wife, happy life" but that can go bad too.😁
-
@pengbuzz That's AWESOME man! Thank God for your wife and finding an ORIGINAL 80's kit! I remember that kit too - pretty cool! It's also great you got your starship nacelles sorted out too! Things are looking up! - MT
-
@Chas I think I used Super Lube (liquid) last time I stripped my old airbrush down. It has Teflon in it and coats nicely.
@derex3592 Congrats on moving indoors! I lived in TX for a short bit and the heat and humidity can get bad! The Eagle looks good too!
@Papa Rat Cool! Those will be a BIG improvement over the stock butcher block hands. - MT
-
@nightmareB4macross Thank you, but you're doing some awesome work! A lot of what I'm doing is because of the lathe and mill making up for my lack dexterity. GREAT detail work and funny pose for your not-so-Chunky Monkey.
@Papa Rat Thank you! Congratulations on your anniversary! Doesn't seem that long! Are you making a glass cockpit for that VF-1 (another dad joke back at you)?
For the Monster, you may want to look at some after market joints to put in that. The stock setup, while cool and articulated, just doesn't hold like Big S said.
I checked USA Gundam Store and Newtype, but they are out of most of them right now.
@Thom Thank you, Thom, I appreciate it! - MT
-
@Papa Rat That M.Lover looks GREAT! I love that Mr. Super Clear. It makes a lot of finishes just meld together. You're VF is coming along cool too!
@nightmareB4macross Dude! Put your top back on, this is a family site!🤣 The Valk spread out reminds me of the old Imai cartoons where one of the girls has her Valks on display as insects with pins in them!😁
@Chas The paint looks SMOOTH on your SDF-1. The mods do too!
ALRIGHT, so, my apologies for all the photos. I thought some of you might wonder how I did what I did and how it may help you (as I learn from you guys doing stuff too).
Somebody I know wanted an F-35 for a temporary display. I mentioned I have an F-35B and they can borrow it after I build it. So I've been asked to build it, while forcing me to get it out of storage and building it. So, win-win!
Back in 2018, I got the Hasegawa F-35B when it was new. Probably one of the best 1/72nd iterations of that airframe. Downsides, no ordnance and the decals are now outdated. The RAM tape that shows up as lighter colored lines all around the plane are now dated. It's all now the same color except for some hatches and stuff.
The first thing people do when they look at an F-35B is look into the giant LiftFan behind the pilot. Hasegawa just has the top guard and a 1950's looking turbine blade under it, so I decided to make it more accurate. I think the F-35B is a cool plane design and I wanted to put the effort into it.
The LiftFan has three sections you can see from the top. 1. The top guard with 11 spokes (and small sensor tubes all around). 2. Variable vanes that look similar to fan blades, but they're not. They're variable guides to adjust air flow. 3. The actual lift fan. In fact, there are two lift fans (counter-rotating) and other stators inside the fan housing, but you won't see them on the kit looking down, so I left them out here and on the model.
First I tried making about seven turbine fans in styrene. All but one failed, and that one was shaped wrong, so I dropped that. This was about a week of wasted effort! So I'm showing you the bad with the good.😉
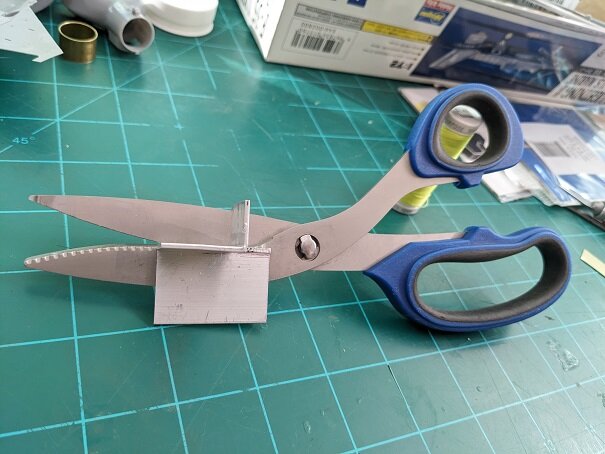
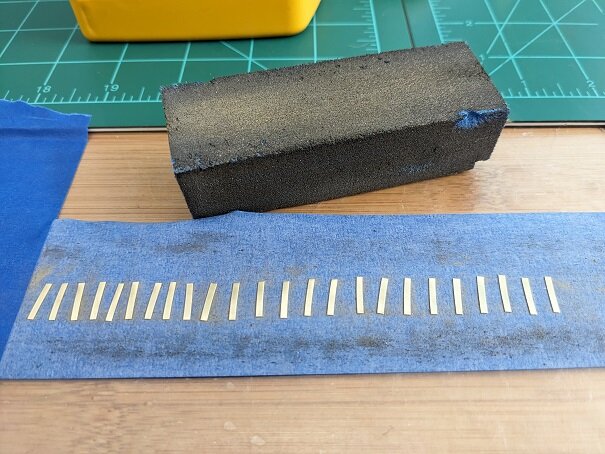
Next step was to build everything from soldered brass. That worked much better, but is A LOT more work. I used a pair of scissors and super-glued an angle piece onto it to act as a guide. - This is now how the "variable" vanes section went together:
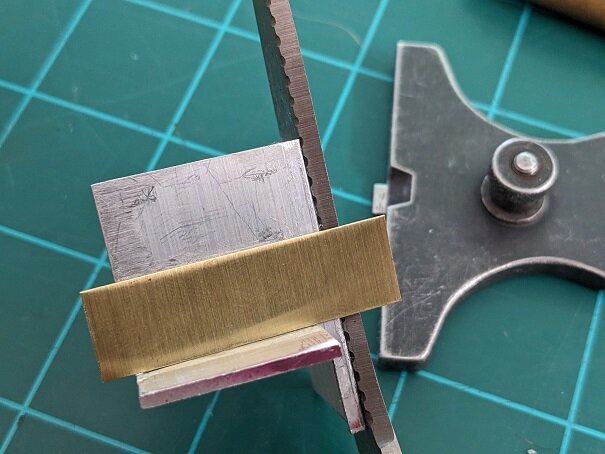
Then a depth gauge was used to keep the thicknesses the same when cutting all those tiny strips.
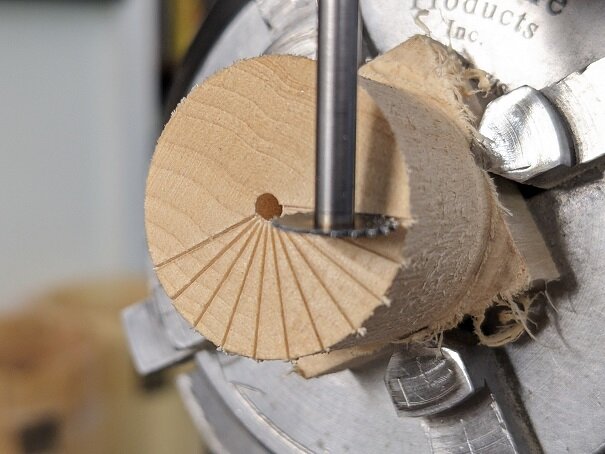
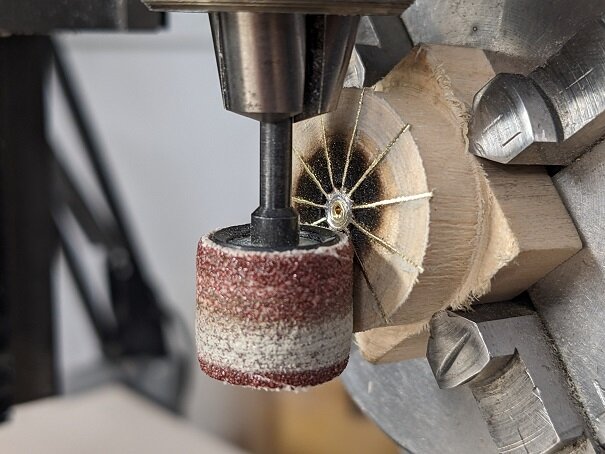
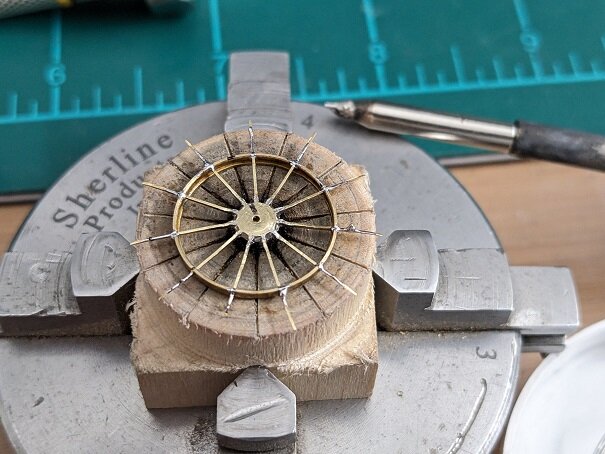
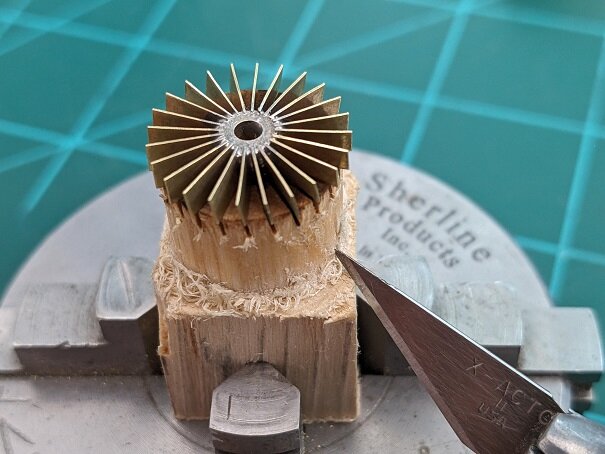
Next, I needed a jig to hold the brass blades while soldering and doing other stuff, so I lathed and milled a block of bass wood.
Next, all those little blades were sanded smooth to help with the finish and solder adhesion.
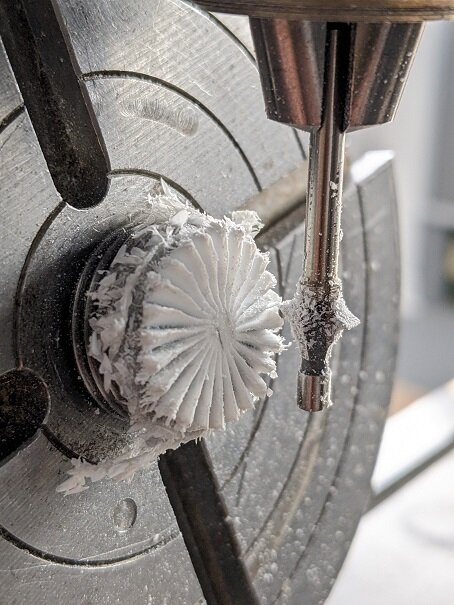
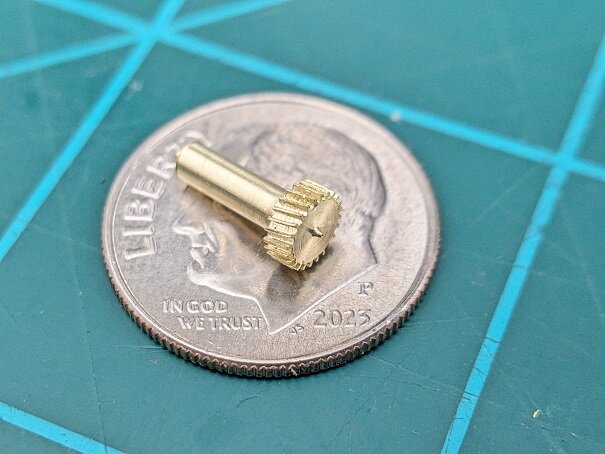
Then the center piece was milled. This took a couple of tries. You can see there is hardly any material on the splines sticking up. This was the delicate part. They could easily break off - even in brass.
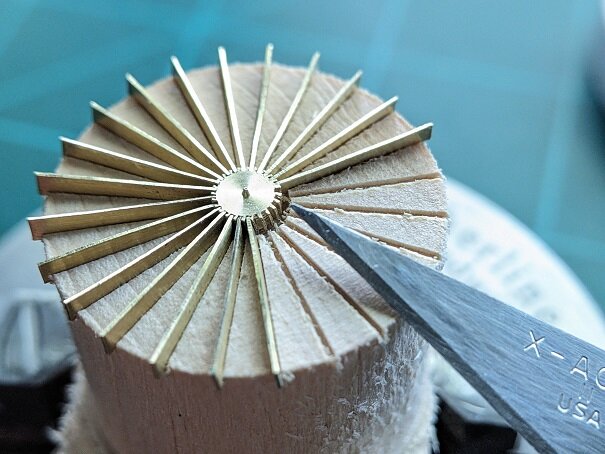
The center piece and blades getting fit together. Then they were soldered. Note there is a slight angle to the left in the blades.
- This is the top "Guard" piece. This is a similar piece, but it is for the guard that goes over the top. This is how I figured out how to shape it without busting up the delicate parts. The pieces stayed in the wood while I CAREFULLY sanded them to an angle.
Soldered onto a piece of K&S metals tube. An iron was used because the mini-torch was too hot for this thin metal.
And after A LOT of cleaning up, filing, and the center piece milled out...
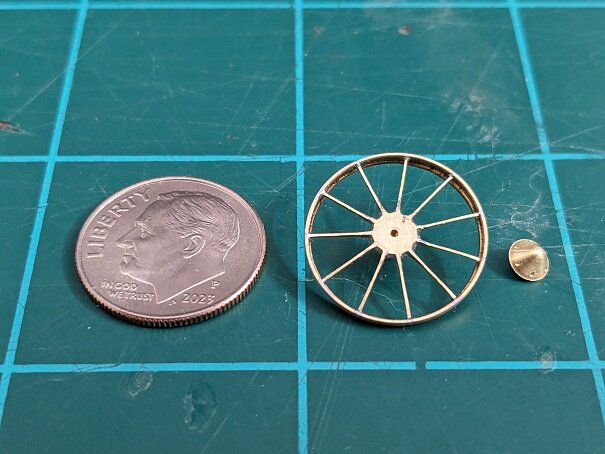
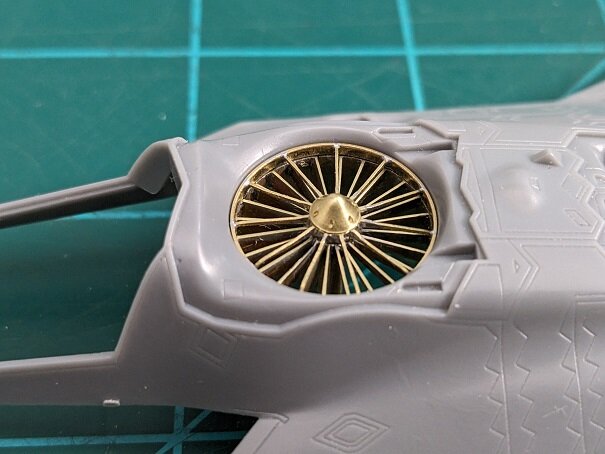
The top guard and vanes fit in place. The K&S tube was a God send, PERFECT fit after I cut out the center tub that came in the kit for the fan.
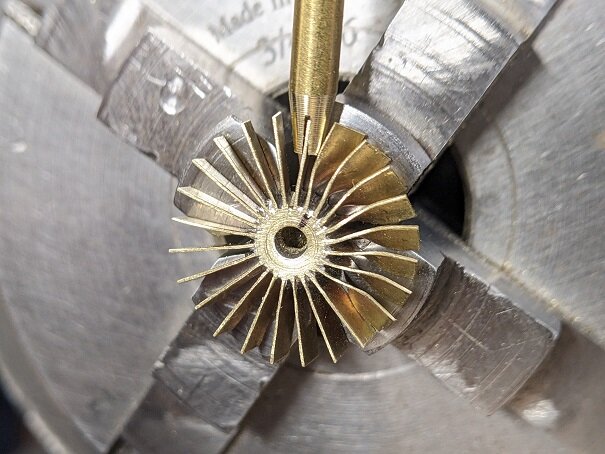
The turbine center hub similar to above. This is also canted and tapered like the actual fan.
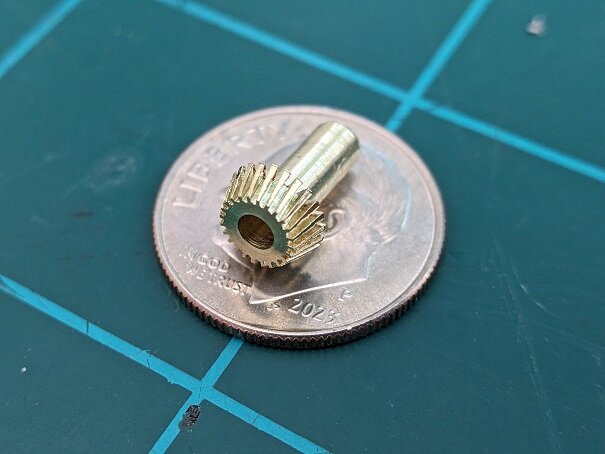
The actual turbine was made similar to the vanes above. Just shorter, stockier blades. This is AFTER all the solder flux was cleaned off.
I tried to think of how to put the twist in the blades. The answer was in front of me. I did opposite of the milling. I made a "reverse" screw driver blade with a taper. Then put it in the mill like I was going to make cuts. Instead, I manually twisted the bit just a little. Raised the bit, rotated the rotary table, lowered it onto another blade, and repeat - 24 times! I had to REALLY resist turning the motor on each time. This is similar to how I mill stuff in rotary increments.
AND FINALLY, everything together. You can see Hasegawa's two pieces. Then (top right to lower left) came the LiftFan casing with the vanes in it, the top guard assembled, and the turbine - polished up and sized to fit inside the tube. The brass rod is the special tool used to twist the blades.
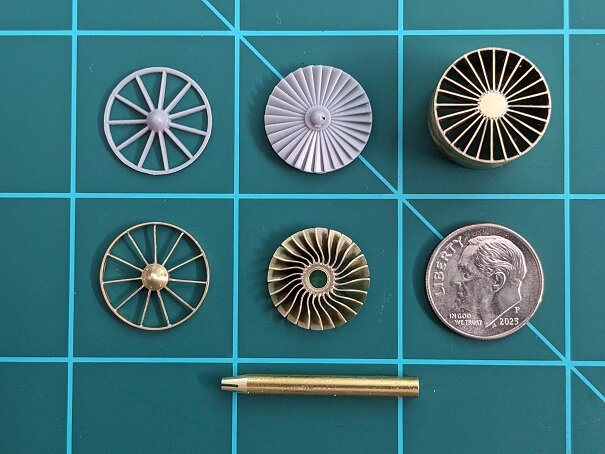
It was fun, but A LOT of work to finally make a turbine. I'll have to remember this process for future models. Thanks for checking in! - MT
-
@GMK AWESOME sculpt and a radical looking design! - MT
-
@Papa Rat Nice fixes to the rear. By the way, use Milliput when it is still wet. It smooths down great with water and your fingers saving sanding, and trim it with blades while still semi-cured. It is good stuff. It just needs practice like any tool.
@Urashiman Cool! Getting all electronicy too! I looked through my dad's old Lionel train stuff. There was this glob of aluminum with fins about the size of a small matchbox. I asked him what it was. He said, "A diode"! Technology sure has changed! 😁- MT
-
@Papa Rat Cool! I haven't built one of those in decades! Looking forward to it!
@nightmareB4macross Thanks for sharing that! I forgot about that awkward designed head! - MT
-
@Cheese3 Your Misa figure looks good! I lost the eye decals for mine, so she came out looking more like Little Orphan Annie!🤣
@derex3592 Your work areas are looking great! Congrats!
@Papa Rat The paint on your -1D looks REALLY good! Nice shading with the color mixtures.
@Chas The mods to your SDF-1 made it look much better!
@pengbuzz I saw a video online on how to save money model building. One of the suggestions was to use a watered down solution of white vinegar for a decal setting solution. I always thought setting solution smelled like acetic acid. I would give it a shot! - MT
-
@pengbuzz THANK YOU for the tip on the glue. I always thought it was the film that yellowed!? GREAT looking weathering and paint. I don't imagine they're the type of people to take their bird to the car wash!😁 - MT
-
@pengbuzz Thanks for the head's up Pengbuzz! Oh no! We finally "get back" a good stock of classic anime models and their company is not looking good. I've bought from them about three times now and no problem. I hope they're not folding 😕
@SteveTheFish Nice and clean paint! She looks good, especially with the patches as Chas said. - MT
-
@nightmareB4macross That will make a COOL diorama!
@Thom GREAT cockpit detail! I'm glad to see a little known airframe get some love!
@Chas Your updates are looking GOOD! I don't know the physical difference between the two (I haven't seen Hasegawa's in person), but I believe the most accurate SDF-1 is still the good ole Arii kit, and it could save you A LOT of hassle:
They're so inexpensive now, thanks to Wise Guys, (if you guys haven't shopped their ebay or web site, you're missing out) you can save a lot of trouble. I almost thought of using Hase's Daedalus and Promethius on the old Arii kit, but I don't know how far off they are. It would be nice to have the small vehicles that come with the Hasegawa kit - if they're to scale. - MT
-
@electric indigo Your changes to the legs DO look better!
@nightmareB4macross SLIGHTLY! That's an understatement! Is that an old Yammie that you've shotgunned!? Nice work! I hope you felt batter after cutting out all that plastic!😁 - MT
-
Thank you guys! This project is fun and stretching my knowledge of some of the arts.
@derex3592 Your new bench looks cool! Not OCD though, just healthy!😁This is OCD (not mine):

@Papa Rat Great finish to a new-old model kit!
@electric indigo That GP04 is looking good! Are you doing anything extra, or building for fun?
@nightmareB4macross The lines on that Valk just look right! MORE accurate lines than the original Chunky Monkey it was. You've become the Weight Watchers of Valks!😅
@pengbuzz I look forward to see what you do! Somebody actually brought one of those into our meeting this month (no hinges though). - MT
-
@Papa Rat Revival? That looks like the original mold (which they are still popping out of after 40 years). I've see a couple of Bandai tour vids and they love to show that off.
@nightmareB4macross The photo of the legs with all the guts reminds me of the original line art showing the internal components.
@Urashiman That's not bad for a test - or a cheap airbrush!
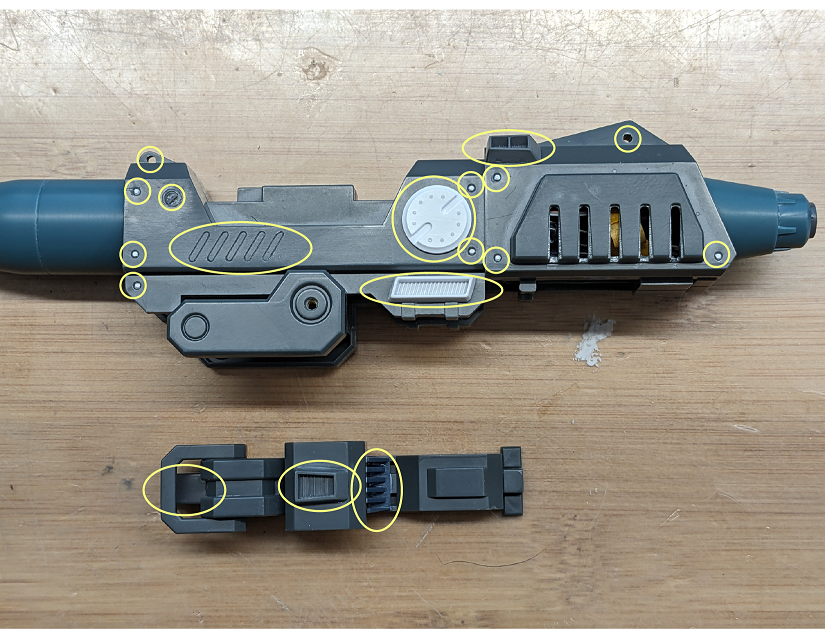
The original cannon has very limited detail on it. So I added lots more. Besides cutting out the vents in the side (from last week's post), I added bolt heads to all the empty sockets that they molded in. Kinda weird they did that.
I scribed some details and added lots of other bits to it including various vents. There were so many changes, I circled them all. If not for you guys, then for my records to remember what the heck I did.
Then I custom made the round plate(s) on the mill. I thought it was a nice touch to an empty space after doing some test fits. Both sides have the same details.
Thanks for checking in! - MT
-
@SteveTheFish Your armored 1J looks good in that scheme! I think it's more accurate. In reality, stuff like drop-tanks and gunpods are for the fleet, not an individual. I think armored add-ons would be the same - especially with how expensive something like that would be. The Enterprise is looking good!
@nightmareB4macross "This is my evil twin brother. He's also more ugly than me!"🤣 Did I miss something, are those printed hands and fingers? - MT
-
@electric indigo Miami Blassty! The Crocket and Tubs mecha!😅 There's a flashback!
@Papa Rat @Thom The BEST CA accelerator, gap filler, or for building up areas with CA is plain ole baking soda (like Arm and Hammer). It's non-toxic and gives body to the area you build it up in. MUCH cheaper too!
@derex3592 How did you get stuck with the litter box!?!😁 That's going to be a sweet bench area!
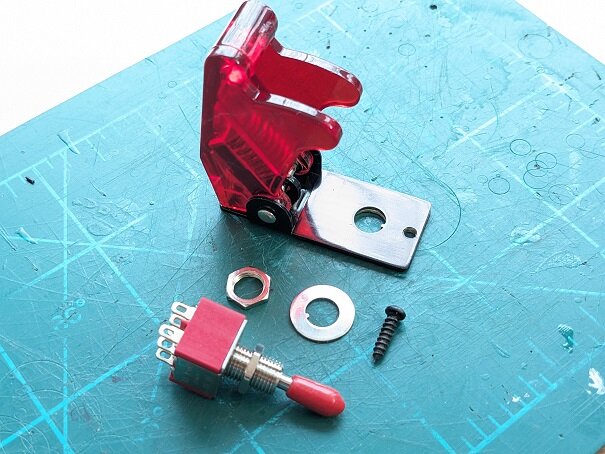
Made some progress on the Dougram kit. The switch for the main gun (two position - up and down) is much smaller than the original switch that came with the "missile switch" assembly. So I had to make a spacer for the hole and a new cover to go over the top.

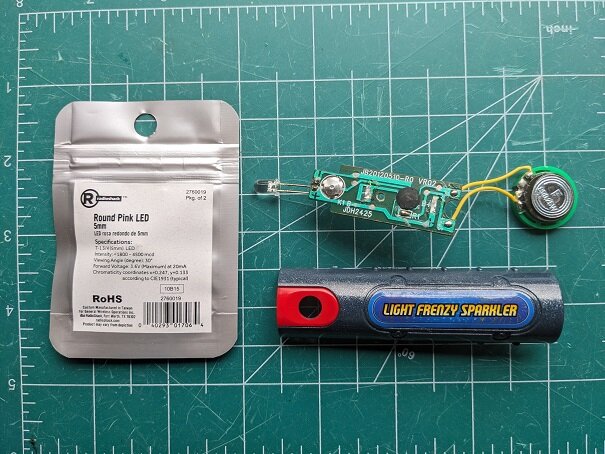
I've have the guts of an "electronic sparkler" sitting around. Originally I bought it for the fiber optics that came out of it. Now the rest of the guts are going to make the light flash and give it a little pulsating white noise. Better than just a light. Radio Shack (which has so many stores closing down - including the one by me😕) had these cool pink LEDs. More anime realistic and not plain ole white or red.
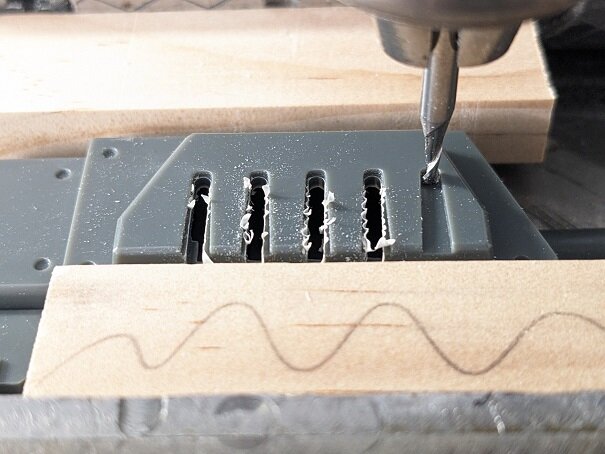
Looking for a good location to install everything, the gun itself seemed good. So I milled out the vents for detail and the speakers to vent through. I took coffee filter screen and cut some pieces to fit into the slotted areas.

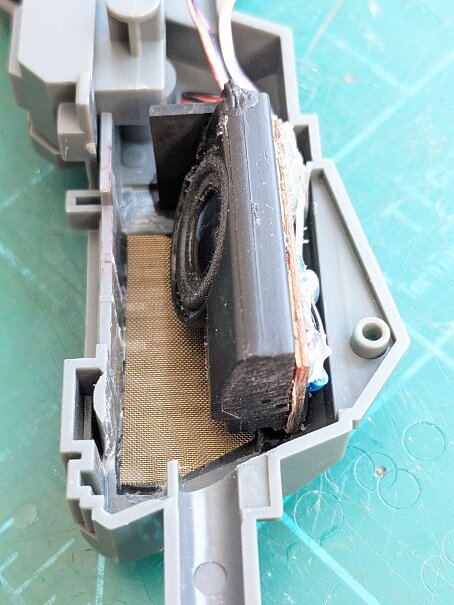
And everything neatly installed.
1. The PC board was shortened and re-soldered with new wire runs.
2. A recycled laptop speaker was used instead of the cheap stock unit (and sounds better).
3. The PC board was glued to the speaker to keep it all a small package.
4. The ABS speaker was glued to the styrene bits by using acetone on the ABS and Tamiya cement on the styrene. Both joints were well soaked and put together. You can weld unlike plastics together - sometimes.
And the whole thing put together.
It looks and sounds pretty cool now! Thanks for checking in! - MT
-
-
@pengbuzz That Fett figure came out AWESOME! You made it BETTER than new!
@Cheese3 You are DEFINITELY going for the 80's urban camo scheme with those colors! Either that, or an original Van's tennis shoe design, also from the 80's!
@Papa Rat You made the space pickle look great right out of the box! I forgot about all those ugly engravings in it. If I even build my Zen fleet kits, it will take A LOT of epoxy putty to get that one to decent proportions! But you did it justice outa the box!
@Urashiman We give you credit for trying to breath life back into your airbrush! Sorry man!🥲
I haven't been slacking off, honestly! Just not online much. Now on to the backpack...
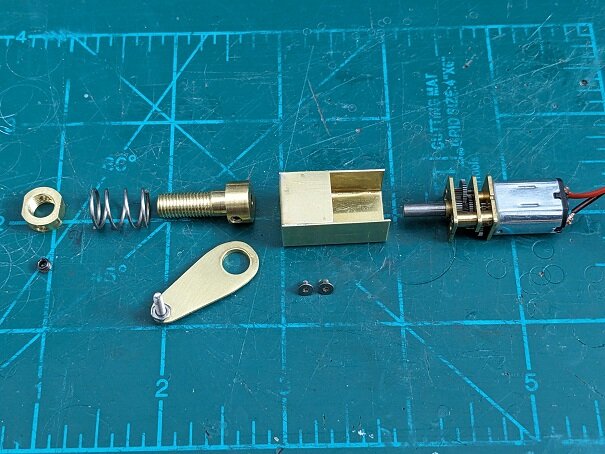
The main backpack (below) is roughly 3" x 4". The backpack cannon is HUGE at 11" long - but thankfully hollow and fairly light weight. Since I'm motorizing the rotary cannon, I thought the backpack should be motorized too. The mechanism to rotate the cannon over the shoulder, and back upright is what you see here. This is the "servo" motor and the friction clutch which will protect it form forced movement. A spring maintains friction, but prevents direct coupling to the motor gear-head. This motor is more powerful and quiet than an actual servo, so that's why I'm going this route. It's also hard to bust up steel gears.
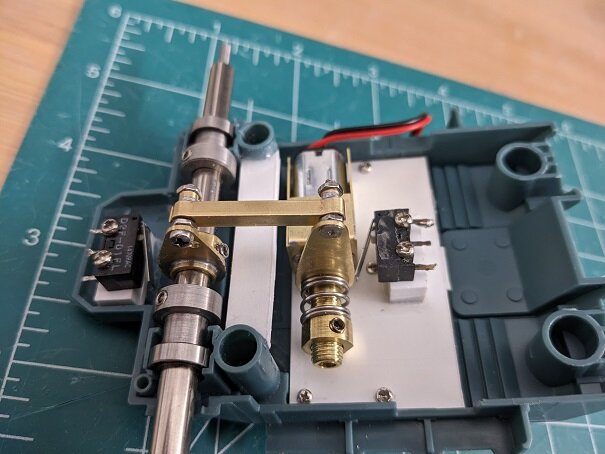
And here's everything put together so far...

You can see how the friction clutched arm connects to the cannon's main shaft (which sits on bearings). Carefully positioned micro switches will cut off the motor - even though the clutch also slips when it can't go any further. Lot's of brass work and soldering.
That's it for now. Thanks for checking in! - MT
-
Sorry guys, been too busy to get on line!
Thank you for all the compliments and likes!
@arbit I'll have to pose it with a can or something. I'm working on parts for the weapons backpack now.
@Big s There are those 30 minute mission bases, but they are narrow and kinda short for a lot of mecha. I saw these and the color is great and being styrene is a bonus!
@Papa Rat That 1J came out great! I didn'y have that on my list, but may rethink that!
@Cheese3 Make that old pod look good!😉 The seams on it are tough. - MT
Whats Lying on your Workbench MK IV
in The Workshop!
Posted
@SteveTheFish That's sad. Marking down for "not weathered enough" is not cool. That choice is up to the modeller. That can also be fixed by noting what you did on the judging sheet and why. A lot of people don't know that they SHOULD make special notes.
The last contest I judged, someone did some Gundams with a wood finish to them. We didn't mark them down because that's not what a Gundam looks like, but the wood effect was very bad.
Like @woodsider said, things are changing A LOT! VERY rarely are models made out of wood anymore. They are now plastic. That's a paradigm shift. Sci-fi becoming VERY popular is the latest shift. Allowing 3D printed models in Gundam competitions is the next one. 😉
@pengbuzz Judges Pengbuzz's model and notes, "Left masking tape on model." 🤣 - MT