

SteveTheFish
-
Posts
121 -
Joined
-
Last visited
Recent Profile Visitors
659 profile views


SteveTheFish's Achievements
")
Destroid Armour Waxer (3/15)
124
Reputation
-
I've heard that as well. I do not care for transforming models. In high school in the early '90s, I built the old Imai transforming Valk (repopped by Bandai), the one with the nose you must replace between transformations. Fiddly bits broke on the landing gear areas. Bandai's Methuss from Z Gundam is one of my favorites, but that transformable kit doesn't really transform well and the parts don't fit properly in jet form. I'd rather have a kit in a solid form than a transformable one that doesn't behave properly.
-
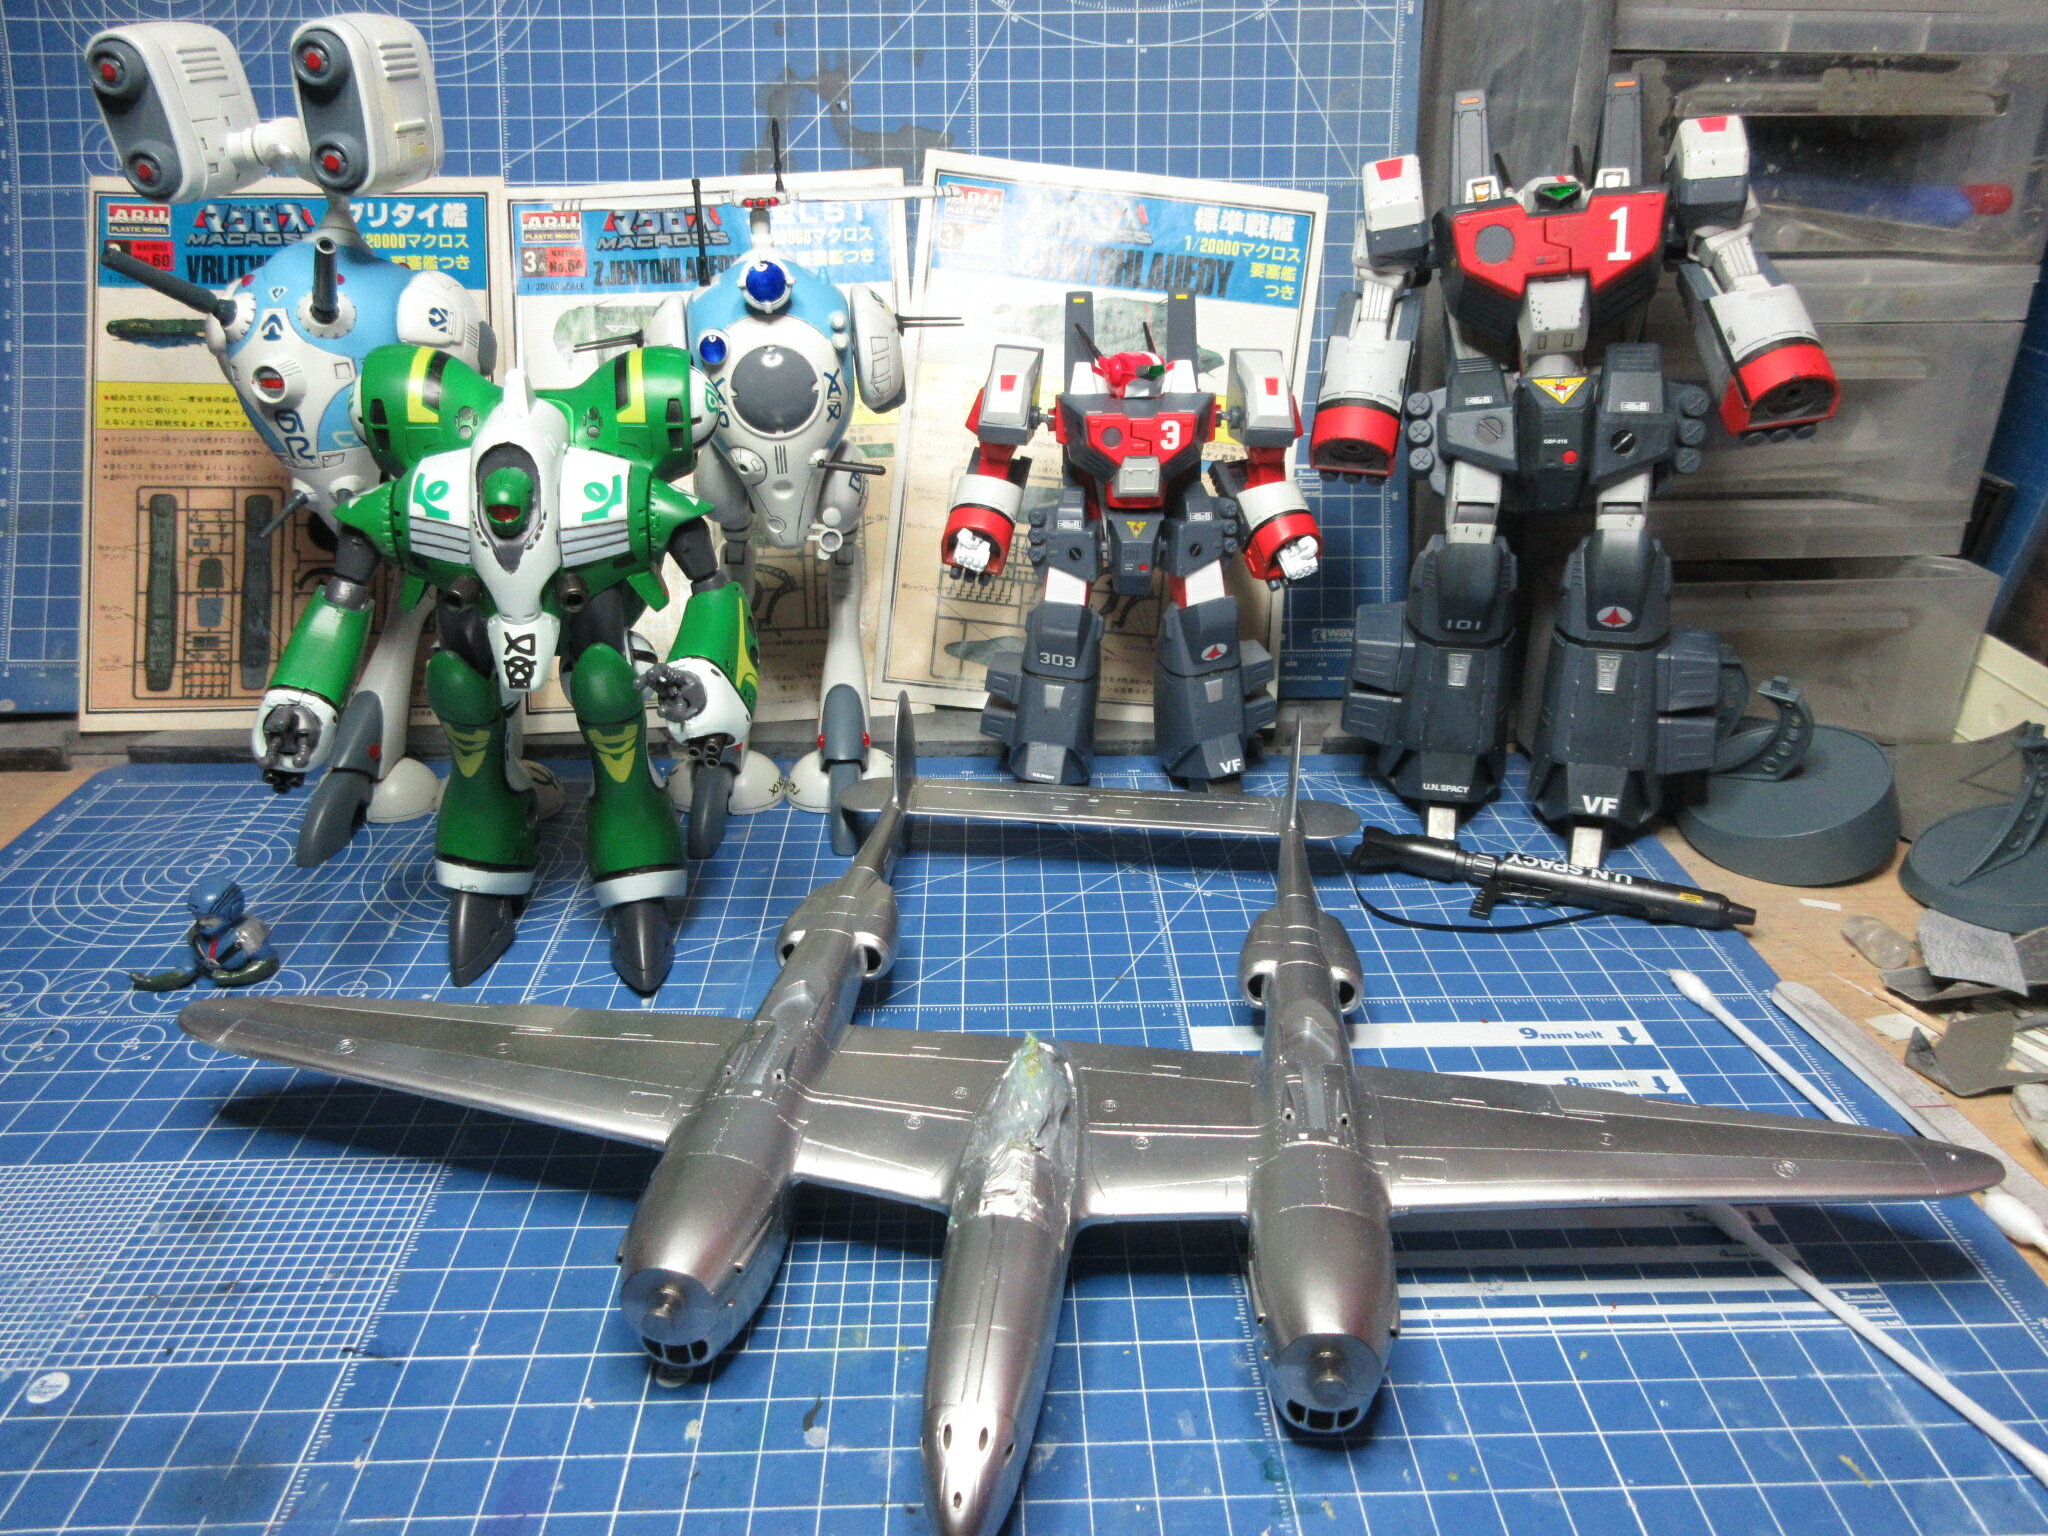
I changed the color of the sensor lens on the Scout Regult from blue to red. Looks nicer. The Missile Regult was finished last fall, but I realized that the upper legs were on backwards, so I had to take the legs apart and switch the parts. I think the Scout is pretty much done. I'm not quite done yet with the Bandai/Imai Q-Rau. Actually I painted the eye area the same gray/white since taking this picture. I had taken a mold of the eye, drilled out the lens area, put the mold back on and backfilled it with clear, UV resin and painted it red. I'll see about taking a close-up pic later. I had articulated the hips with ball joints to have the mecha pose more naturally. As for the Millia Armored Valk, the head, shoulders, waist, and hips are ball joints. Unfortunately, the shoulder ball joints stick out to far. Be honest: it looks weird, right? I'm thinking I might try to pop the ball joints out of the sockets, perhaps cut off the plastic from the ball joints and replace it with metal, and try over. What do you think? Other than that, it has turned out nicely. The Yellow Submarine hands look so much nicer than the hamfists the kit came with. I used the leftover paint mix from the Hasegawa version for the armor color. The only surviving decal I used from the Imai kit was the hammer/torch insignia that goes on the pelvis. The rest were unusable and discarded. The 1:72 Hasegawa kit comes with many unused decals which is quite fortuitous, since they are smaller and in-scale with the 1:100 Imai kit. The VF on the left leg, the Ichijou vernier decals, the ground UN Spacy logo, the 303 decal, and the decals on the tops of the hips are all extras from the Hasegawa kit. It's like Hasegawa had people like me in mind and threw us a bone with all the leftover decals. The rest are generic, random aftermarket science fictiony decals and the UN Spacy logo for the sides of the waist (close to the cockpit on the sides) and on the top left wing are aftermarket decals from eBay/China. The same for the "UN SPACY" lettering on the bottom of the right leg. Panel lining was done with a Gundam Real Touch Marker dark gray (practically black). I want to do a little bit of weathering on these before I consider them complete. Advice on what to do with the silly-looking arm joints would be appreciated.
-
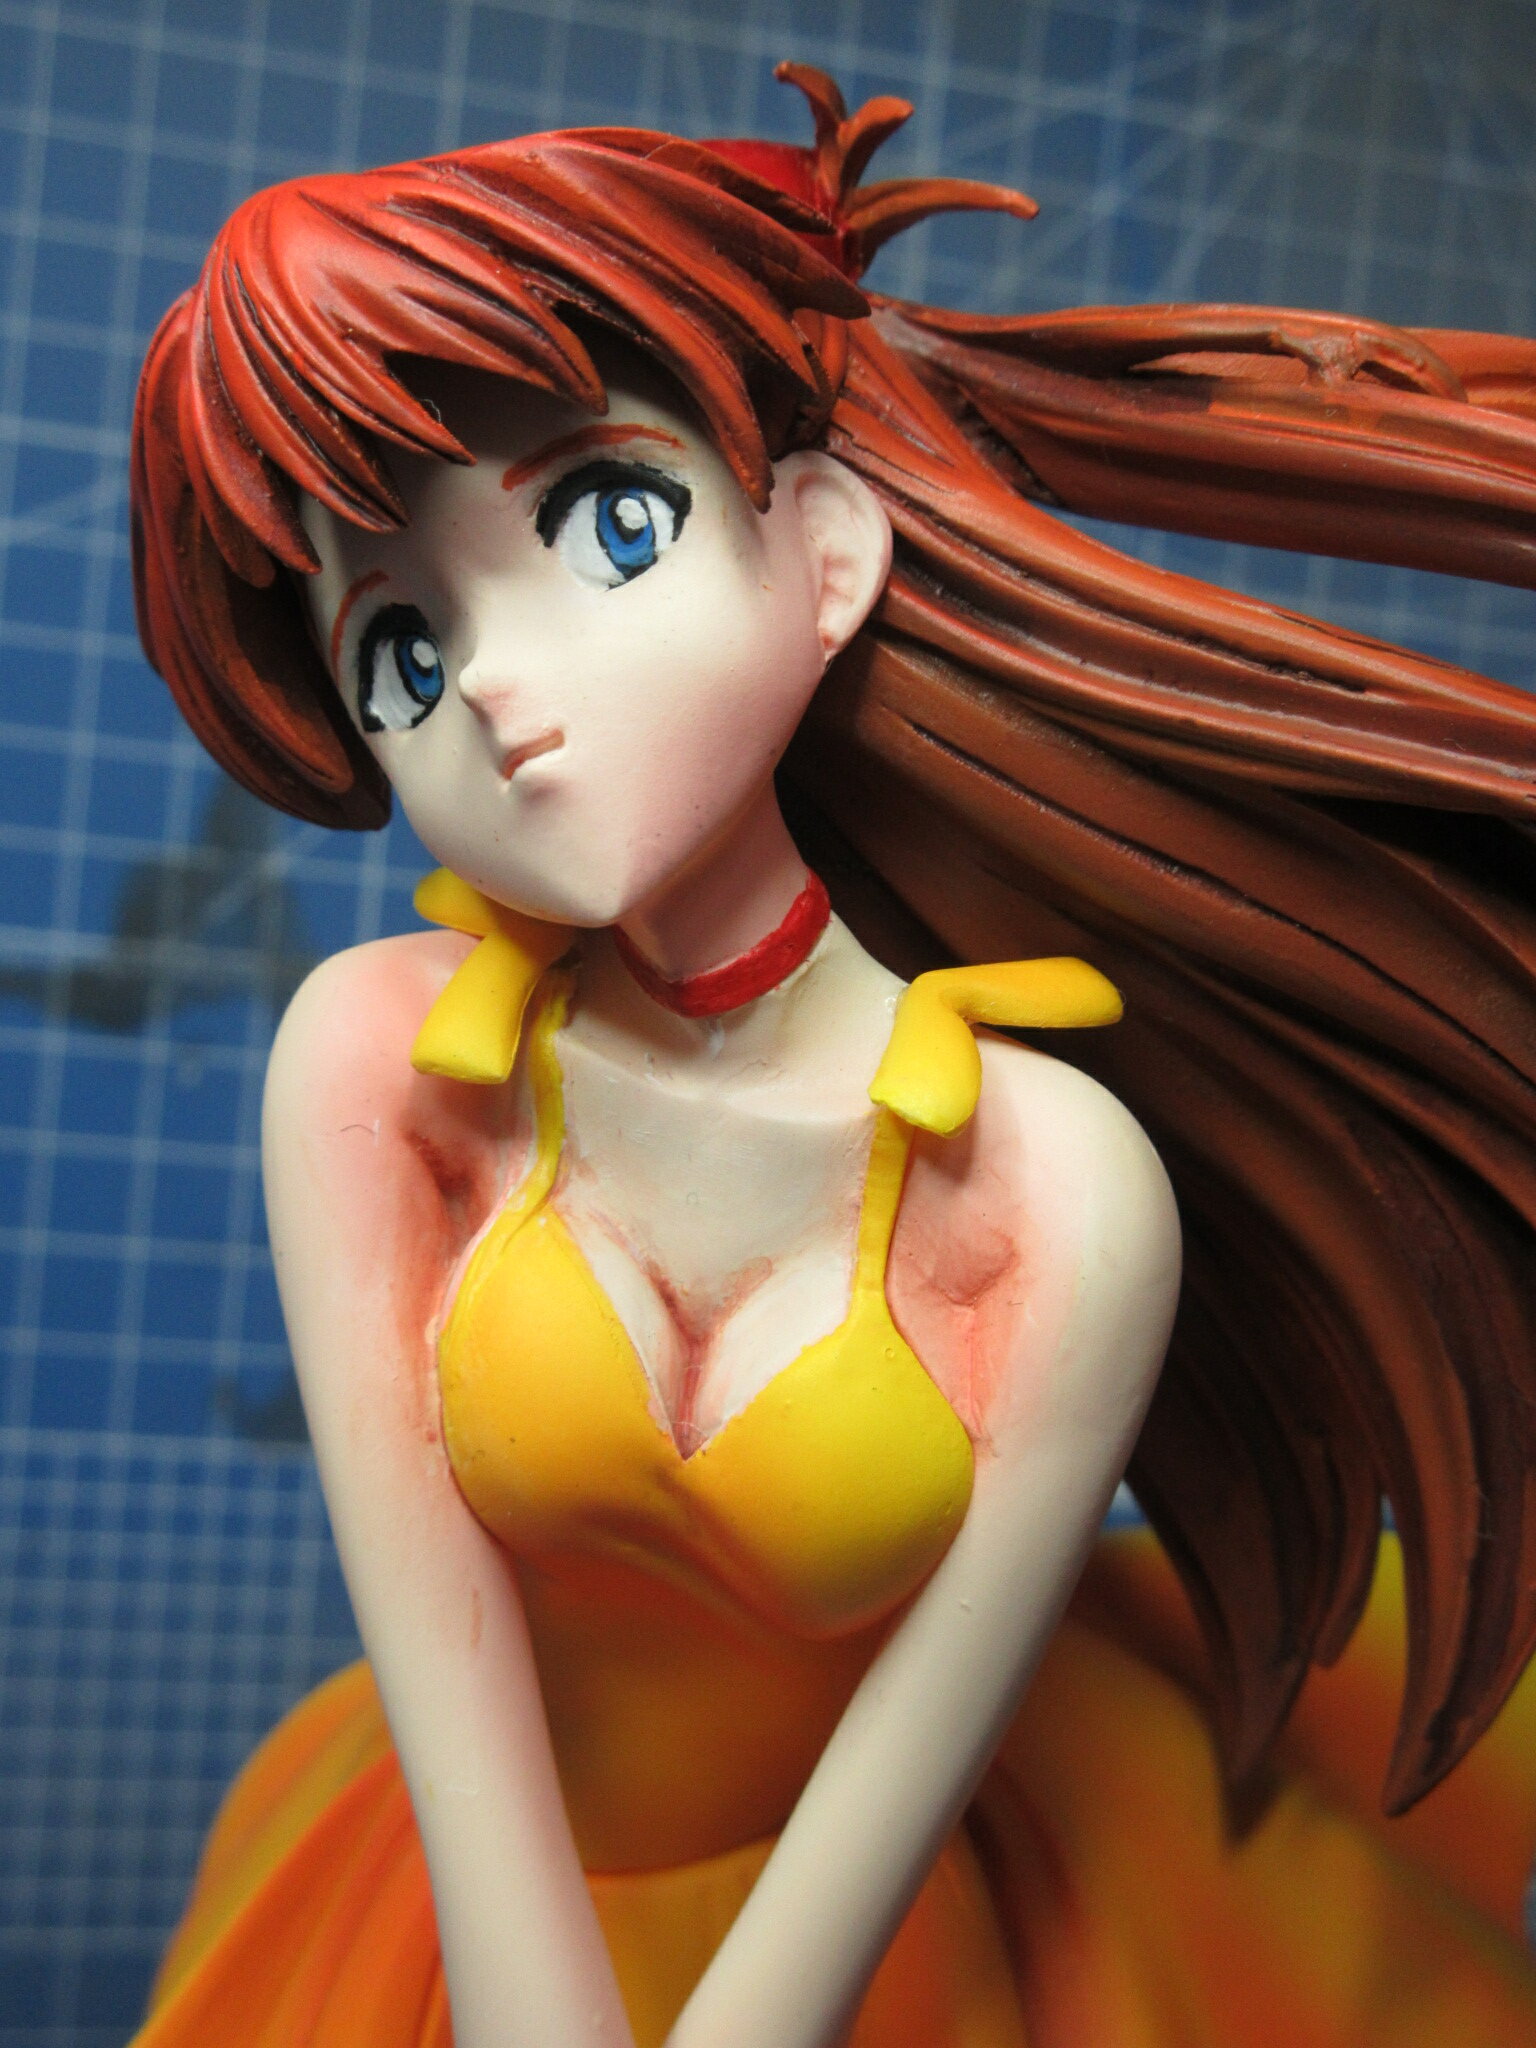
Thanks! I can't do justice to Sadamoto's signature eye style, but it's passable. I see some people who can pull off gradations and I could do that just a bit, but I cannot do the seamless blending that some can. The thing about doing figure garage kits is that it doesn't matter how well you did painting a figure if you screw the eyes up. If the eyes look like crap, the whole figure is gonna look bad. There is one guy who does a lot of Macross builds online and he did a Rei figure that just looked awful. I won't mention names, but he attempted to do something with her eyes that really should not have been bothered with because the shape of the figure did not match what he had in mind. The figure ended up looking disturbingly alien or something.
-
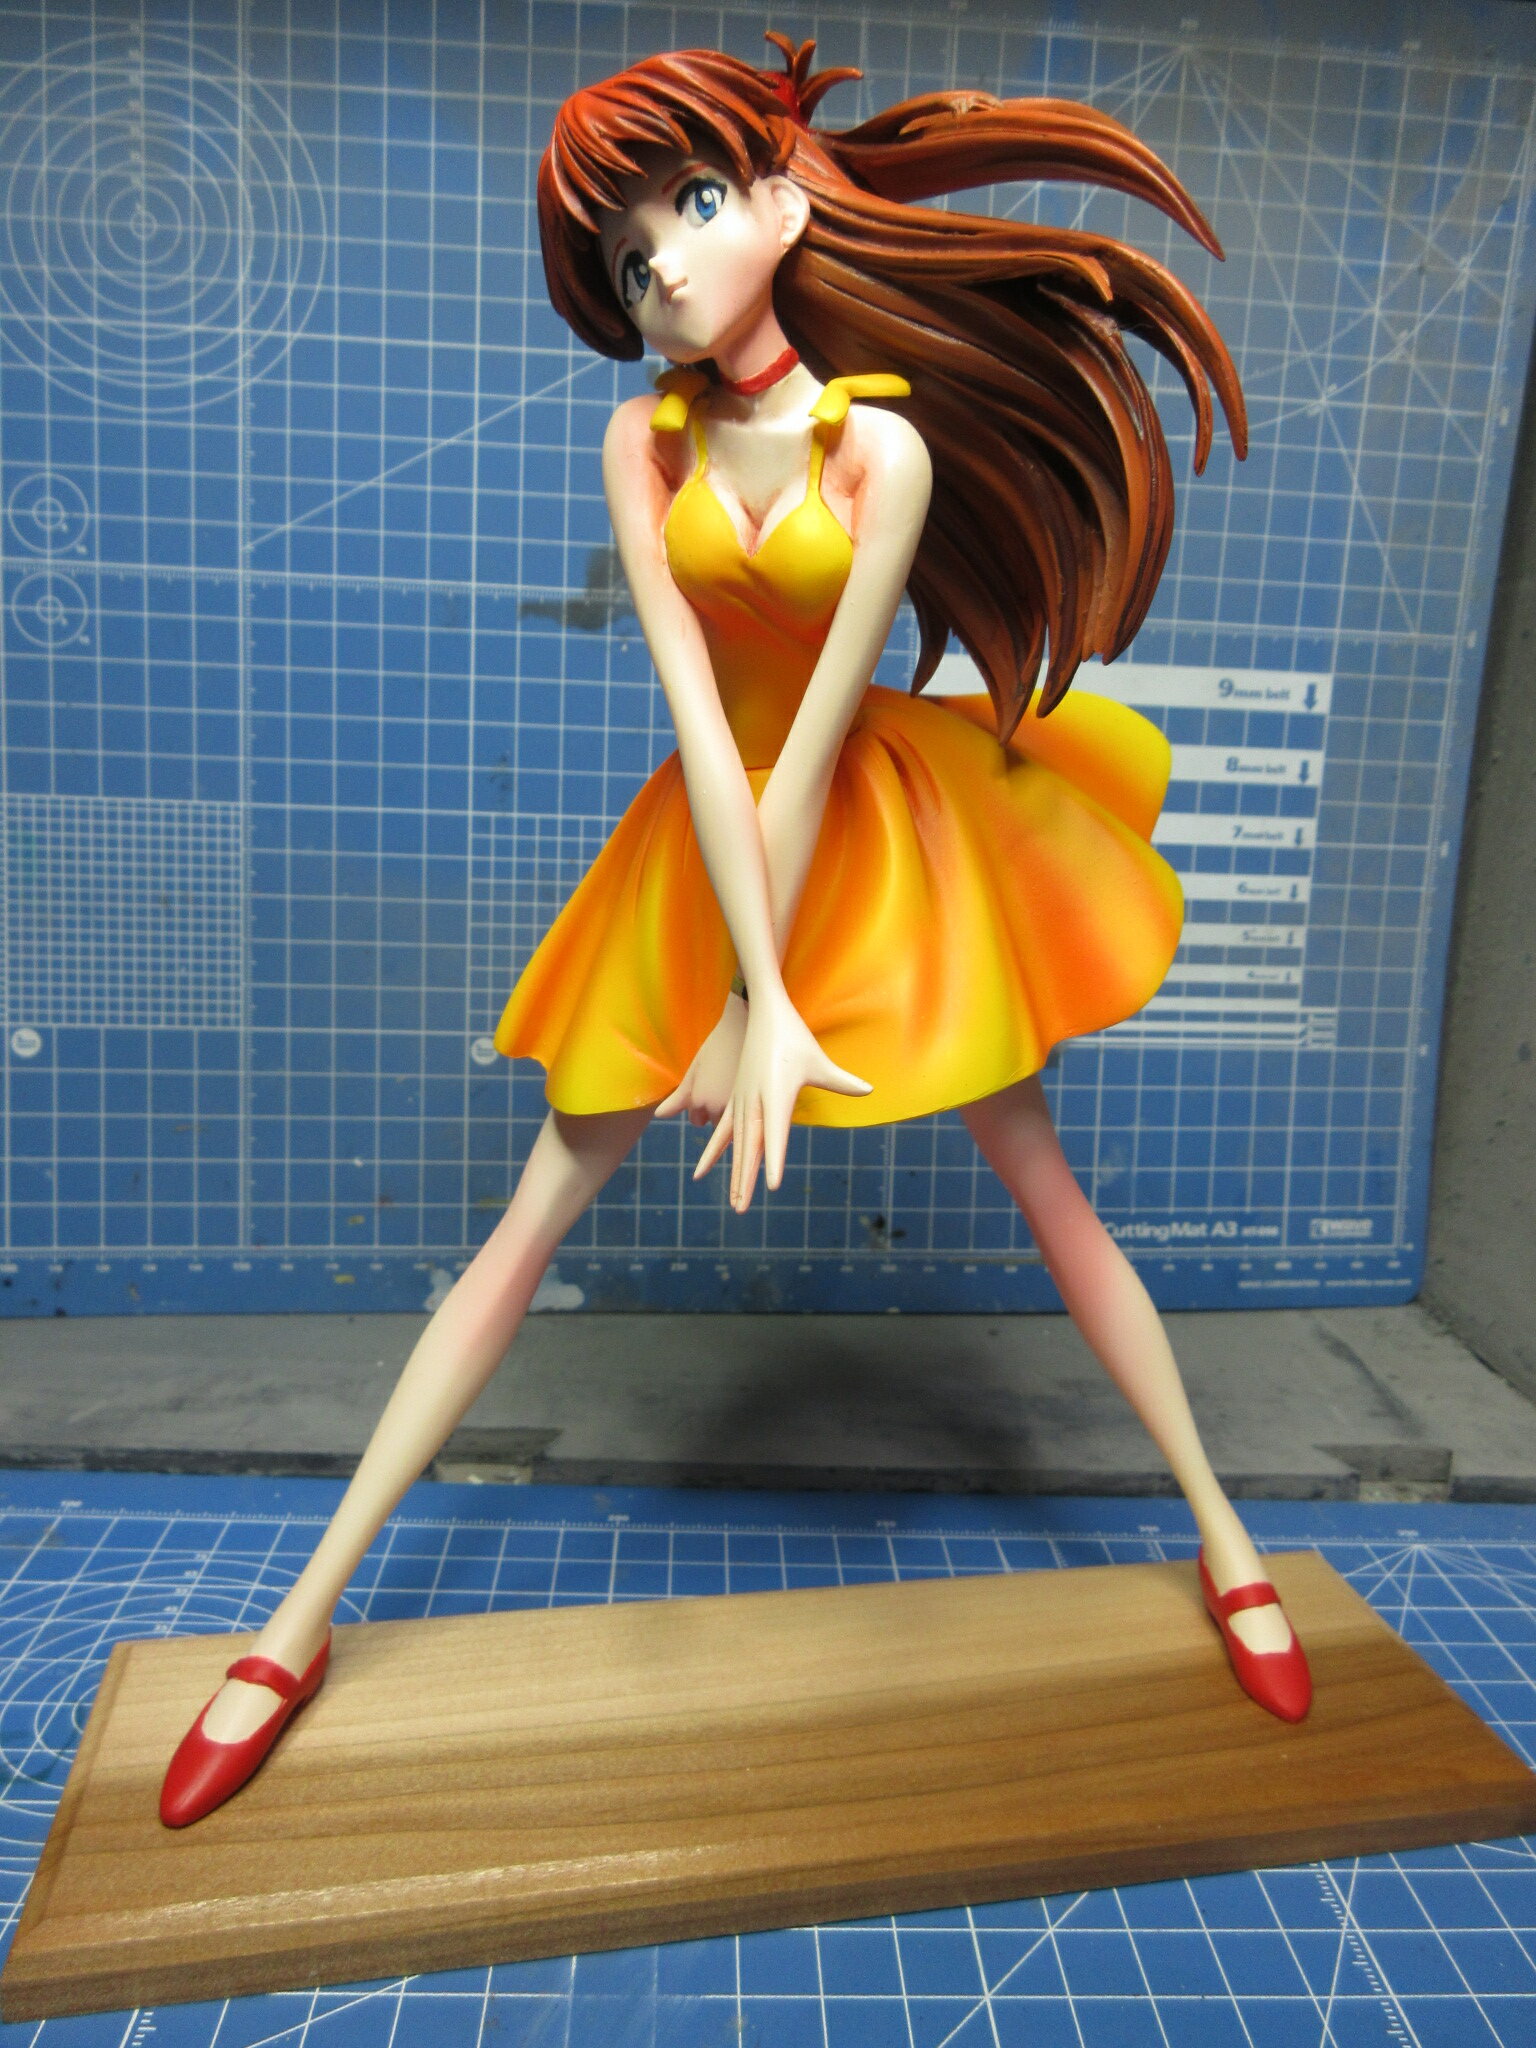
Last night I finally finished my Asuka resin kit from E2046. It did not come with eye decals, so I hand-painted them. Oops, I didn't notice that tiny hair speck on her arm. I just wiped it off.
-
My friend from America came to visit Japan for a couple of weeks, and we spent a weekend together at the start of Golden Week. We scoured the various Book Off, Hard Off, Hobby Off, Surugaya, and Mandai Shoten locations in Gunma and Tochigi Prefectures. I bought a Y-Wing sofubi kit by Argo Nauts at a Book Off Plus in Maebashi. It is mostly vinyl, but also has brass, pewter, and resin parts. Here is a quick dry fit of what it looks like so far. I didn't tape the pieces together or anything, but just quickly assembled it for this picture. I have not yet begun to bend copper wires to put on the ship for its piping. The kit does not come with any decals, so I gave it my own, unique paint scheme. The main body is vinyl, the tail ends of the nacelles are resin, the nacelle beams are brass, and the guns and landing gears are pewter (I think). I painted the vinyl parts with V-Color paints, which are made specifically for painting sofubi kits and toys. I first mixed Light Gray in with Black to make my own German Gray color which I used as an undercoat. I splotched Mr. Masking Neo in areas with a sponge for paint chipping, then went over it with Light Gray. I used Blue and Pastel Blue for the trim, and Orange Yellow to have one panel be a replacement. For the non-sofubi parts, I used Mr. Color 325 (JASDF Gray, IIRC) which is a good match for the V-Color Light Gray. Since it is a sofubi kit, I will have to use an acrylic wash rather than enamel because enamel paints and thinners react badly to vinyl. This reminds me... I have a Macross Valkyrie sofubi kit by Kaiyodo I bought a few years ago. I'd first need to cast one of the arms though, since that part is missing. Fortunately, the seller on YAJ gave me a partial refund after I realized it was missing the piece and both arms are identical to each other anyway. EDIT: I just realized that I had hastily attached the nacelles upside-down. I just threw this quickly together to take a photo before I left for work this morning.

-
This is just strange because Max Factory gets its name from Max Watanabe. I assume he will no longer have any work done for Max Factory. It's just strange because he had his own brand going and now he's the CEO of Wave.
-
Got mine today at the Bunshindo bookstore in town.
-
Their website is still offline... https://www.fujimimokei.com/
-
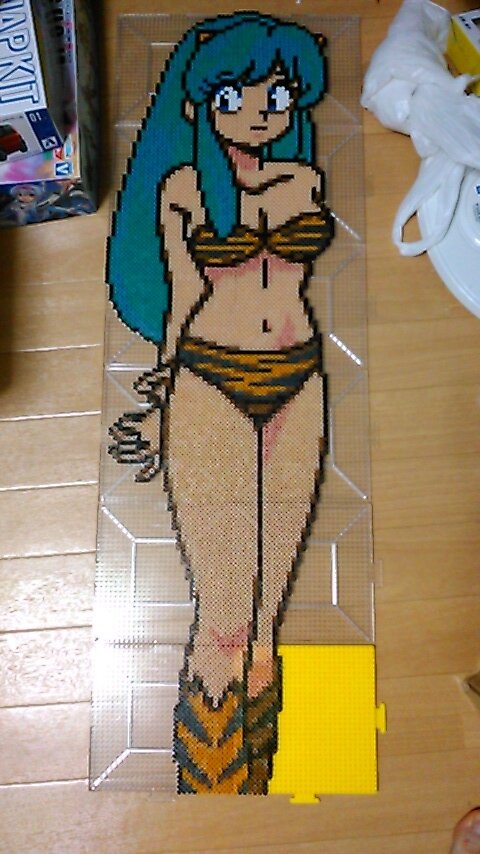
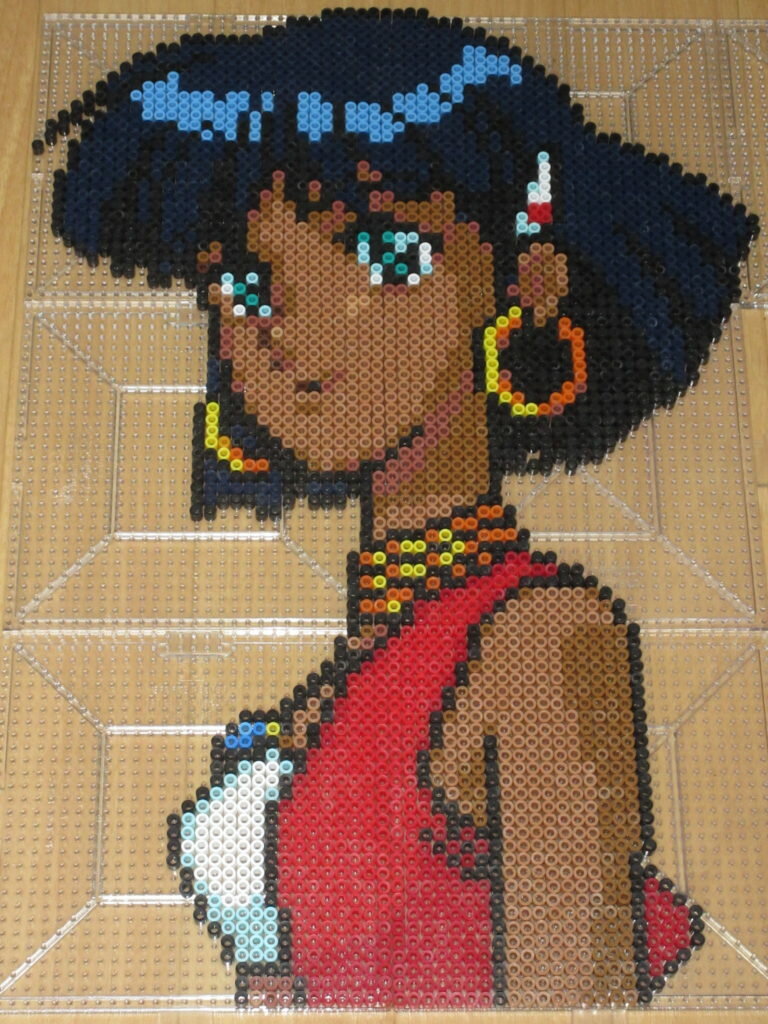
Thanks! Nadia is my most recent work. There are different bead makers: Perler in the US, Hama in the UK, Nabbi in... Denmark or somewhere, and lately I've learned of Artkal in China. Hama kind of complements Perler because they offer different shades of color that Perler does not, but I don't like how glossy their beads are after melting them. Artkal has the best range of colors, and I've only recently learned about them. Artkal has the yellow/brown colors I needed to make Nadia.
-
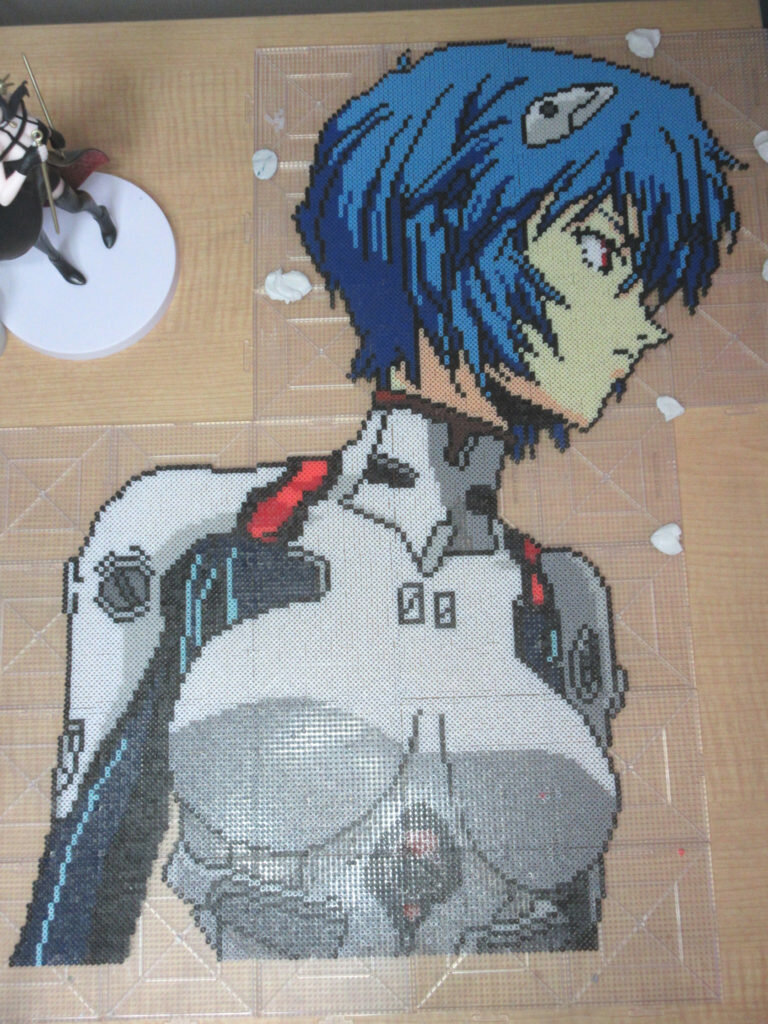
One of my hobbies is making iron beads from pixels taken from 16-bit video games. Since there was an abundance of anime-related video games. When we were still living in America, I found packages of Perler Iron Beads at a craft store and I thought, "I could totally make pixel art from retro video games with these!" Before I knew it, I'd stumbled upon a hobby popular online. You just take game screenshots, enlarge them, and replicate them pixel by pixel from the screen to the beads. It's meticulous, but not tedious. It's fun. Since this is a Macross forum, I'll start with these from the game Macross: Scrambled Valkyrie on the Super Famicom. Lum from the Urusei Yatsura game on the Mega CD. She is particularly tall. Nadia from the PC Engine game. There are also Nano Beads, which are 1/4th the size of regular iron beads. These can sometimes be frustrating because a slight bump can send them all flying because they are so small. Here is Devil Hunter Yohko from the PC Engine game. This one was very big as the sprite took up the entire screen in the game. It would not have been feasible to make this with regular iron beads. Rei from Evangelion, done in Nano Beads. I just found pixel art of her on Pinterest and used it to recreate her.
-
Fujimi won't have a booth at the Shizuoka Hobby Show. They will have a booth at Wonder Festival in July. Possibly the Ani-Chara event this summer too, but I am not sure.
-
Sure! Just be mindful of the time difference. You wouldn't want to appear in a store like that after midnight and the alarms go off!
-
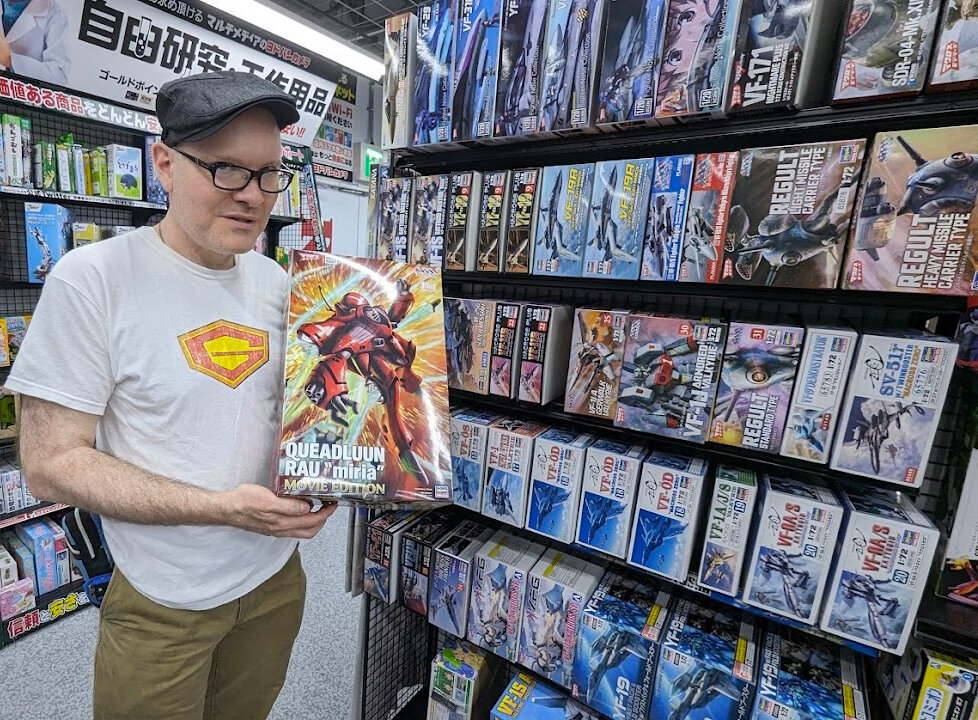
Not really an "on the bench" picture, but today I went to Yodobashi Camera in Utsunomiya with my friend who is visiting Japan. Here is me in the Macross section of the model department. This is the first time seeing the new Q-Rau model in-person. Wow, what a big box! I have enough Yodobashi points that I could have walked out of the store with this kit without paying for it, but unfortunately I have to buy my daughter a crappy Chromebook for her schoolwork and I will need to use those points on that instead.
-
Stuff I have on my workbench. The two 1:100 scale Arii Regults are finished. The 1:144 Bandai/Imai Q-Rau is mostly finished. I want to rework the pilot. I articulated the hips with ball joints. The 1:72 Hasegawa Armored Valk is mostly done. I still need to assemble the hands. The 1:100 Imai Armored Valk is mostly finished. I want to do a bit of weathering on it. After finishing the decal work on Hasegawa's Armored Valk, it has several unused decals and conveniently they are smaller-sized version decals which work just fine for this 1:100 scale kit! I was amazed. Since I went with Millia's color scheme, hers is unit 303 rather than Hikaru's 101. The kit's worn, aged decals were mostly discarded, but I did salvage that hammer/torch emblem for the waist area. That's all I ended up using from those decals that have seen better days. The rest of the decals are aftermarket from HQ Parts as well as aftermarket Macross decals I got on eBay from some seller in China. I used ball joints for all the main parts of articulation and unfortunately the shoulder joints protrude a bit too much. It was hard to guess the size. It doesn't look too bad, I guess. I replaced the hamfists with Hobby Base mecha hands. Finally, the Hasegawa 1:48 Lightning. I ended up redoing gloss black on those panels after extensive masking and then reshot them with Mr. Color Super Metallic 2 201 Super Fine Silver 2. It looks a bit better. I'll do a clear coat with Aqua Gloss before decaling. Oh yeah, and I'm also working on all four Zentraedi ships by Arii. I'll show those another time.
-
It's 1:100 scale. There are no cannons on the scout pod. That one thing you see is some sort of antenna or something. I still have a few more places to paint, I now realize. I'll post better pictures when I'm done.

