grapetang
-
Posts
355 -
Joined
-
Last visited
Content Type
Profiles
Forums
Events
Gallery
Everything posted by grapetang
-
MacrossWorld Convention 2014 Information Thread
grapetang replied to KiriK's topic in Conventions and Local Gatherings
Great news! I hope to make it as well. I'll have to start on a custom one of these days... -
Wow! Great job! Love the diorama pics, especially the worm's eye view. Where're the 'M gals'? :)
-
If the part isn't molded in color, sand it down and repaint until the parts don't rub? Use tougher paint, like lacquers? still subject to scratching... Overcoat/clearcoat with lacquers or clear/colored nail polish? will still scratch. Use epoxy paint? Mold the part in tougher, colored plastic? Dye it? While rubber cement might work, it probably won't stay. Also test somewhere inconspicuous to make sure it doesn't mar your existing paint (especially if acrylic) or melt the plastic. Older formulas used acetone and chemicals that dissolve styrene; newer ones use ammonia which could remove acrylic paint. Also test the lacquer paints and clearcoats. Are these parts in direct contact with each other like a joint, or these parts separate that occasionally connect/click/snap together? If the latter and it's not load-bearing, you can sand down the tab and/or enlarge the hole/slot. I'd be curious to hear other people's solutions as well. Good luck!
-
Cute! Is she articulated? Send me one and I'll light her up (LEDs) for you!
-
Wow! That was sooo poignant & well done. Thanks for posting!
-
Cute! Nice work. Any chance you could use brass tubing or paperclips for the head turrets?
-
Agreed. You really should see it in person!!! As for the flash, there wasn't enough light and I didn't have a camera tripod so the choice was blurry pictures (which I tried) and the flash pics with blown out details. Congrats again to Erikos for the great detailed work and the custom contest win! It was gorgeous to see and a well-deserved win!
-
MacrossWorld Convention 2013 Information Thread
grapetang replied to KiriK's topic in Conventions and Local Gatherings
Wish you could've made it! Here's erikos0311's AMAZING VF-0 custom win: Many thanks to KiriK and staff for putting on a great con! The venue was large, the vendors plentiful, and the guests of honor were great! Mari can still hit those high notes on Ai Oboete Imasuka; Tenjin's presentation was neat; and Nonaka-san was demonstrating his painting skills throughout the day. Some great displays too. Kudos to the cosplayers & performers (some were really amazing) and congrats to the contest, auction, & raffle winners. So many things packed into such a short amount of time! It was really nice seeing familiar faces and meeting new ones. Can't wait for the next con!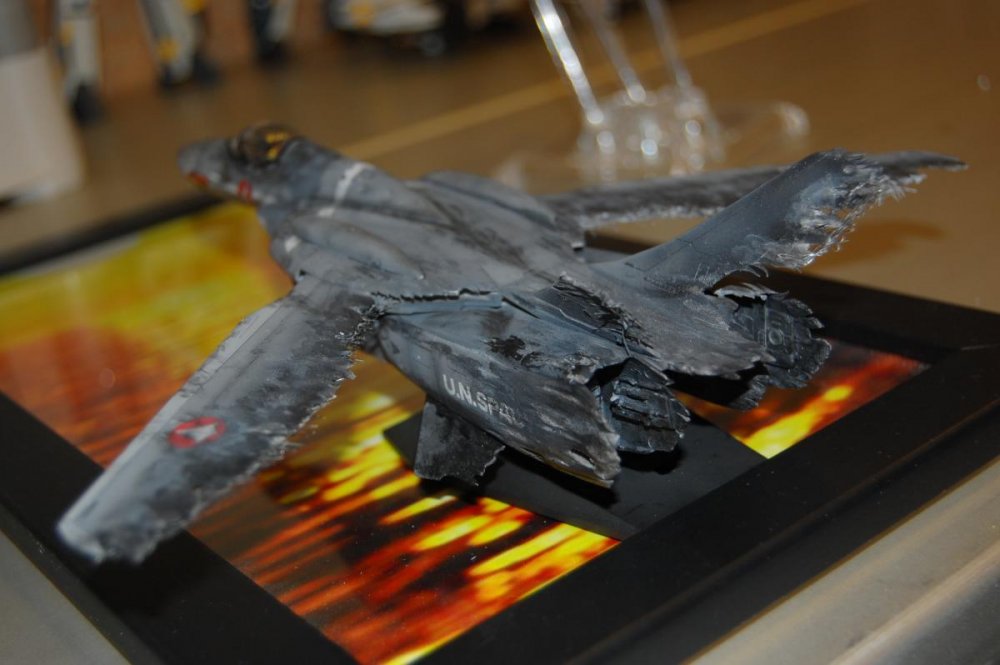
-
Beautiful work! That paint scheme and application is amazing, along with that refueling composite! You've got to build an M+ tanker to go with it!
-
Wow! Great craftsmanship as always! Love the pics (very dynamic) & the color variant. So cool!!!
-
Great paint job & picture! Maybe it's just me but that secret project looks like it has a shadow!!! (Fyana-base?) !!! Resin recasts of the finished prints for lower cost points, please. Cool! Looking forward to everyone's Zentradi/Meltrandi mechs. I need to get working on my list too!
-
Very nice! Stock Yamato repaint without Kurisama parts? Looking forward to the secret project!
-
Books Nippan/U.S. Renditions - A Blast from the Past
grapetang replied to Duke Togo's topic in Anime or Science Fiction
Wow! From the Dark Ages of early US anime & manga... I remember making pilgrimages from Boston to NYC (with a side trip to Yaohan & Pony Toys in NJ) every few months to visit Books Nippan and Books Kinokuniya. That was close to 25 years ago!!! I used to order from Nikaku in San Jose too, and browse the General Products catalogs. Things are so much easier these days... Great find and some fond memories! ps - no card though... -
MacrossWorld Convention 2013 Information Thread
grapetang replied to KiriK's topic in Conventions and Local Gatherings
We're still here though "real life" is keeping us busy! I suspect there might be more of us now we so can try the mini get-togethers when there's something significant! Hope to see everyone in October! -
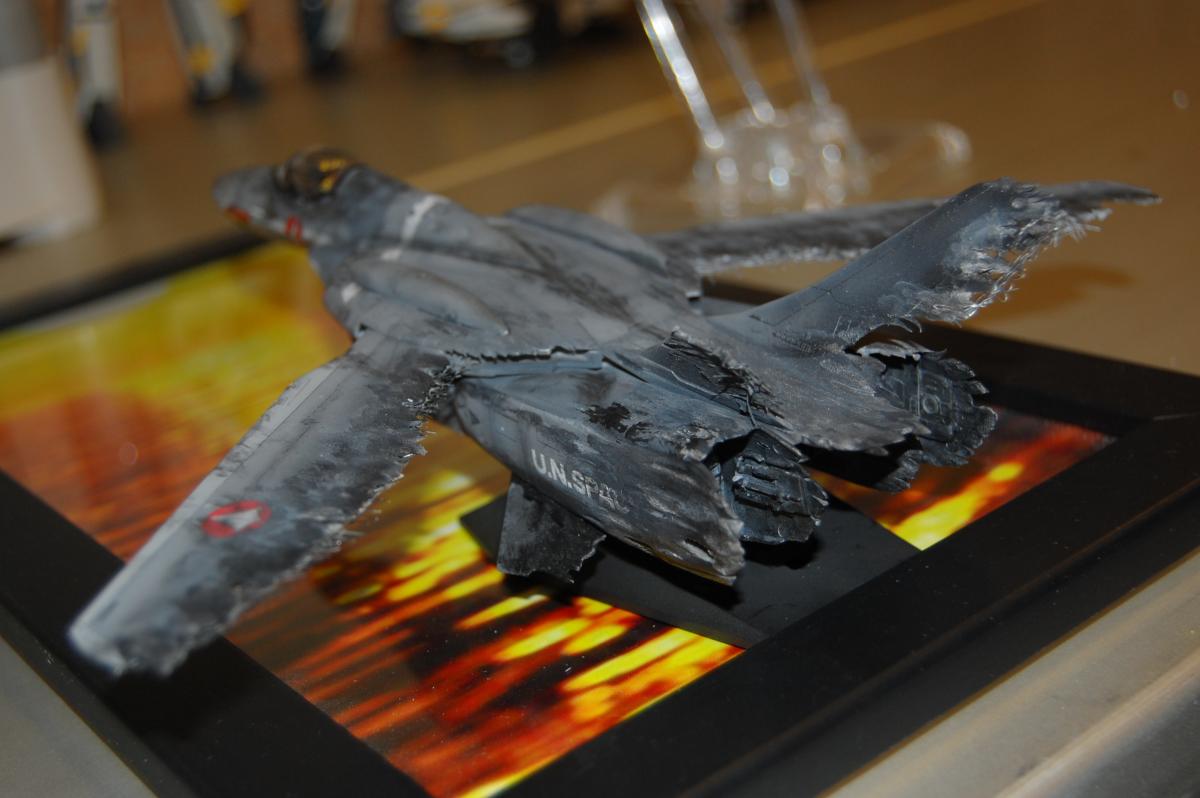
Wow! Great damage and weathering! Those wing and intake effects are really, really well done!
-
Nice! Great match on the lighting - makes it look so real! I love these updates!!!
-
<geek mode> 0402 LEDs? For a simple way to dim LEDs, just increase the resistor value; the LED brightness is proportional (nonlinear, up to a point) to the current running through it. To find the resistor value, you can: look up the current/Lumens info on the LED data sheet & calculate the resistor value: R = (Vsupply - Vled_on) / current use a pot (resistor potentiometer), adjust to your desired brightness, & measure the pot resistance experiment by swapping in larger resistor values (binary search is effective) Swap in the appropriate, cheap resistor once you have your value. It shouldn't make much of a difference but resistors typically have 5% or 10% value tolerances depending on what you choose; the tolerance may matter if your supply voltage is just above the LED turn-on voltage. There are other, more-involved ways to electronically dim the LED but you can also use a regular LED instead of a super-bright, use a diffuser, paint over with transparent/translucent paint, or use gels. </geek mode> This is such a cool & inspiring project!!!
-
Sorry to hear about that. It's plasticizer leaching from the plastic or PVC, which makes the plastic less flexible and more stiff & brittle. I think it happens normally but that heat accelerates the process. Derex is right: wipe off the plasticizer but use something lint-free; do not use tissue. There are also possible health concerns related to the chemicals so wash up well afterwards and keep the younger kids away from plasticizer. Good luck! ps - If others have more info or details, please add.
-
Beautiful work as always! The details, pilot, and the dark grey scheme look great! Your completed kit output rate is just amazing!!!
-
Nice form & work! Great photography composition too! Congrats!
-
Finally Actually Working on the YF-19 Gullet
grapetang replied to Chronocidal's topic in The Workshop!
Nice work! Thanks for posting! -
Ni-cd battery pack question - need them for my AB compressor
grapetang replied to GU-11's topic in The Workshop!
Only the [ power converter ] --> [ SWA-3 ] --> [ compressor power adapter input jack ] is "ready to use". The laptop power supplies need work to connect to the input jack (different plug, voltage? polarity) or to the battery connector, so the rechargeable batteries may be the way to go in the short term. Good luck! PS - found the compressor manual here: http://www.tamiya.com/japan/download/pdf/tools/74520.pdf -
Ni-cd battery pack question - need them for my AB compressor
grapetang replied to GU-11's topic in The Workshop!
Great suggestions from Chas & everyone. Last comments: The [ power converter ] --> [ SWA-3 ] --> [ compressor power adapter input jack ] is the best way to go but pricey. Like you said, the battery option still works! The other alternatives are for hacking and plugging into the compressor battery input. There's a very good chance that the laptop output plugs do not fit the compressor's power input jack; the polarity may be off and we still don't know what the input voltage is on that input jack. With a little bit of jury rigging, it'll work. Good luck & have fun! -
Ni-cd battery pack question - need them for my AB compressor
grapetang replied to GU-11's topic in The Workshop!
Thanks, MechTech! Does anyone actually have the AC adapter for this compressor that could provide the output specs (voltage, current, polarity) as printed on the side? Or is it printed on the side of the compressor? I overlooked the fact that the compressor has a power input jack separate from the battery connection. All the 7.2v stuff we've been guessing about applies to the BATTERY INPUT, not the power adapter input and they could be different. Re: diodes: yes, they are electronic components that you (or someone) would have to solder to wires (14 gauge or thicker). To connect to the power supply side, you would have to: get a mating input jack and solder to that, or UNPLUG first and try soldering directly onto the output plug, or UNPLUG first and cut off the output plug to expose the wires and solder directly to those. Sounds like it would be easier to find the correct adapter or a voltage converter and plug straight in. This one is close (7.5VDC, 4A) but pricey: http://www.ebay.com/itm/7-5V-4A-HIGH-POWER-AC-Adapter-For-Stontronics-SB-074A0F-11-Charger-Supply-Cord-/370743230592 These looks pretty good except the current rating is too low: http://www.ebay.com/itm/New-POTRANS-UP01811070-DC-7V-2-5A-AC-Power-Adapter-/110961150451 http://www.ebay.com/itm/VSK-0615-AC-Power-Adapter-for-Panasonic-DP44-7-2V-2A-/320734006457 Wow. Talk about frustrating. Can anyone help with the AC adapter specs? -
Wow! Beautiful build, WM Cheng!