mickyg
-
Posts
2632 -
Joined
-
Last visited
Content Type
Profiles
Forums
Events
Gallery
Everything posted by mickyg
-

Hasegawa 1/72 VF-19EF/A Isamu Special *March pre-order*
mickyg replied to slide's topic in Model kits
Exactly this - sorry I didn't attach pictures to better illustrate what I was talking about. The vernier parts (NOT the main rearward facing booster nozzles) are really shallow and remind me of a tea cup saucer, whereas the ones on the 1/48 kit (and every toy I can think of) are more bowl shaped. I haven't inspected the DYRL stills or even watched the movie lately to see which one is really accurate though. -
But I thought the defender released on the 11th of August? Did you mean the Spartan? Either way, 30 days is definitely a bit much. I've noticed HLJ is starting to become a bit less competitive lately. I hope your experience is not indicative of a wider change within the company.
-
Looks like it comes with an Arad emblem though, so that's something.
-
Xigfrid, you are a lucky, lucky man! And wow @wmkjr that is some amazing work there! Questions for either of you: Given this front section is cast in blue plastic (at least I think it is) did you have any issues getting the paint to look right/can you see any slight differences in the tone? What sort of paint did you settle on? Any issues with durability that you had to address with any special methods? Did you clearcoat and if so, what did you go with? I'm working on a few projects at the moment and have decided Lacquer paints are the best possible choice for durability. However, I've been really surprised to find that most of the factory paint comes off with Gundam Marker eraser, which I think is just alcohol based thinner, suggesting the paints are actually just regular old acrylics. I'm also having all sorts of trouble with metallic paints. The ones that look the most realistic are also the ones that seem the least durable - as in, they rub off with the slightest touch. Finding that perfect balance between durability and quality seems to be very challenging.
-
Orthographic projections, as best I understand them, are designed to give perfect dimensions for the purposes of translating that to some sort of construction (real or virtual). So if you were to take a ruler and apply whatever scaling is necessary, you'd find everything is exactly the right dimensions to whatever it is you're trying to make, even if the part is farther away from you than some other part. In real life, we don't see that way. Nor is any photograph likely to capture this view. Things that are farther away, even if it's just a little bit farther away, as in the case of a scale model, will still look smaller. Wave's 3D render does not do any perspective scaling. So if you were to measure that wingtip farthest from you, you'll find it's exactly the same size as the one closer to you. It doesn't look quite so bad in the top or side views but when you go from an angle, it just looks weird because we're expecting to see some sort "realistic" view of the model and instead our brains go "something isn't right about this" instead.
-
Please post Bugs and Forum Feedback here
mickyg replied to Shawn's topic in MW Site News & Member Feedback
Things definitely look a bit different since I logged in about 2 hours ago. And I had to sign back in, for the first time in months. -
Oh yeah! Just realised there's no perspective in those renders at all. That makes a huge difference. Thanks for pointing that out.
-
I think Wave's version is the VF-4$. In all seriousness, the G was from the Macross M3 videogame and it was here that it was shown transformed. Apparently the reason the Arcadia/Yamato version is the G is because it's the only way they could get a license for a transforming VF-4. There may be more to the story than that, but that's my recollection. As far as I'm aware, the FB 2012 version is just the "VF-4". Makes me wonder what sort of markings the Wave kit will come with.
-
Your most recent Macross or toy purchase! General thread.
mickyg replied to Gakken85's topic in Hall Of The Super Topics
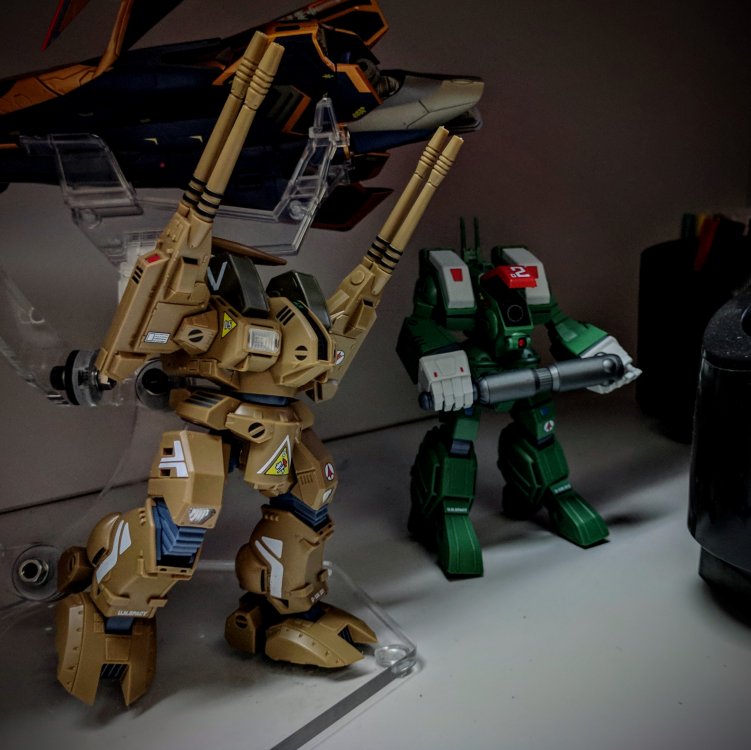
My Defender arrived in from NY (Yep, just one for me) and it only took 2 weeks via cheapest SAL option. I think that's 4 for 4 now. Looks great with the Spartan! Love how dynamic these things look.
-
Just got my Defender in and it looks great! That's exactly 2 weeks since it shipped, via the cheapest SAL option NY has. Not bad!
-
Hasegawa 1/72 VF-19EF/A Isamu Special *March pre-order*
mickyg replied to slide's topic in Model kits
Precisely! I need to find a good pic of the difference though. I guess if you look at the Bandai HM-R or YamCadia 1/60 super parts, it becomes a bit more clear. Actually, even the Hasegawa 1/48 kits seem to get it more "right" than the 1/72 kits do. Just realised this is the VF-19 thread though. Oops... -
Hasegawa 1/72 VF-19EF/A Isamu Special *March pre-order*
mickyg replied to slide's topic in Model kits
Sorry, should have clarified that, eh? The Vernier on the Super Parts for the VF-1 have always been way too shallow and weirdly shaped, in my opinion. Many have opted for Kotobukiya replacement parts as an upgrade for them. I'd hoped the re-release would address this shape issue but from the pics, they're the same old thing. -
Hasegawa 1/72 VF-19EF/A Isamu Special *March pre-order*
mickyg replied to slide's topic in Model kits
Awesome to see these kits getting re-released! Just wish they'd update the booster nozzles on the super packs for these kits. The shape is just all wrong. -
I'm looking at it again just now. There's the tiniest little lip/tooth sticking out on the bottom edge of the wing glove - this part catches on the bottom of the pivoting section of the wing, so there's definitely support there. But I agree, when you add the mass of the drone, along with the leverage that's placed out on the end like it is, well that's a lot pulling on that one small protruding plastic piece.
-
Totally understood. I tend to use a drop of dish soap for my acrylic painting sessions, for that added levelling property the glycerine (I think that's what's responsible) adds. But I'm also in a pretty moderate climate, very similar to San Francisco, actually. With the VF-25G DX Super Packs I did up as Alto's, I actually mixed the Tamiya Red acrylic paint with Mr Levelling Thinner (lacquer) and was very impressed with the results. That'll be my go-to for any future painting endeavours, where durability and quality need to match each other. Unfortunately my experience with the Mr Metal line is still somewhat disappointing. I got one of the chromed foot parts out and did a simple finger touch test, to see if the paint is sealed and properly set. The result: silver on my finger. So I think it's safe to say this method will need a sealer coat in order to lock the paint down. It's possible airbrushing several coats would yield a different result but my only experience there is with a single coat on the tiny Mecha Colle kits and that was as bad or worse than what I'm seeing with my brush painting efforts. Oh well...
-
Messed with my 262 on my desk yesterday and the clear parts to me, seem optional, like an added stability part. The wing section sits pretty tightly even without the folding section tabbed in. Maybe that's another story with the bulk of the drones on there but I wouldn't be surprised if the clear parts are just there for that extra piece of mind. Sort of the way the YF-30 extra parts turned out. I should add that I don't have the option parts yet. So this may change drastically when they arrive (NY has sent me a preparation in progress but no shipped email yet).
-
Yeah, admittedly, I went straight to the pictures in the instruction manual for painting the gunpod. I didn't consult anything else at all. And after comparing that to the Hs DX gunpod, they're very, very different. Though, my Ba kit now looks decidedly more realistic than that horrible thing that ships with the DX... Your red paint method sounds intriguing. I might have to try that. It's funny because I actually have a wonderful airbrush and really enjoy using it, but sometimes it's still more convenient to just grab the paint brushes instead.
-
See, now I remember! That's right, the V1 Frontier line came out after the TV Series and the V2 was quite a bit later. Thanks for jogging my memory. My point is that Bandai set a precedent with Frontier toys that could be applied to the Delta DX line, in that not everything was out, even after the TV series had wrapped. It's just as possible the VF-171 "Delta Version" along with all the other so far unreleased Valks (VF-31E, VF-31A, SV-262Ba...) may still be to come, in exactly the same fashion the Frontier ones were released.
-
Just need to look at the frontier release schedule to see if there's any pattern we can glean from that. Did the movie(s) come out before all the tv variants had been released? Seems like the CF VF-25 wasn't released till after the movie but perhaps I'm mistaken.
-
Just need to look at the frontier release schedule to see if there's any pattern we can glean from that. Did the movie(s) come out before all the tv variants had been released? Seems like the CF VF-25 wasn't released till after the movie but perhaps I'm mistaken.
-
Definitely can be done! I'm still looking for ways of ensuring durability. I'll update this thread if my experiments are successful.
-
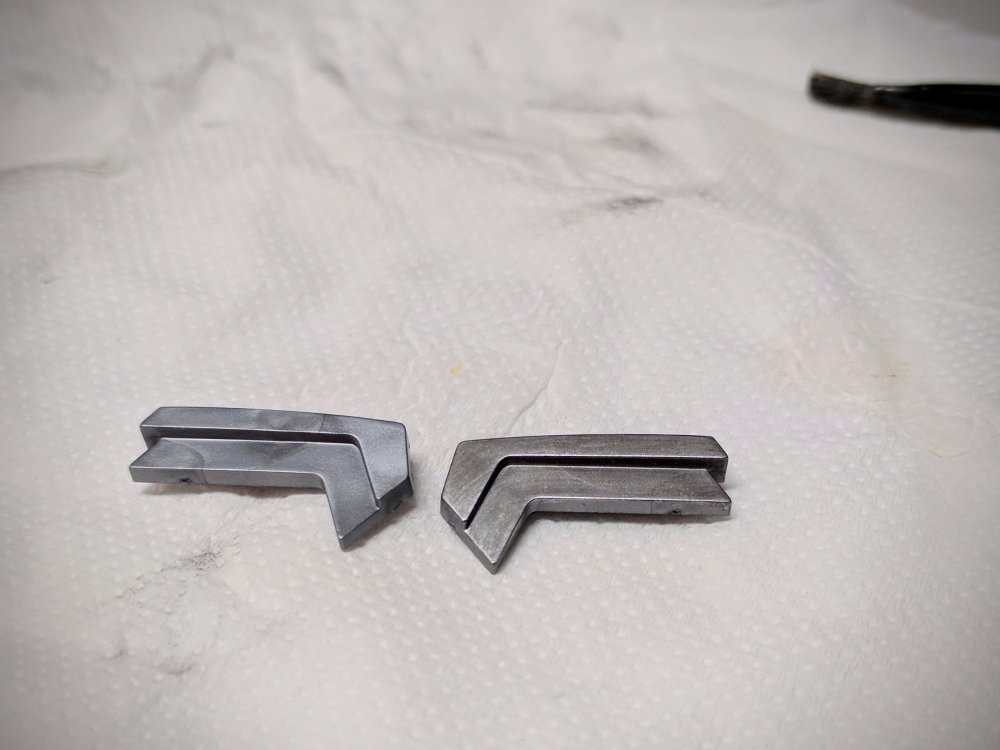
Funny you should bring that up because I was just about to update my post and describe it a bit more in depth. It's a technique I learned from some modelling forum I visited years ago (can't remember where now...). For the silver paints from Mr Metal Color, it works really, really well. The Gold, notsomuch. For it to work, you lay down a thin coat while it's still wet and let it sort of bite into the plastic (or primer, or undercoat of black, depending on how you want to do it). And then before it's totally dry, you dry brush it, creating sort of a polishing effect. Technically speaking, I think it works by using the metal powder in the paint to actually buff against itself. The brush sort of spreads it around. You can come along and buff again with a soft cloth afterward but it's not completely necessary. The downside is that the paint is pretty fragile. It's also very reactive with the oils from my fingers, I've discovered. It can come off even days later. So sealing it or handling very carefully, is a good idea. Now the Gold, I don't know what it is but it does not behave like the silver. It's almost sticky and it just won't go down the way the silver colours do (that includes iron). So you just lay it down while wet, making sure the brush strokes are not too bad before leaving it to dry. It levels reasonably well and then you can come along and do the dry brush thing after it's dried. If you want a durable coat, no doubt the best method is to just use it like it's intended and air brush it. But this method is great for quick and dirty sessions. Sorry, I should add another comment regarding durability. I believe that letting the coat go on wet, ads a lot to the overall durability. I went this way with the feet, for instance and they've shown pretty strong resilience so far. Where it's not durable, is when you rush it and either don't let it set long enough, or you put it on too dry. The binder in these metallic paints seems to be very delicate and if you put the paint on too "dry" it almost seems to evaporate completely, leaving nothing but metal dust behind. So yes, traditional airbrushing, along with using multiple coats, will likely get you a more durable finish, but brush painting can work too.
-
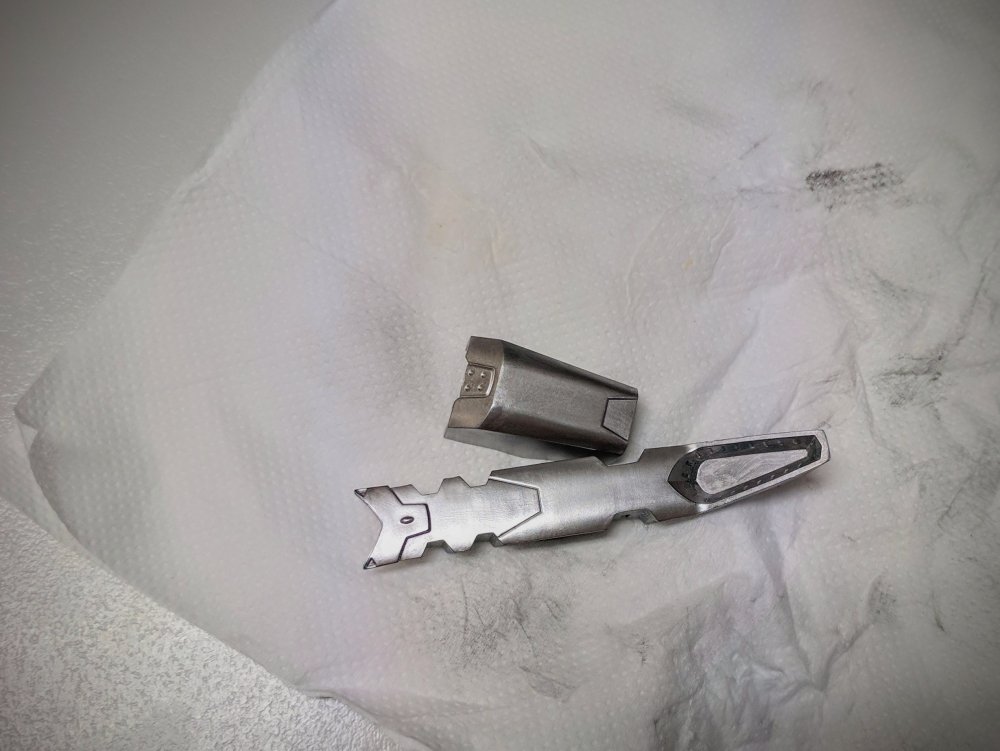
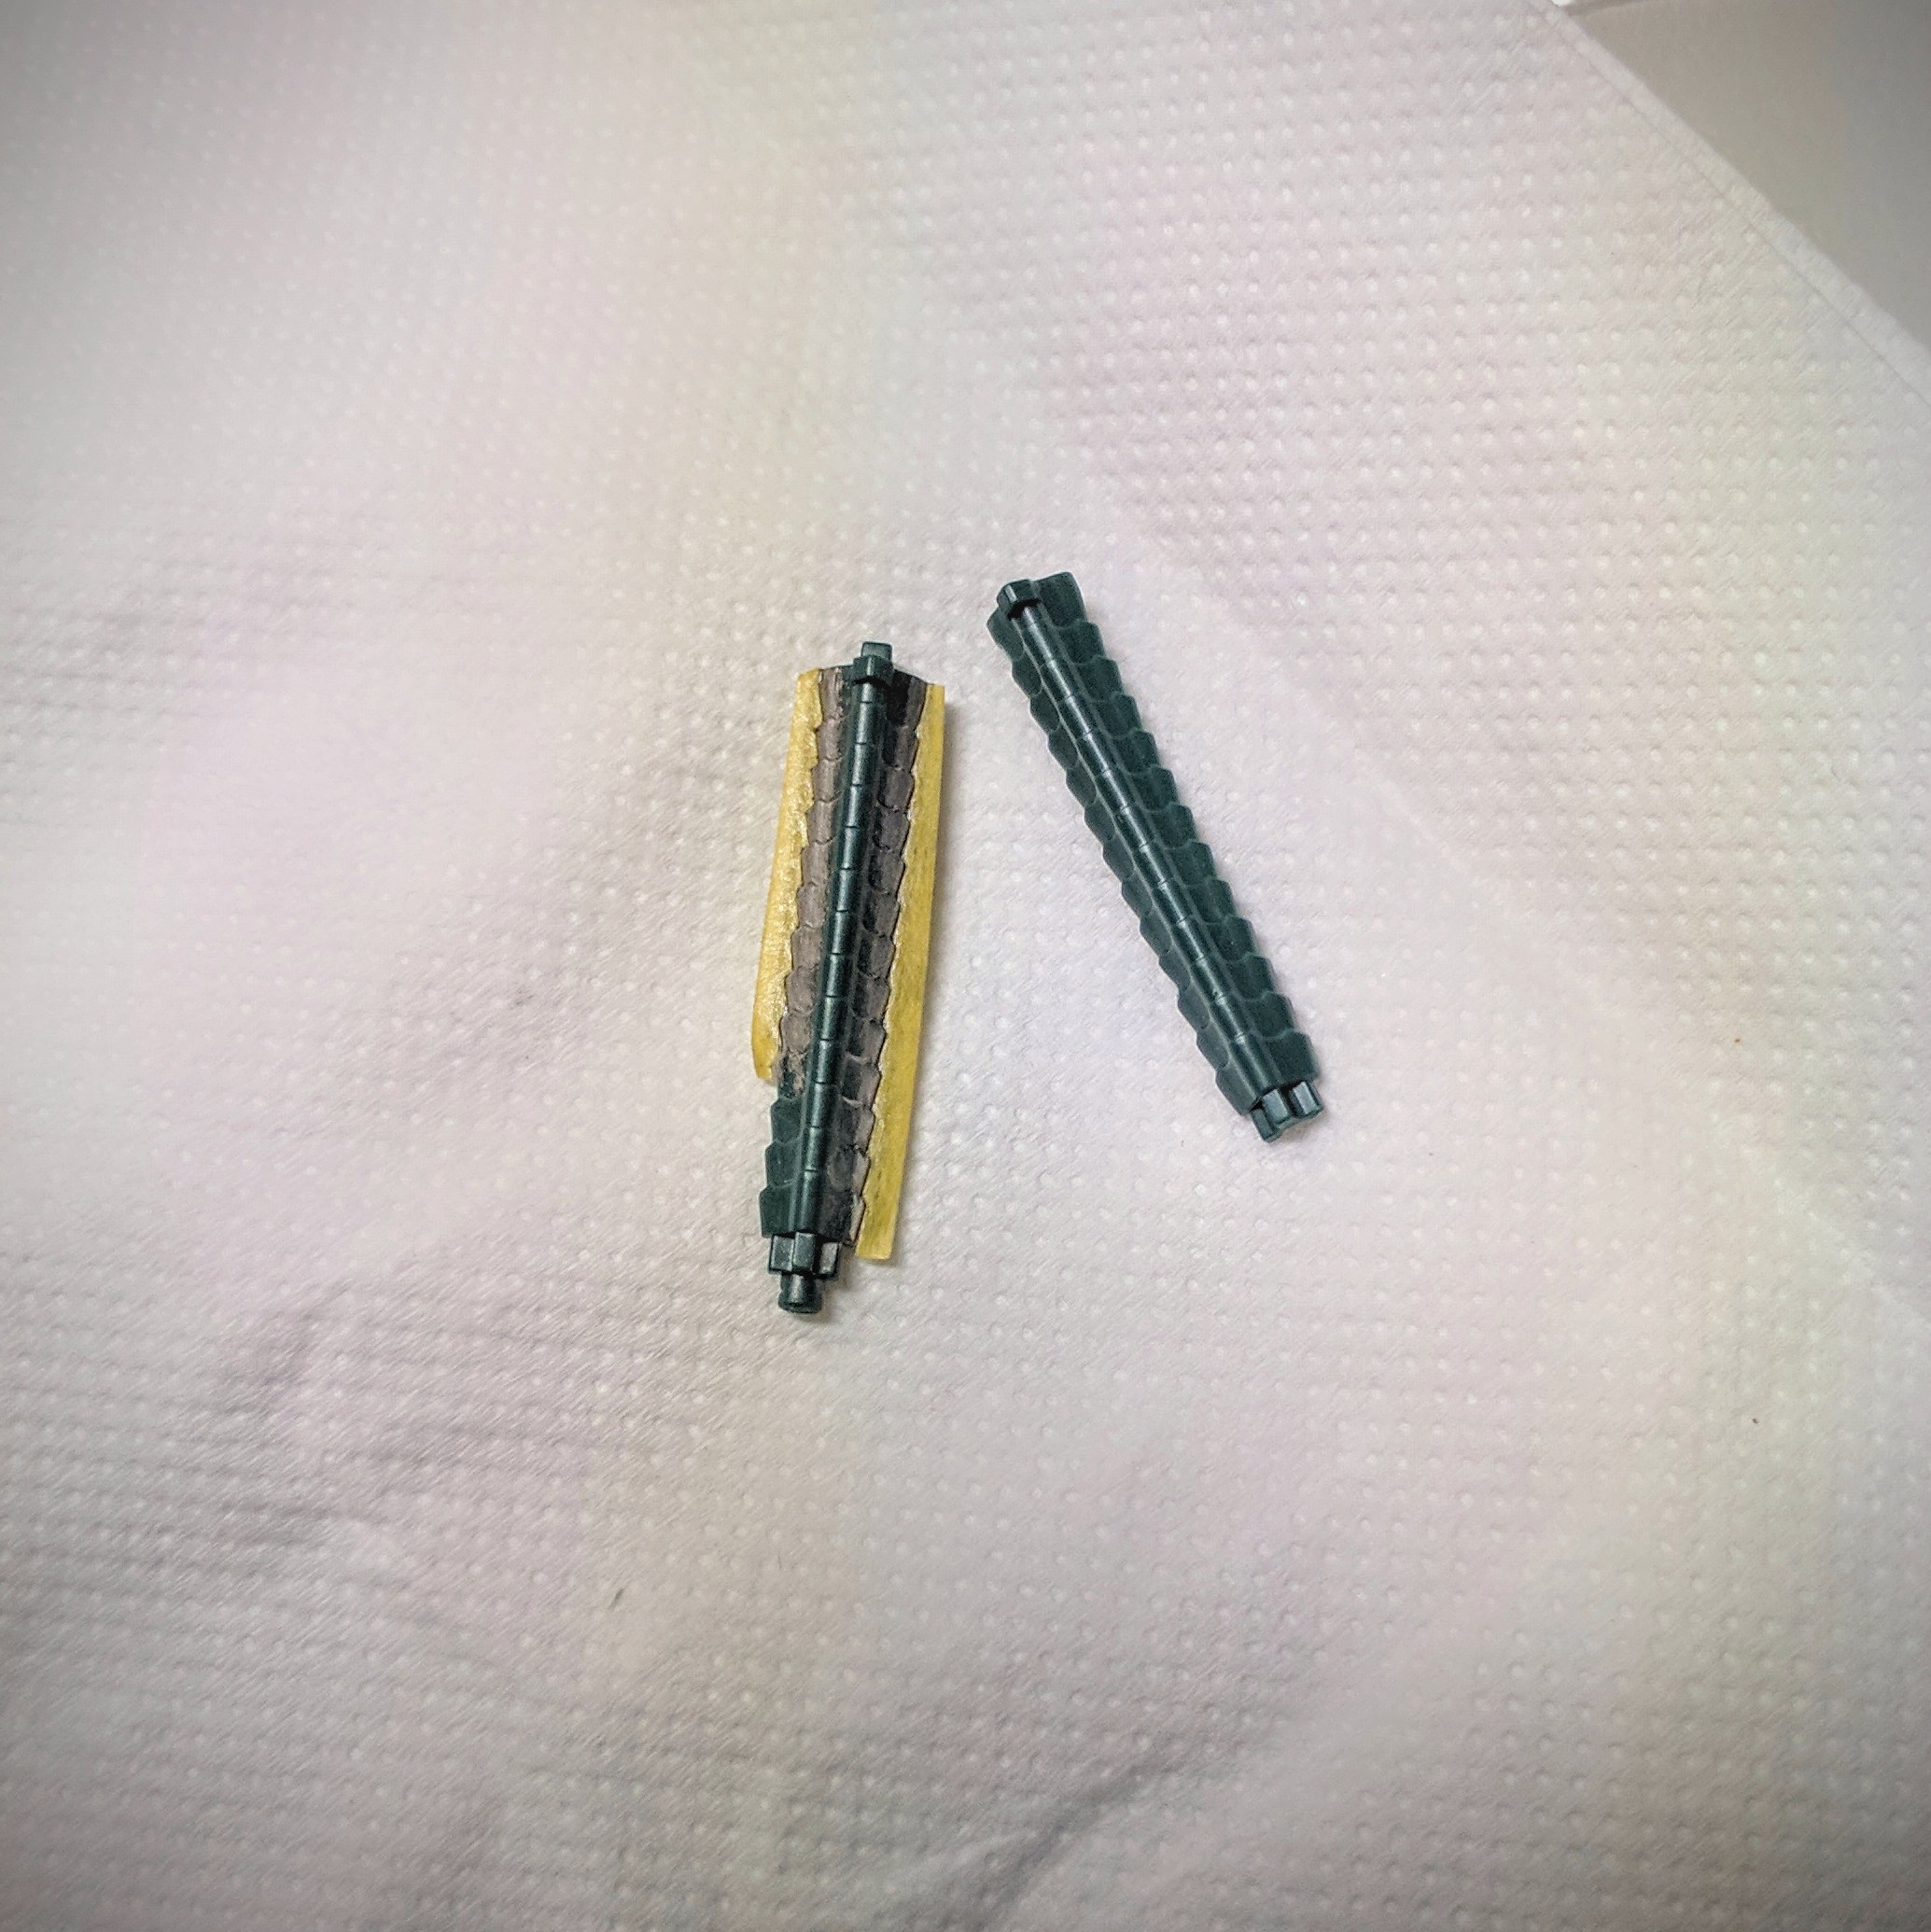
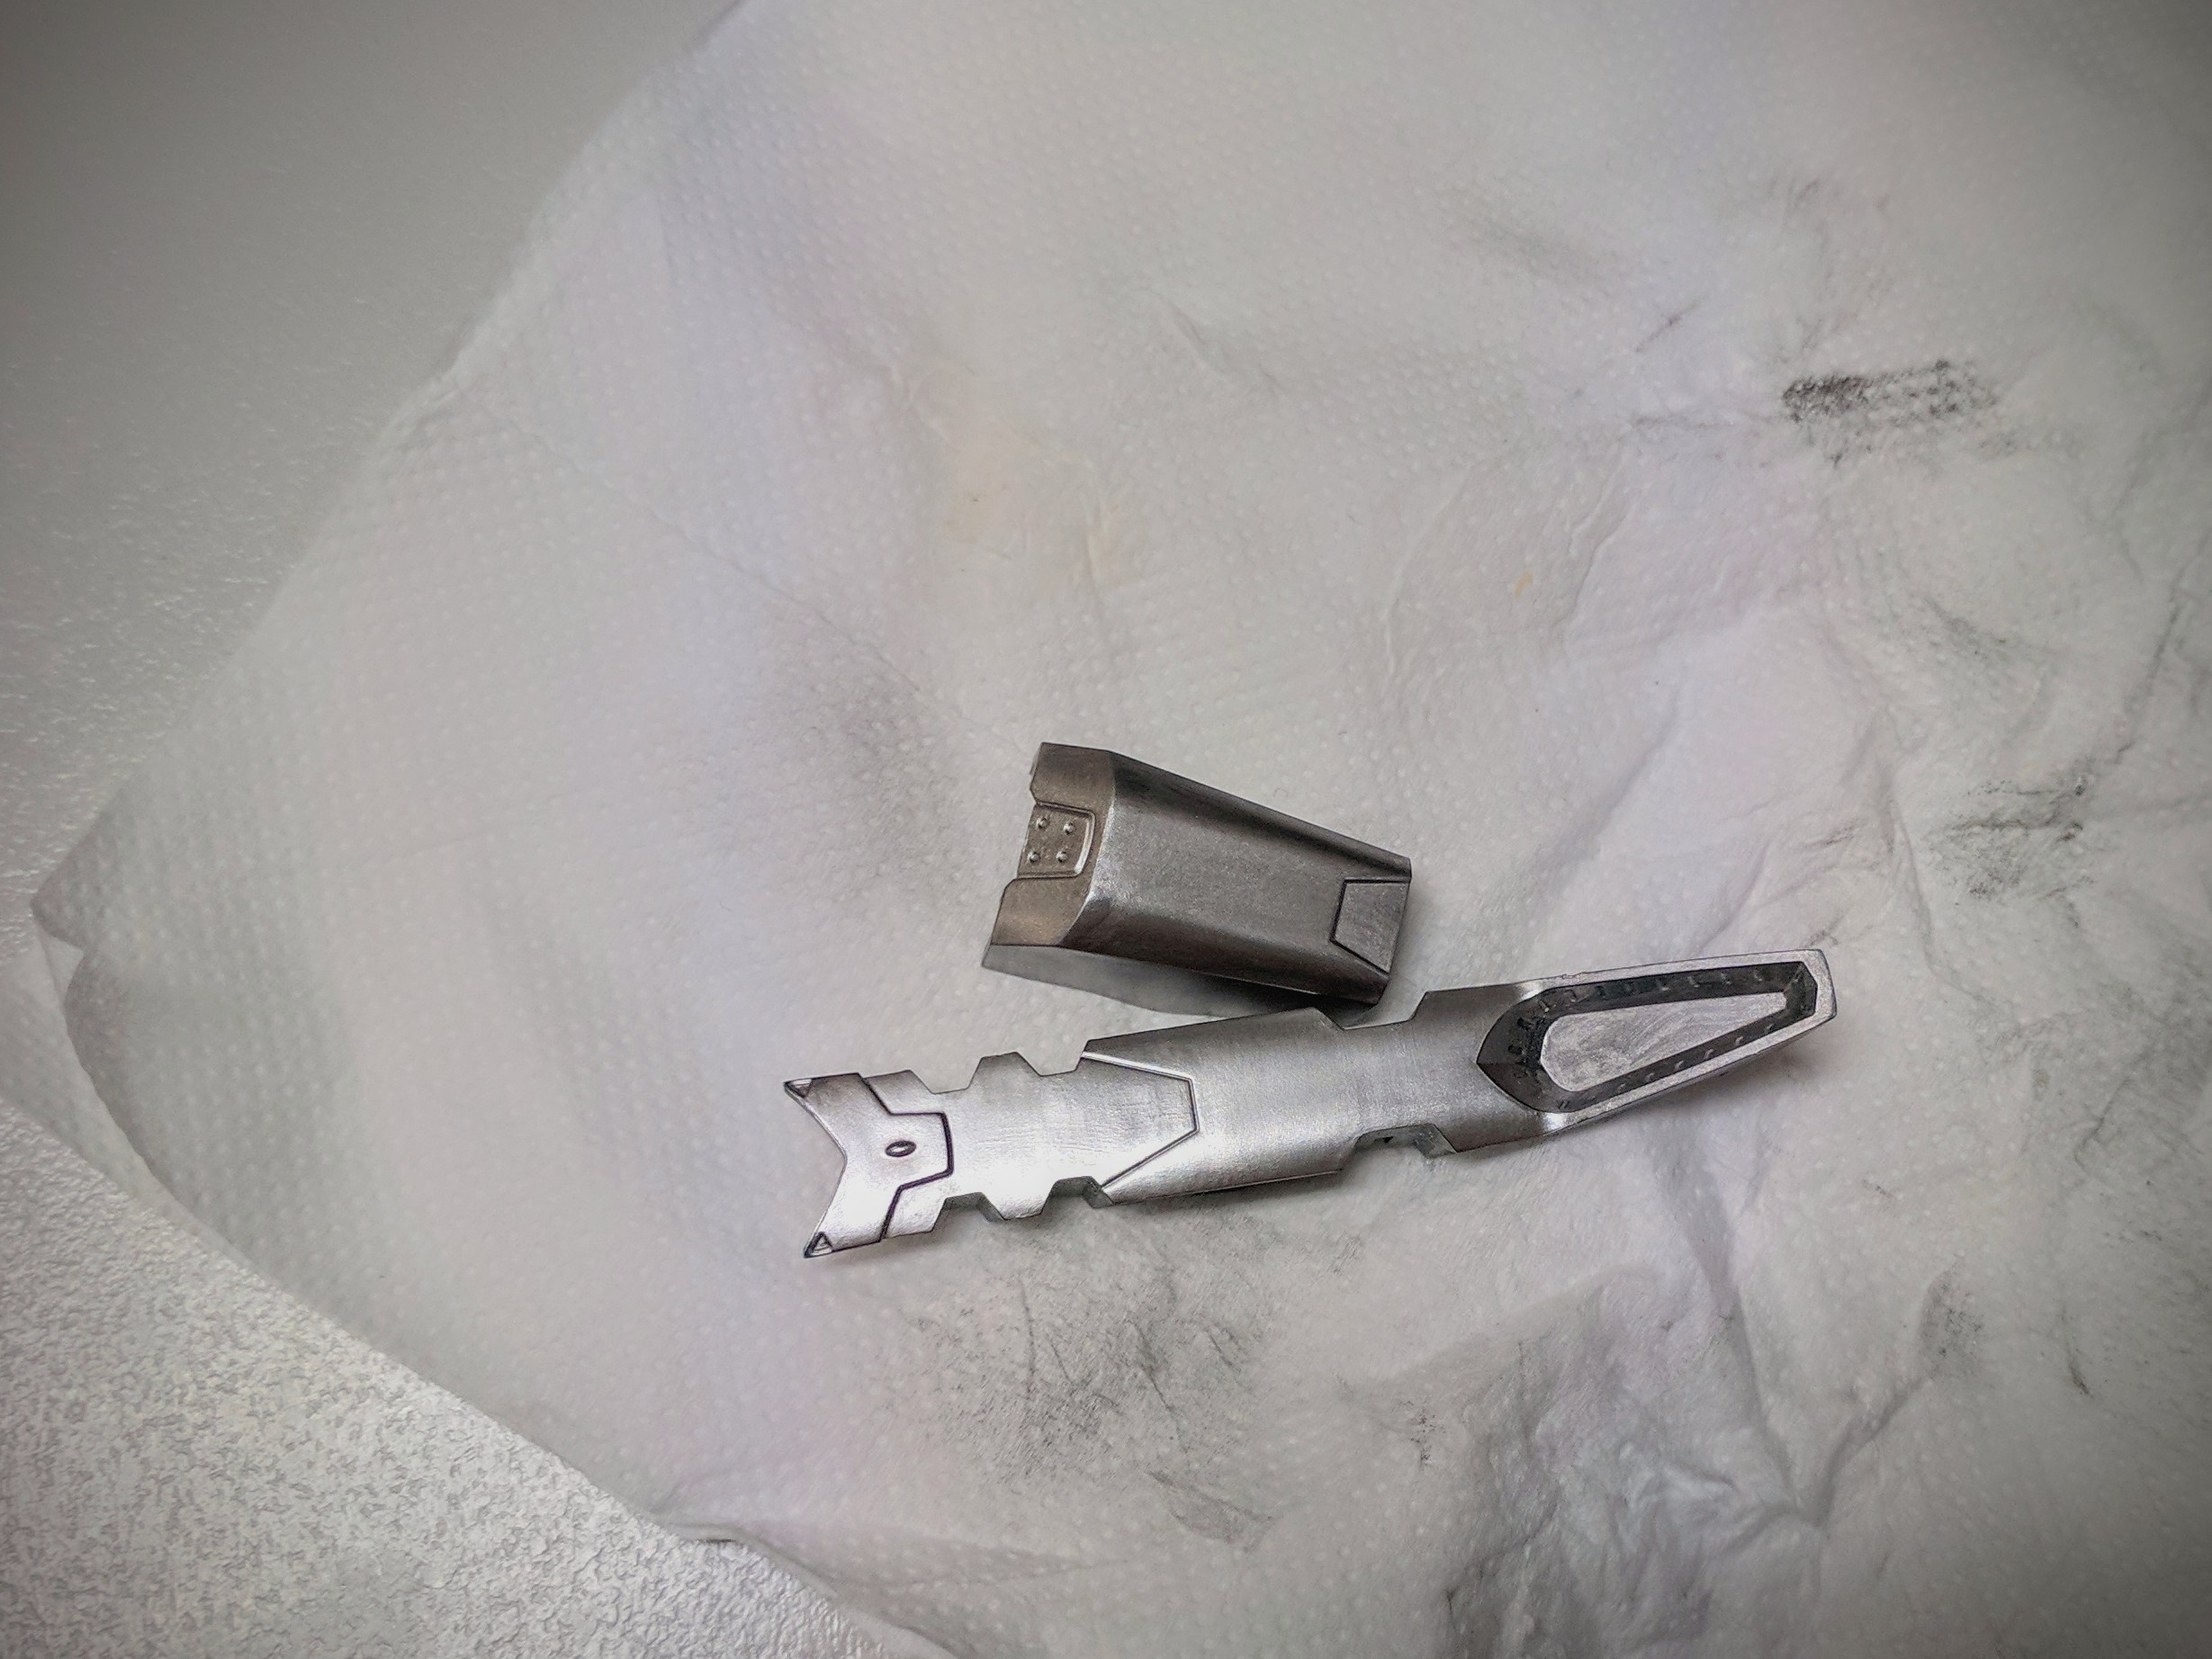
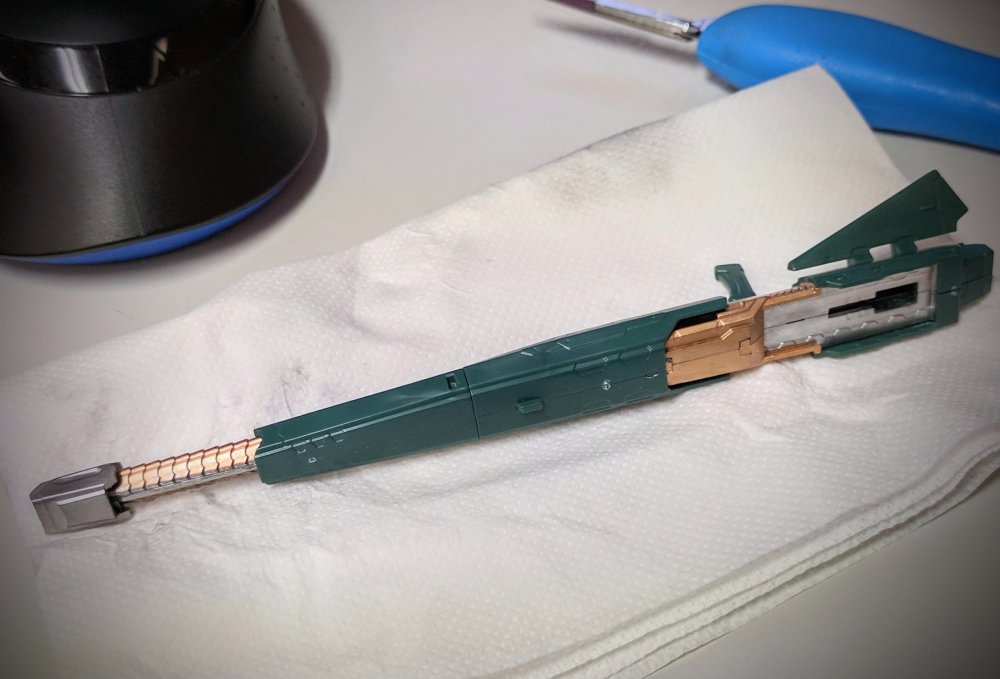
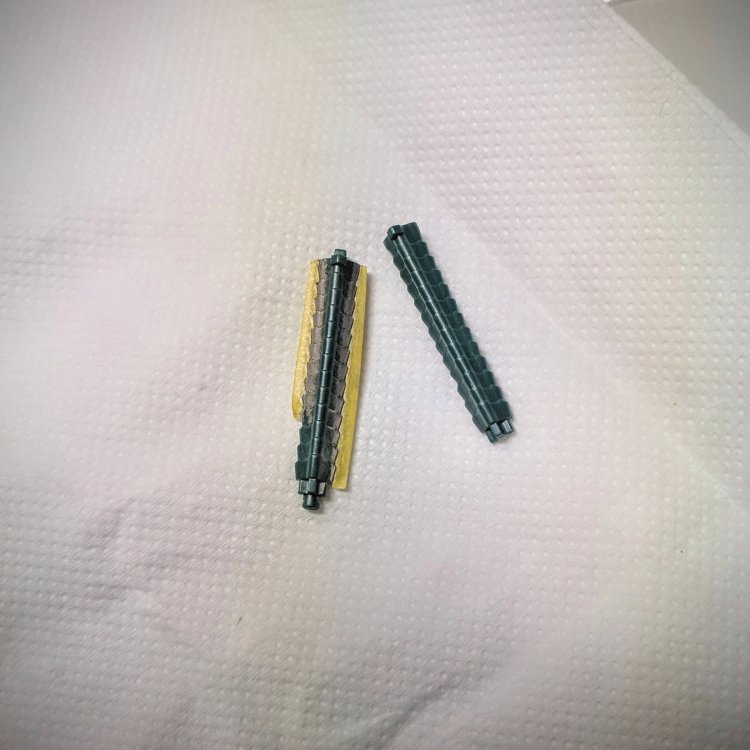
So here's one area that was just begging for some attention: the Gunpod. With the exception of the front silver part, everything else is moulded in green. So some quick and dirty masking and metal painting with Chrome Silver and Gold, and we're in business. Chrome laid down on the flat bar sections on top and bottom, then masked off using Tamiya tape and a sharp hobby knife. Gold applied and unmasked (NOT my best work by a long shot): And everything assembled: Better. But those sprue marks are killing me! And my decision not to paint the green is definitely beginning to make me wonder...

-
And the PF version is $727 (AUD)! Yikes!
-
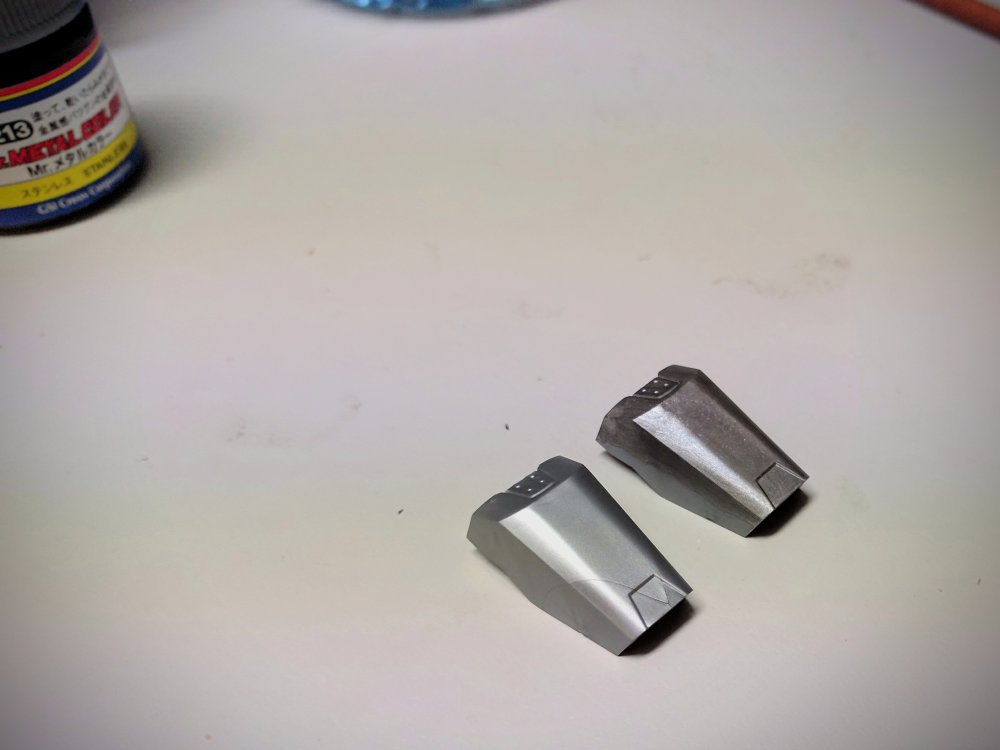
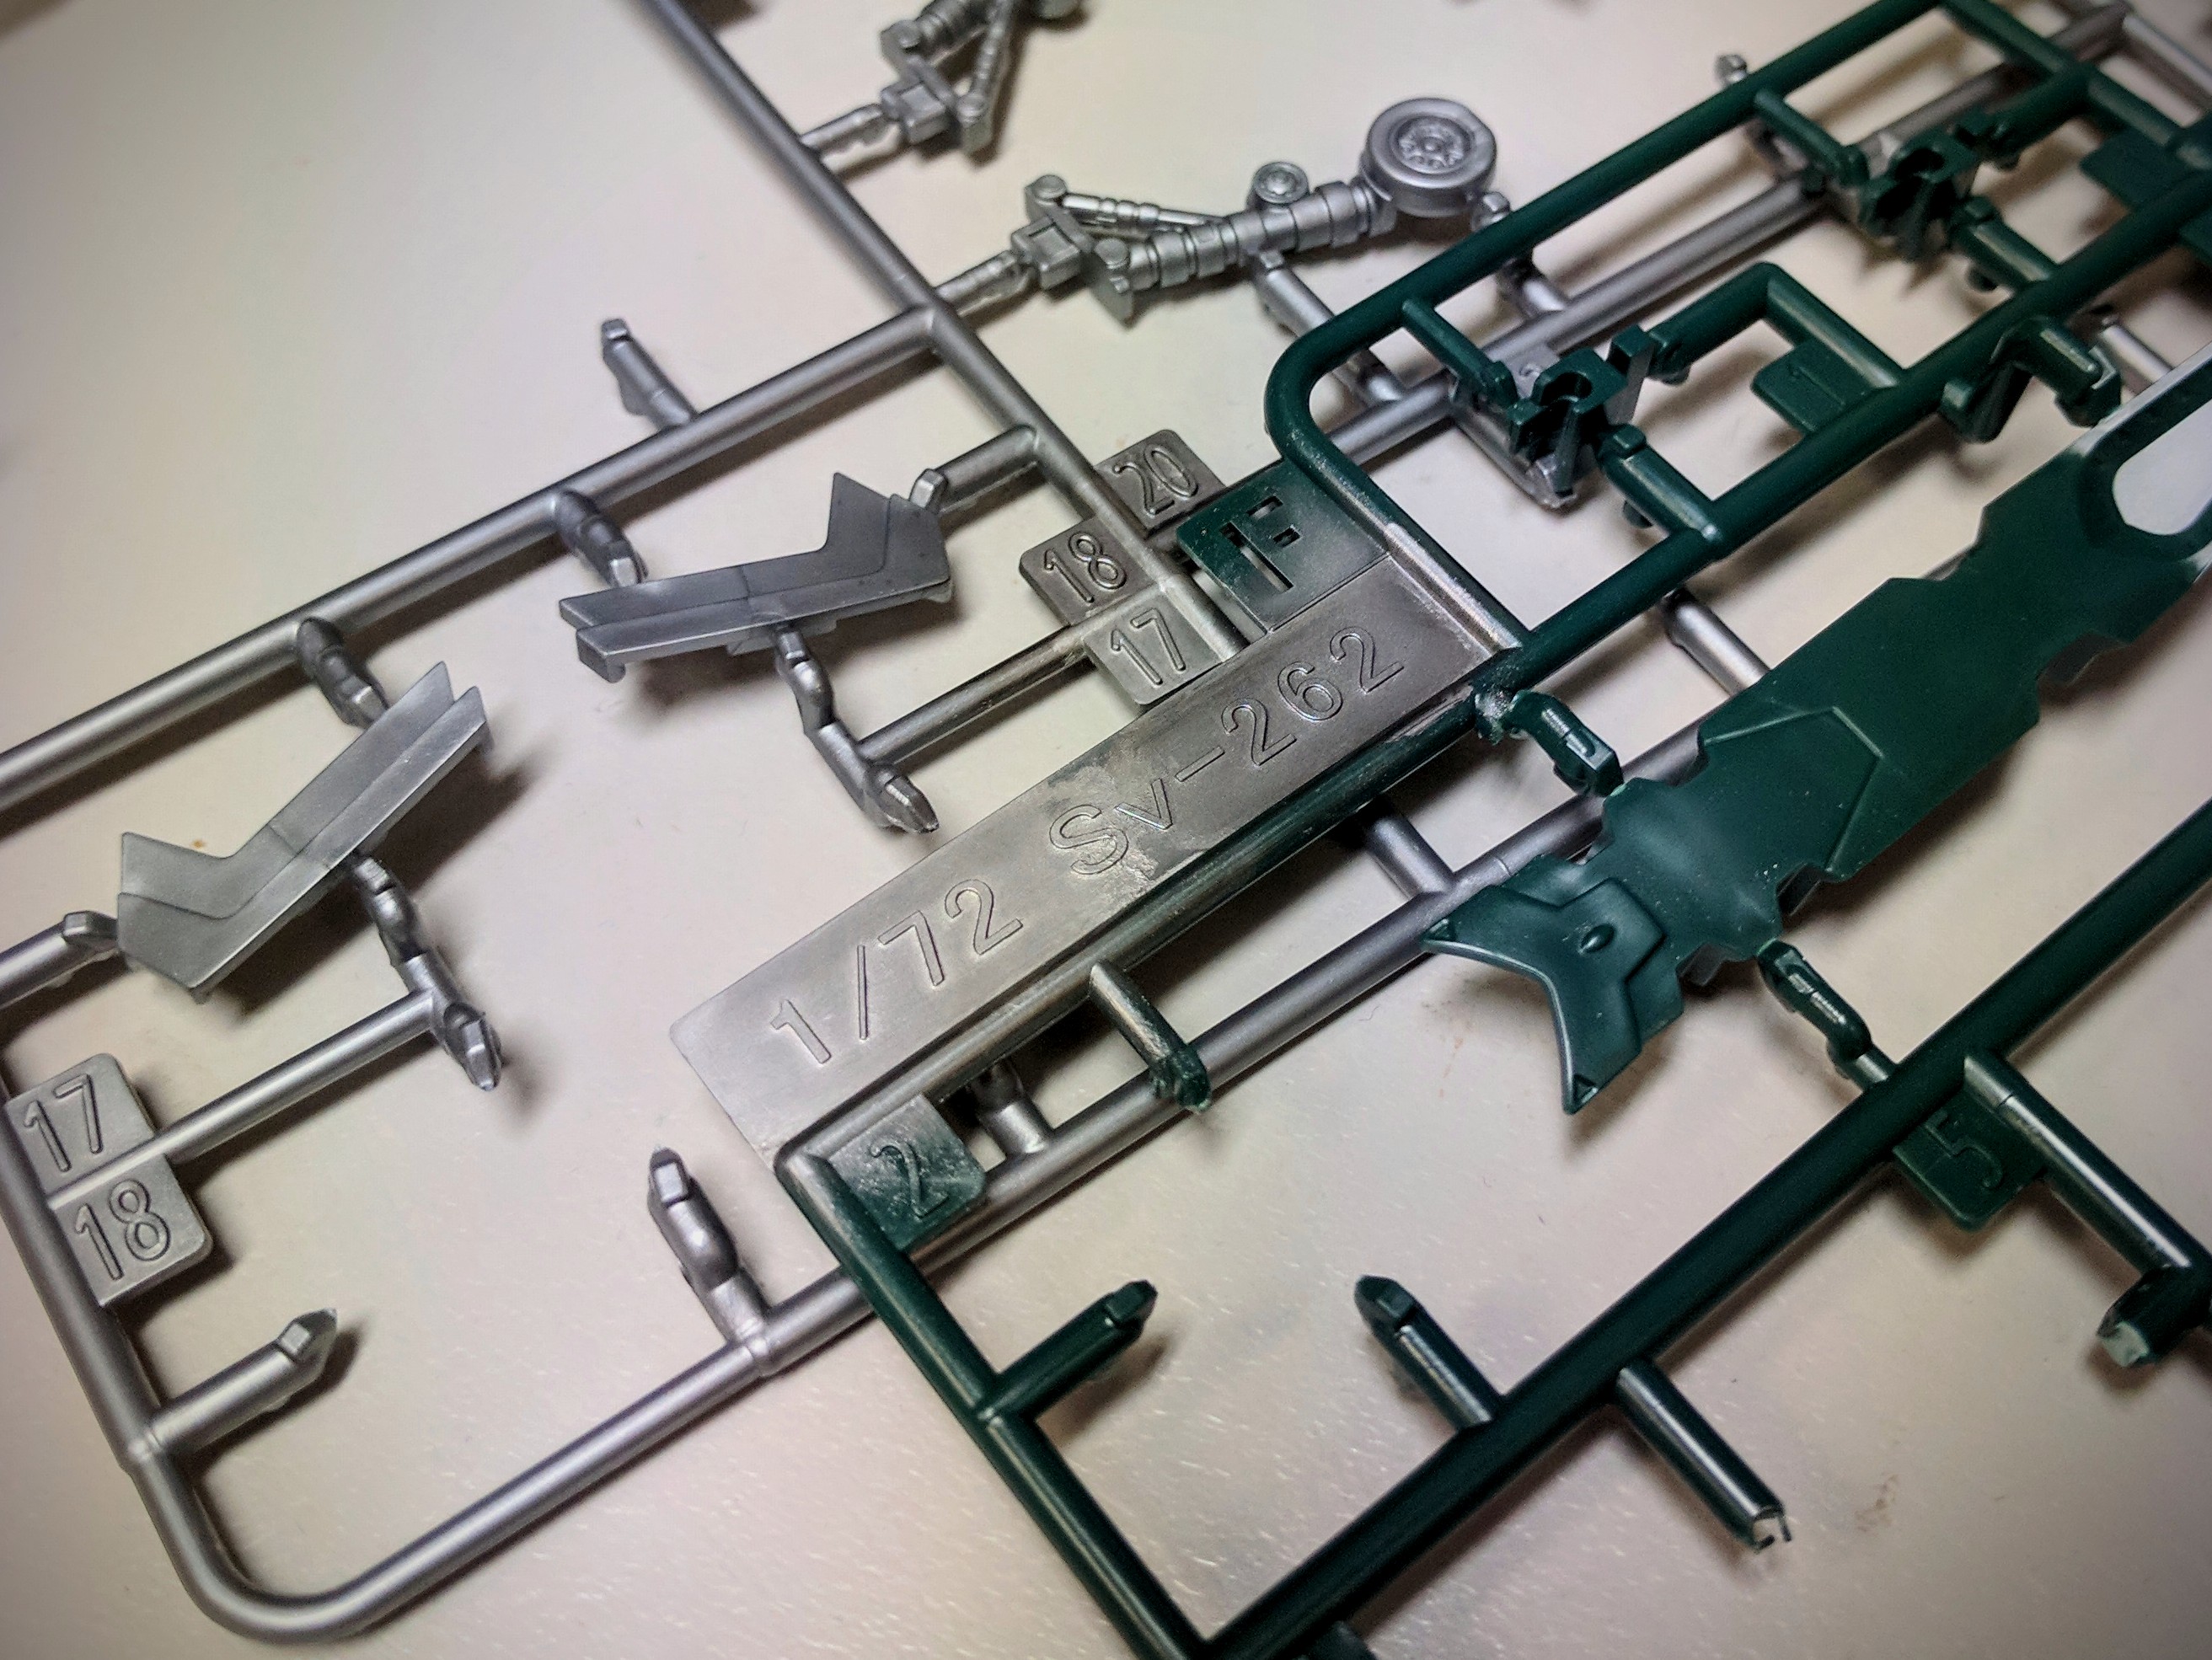
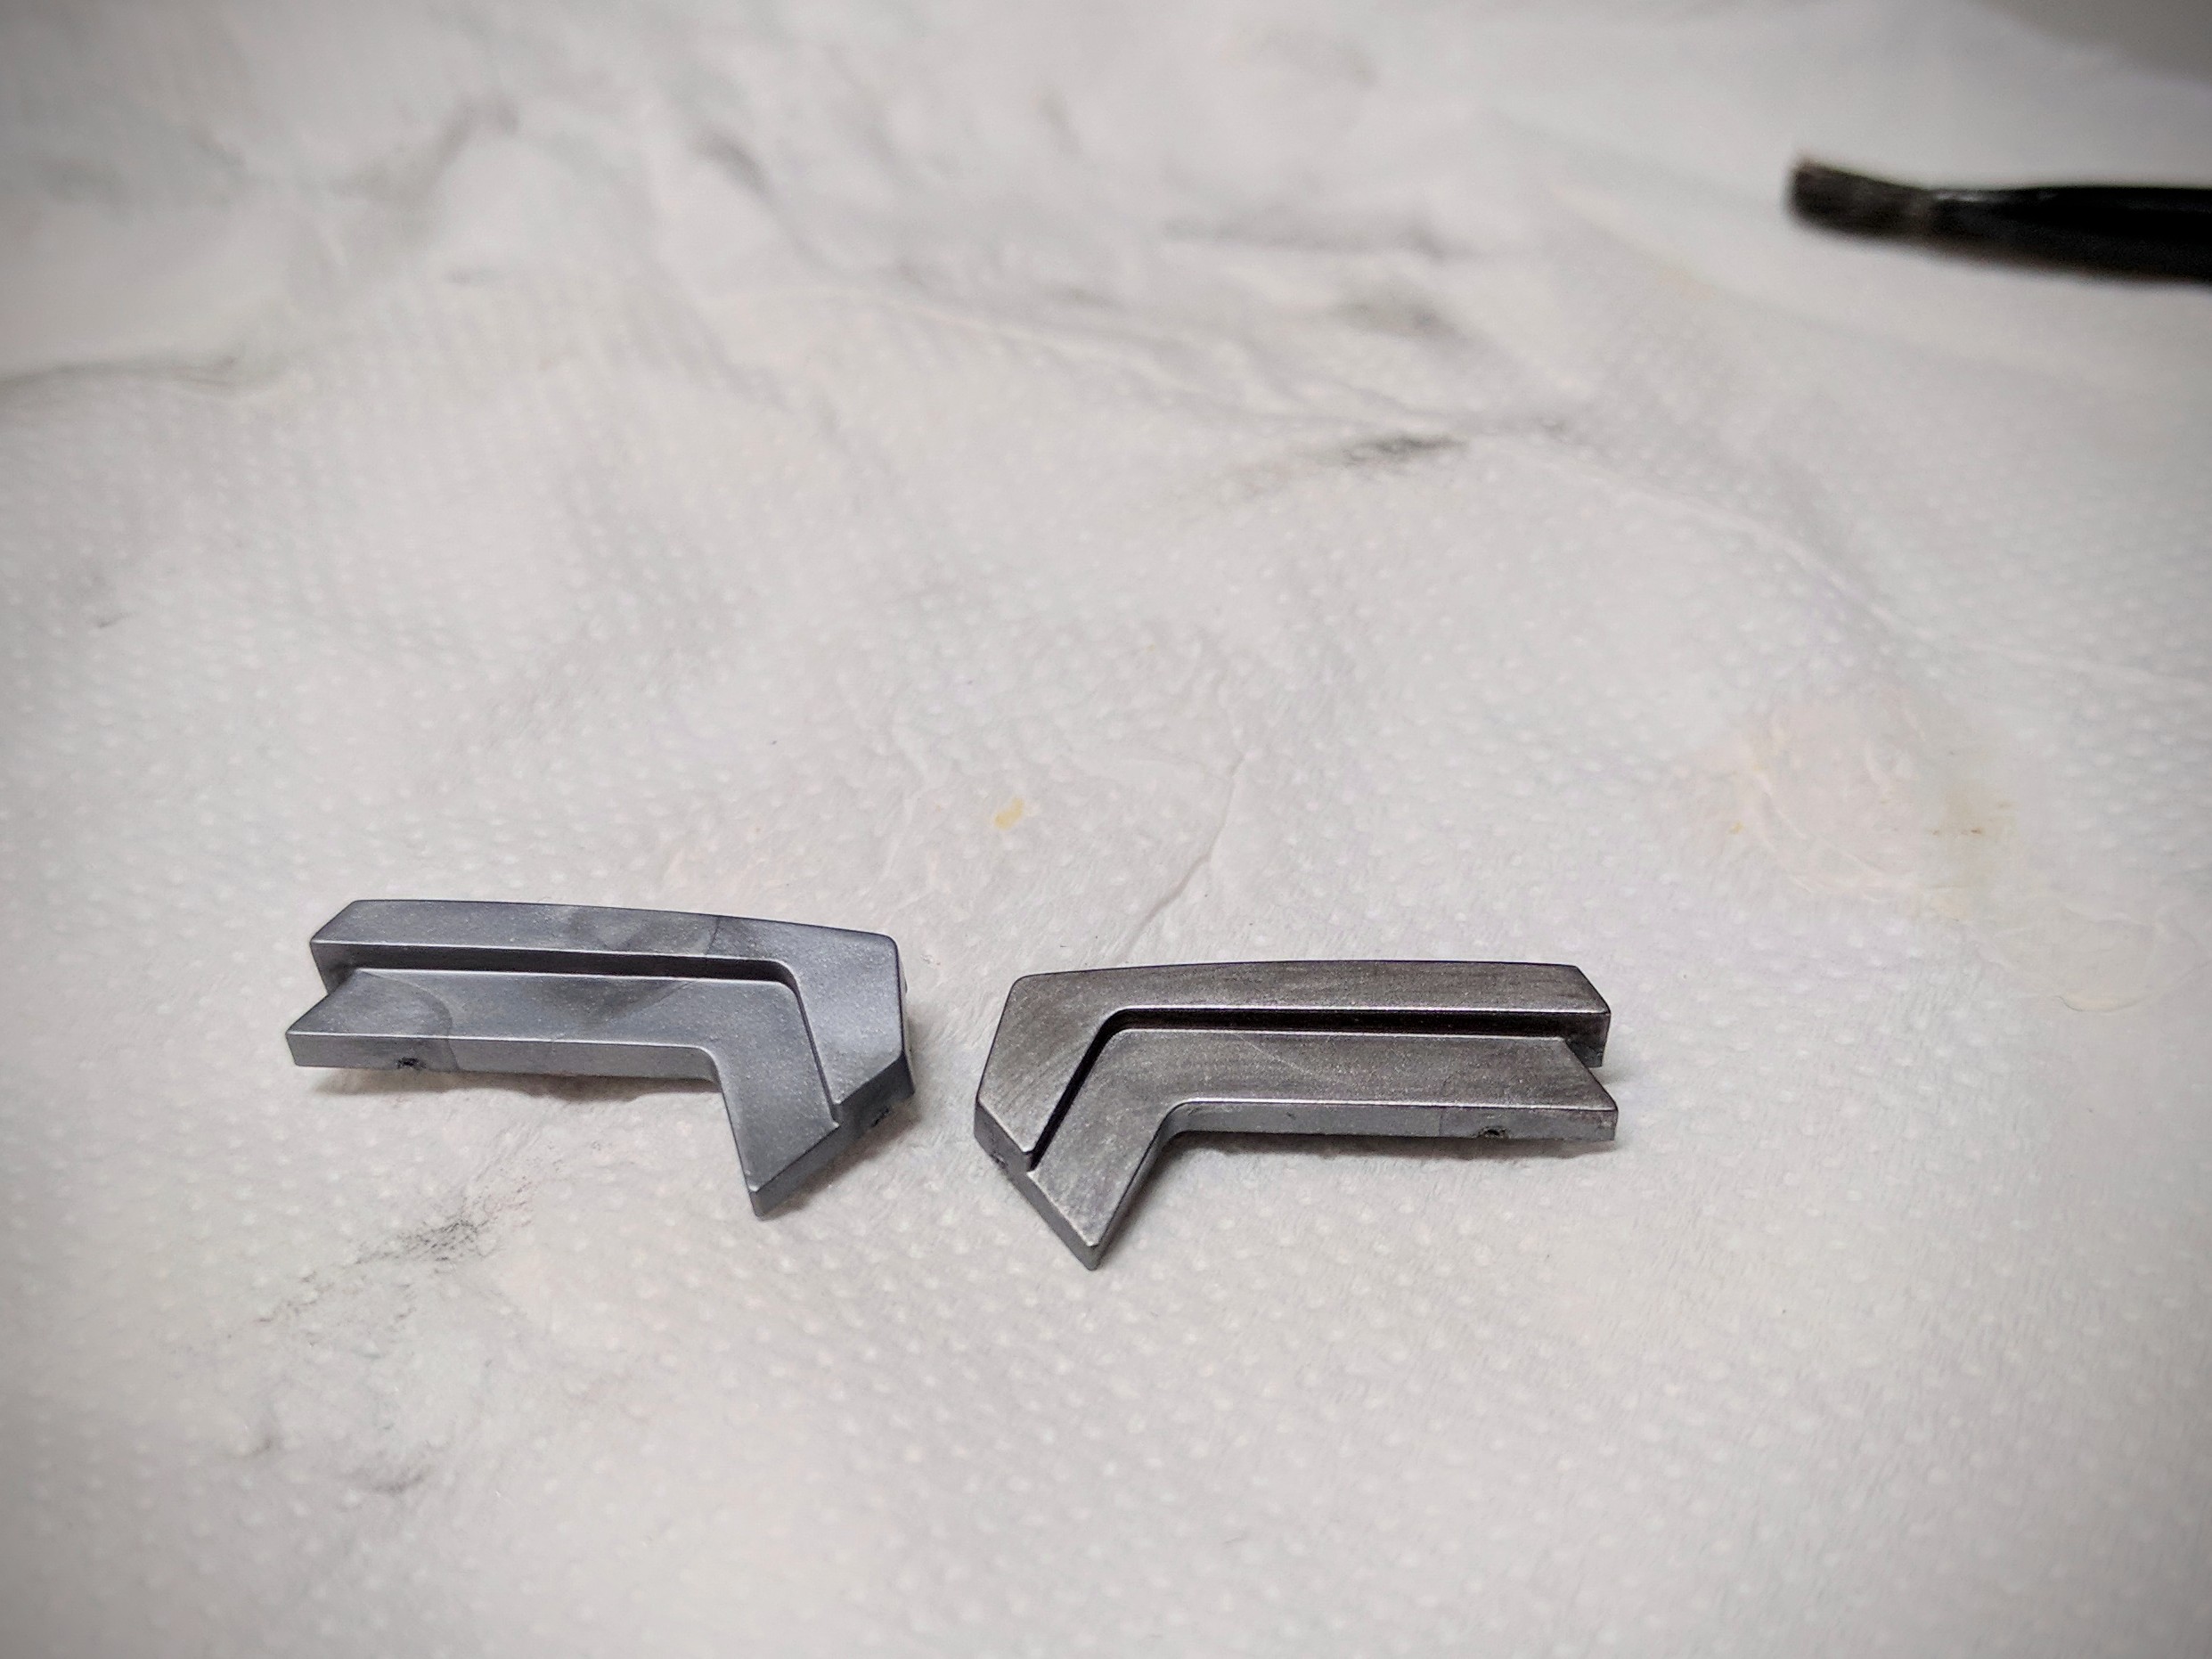
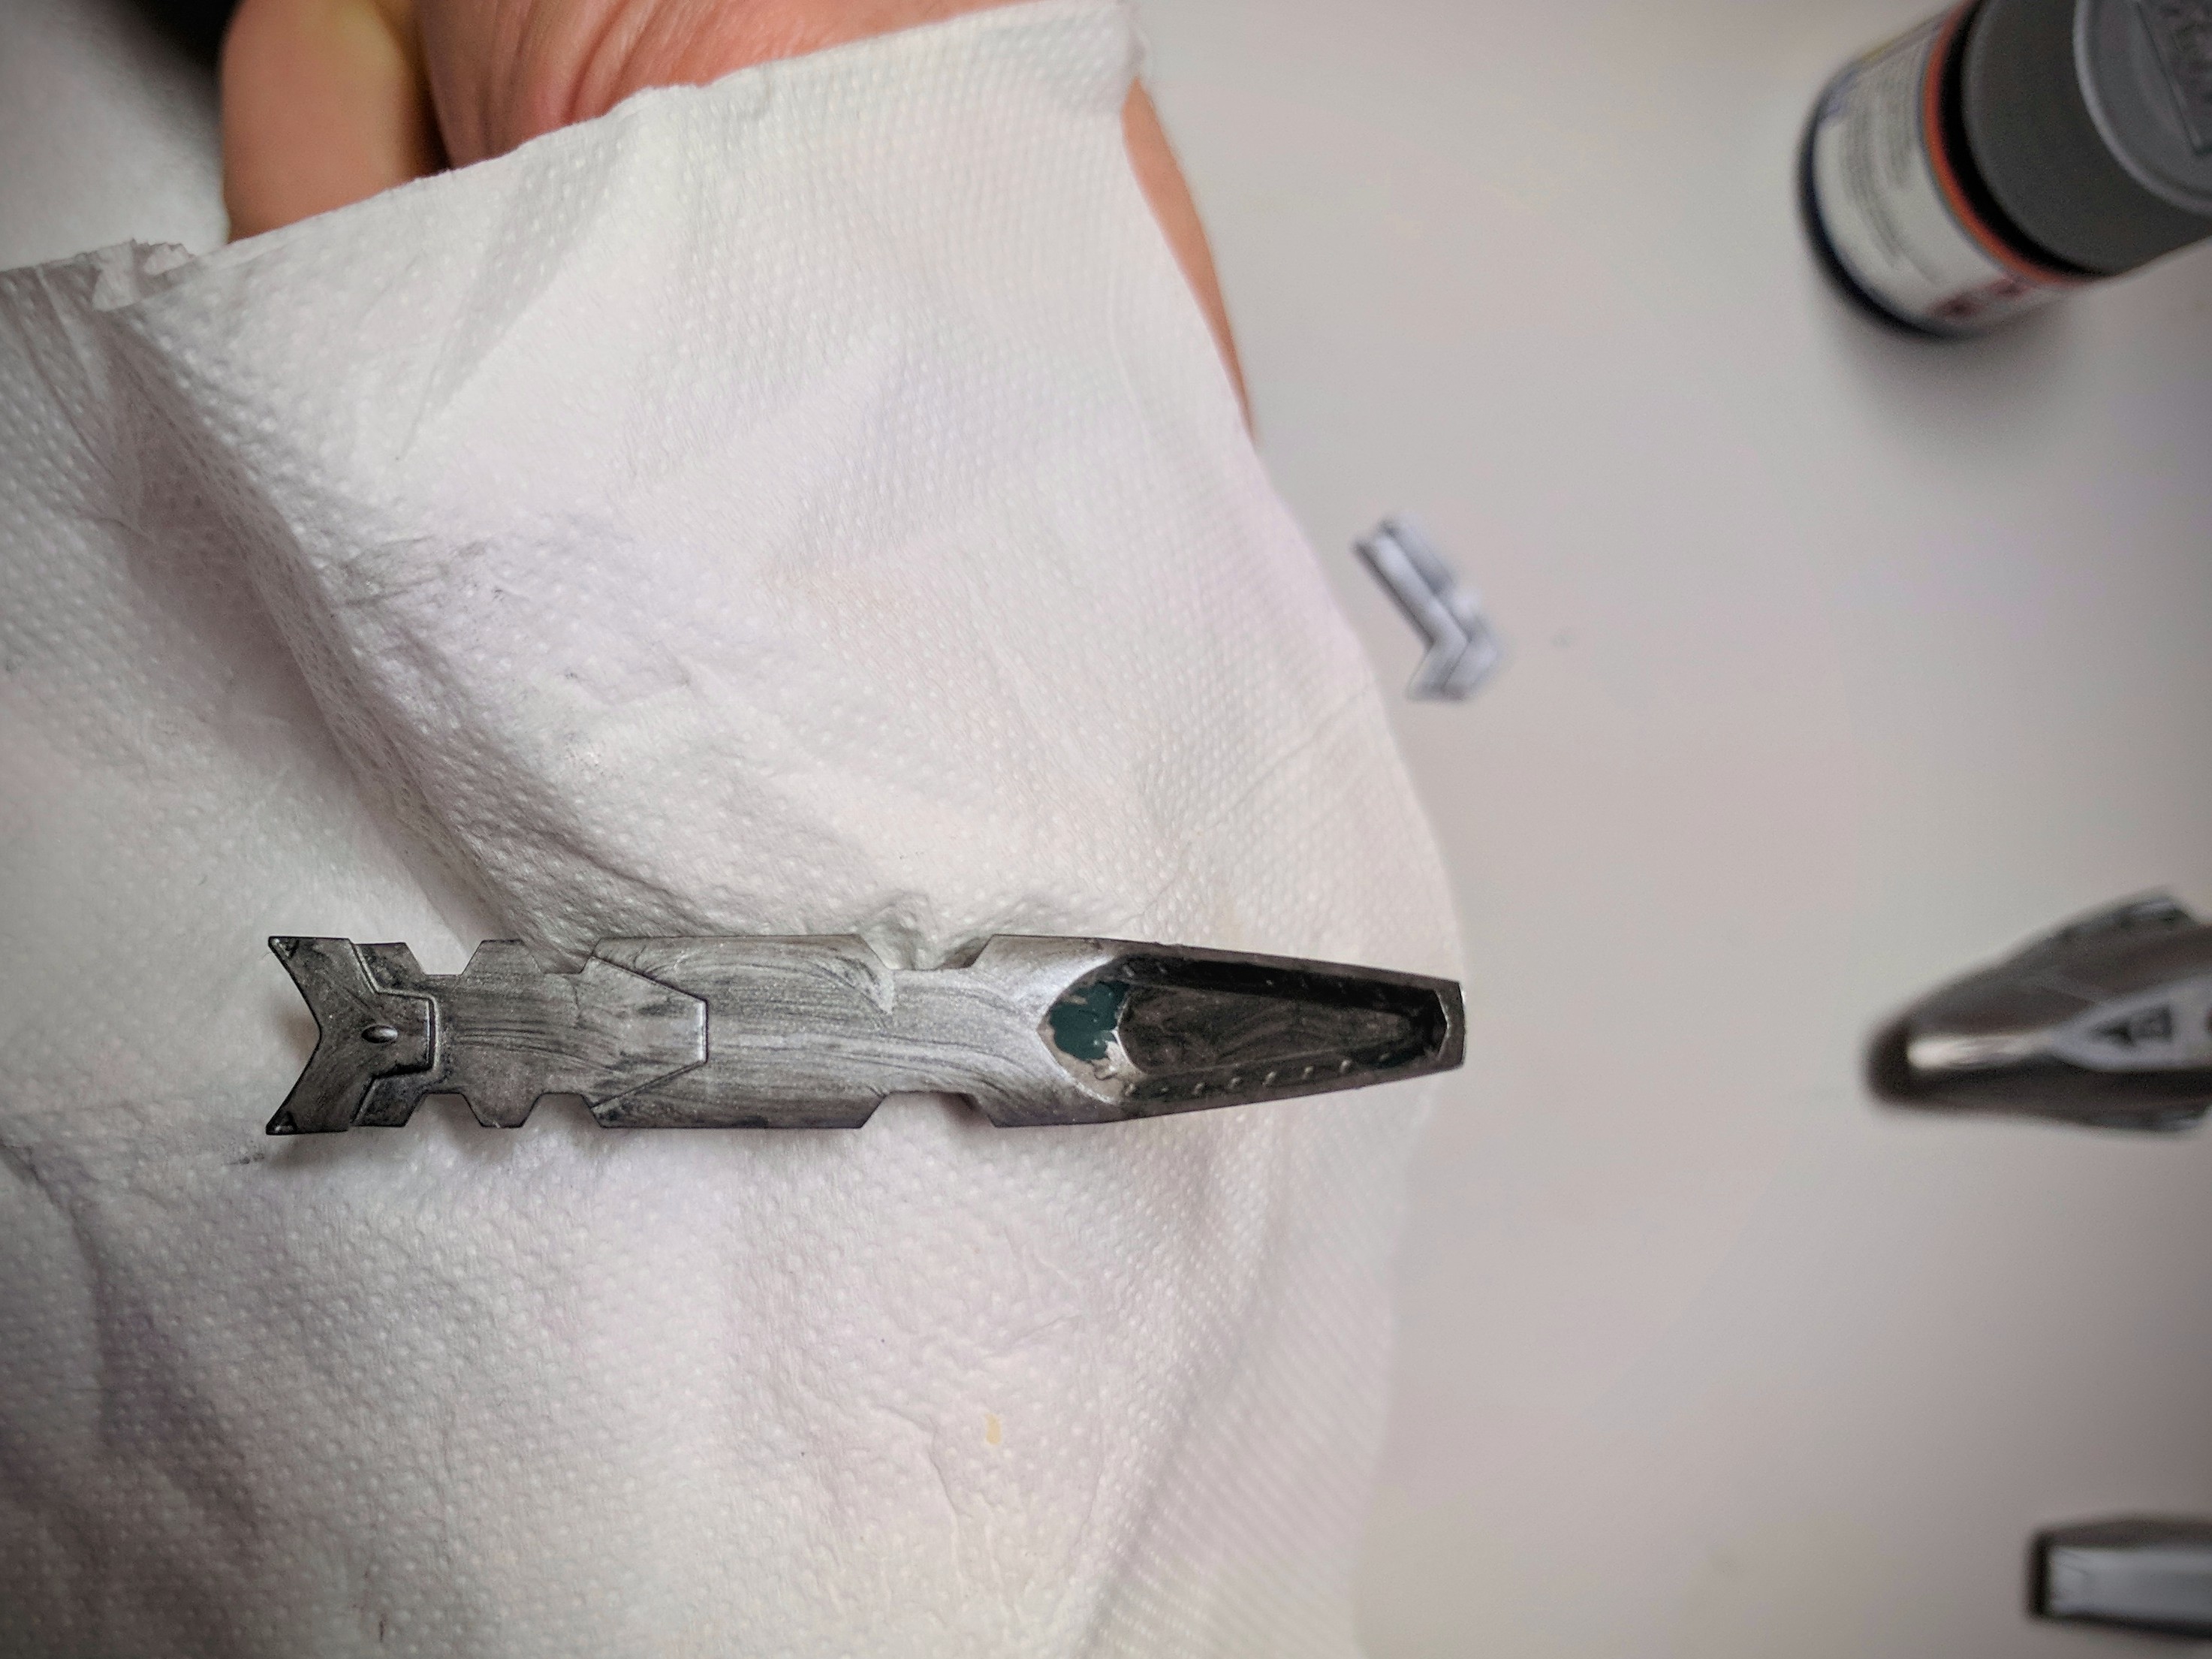
Strange colour bands notwithstanding, I thought I'd illustrate with some pictures, what it is I'm trying to achieve, and a little bit of the process. First, I try to get a good match for the parts in the same way they came out of the factory. The decals are designed to match the plastic as well so it's a good place to start. Here's my typical approach in painting up some areas of the sprue that I don't care about. The silver and green sprues get the same treatment. Stainless and Chrome silver. The 18 on the silver sprue is stainless and the 17 is Chrome Silver. Left for Chrome and right for Stainless on the green one. Once I'm happy with the match (in this case, Stainless was "close enough") I paint a part. The right is painted, the left is straight off the sprue. I'm going for two things here: a more realistic metal sheen, and an attempt to hide the swirl lines that come from the injection process of making the parts. Same with the vents. You can see the swirl marks still but they're much less obvious. Here's how it goes on, strangely enough. I start with a slightly "wet" brushload of metal paint and apply it quickly. The brush strokes are pretty obvious here. But after rubbing the surface with the paintbrush in a "dry brushing" action, it evens out and looks much nicer. It's not uncalled for to need more than one coat but sometimes I get lucky. I'm undecided about whether I'll apply any decals to this "shin" insert. I may be able to paint the dark grey and red highlights, given their relative simplicity (just a line on the flat parts and a red ring inside the depression.