

MacrossJunkie
-
Posts
3255 -
Joined
-
Last visited
Content Type
Profiles
Forums
Events
Gallery
Everything posted by MacrossJunkie
-
The fighter mode stand adapter is also complete garbage. Not only is it very tenuous while on a stand due to it being so far off from center of gravity and being very back heavy, the adapter piece also scratched off some yellow on the crotch piece from my 19S.
-

Pilot name stickers - Maybe we can do some sort of custom sheet?
MacrossJunkie replied to Scream Man's topic in Toys
And that right there is the issue. Even if you didn't need an opaque white font, many decals are only really usable on non-light colored/non-white backgrounds if they have a white underlayer as well or else the color of the paint or plastic underneath shows right through and changes the color of the decal or just makes it hard to see. And since the pilot names often go on the black border of the canopy, not being able to print white is a deal breaker. -
Pilot name stickers - Maybe we can do some sort of custom sheet?
MacrossJunkie replied to Scream Man's topic in Toys
I think that would be a great idea. I've had to leave some blank like the VF-11C and VF-4 because they didn't have any non main character names. Even some oft used generic ones, like Lt. Warmaker, would be fine. -
I don't think you have enough Rei Ayanami's.
-
I've had pretty decent results using Polly S Easy Lift Off, like this. I got some from a hobby store some years back to remove some tampo printed color from a 1/48 VF-1. I tried soaking stuff in windex before that and it did absolutely squat.
-
You are truly a patient man. I would probably accidentally keep rubbing it off in different places while I tried to panel line the entire thing with the pro modelers wash due to the shallow panel lines. I bet there was a lot of going back and redoing areas that you had done before in those 6 hours. I couldn't even get my usual combo of thinner + enamel to do the capillary effect on these lines, much less the pro modelers. Initial testing with oil paint + turpenoid was pretty good as it flowed right through the lines so I'm definitely going with that option.
-
Do share when you get that done. I'd like to see. I've found it a pain to use it when the panel lines are really shallow. I got mine all stickered up and put a gloss coat on it. I was planning to do an oil wash on my VF-4 and SDF-1 today, but the black oil paint I ordered hasn't arrived. So much for Amazon Prime 2 day shipping Nice. You did a pretty good job modding the head so far. From the line art, it seems like the head laser is near identical in shape to the YF-21's.
-
The all gray color scheme looks very good. Did you get the skull emblem from the VF-25 model?
-
So just how hard is it to transform the 171 with the gun and missile pod attached to the arms? Do they get in the way a lot?
-
Yamato 1:3000 SDF-1 Macross - unpainted model kit
MacrossJunkie replied to CF18's topic in The Workshop!
Just one for the panels. Then there was a separate small one for the small red markings and then there was the decal sheet that came with the kit. -
Yamato 1:3000 SDF-1 Macross - unpainted model kit
MacrossJunkie replied to CF18's topic in The Workshop!
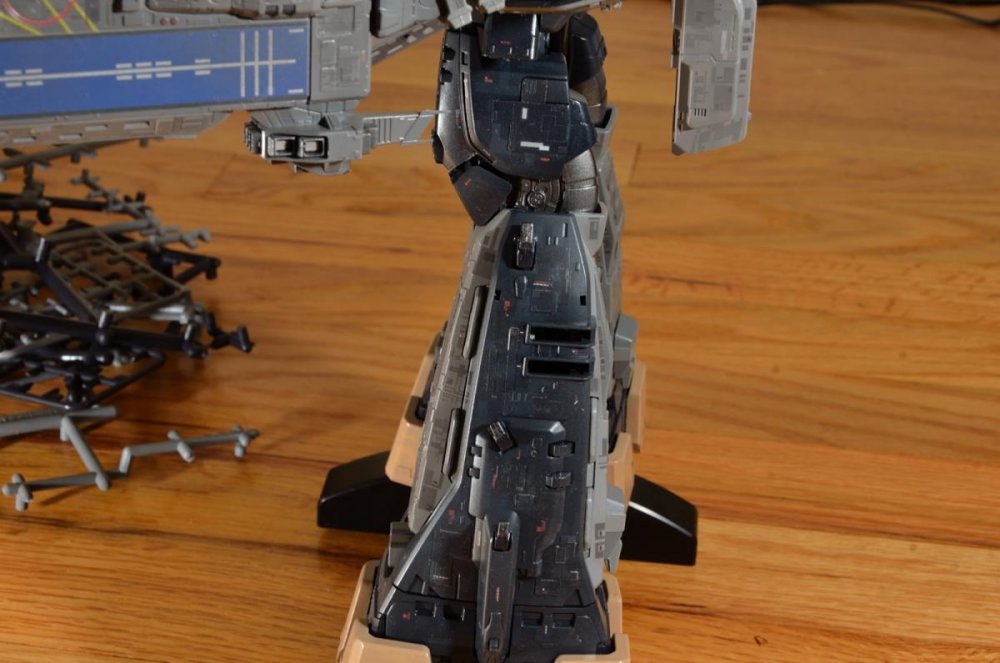
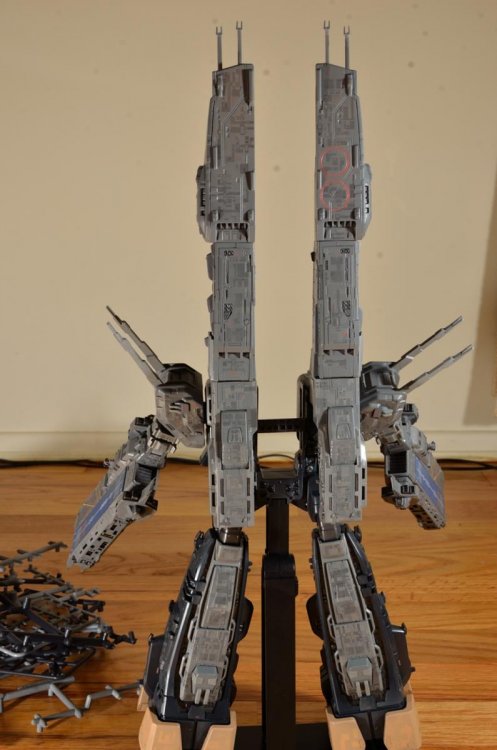
Thanks Benson. I'm nearly there. I snap fitted all the pieces together to make sure there weren't any more surprises as I close in on the finish line. Everything seems to be acceptable at this point. The right arm's articulation seems a little jerky as it get caught on a piece that the left side does, despite it being put together the same way. I even disassembled it and reassembled several times and tried to figure out why it was doing that. No luck. I can live with it though. I added the little PE parts to the ARMDs and tips of the main cannons, however I think I'm not cut out for having those things there because I'm such a klutz. I keep knocking those things off even though I super glued them on. It's just that the super glue doesn't seem to adhere to the photo-etch metal very well. Here are some pics of the main body. I'm letting the center torso area dry at the moment after putting another clear coat on. After this, I need to do a wash, but I have to wait until my black oil paint arrives. The burnt umber I have is too brown and wasn't as dark as I was expecting it to be. I also need to paint the bridge and detail it. Then I plan on clear coating and adding the glow in the dark stickers all over. Finally a flat coat, then add in the finishing details like painting the lights and such. I also plan on painting the alternate destroyed main cannon parts. So I can swap as desired.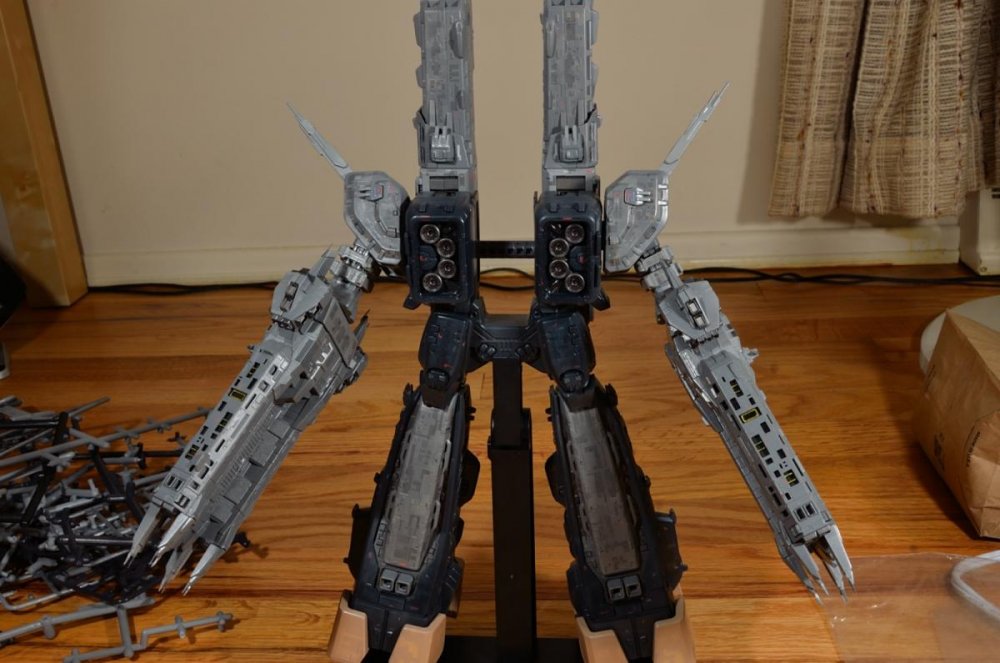

-
1/48+fp's, 1/60+fp's, 1/72, 1/2k, 1/3k,1/100 and now 1/144
MacrossJunkie replied to VF-18S Hornet's topic in Toys
Yeah, I was speaking of the DYRL versions also. The one I have just looks like it has a greenish tint to them, but not as much as the 1/48 versions. Maybe it's just the lighting in this room. -
Mine has been sitting outside my door all day and I didn't even know. I checked tracking today and it said delivered. I was like, wait... what?! Opened my front door and there it was. I guess the postman didn't care about the proof of delivery signature this time. Overall I'm pretty pleased with it. There's just one thing that bothers me besides the missiles falling off with any provocation. Are the arms not supposed to lock in place on the slider? Mine just slide back and forth and flop around on the slider from the elbow area. I thought if I pulled it out far enough that it would click and lock like the VF-19's forearms. That didn't happen. All I managed to do was pull the forearm clean off. I just can't find any way to get the forearm to lock in place and it's really annoying me.
-
1/48+fp's, 1/60+fp's, 1/72, 1/2k, 1/3k,1/100 and now 1/144
MacrossJunkie replied to VF-18S Hornet's topic in Toys
I've always thought they should have been a bit more on the bluish side rather than greenish for both the 1/48 and 1/60 versions. -
Yamato 1/60 VF-17 Nightmare Diamond Force (Thread no.2)
MacrossJunkie replied to IXTL's topic in Toys
With the flash, it also looks like the cherry on top is lit up like Rudolph's nose -
Yamato 1/60 VF-17 Nightmare Diamond Force (Thread no.2)
MacrossJunkie replied to IXTL's topic in Toys
Come on people. Let's see some pics of the 17D already -
Yamato 1:3000 SDF-1 Macross - unpainted model kit
MacrossJunkie replied to CF18's topic in The Workshop!
Has anyone else who built this had issues with the various mechanisms on this thing? This has been a lot more work than I thought. Somehow it just doesn't fit together well or something. I've been having to sand, file, glue and carve away plastic just to get things to fit or work. Often times I've had to disassemble entire sections again because a joint was too stuck or too loose. Some holes have been too big for the screw and so were useless. Particularly when it came to putting screws into the diecast areas. Oh well. If I don't run into more issues, I might be able to finish this up soon. I'll take some progress pics soon. Just venting because this has been frustrating for me which came as a surprise since the toy version had none of these issues and I doubt they had the factory workers filing/sanding pieces just to get them to fit or move. -
It also happens with the gunpod for the VF-11C. No amount of fiddling with arm positioning allows the the gunpod to be parallel. It just veers way off to the side. Doesn't with the 11B's gunpod because it attaches at two points which helps to keep it straight.
-
Man, I hope I get mine soon. These pics are killing me. I keep going back and forth on if I should paint it to be like the FB 2012 version or not.
-
That's a little disappointing to hear about the loose thigh armor. At least it still looks pretty good. I can't wait to get mine.
-
Finally, I feel vindicated after I and some others saw the Kai face molded in the visor and got mocked for it and told they were just the cameras. Thanks, Eugimon.
-
Yamato 1:3000 SDF-1 Macross - unpainted model kit
MacrossJunkie replied to CF18's topic in The Workshop!
A quick update here. I modified the base plate and did the wiring for the LEDs and affixed them in place with some quake putty. I felt that was the best option. In case an LED burned out, I could just pull it out of the hole and replace it with another. So here's how it looks now with all the LEDs in place and powered up. I haven't put the engine nozzles on yet, but you can get a pretty good idea how it will look now. Between this and the glow-in-the-dark stickers I'll put on at the end, this thing should look pretty nice in the dark as well.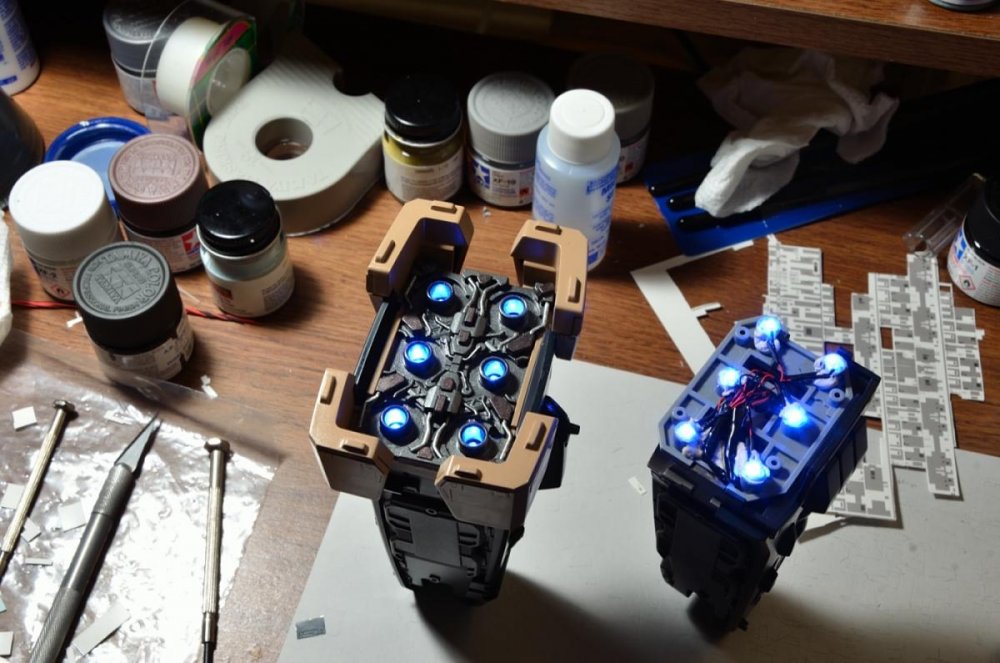

-
I try to do pre-orders also, but in the case of December 2012, I think Yamato is the one shooting itself in the foot. With the release of the very expensive VF-4, VF-19P, VF-17D, and VF-17 super packs all in the same month, I bet more than a few people had to pick and choose what they wanted most and decide to get the other ones later down the road. That's just too much all at once and that's not even counting having to buy gifts for other people as well.
-
Argh. I kept putting that 19F in my cart and then stopping myself from going through with the purchase last night and several times yesterday morning. With the super expensive VF-4, 171 armor pack, and buying gifts for people, I had to tell myself it wasn't a good idea. I am also tempted to get one of the unassembled VF-1 kits because I want to make a "Macross The First" paint schemed valk.
-
I've used the Tamiya lacquer based clear coat sprays on plastic and acrylic paint before and haven't had any problems with them melting or eating through the paint. Now I'm not saying you won't, just that I've never had a problem with it before I switched to using Future for my clear coats. I heard you can use the pastels with plain water mixed with dishwashing detergent if you want to try to avoid fumes from thinner and window cleaner. Never tried it so YMMV. You could try the oil wash thing as well. What I got was Martin/ F. Weber Odorless Turpenoid and Burnt Umber oil paint (Amazon links for illustrative purposes). After doing some research, this brand of turpenoid seems to be safe for model use where some other brands might mess up a Future clear coat or paint finish. From what I've seen in youtube videos and from articles talking about how to use oil washes, it seems to be very forgiving and easy to clean up.


