
Chas
-
Posts
778 -
Joined
-
Last visited
Content Type
Profiles
Forums
Events
Gallery
Everything posted by Chas
-
Yeah, the standard is what I use. It works well.
-
Yep that should work fine.
-
I've cast the hands and individual face parts from various Gundam kits and lots of small pieces from all sorts of other stuff that ad broken off, never really had an issue with air bubbles. I just pack the putty in real tight. Ohh, and DRex I just use miliput as it's cheap and available where I am. No need for anything super special here. Here is a tutorial (where I first learned how to do this) from a Malasian modelling forum PLAMO. All props to the original author http://plamo.outthere.info/forum/showthread.php?tid=38
-
Do yourself a favour and Google 'recasting with epoxy putty'. For a small part like that it is the way I would go - quick, easy, no exotic ($$) material needed, easy to do over and over again, and results are quite usable.
-
OOOOO yes! Appleseed! that would be pretty awesome indeed! OH! OH! What scale are theYamato mecha-collection kits?!
-
https://hlj.com/product/NTK06032/Rsc Cool Macross/Evangelion crossover dio potential? If they made an Eangelion New Tokyo I wonder there is a chance for an actual Macross City version.
-
Just saw these over at HLJ and thought, "Hmmmm 1:2500 maybe it could work in a 1:3000 Macross dio. as a stand in for Mcross city, or possibly even inside the Macross". Just thought yo folks may be interested. https://hlj.com/scripts/hljlist?GenreCode2=all&Word=Geo+Craper&x=11&y=21
-
Chimaera definitely works, given how it's appearance would occur in the Macross universe - What with the very obvious Glaug/Destroid origin for te mech. if you go with Ragnarök though, please be sure to include the umlaut. Changes rock to rook.
-
If you look carefully in that first video link (By DorobouHige) at the 1:11 mark you can see that he is using what looks to be a 60rpm motor. thought you might want to take that into account before you start testing with 150 rpm.
-
In case you need some more inspiration: http://www.modelers-g.jp/modules/myalbum/photo.php?lid=33309
-
Blue: http://www.modelers-g.jp/modules/myalbum/photo.php?lid=19182 White: http://www.modelers-g.jp/modules/myalbum/photo.php?lid=6311 Weathered Grey (metal): http://www.modelers-g.jp/modules/myalbum/photo.php?lid=20902 Just some ideas. EDIT: RED! (with White and Metallic accents.): http://www.modelers-g.jp/modules/myalbum/photo.php?lid=30158
-
Scroll down to the very bottom of the page, on the left you will see the word 'Themes" left click on it and select 'White/Blue'. BAM! lights are back on.
-
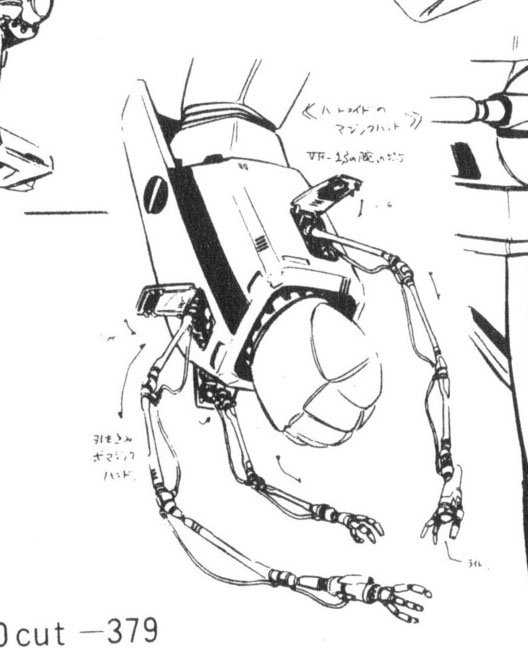
To be honest. I think this is the best solution. Given the pics posted earlier of the bottom/back of the VF-1 a hook placed here is in pretty much the perfect place. There could always be a secondary hook that gets deployed from one of the arms in case the gunpod goes missing. Also remember when Roy is detaching the cockpit from Hikaru's VF-1D? In the sloped part at the front of the arms there are those 3 little robotic manipulators that come out. Maybe something could be done using one of those? I mean they are right there in fighter mode. EDIT: found an image from Perfect Memory
-
No worries mate those pics are quite helpful indeed. Thanks a bunch!
-
That clip makes me want to wretch! There is really nothing of the MacGyver character we know. As presented in the clip this new MacGyver is a cock-sure, smarmy, smug little know it all wunderkind. They got it all wrong. When Mac was doing his thing RDA always played it with a certain amount of trepidation, hesitation, and not being quite sure if it was all gonna work out (sure we all KNEW it would, but it was important for the character to be a little unsure of himself) . In that clip it all seems way too easy, and they all seem way to sure of themselves. There is no sense of risk, of danger. Just a bunch of hot shots showing off. Nothing I'd want to watch.
-
What the hell?!?!? That's HUGE! Where on Earth did you get that! I was really looking forward to this though
-
I was thinking that building a new bar for the hip would not be all that difficult using the kit parts and maybe a piece of the runners. Wouldn't need to resort to 3 d printing for what looks to be a pretty straight forward scratch job.
-
That is some top notch work! Great colour choices and nice subtle panel work.
-
From what I recall Fight! Iczer One is a 3 part OAV from 1985(?) As far as I know there have been 2 sequel OAV's 1990(ish?) Adventue! Iczer 3 1995(ish?) Iczer Girl Iczelion Haven't seen the sequels, but I thoroughly enjoyed the original When I finally saw it. Back in the mid eighties I bought an art book (this one: http://thumbs.ebaystatic.com/images/g/YVYAAOxyOMdS8KSw/s-l225.jpg) which is all I knew of the Anime for years- And I don't read Japanese. So all I had was 'film comic' images to piece together the story. Over the many years that I had the book before I managed to actually see the film I had pretty much managed to put together a very basic idea of what happens, but seeing it finally answered SOOO many questions for me. Pretty good story and a nice mix of Horror, Yuri, and Mecha Anime genres to boot!
-
First 4 pics in this composite image: http://hobbycom.jp/system/photo_sub_images/images/000/000/017/287/M_image.jpg?1376114670 Looks like he did some casting. And those are really great builds, but I still prefer the sculpt of the Hasegawa static mode kits.
-
That's some awesome work right there! I'd love to see more on this build Where is your build thread? Very interested in where how you spliced the legs and what you used/how you went about re-sculpting the skirt. more pics please!
-
For good gloss coats you may need to switch to an airbrush with a larger tip size. (likely a small spray-gun). Check these great videos out for more info.
-
I think that should read " The GIRLwalk mode is so cute.
-
spray booth? howd I make this cheeper & Better PART 2
Chas replied to ARK 3's topic in The Workshop!
Using a downdraft set-up could pull more dust and such from the air in the room over your painting surface. One thing I've often thought about doing is building a spray-booth with a lid on the front section that completely encloses the spray area. The key is that front lid would be made out of plexi and have two holes cut into with gloves attached on the inside of the booth to manipulate objects. Basically a modified sand-blasting booth. http://www.northerntool.com/images/product/2000x2000/155/155655_2000x2000.jpg Downdraft wouldn't be such a problem in that design. -
Apparently the Autodesk designed app if free to download and use and is available now. And the files work on any platform.
