

PsYcHoDyNaMiX
-
Posts
1352 -
Joined
-
Last visited
Content Type
Profiles
Forums
Events
Gallery
Everything posted by PsYcHoDyNaMiX
-
A Little Teaser of a Conversion Kit...
PsYcHoDyNaMiX replied to PsYcHoDyNaMiX's topic in The Workshop!
Bump... Recent listing for additional finished conversion kits: https://ebay.us/m/I9H0nG Through MWF and via PayPal, the asking price for a pre-built kit for MWF members is $110 (before G&S, shipping fees, etc.). -
Ahh yea i definitely see the resemblance now with the MRS, RG and OA now... Yea the tariffs blow... The MB Zeta's head is a tad/bit oversized...
-
The Tornado Hobby head looks nice on the MB HiNu body (they did go a bit heavy handed with the panel lining in contrast to the MB body). The Zero Plan head looks nice in its own way too, but looking at the pic where its mounted on a body I realized it (the head) looked off and then also realized the body wasn't the MB HiNu body, but probably a different 3rd party kit body (I think the Tiger or the Yujioland Hi-Nu).
-
The 24 hour is a decent/nice version on the original artwork (pictured), but it still missed a few key spots if it was meant to reference that OA image. In reference to the OA image (pictured) the point of the visor over the eyes (front of the helm) has a curve or angle that starts earlier in front of the eyes and not right over/above the middle of the eyes, then the line (with a slight downward curve(?)) continues to meet behind the eyes with the bottom part. Also with the top rear part of the sensor casing for the helm... the OA has a slight/subtle curve whereas the 24 hour version is just a straight flat line. The eyes on the 24hr are fairly large in comparison to the OA. The front cover for the V-fin is block on that OA, but it doesn't have that peak and flat spot that's designed on the 24 hr (the OA is appears to just be flat across with no change). I'm sure whoever modeled up the 24 hr version used other artwork references of the Hi-Nu than this OA. I know it's not meant to be an exact version of the reference OA, but it's still a nice take/addon for the MB Hi-Nu
-
Excellent work! It looks awesome!
-
FYI, hopefully no cause for alarm... the black ring which holds/swivels the right belly plate on my YF-21 had (oddly) split. While I had transformed it number of times in the last year (for my project), I was never rough when handling it. When I transformed it today (I used Jenius'/Scorched Earth video guide as a reference), noticed it was a bit loose and saw the split. IIRC said part previously was not/never overly stiff, just about the same tension/smoothness as the left side. Mine was in fighter mode on the display mount/base for the past two (plus) months. The black disc on the right side (now) has a little bit of wiggle room, maybe 1mm or less. I can only speculate possible twisting forces from the transforming process caused it to split. The split is nearly the opposite side of the bay door mounting arm. I just hope it's not another VF-171 CF disintegrating black part/plastic issue. Looking at the DX YF-21 I do not see any other black plastic parts which may be under any kind of mechanical forces other than those bay doors swivel mounts (other black parts are either painted blue parts or cosmetic black plastic which experience no mechanical forces). Aside from the black plastic used for the base, display brackets, and battroid brackets. I had purchased this one from HLJ's PO upon release 6/2024, stored it in HLJ's PW, shipped it (small packet shipped with other items) and opened it for inspection August of 2024, put it back in the box until maybe Feb 2025 and started my project March 2025.

-
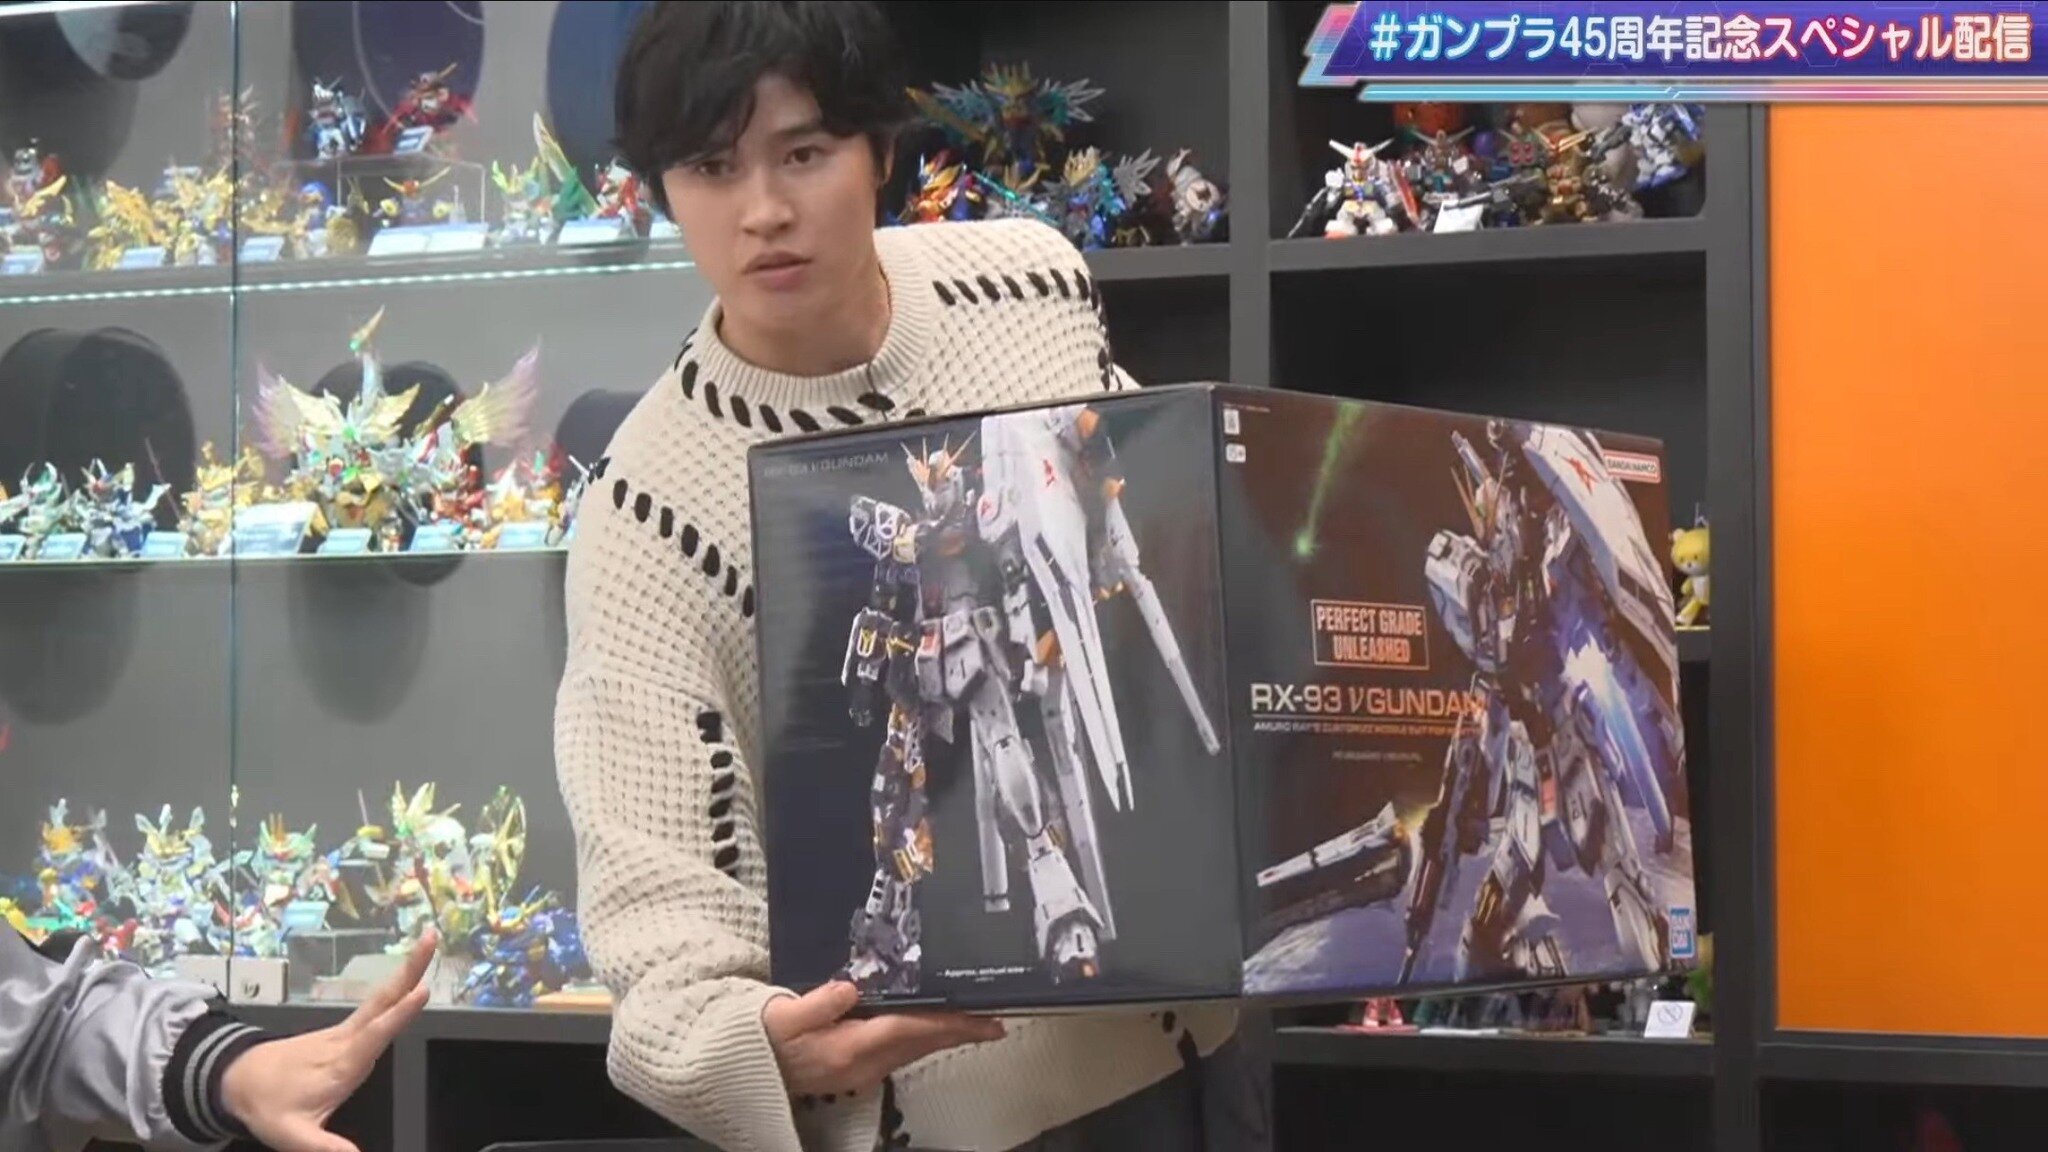
IG post of artwork for PGU Nu... https://www.instagram.com/p/DRMnA6SDUFS/?utm_source=ig_web_copy_link&igsh=MzRlODBiNWFlZA== BandaiHobby did a livestream of it and the box is huge: ... also showcasing issues with standing up on its own. https://www.facebook.com/share/v/1D6HD4BZoS/
-
From the MB Society fb group: https://www.facebook.com/groups/1624242381158259/permalink/4093998294182643/# In the last (group) photo, all are marked 'Display Only' where the Wing Gundam has the TN 'For Sale' plaque.
-
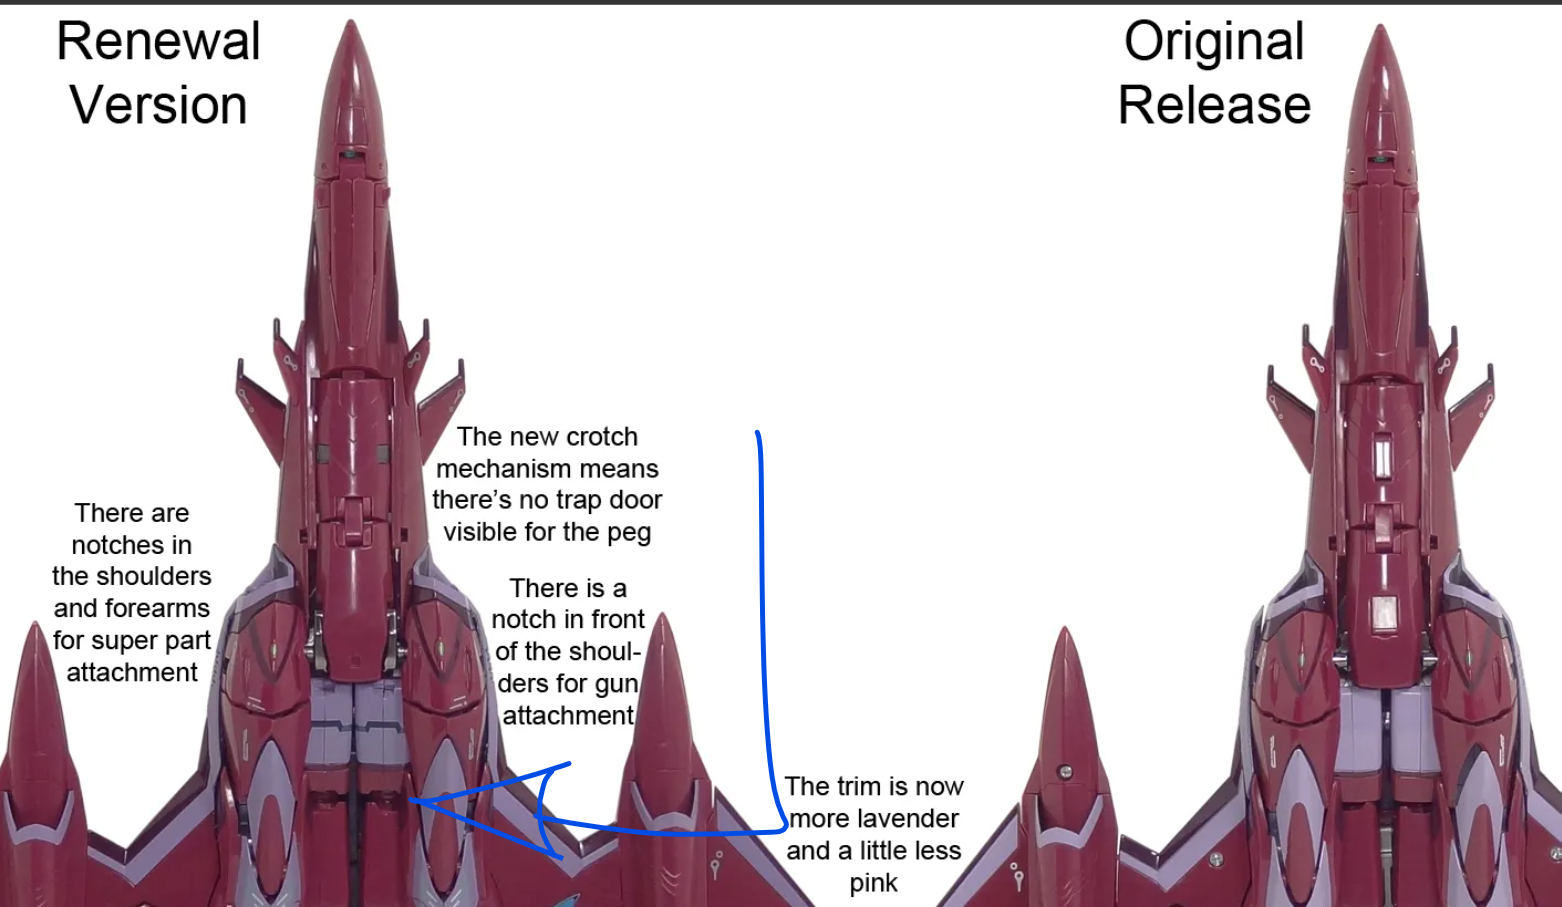
The ports/holes onto of the DX's shoulders look like they would line up with the sounder booster. EDIT: Interesting... it looks like the holes would line up where the HG kit has the sound boosters on the shoulders but the Hi-Metal it looks like it might not use them. I don't own either of those versions could anyone confirm how the sound booster is mounted for either (or both) of those? HG: HiMetal:

-
Medicom/Hot Toys and all 1/6 scale figures
PsYcHoDyNaMiX replied to EXO's topic in Anime or Science Fiction
DV Mustafar AE looks nice... limited to 4k, comments on fb groups were stating this is based more on the ROTS movie version while the Japan SWCelebration version was more like the Asoka series version based on the color of the eyes... 🧐 I think I only watched the Asoka series 1x and will have to rewatch it. Anyhow... the eyes are swappable on both versions of the AE. Also swappable on the regular version, yet which is the only version that comes with blue and 'sith' eyes. -
Probably, but I'm thinking Bandai was looking for a product for regular retail release not a lottery/premium bandai release. Bandai would also need to figure out what to do or re-design the entire undersection with the belly plates as the VF22's design/line art would've be broken up with the current transforming sections for the YF21. Or do something else/simple like the conversion project I did and just make VF22S belly plates. Yea, not sure how Bandai would even attempt the internal gunpod mounting for the VF22S. But being Bandai, they'll just slap/leave them on the bottom just where the YF21 has it currently and if we're lucky Bandai will make some small adjustments so they don't droop. Enough off topic talk from me, lol.
-
Unfortunately it cannot be determined just by looking at the underside. It would need to be transformed into armless gerwalk mode (legs down) to reveal the sides of the shoulders at the very least.
-
I'm wondering if Japanese local stores still have it available (PO sales reflecting demand). (I'm aware the following ship internationally*) I checked Hobbysearch and the PO is sold out (while the VF19K is available), hlj still has the VF17S available, so does AmiAmi.
-
I don't keep up with Metal Robot Spirits, but the MRS Z Plus A1 (Test Image Color) got listed on PBUS: https://p-bandai.com/us/item/F2842380001 EDIT: Okay, I see that they've (PBUS) listed the A1/A2 (C1/C2 Compatible Ver.) in the past: https://p-bandai.com/us/item/F2743613001 As well as the Z Gundam III version: https://p-bandai.com/us/item/F2631686001

-
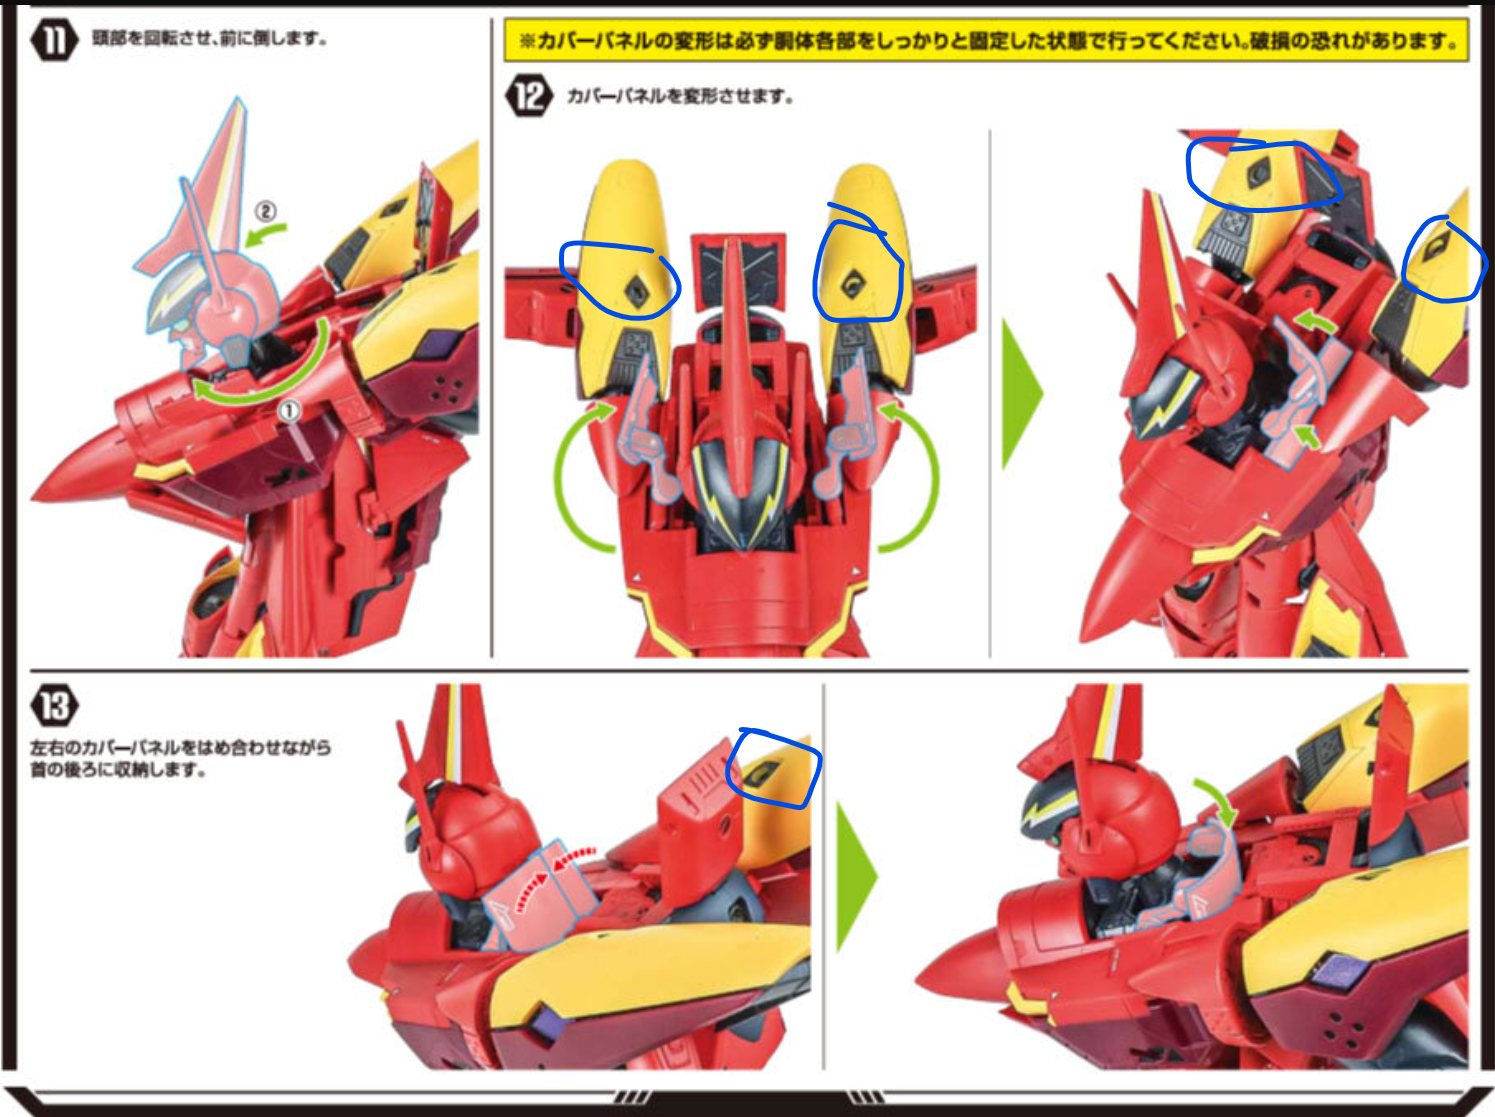
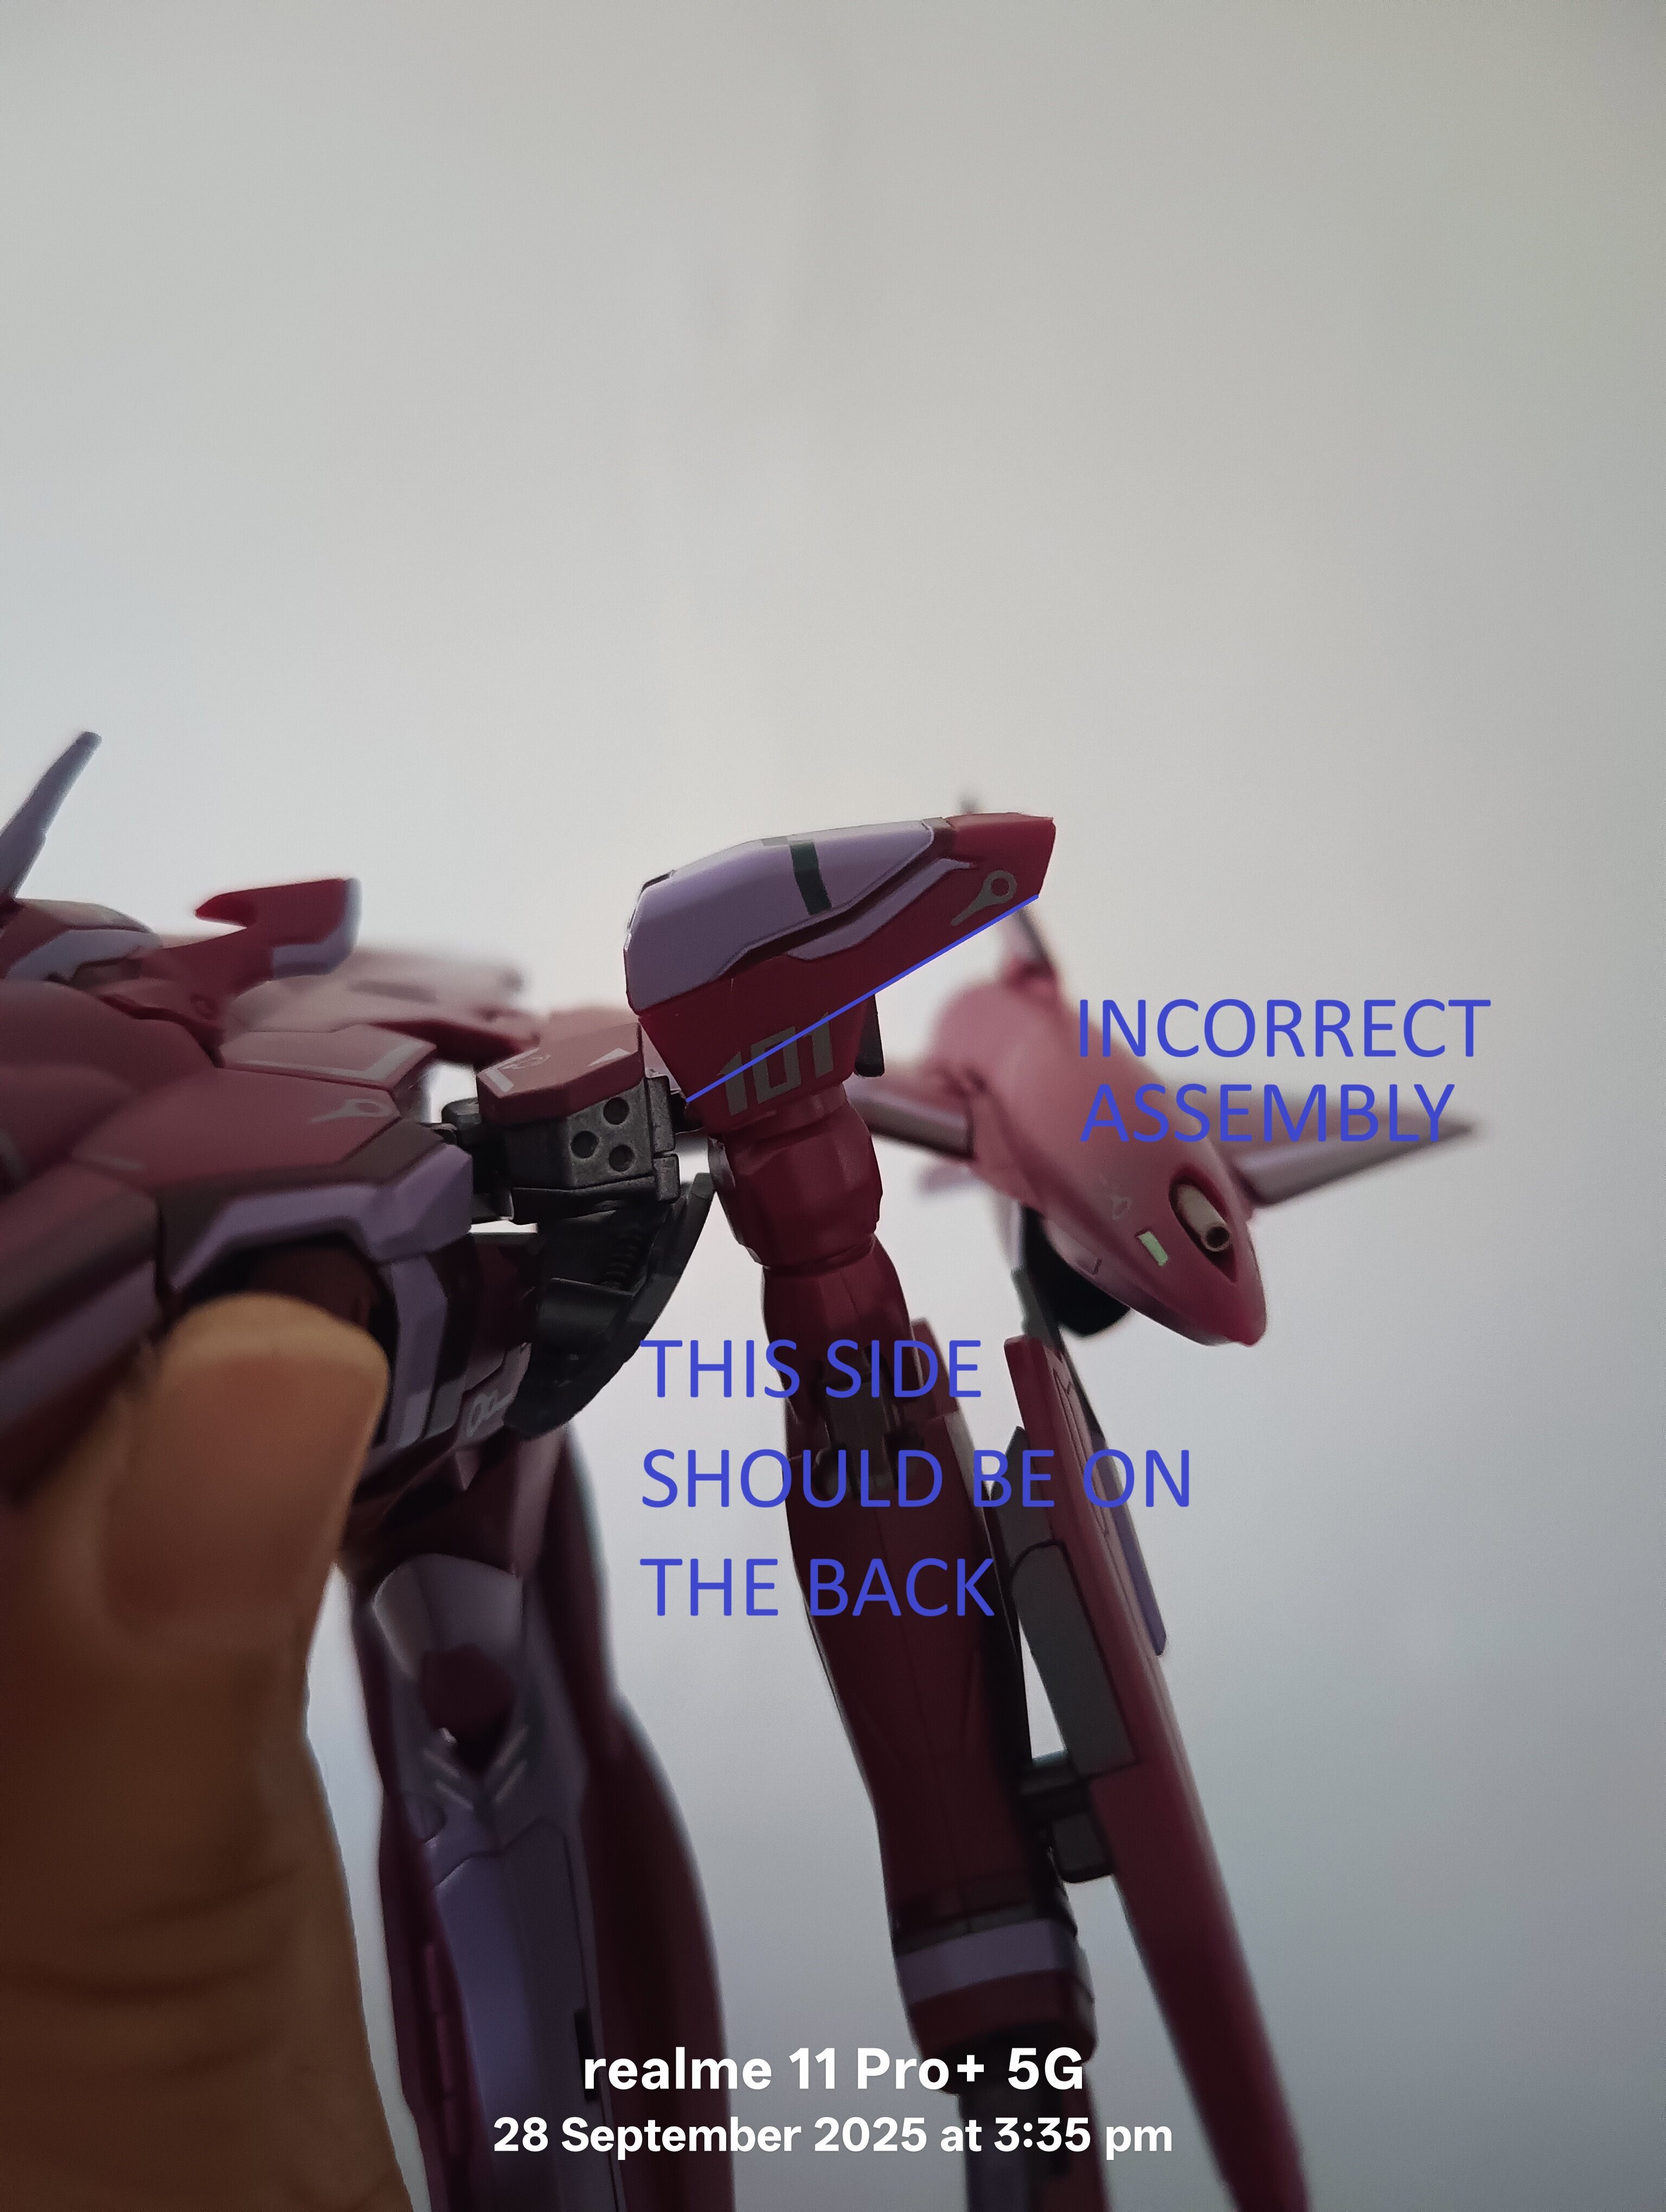
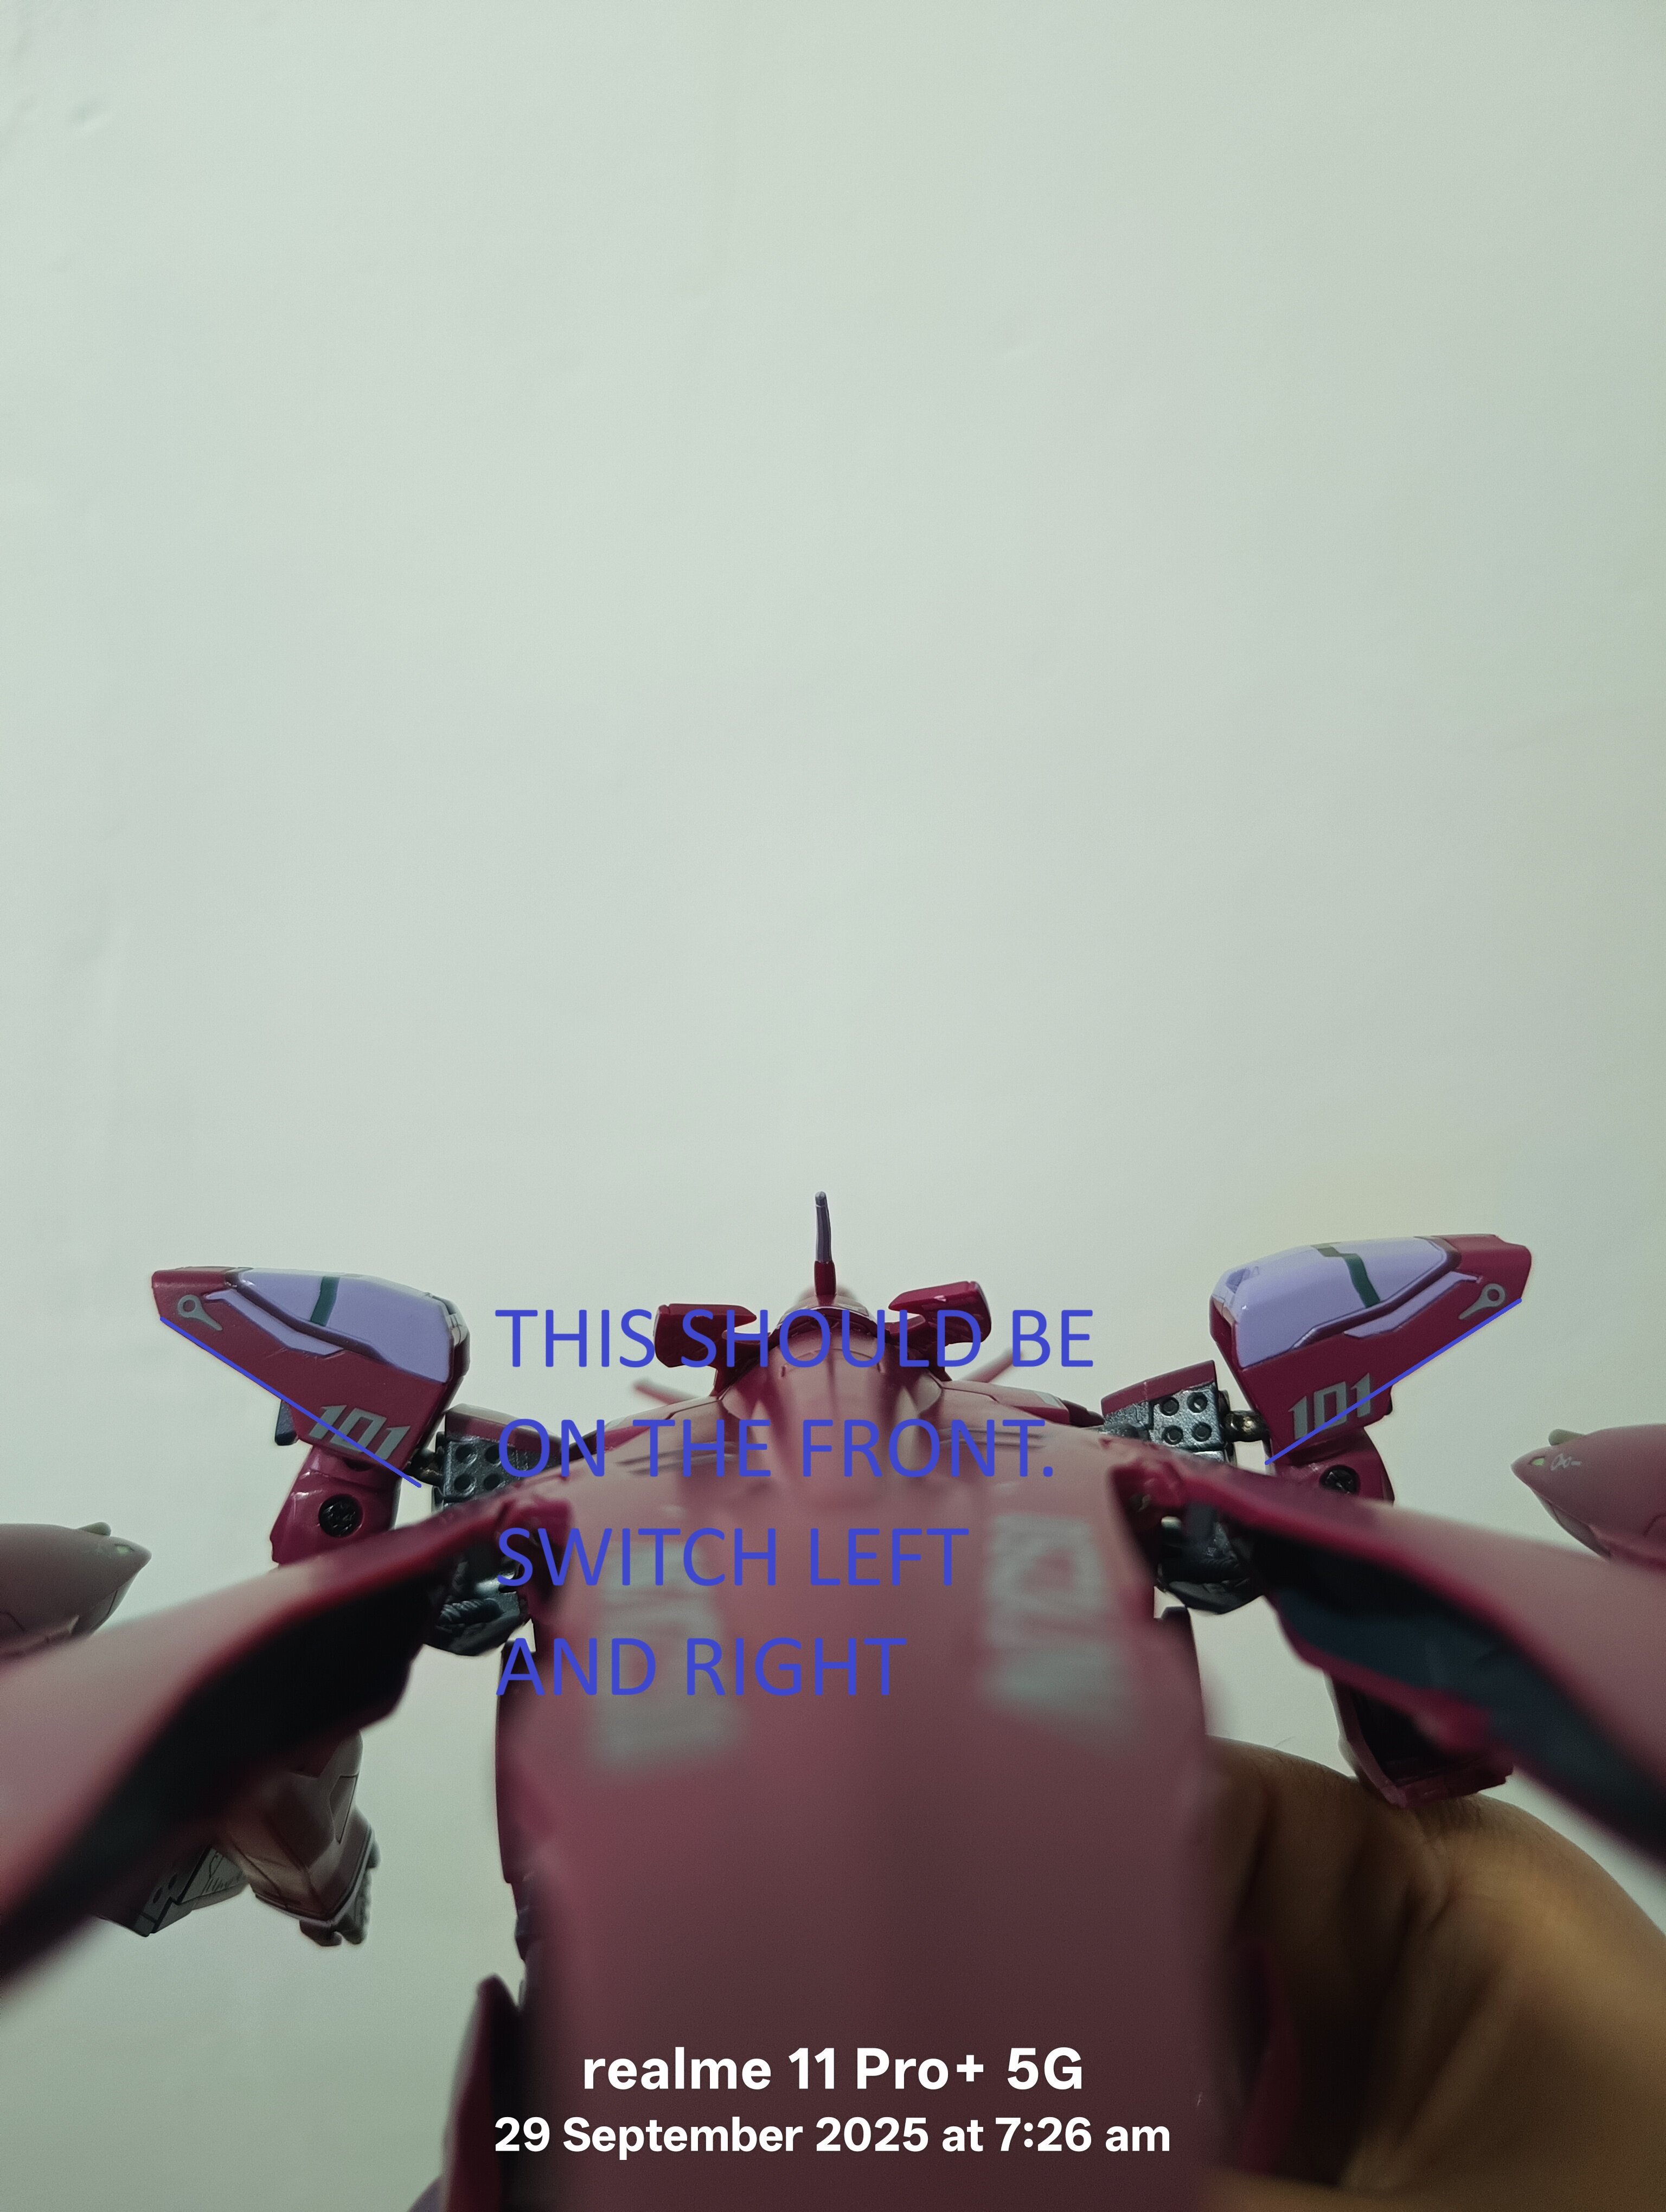
Yea... I was only able to determine the sections/spacing were different from Bandai's picture at first (even with the translations) and was not sure of the exact issue otherwise, until @PointBlankSniper elaborated on the issue (that parts needed to be switched (L to R).
-
NICE swag!
-
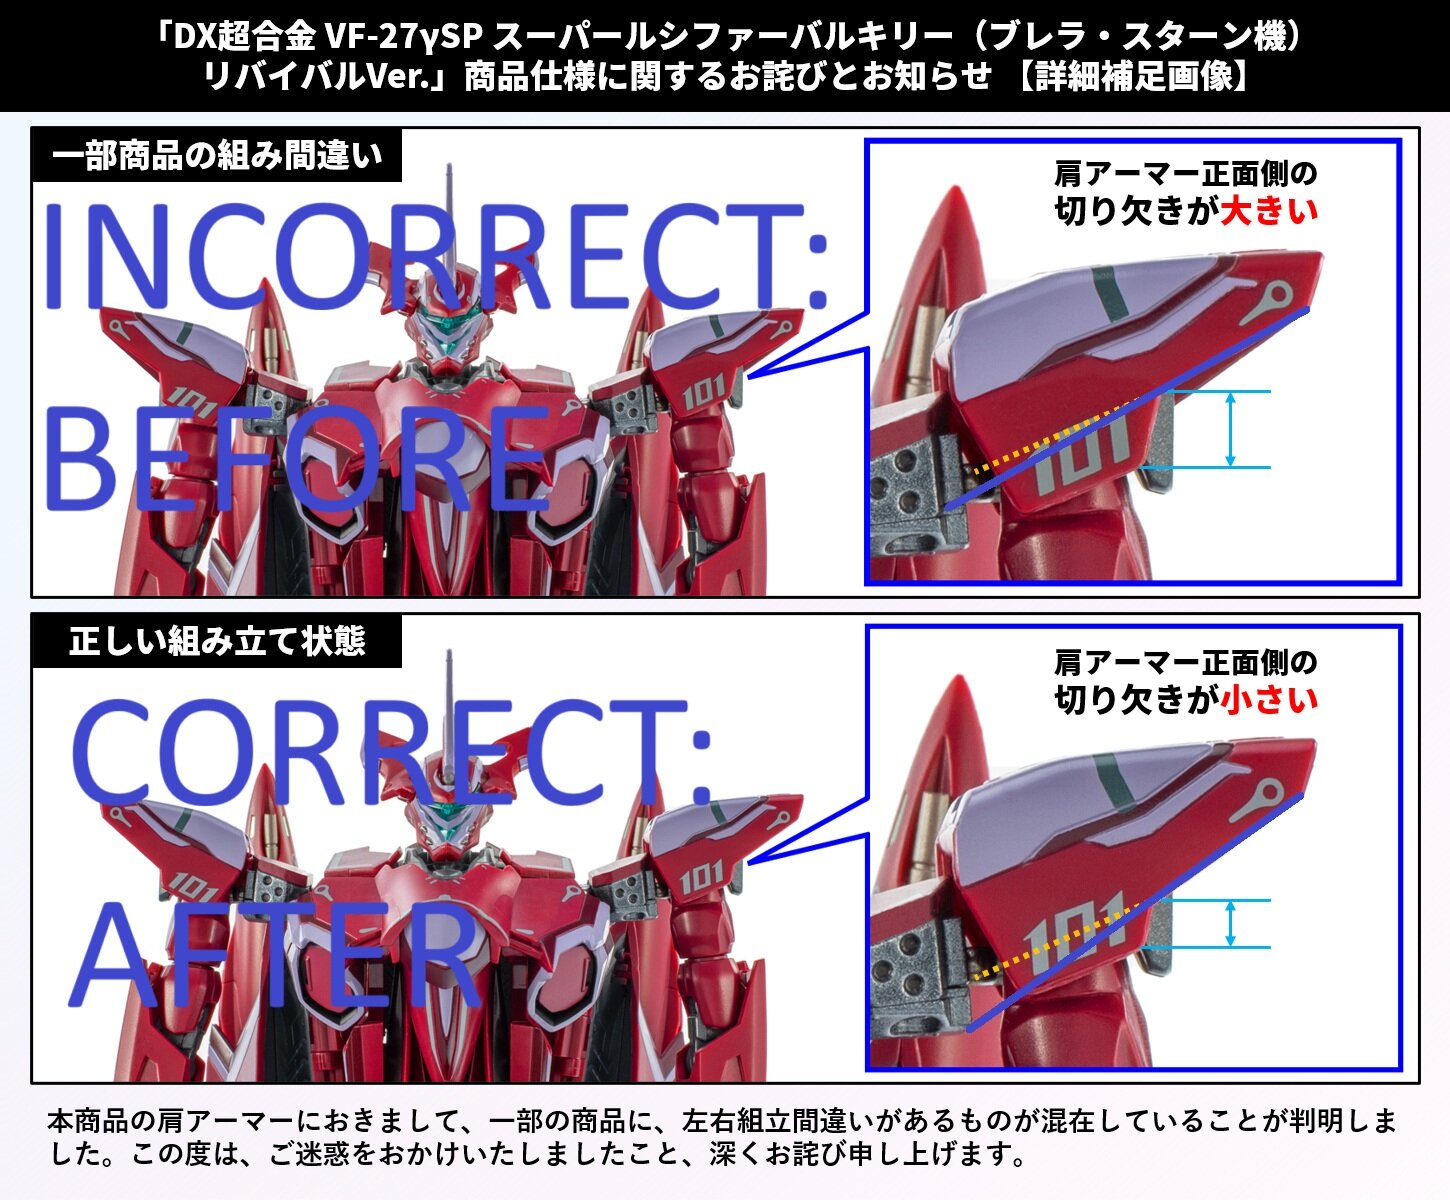
Unfortunately they are not the same. Drawn up for you using MSPaint... You need to disassemble the shoulders and switch the left and right.
-
Gerwalk mode or not yours is mis-assembled/assembled incorrectly. You can leave it if you feel like it has no issues. As provided by the Bandai's instructions above, it should be taken apart and swapped.
-
Yea... a 3d printer and also a scanner (would help). I have the first release 171EX and the re-issue from a few years ago, but idk if I want to put the leg work in for something Bandai is probably going to or already has lined up. Yup not sure about the backpack cannons either, but Bandai can also change that part (the cockroach shell) of the mold up to include connection slots with minimal effort. That's a lot less work that modeling a part up from scratch (ie. the thick legs). I only modeled up a VF22S conversion because I fanboyed hard, lol.
-
OH OH OH, I know what Bandai is going to do... they'll make correct thick leg fast pack add-ons available through PBJP! LOL... 🤣🙄
-
ahh okay my mistake for reading too far in then, lol. Okay if its just screws and swaps that should be fine.👍
-
That's a very sad thing to hear, but very logical and likely scenario. 😕 Yea I thought I'd try to comb through the earlier pages of the thread last night for a pic of the grey prototype (because I was interested in Bandai's earlier approach), but got only as far as the 15th page before falling asleep. LOL... no worries.
-
😅Take your time! No rush at all!
-
Too bad the image provided by Bandai doesn't show the top portion of the incorrect shoulder. The erroneous proportion of the shoulder shown looks like the pre-renewal (1st edition) shoulder which does not have a cutout on the top outer edges (for the super/fast packs). I just really hope it's not a case of pre-renewal molded shoulders in circulation... 🙄 Thank you @jenius for pics, 🙏.

-
Aside from the things that are "anime magic", yes I completely agree with how Bandai is probably throwing in their own take ("knowing better") and it's sucks that they're doing that. In the end I'm sure it (the DXC YF-21) like many other Macross stuff has go through the final approval of Kawamori (and maybe his team: Tenjin, etc.) for final say, right? It's not like Kawamori comes into Bandai's office only to look at it during the prototypes for a once over and gives a yes/no and that's it. It would be believable Bandai gives Kawamori his own milestone prototype version(s) to take back to his home/office to further study/play with (to do his own homework on) and is in full communication directly with Bandai's team before it goes to the production line. Do we even know if (maybe) it's Kawamori making/suggesting these ("better known") changes to Bandai's team for the macross line? And that's not to say (maybe) Kawamori is aware but just overlooks and passes off these changes? 🤷♂️🙄 If so, then that would be sad... I'm interested in looking at the early grey prototype that you're referencing. Do you have a link or picture? As I've said in the previous post I couldn't find it, but recall seeing something of the DXC YF-21 tease year(s) prior to Bandai's TN2019 reveal. Yes the markings on the DXC YF-21 are better than the 19's markings by far. Yea Bandai really f'd up the tampo on the Macross logo for the DXC YF-21's wing and with previous tampo issues (DXC VF-1's 001/100). The Macross logo was correct on the YF-21's prototype displayed at TN2019. We already know Bandai won't own up to it just like the YF-21's antenna issue (how they stated damage was due to the shipping/handling process).
