Anasazi37
-
Posts
2061 -
Joined
-
Last visited
Content Type
Profiles
Forums
Events
Gallery
Everything posted by Anasazi37
-
Tango Papa's stuff is expensive and you sometimes have to wait several weeks for a shipment. It's a one-man operation and his ordering system is a little clumsy. There are better options out there. You'll have a PM from me in about an hour, Jesse. Sorry for the delay....
-
I will try to create an "add on" sheet for those of you with recasts (myself included). I think my vintage GBP still has all of those stickers, so I can use them as references.
-
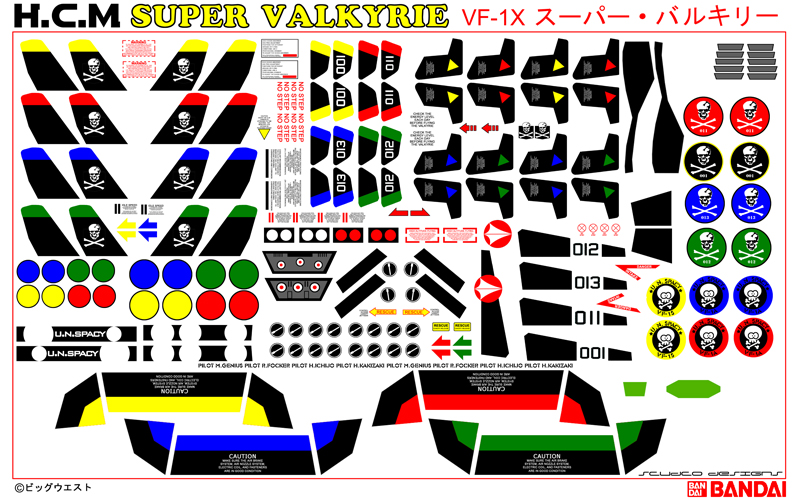
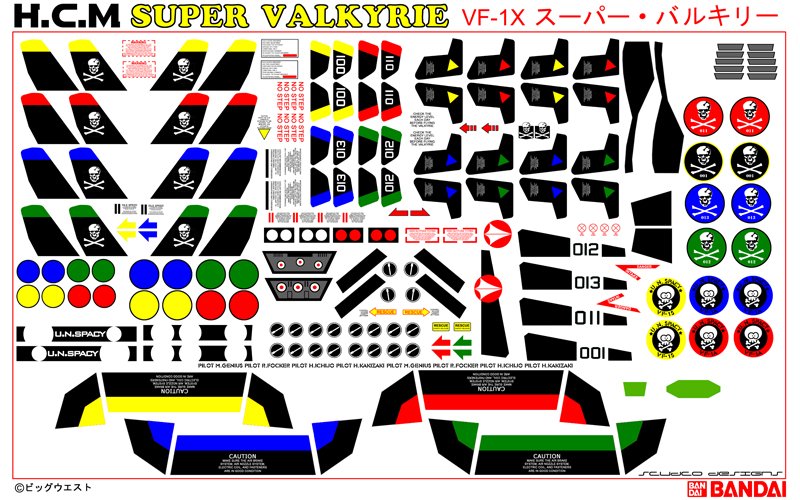
I know, this set is WAY overdue. Some of you have been asking me to make it for several years. Well, I finally got around to it. It was actually 90% done when all that personal stuff happened a few months ago. It feels good to be back on track and finishing projects.... I'm not ready to accept orders for these sets yet, so please don't ask. Any PMs regarding them will be ignored until I am ready to take orders (at least a few weeks). Price will be $5. Here's a sample pic. I can't do anything about the white backing paper, but you can still make out the white designs. As always, there will be sticker and decal versions.

-
The designs will essentially be a scaled up version of the Yamato 1/60 VF-1D set I've already made. It shouldn't take very long to rescale and produce these sets, which can be done as either stickers or decals--customer's choice. All I'll need is a few weeks notice before the kits are ready to ship. Same goes for the Elint and Ostrich kits, if those materialize. Here's a pic of the 1/60 VF-1D set so you can get some idea of what's coming:
-
You mean something like this? It took me about ten minutes in Photoshop. I would normally do it in Illustrator, but this quick and dirty method works almost as well. It also helps that I already have a high res scan of the decal sheet on file from another project. I've spent lots of time figuring how to how efficiently white-point (aka neutralize) the blue backing paper Hasegawa uses on their decal sheets while preserving white decals, as well as replacing colors in the manner that you need. The attached image is a non-printable, off-sized, low-res sample.

-
I've never made my 1/60 set available through TMP, valk exchange, or any other site. Orders for that particular set have always gone through me since there's not much demand for it. Shoot me a PM and we can talk price and wait time (it's not that bad right now).
-
It's good to be back. It was really painful to look at all of these unfinished projects for a few months and wonder why I had no passion or desire to work on them--especially considering how much Macross is a part of my life. Not a fun place to be. I've been spending some serious time in my "mad scientist laboratory" lately, cooking up decals and working on customs. It feels great.
-
Will do. It's going to be a little while, though. Perhaps a month or two, depending on how long it takes me to finish a few customs for some VERY patient MW members.
-
Reason #1: If you don't like the way a valk looks, all you have to do is transform it to a more pleasing mode or send it to a customizer.
-
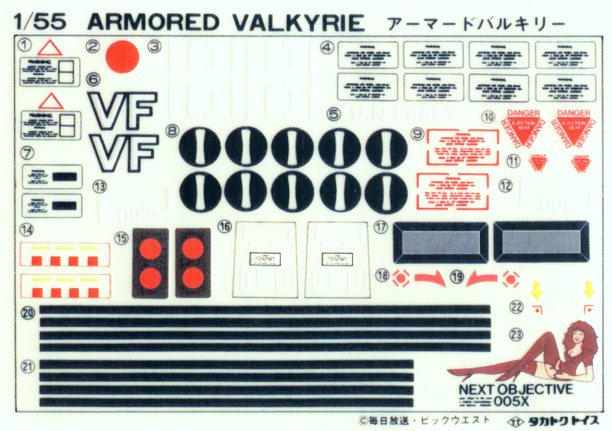
Thanks for the kind words, guys. I almost forgot: 1/55 GBP stickers and decals are in the works. I finally decided to get off my lazy @ss and make the set since it doesn't look like Bandai is going to reissue the armor and there are plenty of naked recasts and originals out there.
-
I've received a bunch of PMs over the past few months from MW members asking where I've been, what the status is on various sticker and decal projects, if I still do customs, etc. For the most part, I've stayed off the MW radar and put all projects on hold since early November because I needed time to deal with some personal stuff. My life's finally back on track, though, and I have rediscovered my passion for all things Macross. I have a serious backlog of orders, so please bear with me while I play catch-up over the next month or two. I also had some ALPS printer issues recently which put a serious crimp in my getting certain orders completed, but those have FINALLY been resolved. FYI: I haven't forgotten about the JM sticker project or Cyclone sticker project, just in case anyone was worried. Those of you who have waited patiently for months for me to get to your orders, I cannot thank you enough. Your sympathy and unwavering support helped me get through the darker days. I owe all of you big time.
-
The sticker project didn't die, I've just been dealing with a ton of personal stuff and Macross took a far back seat for about two months. I'm getting back on track, though. That project is now slated for completion in early spring.
-
I was wondering how your 1J was going to turn out. Very unique. Nice work!
-
I'm dealing with some heavy personal stuff right now and my custom projects (and decal orders) have been deprioritized a bit as a result. I should have one project done in a few days and several more over the next few months.
-
Yeah, what he said. Seriously, though, I hope there are more of you out there who want these sets....
-
Yep, those are for the knees. Nick's tweaking them right now so they fit better.
-
You'll notice that there are no 1J decals on the entire sheet. Nick wants those on a separate supplemental one. It's also easier for me production-wise if they are on a separate sheet. With the current arrangement, I can fit two sheets on one piece of sticker paper. That helps keep the cost down, too.
-
is anyone willing to print noseart decals?
Anasazi37 replied to buddhafabio's topic in The Workshop!
I can do it for you. Let me know what you need done and I can give you an estimate. Nose art for a 1/60 shouldn't cost very much. -
Wow, that's a lot of stuff to fit on one sheet. I could do it, but I don't know how many people would buy it. Let me think about it.
-
I print on demand, so they are ready pretty much anytime starting today for those who ordered the recast kits. You order it, I print it. Turnaround time is about two weeks.
-
myersjessee and mslz22 approached me when they started their recast project and asked if I would be willing to design decals for both the YF-19 and YF-21 based on what Hasegawa includes with their 1/72 models. It took a little longer than expected, but here there are. I even threw in a 1/48 version of the Hasegawa Macross Plus option sheet for those who might be interested. You'll notice that I didn't include any of the elaborate, large, solid color marking decals that come with the Hasegawa kits. I made the decision that if you were nuts enough to take on building either of these models, your skills must be good enough to do masking and painting rather than rely on decals to cover your valk. It also keeps the price down. Speaking of which, here are the prices: YF-19 set - $10.00 YF-21 set - $10.00 Option set - $20.00 (it takes up an entire sheet of decal paper!) Shipping is included in these prices. I'll be contacting everyone who ordered kits from myersjessee and mslz22 over the next few days. After I take orders from those folks, I will post a general thread in the For Sale forum for everyone else.
-
I still make them. They are $12. Stickers or waterslide decals--your choice. PM me if you're interested.
-
Only in that you'll want a grey that isn't so dark the semi-translucent decals won't show up after application. While many decals are opaque, some are partly see-through so they blend nicely into the paint job. I haven't made an Enigma personally, though, but I do use Tamiya acrylics. I'd stay away from dark grey and perhaps medium grey. Kurt would know better, though. PM might be the best way to get a hold of him--I know he's pretty busy with his "real job" these days and doesn't check threads very often....
-
Fixed!
-
Looks great but I think the numbers on the leg fins are upside down. Okay, somebody smack Nick. I'm so busy these days that I didn't even notice the leg fin issue. I'll get that fixed ASAP.