Anasazi37
-
Posts
2061 -
Joined
-
Last visited
Content Type
Profiles
Forums
Events
Gallery
Everything posted by Anasazi37
-
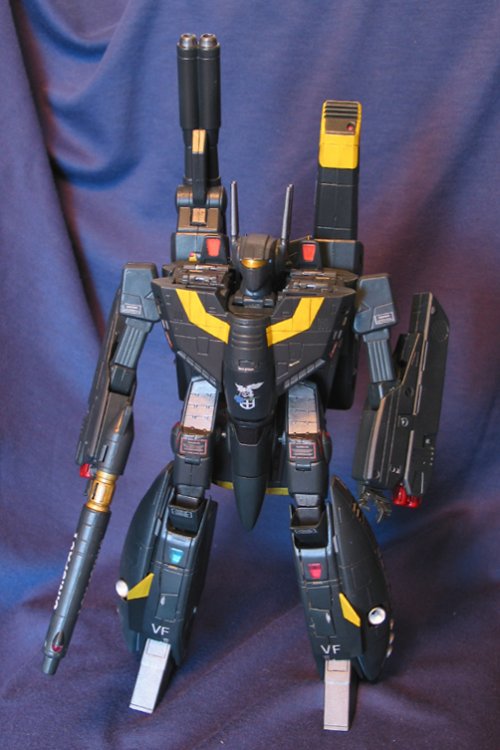
Armored Battroid
-
Something odd is happening with my ISP. Hopefully the problem will be fixed shortly. If not, I'll post pics some other way. Edit: Looks like the problem is fixed.
-
Just uploaded larger pics. Graham, please feel free to add this valk to the custom toy page.
-
The paint job is pretty durable. I sanded down or used a Dremel on the parts that rub together to get rid of paint scrape and the clearcoat I use is tough. However, you should always be careful when transforming a custom.
-
I didn't forget to take out the pegs, I forgot to paint them! I didn't notice the problem until I started taking pictures. They are drying right now and will be put back in tomorrow.
-
Armored Battroid
-
Armored Fighter Armored Gerwalk
-
Gerwalk Battroid
-
This was a commission from g3173. He asked that I not only recreate the Blue Roses 002 Strike in 1/48, but also give it a paint job with a "broken in" look. I started with a solid undercoat of sky grey and then applied sea blue, varying the intensity so it looks like a well-used valk. All metal and yellow colored areas and all of the decals were distressed/weathered using charcoal pastels. It's hard to see all of this in the pics because I prefer more subtle effects, but it's there. While the Minmay Guard Strike was more challenging to create, this has to be my favorite custom. It's going to be really hard to send this one to its new home.... Some of the pics are a little blurry--sorry about that. My digital camera wasn't behaving today.... Fighter
-
So *that* is what Gene and you had up your sleeves when you ordered the DYRL decal sets. I was wondering if you were doing a full repaint or just adding details. Nice work! The fully armored trio is going to be one heck of a sight to behold....
-
FYI: Even though Twin Moons shows my sets as preorders, they are in stock. Tamim's been way too busy to update his site lately. The sets have been available to ship for about three weeks now.
-
What also works well is using charcoal pastels (available at most art supply stores). You take a q-tip and rub it along the length of the pastel chalk, then use the q-tip to apply the weathering where needed. Takes some of the guesswork out of this "advanced" technique. It's pretty similar to smearing pencil on cardstock, but a lot more accurate.
-
Wow, that reviewer doesn't really know what he's talking about. I've tried pretty much every printing technique and paper type out there before I settled on the system I use now. First of all, you should NEVER use ALPS inks on paper designed for inkjet printers. The ink might stay put on small designs, but just try using the decal. Bad, very bad. There are about five or six inkjet decal paper suppliers out there. The paper is specially coated to "trap" the ink on the surface of the paper. Unlike with traditional paper, the ink is not absorbed into the paper so it can smear or run very easily. You also have to wait for the ink to fully dry before applying the protective coating. This can take hours or even days depending on the humidity where you live. The "fixative" they sell with that kit is nothing more than a clear acyrlic top coat which you can buy from Krylon for a few dollars in a much larger size (Crystal Clear). I'd actually recommend using Microscale's Liquid Decal Film for small decal projects. You can even brush it on by hand. Laser decals never look as good as inkjet printed decals (most color laser printers max out at 600 dpi whereas inkjets go as high as 2400 dpi), but the advantage is that they don't use water-based inks. The colors are also less saturated. Here are the supplies I recommend: HPS PAS/2 laser decal paper (www.papilio.com) HPS IAS inkjet decal paper (www.papilio.com) Microscale Liquid Decal Film (www.bare-metal.com) HPS also sells another type of laser decal paper called PAS/N but it's not for the novice. Shin, what Neova describes is essentially the process I use to create decals. It can be a lot more complicated depending on the project (like the Minmay Guard sets), but scanning in orginals, rendering new ones in Illustrator, then resizing them to fit properly is the basic process.
-
I sell custom stickers, as does Takatoys. The catalog of my sets can be found here: Waterslide Decal and Sticker Catalog Takatoys sells his sets through Twin Moons Anime (tmpanime.com). I sell some of my decal sets through TMP as well, but not stickers.
-
I am willing to add a few sets of decals/stickers to the prize pile if that might help generate more interest. Minmay Guard, Blue Roses, Enigma, whatever. Let me know. I'd enter the contest myself but I'm insanely busy with way too many projects right now....
-
I don't need a pristine kit to make the decals, so if Valkyrie can get me one of his "cleanup" casts that should be great. While he's casting the final pieces I can be designing the decals. The last thing I want to do is hold up the distribution of these kits. Your offer is greatly appreciated, though.
-
Will I get to keep the kit you send? Seriously, though, I'd be willing to do the work in exchange for one of the final kits. I couldn't justify the expense of purchasing an original when they came out. If my design work ends up costing less than the price of a kit, I'd be more than willing to pay the difference. I have no idea when I might get around to building this behemoth, but that's besides the point. It can keep my unbuilt Blackaces recast USV and Tanmen models company. My guesstimate is that the "stock" decals probably won't take up more than a half sheet, which would cost approximately $10 or less to produce. If we start throwing in numbers and custom markings, we're looking at closer to a full sheet ($20) per kit. I don't have access to either the VF-X2 art book or the game, so at some point I'll need someone to email me scans, screen captures, etc.
-
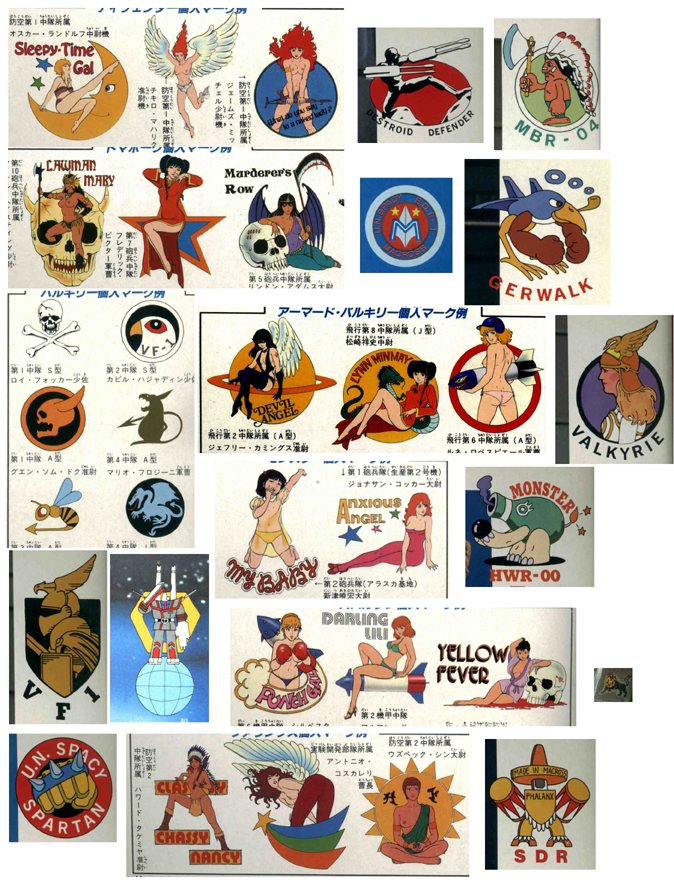
Here's all of the artwork from the Macross Hobby Handbook. Most of it could be used to dress up a Monster. There's also a TON of WWII-era aviation artwork out there that we could "appropriate" for this project.
-
I don't know how I completely missed this thread. Guess I'm the perfect candidate for a long ride on the short bus. ChrisB was kind enough to clue me in. This sounds like an awesome project! I'd be happy to help out with the decal side of things. The original decals do look pretty spartan, but I can fix that. For example, I could toss in a few sets of 0-9 at different scales for custom numbering and I know there's a bunch of kickass artwork in the old Macross Hobby Handbook that would make for great custom markings. If we can scrape together any lineart or screen captures that feature the Monster, I could pull some stuff from those, too. As several of you have already guessed, I'll definitely need access to the kit when making the decals to ensure proper fitting, etc. I have an efficient system now, so it should go pretty fast. I'll try to check in on this thread as often as possible, but if someone can keep me in the loop via PM that would be greatly appreciated.
-
I charge MW members $15/hr (normally $60 for commercial clients) for my design time plus materials fees ($5 per quarter sheet, 4.25 x 5.5). Most projects take between 1 and 5 hours, depending on the complexity of the original designs and what you want.
-
"Future" refers to Future Floor Polish, which you can get at most large home stores like Kmart, Wal-Mart, etc. It's basically a high gloss (and durable) acrylic coating solution. Dirt cheap, too. You need an airbrush to use it, though. If you're going the spray paint route, Krylon Crystal Clear (glossy) or Krylon Satin (semi-gloss) work really well. They are also available at most large stores.
-
You can make stickers using an inkjet or laser printer, but they often do not look anywhere near as good as professionally printed ones or those made using an ALPS printer. One of the big advantages of ALPS printing is that you can print white. No other printer out there can do it.
-
The only decal I can think of that you might be referring to is the one that appears just to the left of the chestplate decals on the sheet. It's designed to fit on the piece that sits under the chestplate (only visible in fighter mode). Here's a picture of it and where it shows up on the original 1/72 model:
-
I believe so. I'll have to clear it with g3173 first, though. My policy is to not release a commissioned set unless the person who paid me to make it for them is comfortable with the idea. I'll post more info as soon as I have it.
-
Those decals are in the works. g3173 has commissioned me to produce them. They should be ready in about a month if I manage to stay on schedule. There really isn't much price difference between what I sold my sets for previously and what TMP Anime charges for them now. The MG set was $33, now it's $36. It's an unfortunately necessary price increase, though. I was simply getting too many individual orders to handle them all myself and Tamim was gracious enough to step in and help with distribution. However, to stay in business, he needs to mark up the price just a little to cover his costs. I shipped out almost all of the decals up for preorder late last week, so they should start going out to those of you who ordered them very soon. The one exception is the Max & Miriya set. I'm still in the process of filling that order inbetween working on a few customs....