Anasazi37
-
Posts
2061 -
Joined
-
Last visited
Content Type
Profiles
Forums
Events
Gallery
Everything posted by Anasazi37
-
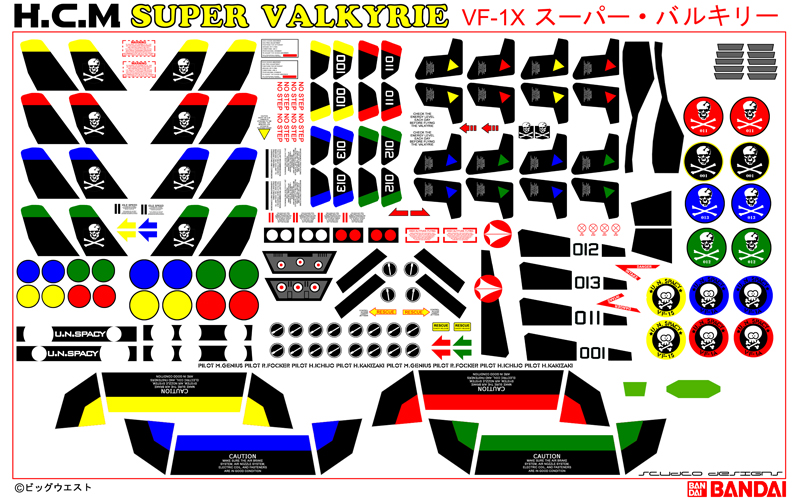
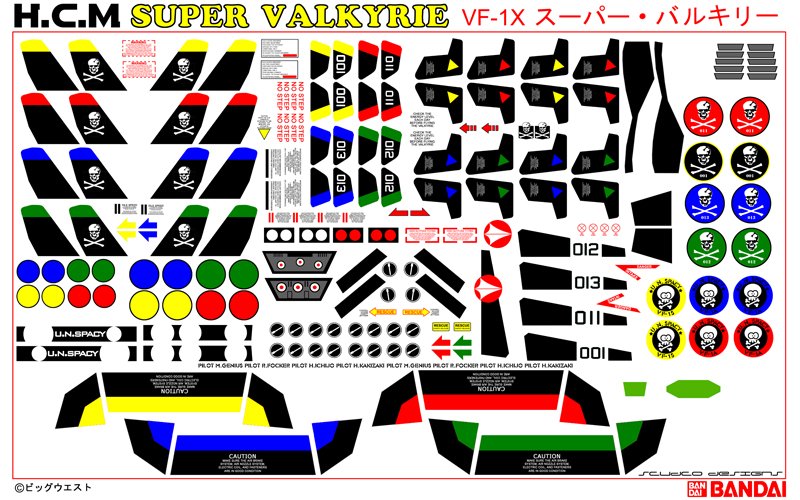
Nick and I finally worked out the design details for the JM sticker set and we tried to incorporate as much of your feedback as possible. A few of the decals won't show up in the sample pic below because they are printed in white.
-
The only Rob parts I have are his Ostrich recast set, Elint recast set, and a nice pile of clear canopies from the one time vf1x.com had them for sale.
-
It depends on what you want to have done. A complete repaint with decals and detailing would be $150 for just the valk, $200 for the valk and fast packs.
-
Wow, that was fast, Kurt. Glad to see that you could make sense of that mess of decals I sent you. (Sorry) Awesome job, as always.
-
*GASP* Chris Barretta is alive?! He dropped off the MW radar several years ago when 1/55s became less popular in the face of Yamato's 1/60 and 1/48 valks. No one's heard from him since. I owe him a great big hug. His heatshield and head sculpts are superb and my 1/55 customs are much better looking as a result. I jealously guard my Barretta resin part stockpile....
-
I designed decal sheets for 1/72, 1/60, 1/55, and 1/48 versions of the original Minmay Guard from Model Graphix (including a strike set for the 1/48--check out the Toy Customs section on the main page). I also have a 1/48 decal sheet adapted from the Hasegawa release of the Minmay Guard Strike (again, check out the Toy Customs page). However, I don't have a 1/55 version of that set available at this time. There hasn't been any demand for it and I can't simply resize my 1/48 set. It would require a lot of work to make the decals fit a 1/55.
-
Yep, it's Grenade Box Protector. Gotta love Engrish....
-
Lots of masking tape and patience. An alternative is that I can get you a set of waterslide decal canopy lines that are opaque black and fit the Bandai 1/55s perfectly. You can see an example of them here: I can probably squeeze them in during another print run and just charge you shipping, so let me know.
-
Nick and I are still working out the details on the number of sheets, etc. I actually have a few PMs from him that I need to go through and respond to before I can say anything more about what these sheets are going to look like. I've done the three piece chestplate decals before on 1/55's and they look okay. It's really the only way to deal with a complex and curving surface like that....
-
The paper I used is ultra thin polyvinyl film (PVF). Adheres to surfaces like a mofo, especially after exposure to heat. Don't push it, though. The topcoat and inks I use aren't indestructible....
-
Chest stripe stickers are notoriously hard to do. I made them for my first 1/55 sets then quickly abandoned them on later sets because they don't work very well.... I'll talk to Nick and see what we can do....
-
Note: This is an actual test set I printed out today. I still have some bugs to work out, but they look great.
-
The going rate is $300 for labor and materials (paint and decals). You have to supply the valk. When you factor in how much time is involved and how expensive the decals are to produce, us customizers are working for peanuts.... Devin: Will the rate be the same for the "MinMay MoonGuard" Custom? Yep. It's my standard rate for a 1/48 Strike custom.
-
Nope, it's not a stripped screw hole. I could have screwed the pieces together so tight that you couldn't see the seam line on that side, but it would have ruined the paint job on the inside of those pieces where the foot thruster pivots. That particular piece was a little larger on the right side than the left (Yamato QC strikes again), so I had to leave a little room for it to move.
-
No, but I can, if you like. There isn't much to see below the chest on those pilots, though. I painted the boot stripes purple, but that's about it....
-
Nope, no masking necessary. Just lots of patience and a fine-tipped brush. If I stray outside the lines a little I go back later with the blunt edge of an Xacto knife and gently scrape off the excess paint. That's good to know. That is what I do, though I am no master modeller like you, Anasazi37. Some of the best techniques are the simplest, most common-sense ones. I often try more elaborate methods on customs but often come back to the basics because I know that they work.
-
The going rate is $300 for labor and materials (paint and decals). You have to supply the valk. When you factor in how much time is involved and how expensive the decals are to produce, us customizers are working for peanuts....
-
Nope, no masking necessary. Just lots of patience and a fine-tipped brush. If I stray outside the lines a little I go back later with the blunt edge of an Xacto knife and gently scrape off the excess paint.
-
The background is a $2 piece of blue material from a fabric store bargain bin, believe it or not. I've gotten so much use out of that thing....
-
Nope. Just diffuse morning or afternoon light. Since Colorado gets about 300 days of sunshine a year I can get away with it. Anywhere else, I'd have to use an artificial light source.
-
Armored Fighter
-
Fighter
-
Armored Gerwalk
-
Gerwalk
-
Armored Battroid