Search the Community
Showing results for tags '1/72'.
-
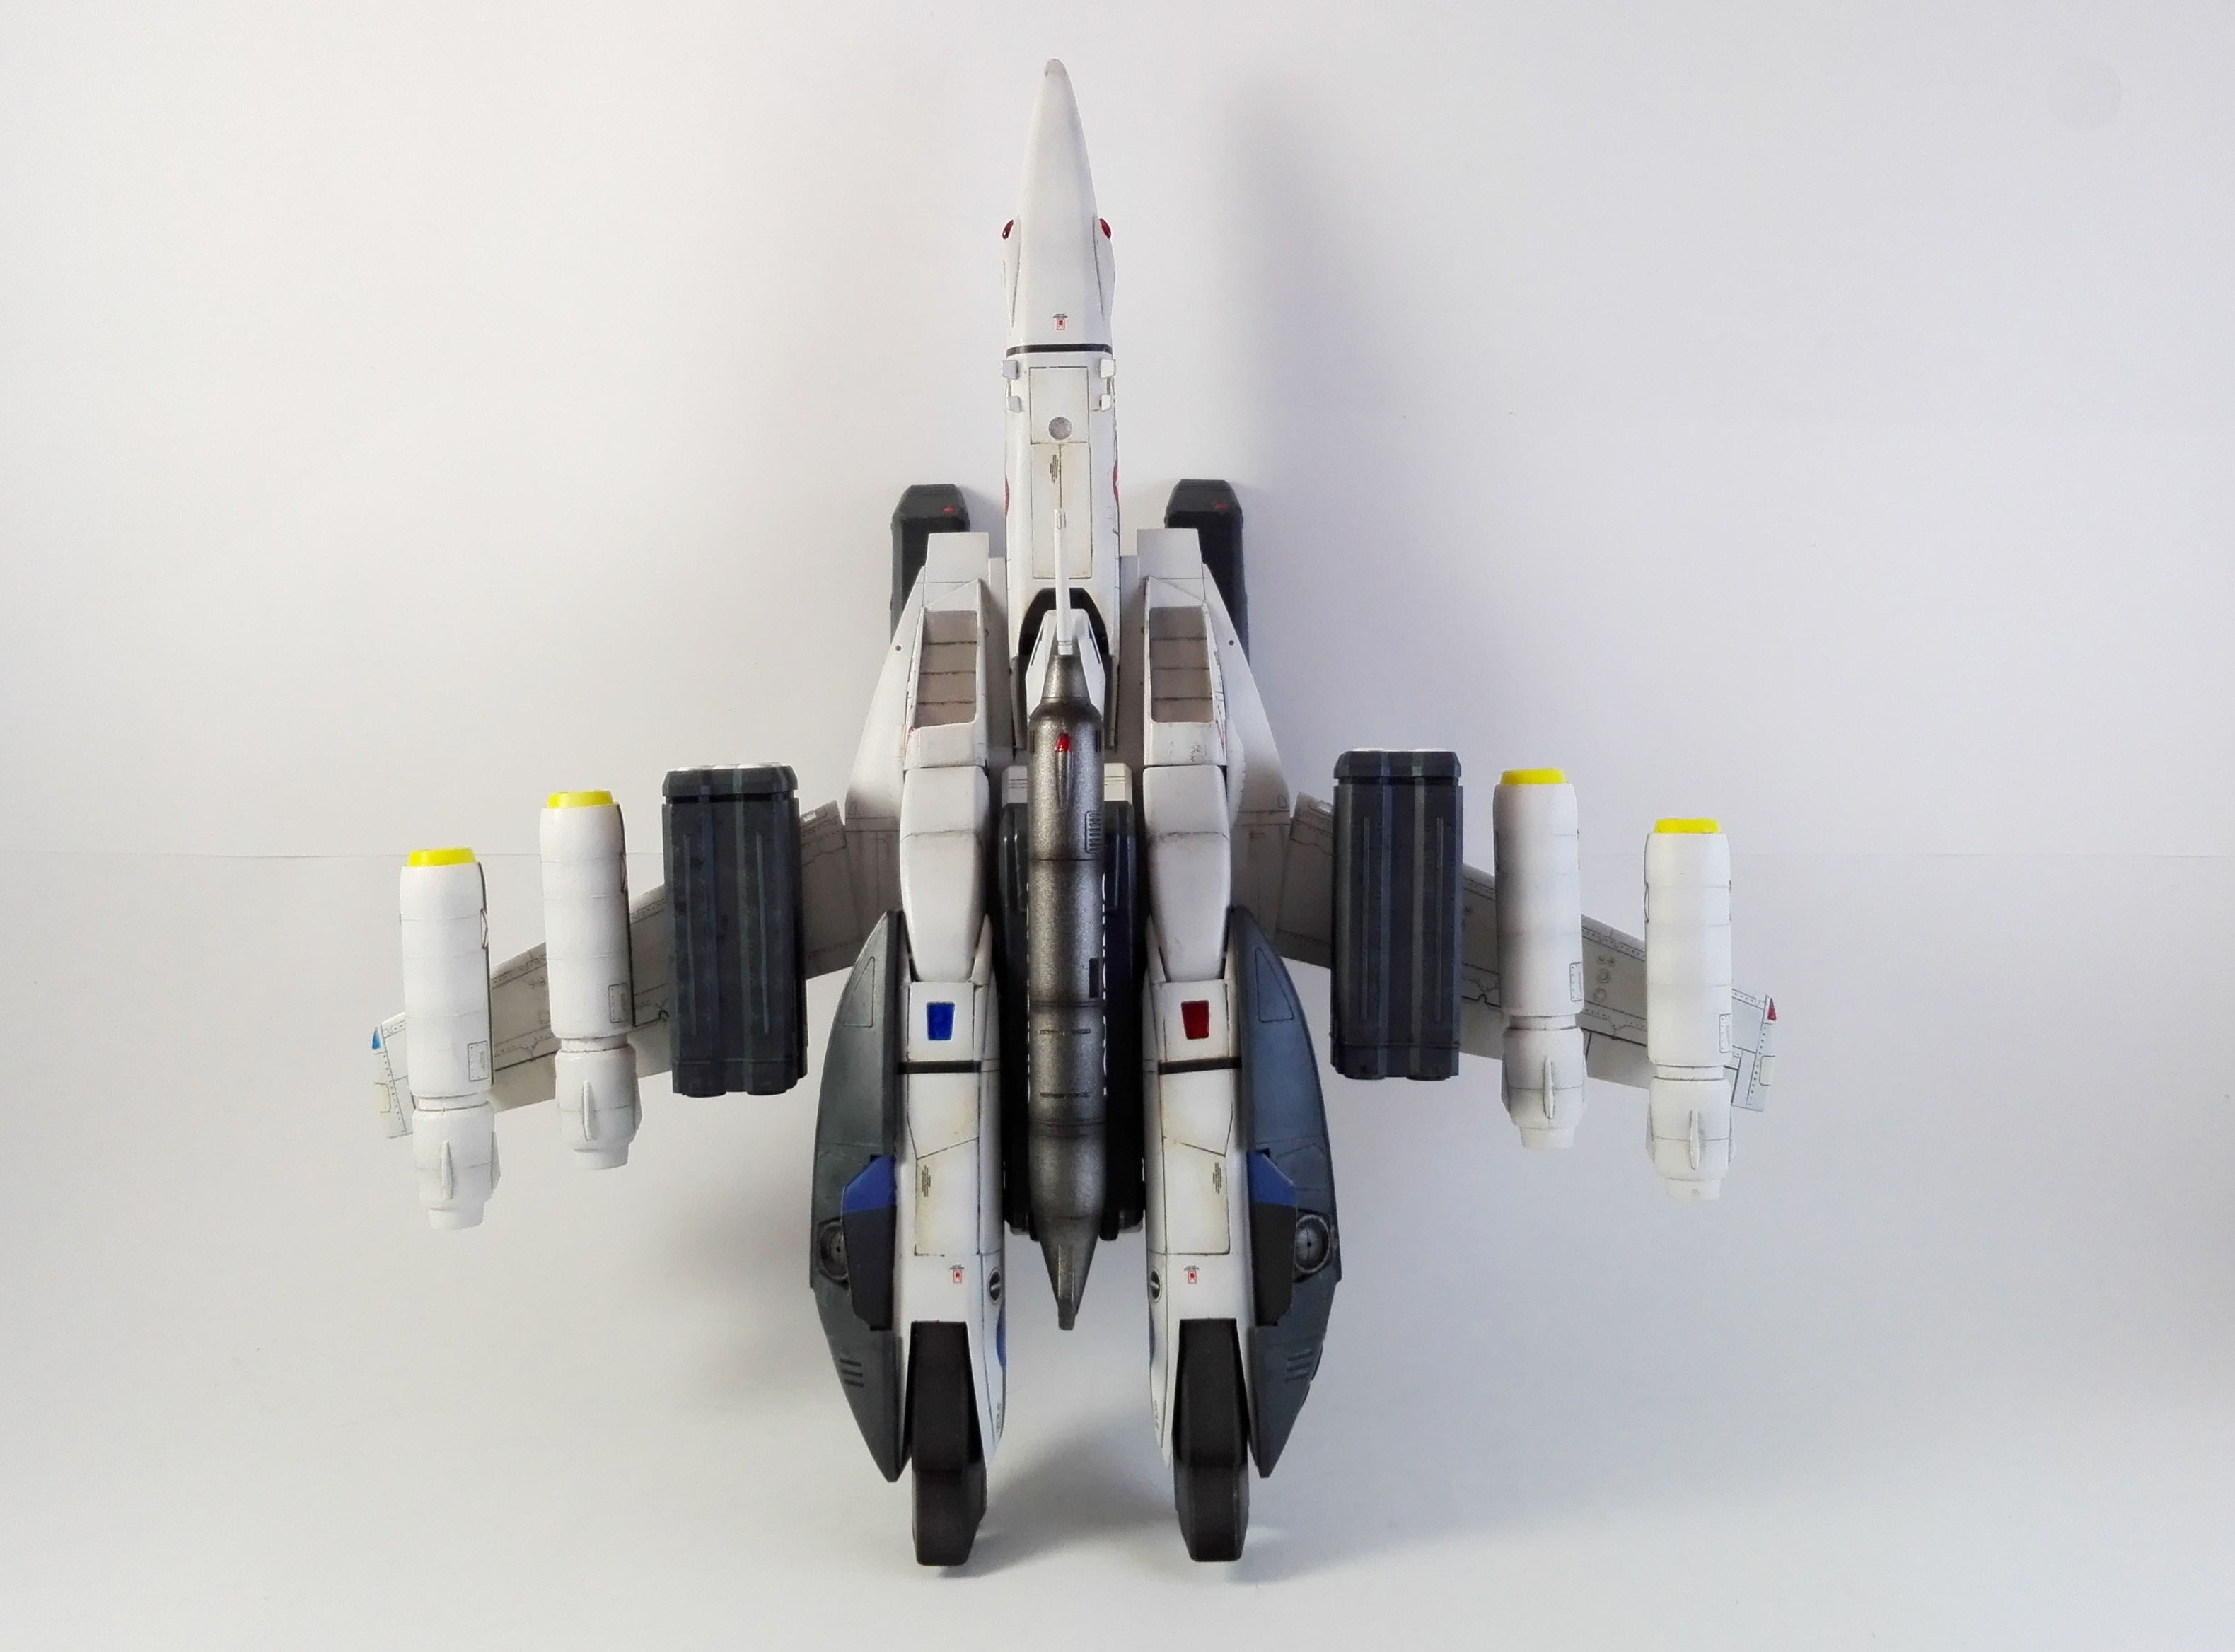
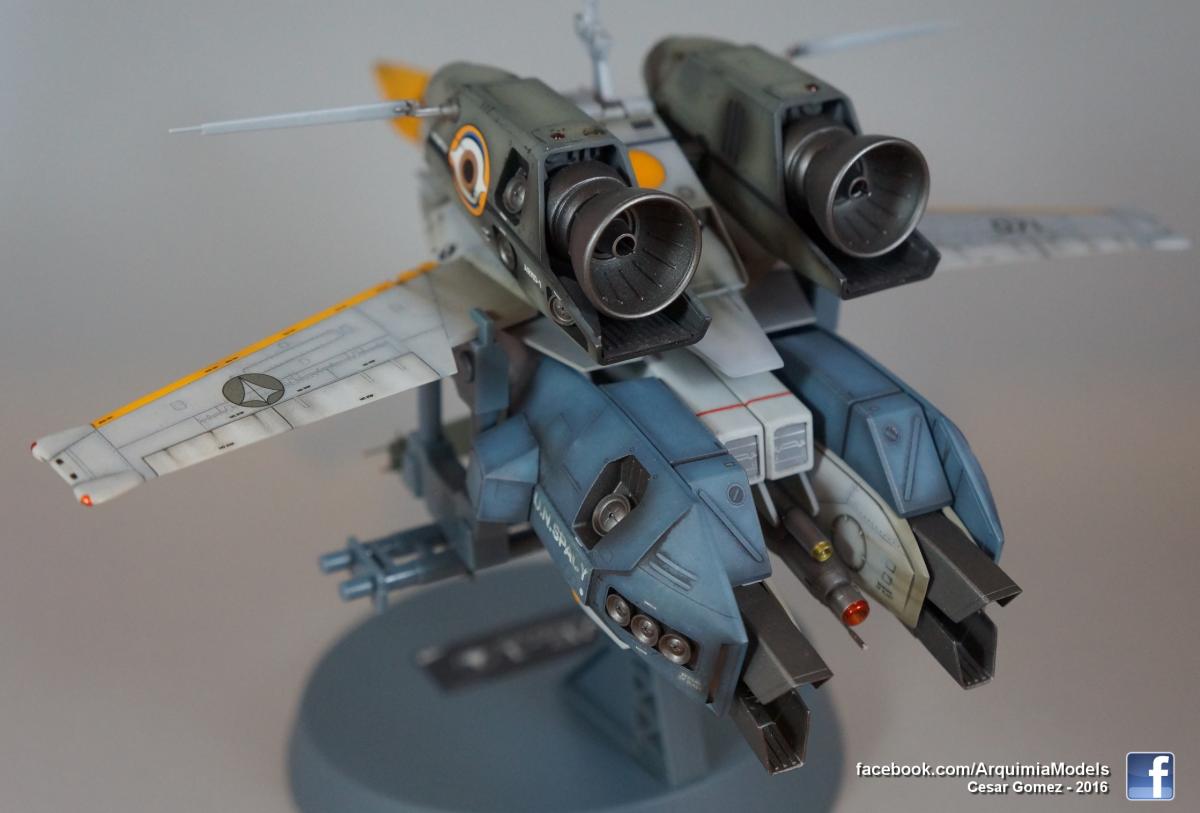
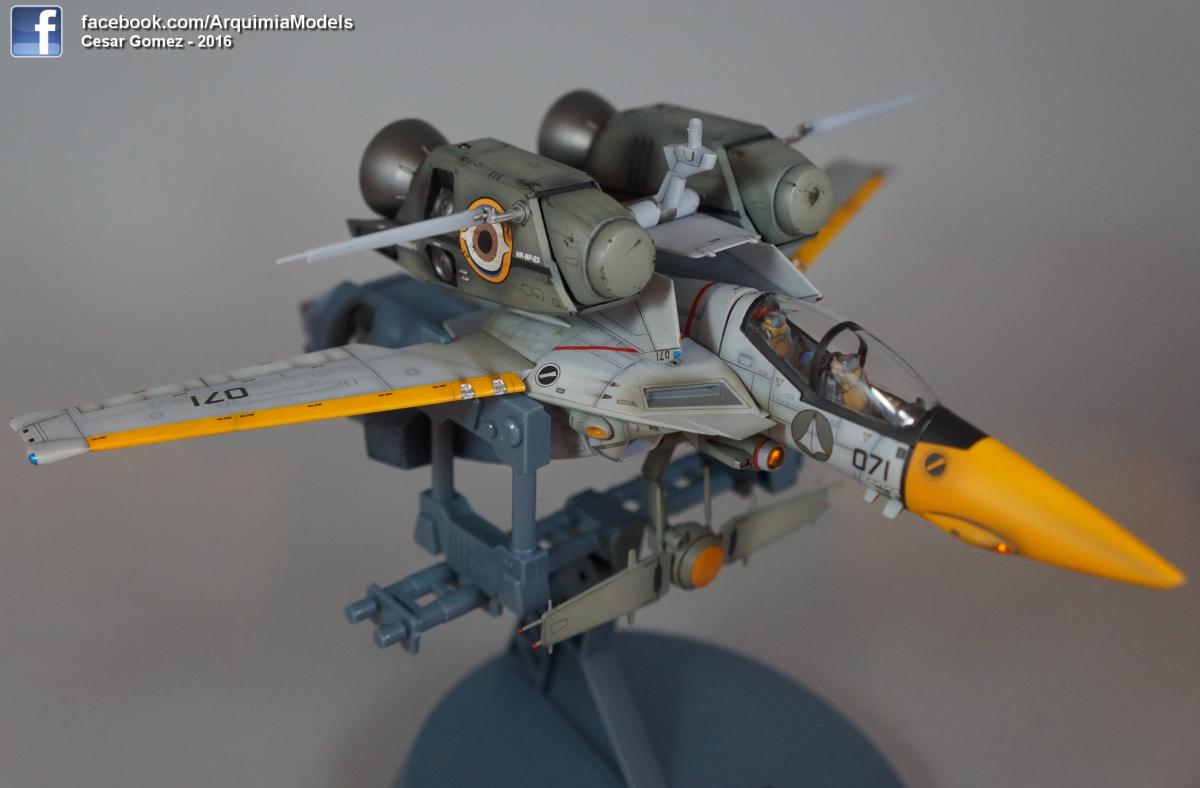
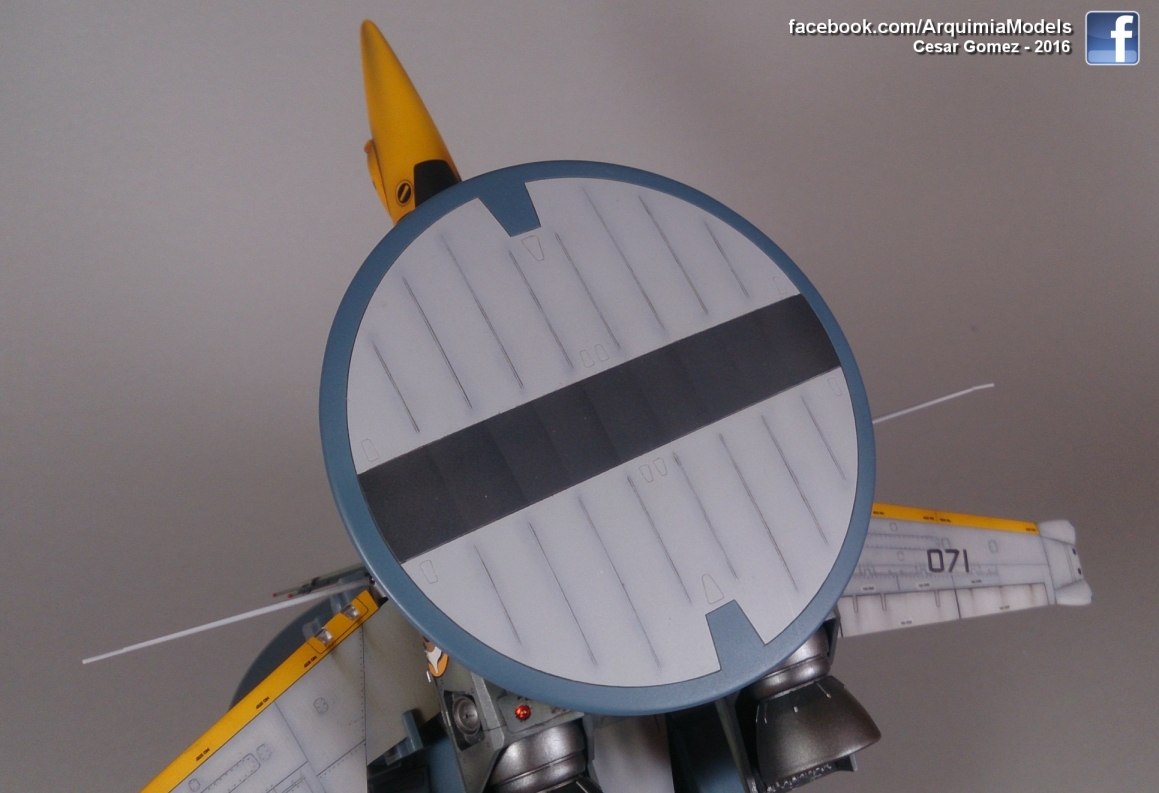
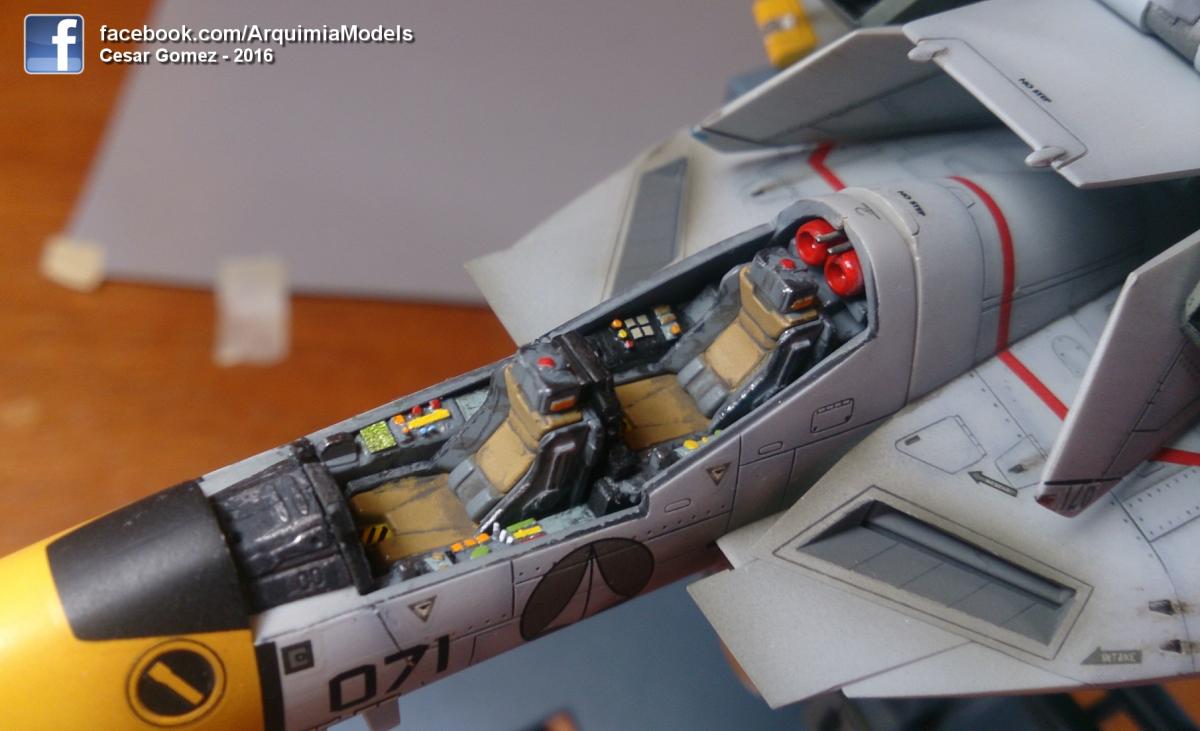
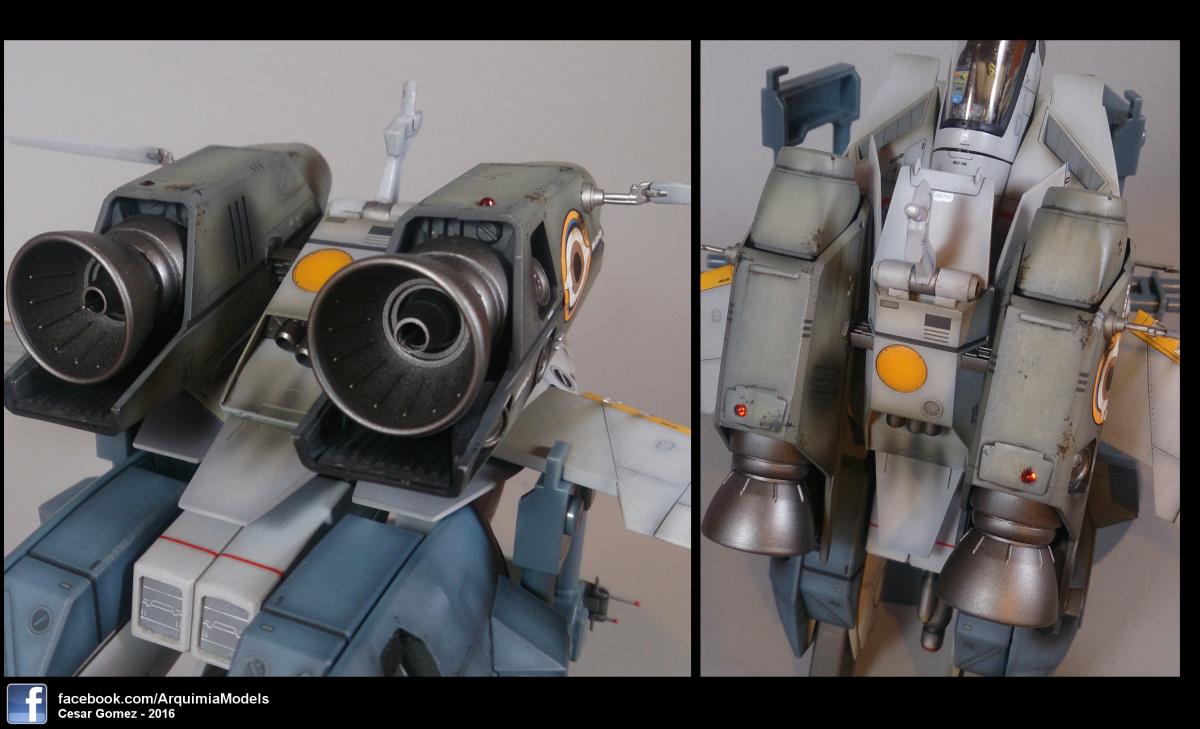
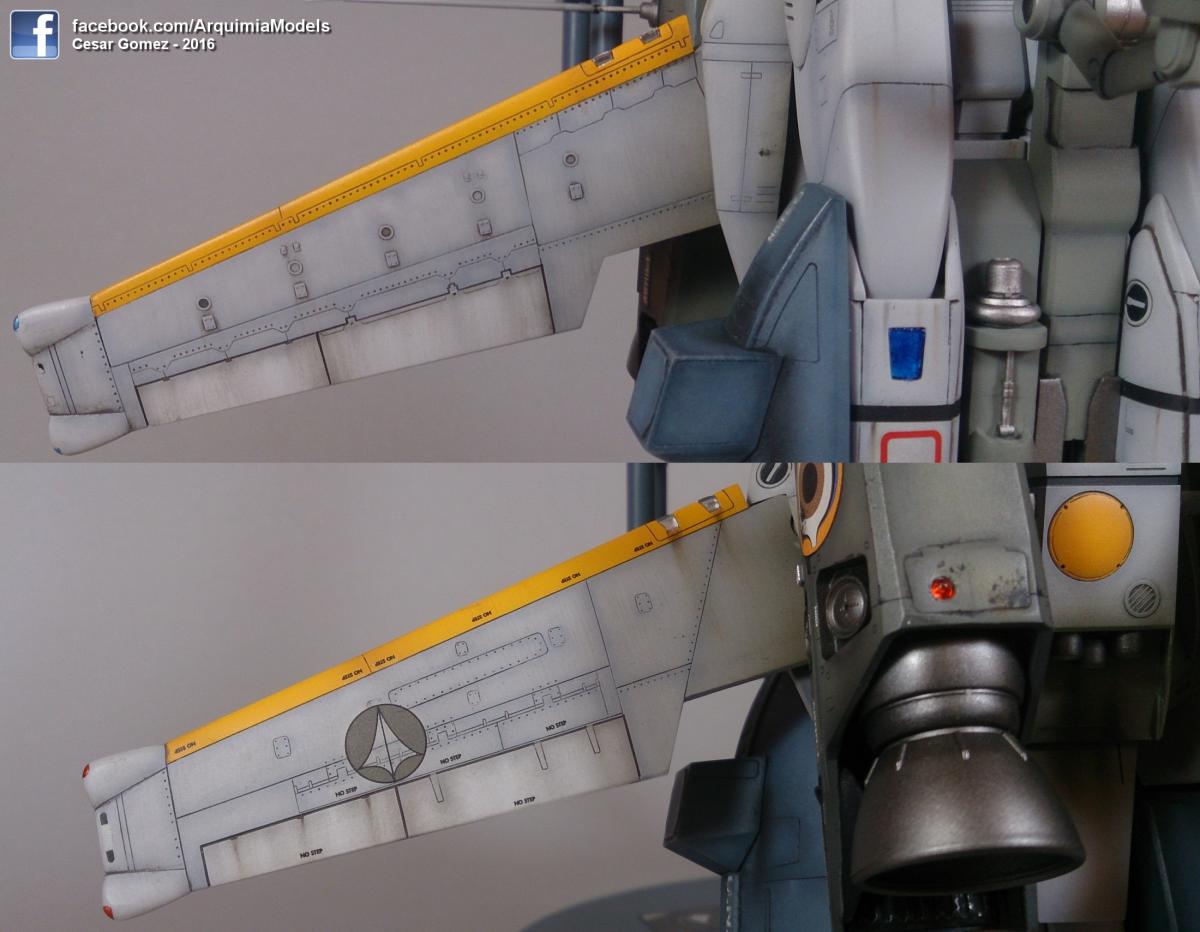
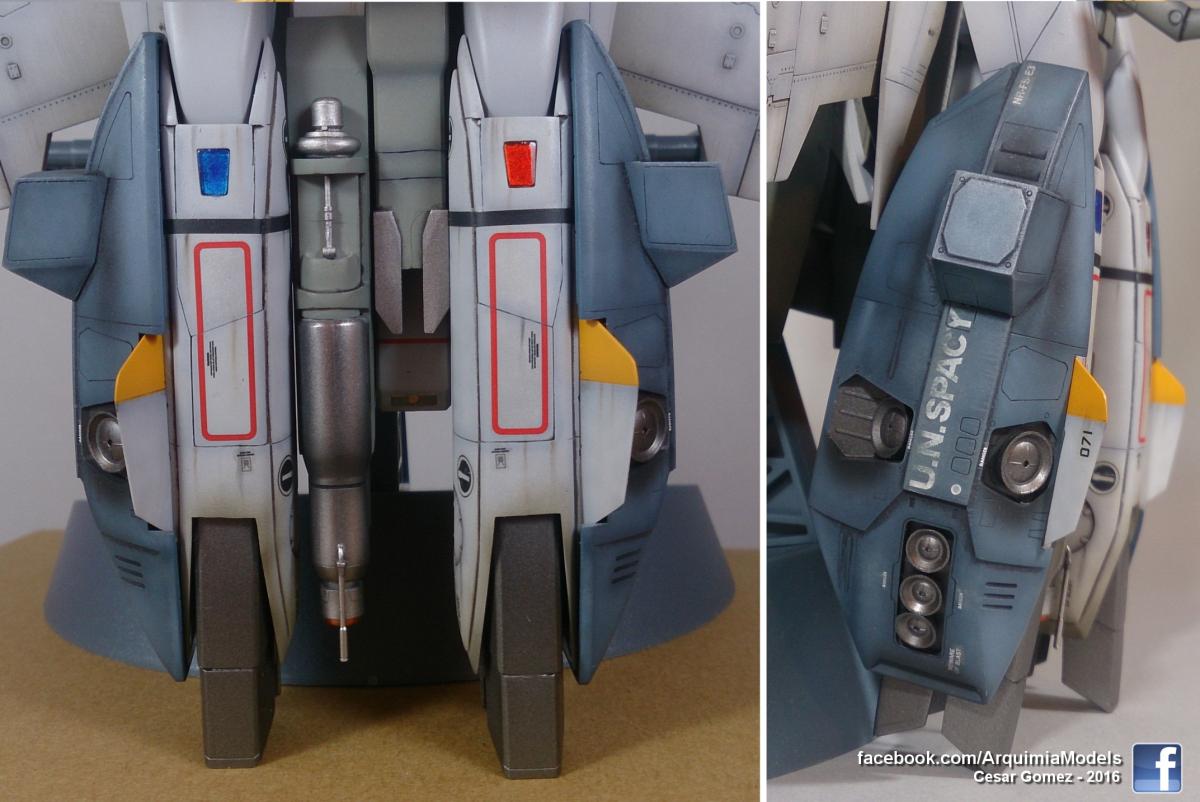
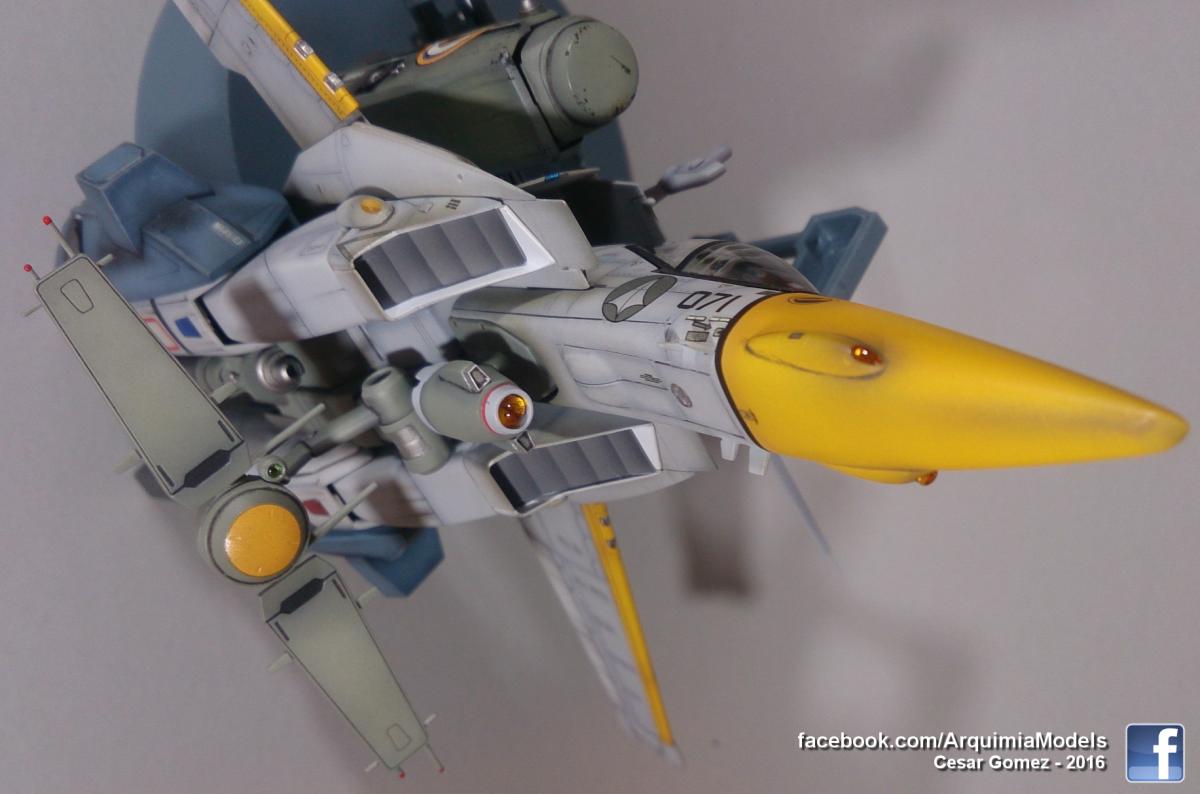
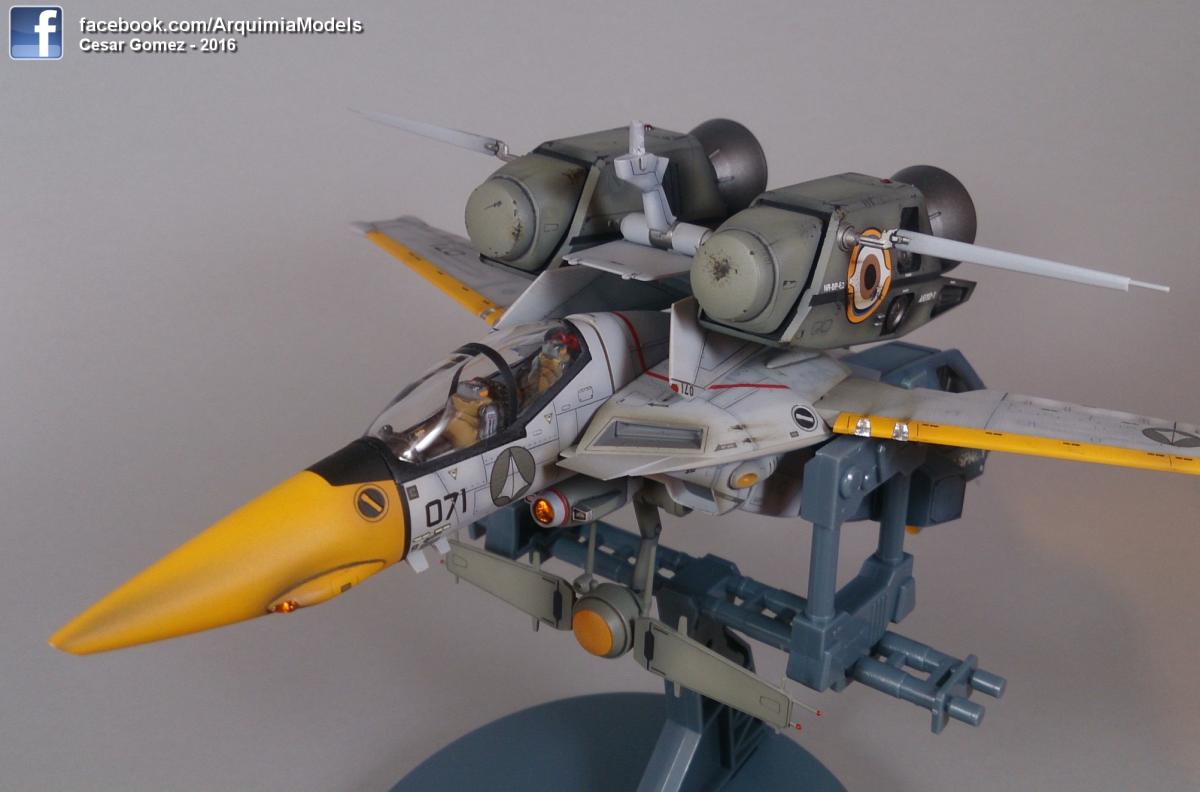
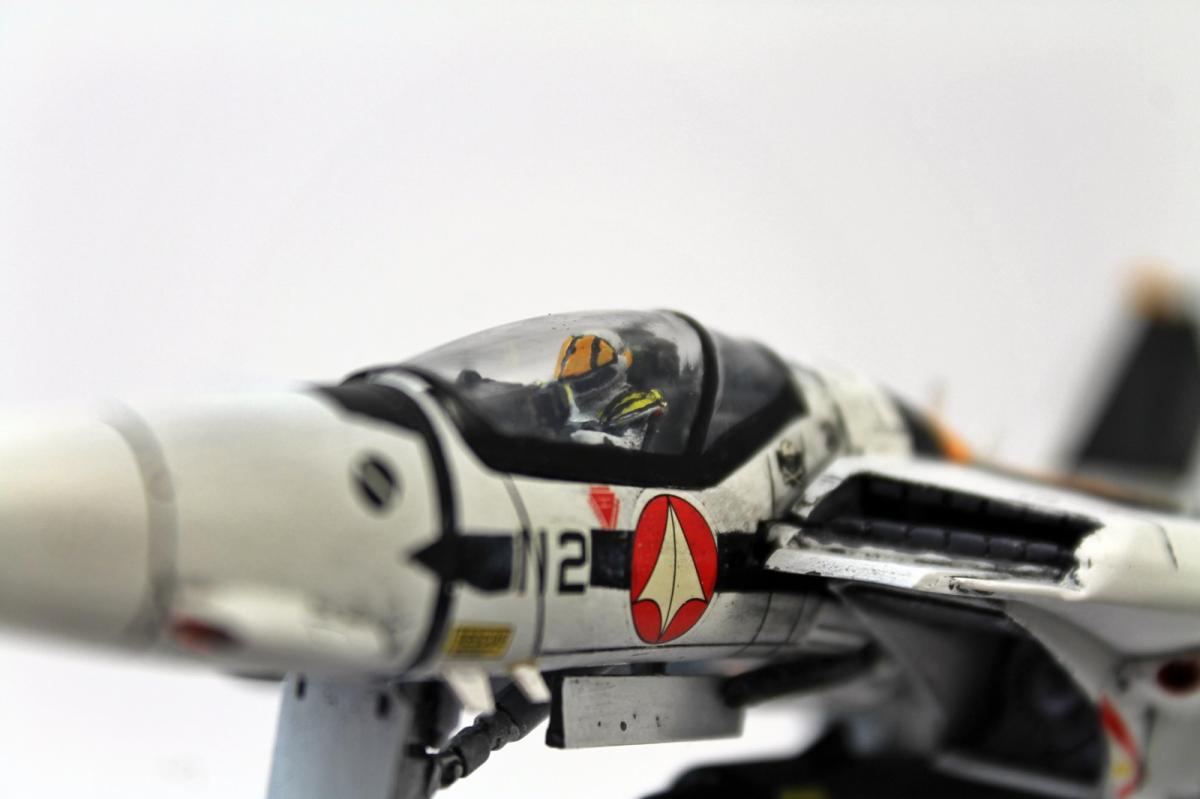
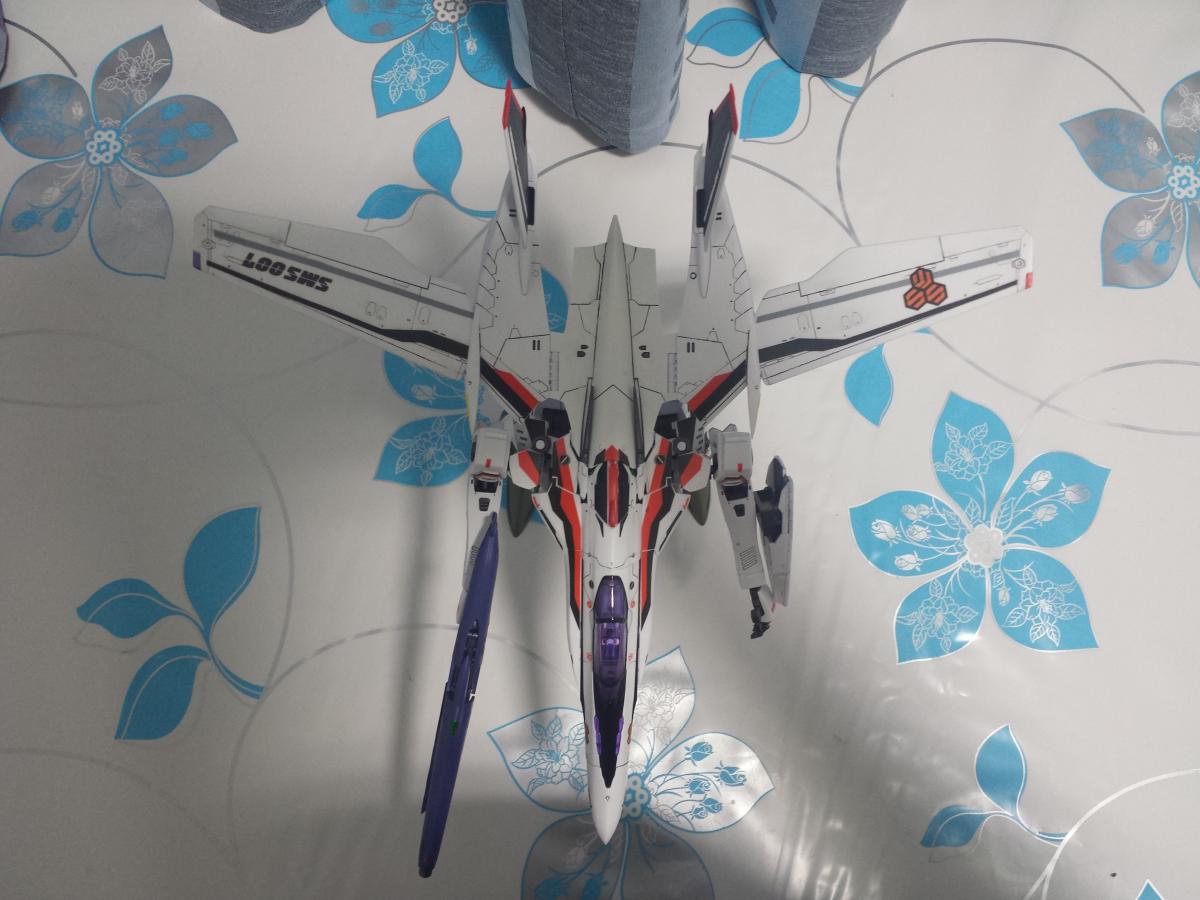
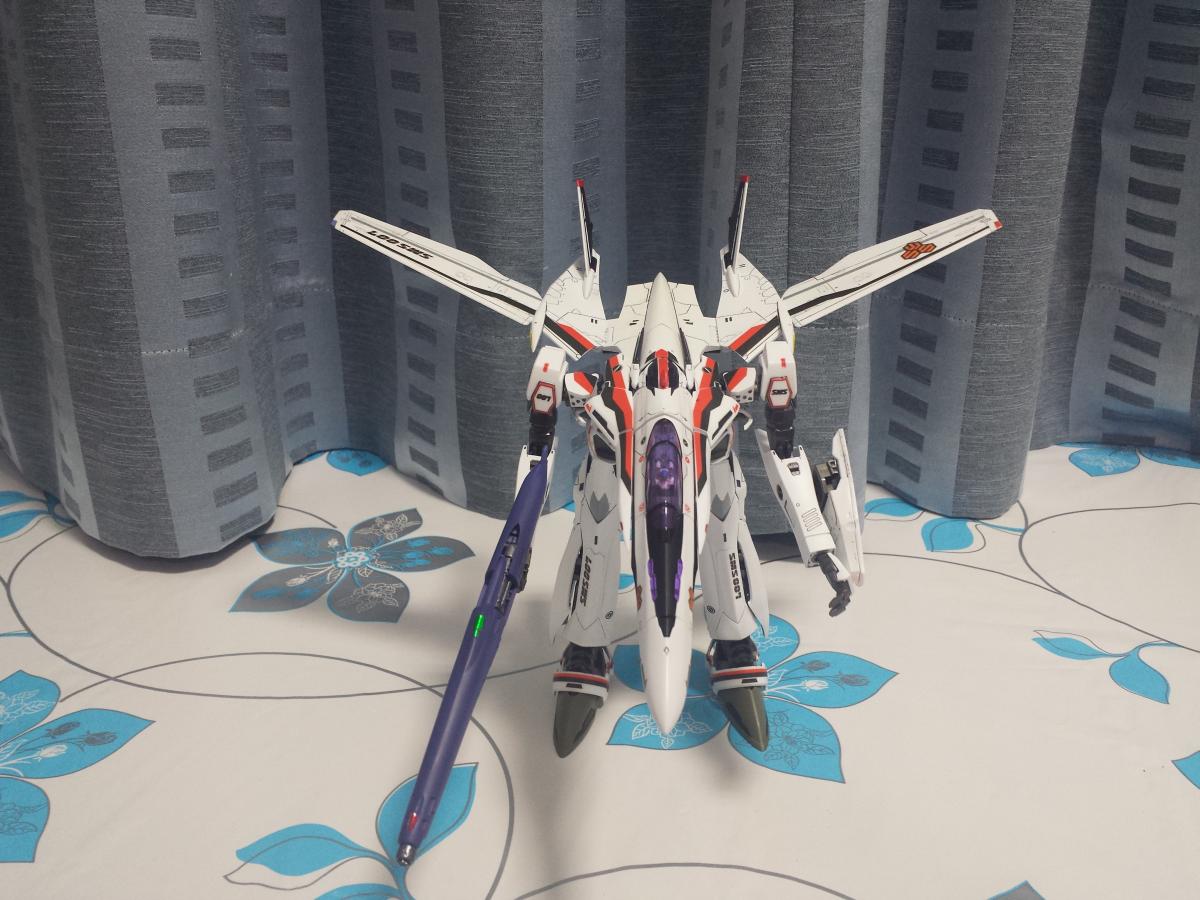
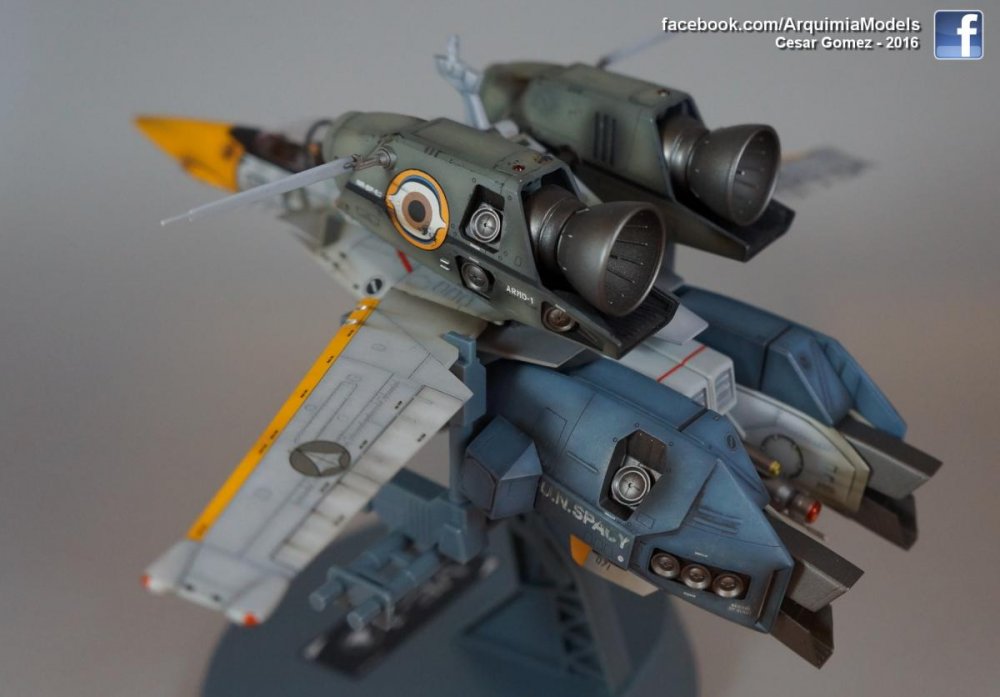
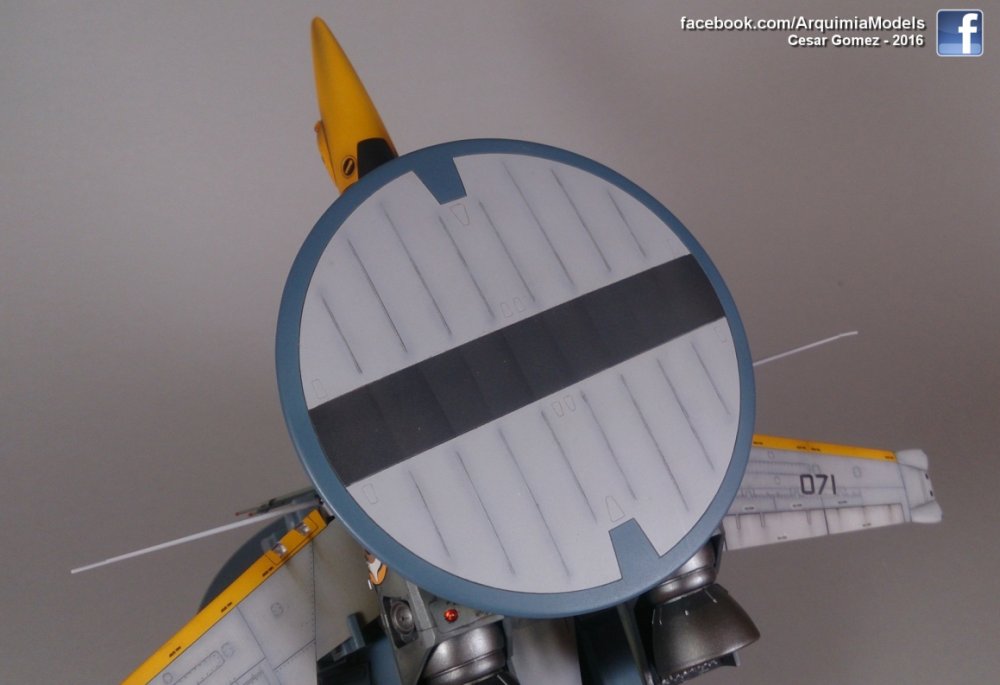
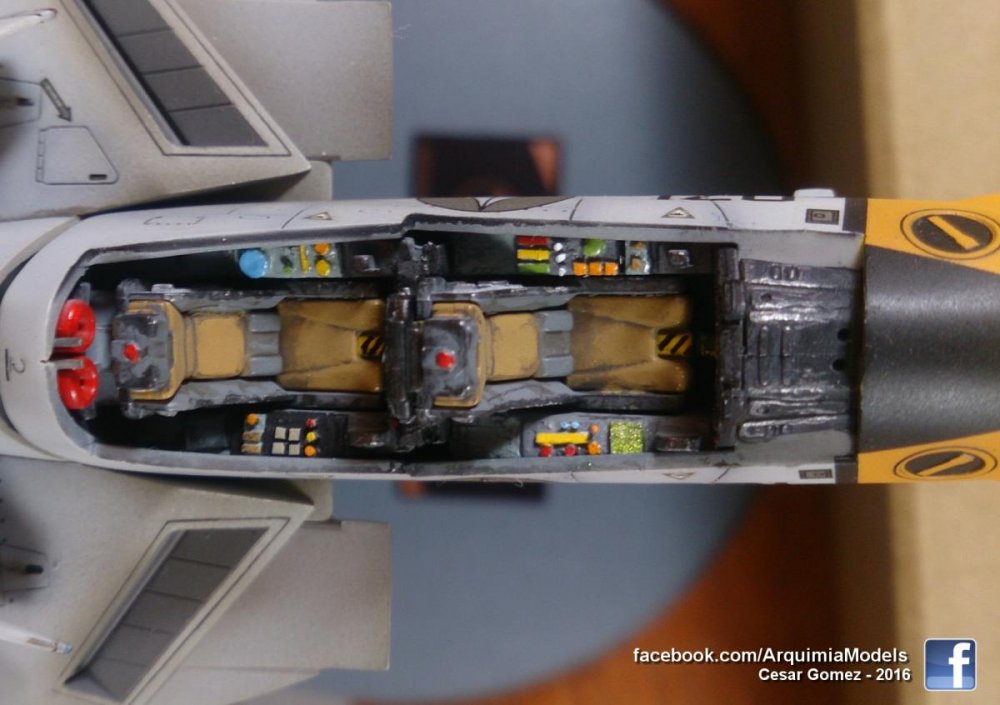
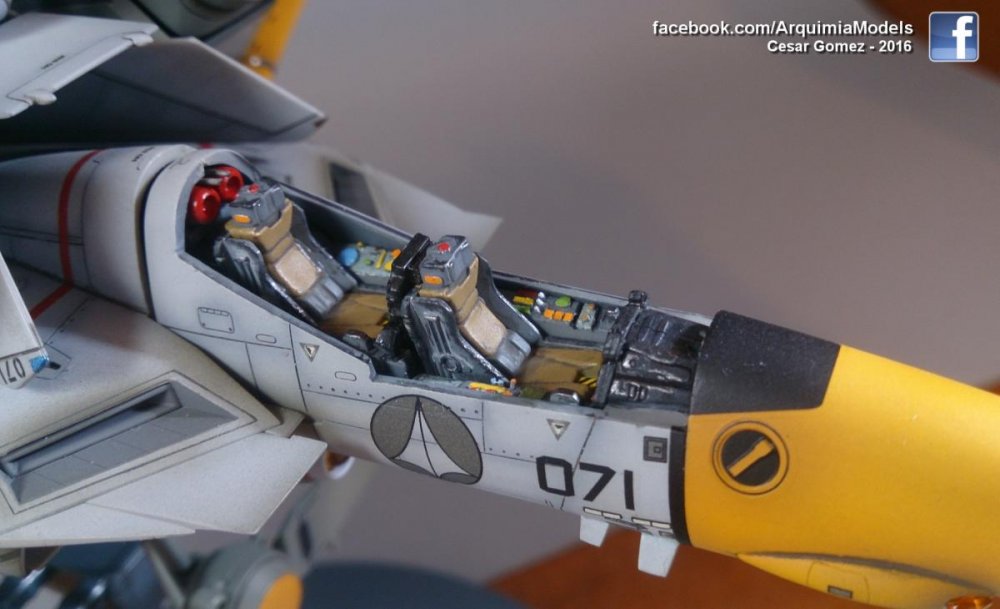
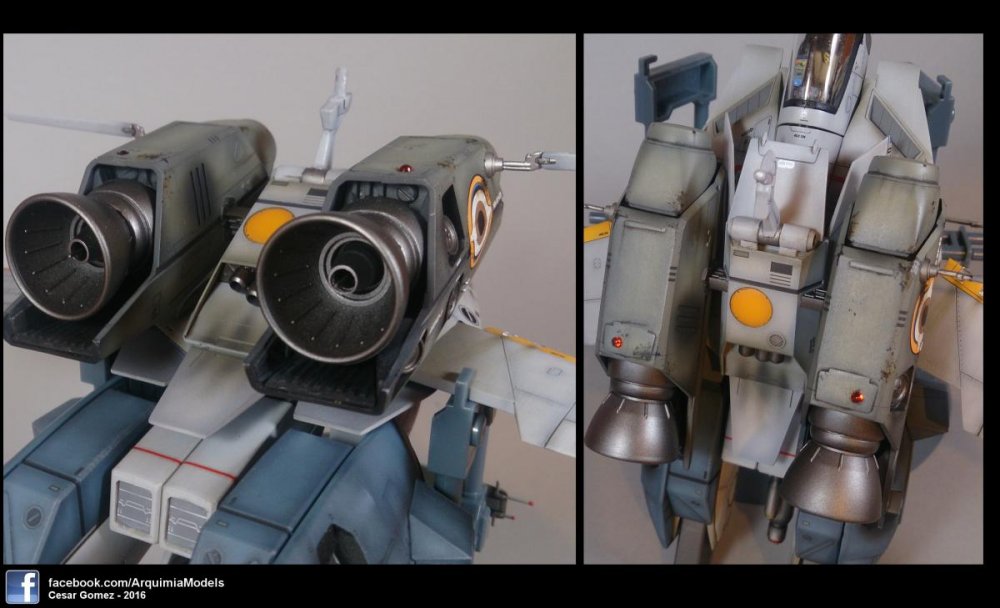
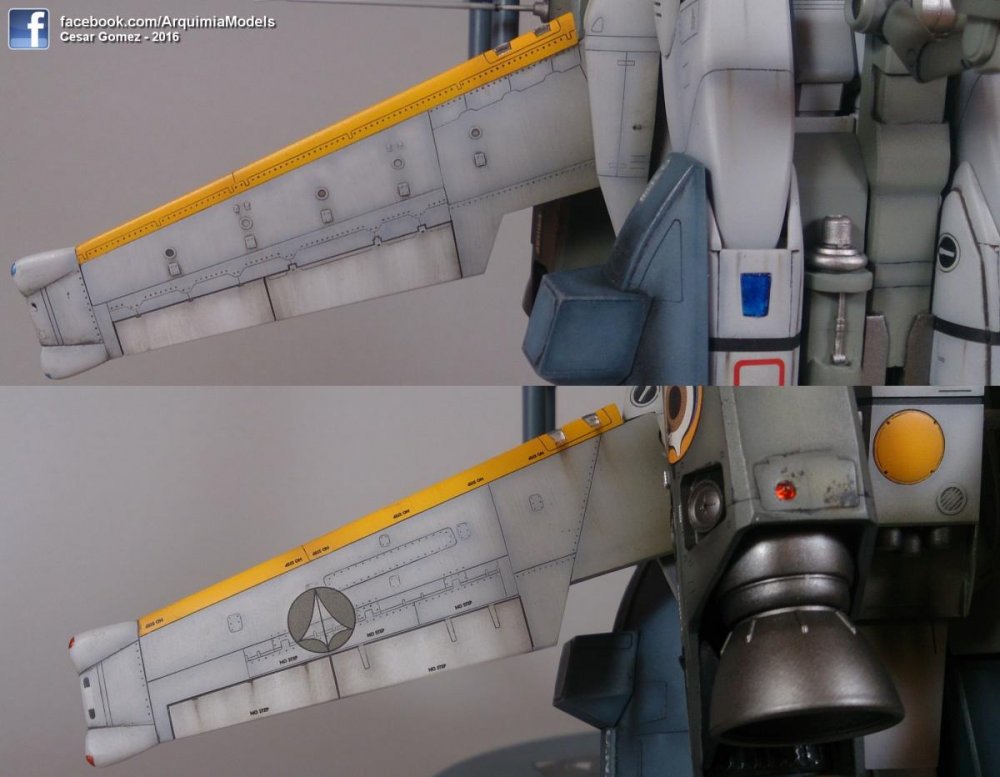
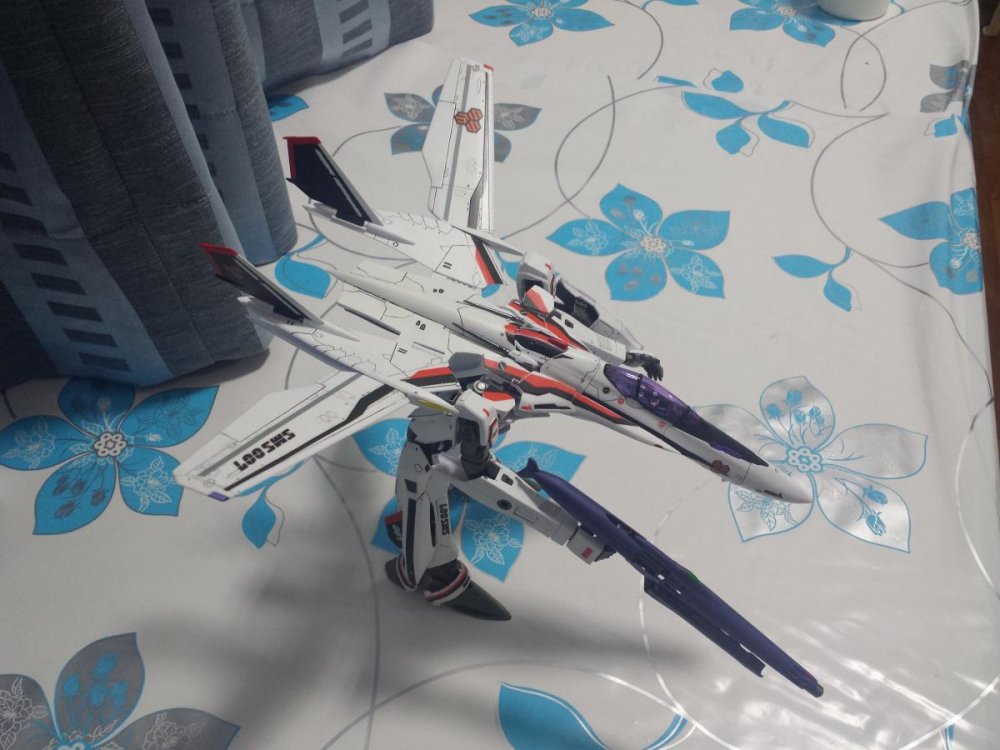
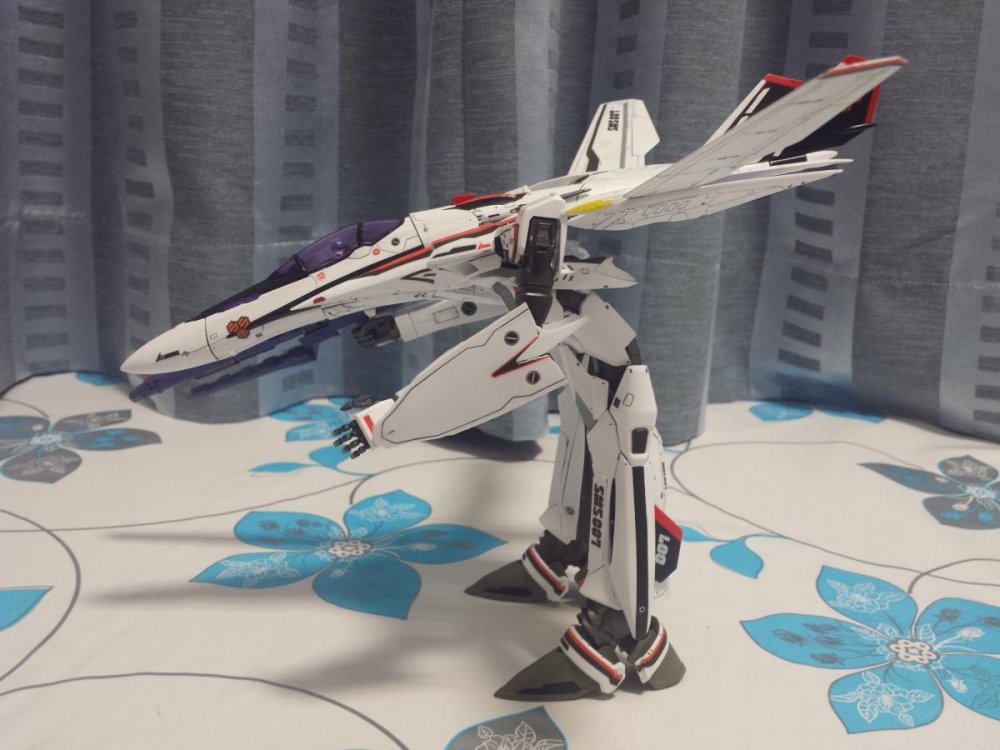
Hi guys! Here's another from the stash! As with my previous model (SV-51) this one have been sitting on the stash for too many years. The build was straight forward after building many vf-1, but the decals were another story. I believe that for being so much time on the box, when I started decaling there were many that literally disintegrated on the water. Lucky me, had many leftovers of previus valks. After all frustration, I believe it came up pretty decent. Now it's time to move to the vf-11 or 25. We'll see. Martin


-
This is such a neat color scheme with great tail fin decals that I had to build one. Here's the result.
-
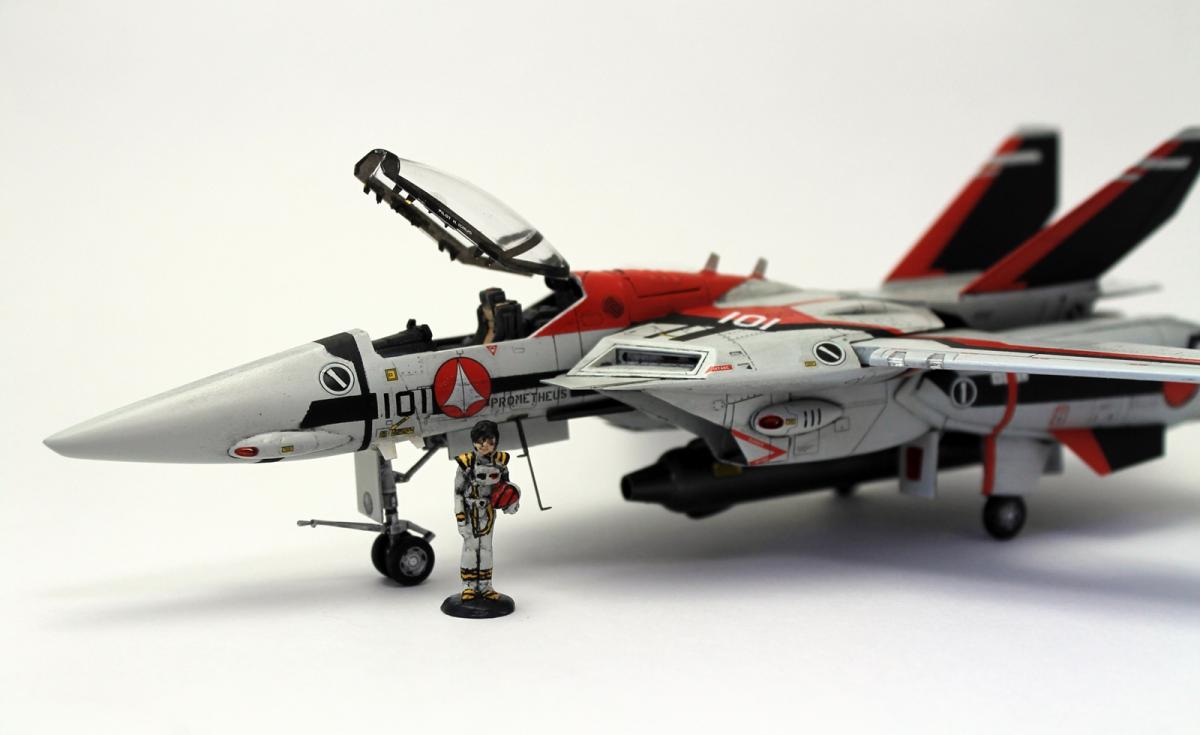
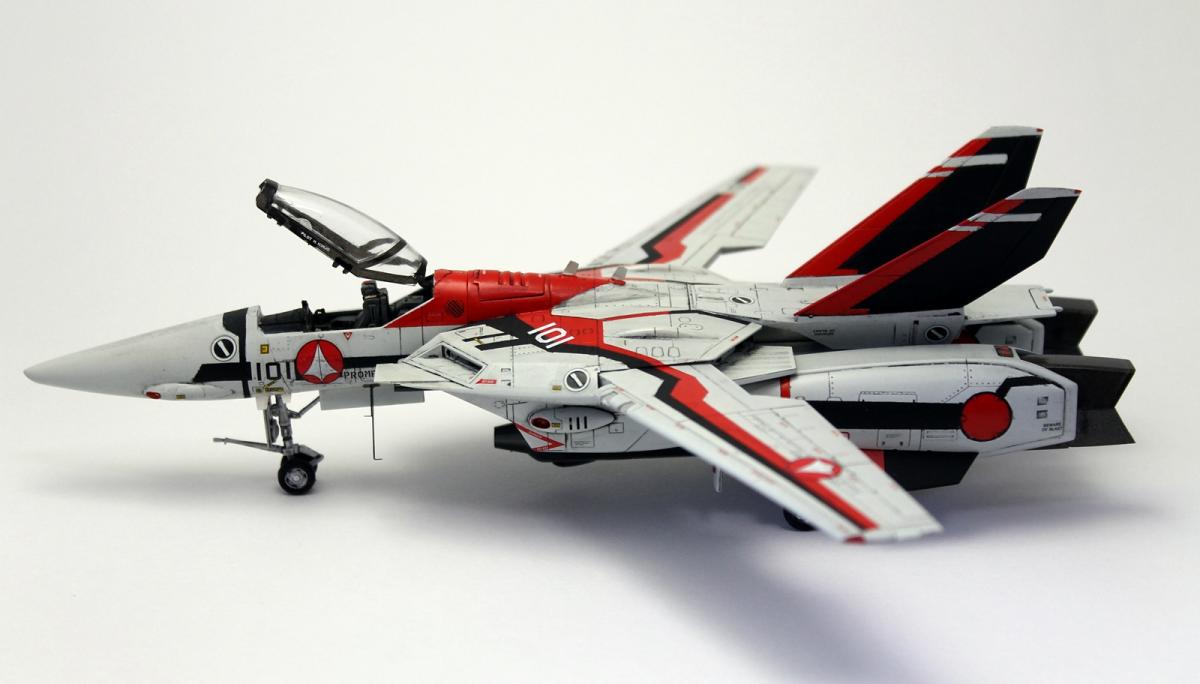
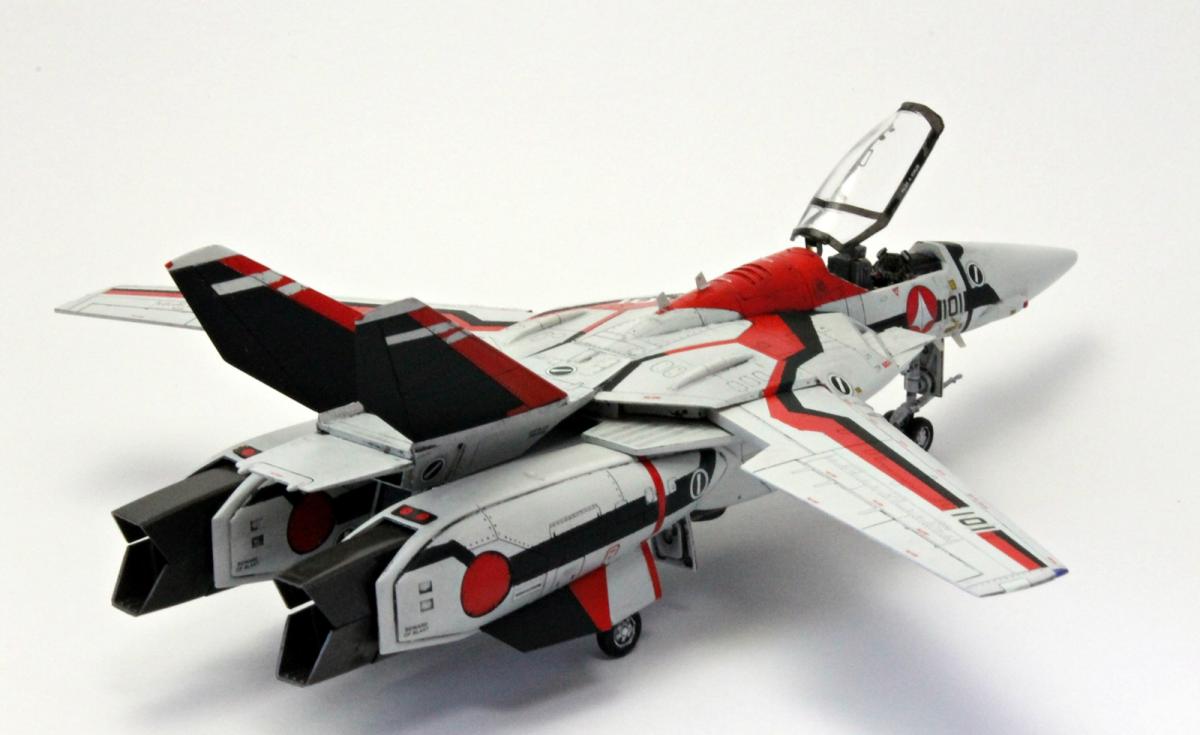
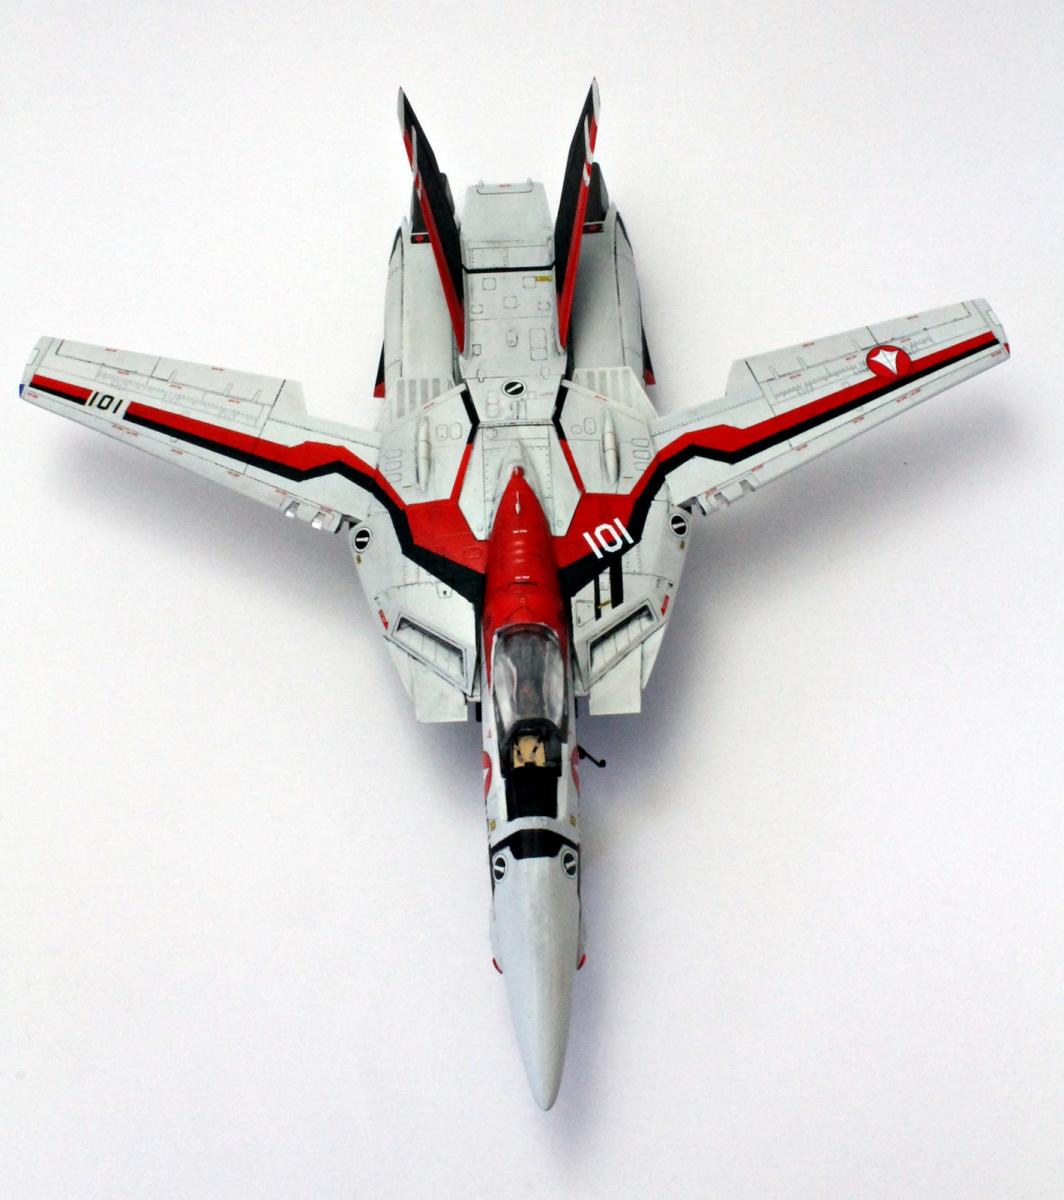
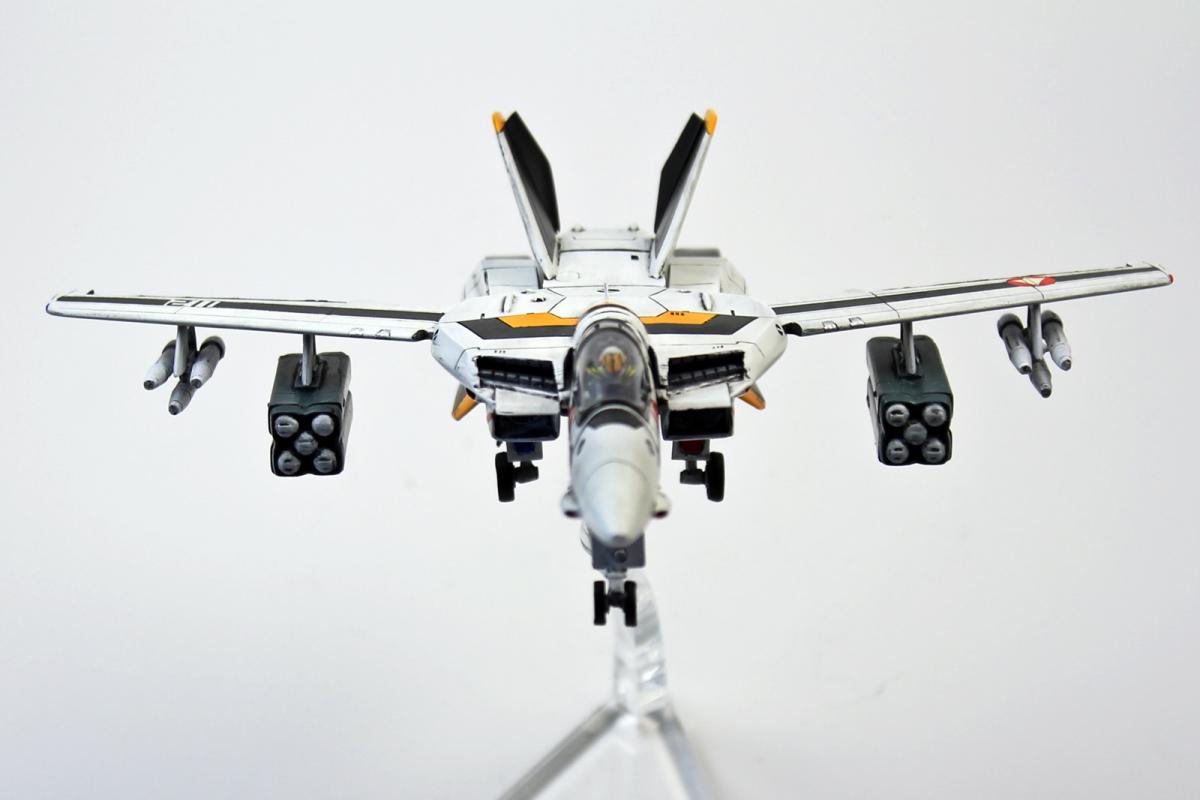
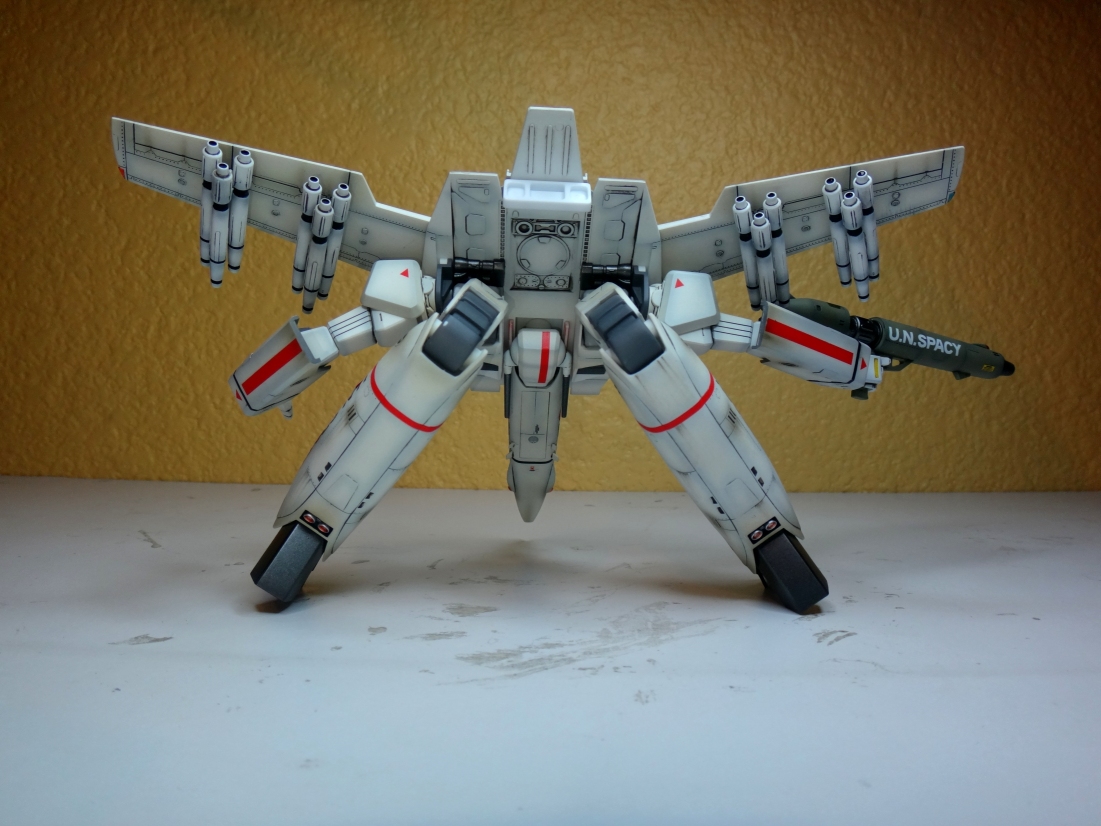
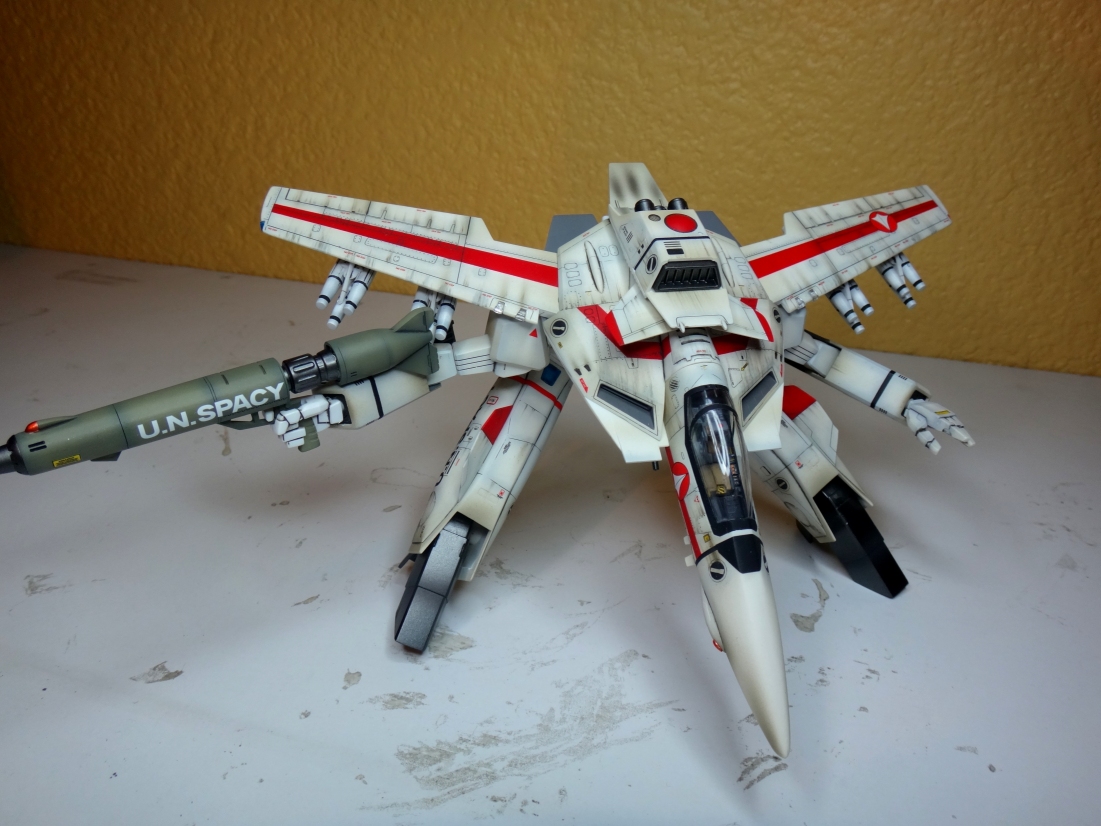
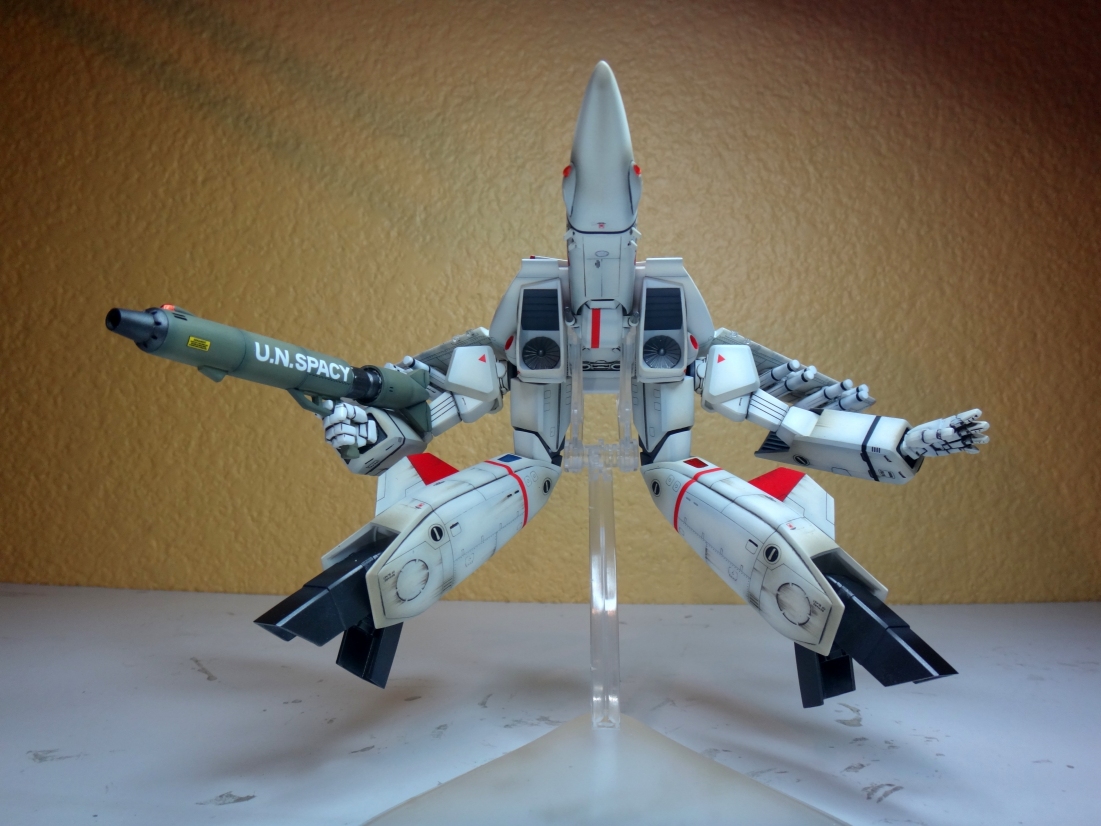
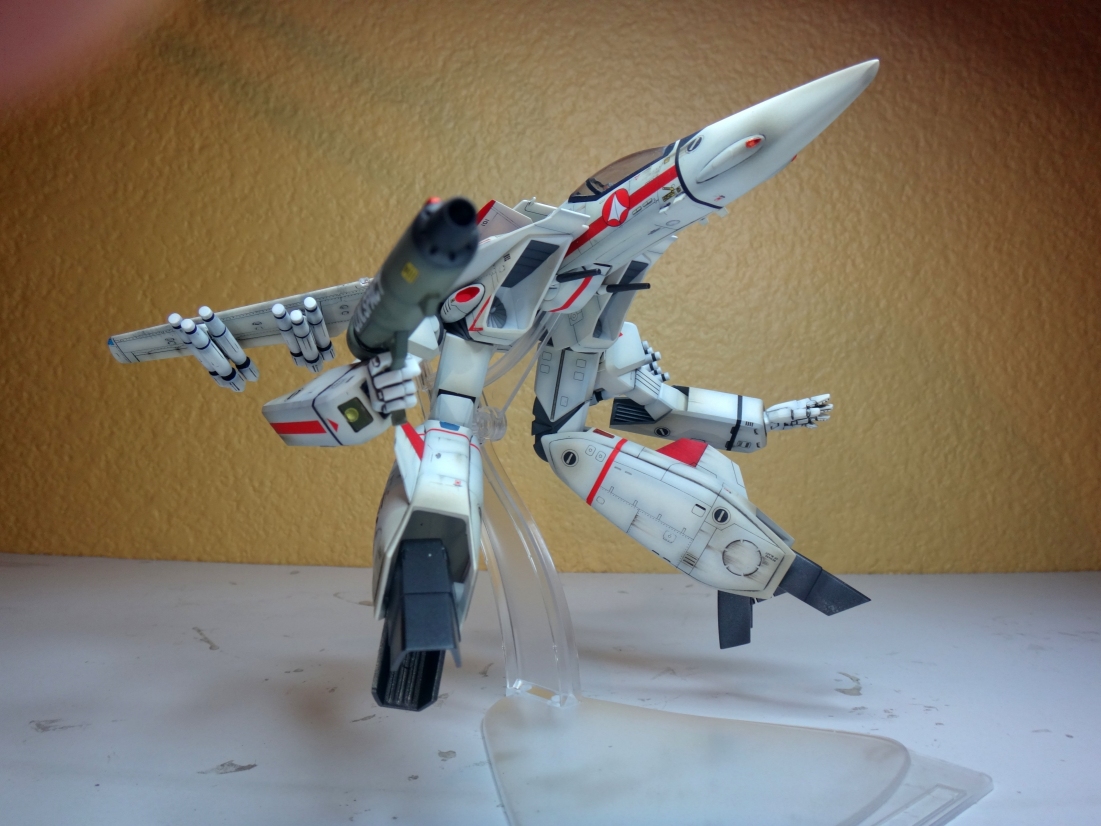
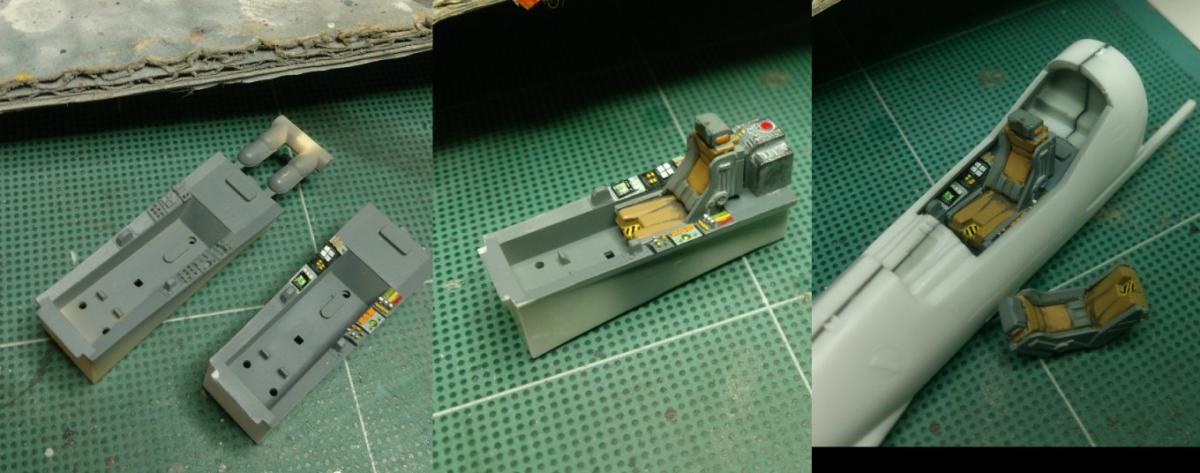
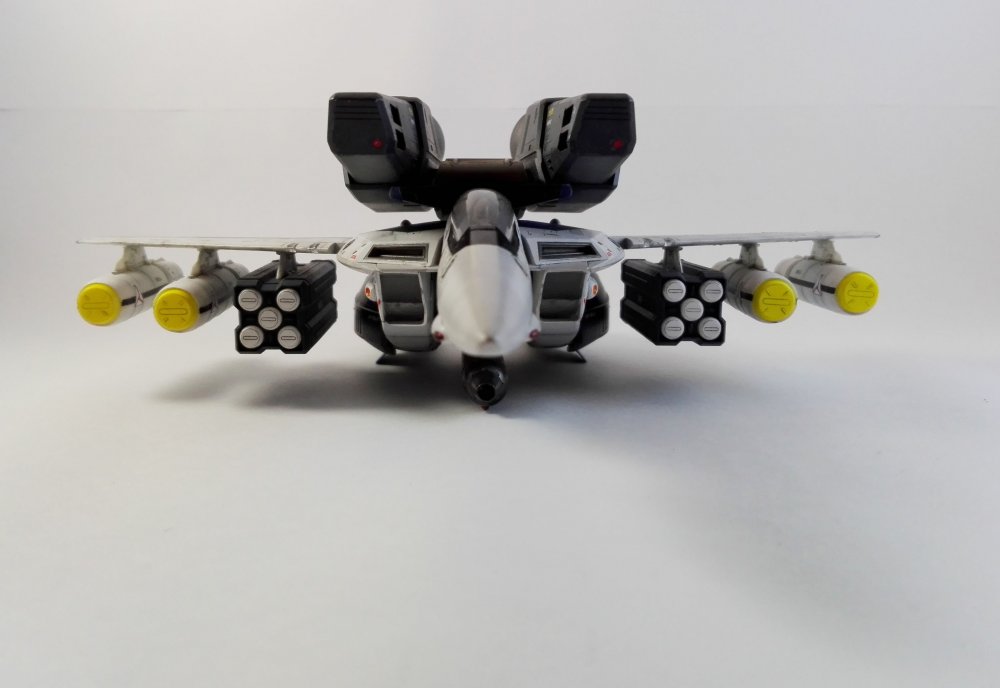
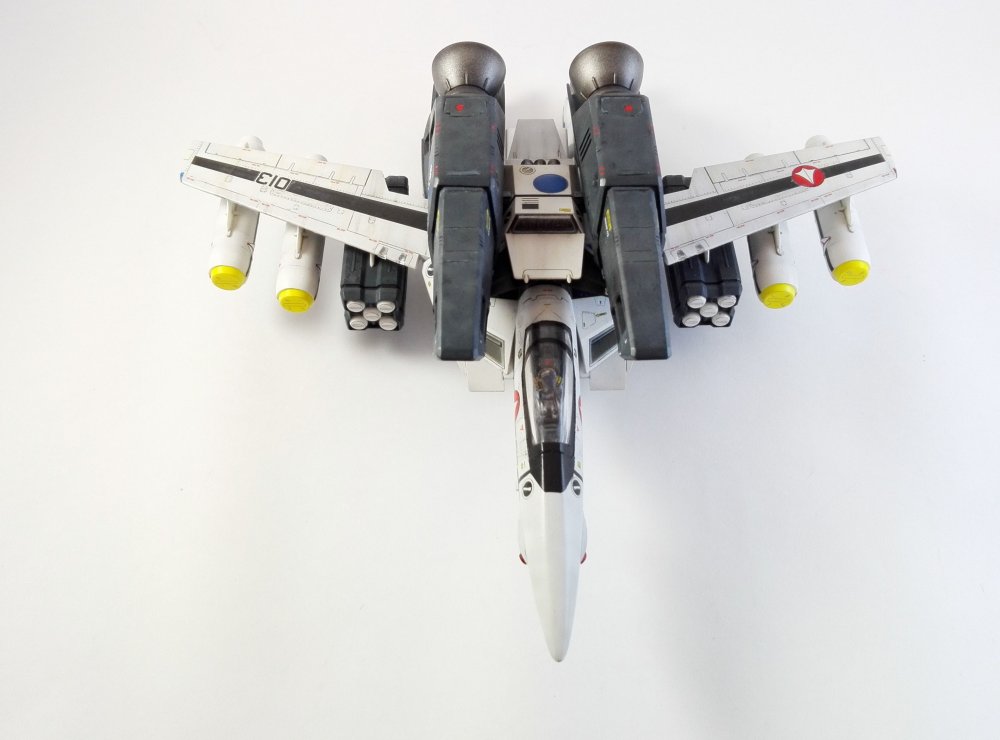
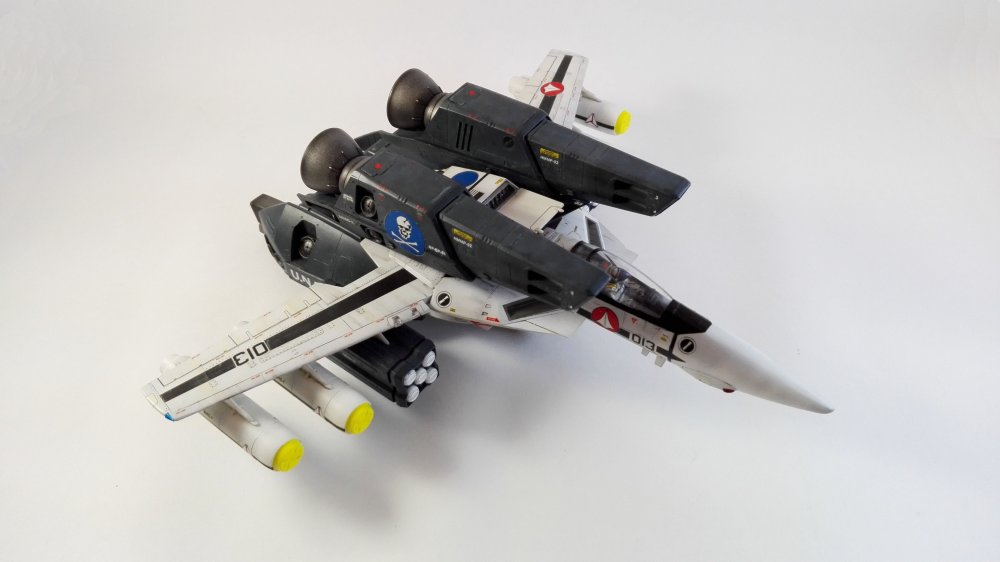
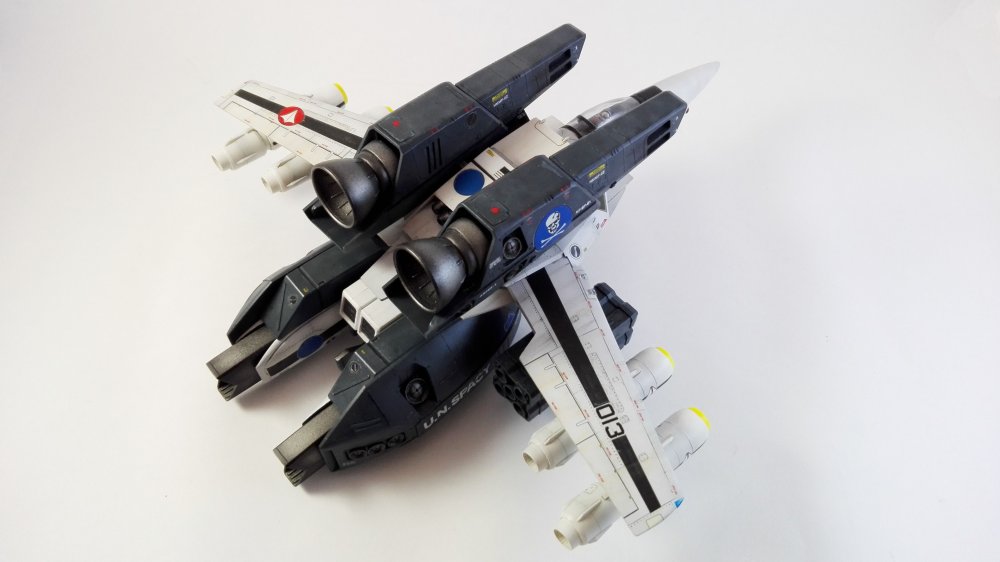
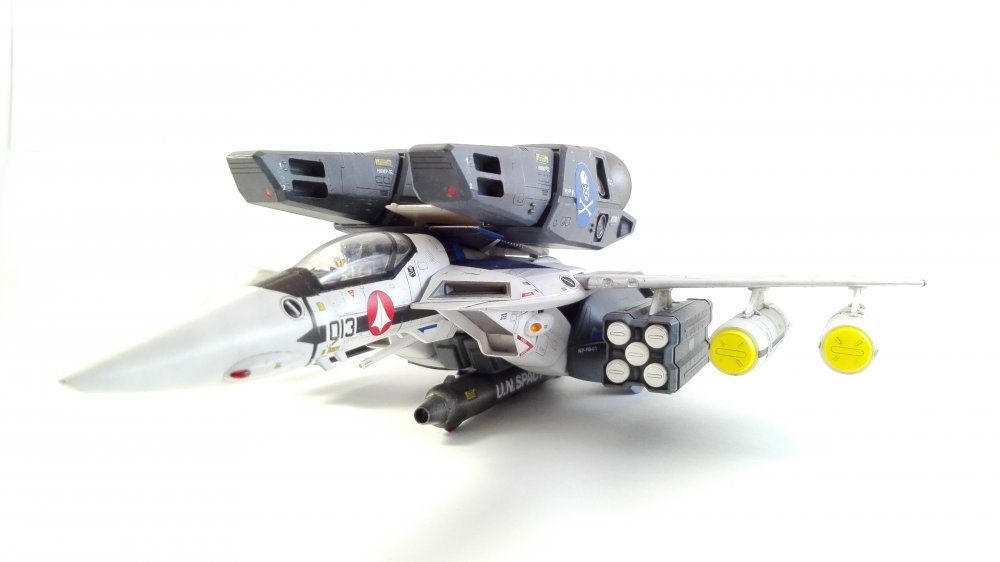
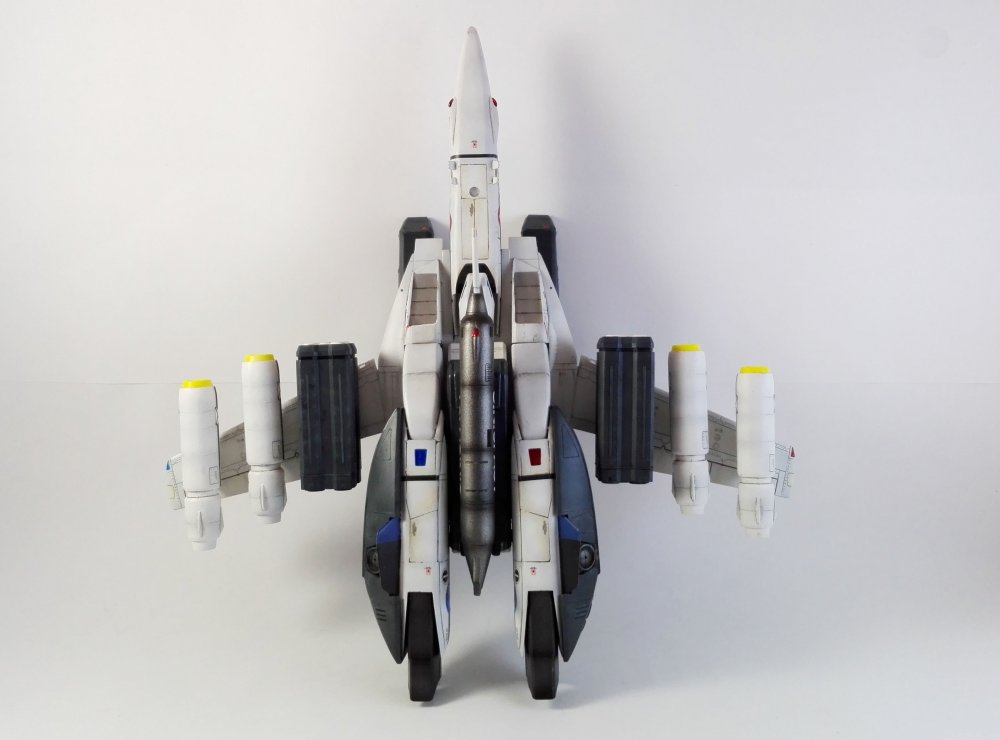
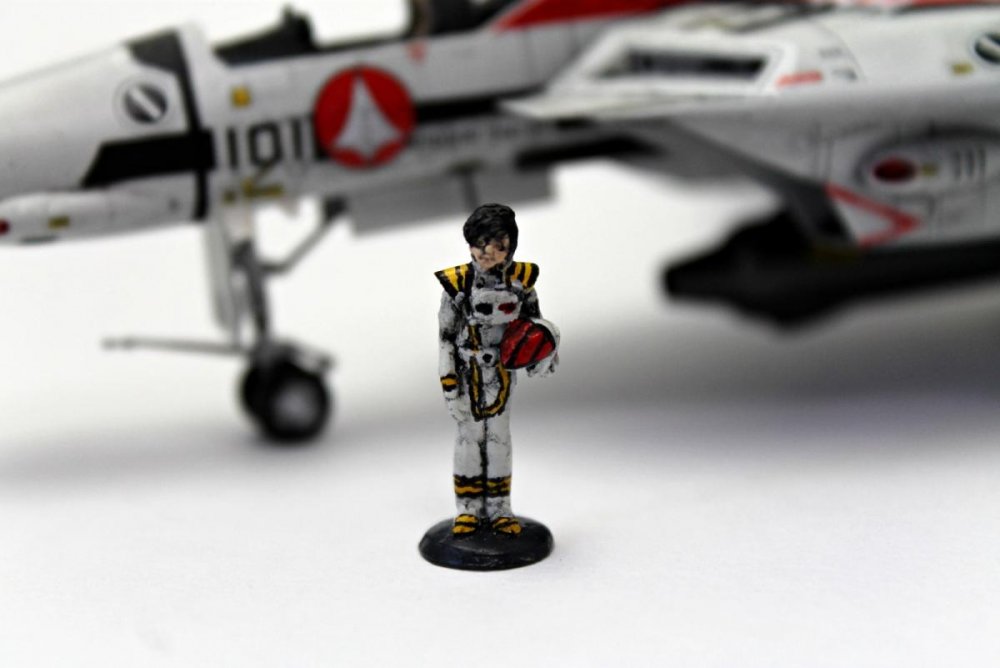
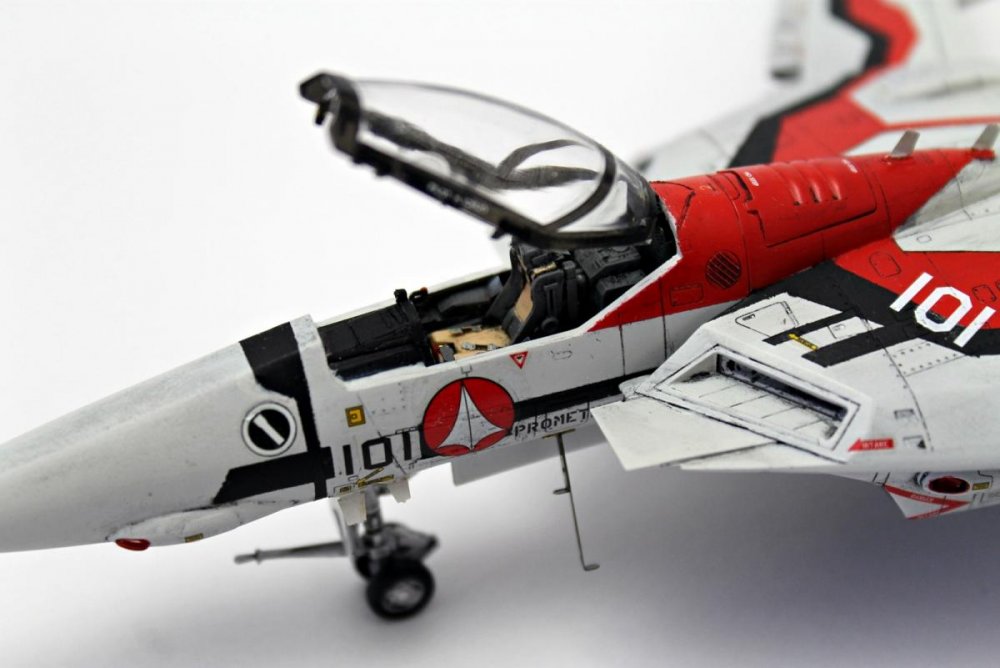
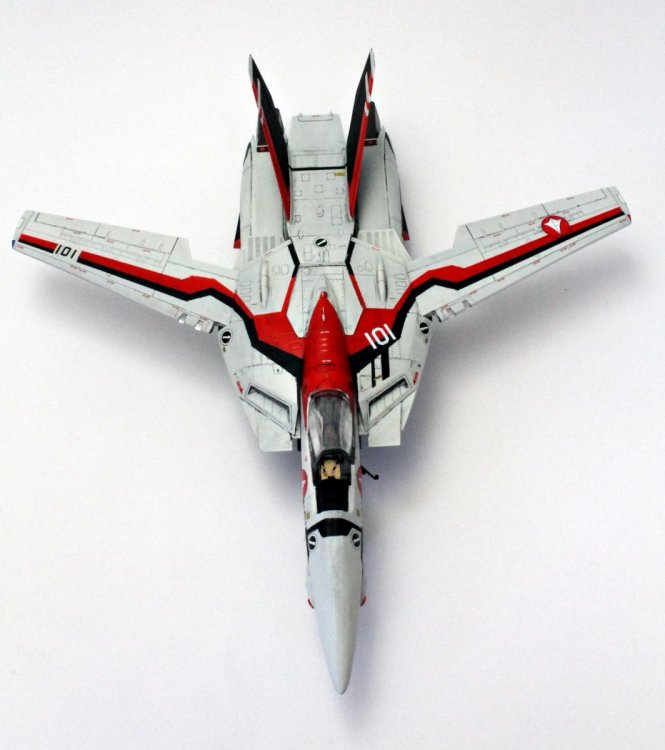
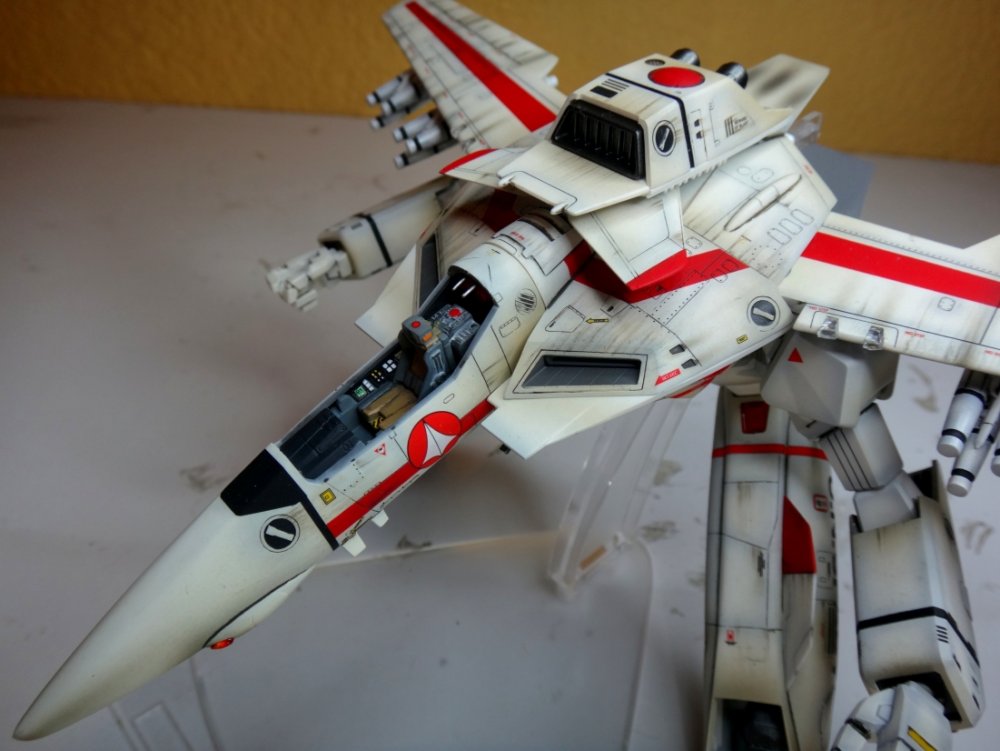
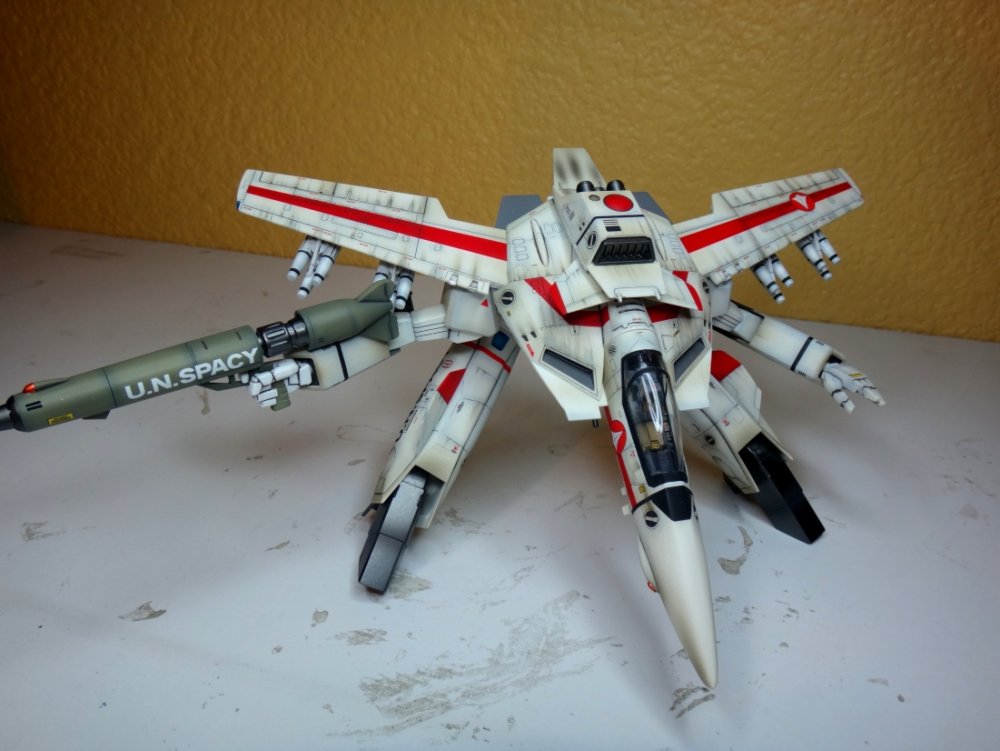
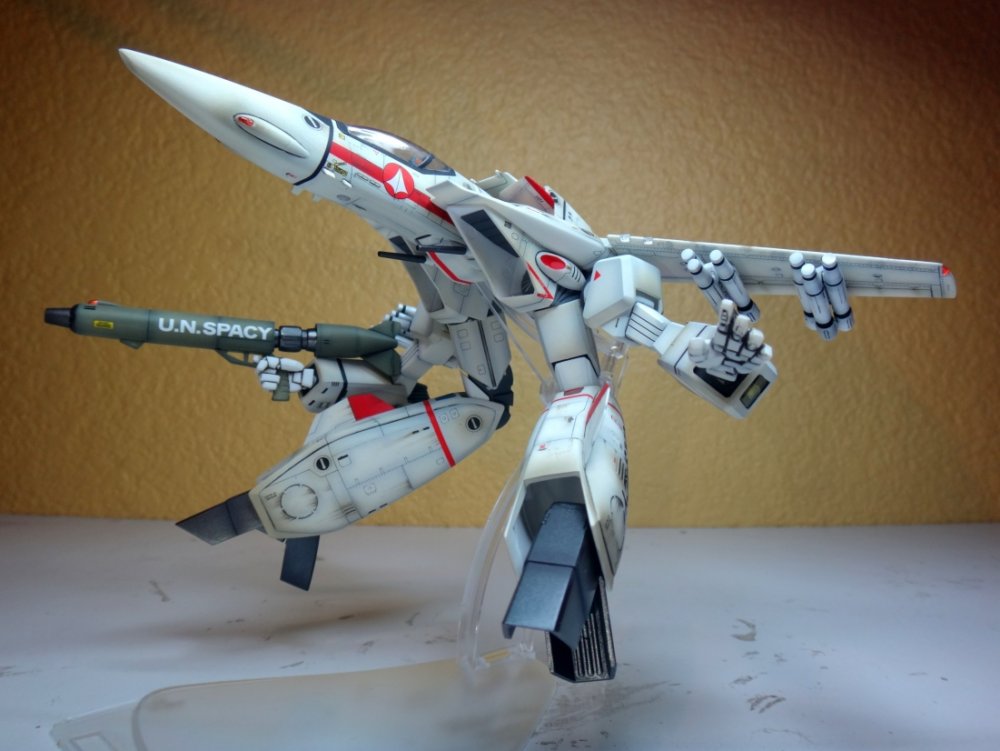
Finally finished! What I was looking to do was this: Did I succeed? Couple of firsts for me on this kit. All of the red and black were painted, not decals. Never done that much of an extensive masking/painting before. Used the Jasmine Models PE set for the first time. And, used Wave sculpting putty to modify a Studio Starforge pilot figure to get a the First figure.


-
I noticed this up for pre-order on HLJ as I was browsing. http://hlj.com/product/hsg65833 I'm not caught up on Delta, but it's a smart-looking VF-1 scheme... and I take it it rocks the EX-Gear system?
-
From the album: Various VF's, Bandai 1/72
The screw that hold the hip joint door in place :-)... Could not be right in the middle of the door because of the mechanism behind it...© Skypoet Inc. International
-
From the album: Various VF's, Bandai 1/72
VF-1A/S, Bandai 1/72, transformable. WIP: no stickers, paint or decals yet... I want to incorporate some possible improvements. The hip joints now hold sufficiently in place, thanks to a small screw on the hip joint door. Simple but does the job, and does not impact transformability or mobility.© Skypoet Inc. International.
-
From the album: Various VF's, Bandai 1/72
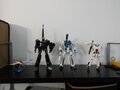
Sv-262H, VF-31, VF-1A/S, Bandai 1/72, transformable. Size comparison. All WIP: no stickers, paint or decals yet... I want to incorporate some possible improvements, mostly on the flimsy VF-1. The hip joints now hold sufficiently in place, thanks to a small screw on the hip joint door. Simple but does the job, and does not impact transformability or mobility.© Skypoet Inc. International.
-
From the album: Various VF's, Bandai 1/72
The sturdy Sv-262 H Draken in its glory, from above, WIP.© Skypoet Inc. International.
-
From the album: Various VF's, Bandai 1/72
The sturdy Bandai 1/72 Sv-262 H Draken in its glory, from above, WIP.© Skypoet Inc. International.
-
Hello, I have just received the superb Master File dedicated to the VF-4, so here is one of my resin VF-4 kit, a good Club-M recast made by SMS: instruction sheets and decals: Main resin parts: See ya !
-
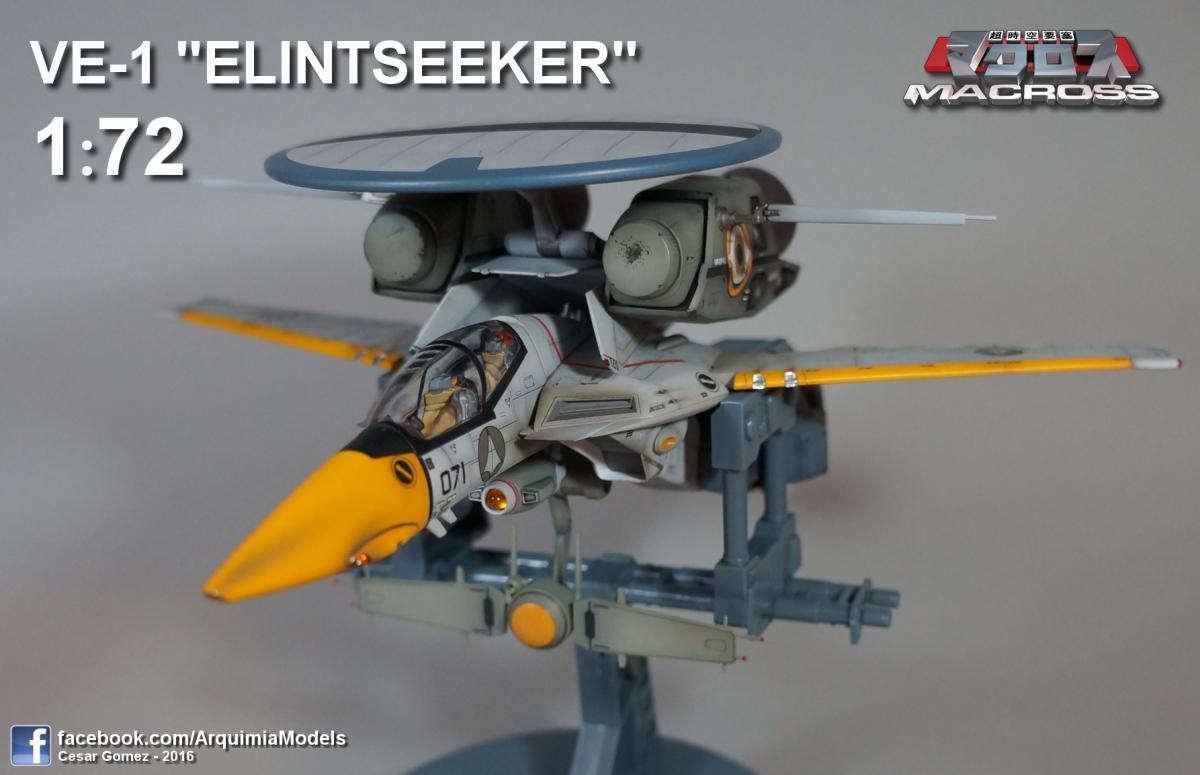
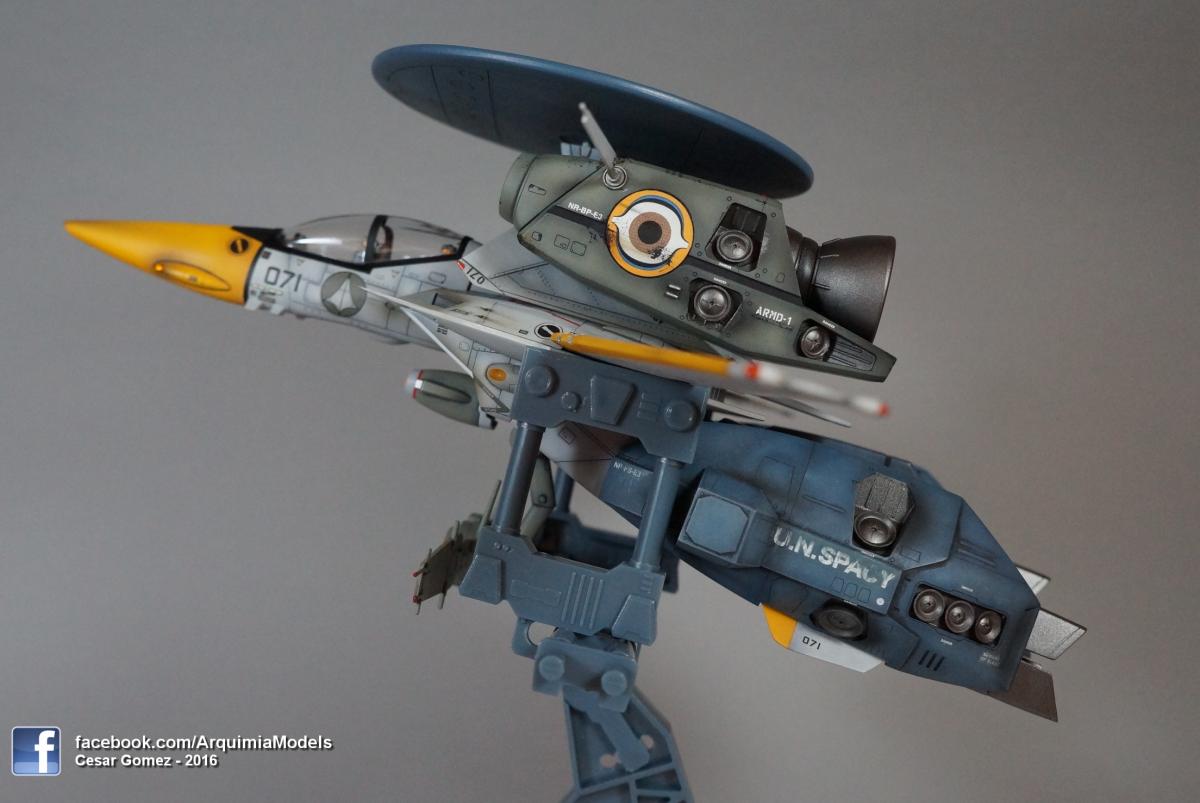
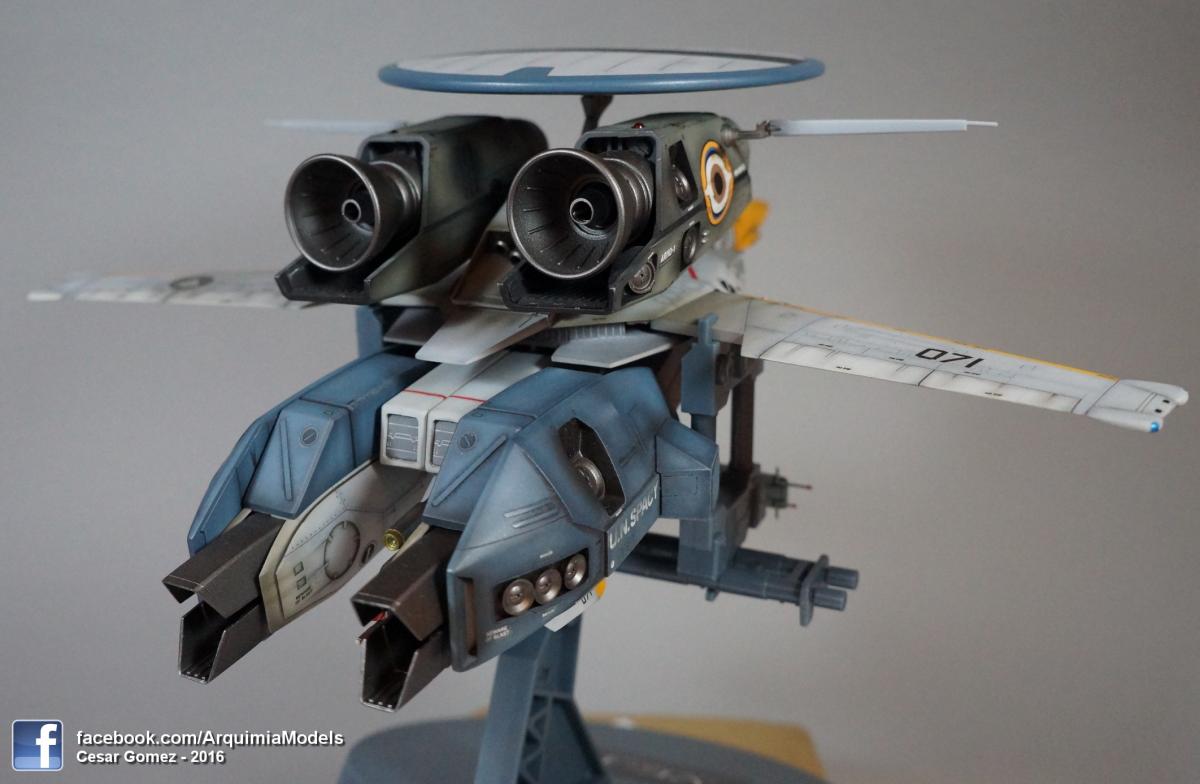
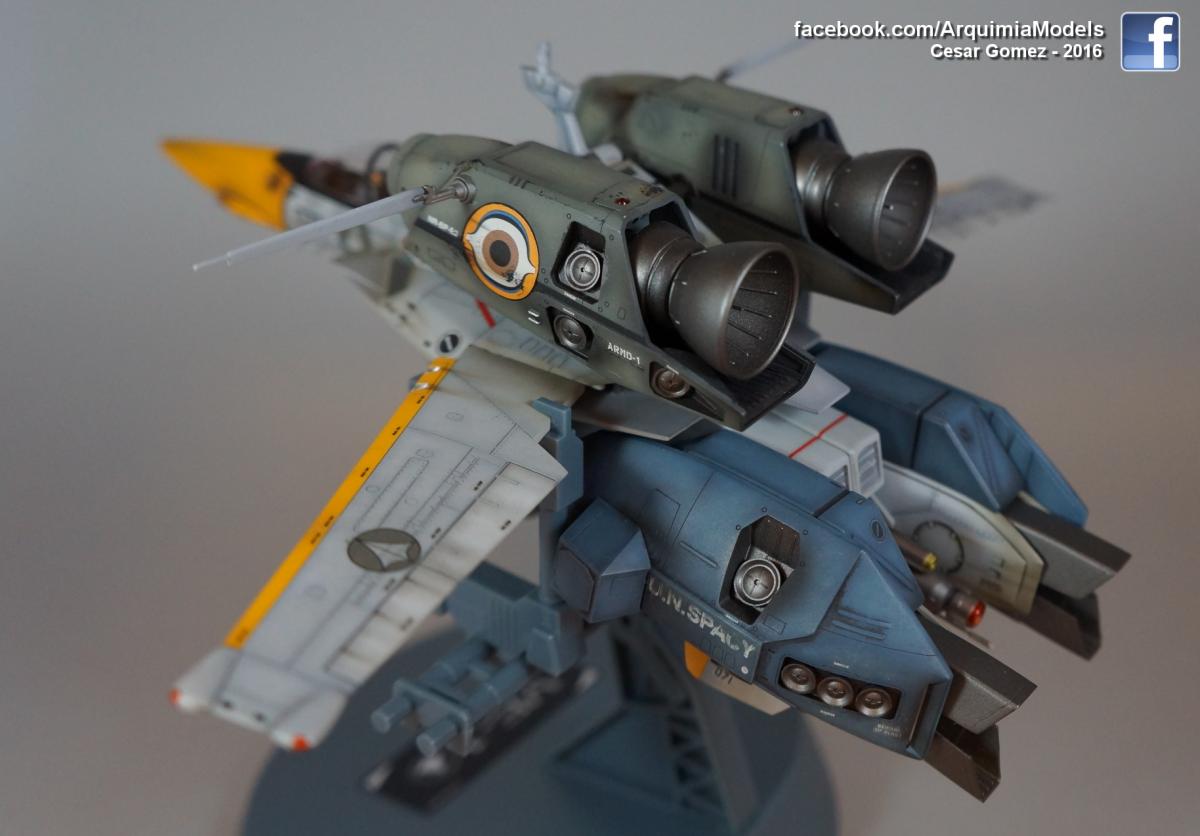
Hi!! Long time since my last post. I want to share my VE-1 Elintseeker, it´s been like 2 years since I finished it, it was in my shelf an eternit - like 10 years or so- waiting to be built), It has some scratch build here and there, specially in the cockpit. Let me know what you think guys.


-
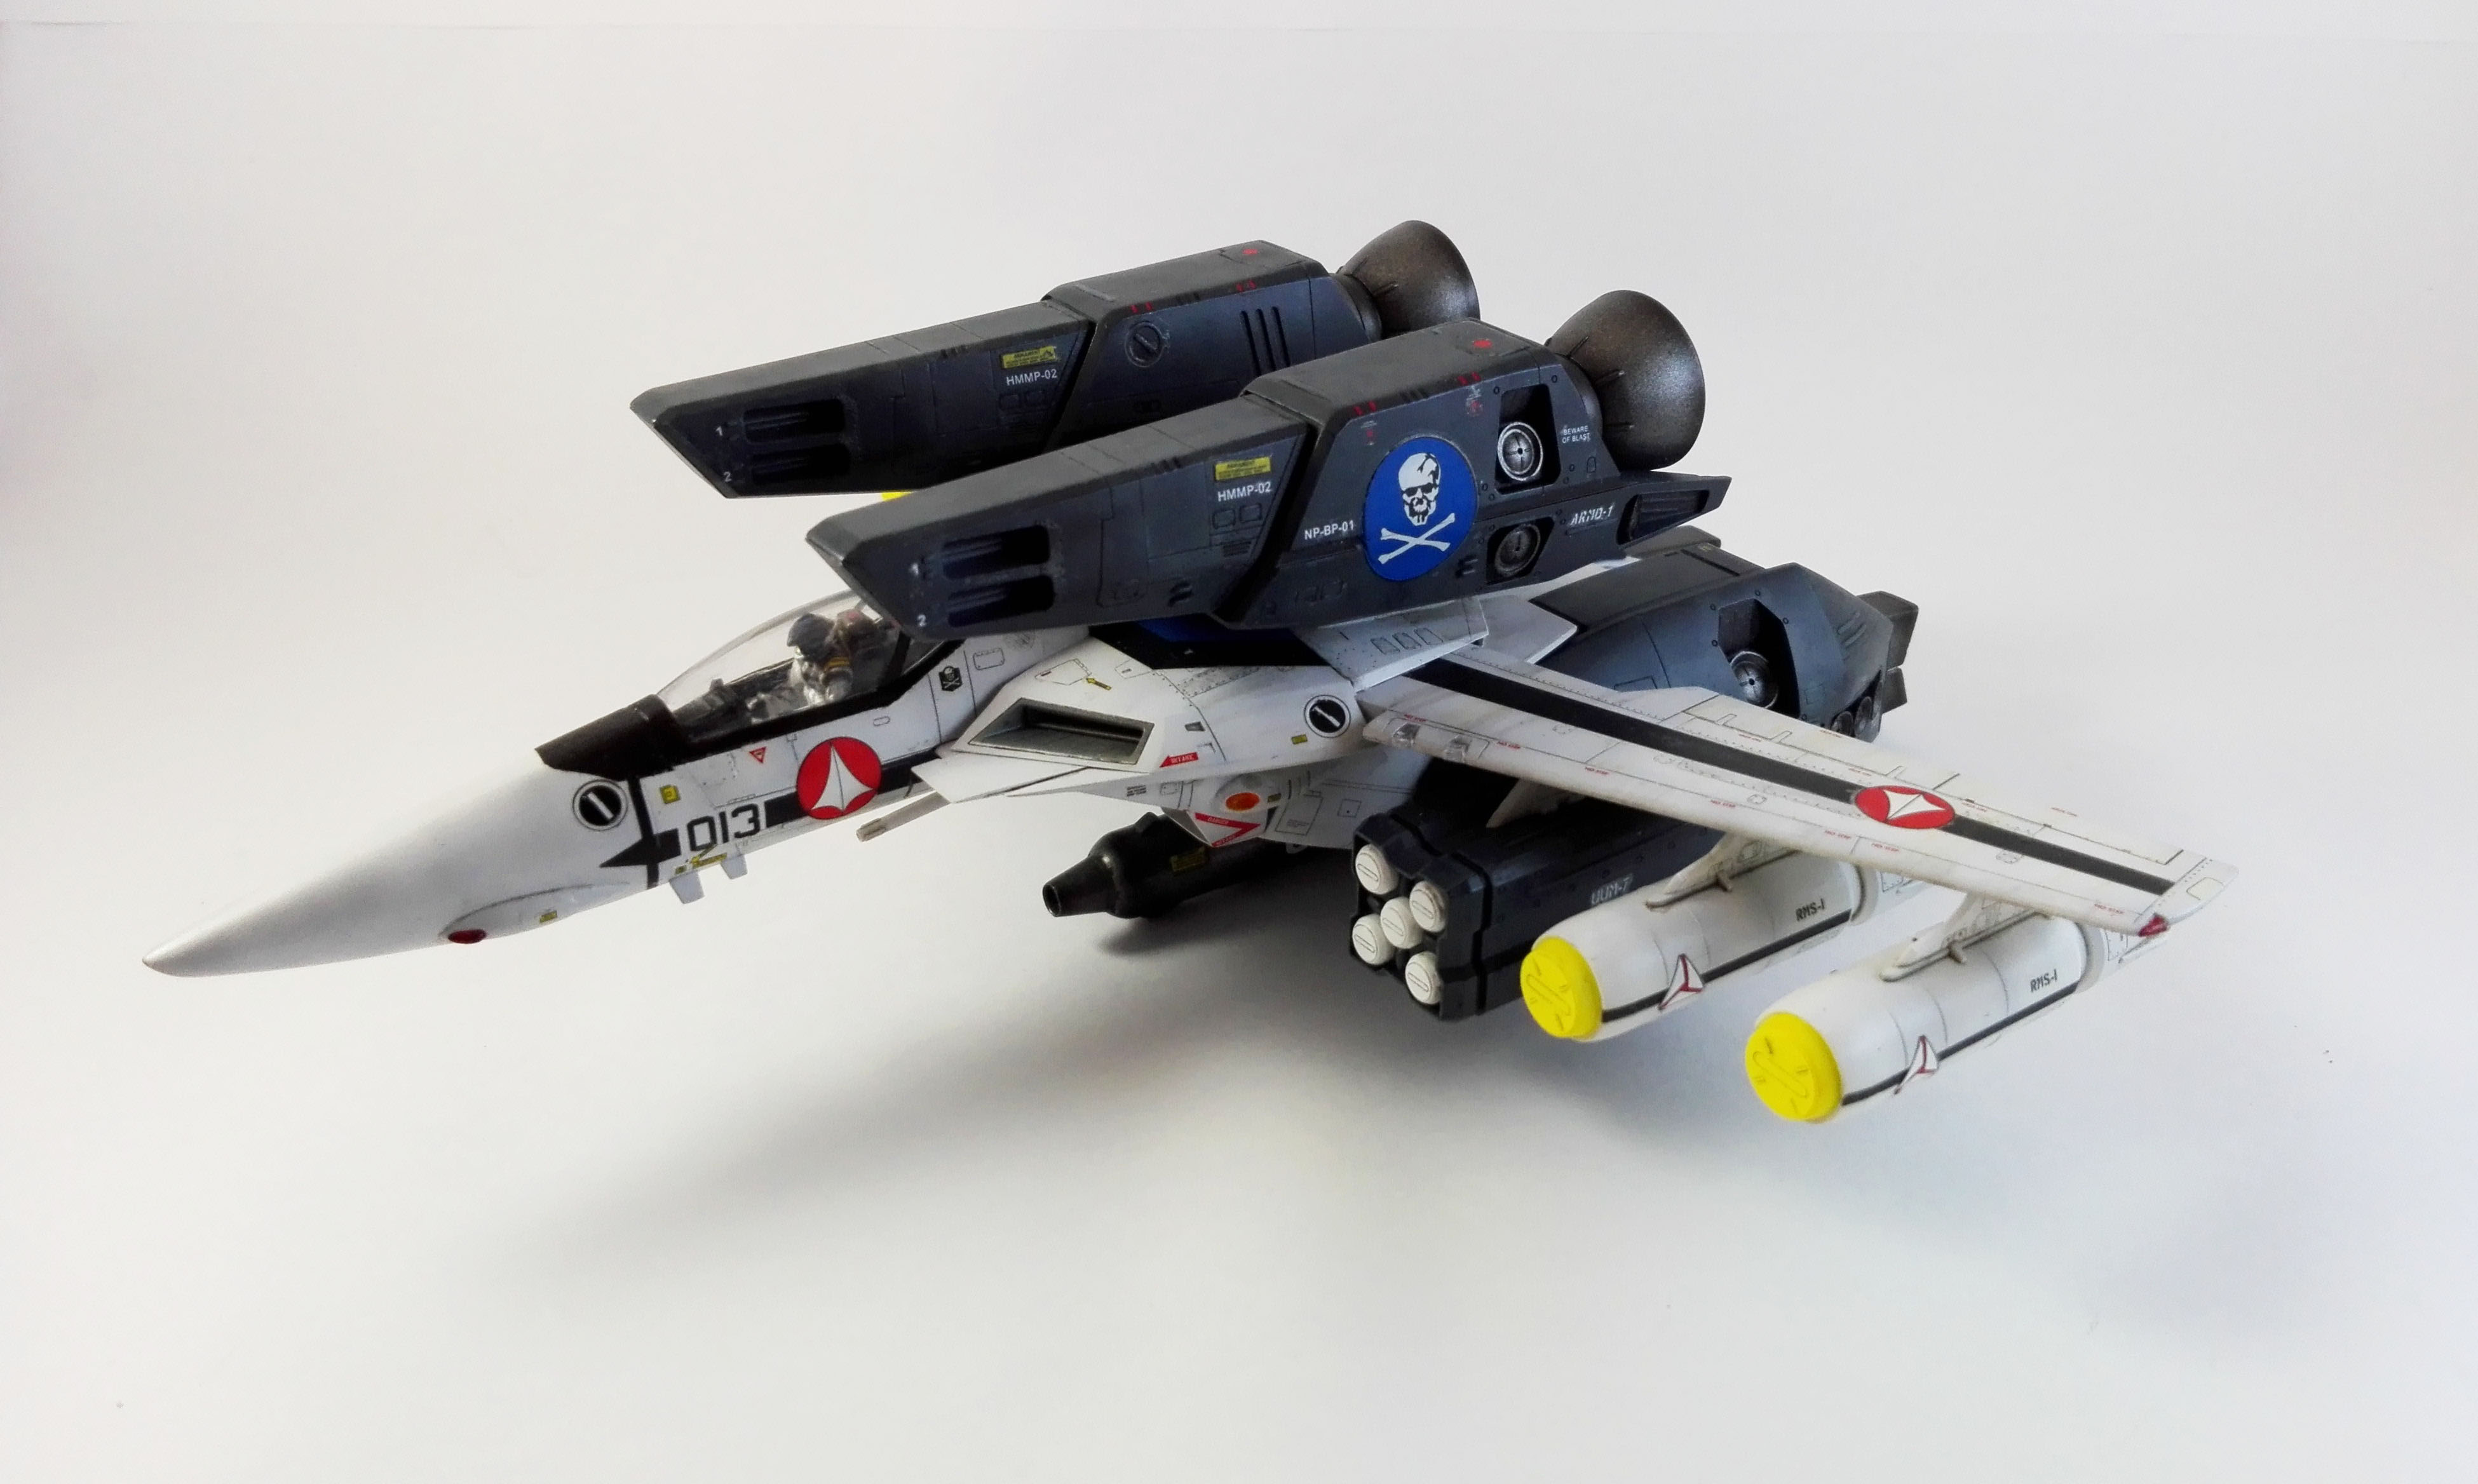
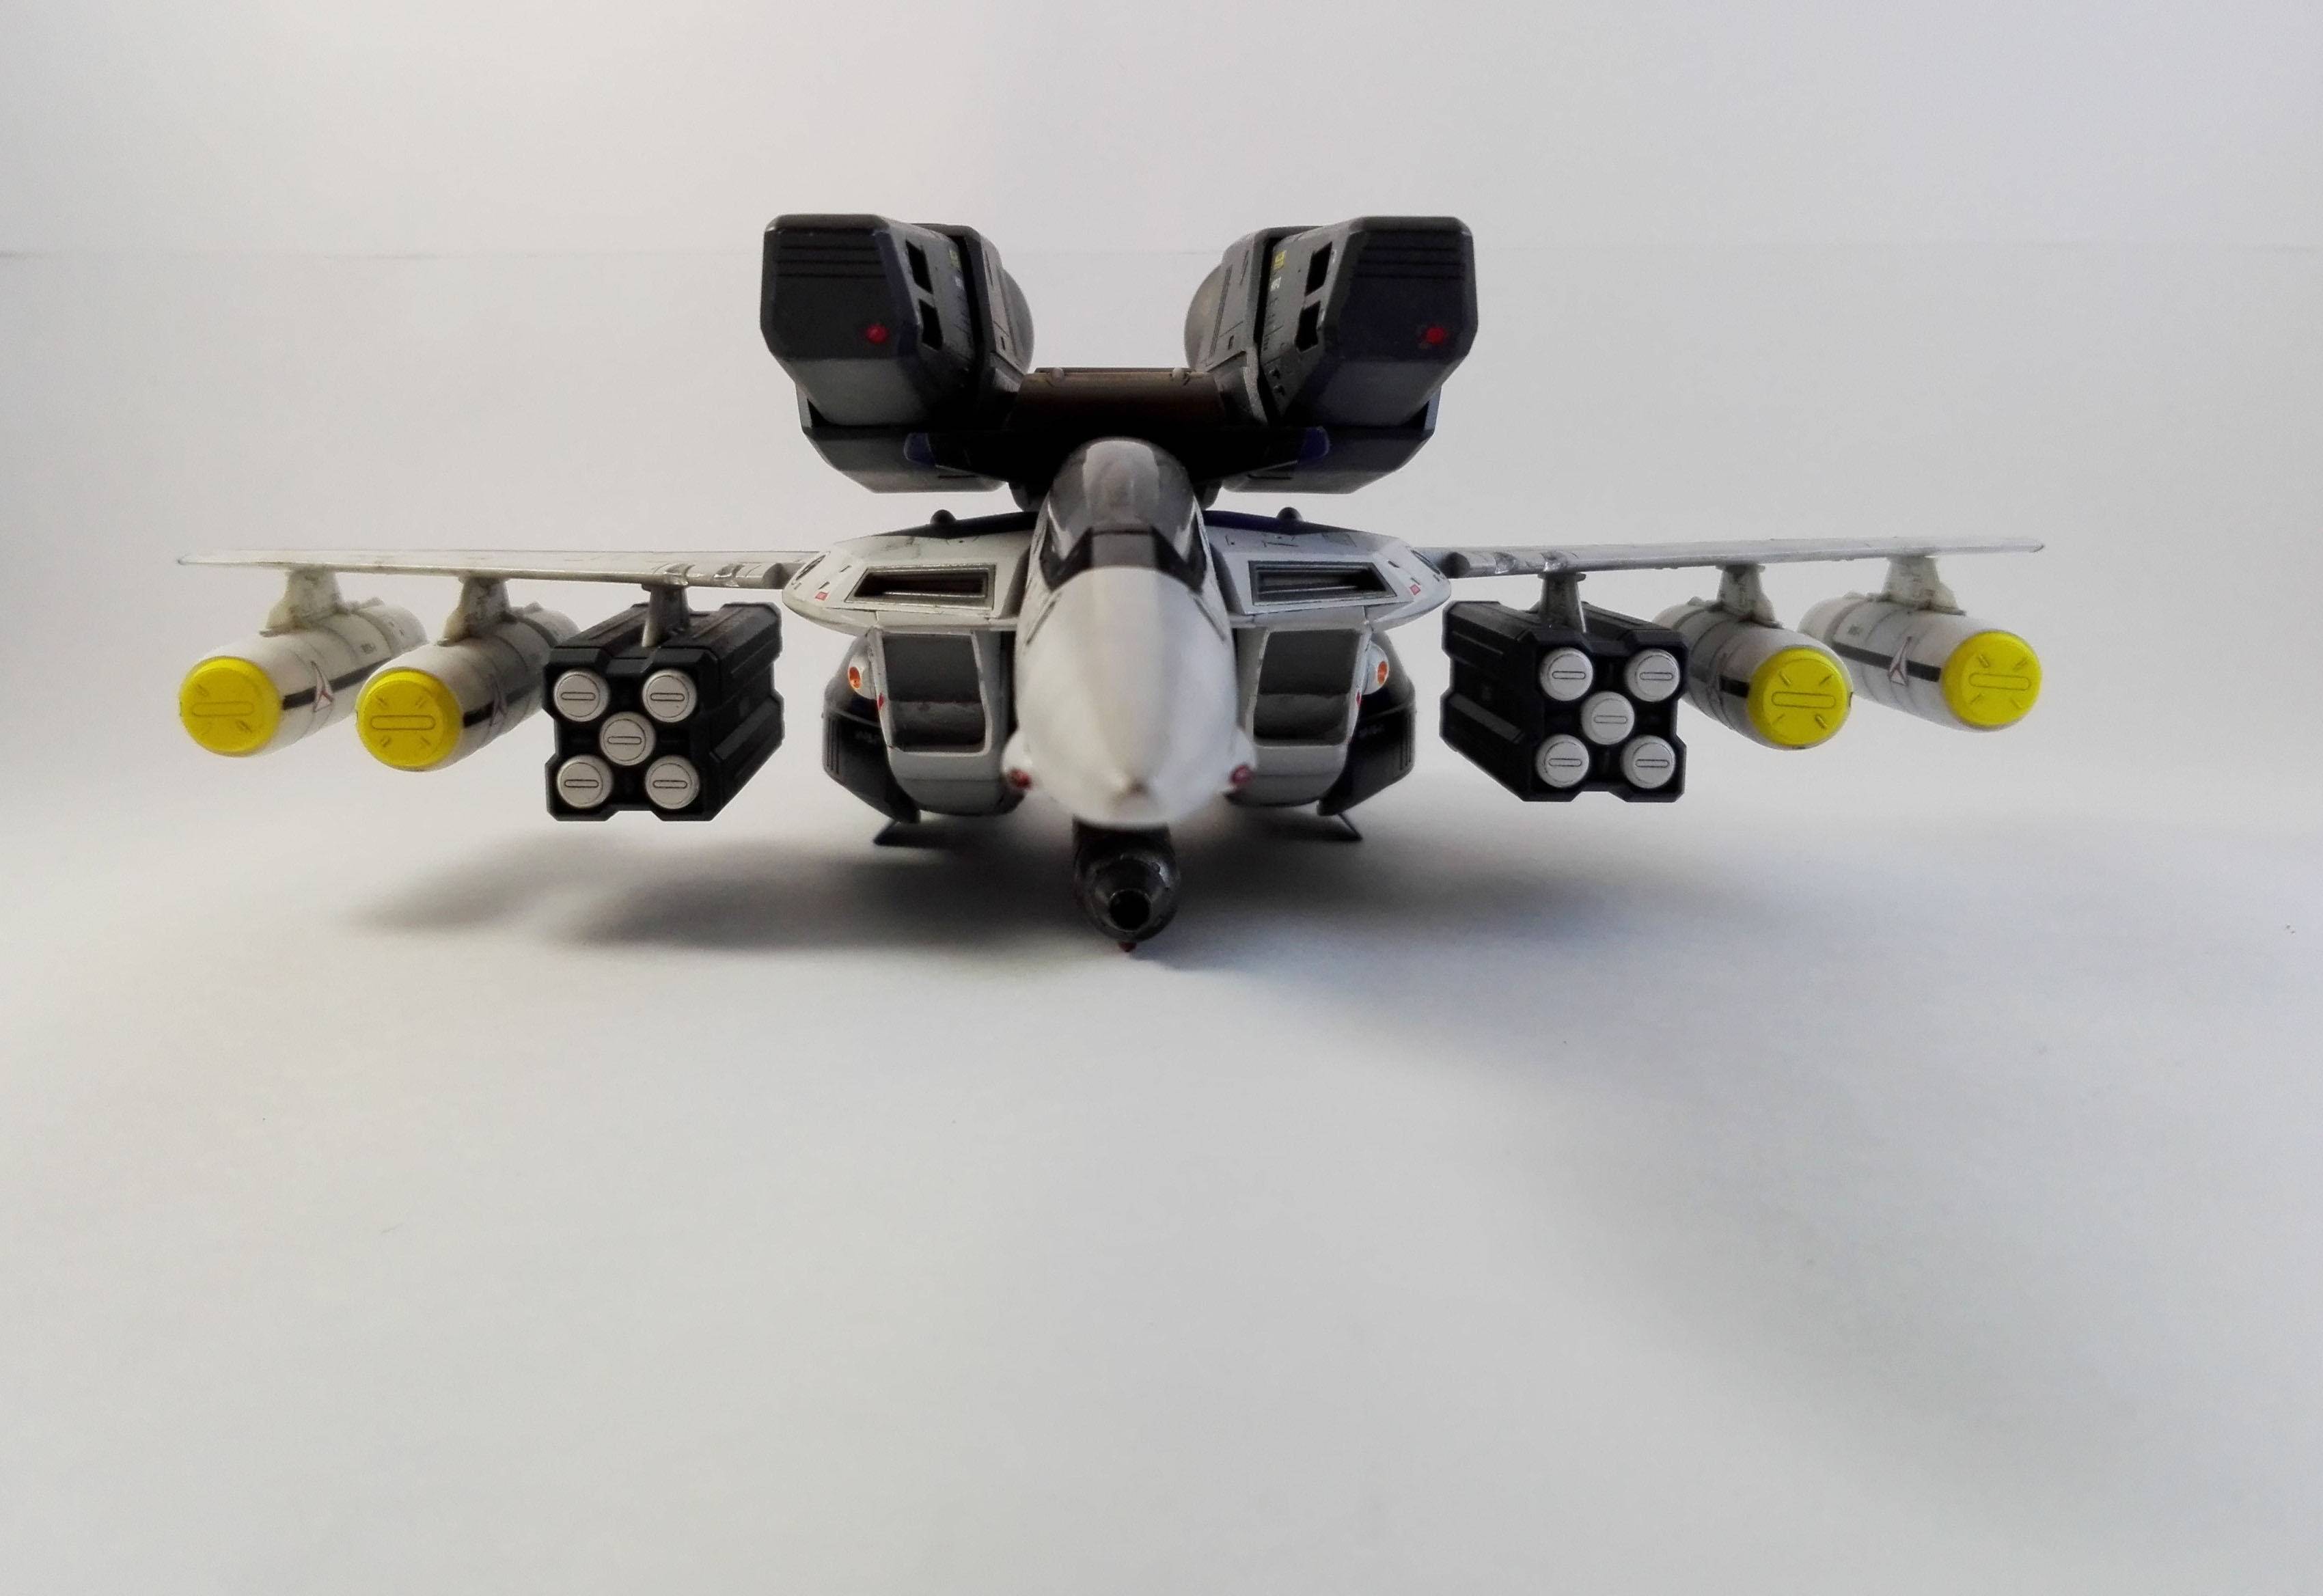
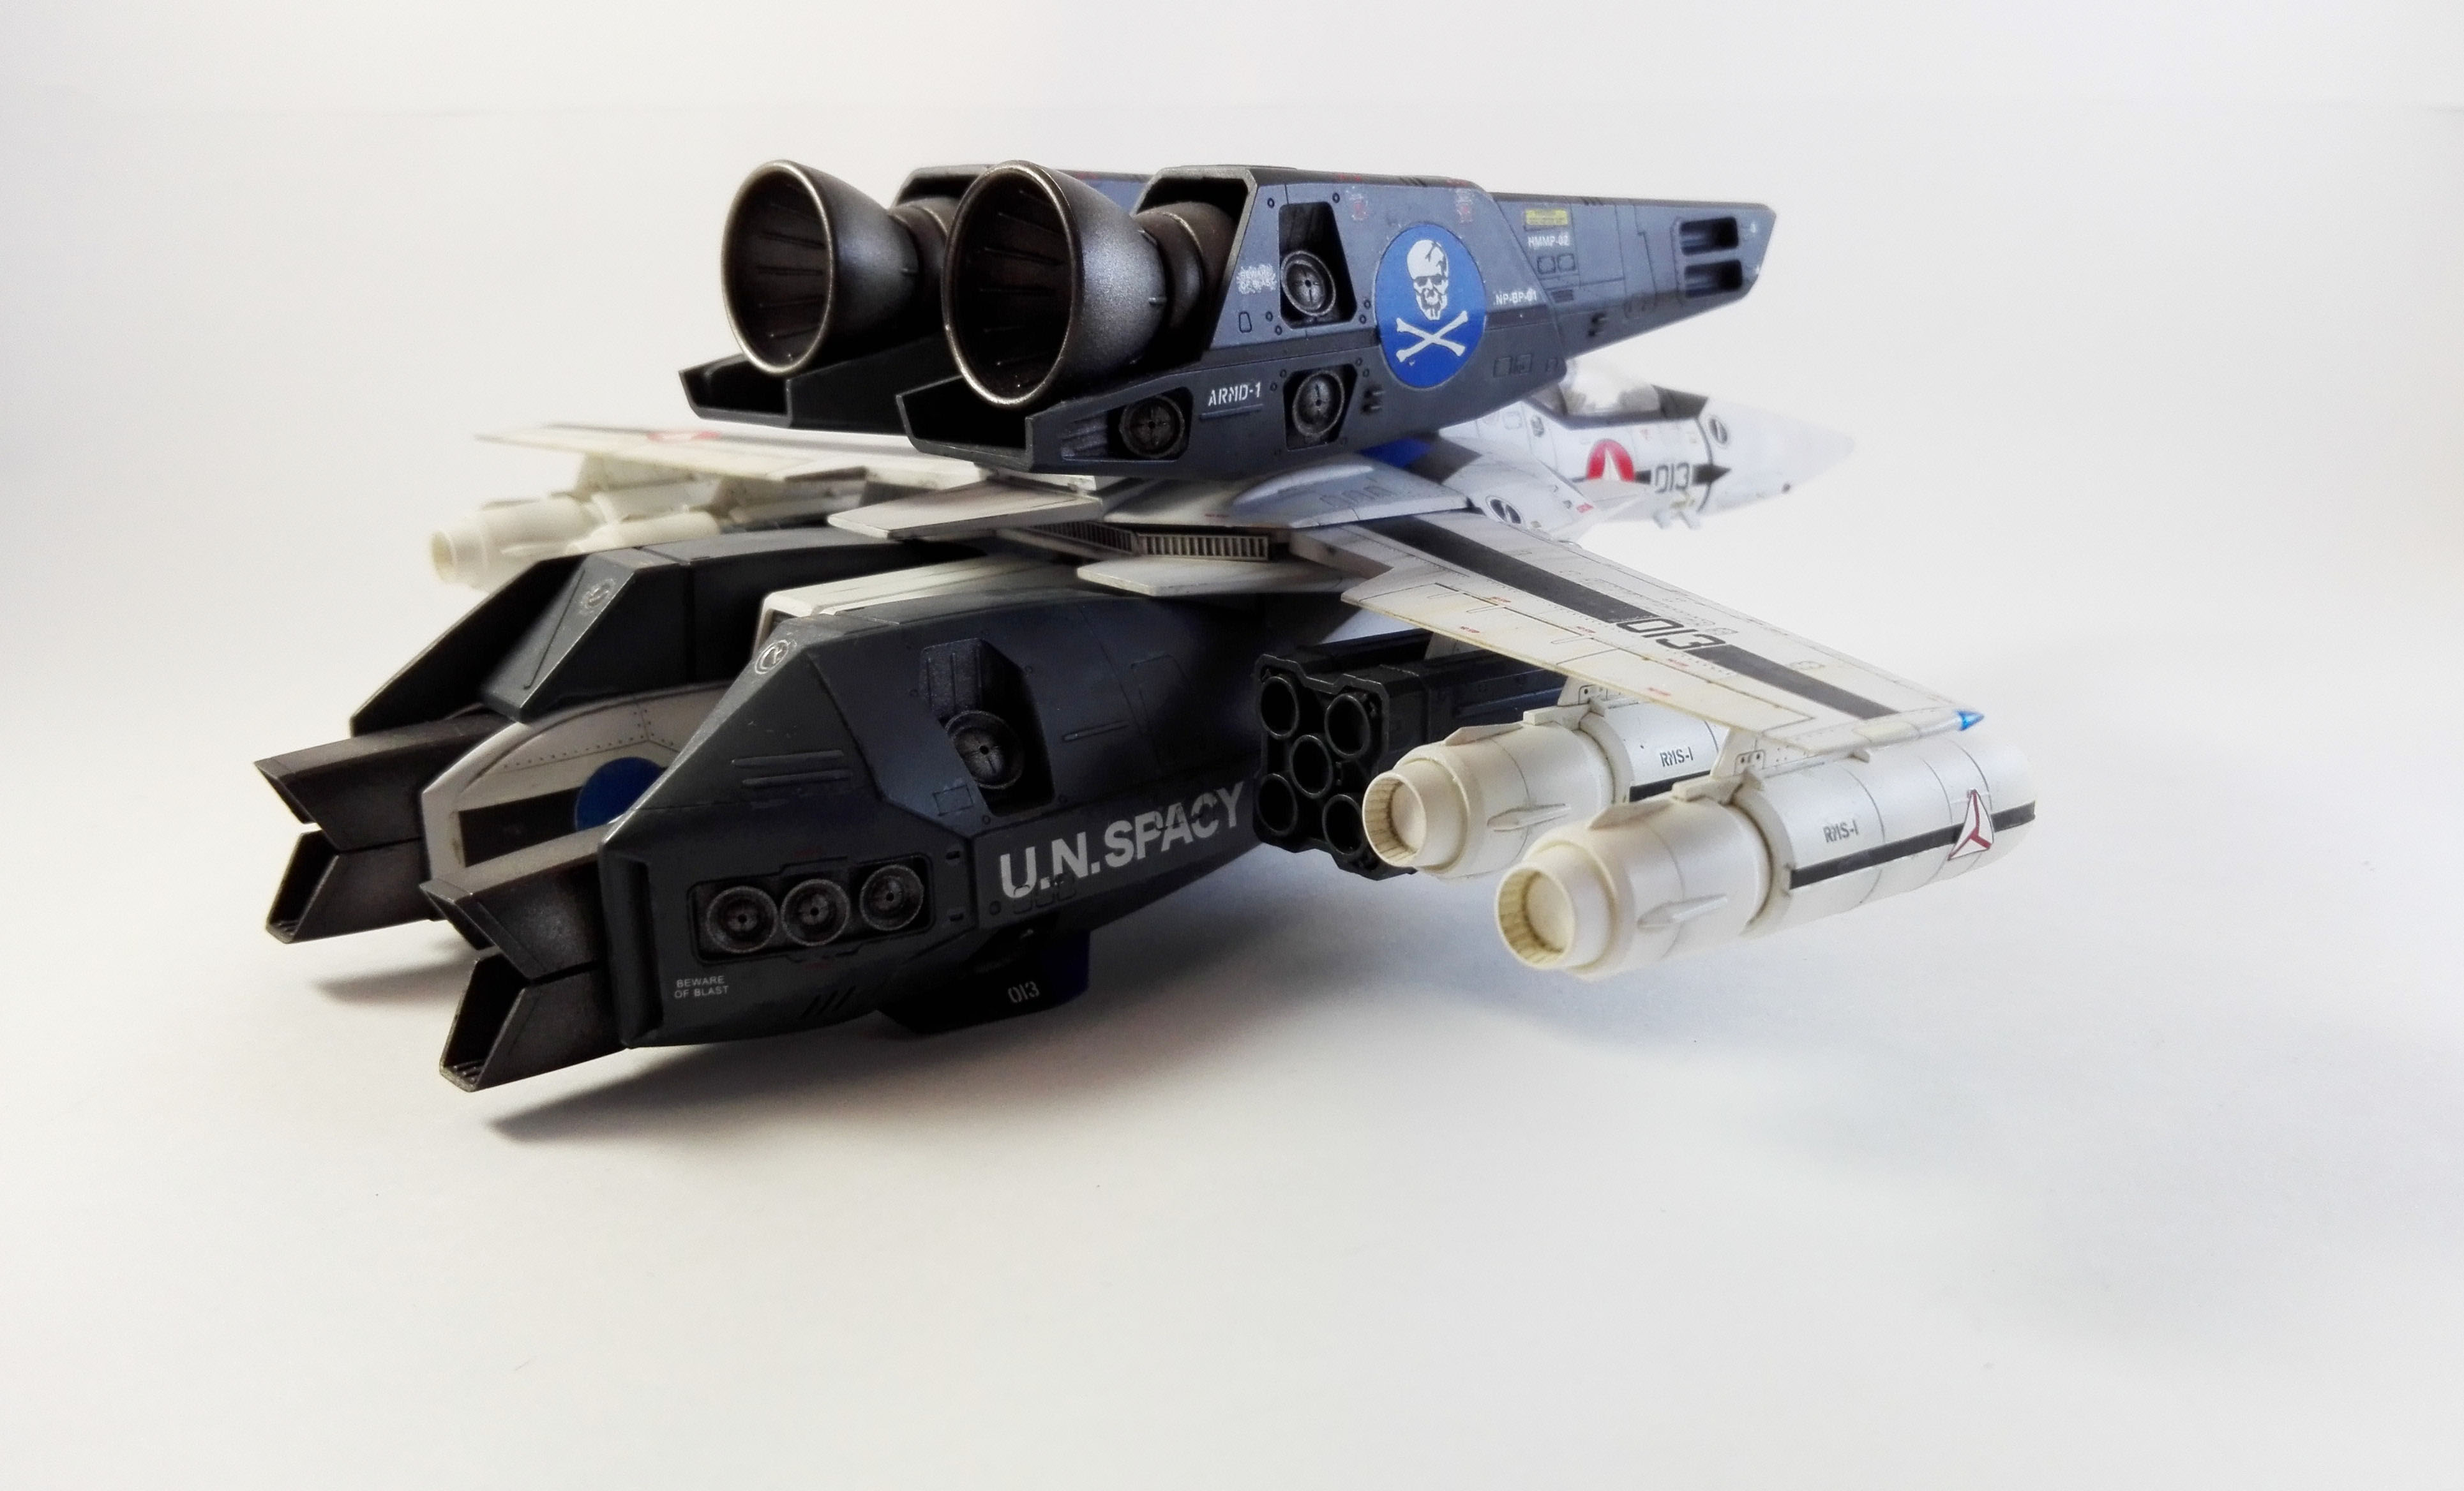
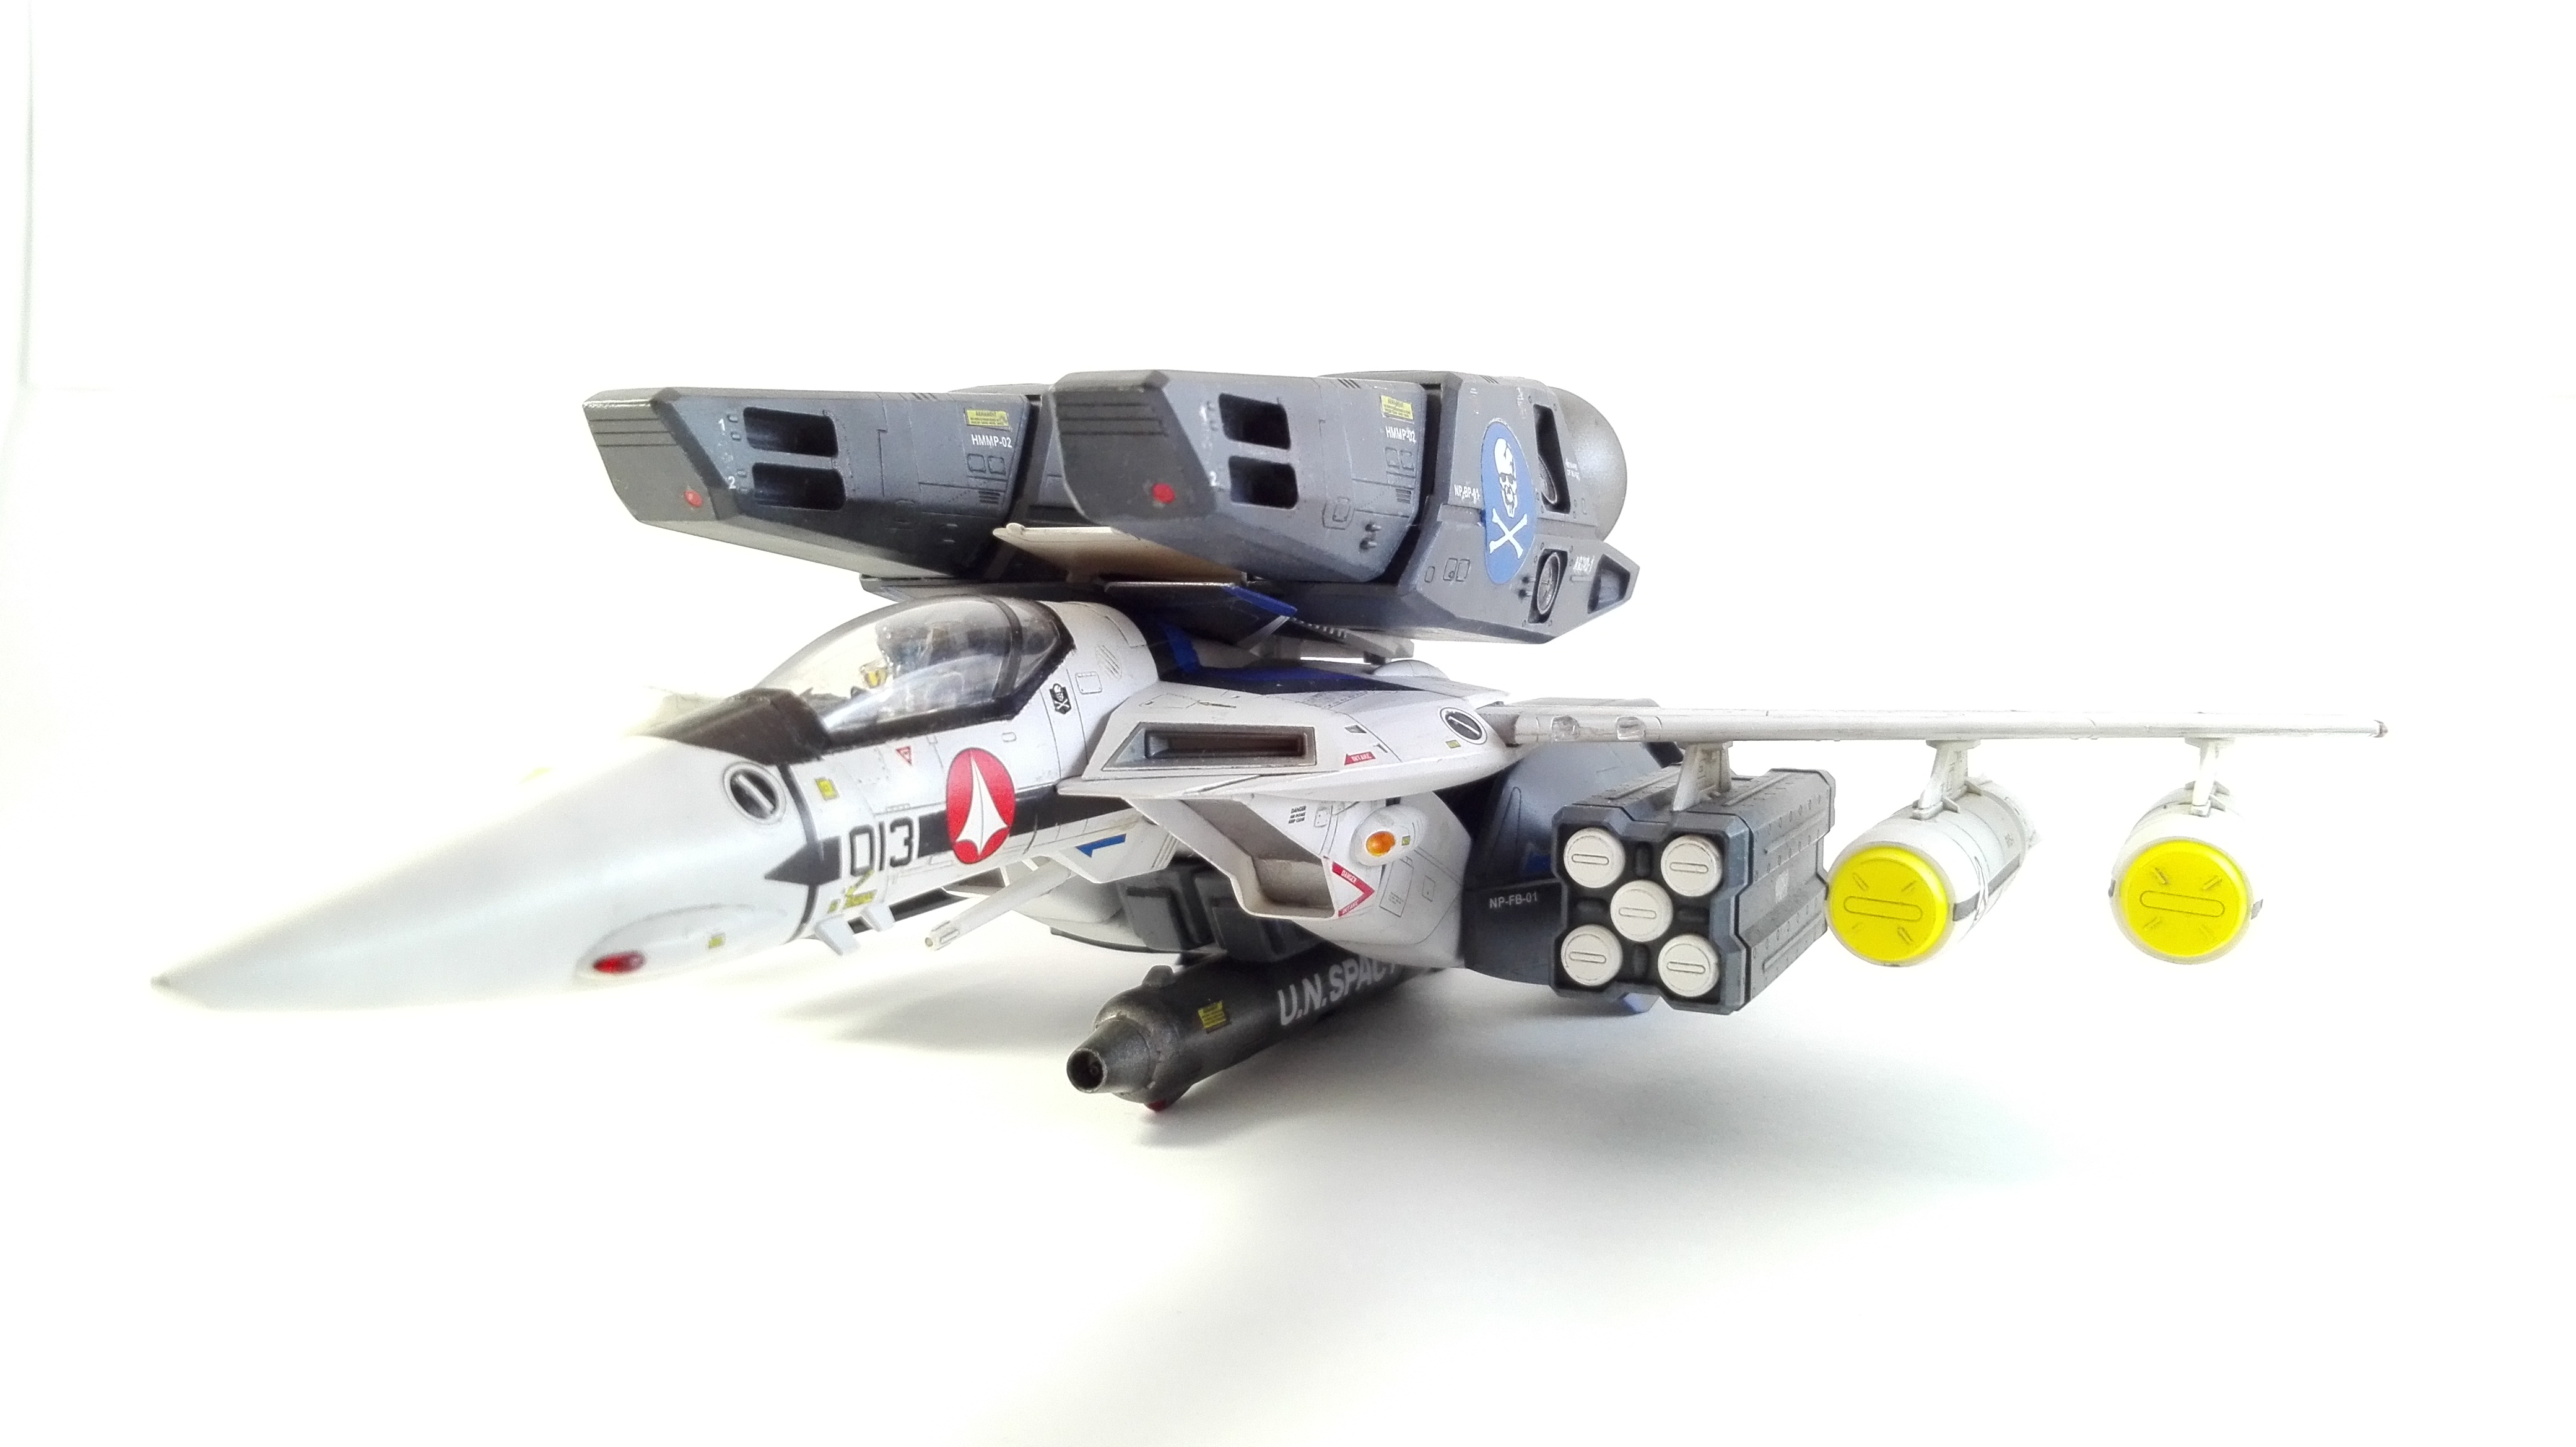
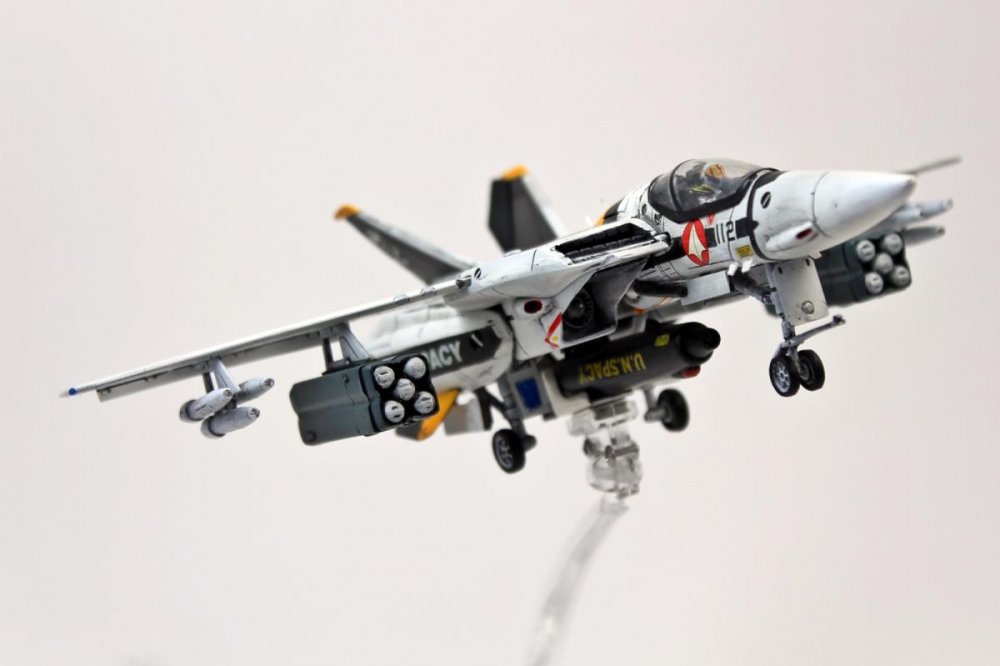
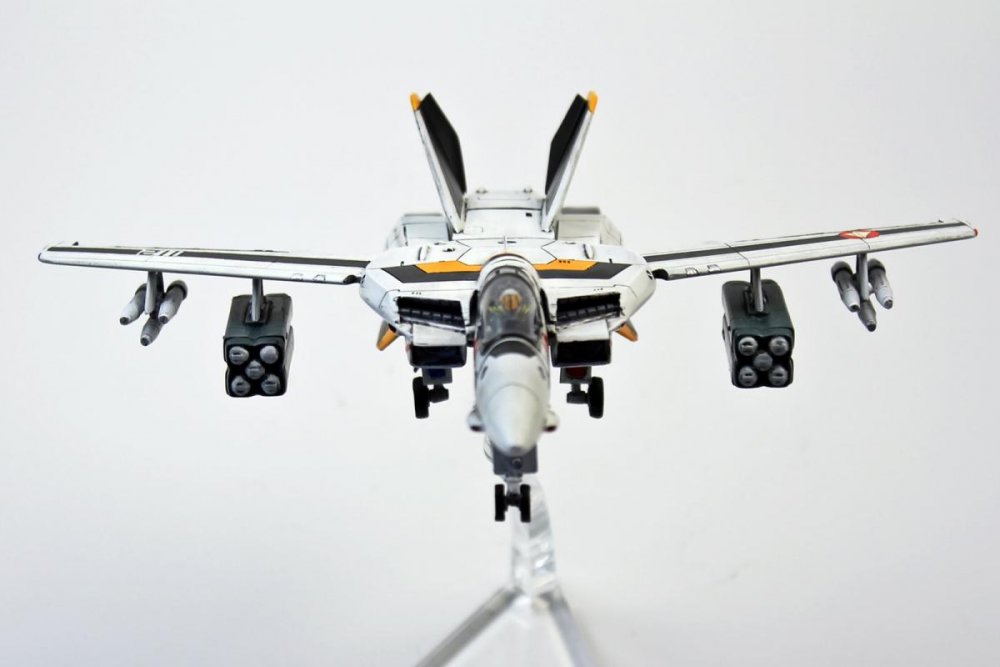
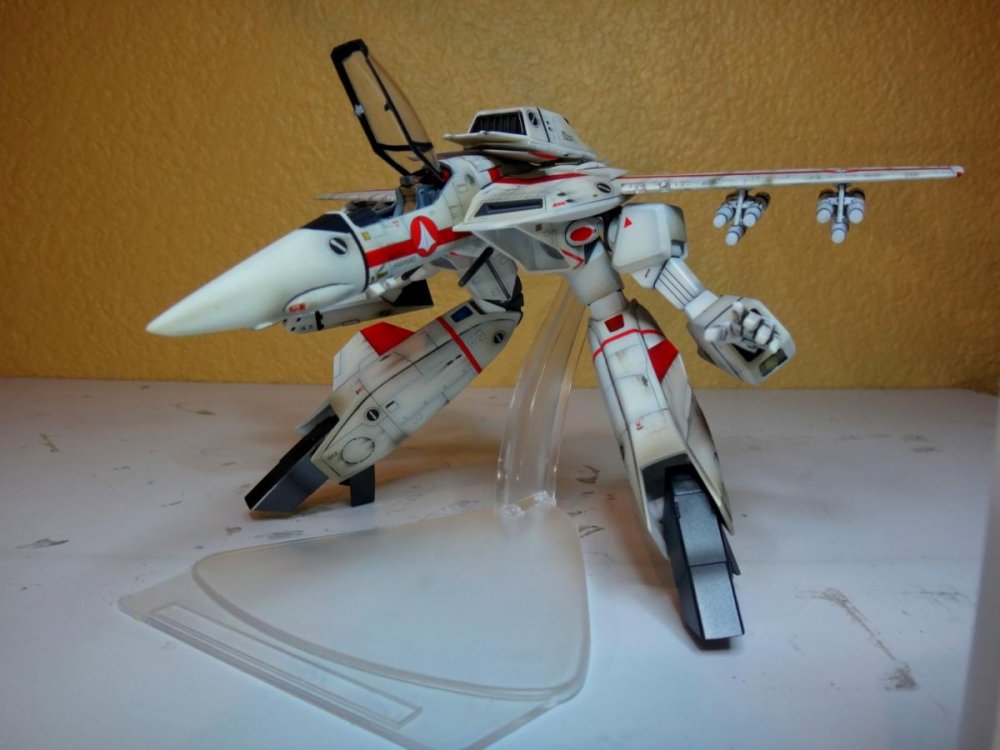
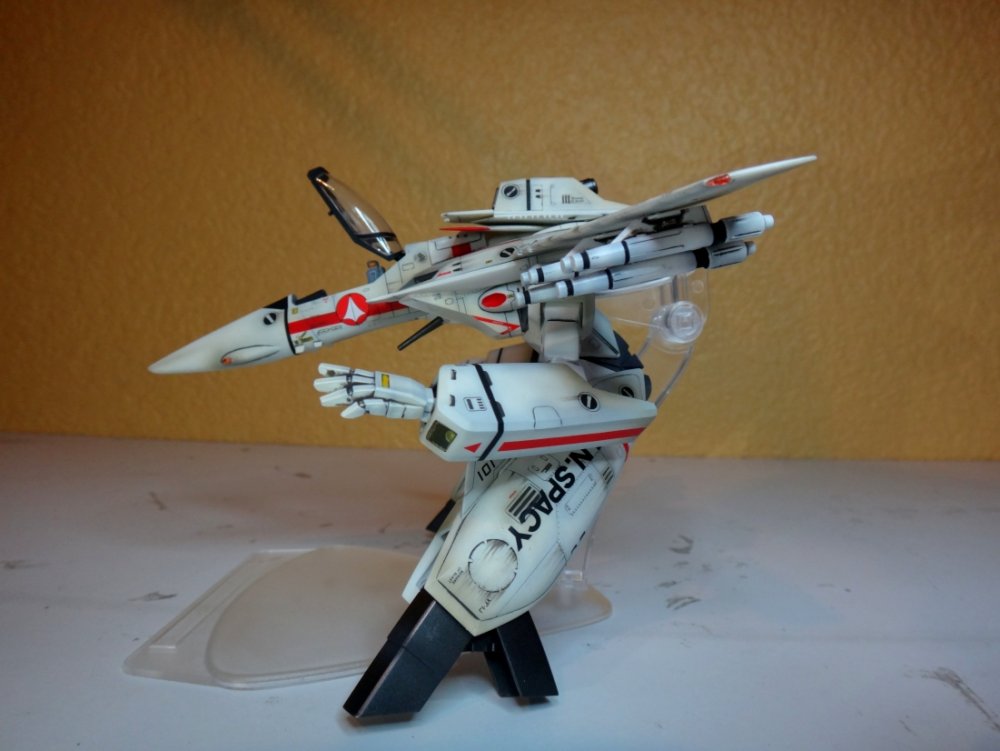
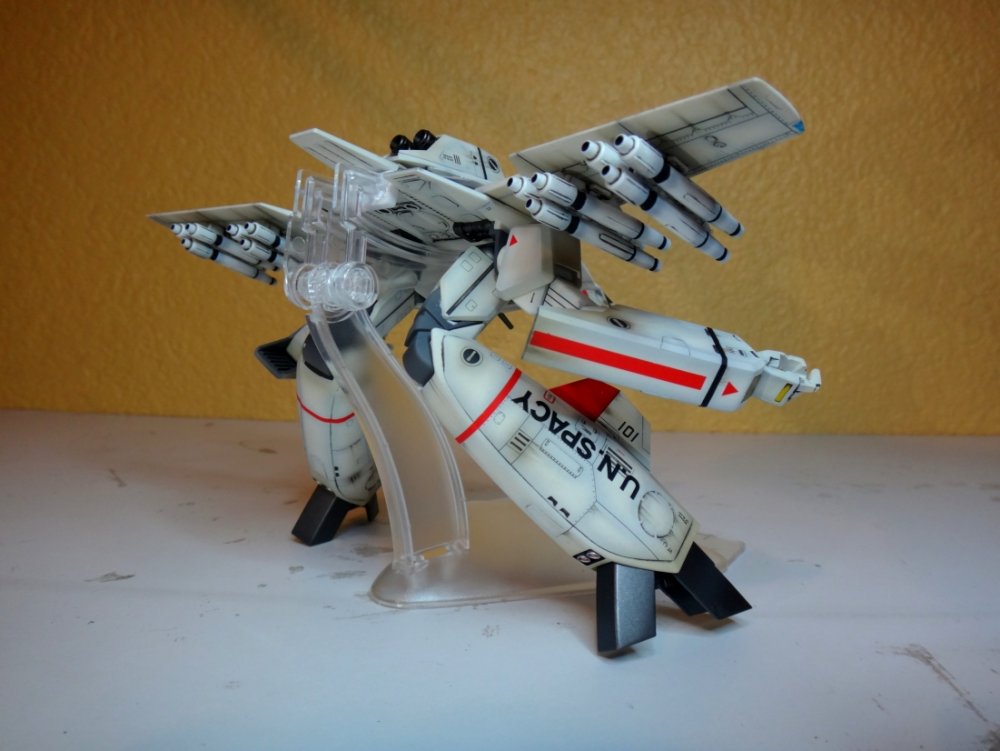
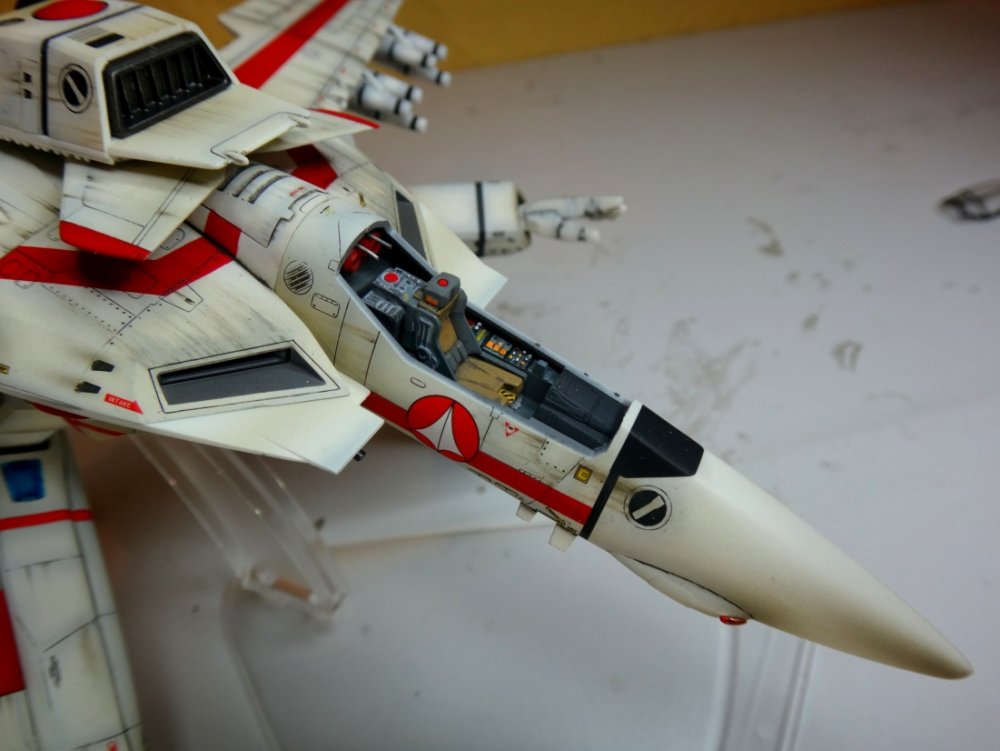
Back in the pre-Hasegawa days, this was the best kit you're going to find of a 1/72 VF-1 Valkyrie. And now, thanks to Hasegawa, you can find these for a steal. Seriously, if you're paying more than ¥3500 for this now, you're getting ripped off. Only decals are the kites, skulls, and other miscellaneous markings. Everything else painted.


-
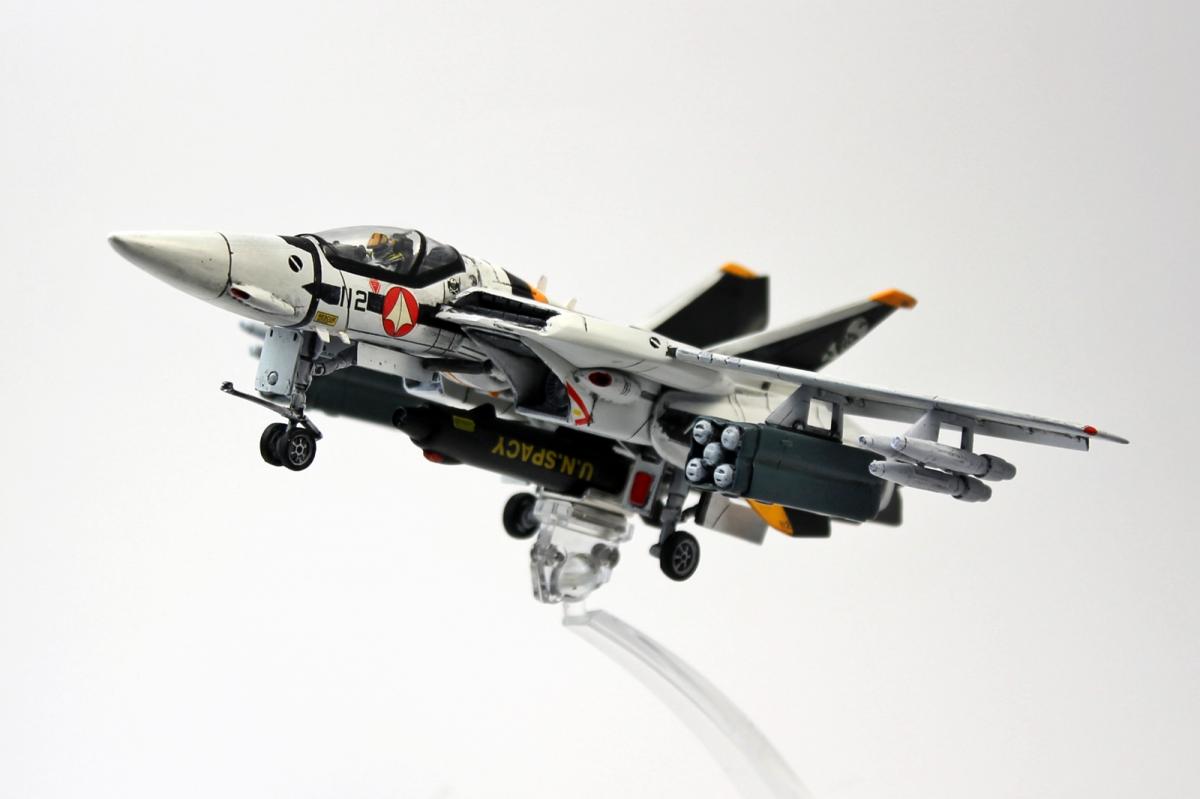
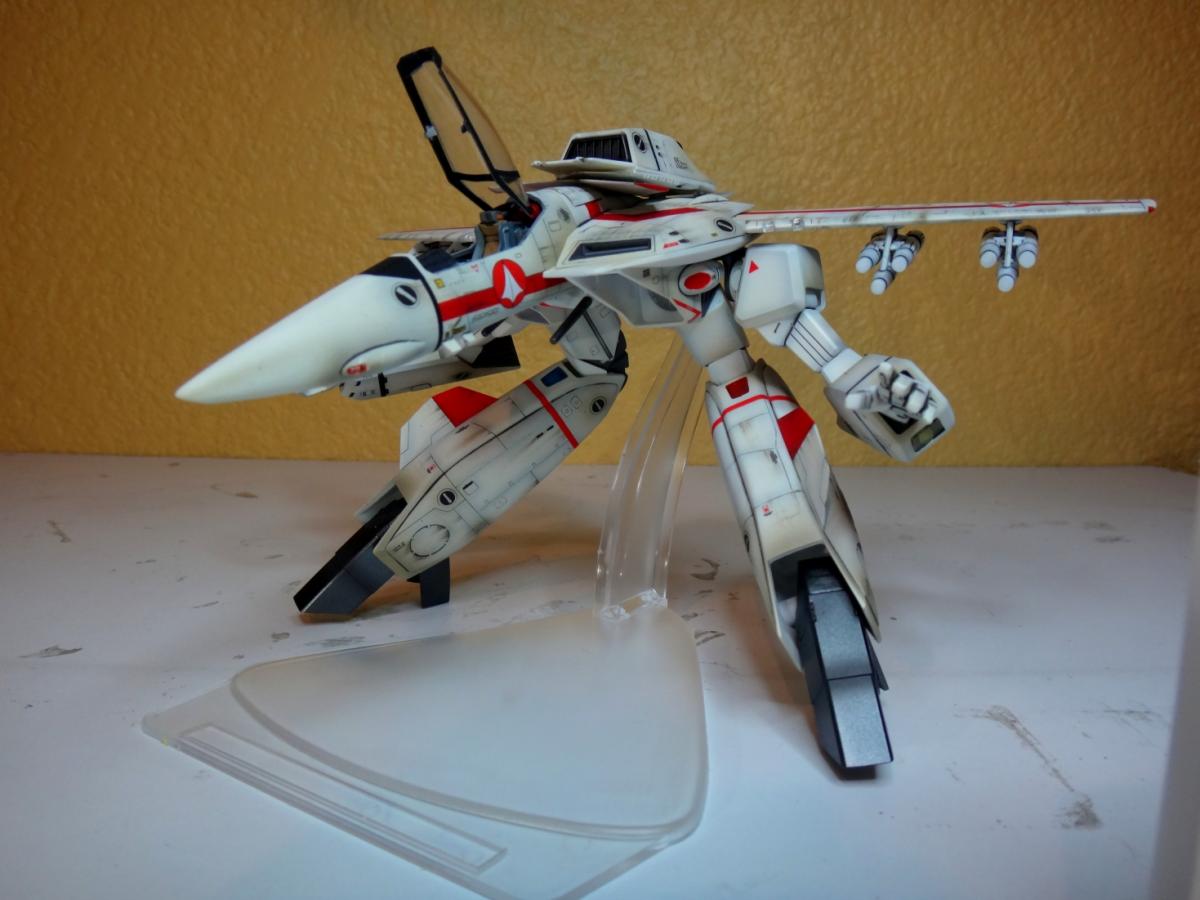
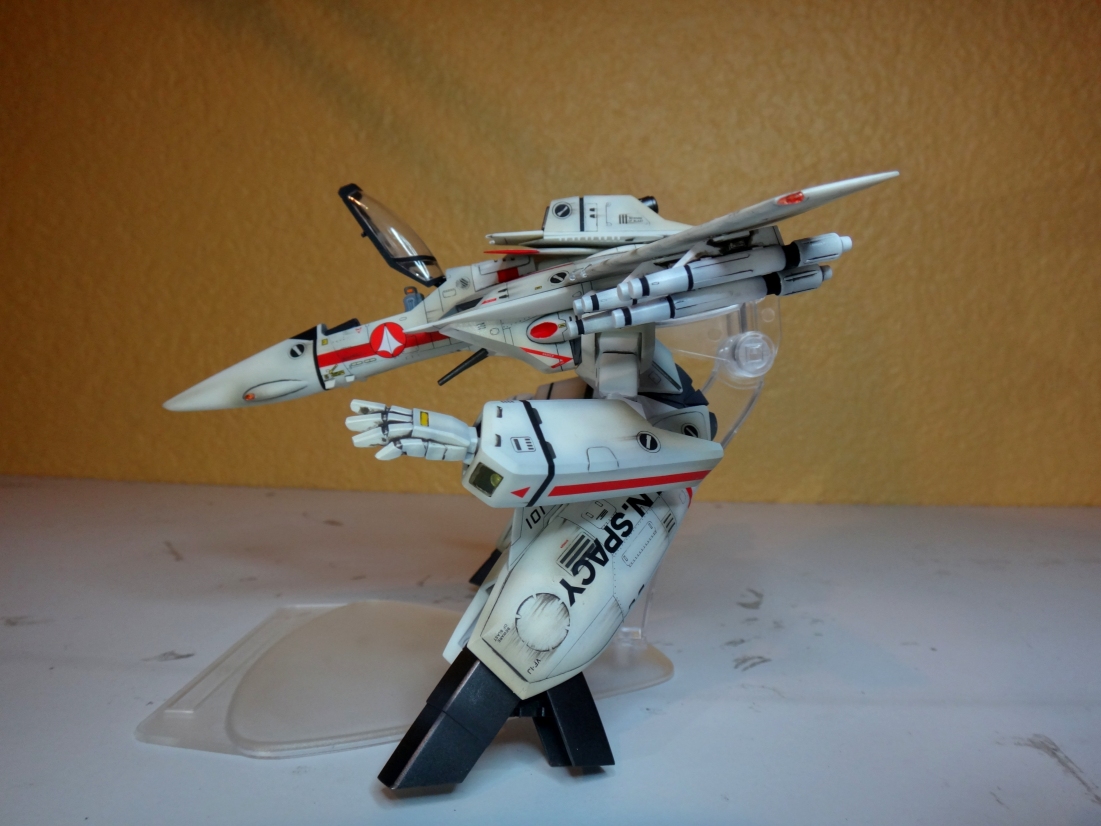
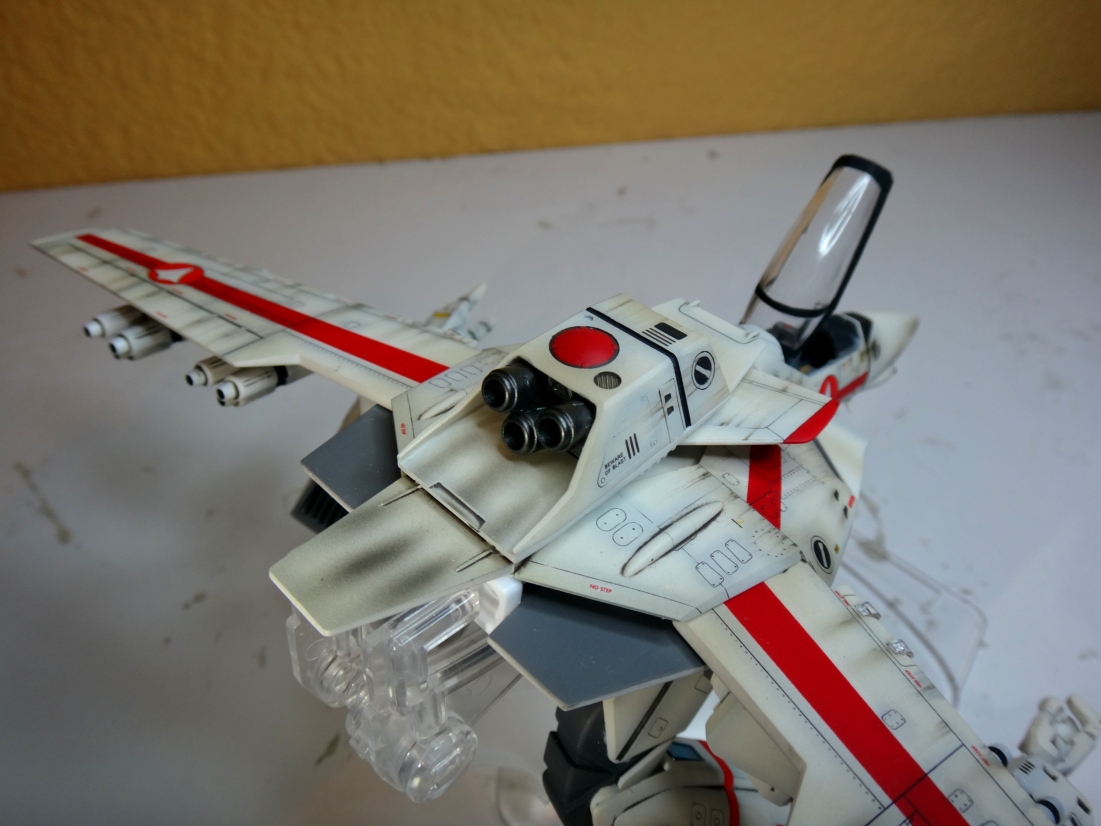
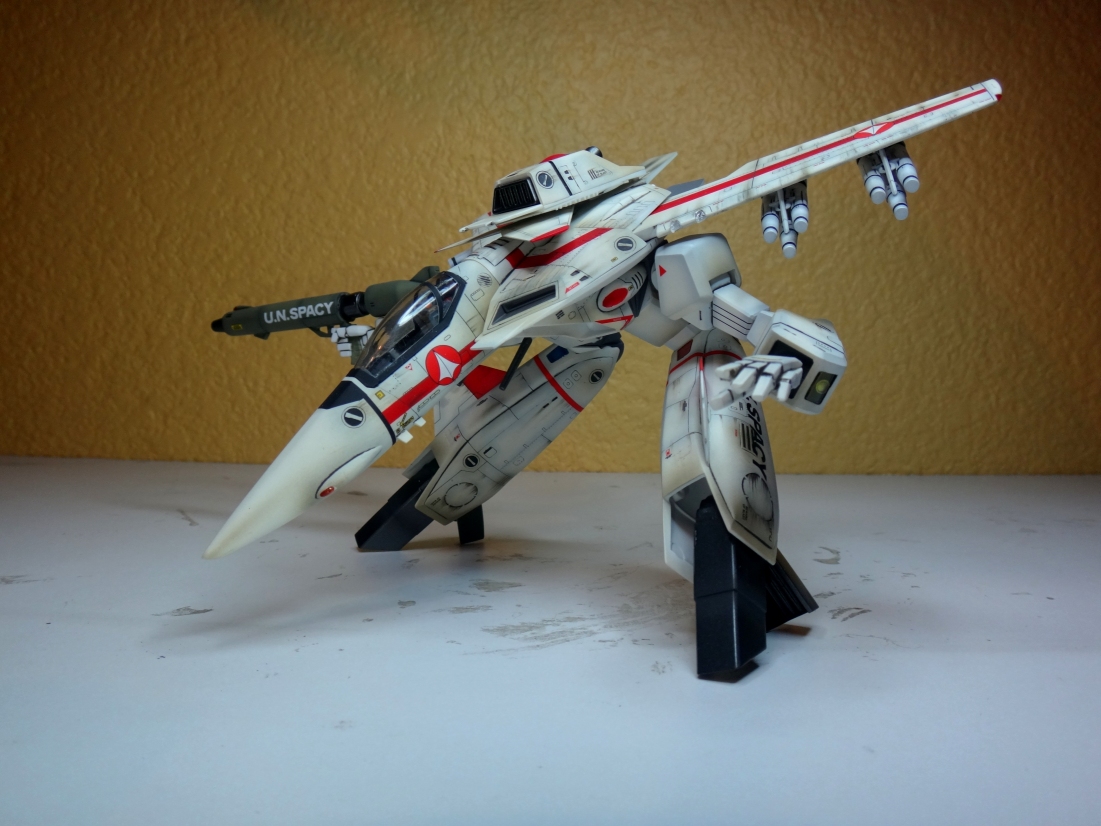
Completed my 1/72 Bandai VF-1S Hikaru kit. This kit has been controversial from the beginning and now that I’ve finished this kit, I figured I’d give my own viewpoint. I’ll try to be fair and balanced. J I built this kit without painting much. The parts I painted were - - the tailfins - the foot thrusters - the gunpod - some minor details here and there - the black stripes on the arms, legs, and wings I had to paint the black stripes because the Bandai decals were terrible and generally a pain to work with. Those areas are also heavily touched during construction. Decals can be easily scratched even with a clear coat on top. Paint is a bit tougher (esp the lacquer & enamels I use). Painting them was also much easier. A couple of mods were made. The main one being the wheels for the landing gear. The wheels included with the kit were way too small for my liking. I thought about using the wheels from the Hasegawa kit but those are small too. I’ve always felt that Valks should have big meaty tires. So anyway, I cut off the wheel attachment point, drilled a hole, inserted a brass rod, and attached F/A-18 Hornet wheels from an aftermarket resin set. This does however mean that the landing gears no longer goes into the bays. But that’s okay since I don’t plan on swooshing this around like a toy or transforming it to any other mode. Another mod was to the gunpod attachment. Since the model is staying in fighter mode, I cut the ugly gunpod holding strap and simply glued the gunpod to the attachment point. The final mod was an attempt to fix the inward slant of the lower legs. Fellow MW member, Budokhan, seemed to have come up with a easy fix and I tried it out. It’s not perfect, but it’s a heck of lot better than it was originally. In general, the buildup of this kit isn’t that hard. Most of the parts come together decently. There is however, one section that I had trouble with Despite following the instructions, I simply could not figure out a way to firmly attach the shoulder rotation point to the socket. After numerous tries, I gave up and gutted the whole shoulder linkage section. Which is just as well as I had no intention of ever taking it out of fighter mode anyways. There’s probably a better way to put that shoulder section together but I really don’t care about transforming so I’m not going to bother. In all honesty, it’s not a bad kit to build into fighter mode. Since I glued many of the moving parts, it’s all nice and tight. Another thing that is nice when it’s all put together is the heft of the model (at least in fighter mode). The quality of plastic Bandai uses and all the mechanisms for transforming gives this model some weight. It’s not important but it feels nice. As for the general “look” I find it to be just fine (at least in fighter mode). It’s not my favorite fighter mode model (that belongs to the Wave 1/100) but it’s looks well enough like a VF-1. If I had to complain, I think the tailfins are a bit on the small side. I guess this is the compromise for battroid mode. In the future, I might replace them with Hasegawa fins or something. That all said, I’m pretty happy with the end result. The mods I made help. Actually, I’m pretty chuffed with the Hornet wheels. I took the pics with a phone camera so some things are not correctly in focus.
-
Hi, I am new to the forums. Just completed my old Bandai VF-25F Alto custom that I had for awhile now and would like to share it with you guys for some feedback. This kit is very time consuming and there is a lot of work that is needed to be done (lots of decals and panel-lining). The end product is great but the kit itself is very fragile and the fit between pieces isn't too good. Every time I move it, it feels like something might break apart (I already broke 2 minor parts). Also, the waterslide decals which are brittle themselves already are always rubbing against each other which may cause them to tear Especially the decal on the battroid's head). Therefore, I decided that I will not risk transforming it and just leave it in gerwalk mode. The gerwalk mode's movements especially around the legs are very limited and cannot extend too wide apart which was pretty disappointing. Other than that it looks great!


-
I have been a member for I believe over 10 years. I don't post much, but this I believe is a worthy and noble cause. Jasmine Models is running low on Stock for these Photo Etched parts. Seems like Macross World might be the best source for JM in regards to repeat customers. Thus I would like to petition the reissue of the following items (most importantly parts for VF in 1/72 and 1/48 scale) Because this is probably the only way that Newca will seriously consider making another batch, if you read this please reply and add your Name to the list and how many you are REALISTICALLY interested in. (see below) I am definitely interested! OTIHCONIP 248004 x 5 248002 x 5 272003 x 15 See Link Below http://www.jasmodel.com/Top_E.htm 1/48 Variable Fighters detailing parts 248001 1/48 MACROSS PLUS YF-19 for Hasegawa 15 USD 248002 1/48 MACROSS VF-1A/J VALKYRIE for Hasegawa 15 USD SOLD OUT 248003 1/48 MACROSS VF-1S/A Skull Squadron for Hasegawa 15 USD 248004 PE Intake cover parts for 1/48 MACROSS VF-1 9 USD SOLD OUT 248005 1/48 F-35B Lightning II for Kitty Hawk KH80102 1/72 Variable Fighters detailing parts 272001 PE upgrade parts for Bandai 1/72 MACROSS FRONTIER VF-25 Series 15 USD Out of Stock 272002 PE upgrade parts for Hasegawa 1/72 MACROSS PLUS YF/VF-19 Series 12 USD Out of Stock 272003 PE upgrade parts for 1/72 MACROSS VF-1 Series VALKRIE cockpit 15 USD Out of Stock 272004 PE upgrade parts for 1/72 MACROSS VF-1 Intaker and Nozzle 9 USD Out of Stock 272005 PE upgrade parts for 1/72 MACROSS PLUS VF-11 Thunderbolt 12 USD
-
No confirmation from the Hasegawa site yet. But I'll probably definitely be buying!!
-
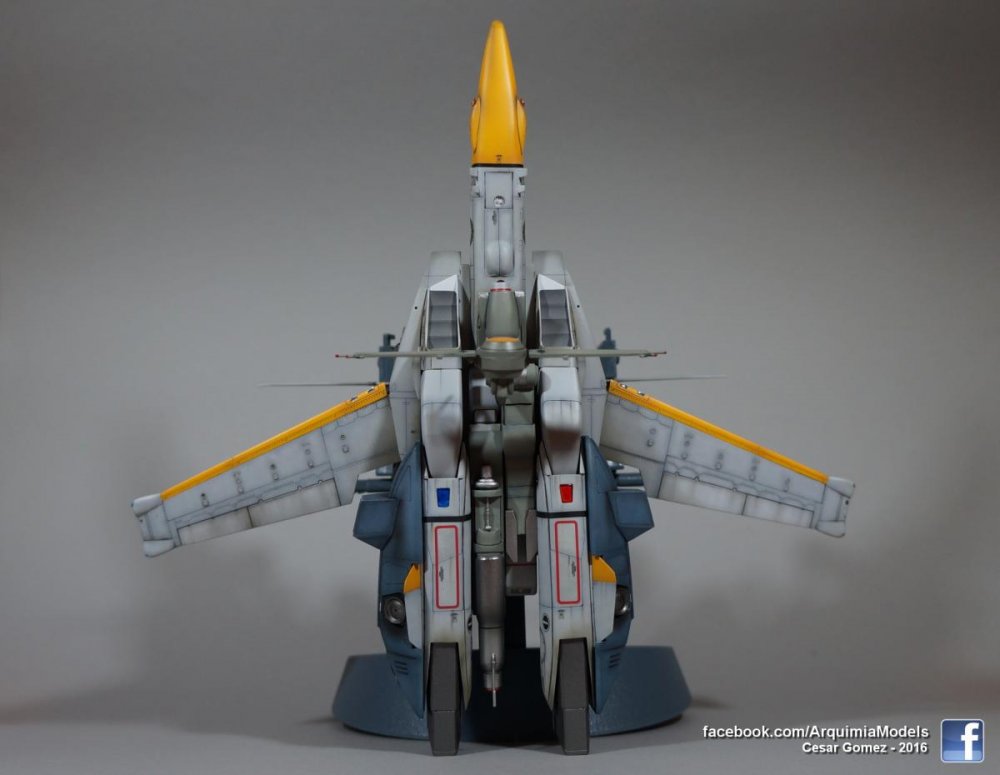
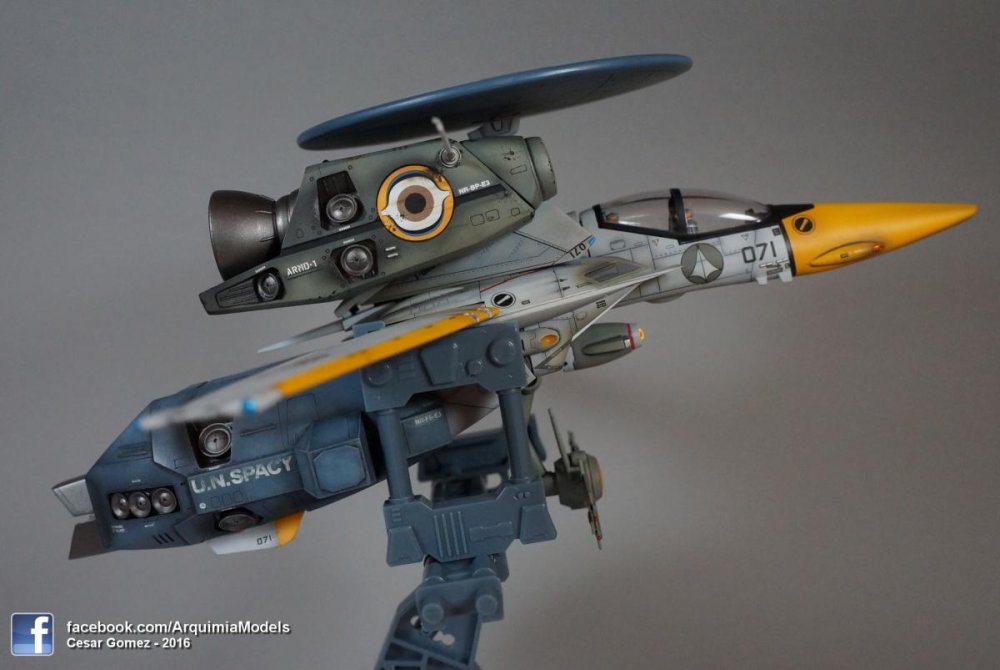
How could I let 2012 go without doing another VF-4? Here is Milia's VF-4 Racing Custom. I had really hoped that the 'Macross: The Ride' racing series would encourage people to do some more racing customs. I love military aircraft, but I also love racers, with their crazy colour schemes and sponsor logos plastered all over the place. I thought about Milia - a pilot hotshot, no longer in active duty. What would she do? Why not race with a hotted-up retro VF-4! However, this V4-F has some pretty substantial... modifications. From the souped up engines, reformed cowlings, control surfaces and even wings... a lot has been replaced in subtle and not-so-subtle ways. Custom decals were produced, one with a fun little spin on Milia's origins. Some were cribbed from a Macross decals option sheet. While I love weathering, somehow, it didn't seem appropriate for a racer like this. It was all about chrome and gloss finishes, and black, red and white. Enjoy the pics. Thanks for looking! Regards, Petar
-
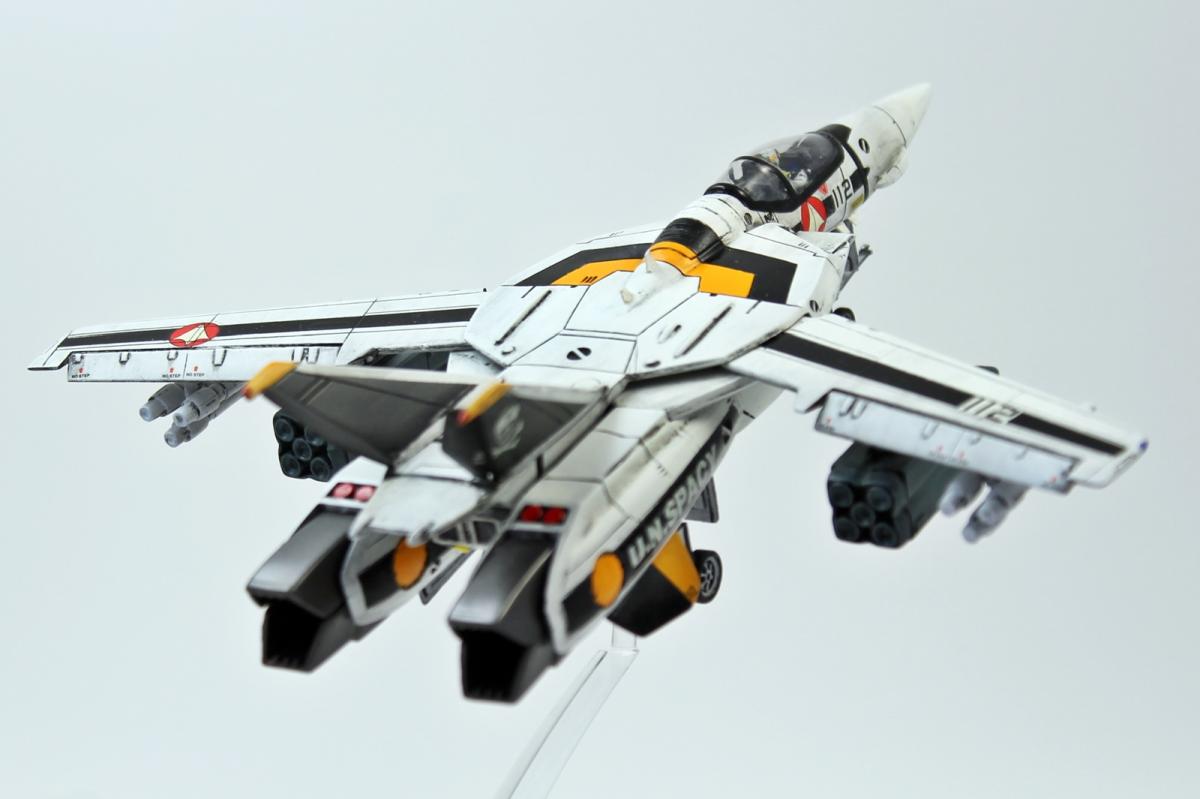
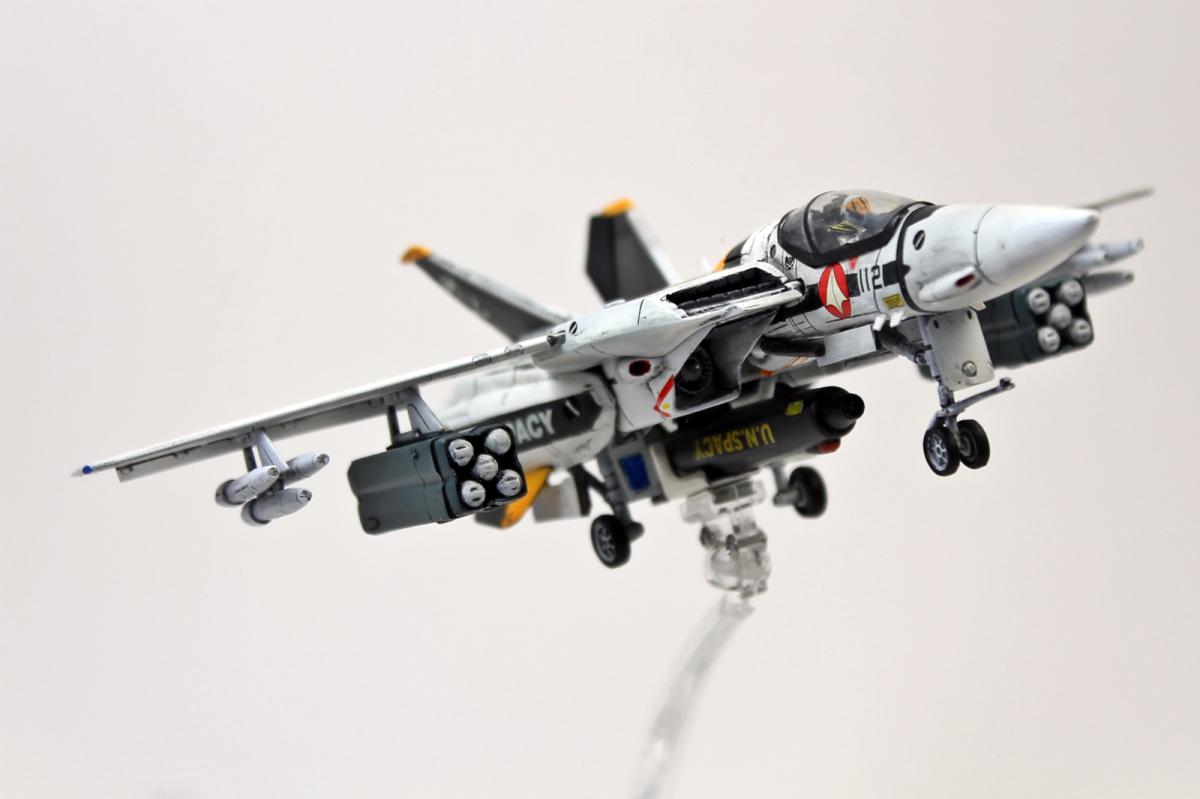
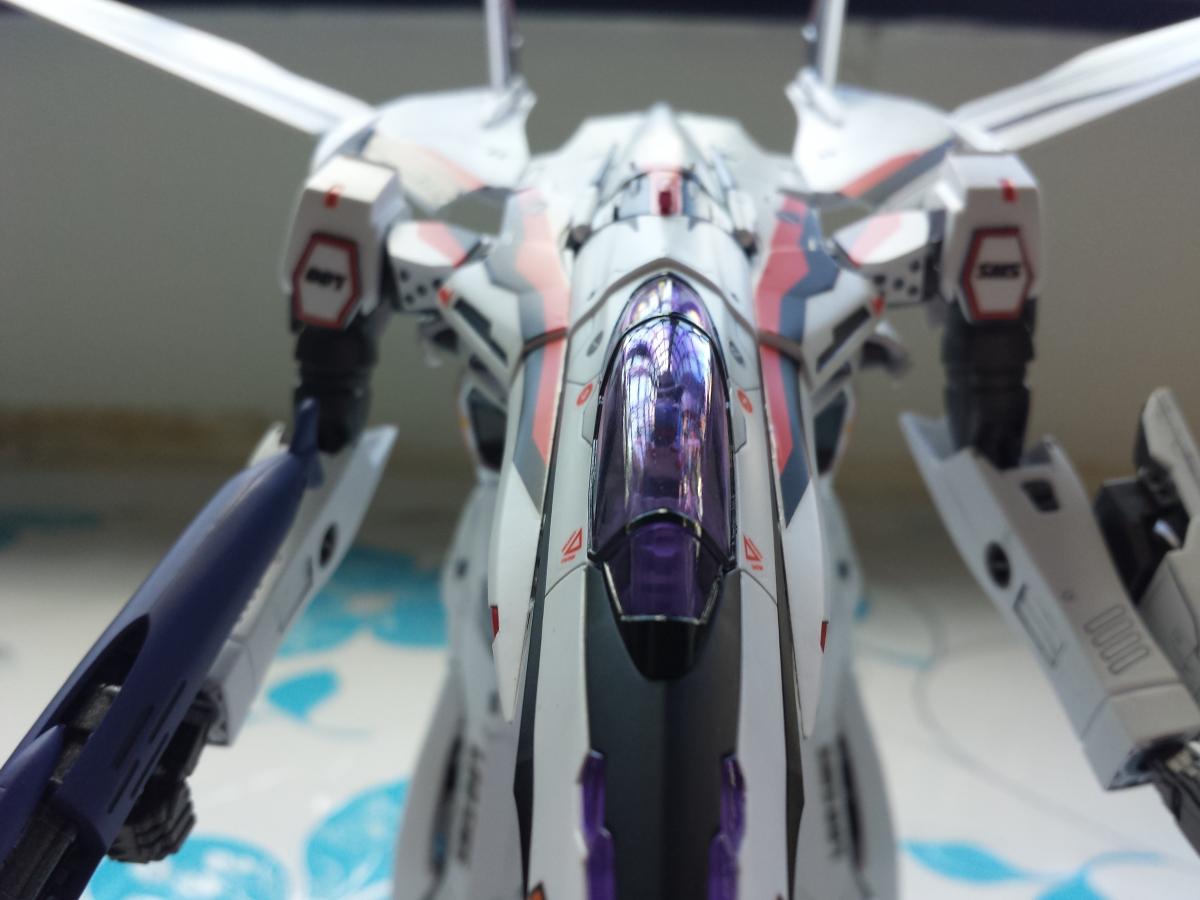
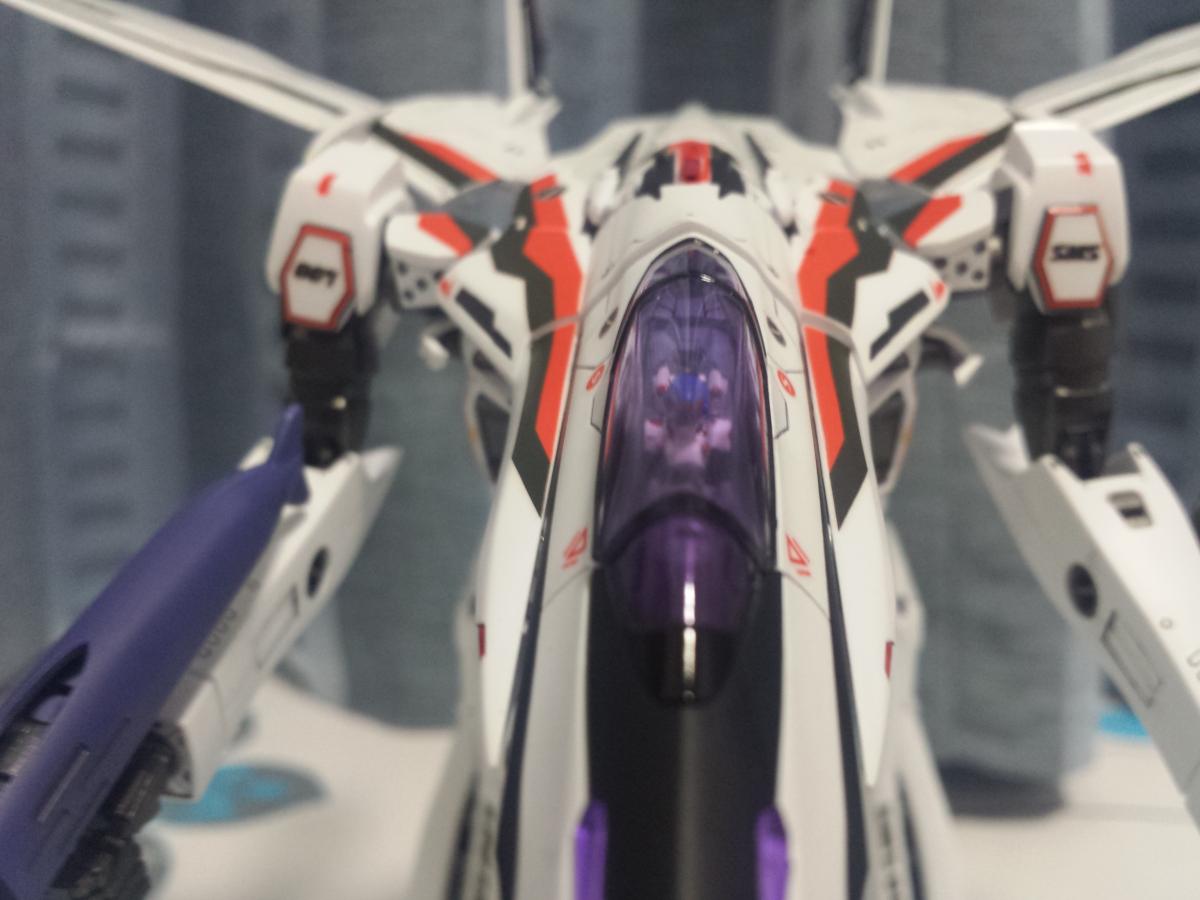
 My friends, Here is a new finished kit from Hasegawa, also with scratch detailed cockpit (added buttons and the modified canopy that can be displayed opened, closed or without it. I already posted my Max VF-1A gerwalk wich you can see in this forum. No more words, let`s see the picutres, please let me know what you think. I really hope you like it. And this is the detail of the scratch cockpit


-
I'm sure older members here remember the Sunwards fiasco. It was basically Yamato's attempt in the early 2000s to circumvent Harmony Gold and try to get their 1/72 VF-1 product out there without using either Macross or Robotech branding. As an interesting comparison, Bandai did just that in the early 1990s with their European version of the 1/55 Super Valkyrie reissue, with no problems. I'm looking for any archived data on Sunwards, who was in charge, if anyone has their website saved, or even an image of the ad they took out in ToyFare, etc. Thei website is long gone and doesn't appear to be saved anywhere, and I cannot find any images, either. Most of the photos they used in their PR material are the stock Yamato photos anyway, but the phrasing they used to promote the toys I recall was very interesting.
-
Hello, first pics of my new building, the Hasegawa's VE-11 "Thunderseeker" ! The box : And the (very) beginning of the building, starting with the pilot and the cockpit : Regards,
-
According to this tweet: 1/48 VF-1 weapons set in November from Hasegawa. 1/72 VF-1 J/A Gerwalk in December.
-
Greetings everyone! First time poster here at MW. Been lookin at this site for a while & thought I'd jump in with all you fine folks! So, like many of you guys, I got the new 1/72 BANDAI Variable Valk kit & was, well, a bit dissapointed. But I have to say, coming from a long time modeler's point of view who does it mainly for the love of it, its not that bad of a kit. Sure it has its problems but we as modelers can just do what we do best...improvise, adapt & overcome right? So saying, I'm planning a little something "special" for my kit but first I need to address some of the problems it has...parts fit, looseness, lack of detail in some spots etc etc..all stuff I'm sure you guys have already come across! The First thing I tackled was the wonky fit of the legs in fighter mode & how they don't fit quite perpendicularly to the fuselage. The main problem is, like I'm sure most of you have figured by now, the grey retention tabs that lock the arms in place in fighter mode. The top edges of these are rubbing the sides of the legs & keeping them from sitting in where they should. Instead of cutting these off entirely tho, I thought if I could shave down one side sufficiently on a diagonal angle it might allow the leg to seat better & have a more perpendicular angle to the fuselage when viewed end-on. Here's what I shaved off: Secondly I thought, again, like most of you I'm sure, that the arms are too spindly & need fixed. I plan on beefing up the upper arms, shoulders & forearms. The first thing I started with was the degree of bend to the elbows. With a little tweaking of the lower part of the upper arm where it joins with the elbow joint, I was able to give it a lot more bend, so much so that now the Battroid mode will have the ability for the Gunpod to actually touch the shoulder armor: Next ( because I'm a hopeless scratchbuilder & can't leave anything alone straight out of the box ) I'm gonna lite this guy up with micro LEDs. The first thing I worked on was the optics section on the head. Since this particular build is gonna be a "one-off" style, i wanted something different. He's gonna be a predominantly really dark low-vis Valk & I thought he'd look kick-@ss with a blue Optic sensor: A veeeeeery long time ago, when the Hasegawa VF-1 kits came out, the only way you could get a pilot figure was to get the add-on weapons set. So, I got one & and while the figure wasn't bad, it could be remade better. Now, don't get me wrong, the pilot figure the new kit comes with aint bad but I'm anal when it comes to miniatures & detail & I looooooves me some detail work... at that point I remembered my old VF-1 Hase pilot. I dug the little guy outta storage & I think with a little tweaking I can make him fit in the new kit: So, thats where I'm at right now. Any ideas or comments are heartily welcomed & appreciated! Thanks for lookin guys n Cheers!! ~BK
-
As I haven't posted here in some time, I have started an interest thread in a 1/72 Zentradi power suit project here: http://www.macrossworld.com/mwf/index.php?showtopic=42217 If there are still any members hoping for more of my 1/72 models, this is your chance!
-
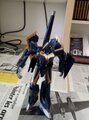
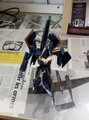
Hi Guys... long time without upload new build pictures! Well, 2014 was a very busy year to me: Finally I got a House, so almost all my free time went to it But little by little I'm getting more time to the hobby, so finally I finished the YF-21. It has the option to go with the cockpit open or closed. Hope do you like it!
-
According to this Tweet, at the studioRECKLESS booth they'll be selling 20 Armored VF-1J conversion kits. You'll need the Hasegawa 1/72 Battroid kit to go with this. Price ¥17,000