wm cheng
-
Posts
4338 -
Joined
-
Last visited
Content Type
Profiles
Forums
Events
Gallery
Everything posted by wm cheng
-
Finally finished the graphics for the signal arm paddles. I have posted them for download in my build-up thread! http://www.macrossworld.com/mwf/index.php?...ic=16726&st=200 Good luck... now I want to see everybody else's launch arm models.

-
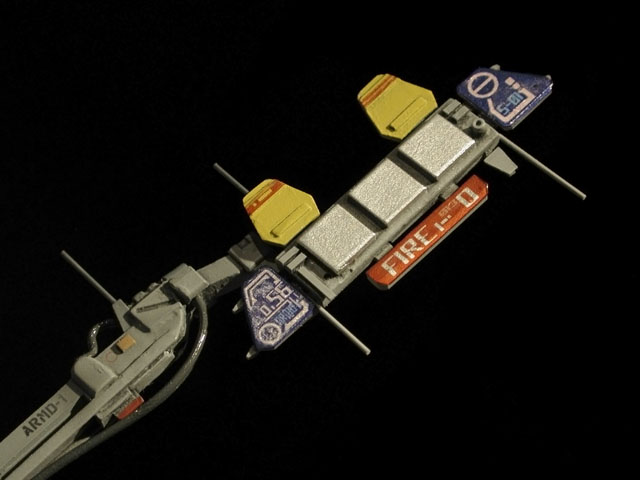
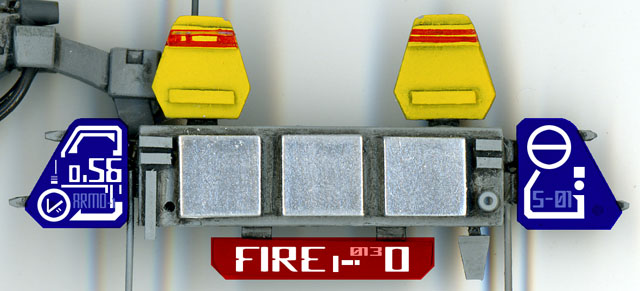
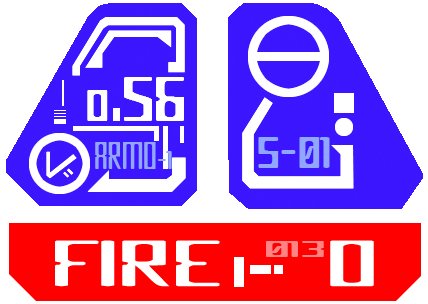
Yay! Finally finished... I had a few minutes tonight and decalled the signal arm. Luckily the graphics worked perfectly. I first painted the paddles with a Tamiya silver paint marker to get a highly reflective silver. Then I decalled over them with the graphics I created in photoshop (by first scanning the part in and drawing it out) and inkjet printed onto "inkjet" decal paper by Bare Metal Foil http://www.bare-metal.com/gateways/decal_supplies.html onto clear decal paper. The "white" is just areas where there were no inkjet ink, so the silver underneath showed through. I took the photo immediately, so some of the silvering on the blue areas of the paddles is just the decal setting solution catching the light (its still wet as I type this). But its drying perfectly - I am really happy with it now (its that finishing touch which was missing). So as promised, below is the graphic I used - its sized perfectly, so print your own and give it a try! Photoshop work on top of the scanned part. Photo of the decalled part. Raster graphics file at 100% at 600dpi (Good luck!)


-
The Yamatos are quite well engineered (I have one of everyone myself) but they are still a long way from being able to be compared to as models. They are miles ahead of the chunky monkeys of the 80s (IMHO) but the depth of the panel lines and such still relegate it to toy status for me (even if we attempt a decent paint). They do rival the old ARII/IMAI models of the 80s though. The closest toys I've seen to being models are the Gundam FIX Figuration - their paint and markings are incredible. However, it is sad that I find model making a dying art. Just looking at the bricks & mortar shops around here - so many have gone out of business! I find that I can no longer get all my supplies locally and must rely more and more on the internet. A bad sign of things to come. I think the newer generation lacks the patients that is required to build a model - its the "instant gratification" generation! What's easier than paint something that's already been made! (sorry, no offense to the amazing customizers on this site) - its more a stab at the lazier younger generation.
-
It works better when you push the crack together and hold while the tube stuff sets - I find even if you sit there and hold it in your hands (pushing it together) for 60sec or so, it really helps with the strength of the bond (versus just letting sit on its own) That old testors orange stuff is what I've been using since I was 7! I should try some of the newer glues out there - old habits are hard to break. I do use crazy glue, and liquid cement from time to time.
-
Fantastic! Can't wait to follow your build up! You need to make a mini-mave about to land on that thing! (in scale! ) Thanks for posting - man, I love the mech designs in Yuk!
-
I'm not sure about the durability without clear-coating, but I clear coat mine with ModelMaster semi-gloss which gives a finish exactly like the plastic (it was too hard to tell where I sprayed and where I missed ) You're right, Future is too shiny, but would make a good under coat to apply the decals onto. I don't think there is any realistic way to return the Valk to its original state. There will be signs - I am guessing, but the plastic will probably age differently around the areas that have stickers or decals applied, and if they are taken off, they may leave ghosts in the plastic (at least this has happened to some of my older toys in the past - but not necessarily the Yamato Valkyrie per se). You should just enjoy your Valk! If you want to invest, keep one MIB! Its pretty hard to pass off something that's been modified and played around with as MIB. Plus you'll always be handling it gingerly. The homemade decal kits only work when you are decalling onto light or white surfaces - it cannot print white. You've got a problem with the U.N. Spacy lettering on the legs if you use those decals. I use Anasazi's decals, and they are great (keep in mind that it comes from an Alps printer - so the colours other than CMYK are screened to make up the composite colour).
-
Waterslide decals all the way!! Especially if you're going to clear coat the Valks afterwards anyways - that will protect the decals. Additionally, with the waterslides, the edges are so thin that they appear painted on (more realistic) and the edges don't get caught and lift up as some stickers sometimes do. You may be able to PM anasazi directly here on MW...
-
Fantastic work Berttt!! Yay! someone actually finally finished one of these babies (and it ain't me! ) Thanks for sharing - it really looks great. Are you going to weather your base a little more? I love seeing your work - please if anyone else has finished their boosters, I WANT TO SEE THEM. It gives me my fix when I don't have the time to build. Yes, my booster is on the back burner - I'm working now (thankfully!) and I've been sick with a flu. As soon as I have a moments time, I want to finish up the launch arm signal paddles (I've got the decals printed from my inkjet printer) and I'll post the photos along with the graphics if all goes well. That's first, then this booster (but probably detail up and decal the Yamato 1/48 GBP first - oops a toy! that might be a sin around here ) Then I just got my FineMolds Millenium Falcon too - that might throw me out of Macross for a few months if I ever get around to it!
-
Thats a nasty crack - damn, its in a flexible part of the wing root too. The first thing to do if you are going the solvent type cement route is to clean the super glue residue out of the crack (maybe hard) but the solvent can only work when there is a good styrene to styrene bond. I recommend using the tube cement and try to get it into the actual crack surface so that it oozes out both sides (top and bottom) and tape/clamp or affix it so that there is constant pressure pushing the crack together to form a tight seal. Don't touch it for a day or so to make sure that it fully cures. Then you sand away the excess styrene/glue that has oozed up from the crack (only after its fully cured). You can also use epoxy (resin type) glues such as 5min epoxy, but you need to rough up the styrene surface so that there is some "tooth" for the resin to grab hold of. Usually these types of 5min epoxies offer the greatest strength - however in your case, since the actual mating surfaces are quite small and it would be tough to get a good amount of epoxy glue into such a small crack since they are quite thick in consistency and will cure in 5 minutes! I wouldn't recommend epoxy for your type of repair. Good luck and keep us posted to how your repair job goes - its through these accidents that we learn the most about the hobby. Wouldn't a model building process just be boring if everything went well!
-
What a great idea about the toothpicks!! If you stay away from glossy paints, it eases the fingerprint situation (that's why I usually use semi-gloss - its more forgiving of fingerprints) Plus I usually spray dry enough that its just wet when its hitting the plane and dries within seconds. I can usually handle the model lightly to spray additional coats within minutes. Becareful to not spray too wet or thick - its better to spray lots of thin coats than few thick ones. Great build up so far!
-
OMG!! Thats absolutely fantastic! What amazing skill! and I don't even really like this design, but your model is amazing - all that engraving detail - your factory of one rivals Hasegawa! Keep up the amazing work! Thanks for sharing.
-
Its very cool - there are a few of them, the obvious ones are two on the back behind the cockpit - two horizontal slits (there's an option where there are ramjet intakes that seem to pop up in that area). Additionally there is the lower scoop under the cockpit in front of the main gears, and two hidden side intakes under the forward conards.
-
YEP
-
Hey! thats looking great! Yay... another build up thread - just what I needed to carry me through the winter blahs when I can't build due to work. I'll live vicariously through you. You don't necessarily need the clear coat in the cockpit area since it won't really be touched afterwards. I use the clearcoat after the oil wash because I'm afraid it might rub off over time with handling. Just a step to miss and speed things along. Additionally, you should try the Aclad Metalizer stuff... its amazing (only airbrushed though - pre thinned and expensive). Its so much finer than the Tamiya metallics - the silver metallic particles I find too big. Now I only use the Aclad Metalizers for everything metallic. (p.s. I didn't find out about the Aclad when I built the YF-19)
-
A little update... I got a chance to scan the signal arm lights into the scanner and I was trying to print my own decals. I thought I'd try to follow the anime screen capture, but mirror it (since my orientation for the signal arm and launch arm is actually mirrored from the opening sequence in DYRL). Here's the preliminary graphics overlaid onto the resin signal arm. I plan on trying out the "inkjet" Bare-Metal Foil clear decals and I will also try the laser decals by the same company which I will colour copy at work (yay! our production has a colour copier this time!) Since I can't print white, I will probably paint the paddles white or silver underneath and apply the red/blue decals over top of that, so the white letters are the negative which will show through whats beneath. If they are sucessful, I will post the full resolution graphics here so you can download and try to print them out yourselves for this kit.

-
HERE you go, wm. I'd hate to think of anybody stuck waiting around for Space to air Galactica. 373694[/snapback] Thanks!!
-
Did eps 18 air on Space on Friday night? I can't find it on bittorrent today. Being in Canada, we're more than half a season behind.
-
Thanks I'll try it out... What about this? http://www.amazon.co.jp/exec/obidos/ASIN/4...9221243-4641833 Is this another art book on Yukikaze? - 190p
-
There actually IS an art book out now http://www.amazon.co.jp/exec/obidos/ASIN/B...8-9975565雪風 The Fairy Air Force At War DVD comes with a VERY nice art book. Very comprehensive too. The DVD it comes with is kinda lame, but that's not what I bought it for It's 50 bucks VERY well spent! 372672[/snapback] Ah!! finally an art book!! I WANT IT! How do I order from Amazon Japan? Can someone get it for me and ship it to Canada? Or is there another service that I may order this from? What's on the DVD - is it region coded? That model does look sweet - beautiful parts! Still not sure about the boxy sides, but love the side view! Maybe just too many wing surfaces?
-
Definitely get the Mr. Surfacer 500 & 1000 even 1500 and see if you can get them in white instead of the grey. Get Tamiya masking tape and their assortment of fine grade/grit sandpapers (1000+ grit plus). Get the Hasegawa photo-etched micro saws. Get an assortment of WAVE option parts and their X-Decals (both sheets) Do you have an airbrush or compressor? If not, that's a great item to get. Then you also need to get a good 3M face mask with organic filters. Ah.. the list never ends... p.s. if you still have money after that... get the Fine Molds Millenium Falcon!! Boy can I spend other people's money!!
-
Don't get me wrong... I love the design. Its just more boxy around the forward fuselage (right behind the cockpit) than I thought. The orthographic views in those drawings don't really show how squared off the sides are. I guess you see it constantly moving around in the show - so you don't get a sense of how flat the sides are. Now I only wish Bandai would come out with a 1/100 scale version that is cheaper and in scale with my other Yuks. I don't think I can afford to go Platz on this one... I WANT AN ART BOOK!
-
Damn! I've been waiting for this plane - but I swore it looked a lot sleeker in the anime... is it really that boxy?! It may not be a platz resin, it could just be some poorly proportioned scratchbuild.
-
Yeah, I toyed with the idea of doing a clear version with guts - but only for a second and then I came to my senses!! Too bad its a clear green one and not a colourless one. I think you can just use regular tube stuff cement, it dries quite clear - and use more so that it oozes out of the joint, you can then use that to sand down the seam (that's what I do for normal seams - less filling - no putty matching needed) and the cement solvent takes on the colour of the styrene anyways. I'd love to see what you do with it - post shots!
-
Yay! thanks Graham. Hope to contribute more in the future...
-
I think they do it on purpose! It makes people feel better to get a big box after laying down so much money.