Ido
-
Posts
847 -
Joined
-
Last visited
Content Type
Profiles
Forums
Events
Gallery
Everything posted by Ido
-
From what I got, we are supposed to just post in the model/toy section all the topics that we are supposed to post in the how-to section. About the build up, I think we can still open a topic with our "in-progress" works, cause even if I could submit it for the site, I think we all prefer post the build-up and get suggestions and opinions from the MW members. Then IF we have time and will we can submit a step by step guide. My 0.02$
-
Saw the latest movie, it show better the model and it look really nice, indeed a "Ultra-lightweight foam, fiberglassed. With the proper blended lower surfaces, and what-not. (And munitions!)" Will be wonderful. Good Luck!
-
These ranks will be very cool under the title instead of the blue squares.
-
Uhm... I think its welcome for the VF-0 cause they actually look that way, but the hasegawa VF-1 exhausts are already correct (just too long) so I'm not going to modify them, if you have suggestion about the colors they are welcome.
-
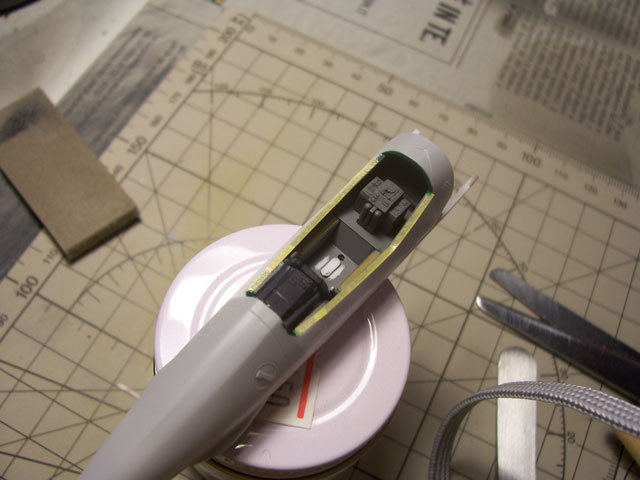
Well, I metalized them with mr.metal color alinume(aluminum in engrish), Mr. metal color require a sealer so after a layer of gloss-cote I washed it with tamiya smoke enamel plus flat base, I'm happy with the results but I think it will be even better with stainless metalizer cause its less shiny. The picture just don't let you understand anyways.-. You can also see the intakes/hands covers painted with dark seagray(331) and washed with flat black. Some other little stuff and then I can work completely on the exhausts, any suggestion about that?
-
wow, the first pic look a lot more a CG model then a scale model, weird, looks very good.
-
Hasegawa 1/72 Vf-1j/a/s I will build it as DYRL version Kakizaki Vf-1A, landing gear down, pilot-less, canopy and airbreak closed. The cockpit its sealed and the fuselage primed, now i'll do some of the parts that need to be painted before assembling such as exhausts, fans and intakes... About the intakes fans, how they are supposed to looks like? Should I just go with chrome silver?
-
I tried both white and light gray but it doesn't remain on damn...

-
Sanding and repainting the black part wasn't a problem but I wished to do a white wash to make out the details, however the wash didn't stayed on, there is something different to do with very light colors wash? About sealing the canopy... I masktaped the cockpit borders with micron masking tape (1mm) and used modeler's mask-sol for the hard to reach area, the canopy will be covered with masking-sol and glued on using a little of liquid mask, I hope this time the paint don't make its way in the cockpit edges. That's all for today, I'll continue it tomorrow.
-
As the how-to section its closing I'll continue the topic here Old topic Mr.surfacer 500 do its work but its a little hard to cover, now give the last look to the cockpit before I seal it and prime the thing.
-
IAD, I followed all the work in the R/C forum topic, It's amazing, but I didn't understand very well what kind of engines it uses, have you pics or links? I wonder if you were able to watch Macross Zero after all, if yes do you like it? ps In you opinion a R/C VF-0 will be possible?
-
Yeah its a decal, I made error of point the light directely at the piece so you see that shiny white monitor... I finally melted togheter the two halves of the fuselage, yes "melted" cause I used Tenax-7R, This way I'm sure they will never split and ruin the paint job. I already reshaped the edge behind the cockpit and the edges of the landing gear bay, I used polyester putty that works great for this kind of work. I didn't glued the seat and masked the cockpit so hopefully I'll avoid part of the sanding dust to get in there, I also suggest to don't glue the HUD, just fit it in the hole and glue it when you have finished with the seams. I aplied the first coat of mr.surfacer 500, now I'll wait it to dry and I'll aplly more where its necessary. Then sanding, sanding and more sanding...
-
Have you some pics of that? If are talking about the tv series cockpit, well I'm doing the dyrl version of Kakizaki's VF-1A and all the dyrl artworks I have show the eject handle where I placed it.
-
I wonder If I'm posting too many pics, probably if there is someone with a 56k connction he want to kill me. Did it but just near the seat. For the handle I bended a 0.3 mm copper wire, then I painted it with semi-gloss yellow. For the black strips I used a 0.2 mm copic modeler marker, its acrylic so you can delete them how many times you like with a swab and windex, once I was happy with one side I sealed it with gloss-cote then i did the other side and finished the thing with super clear semi-gloss. (don't use it for large areas! add gloss clear to super clear flat instead) The long part of the rod help a lot for painting and gluing it. Argh! the monitor isn't really that crappy, it's just the future floor polish on it thats reflect light and maximize the faults. The instrument panel is coated with a satin coat, the exterior black is flat. it looks a lot better in person
-
I'm continuing this but I got the camera back just now so here a general shot just for today, tomorrow I will do some better pics of all the parts, now is evening in Italy and its hard to me to take pics, that is better one among likely 20 shots. The decals, the black H.u.d. and the ejection handle finally killed the boring two-tones look. Differently from others I didn't loaded it with non-canon details but I tried to keep it close to the artworks (even if the hasegawa model isn't really canon ), what do you think? does it looks convincing?

-
I'm not a RC planes expert, I can't judge the quality of your job but as Macross fan, sv-51y fan, and as modeler too all I can say is that seing the sv-51 model actually fliyng its wonderful, please keep it up, I can't wait to see more.
-
I think its supposed to be Shin's vf-0a as it have the "311" number, instead of go for a very dirty white they did a light gray directly I suppose. That's lazy.
-
I know it gives the A/S option, I just desire to build a vf-0s with ghost that's all. Think about the WM cheng VF-0s with full armament, OMG! OMG!
-
It looks awesome, I really wish to do a vf-0s with ghost.
-
Criticize tastes and judge its immature itself.
-
Still sucks but better... I forgot to mention that nothing its glued or placed correctly just placed randomly on for the pics. Edit: I posted the wrong pic, now its correct.
-
Today I assembled the seat without problems using micro-weld, I like it a lot when I need to achieve a very precise application (you can apply it with your favorite brush), and a good clean bond, the best part its that it can't really damage mr.color. Then I handbrushed same details, to hand paint mr. color you need to mix it with retarder mild, I mix it in a 1:1 ratio and its very good for small surfaces, never tried on large surfaces but I will never hand brush that. After handbrushing I did an enamel wash on the landing gear bay and the other parts, they look ok. Taking good pics Its really hard cause the size of the thing, please consider that in the pics the colors are darker, and it look glossier, the whole stuff its painted with semi-gloss colors and flat colors for the wash. It actually looks better, some details are invisible in the pics
-
Time for update this, sorry for the crappy pics, I really cannot do better ones. I'm a dummy with digital cameras too Its time to give the seat its second base color, so I mask the parts I'm going to paint. If I remember it right, masking sol damage acrylics paints so don't use it on acrylics. Hasegawa directions suggest to use the color "middle stone", it looks right on the cap, but the actual color its too yellow and bright IMO, so I added a little of Khaki green, it looks good. After removing the masking... ...I lightly sanded with 2000 grit paper the imperfections, after an enamel wash it will look decent, I hope ---------------------- Airbrushed and ready to decal... Now lets try to assemble the seat...
-
Looks nice, good job.
-
Hubrol bottles sucks, after a while they doens't close perfectly and dry just in the bottle if they aren't already dried in the bottles when you buy them. Another reason cause I like modeling Lacquers is cause I will never trash them cause they ruined right in the bottle, so I can keep a lot of them without worries.