TMBounty_Hunter
-
Posts
618 -
Joined
-
Last visited
Content Type
Profiles
Forums
Events
Gallery
Everything posted by TMBounty_Hunter
-

The Newbie and Short Questions thread
TMBounty_Hunter replied to azrael's topic in Movies and TV Series
Does Wave still make the 1/100 VF-1S Roy Fokker battroid kit? Seems to be out of stock everywhere. Did they just settle on making people buy the Super Battroid kit instead? -
Help me out How to build Hasegawa kits
TMBounty_Hunter replied to Mr Bomber's topic in The Workshop!
Hey baxojayz! Yeah it's been a while. Thanks for all the info guys. I'm looking for more info specific to the VF-1 kits. Something like the accumulated knowledge of the community over the decade+ of building the kits. -
Help me out How to build Hasegawa kits
TMBounty_Hunter replied to Mr Bomber's topic in The Workshop!
I've always wanted to ask, is there any specific tips and tricks to building the Hasegawa kits? Stuff that makes your life easier. Just off the top of my head: What's the best way to secure those super thin vertical stabilizers on the VF-1 valk? How best to approach the clear parts? Both the simple ones on the valk and the ones you sandwich into the arms and legs on the battroid(and now gerwalk) kit. Best assembly order? Stuff like that. -
The Newbie and Short Questions thread
TMBounty_Hunter replied to azrael's topic in Movies and TV Series
Hmm, so there's a bit of reference but not as much as I hoped. Oh well. Thanks very much for the pics and info! -
The Newbie and Short Questions thread
TMBounty_Hunter replied to azrael's topic in Movies and TV Series
Are there some official pics showing what the VF-1 and VF-0 radars are supposed to look like? What do they hide under those nosecones? -
Beautifully detailed thread with amazing results. Thanks very much for all the posts and pics!
-
The Mr. Color Thinner bottles (as well as the plugs inside the Mr. Color paint bottles) are made of polyethylene and that's one of the most chemical resistant plastics there is. I have an old PE bottle from some isopropyl alcohol that I use to store dirty hardware store lacquer thinner and it works just fine. Polypropylene is also pretty resistant to chemical. The smallest size of solvents at my local hardware store comes in PP bottles while the larger ones are metal canisters. Both PP and PE are commonly used for lab equipment and other chemical storage. I'm still mildly amazed at this Mr. Thinner thing. That will probably lead to me changing my painting habits. Would still like to eventually find out the exact ingredients though.
-
I'm sure there must be some misunderstand of terms here because in the past I've used non-Mr. Color brand lacquer thinners as very thin cement for standard (poly)styrene kits and in extreme cases melting spare sprues and other scrap styrene in the thinner to make a filler. EDIT: So I had to double check for myself. Filled 3 paint jars with scrap styrene from Evergreen, Bandai, Hasegawa, Kotobukiya and Tamiya then poured in the thinners. 30 minutes later: Mr. Color Thinner - styrene seems untouched. Mr. Color Replenishing Agent - styrene is mostly melted. Hardware store lacquer thinner - styrene completely melted into goop, as I assumed all these years all lacquer-based products would do. So now I learn that the lacquer component of Mr. Color lacquer paint is actually in the paint bottles and Replenishing Agent, not the Thinner itself. Quite the revelation. Would be nice if they actually had ingredient labels on these bottles.
-
Whoa, Mr. Color Thinner doesn't actually melt styrene? D: I've always assumed it was lacquer thinner with a bunch of other stuff mixed in and would be just as melty on bare plastic. Thanks very much for that information!
-
http://www.hasegawa-model.co.jp/product/26/ The description does make it sound like both DYRL and TV pilots and decals are included.
-
I have encountered significantly more laziness than anticipated with this project. Also kinda enlarged in scope ass I'm building the valk mode in parallel so that I can paint them at the same time with the same paint batch. In the mean time here's some VT-1, VE-1 builds from twitter: https://twitter.com/SzAdgo4GDjCLqS6/status/613698564162596865 https://twitter.com/SzAdgo4GDjCLqS6/status/611409945842442240 https://twitter.com/SzAdgo4GDjCLqS6/status/611412752662310912 https://twitter.com/Temukichi/status/604551226479374336 Seems most people can't be bothered to wait for Hasegawa
-
Another pic of the huge VF-1 https://twitter.com/anihilate/status/612058804721586177
-
I love this thread. The more progress pictures the merrier! And the results are amazing too
-
Awww, I assumed it was 1/72. Oh well. Thanks very much for the instructions though!
-
Ooooh well this should be useful. Where does one get that Hikaru figure?
-
Hmm, well that's interesting. Thanks for the info!
-
Looking at that map, is Kotobukiya attending?
-
Seeing beautifully finished builds is incredibly motivating. Thanks for posting this!
-
Hasegawa Max VF-1A Gerwalk with scratch detailed cockpit
TMBounty_Hunter replied to Cesar Enrique's topic in Model kits
Man, this looks so great. Really awesome to see what's possible. -
dbh1973, the two kits are the VF-1A/J Gerwalk kit plus the VF-1D Valkyrie kit. I should probably mention I'm a slow builder. Right now there's a lot of really boring stuff to do like filling in ejector pin marks and occasional sink hole, that isn't really worth updating is it? Optimistically it's getting primed in 2-ish weeks and done end of May? Pessimistically... well I have an ARII VF-1D that was started in December 2012 and still isn't finished.... Two things scare me about this build though: Hasegawa's really really fine panel lines and inevitably trying to scratchbuild a 1/72 Minmay...
-
It kept gnawing at me and gnawing at me so might as well have a go while it's still gnawing at me. Also before Hasegawa announces the official one. Cutting up GB6 to fit The D And it fits To make things on top fit, chopped up GB11 and D5 The product. The support column from GB11 was moved over to GB12 And finally cutting out the bit that drops down like A17 would on the A/J/S Fits together pretty nicely Probably still some tweaking to do but overall that was pretty easy
-
Beginner's Model Building Construction BASICS
TMBounty_Hunter replied to MechTech's topic in The Workshop!
Not sure if this is the right place but....has anyone ever built a Hasegawa VF-1 in fighter mode using the ever-so-slightly fatter legs and arms from the battroid or gerwalk kits? What would that look like? -
Is anyone planning an upscaled build? Maybe 1/350?
-
New from Hasegawa 1/48 Weapons and 1/72Gerwalk
TMBounty_Hunter replied to Jefuemon's topic in Model kits
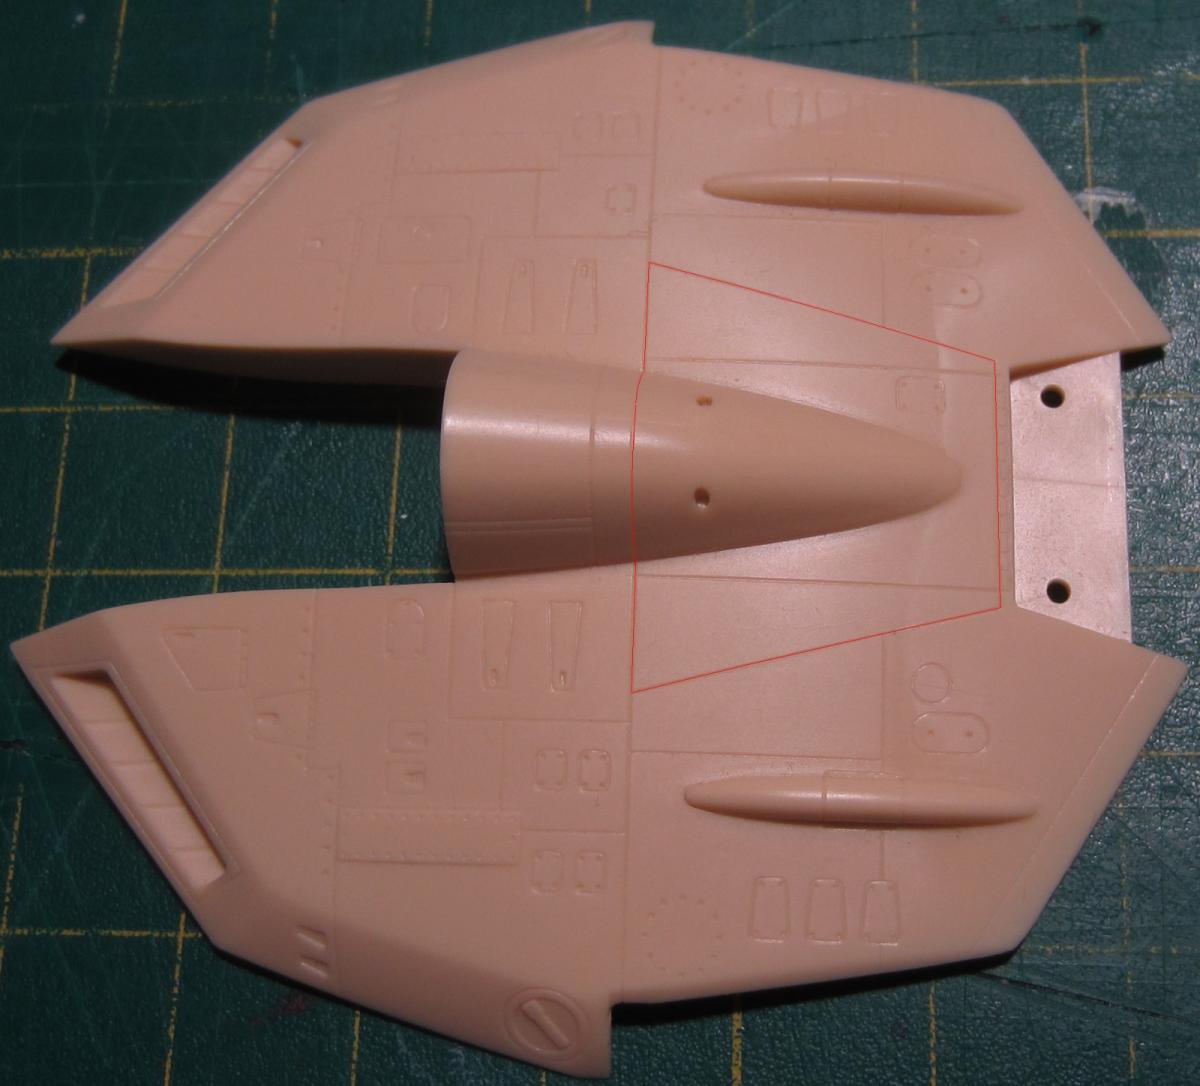
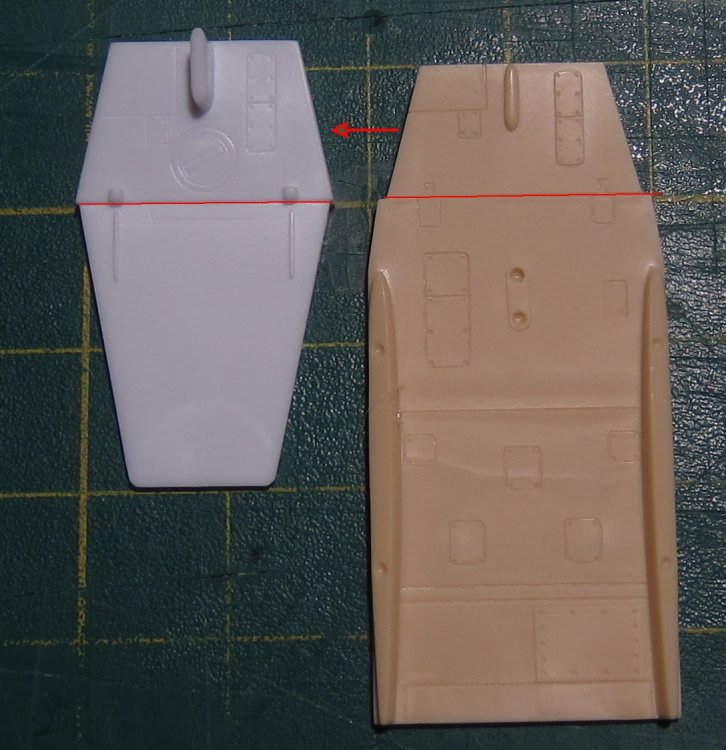
My Gerwalk kit finally arrived. I really don't want to build it yet before I get more practice but I still spent some time in the box. From looking at it and the Valk VF-1J and VF-1D kits, it seems to me there's only 3 things you need to mod: Cut up the Gerwalk GB6 part to match the D D11 part Cut up the D D12 part to drop down (like Step 7 in Gerwalk manual): And then graft the top of D part D5 onto the Gerwalk GB11: So is that really it or did I miss something?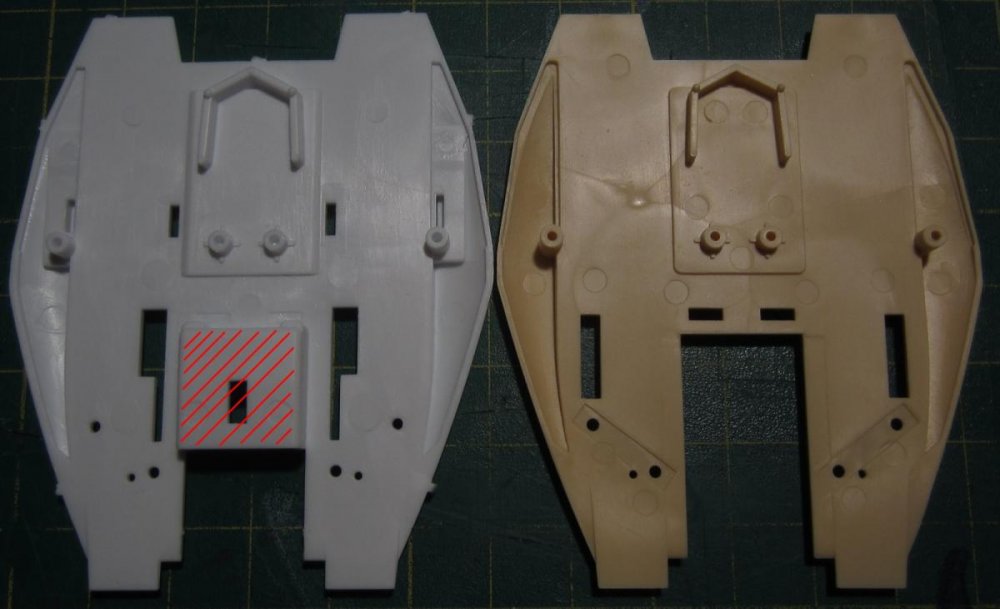

-
A single normal Gerwalk kit is 2600 yen, so kinda doubtful there's 2 of them in the box and super parts