leading edge
-
Posts
436 -
Joined
-
Last visited
Content Type
Profiles
Forums
Events
Gallery
Everything posted by leading edge
-
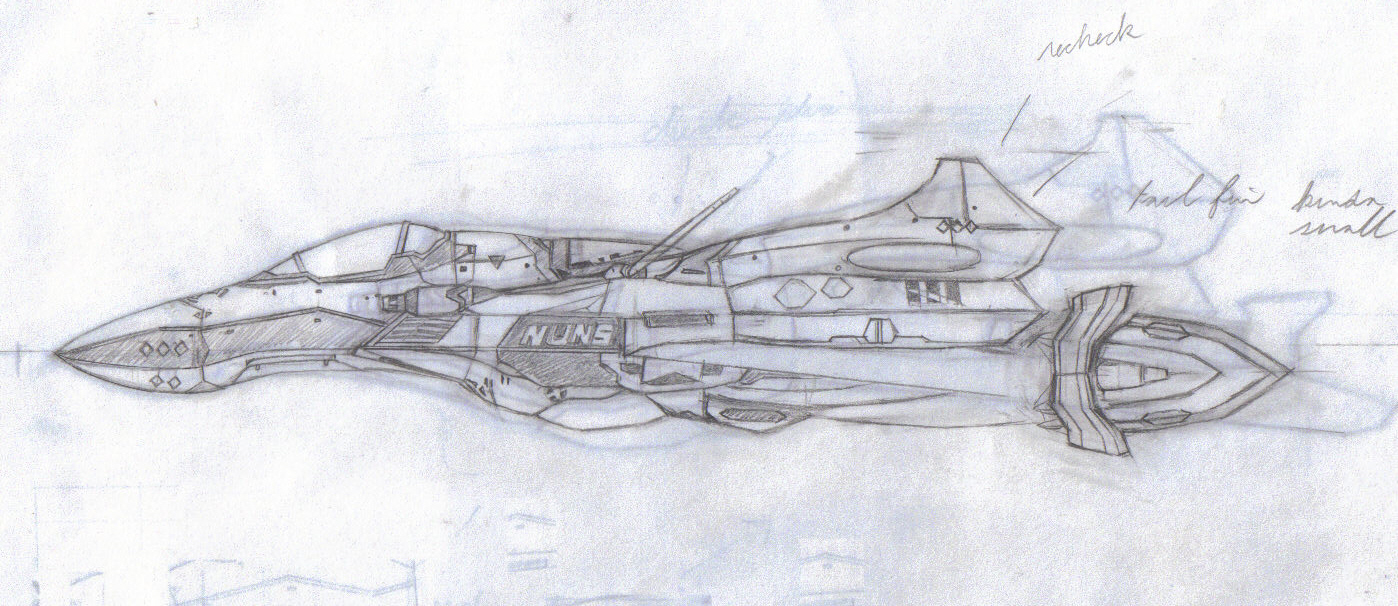
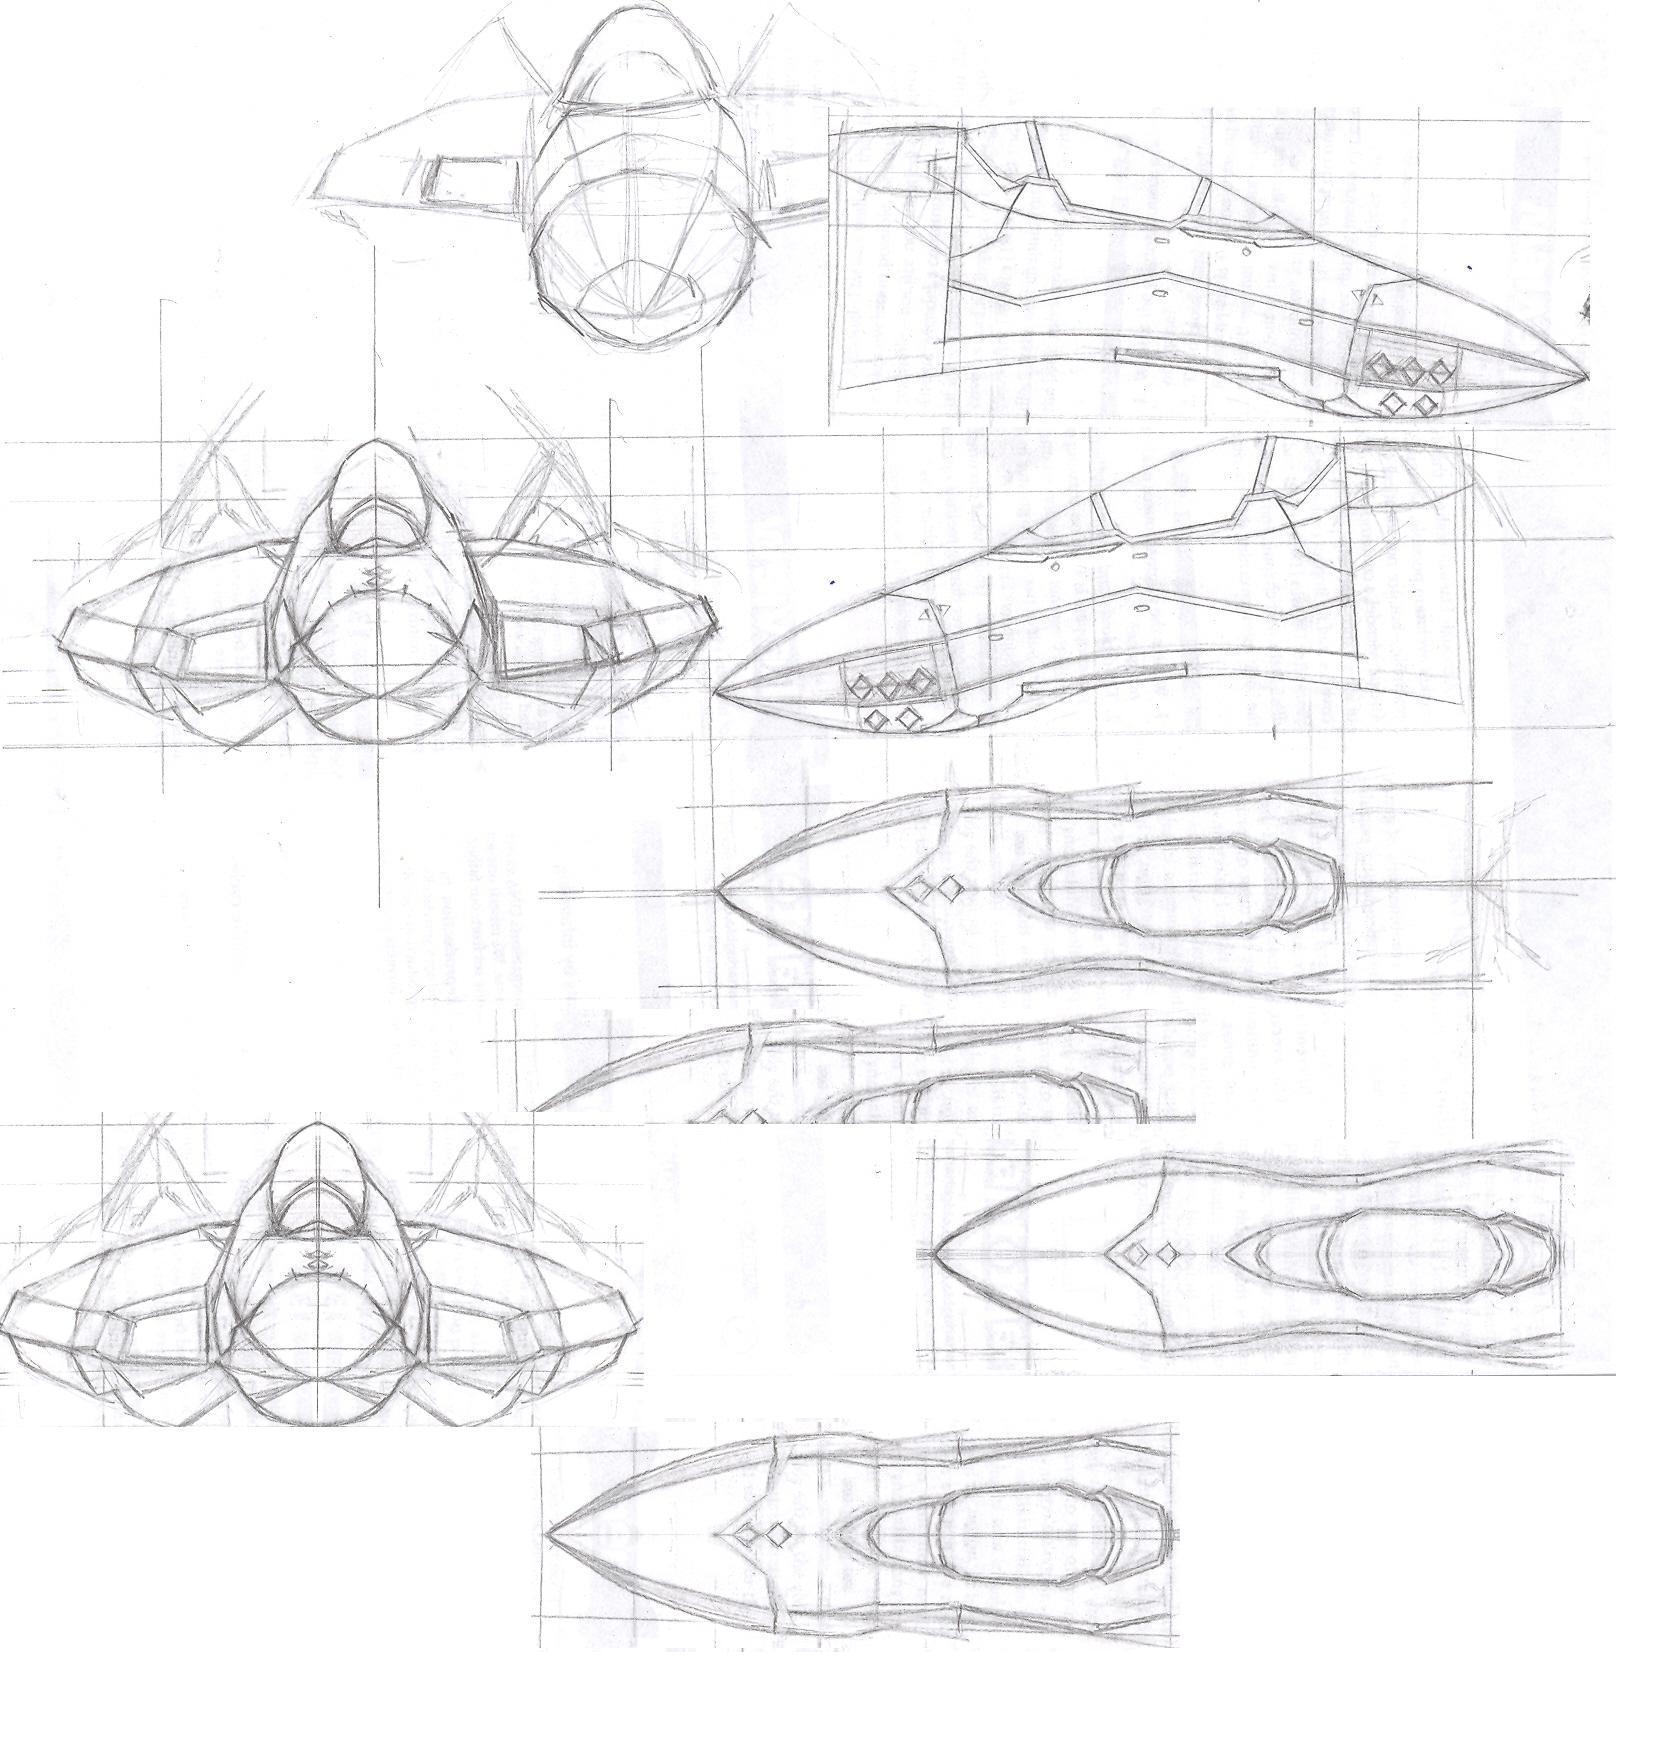
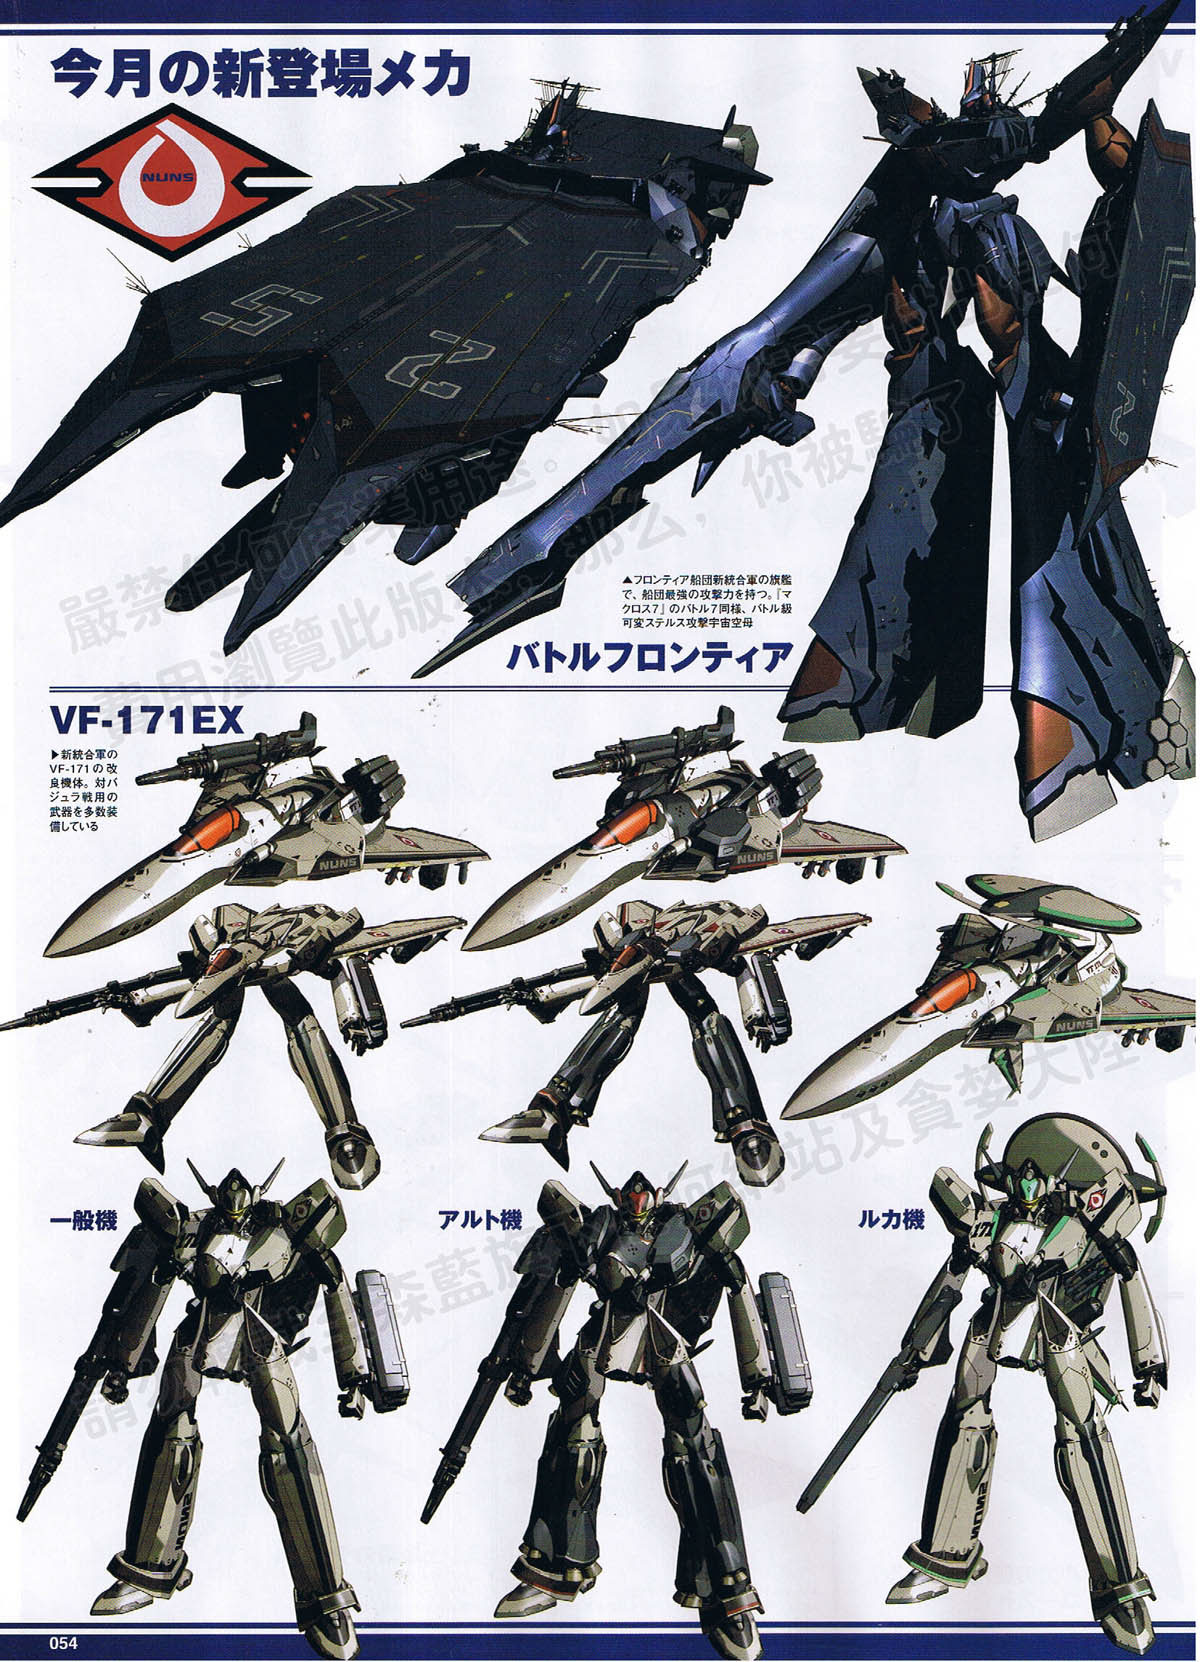
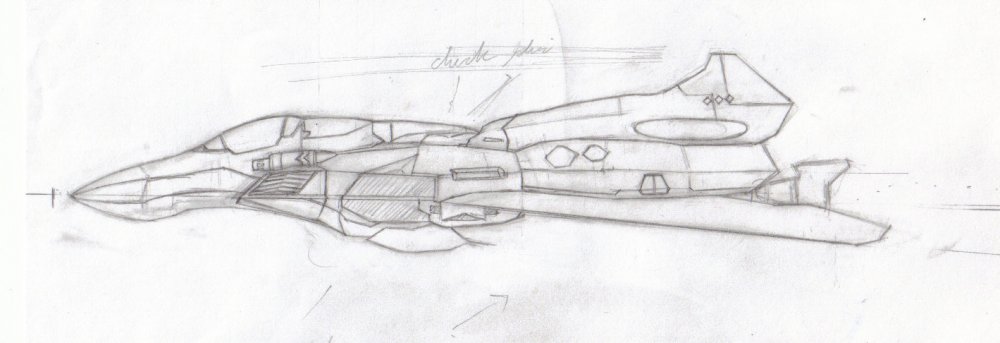
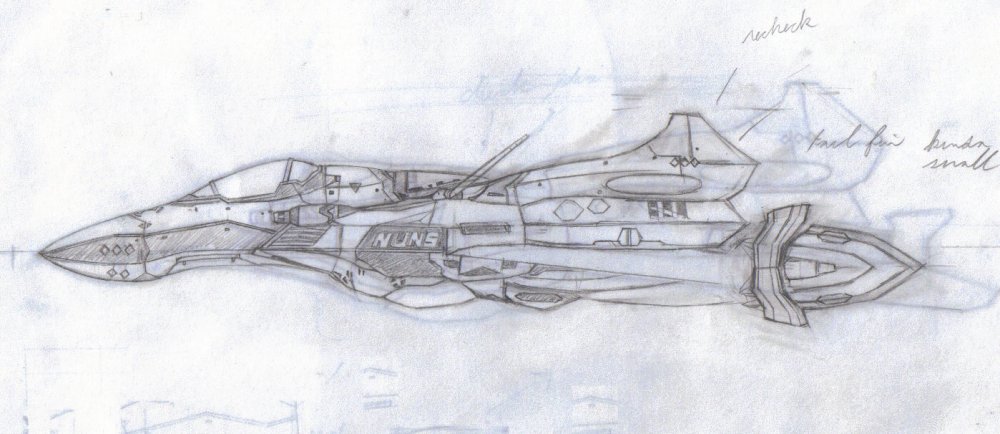
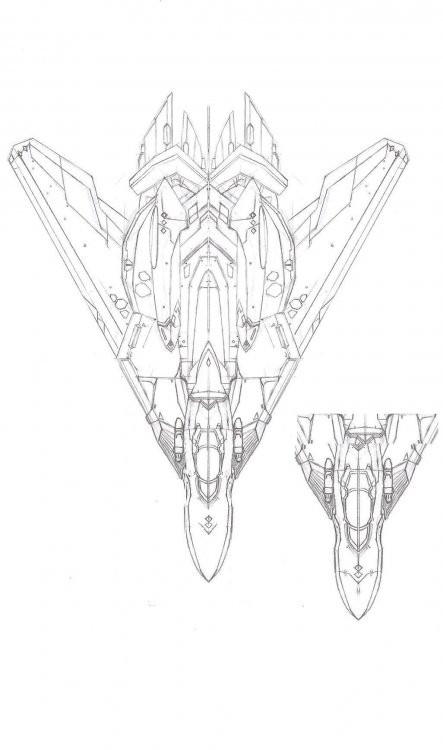
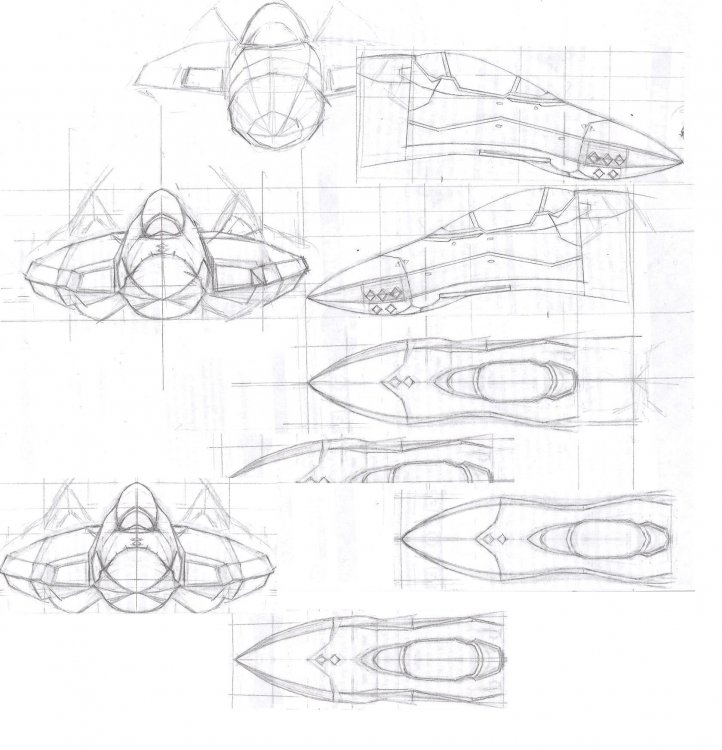
Ever since Macross Frontier came out I've been trying to create a VF-171 EX. I feel it's one of the craft of the series that was given a bad rap. The Messiah though very well designed is cutting edge while the VF-171 Ex is a last minute custom modified craft. The fact that people expected it to be equal or better is a bit unfair so I've decided to give this mecha it's due with a fully transformable mode. I plan to use this as a basis for another project I will be presenting in the near future. This topic will be updated as often as significant progress is made. Here are some plans I've drawn up and would appreciate some feedback so I can perfect some of the more complex areas. Remember these are rough sketches so the refinements will be made as the project develops. The black and white images are some sketches I've been working on and the other thumbnails are reference for the project please tell me what you thinks the criticism or ideas would be welcome.

-
There are a number of things you can do I'll list some sites and a few tips i myself use. 1. Prep the surface for paint that entails sanding at varying grits of sand paper and applying putty on uneven areas. I use Milliput fine it's used on porcelin and I ca guarantee a complete and smooth finish if sanded evenly 2. Primer from personal experience a good thinned primer with three coats of gray are what i use an with an airbrush. A lot of people use spray cans I recommend them if you have little money but if you want a custom coat( varying layers of lite and dark areas on the vehicle) then mix the paint yourself and use a airbrush 3. Painting: Painting is easy if you pay attention and make sure you know your paint. Paint can be tricky because if it is too permanent if you make a mistake you can"t easily remove it without damaging you model. I prefer a 3-4 coat spray the first 2 are about surface and color so get a grayer color than what you would normally use . I generally use this to see and test the surface to see if the color works and if the area is evenly sanded a must after you get to the painting stage. Once the paint is laid 2 coats and make sure it is fine and even so you can see a little gray through it. Remember the paint must not be too thick or when you finish it will look like the surface was warped. When you apply the 3-4 coat use semi-gloss if required and keep it even and a little thicker but remember keep it even. Finnally the finishing touches on the finish if it is a flat surface use some microscale flat coat or microscale gloss to finish. The reason for this is to keep you newly painted job an extra bit of strength and what better way to do this than by airbrushing with a transparent coat of clear plastic. This is something I like to do and take it if you want but lambskin on a low setting with a tiny buffer or nail polisher keeps a gloss surface looking sharp. Here are some sites: http://www.hobbyfanatics.com/index.php?/to...macross-models/ http://www.arcforums.com/forums/air/index....p;#entry1624663 http://scope-eye.net/ http://themodelmakersresource.co.uk/articles/article003.html http://www.tamiya.com/english/scale/beginner2/2.htm http://www.youtube.com/watch?v=p7F8La1BgRE-video guide
-

Novice styrene/foam board builder looking for tips
leading edge replied to Iceblue106's topic in The Workshop!
At the moment I can share a number of discoveries which will enable even the most frugal model builder/scratchbuilder make their projects that much more satsfying there is something called styrofoam board specifically blue styrofoam it's used in home insulation. It's manufactured by dupoint DOW extruded styrofoam it is coarse yet fine and denser than the average foam found at stores like Michaels. Now understand it's in your best interest if you have to buy something do it with a friend or a very large project otherwise you'll be spending $400 on a piece of 12-14ft foam that will sit forever in your garage. Usually if it's a foot or so it would be $5 or so a square foot depending on the supplier. Mechtech when working on the Daedalus mentioned a mixing of talc powder and paint applying it to cardboard. I tried some of his techniques on this stuff and of course it works there are a few advantages and disadvantages. Styrafoam is better at shape and holding the paint /talc together create a good binder and color to shape vehicular form. I use terracotta not very strong but makes form clearly and cleanly by mixing an appropriate amount of talc and colored acrylic paint you get a pliable yet shapeable shell. To bind the two pieces of foam use Elmer's school glue paste as long as no moisture is present you should be able to stack and bind the materials together. I've seen some very interesting use o this in the following sites. http://www.heresy-online.net/forums/showthread.php?t=36990 http://advancedtautactica.com/viewtopic.ph...7b&p=175840 http://staff.bath.ac.uk/ensajg/tg/TG4foambuck.jpg http://cs.trains.com/trccs/forums/p/146899/1629219.aspx http://www.lowes.com/lowes/lkn?action=prod...cts&Ntt=DOW -
Tester Model Master or other preferred paint for 1/48 plastic?
leading edge replied to RCB's topic in The Workshop!
I've worker with Testors stuff before good color but has some issues wit drying if not careful can rub away if a acid is anywhere near it before it dries. Usually I dry it with a hair dryer and mix a bit of thinner and the right amount of Microscale for strength the combination in an air brush makes for a stronger more even coat of paint. Also I like to thoroughly sand my surface before painting which is extremely helpful. A 900grid give more stick than 1000 grit. Testors is more about economics but if there is a sale try Tamiya for a finer finish. -
Droopy leg/flappy wing fix for 1/72 VF-25 kits
leading edge replied to Chronocidal's topic in The Workshop!
If you have a hand Dremel and a small enough bit you could carefully sand down the inside of the area to where it is more smooth. As for the you drooping area s nice that the kit responded so well to the tightening looks good the older Macross kits form the 90's were a pain to transform and build it's nice to know that the newer ones if there are minor problems you can correct them easily. If you want to be sure the area hold try testing it out with material that won't stick to the plastic to see how tight or loose you need it. I do a test with some paper or soft foam that can be crammed evenly in a seam. The level of tightness is usually best if you can remove it with only very minor difficulty. If a seam is too tight or too loose I like to use some Milliput fine to fill it up after properly calculating the mass needed via the fill method mentioned above. When the amount is ready I spread it on with a flat dental tool so the putty will spread cleanly then after about 4-5hrs I sand and paint the area. -
How did you get the rivets so evenly spaced? Did you use a precalculated temlate? I like to use a .005 drill bit by hand very small so I have to be careful or the bit will snap.
-
I'm going to attempt duplicating the YF-19 CAD model at some point in the future, and use that as a test bed for the idea, checking to see if it changes the transformation any. It might even be possible to use 3D printer of some sort to make a new fuselage section with these changes incorporated, but I don't know what type of materials would be needed for that. Anyone have any thoughts on this? Would it even be worth attempting, or is it more likely to completely screw up the plane? Edit: It may not look like much of a difference, but here's what the end result would be, without all the extra colors and lines. The problem with all those solutions no offense is that they are extremely time consuming or very difficult without the proper tools. You said something about a 3d-printer that might help the next question is do you really want to commit that many resources to this? I have a solution it's rather unsophisticated either alter the plastic via heat gun or sand it down and replace mass with liquified ABS plastic as that is what Yamato usually makes their valkyries out of. ABS is very difficult to melt however if you grind a piece and practice with some modeling glue or solvents you can make a paste another idea is just to use my favorite epoxy putty Milliput fine it's extremely good at repairing and supporting surfaces than the usual putties out there and it's very strong. It sound a lot less sophisticated but if you aren't careful the plastic could stick. I sugest you practice with a heat gun or remove the plastic with a fine sanding tool to get the shape you want. As for the shape of the rounded areas Yamato forgot putty or a subtractive method to change shape is an idea. Mind you this suggestion is the best I could come up with so you will probably need to read up on similar method to get the result you want.
-
Retro kit : Arii 1/100 VF-1S fighter (completed)
leading edge replied to Vifam7's topic in The Workshop!
I like the white a little grayer than pure kind of titanium white and the black looks pretty pristine. Did you do anything to the surface like a little epoxy and sanding to even out the imperfections in the surface? Thos e older kits had areas with "dimples" where the plastic wasn't properly cast. From what I can see from you pictures the body is all there and the paint is applied very evenly. -
I like the option to keep finished details very impermanent although that is not to say that Gundam markers are not good it's just that a well prepared surface maximizes the results. A careful sanding with grits ranging from 100 grit to 900 give the surface a pristine kind of look. Between the sanding is the best way to apply the color I found between 400 and 600 grit is usually good especially if it is a dense surface like epoxy resin kits and ABS plastics. A middle tone gray marker is good then black afterward when all the details are finished I like a little graphite on the surface between the panel lines just as a finishing touch. I've heard from other aircraft modeling sites some people like to use powdered colors ( pastels, crushed charcoal) to great affect I haven't tried anything except for the surface priming method and the graphite finish.
-
Advice wanted: What's the best way to mask the canopy?
leading edge replied to Vifam7's topic in The Workshop!
How effective is this Tamiya tape I don't have any experience with it. Does it work well with brushes as well as airbrush? -
Although I don't usually mask the canopies I put together just as some quick advice try using a resist on the canopy. One comes to mind by Grumbacher it's a kind of watercolor rubber resist that gently clings to paper and plastic. It makes accurate lines when I've used it on paper and models ( I use it to airbrush and hand paint camo lines). It's very accurate when used with an airbrush and won't run I've even used a brush to do some work. I usually find it at craft store Aaron Brothers and Michaels.
-
your transforming sequence in an indie film intrigues me if you have any questions or any developments in the project is there a web site or will you be posting the updates on the Macross World forum?
-
Quality job on the deck man I never knew you could used acrylic talcum powder that way. How do you keep all those lines so crisp? In any case you need to get that in a magazine dude your sure to get some notoriety for such a professional job.
-
Awesome Valkyrie man. I've been wanting to do that to a Hasagawa for years hats off to the quality job on both the plane and the Battroid.
-
I don't know about the stores you like to visit bu there is a local store called Value Craft in California I like to visit the staff like store help with specialty craft so scratch built stuff passes in the store all the time. It's a combination artstore/ framing store with a an entire section of the store devoted to train, aircraft and remote controlled planes. As for the Macross/ Robotech galleries here are a few links macross model links
-
I'd be cautious about mixing chemicals with paint be sure to read the ingredients before you add something I once did something like that and the paints didn't mix well and about a half an hour later the paint changed color ( kind of two parts grayer than it should have). I guess too much oil in acrylic paints I guess. I usually use alcohol with maybe a Microscale industries microfinish it adds body yet protects the paint as it is sprayed on. Used sparing the paint should spray evenly and depending on the microscale (gloss, matt, and semi-gloss) you can create a superior finish to your kits.
-
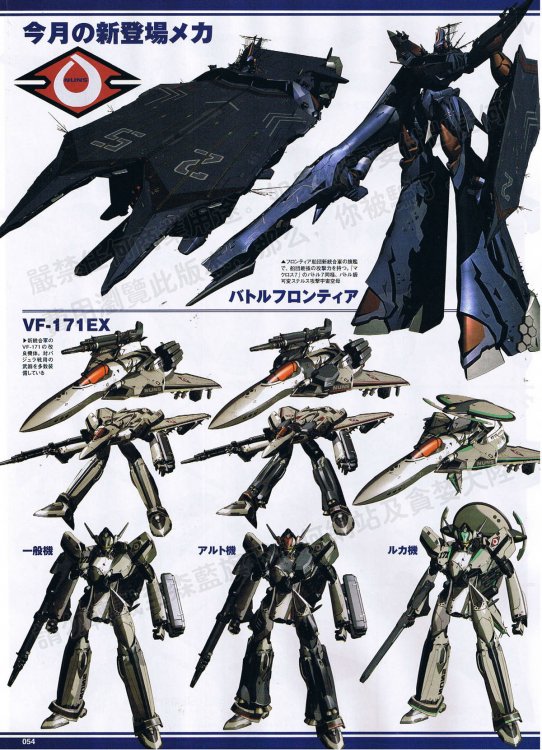
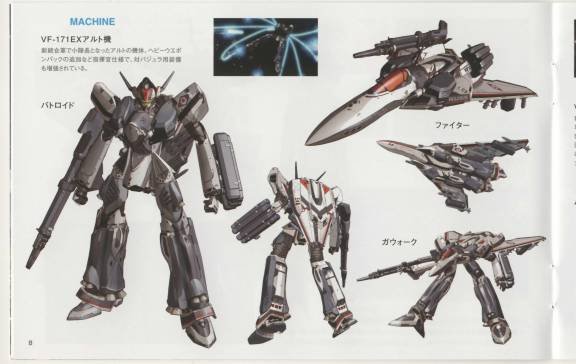
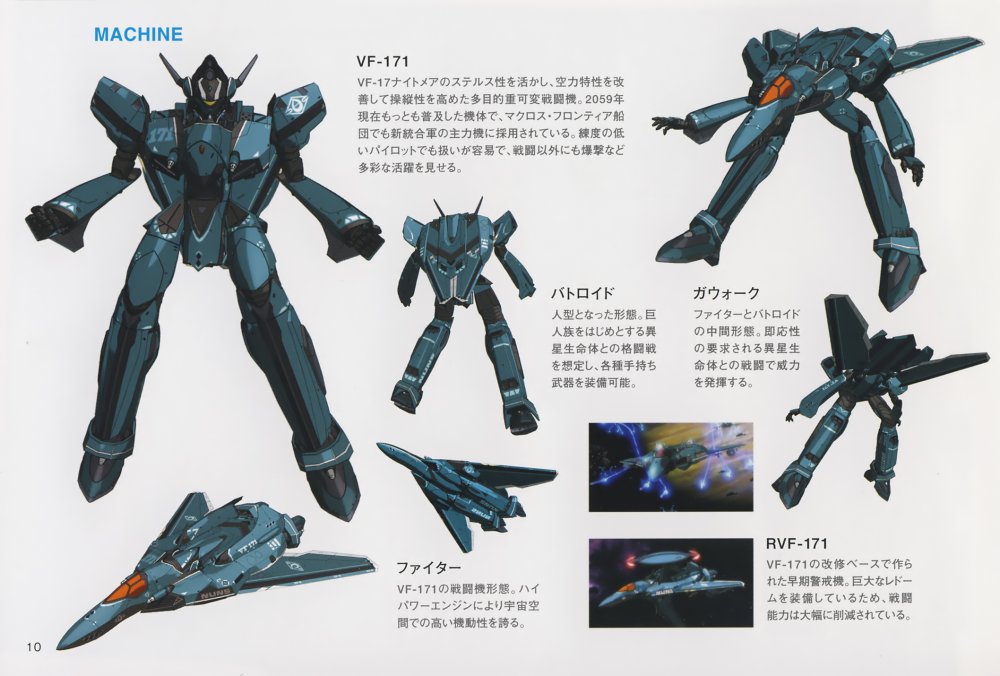
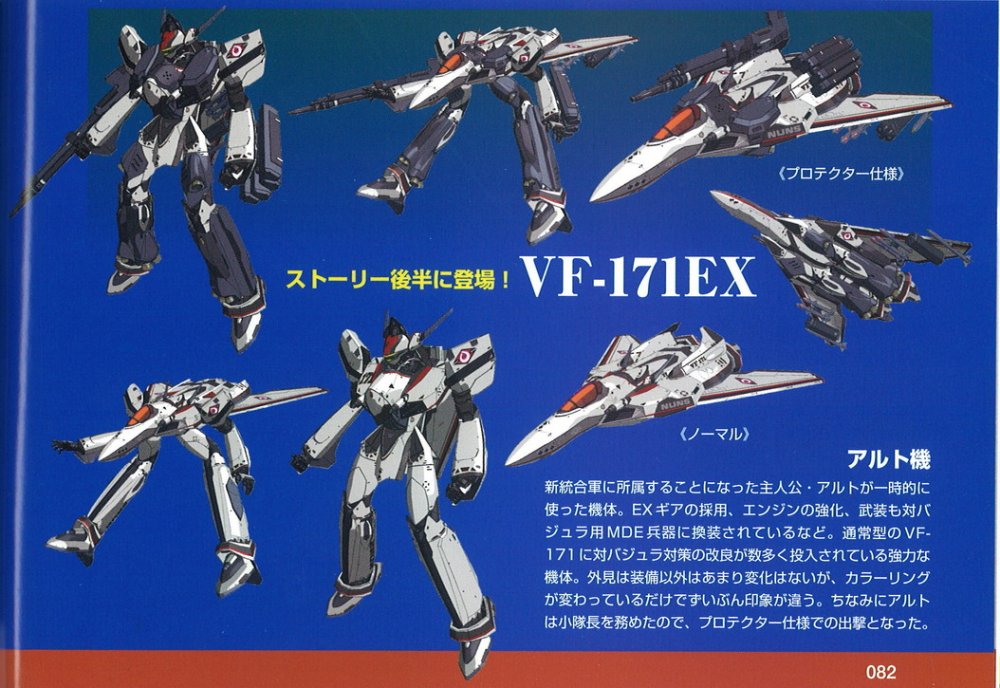
How did you get enough physical infomation about the VF-171 Nightmare plus to get such accurate model? I've been trying to get enough screenshots to make a scratch built VF-171 Ex nightmare plus but haven't had enough detail to draw an orthographic view of the plane mode's nacelles to draw it properly. Any advice or resources you could share would be most appreciated.
-
If you need to make some thing transform a test model for a transformation is usually best if you have the transmode made first i.e. the plane or vehicle. Afterwards work the robot into the design with careful allowances for size and mass of both the plane/vehicle and the robot mode. As a kid I found the best way to transform and object was to use paper or cardstock and identify and area that looks or could be a hand or leg and work it into the design. The joints and frame can be transformed back and forth with a release of temporary lock which hold the untransormed parts in place. A peg could hold the part in place another idea i've tried is a small magnet attached as a peg male or female joint should hold tha part until your ready to transform. The transformed animated toys use a simultaneous gear system which allows for the parts to move almost all at once( Starscream and Megtron arm joints.)Other than that I would examine some toys possible some new transformers or Yamato Macross fighters.
-
Most toys during the 80' were made sometimes without a UV blocker added to the plastic to retard yellowing caused from either aging via sunlight or chemical stains. I would suggest to prevent yellowing in the first place try a light coat of airbrushed UV protective acrylic or a special case designed to block UV rays both can be found at either a hobby store or art supplier ( i.e. Aaron Brothers and Hobby People). I usually coat some of my models this way as a final touch to prevent scratches to the paint job.
-
YF-19 Demonstrator Hasegawa 1/72 Finished
leading edge replied to denversaur's topic in The Workshop!