MacrossJunkie
-
Posts
3254 -
Joined
-
Last visited
Content Type
Profiles
Forums
Events
Gallery
Everything posted by MacrossJunkie
-
Will be about the same length in fighter mode. The v2 battroid will be taller mostly due to the improved hip positioning and neck. The v1 looked too short anyway for its stated height.
-
Me too. I sticker all my valks. Even Yamato valks have some chemicals still on the surface as well as finger oils from my handling that affects sticker adhesion so I clean a surface before I sticker it. After that, there is no need for cleaning. Perhaps dusting after a while, but that is easy to brush off.
-

Strike A Pose! V.4 - The Macross Mech Pose Thread
MacrossJunkie replied to JCSaves's topic in Hall Of The Super Topics
Sorry. It's physically impossible. -
Be careful with the rubbing alcohol on the painted surfaces. Also, the clear colored plastic pieces aren't molded in colored plastic, like the red and blue pieces below the knees on the legs of a VF-1. They are clear plastic coated in colored clear acrylic paint which the rubbing alcohol will wipe off or ruin the finish. Use it sparingly if you must use it, but try a cloth (microfiber for no dust) dampened with water first. And if you have any Bandai DX's, don't even think about using the alcohol. The paint comes right off without any effort. It's like wiping dry marker off a white board.
-
Bandai DX Chogokin YF-29 Durandal Valkyrie
MacrossJunkie replied to UN Spacy's topic in Hall Of The Super Topics
I have no idea what some of those options mean. In particular #7, 11, 16 (something about the gunpod), 18, and 19. -
Bandai DX Chogokin YF-29 Durandal Valkyrie
MacrossJunkie replied to UN Spacy's topic in Hall Of The Super Topics
The irony definitely wasn't lost to me when I made my post, but who knows? Yamato's next release could have QC issues too (hopefully not), but Yamato overall has really improved their QC compared to years past. Unfortunately, I think the same QC issues with Bandai's DX line will crop up in the V2 VF-25 as well since they will very likely be using the same glossy plastic that doesn't allow for good paint adhesion and the metal joints will likely still get floppy over time even with no use. My 29 also came covered in grease, which is odd since there are others that have said theirs were clean. To be fair, Bandai seems to be stepping up their game as well with what seems to be more effort being put into their Macross releases now than when those half assed DX VF-25s came out. -
Bandai DX Chogokin YF-29 Durandal Valkyrie
MacrossJunkie replied to UN Spacy's topic in Hall Of The Super Topics
Despite only having the YF-29, I would say if you like the VF-19 Kai, then go with that. I have found the YF-29 to be somewhat frustrating. The metal shoulder hinges get loose quickly (the left one on my got loose over two days) and attempts to tighten it with super glue have failed. The arms and legs are loose at certain positions as well. There are numerous points where the paint scratches off just by the act of transforming it, even if careful. Not to mention the paint itself still doesn't seem to adhere very well to the plastic. It's to the point that I've had to modify the toy just to prevent the paint from being scraped off. From reading over the VF-19 thread, the VF-19 doesn't seem to have any significant issues other than people worrying that the ball jointed ankles might become loose over time. They both look great, but the 19 seems to be better engineered and suffers from fewer QC issues than the 29. -
Strike A Pose! V.4 - The Macross Mech Pose Thread
MacrossJunkie replied to JCSaves's topic in Hall Of The Super Topics
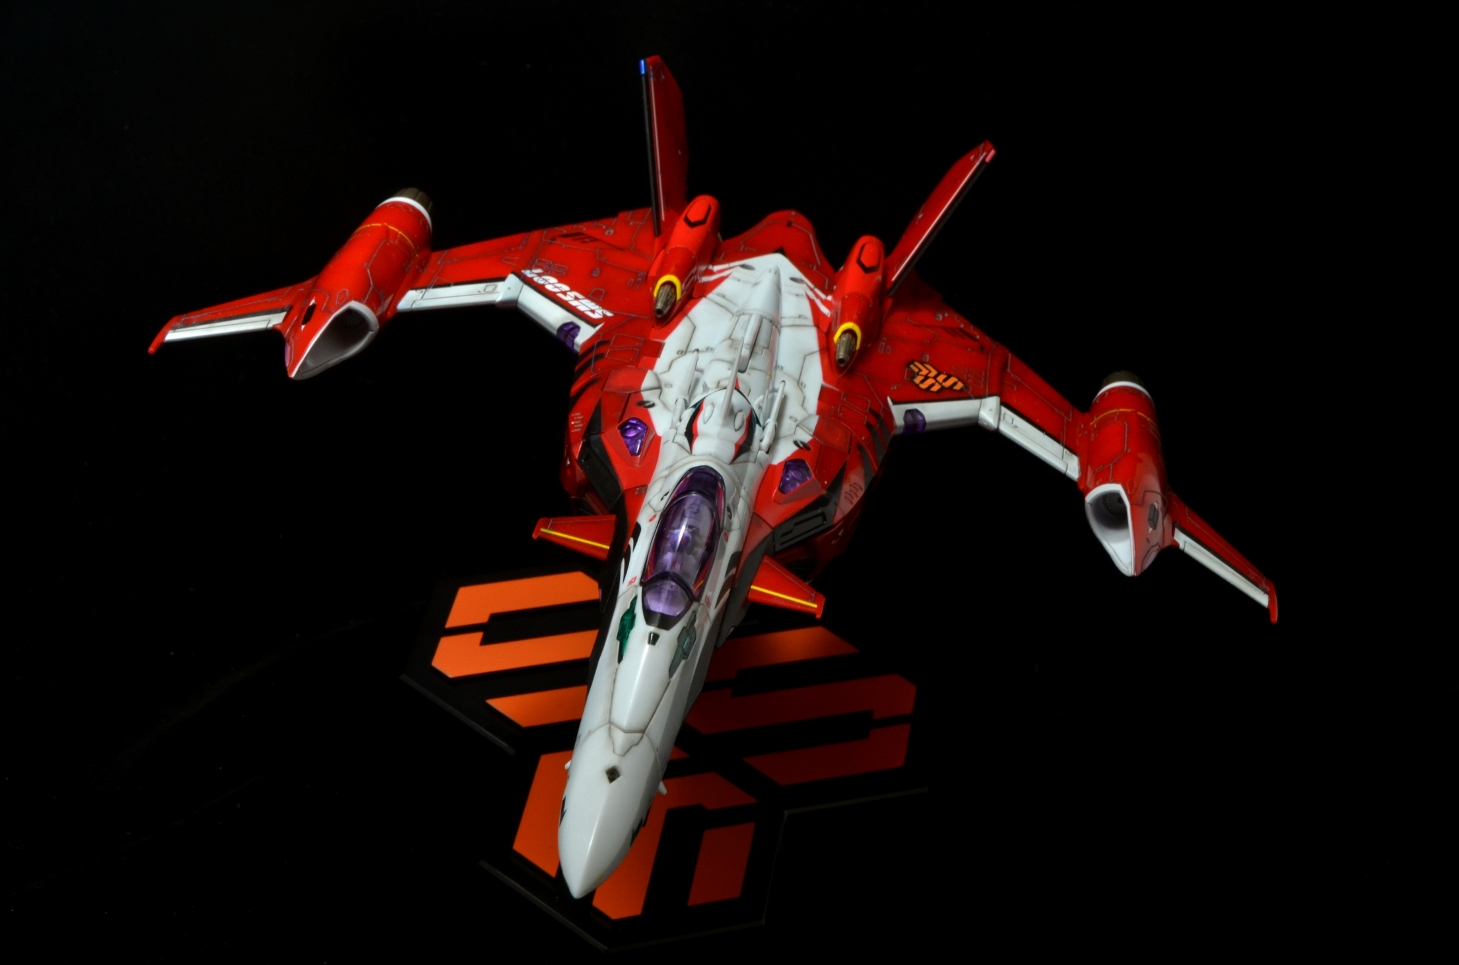
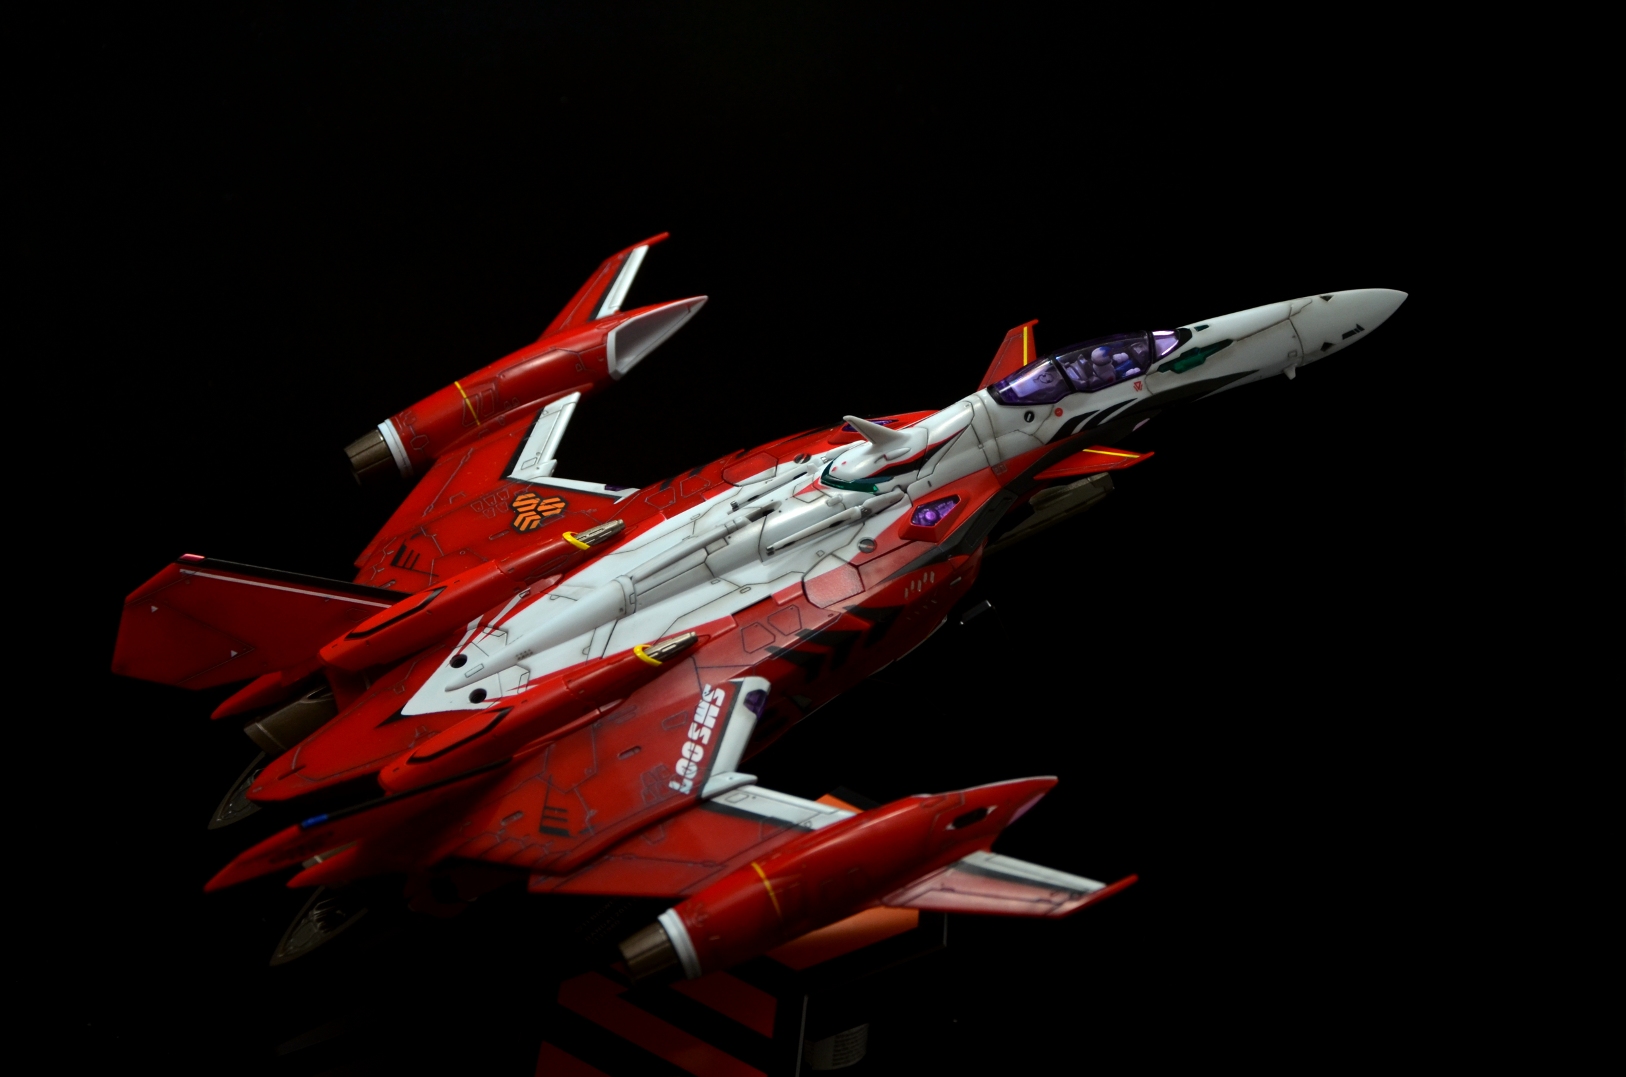
Took a couple pics of my YF-29 while it's still all glossy from the clear coat for those that like shiny. Going to touch up some weathering and add the flat coat later when I have time.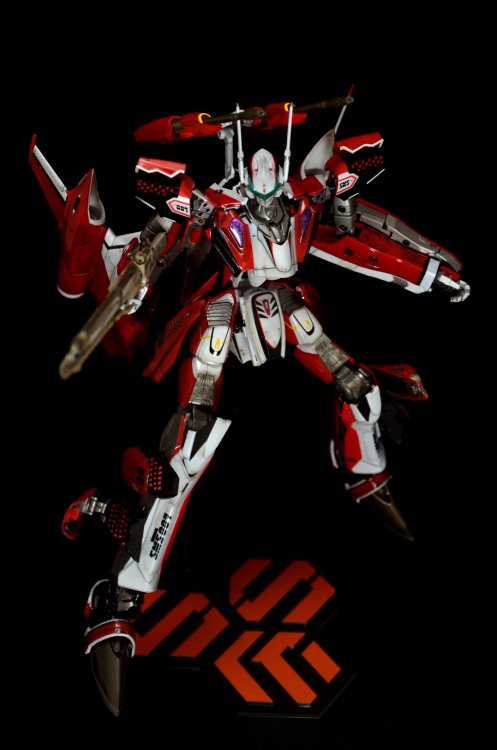

-
Bandai DX Chogokin YF-29 Durandal Valkyrie
MacrossJunkie replied to UN Spacy's topic in Hall Of The Super Topics
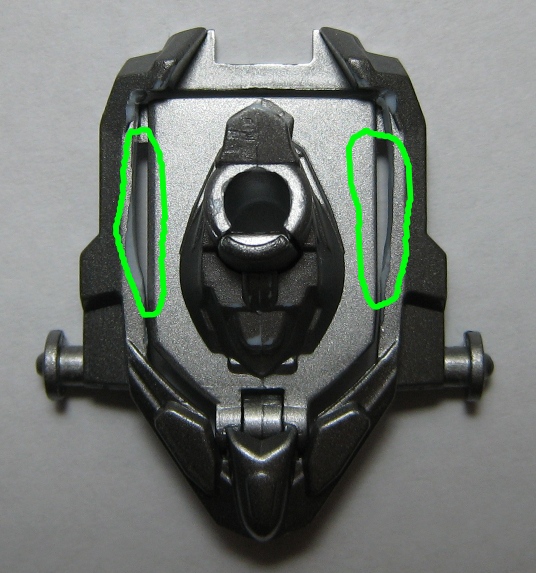
I found that cause of the paint scratching off the sides of the head was a dual problem. One, the double jointed hinge for the piece the head is attached to is way too stiff, requiring a lot of force to get the head in and causing it to rub against surfaces. Two, the edges of the outer piece is too narrow and scrapes off the paint while you try to get the head down. Even if you know about it and try to get it down without it scraping, it seems nearly impossible to do so. I ended up carving off a bit of plastic to give the red painted pieces at the sides of the head enough clearance. I used a metallic silver gundam paint marker to touch up the paint (not shown above) and cover up the bare white plastic afterwards. I need to get some decent lubricant to loosen the hinges. After disassembling and taking off the neck/collar piece, that sucker is still hard to move even without other parts getting in the way. Meanwhile, the metal left shoulder hinge flops around and can't even support the weight of the arm
-
Bandai DX Chogokin YF-29 Durandal Valkyrie
MacrossJunkie replied to UN Spacy's topic in Hall Of The Super Topics
Future does have a high surface tension, but I usually don't have trouble airbrushing it onto surfaces until I tried it on the Bandai plastics. It's even somewhat hard to coat with paint, which is not something I normally have difficulty with. As for the lacquer, I never said it was delicate. If you re-read what I said, I said that it doesn't adhere to the plastic. So when you put pressure on it or bump it, it forms something that looks like air bubbles due to the lacquer having lifted off the surface. And yes, sanding the surface would defeat the purpose of applying a protective layer of clear coat in the first place. Future, for the most part, seems to be doing a decent job of adhering to the surface of the toy after you successfully get it coated. -
Bandai DX Chogokin YF-29 Durandal Valkyrie
MacrossJunkie replied to UN Spacy's topic in Hall Of The Super Topics
Not lacquer, but I did start coating the valk in acrylic (Future). It is a complete pain in the ass though because both the glossy plastic and the paint seem to be very hydrophobic and it just pools up and it's very difficult to get it to coat. The lacquers for plastic models that I've tried in the past though were just junk on bandai's the DX VF-25 and 27. While they would coat the valks, they wouldn't adhere in the slightest. A bit of pressure or a light knock of a finger nail on the lacquer coats would cause them to lift off the surface causing something that looked like air bubbles since the coating was no longer attached to the surface. Back to the Future (not the movie, the floor wax made by Pledge), even air brushing was difficult, but it's your best bet. Just have to do a lot of coats and hope that you are able to coat the entire surface. Afterwards, once it was dry, I touched up parts that would not coat with a small brush. Strangely it's even harder to coat the paint they used than the plastic itself, particularly the black. The top side of fighter mode is done, so I have to do the bottom side next and then the areas uncovered by battroid mode. After that, I'll try doing a flat coat since Future is so shiny, it's like the valk is permanently wet. Nope. Actually, if you thinned it down, it would likely be difficult to get it to stick to the plastic due to the hydrophobic properties of the glossy plastic mentioned above and liquid's tendency to pool on it. I just took a small brush and applied the paint straight out of the bottle. -
Bandai DX Chogokin YF-29 Durandal Valkyrie
MacrossJunkie replied to UN Spacy's topic in Hall Of The Super Topics
I had the same chips on the side of the head for mine and just as big as well. I'm not sure when that happened. Possibly when I was struggling to get the head back down into fighter mode. I also had a slight chip on the right shoulder also right in the same place where the part would be under the fold quartz. Fortunately, I just happened to have paint of the right color to fix the red paint chips. I used Tamiya Flat Red (XF-7) and painted the white plastic left behind by the chipped off red paint. The color seems to be an exact match in shade of red. Now I just need to fix the chipped black paint.
-
Bandai DX Chogokin YF-29 Durandal Valkyrie
MacrossJunkie replied to UN Spacy's topic in Hall Of The Super Topics
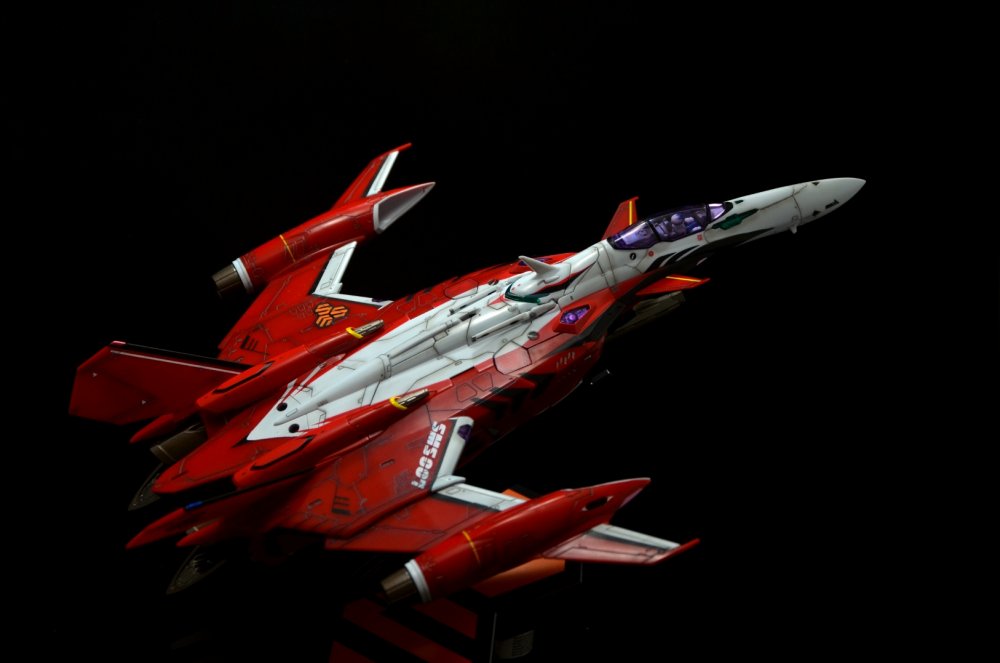
I have to say that the fighter mode has really grown on me, especially now that I have it in person. Did a quick panel lining and light weathering on just the fighter surfaces for now to see how it would look. The amount of surface detail it has is really nice.
-
Bandai DX Chogokin YF-29 Durandal Valkyrie
MacrossJunkie replied to UN Spacy's topic in Hall Of The Super Topics
Have you tried pushing down on the bottom end of the cover plate? The top edge is hinged. I only accidentally discovered it during the first time I transformed it. My thumb was on the piece and accidentally pushed it in and the piece came off. -
Bandai DX Chogokin YF-29 Durandal Valkyrie
MacrossJunkie replied to UN Spacy's topic in Hall Of The Super Topics
Just got mine today. My thoughts: The good (likes and improvements over the VF-25): - The crotch piece now locks into place at the correct angle. I originally thought they had some sort of bar that would fold out to prop it out, but that's not the case. It just locks into the proper angle once you pull it out all the way. - The clips on the top of the intakes are a huge improvement over the rounded pegs used in the v1 VF-25. They are so strong that it is actually difficult to detach the legs. - The hip guns are now attached via a ball and socket joint so they don't keep falling off. For the VF-25 and 27, it was a ball joint going in a tube and came of pretty easily during transformation attempts. - I like that they used a lot more clear plastic pieces instead of painting them in areas such as the sensor arrays. - The new posable hands are very tight and hold the weapons well. - The reversal of the ball and socket joint for the wrists is an improvement over that of the VF-25 and 27. The larger ball joints seem to be tighter and hold more weight... for now. - The knife slides into the shield very securely and doesn't rattle around. - The front landing gear is practically double the length of the VF-25's. - There is a whole lot more panel detail on the surface compared to the 25. - It actually has a neck this time. - The mechanism for the shoulder block has changed over the way the VF-25 and 27 handled it and I find it works a lot better and keeps the shoulders closer to the main body as well. The bad (could use improvement): - The new method to keep the crotch folded and locked into place using the hip swing bars is still not very strong and disengaged a few times while trying to move the legs. - The crappy pvc head lasers are hard to position because the material firsts twists around before it actually starts to move in the socket so unless you move it a good amount, it will just untwist back to its original position. - The "C" clips that attach the shoulder armor to the arms are pretty wimpy and the shoulders fall off easily, especially during transformation. - The shield in fighter mode doesn't clip on very securely and it falls off fairly easily. The part of the shield that slides out is pulled out all the way, so it's just the connection itself that is fairly poor. - May not be a bad, but the front landing gear seems to stop a very strange angle as it angles so far back that it looks strange and doesn't seem like it would be structurally sound for landing. - The bar that attaches the beam turret could stand to be metal instead of plastic. It twists when you try to turn the tightly attached turret and I fear breaking it. The ugly (QC issues): - The hinge that attaches the left wing to the back plate had stress marks at the corners right out of the box. - The diamond shaped area on left wing engine is missing half that shiny pink paint while the other side's engine is fully painted. - A bit of sloppy paint application here and there. Paint scuff marks and chips out of the box. - The beam turret might be a little warped. It's not noticeable unless you look at the fighter from the back and look at the spacing between the bottom of the beam guns and the top of the legs. No amount of fiddling with it could make it even. The strange: The cover plate for the crotch piece for some reason is designed to act like a button to pop the cover plate off. Underneath is a little bar or clip that doesn't stick into the cover plate itself. I wonder what it's for. My first thought was it's possibly for a swappable part for a future armor pack of some sort, but I find that unlikely. -
Bandai DX Chogokin YF-29 Durandal Valkyrie
MacrossJunkie replied to UN Spacy's topic in Hall Of The Super Topics
I wonder if gray colored plastic is just inherently weaker and prone to self destructing. It seems that the majority of the breaks and cracks on my valks that occur without hardly any interaction are mostly on gray plastic pieces. - Original 1/72 VF-11B, gray plastic connecting the legs broke under its own weight. - Left hip of my Gamlin VF-22S: cracked on its own. - Lower swiveling portion of both thighs on Ivanov's SV-51, internal connecting pieces where the screw goes into crumbled over time and the thighs split in half, forcing me to glue the two halves back together for both legs. - Gray shoulder socket pieces for VF-0A, both shoulders split on their own. - Ozma's VF-25S wing hinge split at the corner. - Other people have reported the gray portion of the YF-19's arm also breaking seeming fairly commonly. The only other cracks or breaks I've had with my valks that didn't involve gray pieces were a self destructing left thigh on Nora's SV-51 in a similar fashion to Ivanov's and the cracked shoulder hinge on the VT-1 which is the fault of the pin used. -
I had floppy wing issues with my Milia version. I put a couple drops of liquid cement for plastic models onto the exposed ends of the metal rod shown in your pic and moved it around to work it into the gaps. Now it's decently tight enough to stay in place.
-
Actually, that's not red plastic. It's just coated with a clear red paint and I guess the silicone reacted with the paint. For the most part, it seems that bare plastic parts are fine when in contact with the tips.
-
Bandai DX Chogokin YF-29 Durandal Valkyrie
MacrossJunkie replied to UN Spacy's topic in Hall Of The Super Topics
I really like the YF-29's gunpod. It's large and looks neat with the split halves but not huge and unwieldy like the VF-27's. Hopefully the toy version is more stable and not so flimsy feeling like the VF-25's and 27's when opened. -
I hope they give this another small run sometime in the future. I missed out on it the first time due to some expenses preventing me from being able to buy it on the initial release.
-
Bandai DX Chogokin YF-29 Durandal Valkyrie
MacrossJunkie replied to UN Spacy's topic in Hall Of The Super Topics
Has there been any mention of whether there is any sort of locking mechanism that keeps the crotch piece pointed out as implied by the pics or are they just cheating with that like a lot of people (including me) do? -
In my case, mine are stored in detolfs which currently have no lighting in the cases, my home office's blinds are always shut and the only sunlight that gets in is indirect light that leaks in between the blinds but none that shines directly on the cases. The times I checked were during winter and early spring when it was still cold and I keep the heat set at 60F (16C) in the house since I like the cold. So heat and sunlight are not really factors for me.
-
There was no damage to your X-Wing? I used Testor's Dullcote as well on the valk in my pic above, but you can see the obvious damage the tips did to it. I wonder why.
-
Yamato 1:3000 SDF-1 Macross - unpainted model kit
MacrossJunkie replied to CF18's topic in The Workshop!
I'd be up also for buying a PE sheet that someone doesn't plan on using. I hope those glow in the dark decals will be offered up at places like HLJ. I don't understand why they don't offer up all the extras like the sticker sheets and PE parts in a bundle. They're already making them, how hard could it possibly be to make extras and sell them to the people that bought their product early and at nearly double the price only just a relatively short time ago? -
Were they contacting plastic or touching painted surfaces? If you had any that were touching painted surfaces, could you specify a few toys and where they were touching? What sort of clear coat did you use on your X-Wing model? Just curious and I think it would be useful to know.