-
Posts
2061 -
Joined
-
Last visited
Content Type
Profiles
Forums
Events
Gallery
Everything posted by Anasazi37
-
My best guess is that it's sitting in Customs at the Chicago airport mail facility. I wouldn't trust the "Origin Post" entry from USPS. I can take a week or more to clear Customs, regardless of entry point. In my limited experience, Chicago tends to be faster than Los Angeles, but who knows these days.
-
A friend of mine who collects and builds LEGO sets swears by this method: https://www.lego.com/ms-my/service/help/fun-for-fans/behind-the-scenes/brick-facts/apply-decals-blt39ee67a2a9490ca7 "Our designers have shared this trick for applying decals: lightly spray a window cleaner on the surface of the parts to be decorated. This will allow you to adjust the decal without damaging it. Once you have the decal in the right place, use a flat edge to smooth out any bubbles and let it dry." I prefer paint and decals as well, but if you're stuck with stickers, this method might be worth considering. You could also use a small brush and just lightly apply the cleaner. That way you're not blasting the entire part with liquid. I've never tried this approach, but I can see how it might work decently well. Rubbing alcohol might work, too. Neither one should be used on a painted surface, though.
-
What about modifying this stand on Thingiverse to meet your needs? https://www.thingiverse.com/thing:2889235 I realize that it looks an awful lot like a Flightpose stand, but since those stands are unavailable, it's an option worth considering. From eyeballing the design, I think the main thing you'd need to modify in a free software program like 3D Builder is the length of the three rods. And maybe this is the one you already found: https://www.thingiverse.com/thing:3229798 Which I think could work for a variety of valks if you print appropriate adapters.
-
This is why I invested in a vinyl cutter about two years ago. I now make my own masks for airbrushing. If you get the design right, the masks will conform to the curved surface of the chestplate. Definitely takes some practice to get the technique down.
-
I usually brush Micro Set on the target surface and the underside of the decal, apply the decal, then brush Micro Sol on top of it. No wrinkles, no air bubbles, and the film conforms to complex surfaces and panel lines well. Once the decal is fully set, I use a very sharp hobby knife and gently run it along the panel lines, then apply a bit more Micro Sol so the film can adhere to the sides of the line channels. Gives the decal that painted-on look. On the rare occasion that a decal doesn't set correctly, i.e., there is curling along the edges, I might apply a bit more Micro Sol and gently press down on the film with a cotton swab. The curling is usually an indication of an issue with the gloss coat on the target surface, an issue with the adhesive on the film, or that the film is too thick. There is a lot of thick film out there, unfortunately. Almost sticker-like. I've been getting excellent quality thin paper from the same supplier for 20+ years now. For that paper, and when I'm working with old decals, I always hand-brush on Liquid Decal Film first. Adds a nice layer of protection.
-
Wait...the 1/72 fighter kits come with stickers instead of decals? It was a mistake to do that for the 1/20 kits, but I kind of understood because the idea was to make something that big easy for novices to assemble and decorate. No one in their right mind wants stickers for a highly-detailed 1/72 scale model. All Plamax would have to do is look at literally everything made by Hasegawa and Tamiya to see that waterslides are the correct choice.
-
I've worked with a lot of Macross sticker and decal sheets over the past 20+ years, scanning them in at high resolution, and you do sometimes see strange stuff in the fine print. Usually it's just nonsense or repeating patterns of "xxx" to approximate words, but what you just found is in a league of its own. My Tomahawk should arrive today. Will have to check out the sticker sheet to see if mine has the same text.
-
I've often wondered the same thing. My best guess is that there's an assumption on the part of the manufacturer as to what the consumer will want to work with. Toys, theoretically, should be ready to interact with right out of the box. Stickers are easy to apply, and historically decals have not been included with toys, so it might be that simple. I'd happily pay a little bit more to have sticker and decal versions of the markings included. The Plamax 1/20 VF-1 kits are an interesting anomaly, though. They are most definitely a model that you have to assemble, and I think we all assumed that decals would be included, but we got stickers. Really crappy, profoundly disappointing stickers. If I'm correctly remembering their marketing material, the point was to make the kit easy to assemble and decorate for novice builders. Given the price tag, I wasn't looking for easy. I was looking for quality. They eventually released a set of decals (DX version that more or less matched the sticker sheets for $60) for it. Including both sticker and decals with those kits might have been too costly for Goodsmile/Max Factory to consider, but I would have been fine with it.
-
Some additional images of the battroid kit, courtesy of Dengeki Hobby Web: https://hobby.dengeki.com/event/1749622/ The close-up shot of the informational sign says "TBD" for both price and release date. No surprise there.
-
You also need a Japanese bank account, credit card, and mailing address. Maybe some other things I'm not recalling, too. To my knowledge, no one living outside of Japan has successfully ordered a TWE item from P-Bandai since they put all of these administrative checks in place. When Bandai says "domestic only," they apparently mean it. VPN or header modding will at least let you look at the full product page, which is nice.
-
Probably the closest we'll ever see to that is the Chunky Monkey ...and with respect to the new Roy fighter kit, I will say that I appreciate Hasegawa's approach of making one DYRL VF-1 kit with 1A and 1S heads and a larger sheet of decals covering all Skull Squadron variants. Seems like a waste to make a new set for each variant, but maybe they're capitalizing on our "gotta catch them all" mindset and it makes financial sense for them to go this direction. We know they've thought of the multiple variants option before--just look at the (highly overpriced and incomplete) DX decals they made for the 1/20 kits.
-
So on top of their already-super-inflated shipping prices, they hit you for another ¥1750? Not cool. That's the whole point of paying up front for shipping. I'm definitely never ordering from them. I thought Jungle and Mandarake Complex shipping prices were bad, but this is some next level stuff....
-
1/72 Roy is on the way, too
-
Looks like a battroid VF-1J is in the works
-
The only 171 that I have is the CF (agree with you on the color scheme) and I've never transformed it because I'm worried about exploding triangles.
-
-
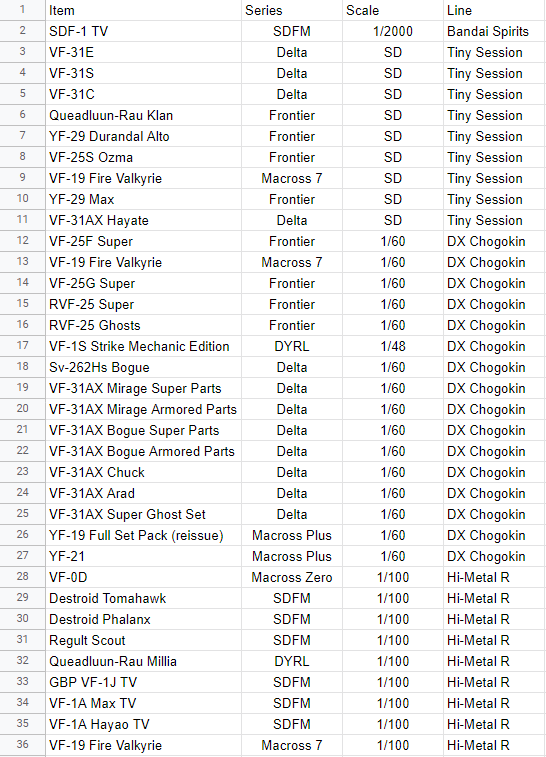
I think we're all waiting to see how many items displayed at the event will actually be released or re-released. My rough count, based on pictures, is at least 35 different items. I started a spreadsheet because there was a lot to keep track of:
-
Given how Bandai is jacking up prices for WWM items, I'm surprised the three new Tiny Session valks aren't $169.99 as well.
-
Clicked the "ship" button this morning at HLJ, so I should have mine early next week. Had to wait until the Nendoroid Denji reissue was available so I could ship everything in my Private Warehouse, which includes an Arcadia Tomahawk. I'm debating if I should make decals for that. Not enough hours in the day and every time I use my ALPS printer I'm basically gambling that it won't break. Discussion for the other dedicated thread.
-
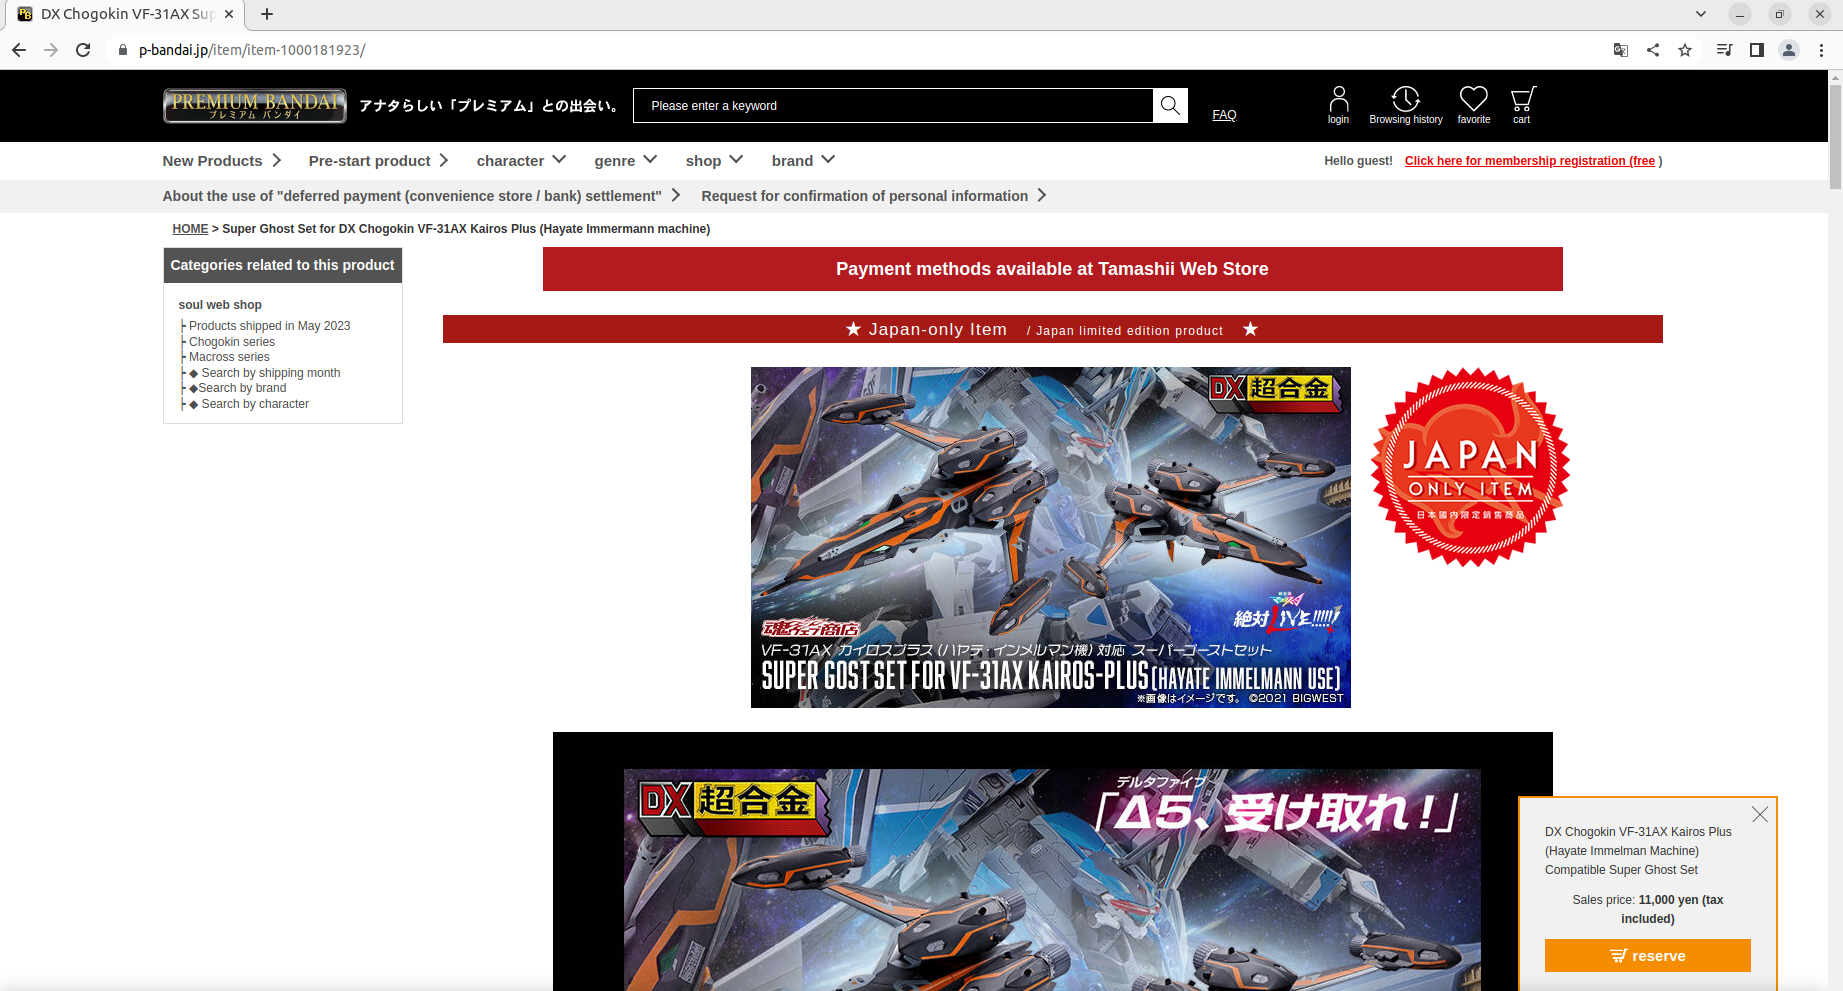
I'm guessing that it's some kind of proxy-based extension for Chrome that routes the browser's traffic through a server in Japan. Another option is VPN software that does the rerouting for your entire internet connection. If one were to have either capability on hand, one might see something like this for the item in question:
-
I couldn't sleep last night and happened to be up when the PO opened for these three, so I went to HLJ. Wow, that was a terrible decision. Not sure if it's because a ton of items from a lot of different properties went up for PO right after the Tamashii Nations event, but their site was getting absolutely hammered starting at 4pm JST. I tried to buy them for 30 minutes, but couldn't get to the payment screen (it would keep crashing). I finally gave up and tried again early this morning, remembering that these don't sell out instantly like the DX valks. Completed the order in 10-15 seconds. The experience reminded me to NOT use HLJ when PO Madness is a real concern. Their system can't handle the traffic.


