neptunesurvey Posted January 15, 2004 Share Posted January 15, 2004 Did anybody do a recast of the launch arm from the dryl? I remember somebody talking about that on the old boards. Quote Link to comment Share on other sites More sharing options...
cobywan Posted January 15, 2004 Share Posted January 15, 2004 There were quite a few things talked about that haven't come about. Wasn't Monkey Nugget going to do it? Quote Link to comment Share on other sites More sharing options...
Valkyrie Posted January 15, 2004 Share Posted January 15, 2004 That'd be me, actually. I've got an original, on loan from Noel. It's taken longer than I would have liked because, frankly speaking, the original kit sucks. The casting job is pretty shoddy, and the arm itself is horrible. They tried to cast the arm with an aluminum rod for an insert, which was a good idea, but they went about it all wrong, and the results were pretty disarterous. I've come up with a much more effective design, but I've gotta scratch-build the arm part to do it. And I have yet to get around to doing it (aside from one failed attempt). Also, Noel's pics of the finish kit at Wonderfest show it with some parts that aren't included in the kit. Namely, two hydrolic actuators and a cowel of sorts at the base. I'm going to machine the actuators on my lathe, since the kit really does need them. But I'm still not sure what to do for the base.... Quote Link to comment Share on other sites More sharing options...
Angel's Fury Posted January 15, 2004 Share Posted January 15, 2004 Valkyrie, will the launch arm be able to hold or stand the weight of a 1/48 or 1/72 valk toy once you've finished it? If it can, can I purchase it from you? Quote Link to comment Share on other sites More sharing options...
asianLove Posted January 15, 2004 Share Posted January 15, 2004 Wow Valkryie! It sounds like you took on a tough "mission" for yourself! What's your new, more effective design? How much are you going to have to scratch-build? Daunting task? I hope you look in your efforts! I'm sure they will be well appreciated by the community! Quote Link to comment Share on other sites More sharing options...
Valkyrie Posted January 16, 2004 Share Posted January 16, 2004 It's a bit daunting only because I'm still rather inexperienced at scratchbuilding :/ My design involves splitting the arm into 3 parts. This will both let me pressure cast them to eliminate air bubbles (by making the molds small enough to fit into my pressure chamber), and also make the metal insert work better. The middle part will have a section of the rod sticking out of each end, which will mate with the two end pieces. And AF... no. It's only for the 1/72 Hasegawa VF-1. Any VF-1 toy would be far too heavy for it. Quote Link to comment Share on other sites More sharing options...
Myersjessee Posted January 16, 2004 Share Posted January 16, 2004 sounds AWESOME! Quote Link to comment Share on other sites More sharing options...
neptunesurvey Posted January 16, 2004 Author Share Posted January 16, 2004 Sounds good. Here is hoping that everything works out. Quote Link to comment Share on other sites More sharing options...
Angel's Fury Posted January 16, 2004 Share Posted January 16, 2004 It's a bit daunting only because I'm still rather inexperienced at scratchbuilding :/My design involves splitting the arm into 3 parts. This will both let me pressure cast them to eliminate air bubbles (by making the molds small enough to fit into my pressure chamber), and also make the metal insert work better. The middle part will have a section of the rod sticking out of each end, which will mate with the two end pieces. And AF... no. It's only for the 1/72 Hasegawa VF-1. Any VF-1 toy would be far too heavy for it. Thanks & good luck anyway! Quote Link to comment Share on other sites More sharing options...
Grayson72 Posted January 16, 2004 Share Posted January 16, 2004 I'll take one whenever you finish, I'm sure it'll be awesome. Quote Link to comment Share on other sites More sharing options...
wm cheng Posted January 18, 2004 Share Posted January 18, 2004 Here, here, I'll definitely take a few off your hands.... Looking forward to this with great anticipation!! Ever thought about putting/embedding rare-earth magnets in the arm which can be paired up with rare-earth magnets that can be hidden in the Hasegawa's fast packs (underneath the plastic) just a thought Please keep us informed. Quote Link to comment Share on other sites More sharing options...
Valkyrie Posted January 18, 2004 Share Posted January 18, 2004 Actually, that's another design challenge I need to overcome... The original kit includes a resin insert with a nut embedded in it, which goes inside the backpack part of the super/strike valkyrie kit. You'd drill a hole in the backpack, and secure the backpack and boosters to the launch arm with a screw. That'd be fine if it wasn't for the fact that the connection between the backpack and the rest of the valkyrie is very weak. It's just two small glued joints that hold it all together. Certainly not enough to support the valkyrie while suspended by the boosters. So I've gotta come up with something better. It'll most likely involve that screw coming from the launch arm, extending through the top and bottom of the backpack, and being secured to the valkyrie through a hole drilled in the upper fuselage. Or something like that. The magnet idea is also a posibility, but the backpack would have to be secured to the fuselage with a screw, and also have a cutouts in the top of the resin backpack inserts for the magnets to go.... In fact, I'm liking that idea better Quote Link to comment Share on other sites More sharing options...
Neova Posted January 18, 2004 Share Posted January 18, 2004 I am definately interested in a few when you get done with this project. I hope we end up with an arm that won't require cutting into the kits. Quote Link to comment Share on other sites More sharing options...
Myersjessee Posted January 18, 2004 Share Posted January 18, 2004 I had not thought about the rare earth magnets before, but they would definitly hold a valkyrie (and crush your fingers with the bigger ones ) I would love to see that option work....cleaner then having to drill a hole through a nice model... (in case you were looking for ideas Valkyrie. Also, I have this kit as well, so I will post some pictures if thats helps anyone. I dont think mine is that bad, but I would love to see how far Valkyrie can take it. Quote Link to comment Share on other sites More sharing options...
Myersjessee Posted January 18, 2004 Share Posted January 18, 2004 Here are he pieces in the kit Youll not all the detail pieces are for the actual clamps...not really anything for the arm itself or the base. Quote Link to comment Share on other sites More sharing options...
Myersjessee Posted January 18, 2004 Share Posted January 18, 2004 Here is a closeup of some of the pieces Quote Link to comment Share on other sites More sharing options...
Myersjessee Posted January 18, 2004 Share Posted January 18, 2004 Here is a closeup of the inside of the bar..you can see the metal rod sticking out...to be done well you would want to putty over it... Quote Link to comment Share on other sites More sharing options...
Myersjessee Posted January 18, 2004 Share Posted January 18, 2004 and the outside of the par...where again more puttying and cleanup would need to be done where the resin has not adhered to the bar Quote Link to comment Share on other sites More sharing options...
Myersjessee Posted January 18, 2004 Share Posted January 18, 2004 here is how it goes together...again...note no detail on the arm Quote Link to comment Share on other sites More sharing options...
Myersjessee Posted January 18, 2004 Share Posted January 18, 2004 Here are some shots from WF to compare with...it looks like they added some details that are not in the kit...still...I love the kit (thanks Min! ) and don't think the details would be to hard to add...so I anxiousley await. Quote Link to comment Share on other sites More sharing options...
Neova Posted January 18, 2004 Share Posted January 18, 2004 (edited) Is the clamp itself spring loaded or in a fixed position? I know if these were real, it would be on hydrolics but I was just wondering. Can you post more pictures of the clamp pieces itself? Valkyrie can probably add the details back on through the use of Wave or Kotobukiya parts before re-casting. It does look nice so far. Hopefully we can get the arms to look similar to this one detail wise: Edited January 18, 2004 by Neova Quote Link to comment Share on other sites More sharing options...
Mechleader Posted January 19, 2004 Share Posted January 19, 2004 I've been waiting a long time for this!!!! I can't wait!!!! Quote Link to comment Share on other sites More sharing options...
Myersjessee Posted January 19, 2004 Share Posted January 19, 2004 I think the kit featured by Kouichi Saeki must be scratch built..it is way different then the WF kit...but wow...gorgeous. Quote Link to comment Share on other sites More sharing options...
wm cheng Posted January 21, 2004 Share Posted January 21, 2004 (edited) Yeah, I too think its a scratch build. I think the magnet idea would work (these rare earth magnets are crazy strong) I don't think we need to drill anything, I was just thinking that it would be epoxied underneath/inside the packs. So there would be a layer of styrene plastic between it and the magnets in the arm part. They are so strong, I believe they will hold through the plastic without actual magnet to magnet contact (actually, I think if there was magnet to magnet contact - we'd never get the Valk or packs off without breaking the model kit!). Or I wonder if that photo-etched plate on top of the packs would be magnetic - maybe all we need is a magnet on the arm part itself. But you are right, the packs on the model are fragile, but the model is pretty light, and I held my model by the packs and shook it abit on the angle and it seemed fine (I always, scrape the paint away from the contact areas when I use a "solvent" type styrene cement on joints that will be stressed though). I don't think you need the screw to go though the back pack (IMHO). Actually, maybe you don't have to embed the metal tube at all, the scratch build has it exposed, maybe we should only resin cast the ends. The tubes are pretty common at most hobby or train shops, maybe it could be a two tube system like a 1/4" diameter brass tube on the bottom teamed with a 1/8" diameter tube up top - bonded together it would be quite stiff. Interesting to see what happens, keep me in the loop. Edited January 21, 2004 by wm cheng Quote Link to comment Share on other sites More sharing options...
wm cheng Posted January 21, 2004 Share Posted January 21, 2004 Here's a shot of from DYRL - I'll look to see if I can find some lineart. Quote Link to comment Share on other sites More sharing options...
Neova Posted January 21, 2004 Share Posted January 21, 2004 Here's a shot of from DYRL - I'll look to see if I can find some lineart. I would love to see the GO Traffic Light, on the bottom right of the picture, as a followup piece! I also like the exposed twin tube idea. It would cheaper, easier to build and more accurate to DYRL's AMRD Launch procedure. Quote Link to comment Share on other sites More sharing options...
Valkyrie Posted January 21, 2004 Share Posted January 21, 2004 Hey, that 'traffic light' is a really good idea Don't worry about the metal reinforcing of the arm. I've got a cheap and effective solution in place for that And yea, I'd like to avoid having to drill holes in the kit too. It may be necessary, it may not. We'll see. I was checking out the super valk that I built a while back, and the backpack joint is a bit stronger than I remembered. But not a lot. There's actually a third point you can glue to help secure them together. I'm kinda wondering if another pair of rare earth magnets between the backpack and fuselage would help make it more sturdy. There'd be a decent size gap between them, but like WM said, those things are crazy strong And I've gotta say, the more I think about the idea of using magnets to connect the arm to the backpack, the more I'm liking it. All of the concerns I've had have been laid to rest. The Valkyrie won't be rotate, using the magnet as a pivot point, because the claws will stabilize it. And the Valkyrie will still be able to be removed, because the claws don't actually grip the boosters anywhere, So you'll just be able to slide the valk off the arm to release it (that'd be much easier than pulling it directly off). But I don't know where to get rare earth magnets that small yet. It'd have to fit in a piece that's about 0.3" square. Anyone have any sources? Quote Link to comment Share on other sites More sharing options...
Gerwalker Posted January 21, 2004 Share Posted January 21, 2004 Oh I love those magnets. My source: old hard disks and cd players. The hard disk have big ones, flat but curved in the part that moves the reading/writing arm. The Cd players often have small square ones in the lenses control (inside the box that contains the laser and lens) Btw: those cd player lenses are great for model details, from sensors to missiles lens. Check here: Rare earth magnets If you don't have old hard disk and cd players (I get a lot of them from a PC repair store, they have a lot of them since they through them away when burnt) you can buy them here: Amazingmagnets Quote Link to comment Share on other sites More sharing options...
wm cheng Posted January 21, 2004 Share Posted January 21, 2004 I get them via Lee Valley Tools up here in Toronto, there are a variety of sizes, I'll look into what the smallest ones are this weekend and get back to you. I was thinking maybe four magnets (they are round kind of like little watch batteries) - two per booster - or three one per booster and one underneath the backpack - it would be better if we knew what the points of contact were underneath the "claw". Maybe the claw portion would only have a metal plate, and the magnets are only in the model boosters? Then you wouldn't really have to hollow any resin out. I love the traffic light idea too. Quote Link to comment Share on other sites More sharing options...
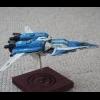
Valkyrie Posted January 21, 2004 Share Posted January 21, 2004 I'm not sure how realistic the idea of using magnets to grip the boosters is... First, the rear claws attatch to the very rear part of the upper booster, and there's no clearance between the booster wall and the nozzle assembly. And even if it wasn't, a magnet there would still be exposed on a finished kit. Unless maybe it was mounted in the booster housing... hmm... Second, the metal plates in the claws are a good idea. That'd work... but I have no means of cutting or machining pieces of steel (or some other magnetic metal) like that. And besides, the forces of the magnets on the claws would be so strong with rare earth magnets, that you'd likely snap off a claw or two in the process of removing the Valkyrie. Maybe if some weaker magnets were used instead though... But in any case, I'm thinking a single pair of rare earth magnets to connect the arm to the backpack would be sufficient. And here's a quick pic of (more or less) how the claws fall into place. Made from a few hastily assembled recast parts, and held together with clay. Quote Link to comment Share on other sites More sharing options...
Myersjessee Posted January 21, 2004 Share Posted January 21, 2004 ...and we have now kick started Ken's imagination...go to it buddy! (we are all anxiousley awaiting more launch arms! Sign me up for 2 now please!! ) Quote Link to comment Share on other sites More sharing options...
wm cheng Posted January 21, 2004 Share Posted January 21, 2004 (edited) Hey Valkyrie, No exposed magnets, I mean they should be under the plastic inside the booster housing, so the magnets will have to pull through the thickness of the styrene plastic (so it would lessen the attaction and not pull our precious models apart). Don't the connection points of the claw move farther forward, I thought those red decals on the top edge of the booster packs delineate the connection points to the launch arm. Edited January 21, 2004 by wm cheng Quote Link to comment Share on other sites More sharing options...
RTHK Posted January 21, 2004 Share Posted January 21, 2004 (edited) Here's a shot of from DYRL - I'll look to see if I can find some lineart. lineart 1 Edited January 21, 2004 by RTHK Quote Link to comment Share on other sites More sharing options...
RTHK Posted January 21, 2004 Share Posted January 21, 2004 lineart 2 Quote Link to comment Share on other sites More sharing options...
RTHK Posted January 21, 2004 Share Posted January 21, 2004 lineart 3 Quote Link to comment Share on other sites More sharing options...
Recommended Posts
Join the conversation
You can post now and register later. If you have an account, sign in now to post with your account.