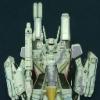
kkx Posted September 15, 2006 Share Posted September 15, 2006 hi, I am not sure if this is the correct place to ask this, but I need some advice from you guys. this is my first model and I am at the panel line stage. Is the panel line shown in the picture too prominent ? I am using chalk pastel mixed with water and a few drop of washing liquid. I try to use dark brown so as not to create too strong a contrast to the base color, but it didn't seems to work. The panel line still look very dark. The pastel is great, very easy to clean up and almost idot proof (I can redo them many times), but that bad thing is that it is too easy to remove. It is very hard for me to get a consistent "darkness" across the whole model. Some of the line is very shallow, my own fault (too many layers of paint and primer), so it is very hard for me to high light some of the line. Will using ink or oil wash be easier ? Thanks for any advices in advance. Cheers, kkx Quote Link to comment Share on other sites More sharing options...
Chas Posted September 15, 2006 Share Posted September 15, 2006 (edited) Is the panel line shown in the picture too prominent ? That is purely a matter of taste. Do you like the way it looks? If so then no it is not too prominent. With model building (particularly SF and Fantasy subjects) ther is no 'Right' way for the model to look (unless you are trying to recreate a specific subject, in our case how a subject looks 'on screen'. If that is what you are attempting it would be best to state what the subject is and maybe post some of the ref. images you are using. Barring that you are the sole arbiter of what is right or wrong. In my opinion it looks quite good! Keep it up and let's see some more! P.S. I usually do panel lines after the Decals have gone on (less coats on the model that way, er. . . well. . . the way I do it anyway, not sure of others here.) Edited September 15, 2006 by Chas Quote Link to comment Share on other sites More sharing options...
HWR MKII Posted September 15, 2006 Share Posted September 15, 2006 That looks great. I would be hard pressed to do better. Quote Link to comment Share on other sites More sharing options...
Myersjessee Posted September 15, 2006 Share Posted September 15, 2006 Looks good to me. Perhaps a little dark, but at the scale it should look nice for viewing. Quote Link to comment Share on other sites More sharing options...
kkx Posted September 15, 2006 Author Share Posted September 15, 2006 (edited) That is purely a matter of taste. Do you like the way it looks? If so then no it is not too prominent. With model building (particularly SF and Fantasy subjects) ther is no 'Right' way for the model to look (unless you are trying to recreate a specific subject, in our case how a subject looks 'on screen'. If that is what you are attempting it would be best to state what the subject is and maybe post some of the ref. images you are using. Barring that you are the sole arbiter of what is right or wrong. In my opinion it looks quite good! Keep it up and let's see some more! P.S. I usually do panel lines after the Decals have gone on (less coats on the model that way, er. . . well. . . the way I do it anyway, not sure of others here.) Thanks Chas and HWR for the encouraging comments and advices. Now I feel more assured. I am not trying to recreate any specific subject (too ambitious for a first timer to do that I think). I will keep going and hopefully finish this soon (without another big disaster, like the fin dissapear into the nose con when I try to glue it on). Yeah, I was wondering if doing the panel line first before decal is correct. I do it this way because some of the panel line was disappearing when I was done with the painting. If I do decal first, then I need to seal the decal with another layer of future before doing panel line. I was kind of worry that by then, it will be one layer of coat too many for some of the line..... I hope this will turn out ok (finger crossing).... Edited September 15, 2006 by kkx Quote Link to comment Share on other sites More sharing options...
Chas Posted September 15, 2006 Share Posted September 15, 2006 If I do decal first, then I need to seal the decal with another layer of future before decal. I was kind of worry that by then, it will be one layer of coat too many for some of the line..... Again there isn't a right way to do this. I usually do the panel lines after I decal because when I used to do the panel lines first then clearcoat then decal, I found that I would, more often than not, need to redo the panel lines on the sections where the decals crossed over them to get a good scale effect and make the decals look painted on rather than having them look like something applied on top of the suface. So what I do is: primer, base coat, clear coat, decals, clearcoat, panel lines, weather, dull coat. But as I said that's just what I do, and by no means is my way the only correct way to do this. I' there are better ways but this is what I have found works for me. One adjustment is if I'm going do heavy weathering I sometimes do a clearcoat after the panel lines. Oh and keep in mind I'm a brush painter, don't know how those air brush folks do things. Quote Link to comment Share on other sites More sharing options...
kkx Posted September 15, 2006 Author Share Posted September 15, 2006 (edited) Again there isn't a right way to do this. I usually do the panel lines after I decal because when I used to do the panel lines first then clearcoat then decal, I found that I would, more often than not, need to redo the panel lines on the sections where the decals crossed over them to get a good scale effect and make the decals look painted on rather than having them look like something applied on top of the suface. So what I do is: primer, base coat, clear coat, decals, clearcoat, panel lines, weather, dull coat. But as I said that's just what I do, and by no means is my way the only correct way to do this. I' there are better ways but this is what I have found works for me. One adjustment is if I'm going do heavy weathering I sometimes do a clearcoat after the panel lines. Oh and keep in mind I'm a brush painter, don't know how those air brush folks do things. Hi Chas, What you said make senses. Damn, now I am tempted to wash the who thing clean and do decal first. Some part might be a bit difficult to clean and some hours of effort down the drain.... Thanks for the explaination, it is much clearer now. If it is too late to save my current build, at least my next one will be better (I hope). I am amaze that you can paint just using brush. I try to do that when I started, but it is very hard to not leave some brush mark. How did you do it ? Some other people in this forum also said that they are using just brush. Putting on a few coat of very thin paint. I try to do that, but the results is still ver bad. Then I invested in an airbrush.... But still good to learn to do just brush painting, it is a very valuable skills I think. Edited September 15, 2006 by kkx Quote Link to comment Share on other sites More sharing options...
Chas Posted September 15, 2006 Share Posted September 15, 2006 Damn, now I am tempted to wash the who thing clean and do decal first. . . Some part might be a bit difficult to clean and some hours of effort down the drain.... sad.gif . . . If it is too late to save my current build, at least my next one will be better (I hope). I don't think there is any reason to strip what you've already done and start over. Doing it in the order that you have been should still work out fine. I mean you certainly hven't ruined the model. in fact, if the sample image you posted is anything to go by, your first kit will look a whole hell of a lot better than my first kit did! Just keep going with what you've been doing for this kit and try it the other way on your next. That way you'll be able to compare the two methods directly. How did you do it ? Yeah, well my technique has changed a lot in the last year or so. The secret is keeping the coats very thin and painting the whole kit in one direction (say top to bottom) letting it dry throughly then paint the next coat in another dircetion (say left to right ) and just keep alternating this untill you are satisfied with the depth of colour. Quote Link to comment Share on other sites More sharing options...
big F Posted September 15, 2006 Share Posted September 15, 2006 Looking good so far. The whole paint and pannel lines is very much a personal thing, as already stated in previous posts. Just do what you feel comfortable doing and in time you will modify the way you do it as you find better ways of doing the various bits. Modeling is a learning process that you never quite master. It's a long but enjoyable road from Slap it togther modler to masterclass modler. Quote Link to comment Share on other sites More sharing options...
Maxtype Posted September 15, 2006 Share Posted September 15, 2006 If nobody minds my adding a question on this thread,I'm building a Hasegawa VF-1J as Miriatype and I was wondering how to do the panel lines on this red airplane.I figure her plane won't have too mush weathering-Miria would probably assign one guy just to polish the Valk-and I don't know if I should airbrush pre-shade(and what tone to use)or lining later? Quote Link to comment Share on other sites More sharing options...
David Hingtgen Posted September 16, 2006 Share Posted September 16, 2006 I have the same question: I want to give my 1/48 Milia a wash, but have no idea what color to use. Red planes are almost non-existent, and the few that are tend to be spotless. I was thinking anything from light grey to rust-brown to deep red. I might even just go with dry-brushing silver to show paint wear. I actually want to go for a "war weary" Milia. Taken good care of, but seeing so much action it can't be flawless, with a few panels replaced. (My goal is to weather it so it looks "real"--being pure red is inherently toyistic) I asked over at ARC, and most said use burnt umber. Here's one of the few weathered red models I've found: http://www.aircraftresourcecenter.com/Gal4...tin/gal3536.htm I never did ask him how he did his. Quote Link to comment Share on other sites More sharing options...
Chas Posted September 16, 2006 Share Posted September 16, 2006 Well here's an image of a pre-shaded Millia super from the Completed models by Hong Kong Modelers thread in the Models forum. Don't know what colours he used for the pre-shading though. Couldn't you just use like a medium/dark grey or something for pre shadinng? I've never used the technique, but my impression was that the colour one used for the preshading was not all that important as long as it was darker in tone than the base-coat colour, but not too dark. Quote Link to comment Share on other sites More sharing options...
David Hingtgen Posted September 16, 2006 Share Posted September 16, 2006 To me, using black preshading on a red always looks more like coal dust/tar than simply dirt/weathering. Almost purplish at times. Example is this: http://www.hkml.net/Discuz/attachment.php?...p;checkid=5789f Now this one looks a lot closer to what I want: http://www.hkml.net/Discuz/viewthread.php?...556&fpage=2 Looks a lot more like a wash to me, and far more subtle. The panel lines are distinct, but you really can't tell any "color" of them. Black ahead of the flaps, but that's mainly because it's so deeply engraved there. Quote Link to comment Share on other sites More sharing options...
Chas Posted September 16, 2006 Share Posted September 16, 2006 Yeah I think that second one is deffinately a wash. I see what you mean about the pupleish look on that first one too Harsh! Quote Link to comment Share on other sites More sharing options...
Maxtype Posted September 16, 2006 Share Posted September 16, 2006 (edited) Well here's an image of a pre-shaded Millia super from the Completed models by Hong Kong Modelers thread in the Models forum. Don't know what colours he used for the pre-shading though. Couldn't you just use like a medium/dark grey or something for pre shadinng? I've never used the technique, but my impression was that the colour one used for the preshading was not all that important as long as it was darker in tone than the base-coat colour, but not too dark. This is quite close to what I was thinking-maybe a bit cleaner.It's funny-I would love a 1/24 scale Viper Mk II to build 'cuz those birds are DIRRR-T! I just don't think a Valk would be BSG dirty-especially not Miria's. ^_^David,your second example is probably the closest to what I had in mind.Another question for you guys,onthe red Valk,would you prime it grey or white? Edited September 16, 2006 by Maxtype Quote Link to comment Share on other sites More sharing options...
big F Posted September 16, 2006 Share Posted September 16, 2006 (edited) I recently did a 1/55 Miria (I Know it`s a toy) As far as pannel lines werre concerned I used black with a tiny bit of brown in it. I havent dirtied it up as yet as it a toy so realisum is a bit out of the window anyway. On the subject of red paint. I first used a grey plastic primer and painted my Nissan 539 red onto it. Looked good and I was pleased. Then when I ran out of Grey primer and the shop didnt have any I used White primer. OMG how much brighter is the Red when laying on white primer. This harkens back to the days when I used to race 1/10 RC in the Tamiya Eurocup. On the clear lexan body shells we used to back the paint in eaither white, Silver or black to make the paint eaither stand out or dull off, depending on the colour or what you wanted to achive. I had to spend ages repainting all the bits to match. I now stick to one primer colour no matter what. Edited September 16, 2006 by big F Quote Link to comment Share on other sites More sharing options...
MechTech Posted September 17, 2006 Share Posted September 17, 2006 (edited) What do REAL panel lines look like on REAL red (purple) aircraft? I could only think of one team, the Red Arrows (they're excellent by the way). Here's their website: http://www.raf.mod.uk/reds/gallery.html Note there are panel lines in some places, and not in others. The question is if you're going for "display team clean," or "Miriya and I just took on the Zentraedi fleet." - MT Edited September 17, 2006 by MechTech Quote Link to comment Share on other sites More sharing options...
Maxtype Posted September 17, 2006 Share Posted September 17, 2006 (edited) What do REAL panel lines look like on REAL red (purple) aircraft? I could only think of one team, the Red Arrows (they're excellent by the way). Here's their website: http://www.raf.mod.uk/reds/gallery.html Note there are panel lines in some places, and not in others. The question is if you're going for "display team clean," or "Miriya and I just took on the Zentraedi fleet." - MT Thanks for those pictures,MechTech!I'm going for a "Viva Maria" episode-time line so Millia's Valk probably would look like the Red Arrows-pretty clean after 2 years of peacetime ops and marriage. So do you guys figure medium-to dark grey pre-shade?Or an oil wash of medium brown? Edited September 17, 2006 by Maxtype Quote Link to comment Share on other sites More sharing options...
David Hingtgen Posted September 17, 2006 Share Posted September 17, 2006 See, I want the "just took on the fleet" look----and as I commented earlier, you never see "dirty" red planes--they're all shiny clean demos. And I get the impression Milia's plane was probably never shiny to start with---I think it should be red, but flat red. VFA-102's CAG plane is currently about half red, but they painted it glossy to start with---quite rare. It's stayed that way for a while, it might actually get a chance to weather decently. I might have to wait until that plane gets older, for a reference to weather my Milia! However, it's the 50th Ann. scheme, so they might only leave it painted like that for a year. Quote Link to comment Share on other sites More sharing options...
Maxtype Posted September 17, 2006 Share Posted September 17, 2006 See, I want the "just took on the fleet" look----and as I commented earlier, you never see "dirty" red planes--they're all shiny clean demos. And I get the impression Milia's plane was probably never shiny to start with---I think it should be red, but flat red. VFA-102's CAG plane is currently about half red, but they painted it glossy to start with---quite rare. It's stayed that way for a while, it might actually get a chance to weather decently. I might have to wait until that plane gets older, for a reference to weather my Milia! However, it's the 50th Ann. scheme, so they might only leave it painted like that for a year. David,I think you are correct about glossy vs. flat on the MilliaType-I want it flat but fairly clean.Where can I see a photo of that VFA-102 CAG bird? Quote Link to comment Share on other sites More sharing options...
David Hingtgen Posted September 18, 2006 Share Posted September 18, 2006 VFA-102's own site is down, and there's surprisingly few (and none good) at the Navy's site. Here's a few I have. Quote Link to comment Share on other sites More sharing options...
Maxtype Posted September 18, 2006 Share Posted September 18, 2006 VFA-102's own site is down, and there's surprisingly few (and none good) at the Navy's site. Here's a few I have. Thanks,those are pretty cool shots! Quote Link to comment Share on other sites More sharing options...
Spatula Posted September 18, 2006 Share Posted September 18, 2006 I just happen to use raw umber #2006 by Model Master, and it works great. Make sure you use the Model Master enamel paint thinner, and NOT the paint brush cleaner, as I have mistakenly done in the past. ::thinner eating base coat like wut:: Quote Link to comment Share on other sites More sharing options...
big F Posted September 18, 2006 Share Posted September 18, 2006 Nice shots David Quote Link to comment Share on other sites More sharing options...
Maxtype Posted September 18, 2006 Share Posted September 18, 2006 I just happen to use raw umber #2006 by Model Master, and it works great. Make sure you use the Model Master enamel paint thinner, and NOT the paint brush cleaner, as I have mistakenly done in the past. ::thinner eating base coat like wut:: Spatula,I was wondering what base coats & colors you've tried the raw umber on? Quote Link to comment Share on other sites More sharing options...
David Hingtgen Posted September 19, 2006 Share Posted September 19, 2006 Are people commenting on the photos themselves? Because I didn't take them, I meant I merely have them on my hard drive. Just wondering. There are better ones, but they are HUGE and MW's attachments are slightly wonky again. Quote Link to comment Share on other sites More sharing options...
Maxtype Posted September 20, 2006 Share Posted September 20, 2006 Are people commenting on the photos themselves? Because I didn't take them, I meant I merely have them on my hard drive. Just wondering. There are better ones, but they are HUGE and MW's attachments are slightly wonky again. I was actually commenting on the color scheme,and thanking you for posting the pictures 'cuz the unit's website was down when I looked. Quote Link to comment Share on other sites More sharing options...
Recommended Posts
Join the conversation
You can post now and register later. If you have an account, sign in now to post with your account.