Chronocidal
-
Posts
10111 -
Joined
-
Last visited
Content Type
Profiles
Forums
Events
Gallery
Everything posted by Chronocidal
-

The Cheapo Tips n Tricks Guide to the VF-25
Chronocidal replied to Chronocidal's topic in The Workshop!
I did use superglue, but apparently I got some on the inside of the hole, and it shrank, meaning pushing it onto the hinge spread it again. -
The Cheapo Tips n Tricks Guide to the VF-25
Chronocidal replied to Chronocidal's topic in The Workshop!
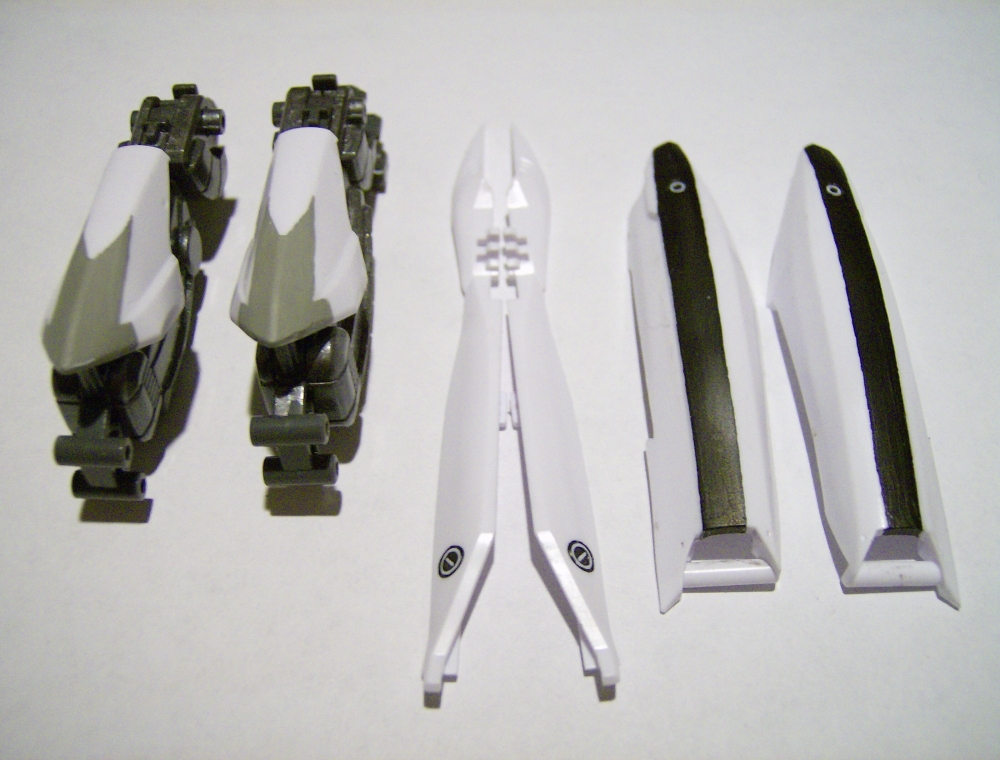
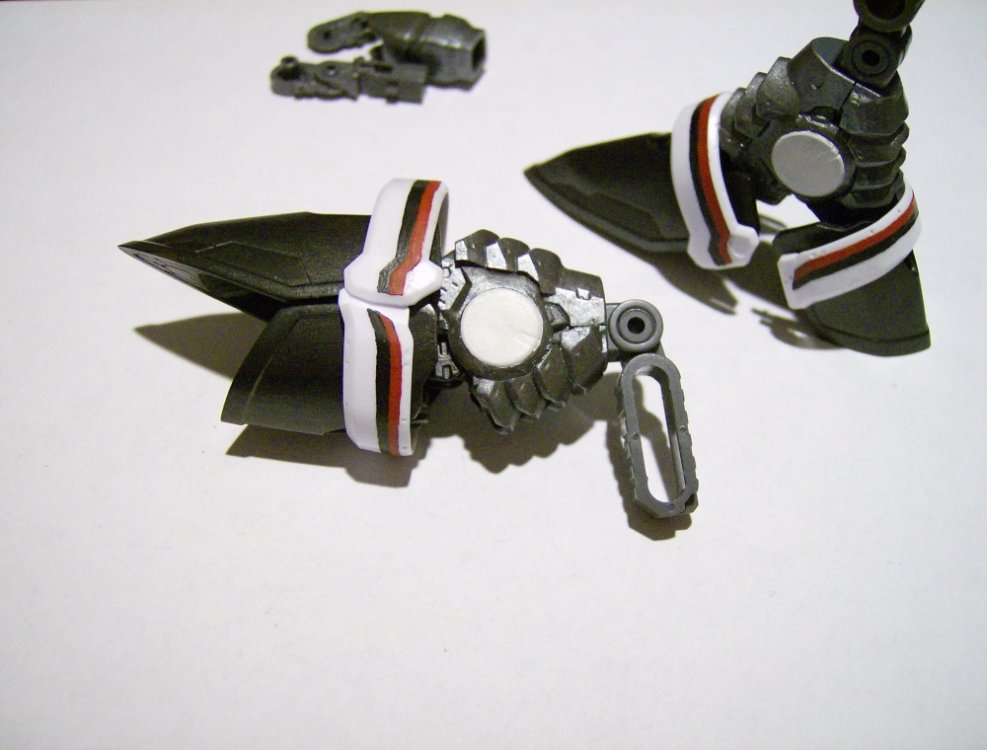
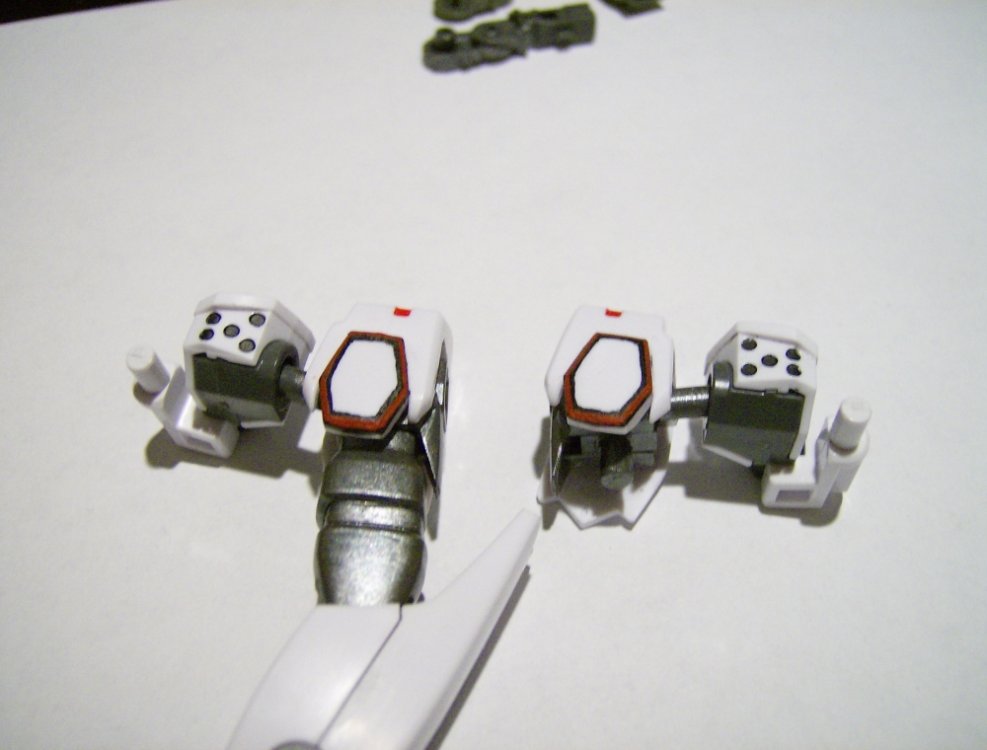
After a little bit of experimental paint mixing, I think I'm really happy with how the feet turned out. What I wound up doing was making a blend gunmetal and metallic gold, with a bit of flat black to darken it. The mixture went on very smooth, and gave me a nice semi-gloss metallic look, with a hint of brown to it. It kind of looks like antiqued brass in person. For the insides of the feet, I just mixed a little more flat black with gunmetal, and got a nice dull metallic black. I remember reading about various problems with the decals on the foot cuffs, and how they refused to fit correctly for some people, but I don't remember which half didn't fit. What I did realize while painting them though... Bandai got the heel cuff decals backwards. While the colors are right with the red on top, the decals bend the wrong direction. Looking at the cuffs, the stripes on the toe dip downward at the edges, but the decals for the heel bend upwards. From all the pictures of the anime I have, it looks like the heel strips should curve to match the cuff, and join up into a roughly continuous stripe when the feet are closed, so I painted them that way, except I skipped painting the small tab that overlaps since moving the feet would just rub the paint off there.
-
The Cheapo Tips n Tricks Guide to the VF-25
Chronocidal replied to Chronocidal's topic in The Workshop!
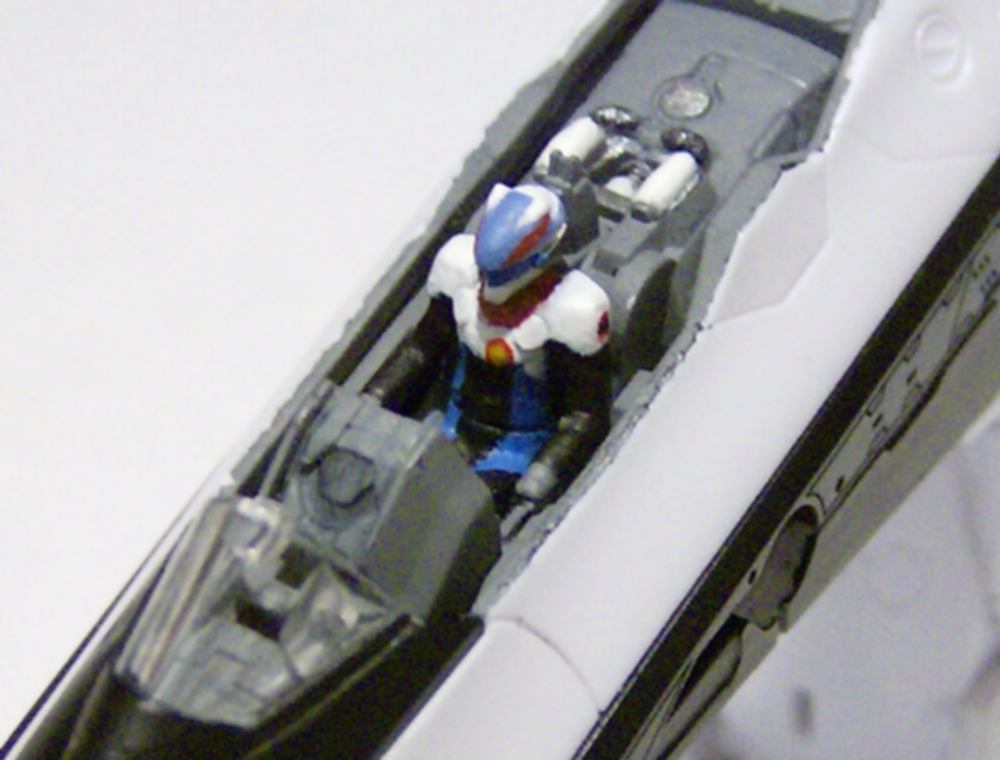
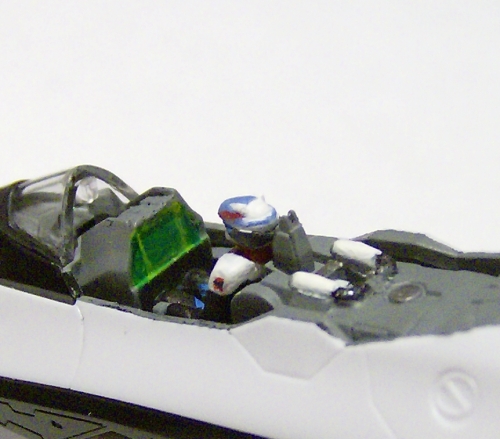
I'll have to look that up in the near future... I've got an order planned for a 1/60 TV Roy in the near future, so I'll have to check if HLJ carries that. I'm not against spending any money, but I do want to avoid the more expensive things I could use. So far, I think I've spent maybe $20 in materials that I didn't already have, mainly paints and brushes. Up to now, I've just been keeping by brush wet with water while painting, and it's allowed the paint to flow fairly evenly. My only real problem has been my own impatience, and my tendency to try and keep fiddling with things to make them better. If I just wet the paint down a lot, and let it flow into very thin coats, it comes out extremely smooth. It just takes a while to dry, and takes a lot of coats. After reading through the old kit topics for ideas and reference pictures, I came across a couple of discussions about how to paint the pilot's details since they're so tiny, so a short description of the process I used probably couldn't hurt. The real trick I found to getting the pilot done well was doing things in layers. First thing I did was paint the collar area, since it's the hardest to get to, and any attempt to paint that later would get red everywhere. Next, I think I did all the black on the uniform. If I had thought about it at the time, I would have painted black further up to the neck, but I just left the entire neck area red. Oh well, I'll have to remember that next time. Next I'm pretty sure I did the blue on the lower uniform, just to get it out of the way, including the stripes on the pants molded into the cockpit. Since those areas go under the armpits, I think I may have touched up the black afterwards to make sure I had the right areas colored. After that came the white on the helmet and shoulders, which took a couple of coats to cover the dark plastic. One thing I made sure to add was the white patches under the arms, which Bandai forgot to mold into the pilot. They're supposed to be ribbed areas I think, but I just painted a diagonal down under the arms. The last bits here were just red dots on the chest and shoulders, with small black and yellow dots in the middle for the patches. I forget what order I painted the helmet in, because I'm pretty sure I went back and forth between colors to touch up areas a few times. The order that makes sense to me now is the visor first, followed by the black strip around the back of the head, and blue on the upper front of the helmet, which actually has a thin blue strip that wraps around the head (think I used my smallest brush, but it might've been a toothpick). Final bit was the two red stripes down the front, which I only now realize aren't the right shape, but I'm not worrying about it on this one. In other news, I might have to make one of these in fighter mode only. That arm that broke glued decently enough, but split in a second spot the instant I tried to reassemble it. I've got it re-soaked in glue again, but I doubt that piece will ever be strong enough to bend much. I'm going to have to file down the inside of the hole to make sure it fits over the hinge pin in the elbow.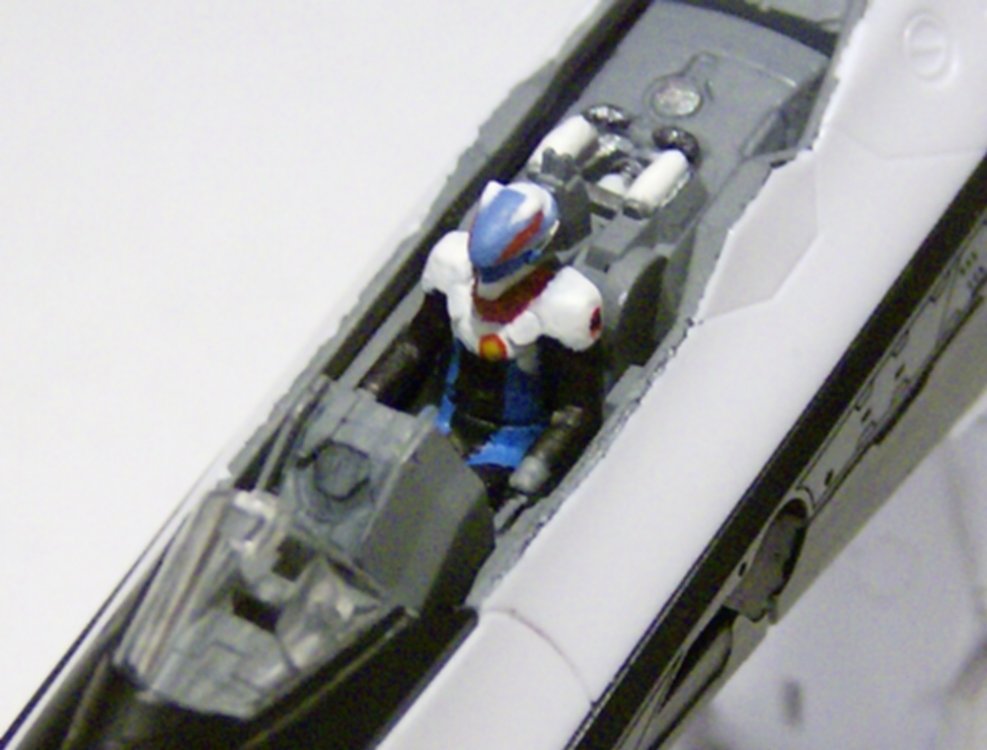

-
MickyG's Yamato VF-1S Unpainted, Unassembled Kit Build
Chronocidal replied to mickyg's topic in The Workshop!
Well, while this is technically a non-existent aircraft, considering the era it was designed in, I'd think it would use standard military colors for that time period. I don't know the exact shades used, but there are definitely specific grays used for the interiors of navy aircraft. Considering the resemblance, you'd probably do well to look up the standard cockpit shades for things like Tomcats and Hornets. Now, if you really want to make things interesting... you could add some extra bits to the cockpit that aren't there yet... I'm thinking ejection seat handles, canopy rail seals/hooks, etc., things you'd find in an actual cockpit. I don't know how model-like you intend this to be, but it would be fun to add a few details Yamato never put in. -
The Cheapo Tips n Tricks Guide to the VF-25
Chronocidal replied to Chronocidal's topic in The Workshop!
I'm realizing that practice with acrylic paints has been what I needed most, since while they clean up nicely, most of my previous experience was with enamels, which dry much slower. Most of my problems have been coming from trying to even out the paint after the first few brush strokes, only to find the paint had alread started to dry, and the extra brushing was causing clumps. Mostly I just had to learn to be patient, put down one even coat, and let it sit for a good few minutes. After that metallizer failed on the feet, I just stripped it off the best I could, and put them aside for a while to work on the rest of the legs. I've been trying to go as much by the anime as possible in terms of the pattern, looking up the various colored patches that bandai didn't include on the kit. I'm simplifying the colors a bit though, just sticking with a couple consistent colors that I don't have to mix. I think I might redo the kneecaps, after realizing how close the tolerances are between them and the shin plates. If I filed down the lower edges a little, or maybe the upper edges of the shin plates, there would probably be plenty of clearance to keep these from scraping. The legs have been put together and taken apart probably a half dozen times now. While those parts were drying, I decided to see about painting the wing stripes on. I took a few liberties with the stripes, and instead of the lines the decals follow, I just stuck with existing panel lines for the black stripes. Likewise with the grey strips, I pushed them back to the front edge of the control surfaces, which actually looks closer to what the anime has than the kit directions show. The underside stripes went on easily, since they have a nice dividing line marked. I discovered that my red paint sticks much better over a base coat, so I painted the entire tip black, and then added the red on the tip, just dividing the black in half at the inner edge of the light on the tip of the wing. The lights I intended to be slightly transparent over silver, but both my gloss red and the bit of greenish-blue I mixed turned out too thick. They did pick up a bit of metallic sheen to them though, so I'm happy. Again, with the red paint over black, I did the shoulder plate pinstriping, and it turned out okay, but I might redo it more evenly later, or at least even out the rough edges. The red may also need another coat or two here, it seems more dim than the wingtips turned out. The red stripe might look better a bit wider as well, so there is less black showing. Sadly, I've got to wait for one of the elbow joints to harden after gluing it.. I managed to snap one of the hinge loops while trying to move the arm earlier, since I'd forgotten to move half of the joint after painting it, and it stuck. Next up should be the foot assemblies, after I decide what type of paint to try on them.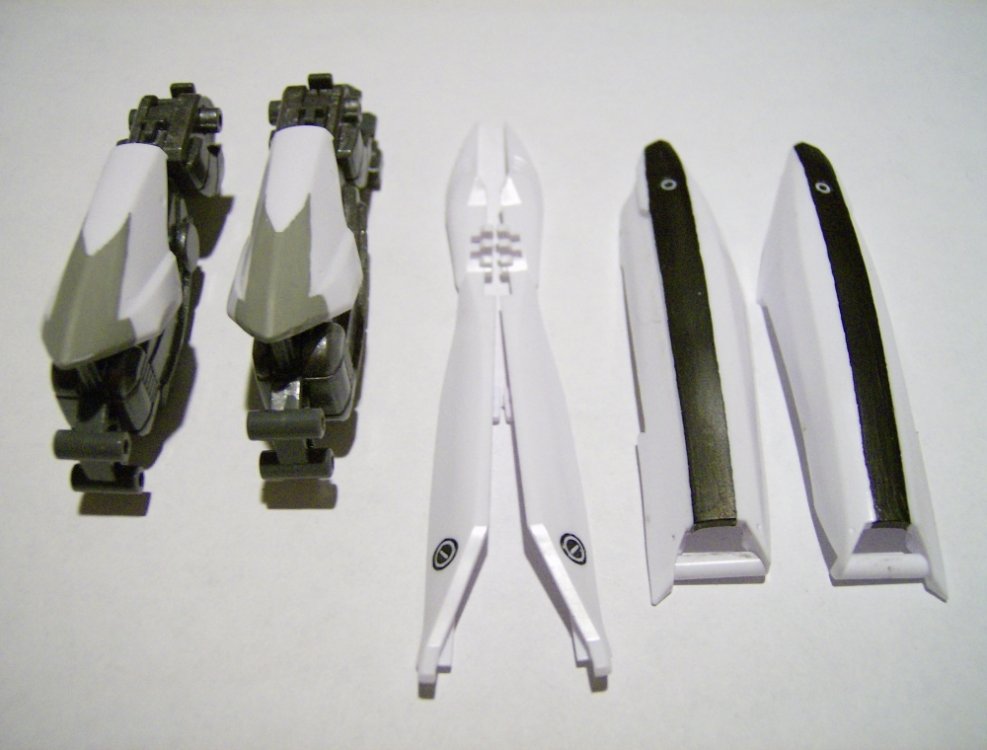

-
Oh, sure Bandai.. give the SD version a thigh swivel..
-
Shhh, they might hear you! Actually, comparing the bit of cad we can see with the YF-19 pics, it's quite different already. And except for where the leading edge of the wing meets the fuselage, it looks extremely close to the Hi-Metal 1/100 (the bandai's leading edge has a steeper slope, and intersects the fuselage beneath the canards, instead of ahead of them).
-
To be fair.. the YF-19 cad was identical to the final product. Having a full 3D perspective just has a way of making things look better (or worse at times). I do wonder how this mold will look as a VF-19F or S though. I think the nose will look a little better without the canards, but I don't know how those clipped wings will look.
-
Same, I was really looking forward to a 1/48 kit. Although, I do really appreciate the idea of getting some dedicated fighter kits. There are a ton of custom paintschemes I've wanted to try out on the VF-25, and the transforming kits just aren't practical for that.
-
Eh, give it time. This'll rival the 1/60 YF-19 thread before you know it, complete with all the battying, anti-battying, and anti-anti-batty battying. I've got high hopes in this one though, if only because it means they might have figured out how to do a slim YF-19 later on.
-
Official Bandai DX Chogokin VB-6 König Monster Thread
Chronocidal replied to Funkenstein's topic in Toys
Ok, now THAT is a monster girl, and quite literally so. Love the dripping ice cream. I still prefer the plain old vintage shark mouth design though. Pasting any kind of art over that is just a waste. Personally, I'm still waiting for a full sized version of the Cathy art that got released with a few limited Ozma kits. -
The Cheapo Tips n Tricks Guide to the VF-25
Chronocidal replied to Chronocidal's topic in The Workshop!
Heh.. figures I'd remember that backwards. It's been far too long since I did any serious model building, if you can't tell.. I'm pretty much re-learning as I go. I did try buffing before it dried too much, but it stayed tacky a long time, and just coated the plastic in fuzz. Probably what I get for brushing instead of spraying. Oh well, back to the drawing board then. I might have to try and see if I can get a good bronze acrylic to try. -
Now those turned out nice! They pretty much look painted on.
-
The Cheapo Tips n Tricks Guide to the VF-25
Chronocidal replied to Chronocidal's topic in The Workshop!
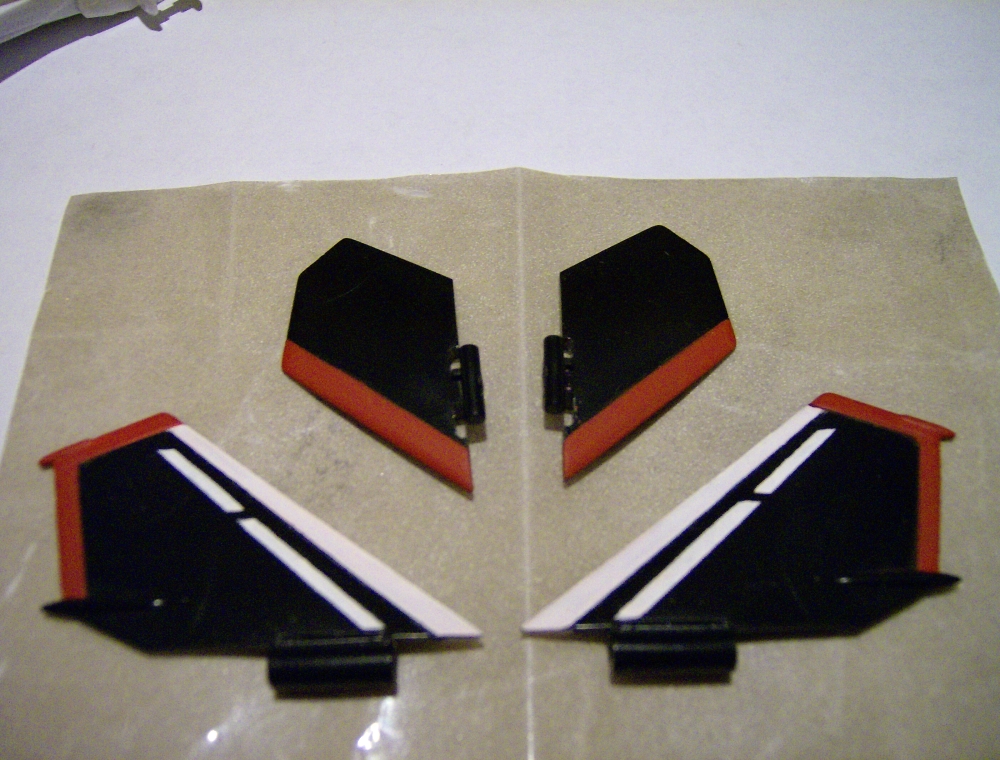
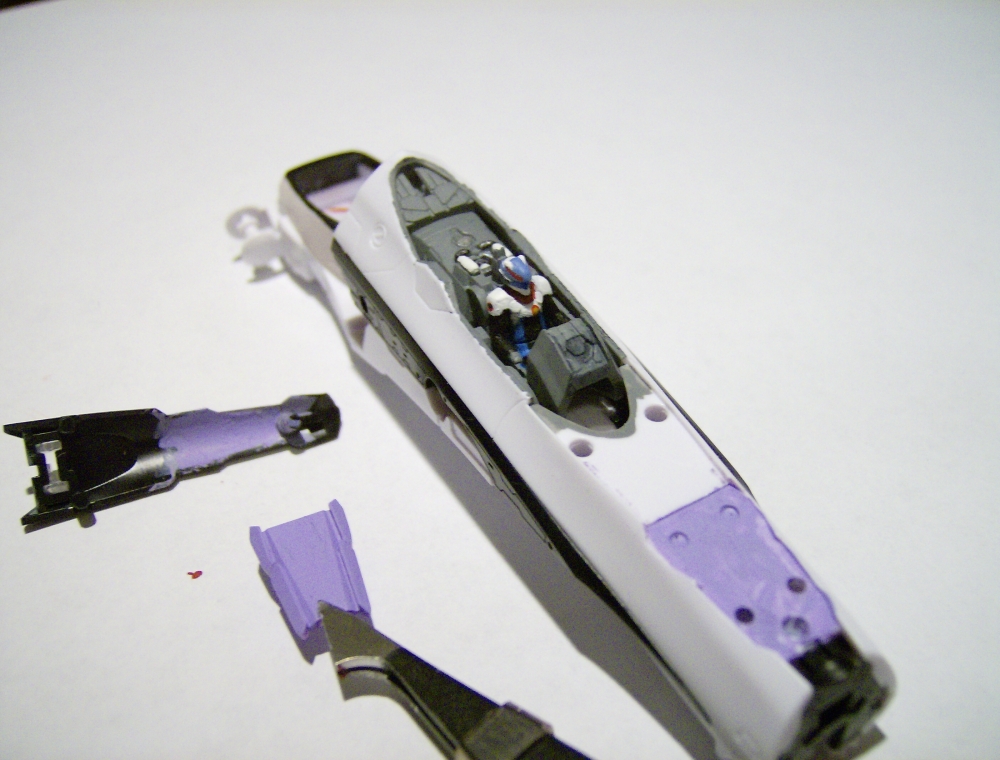
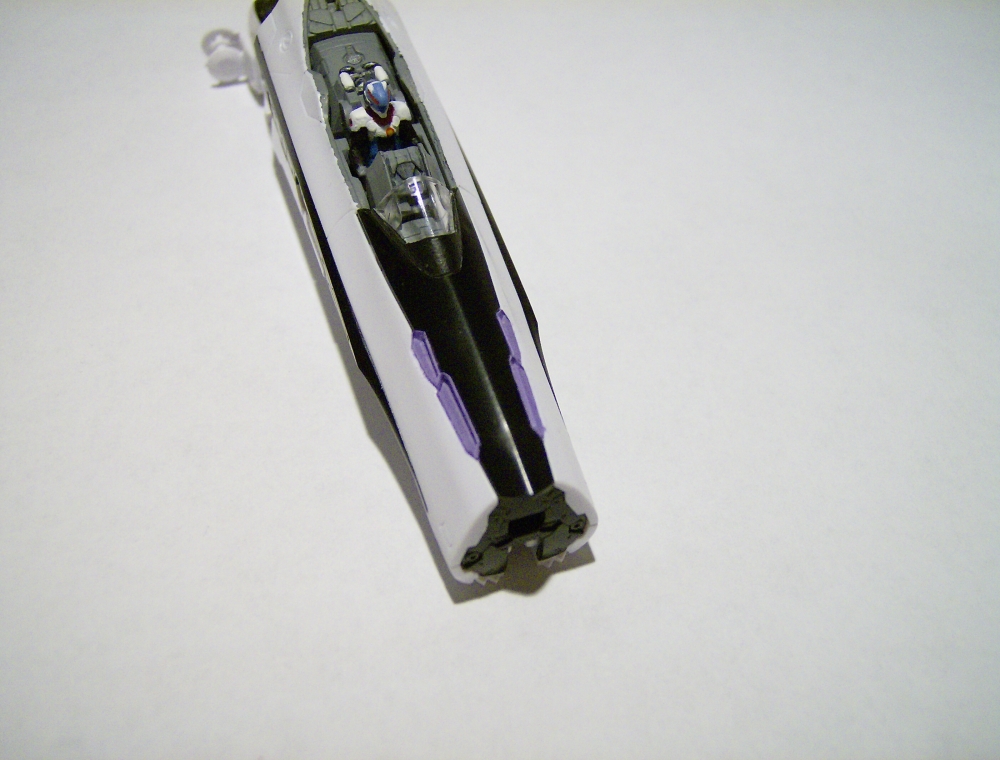
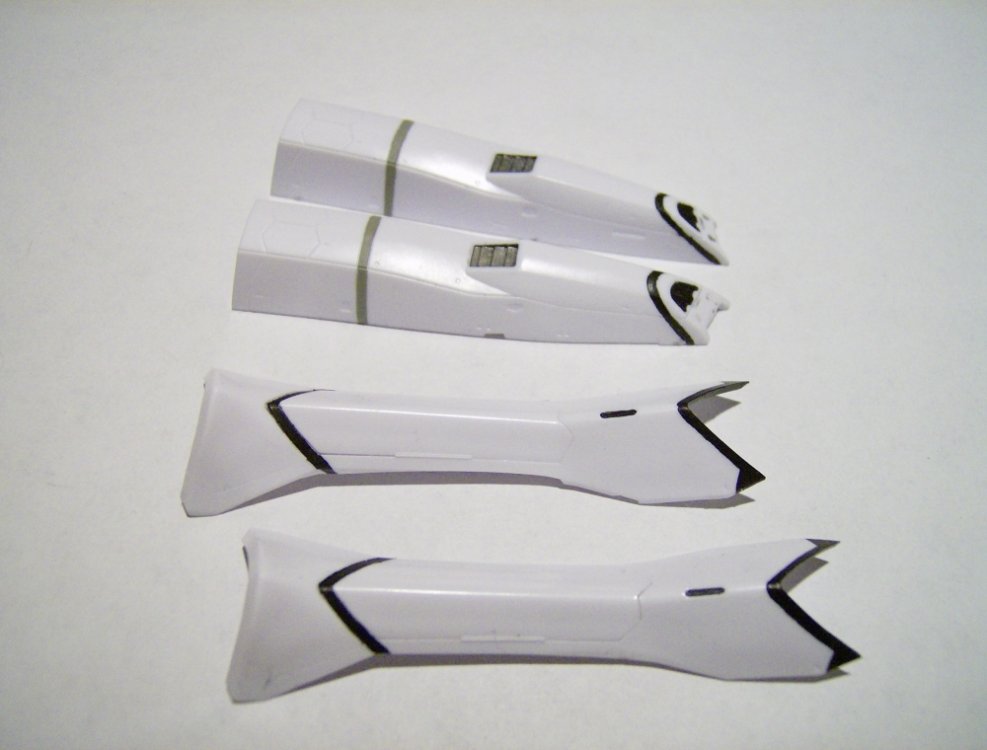
Now for the two things that gave me numerous fits over the past week.. the tails and crotch plate. I must have painted and stripped the tails and stabs at least a couple dozen times due to the paint getting lumpy on me. Mostly it was because I was just impatient with adding additional coats, and I kept pulling up the previous coat. Lesson learned: paint a coat, and find something else to do for a while. In the end, they turned out okay, but the paint is still a little uneven in those two tail stripes. I might try to redo those with a smaller brush later. Next.. a slight personal rant, so feel free to skip this part. What really tends to bug me above all else about these kits is Bandai's facepalm-worthy decisions for which parts are made in which colors. I don't mind painting a few details a different color, but casting parts an entirely wrong color drives me nutty. I know some concessions are made for the purposes of molding, but really... the big fat blue hinges that wind up on the VF-25G's belly are just dumb looking and, being hinges, probably the most likely pieces to scratch the paint off of on top of that. Maybe the worst of all though.. the crotch plate. I want to smack the guy responsible for that upside the head. The piece is molded in black, and you have to paint the entire thing white, with a bit of black trim. I lost count how many times I tried to paint it evenly (by hand, so yes, it's my own fault). Really, even this wouldn't be so bad, except that in order to get that piece to match, you need to paint it with the most utterly angelic, holy, not-of-this-earth shade of white. I mean, seriously. I could ask the Pope to bless and purify my paint, and it wouldn't match Bandai's plastic. I mean, not even the included foil sticker matches the plastic, and it's actually darker than my white paint! Seriously.. if they're going to give you stickers to make up for pieces being the wrong color, the least they could do is make them the same color as the plastic. My latest work has been with the arms and leg assemblies. For the most part, I'm going with an acrylic gunmetal on the mechanical parts, so we'll see how well it holds up under the rubbing of transformation. For the feet though, I'm trying some enamels instead of acrylics. I have several types of Model Master metallizer that I've used before, want to see what they look like. They're recommended for airbrush only, and they're very thin, but that might be just what I need for these brown feet. So far, I've put a test coat of an anthracite gray over some of the leftover brown parts tree, and it looks like it will give a nice metallic gloss to the plastic without actually covering up the brown color. I'm going to let it dry for a while and then see what happens if I buff it out a little.
-
I'm not sure if I regret getting my DX Alto and Michael or not.. Bandai just got really sloppy with them. And actually, I'm half expecting that blue tinted Alto to turn into a collectors item due to the lukewarm reception it got. I don't know how sales went in Japan, but I don't think that one's ever been sold out when I looked.
-
Aside from the wingspan, the plane itself looks to be about the size of an RA-5 Vigilante actually. And it's looking beautiful.
-
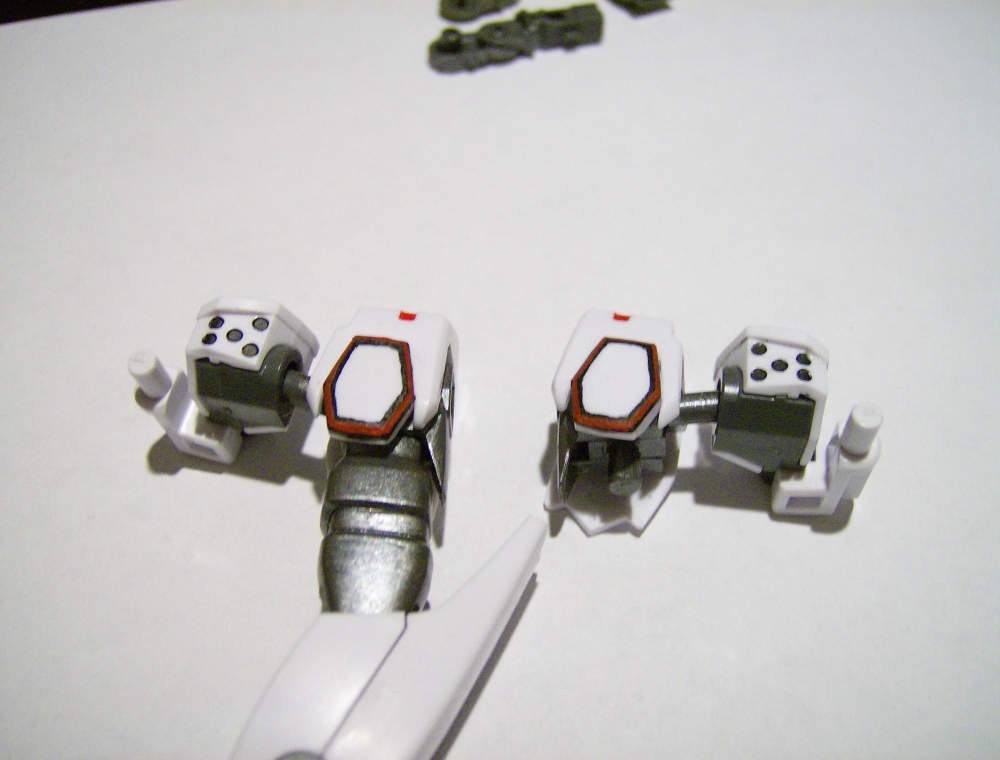
When I first got my VF-25G DX, I looked that that hinge and definitely went ? Here's the thing about those hinges... they're at the end of another hinged plate, both of which move independently. If you don't keep both sides lined up while moving the back plate, it's just asking to snap. Think of it like trying to make a sturdy connection between the middle segments of two of your fingers. Move one finger more than the other, and you put a tremendous amount of stress on the connection. Only potential fix I can see for that problem is replacing those two circular hinges with a single metal bar that runs between them, to make sure those two shoulder plates stay linked.
-
The Cheapo Tips n Tricks Guide to the VF-25
Chronocidal replied to Chronocidal's topic in The Workshop!
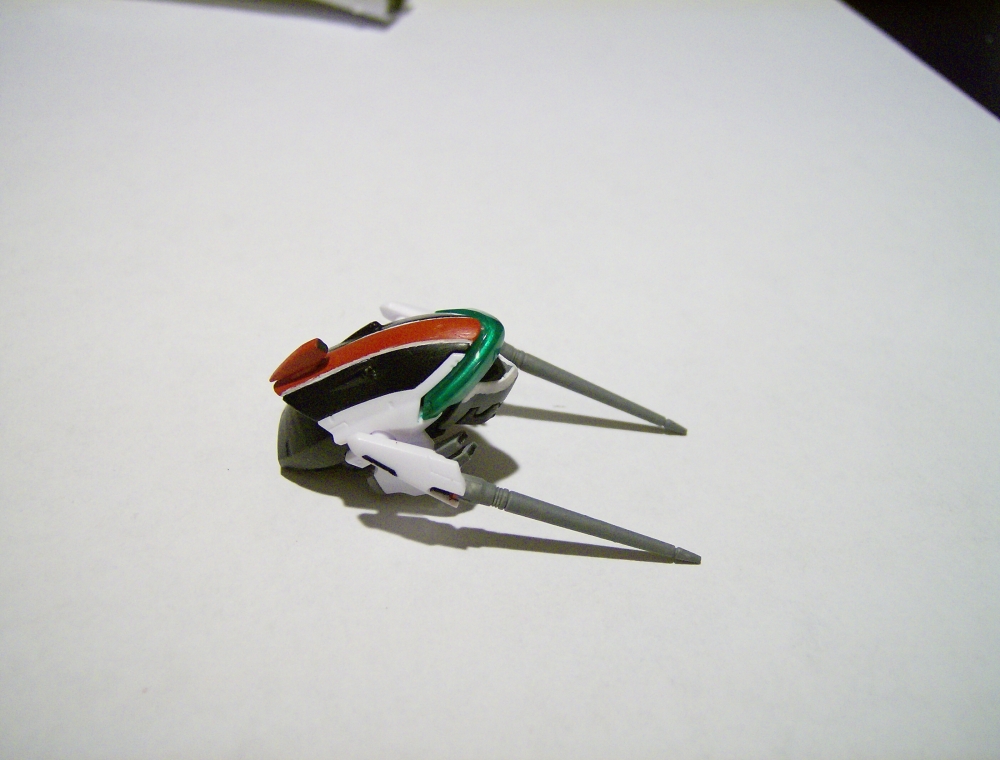
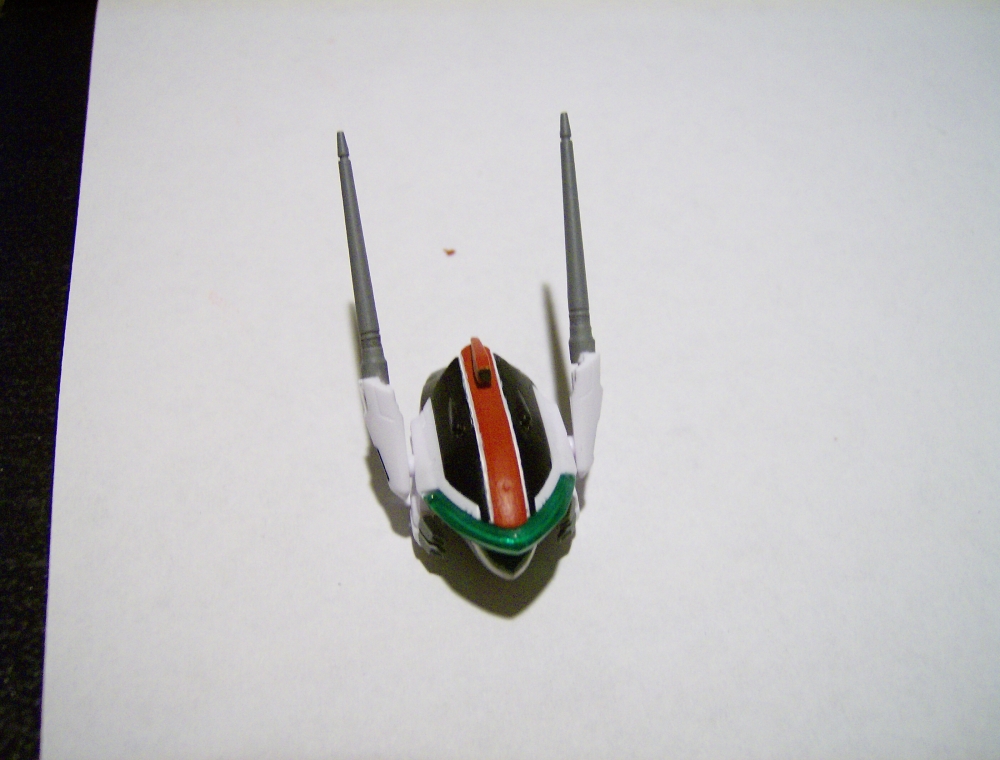
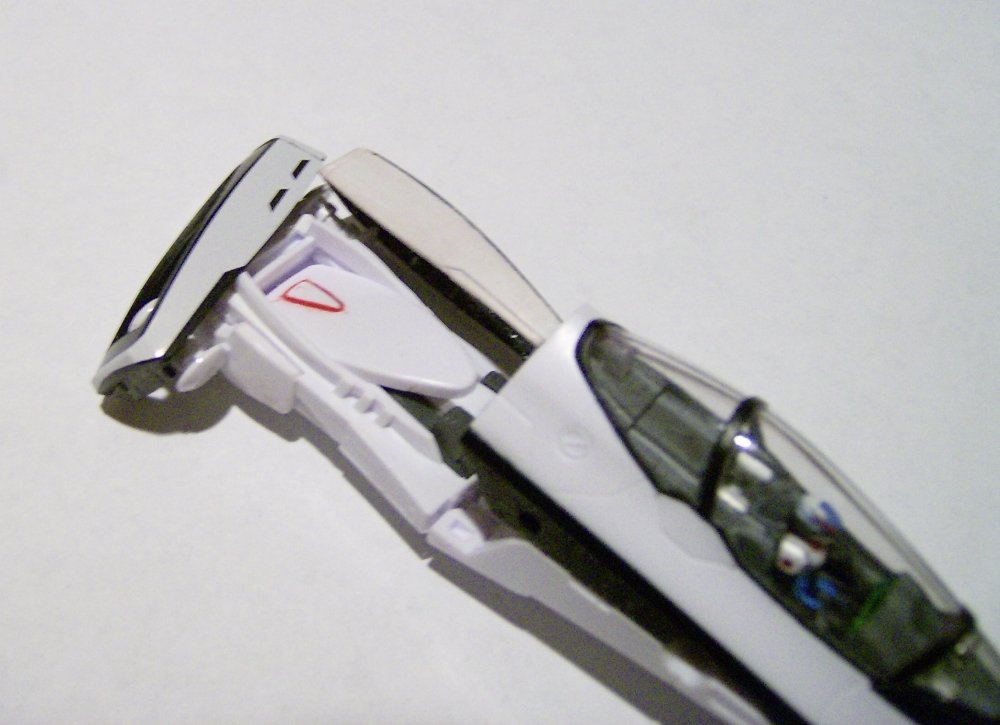
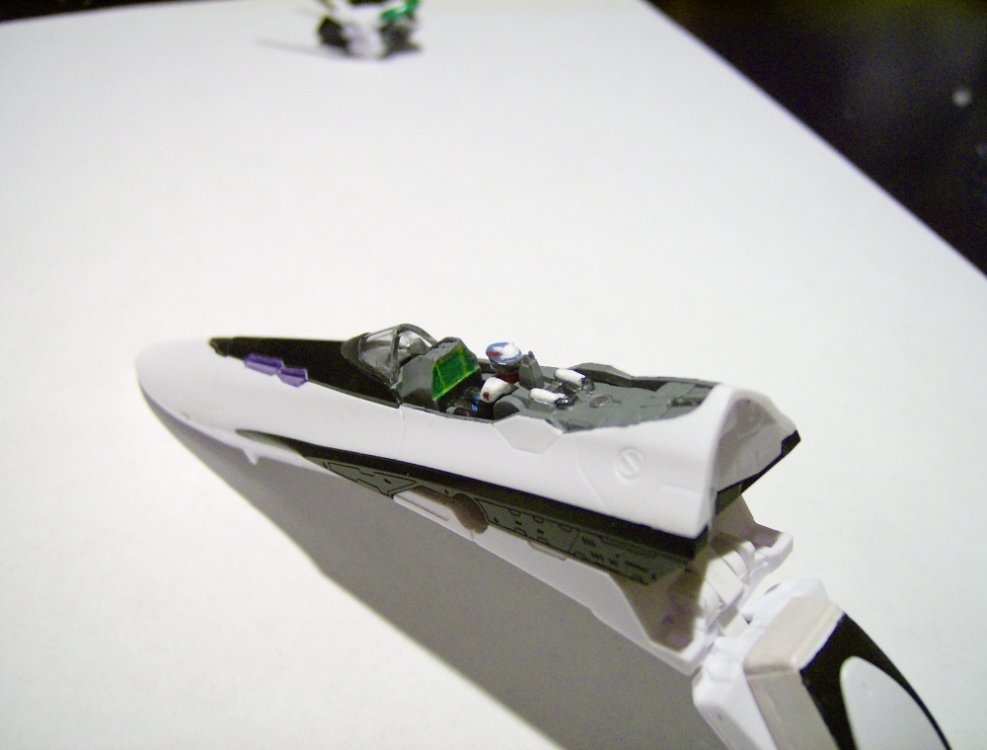
Next up, time for the head. I didn't do too much of anything special with this, mostly just painting with a very small brush. For the visor, I painted the entire back side a pure silver color, as well painting the place where it mounts, just in case it thinned out a bit as it was drying. For the front.. well, I didn't have any transparent green, so I just dipped my brush in the top of an unmixed bottle of bright green paint. It coated surprisingly well, and left the visor a nice bright green color. I used almost the same method for the front of the sensor on top of the head, first painting a layer of silver, then dabbing a drop of thinned green over it. For the top part of the head, I remembered all the problems mentioned with the white pinstripe decals going directly over the seam, so I thought I might actually use that seam to my advantage. Before putting the head together, I sanded down the edges of the red center piece slightly, at about a 45 degree angle. Once the head was together, I just let white paint run into that crevice, leaving a nice even stripe in the joint once the excess was wiped off. I may redo this piece though, since the black and red paint I used didn't smooth out as nicely as I'd like, and the stripes are a little uneven. Btw, it took a little touching up, but I was able to get the red stripe painted at the base of the head lasers. I think I used a 10/0 brush for it, but it might have been a toothpick.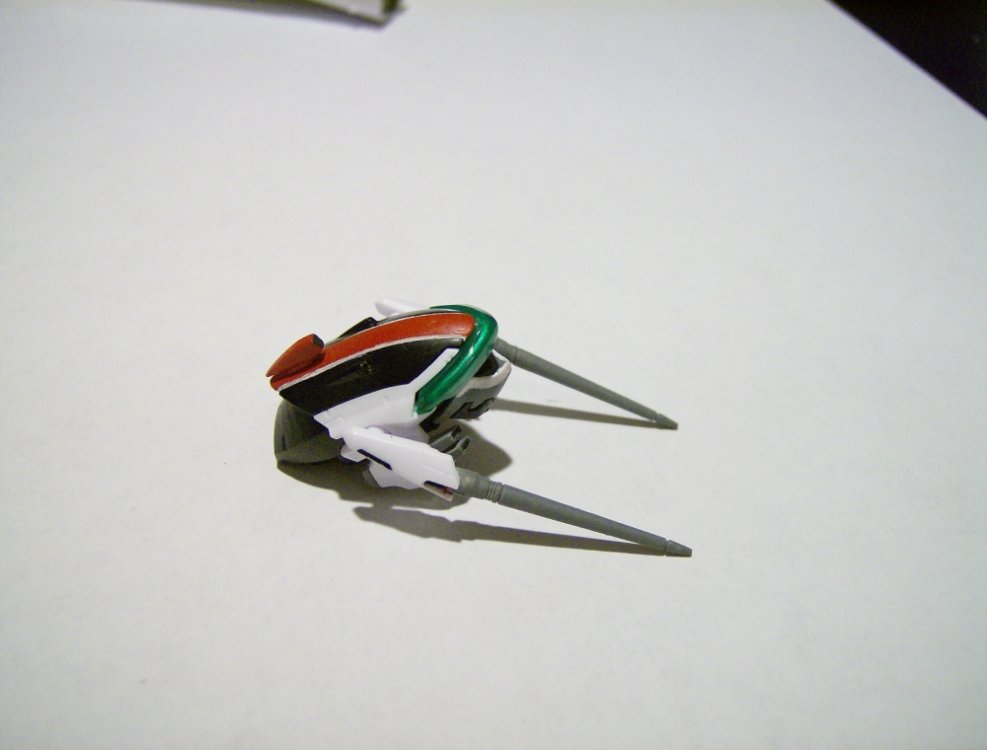

-
Ok, all comments about the hip placement aside.. this is the first time we've gotten internal CAD views before, and picking this thing apart is fun, even from a low-res picture. The nose structure looks really compact this time, and I think the Fire Valk's different canopy from the YF-19 really freed up a lot of space in the nose (I think it opens rearward in one piece, rather than split). Also, since it opens at the rear, the front edge of the canopy is open, leaving room for the cockpit hatch on the front, and for the entire cockpit to rotate. Now, it might be a trick of the angle, but the nose looks very thin indeed, as if everything was crammed in very tightly. In fact.. judging by the linkage there... it looks as if the entire nose transformation is linked together. Basically, it looks like the mechanisms for lowering the nose flap under the cockpit, the z-fold nose break for shortening the torso, and the cockpit rotation are all connected. At the very least, it looks like the cockpit rotation is linked to one of those two motions. I'm really liking how the crotch plate folds flush in fighter too, it looks completely streamlined with the fuselage, and it looks like it folds like the Hi-Metal, instead of the flipping action used on the YF-19. The way the YF-19 did it takes up extra space, since the curved side is facing upwards, and the back side of the plate is just wasted space. Two things I really want to see more on: the head and hips. The head looks like it does fit under the cover plates in back, but I have no idea how it'll pull that off. It looks like the head may slide back further than the YF-19, and then slide forward again, so you can get the head probes past the upper chest plate. For the hips.. I don't know what to think. You can see a bit of them in the front view of the battroid mode, and there is clearly something very different about them. I mean.. the upper hip plate just seems like it's not there. It looks like there's a small bit of it above the hips, but there is something else there directly above the intakes.... Ohhh.. shooot. I could be very wrong here... but it looks like the upper hip plates are attached to the front half of the fuselage... as in, they lift up, and slide down with the cockpit during the Z-fold.. putting them behind the hips. That would explain the dividing line on the hip plates right behind the canards.. I still have my reservations about the LEX placement.. but a little part of me deep inside just started quietly jumping for joy. PS. Yes.. lots of speculation, I know. I just can't wait for more pics about this thing now, to see if they actually pulled off what I think they did. Edit: Btw, just for fun, based on what's visible in that picture, and going by the Bandai Hi-Metal...
-
Actually, I kind of don't blame them doing it this way, even if it does suck for us. Financially speaking, those kits might be more profitable in several ways than a full fledged toy. After the Q-Rau didn't sell very well, I don't blame them at all for wanting to test the waters. What's interesting about this is it sounds like they're pulling their SDF-1 kit shenanigans again, but now we know how that story is ending (or, at least we know the $2000 model wasn't the end of it). Let's say they do release it as a $400 kit, and the Japanese collectors eat them up. Would it be too farfetched to say the kit is designed to cover the production costs of a toy version? If it sells well, they know the interest is there, and could go ahead with the toy. If not, they still filled a niche for collectors, and made a decent profit from the kit. For Yamato, it's all about what's profitable. And to be honest, I'm all for them making a profit, since it increases chances that they will keep making the more obscure Macross vehicles. I do think this websclusive crap needs to disappear forever, though. Honestly though.. I probably wouldn't buy a Regult myself, so I'm not too worried about this. I'm more of an aircraft fan, and while they're good for dioramas/battle scenes, I keep my valks mostly displayed in flight anyway.
-
True, I admit I was looking at the Hi-Metal when I said that, and that version has the hip joint fairly far back, pushing the LEX further behind the canard. (btw, LEX= leading edge extension, the upper portion of the hips above the main intake) Maybe I should rephrase what I mean... the nose just looks too short. The space between the canards and the head looks really compressed, and it pushes the top of the hips clear up to the canopy. Even that line art shows the front edge of the hip plate falling under the canards, not ahead of them (on the top view anyway.. yay for line-art ) Eh, I'm just paranoid. I just hate these "wait and see" bits. Hopefully we'll see a bit more CAD work soon like we did with the YF-19.
-
I don't mind a bit about the exposed head really.. I leave the cover off the Hi-Metal anyway because I don't care to swap all those tiny parts. That CAD though... bothers me. Severely. The views of the nose don't look too bad on their own, but that top view is very, very wrong. Not quite Bandai 1/65 wrong, but close. They may have dropped the nose, which I like.. but the LEX should NOT extend ahead of the canards!
-
The Cheapo Tips n Tricks Guide to the VF-25
Chronocidal replied to Chronocidal's topic in The Workshop!
Thanks At least it wasn't too far off color wise, I just need a darker center screen, and more of a gray border. It probably would look better to print it and stick it on, but part of my personal challenge with this is to see just how far I can get with just painting things. I'm probably going to be punishing myself a lot (already have with the tails actually, but that's another story), but I want to see how it goes. Btw, somewhere along the way, I discovered a really useful tool for cleaning up paint that went out of the lines: a filed down toothpick. I just filed a round toothpick to a chiseled point, wet it a bit, and used it to smooth out rough paint edges. Worked wonders for cleaning up the tails, and it's a great tool in general for scraping paint off when it's still semi-wet, since the wood usually won't hurt the plastic at all. -
The Cheapo Tips n Tricks Guide to the VF-25
Chronocidal replied to Chronocidal's topic in The Workshop!
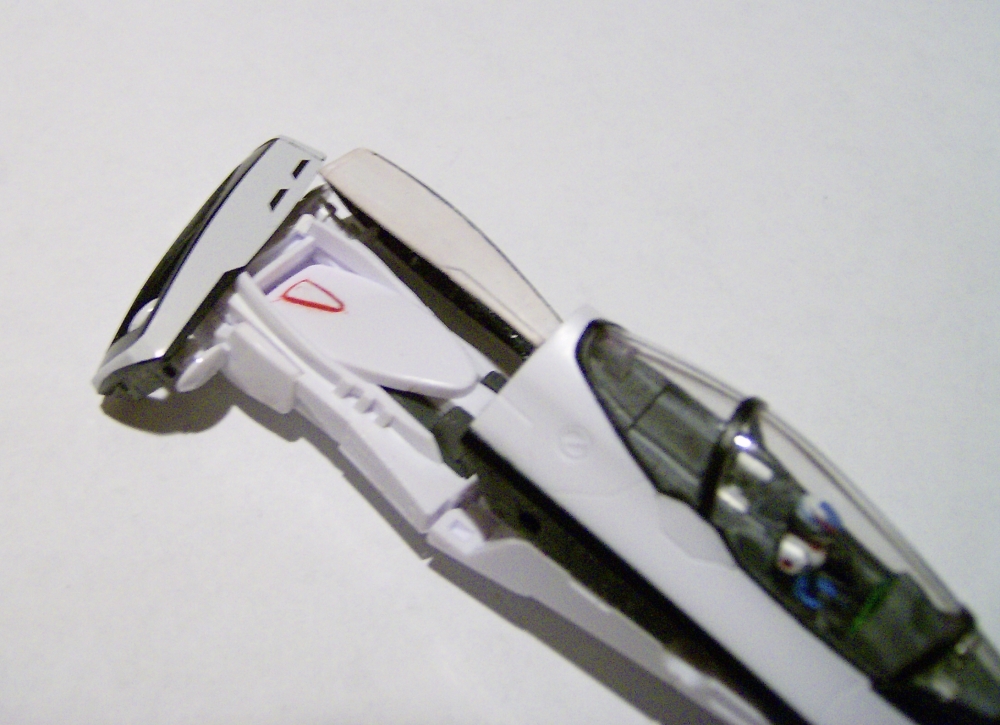
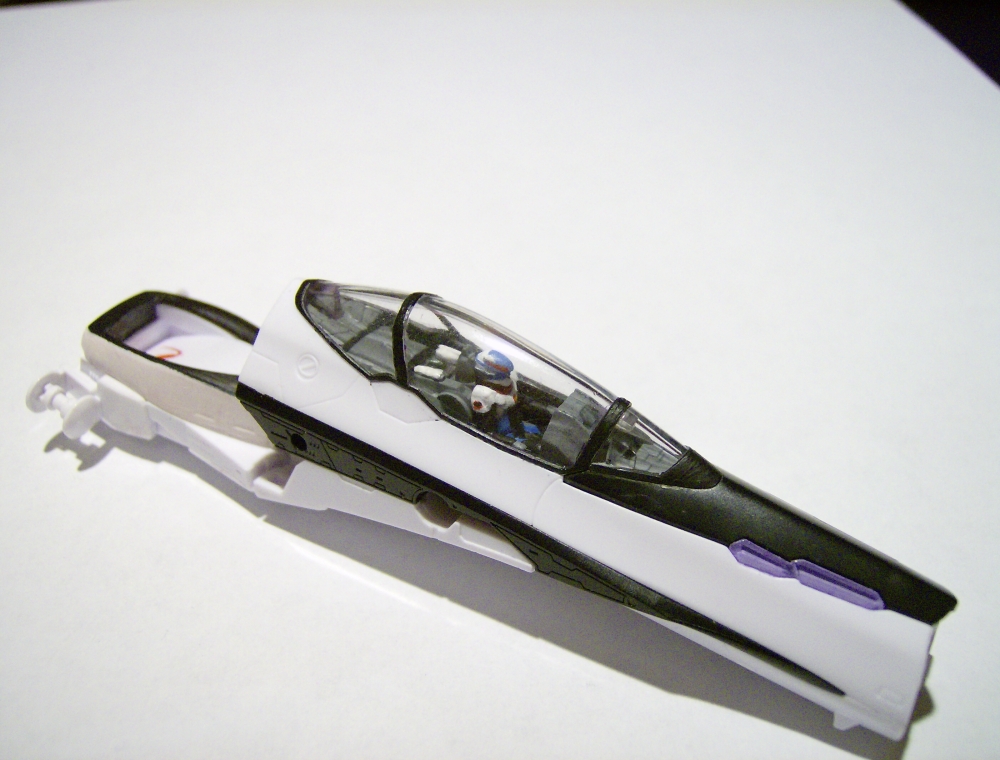
Before I forget, just a quick note... I'm trying to avoid buying any specific colors for this build up. Most of the more complex colors I've been mixing on the fly (the lavender for the sensors, Alto's suit colors, etc.) because I don't need to paint anything very large. In many cases though, I'm going to be using rough approximations using colors I already have handy, which include a lot of military standard colors. Now, next up, the canopy frame. Most aircraft I know have canopy frames that match the cockpit interior on the inside, so I figured I'd just make a dual layer paint job on the canopy. For the first coat, I used dark gull grey, the same color I used on the cockpit interior. That made it so the canopy frame appears gray on the inside. Second, I painted the black over that (after it was VERY dry). So, although it's tough to see, the end result is that the canopy frame is gray on the inside, black on the outside. For the cockpit interior, I didn't really do anything special, except drive myself nuts painting the details with a tiny brush. While I've seen many people use printouts of the instrument panel in the cockpit, I got a bit lazy.. and decided to make a bunch of extra work for myself. (As a side note, there's going to be a LOT of that during this build... my lazyness toward doing certain things usually winds up making me do a lot more work. Whether the results are worth it, I have no idea.. I just like doing things differently to see what happens. ) For the instrument panel, I basically went from my memory of the show... which wasn't great, but didn't give terrible results. I essentially painted the background of the screen a bright green, and outlined a couple of divisions in yellow while the green was still wet. It's nothing fancy, and I might go back later to revise it, but I'm okay with it for now. That's about it for tonight, I need to get back to actually doing some work on the kit now that a good bit of painting is done. Next up will probably be the head, and I have plan for how to get those white pinstripes painted on with a minimum of pain.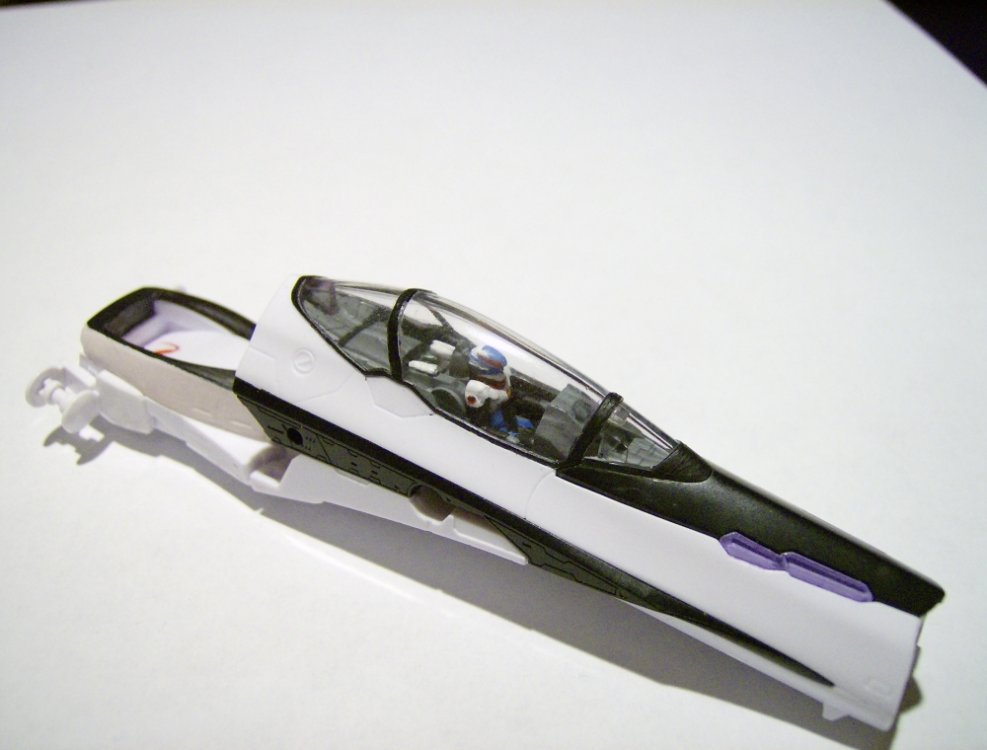
-
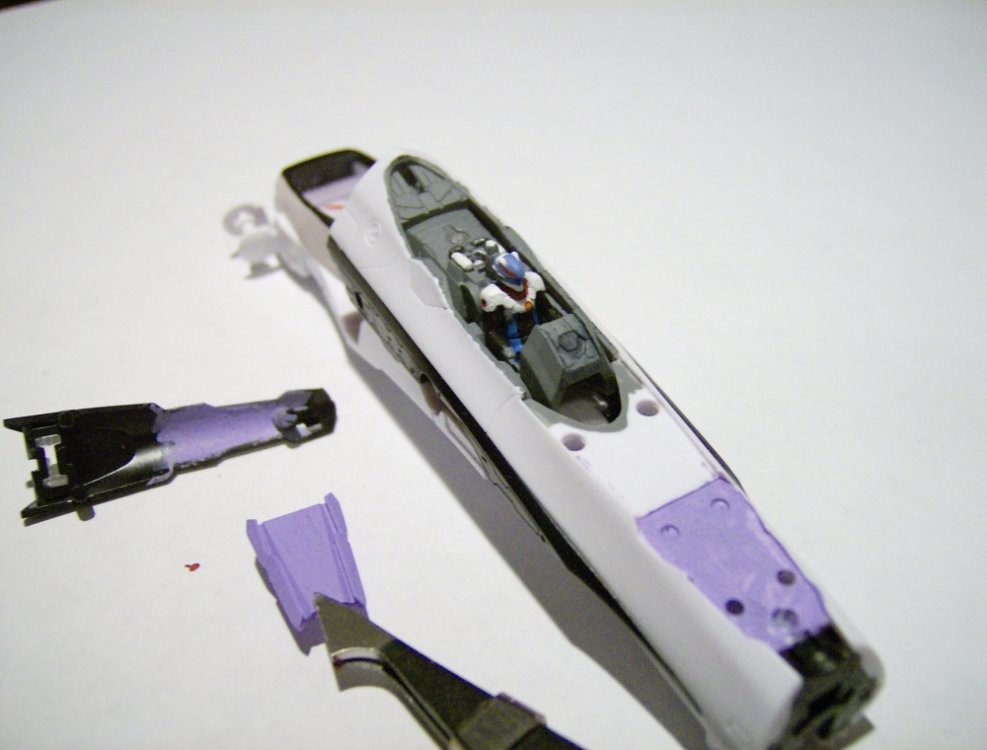
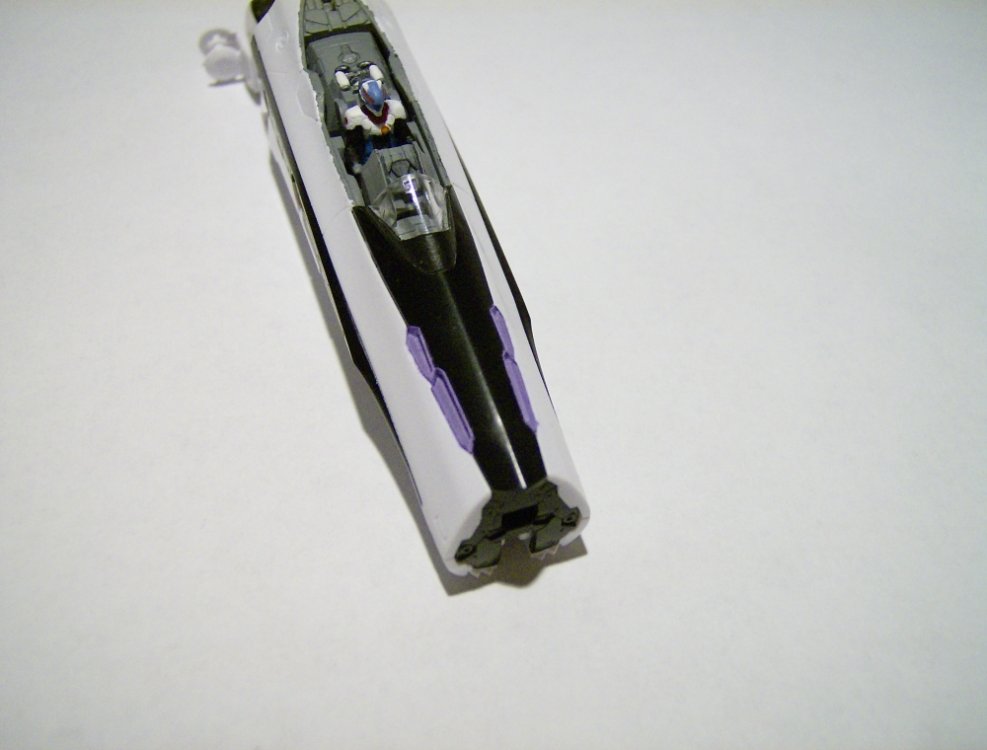
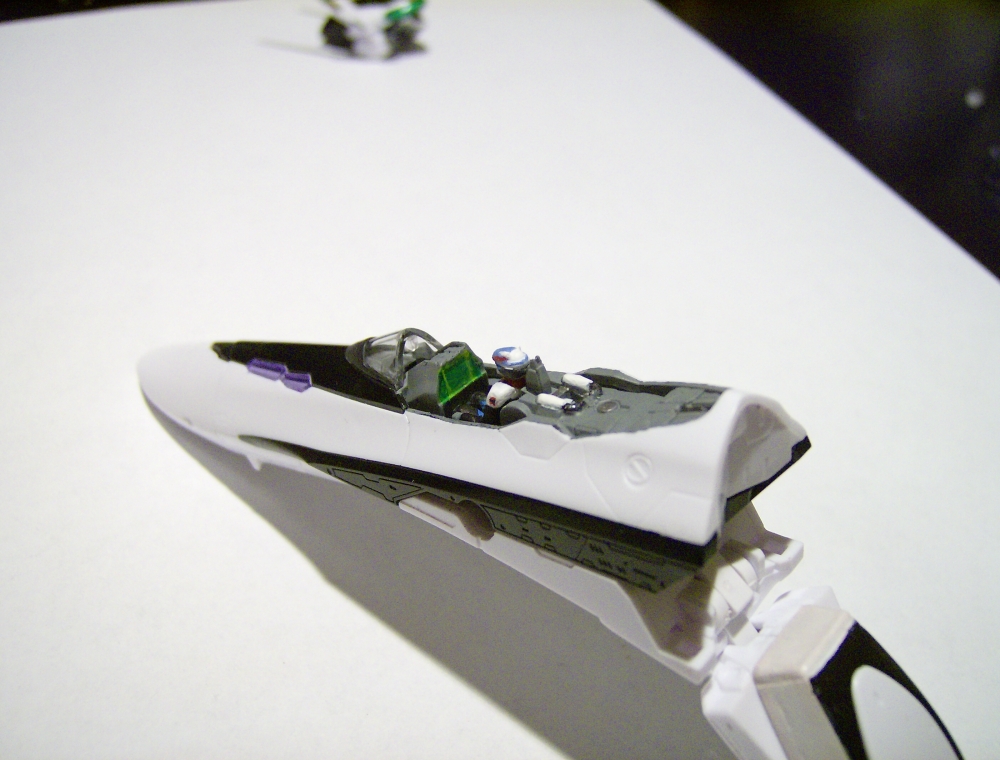
What with the other VF-25 kit builds going on, I hesitated to make this a separate topic, but I'd rather post my stuff here than constantly derail MickyG's long build up. So, while most other build-ups usually include people trying to make relative masterpieces.. I'm taking a slightly different route. In short, this is my second VF-25, but the first I've put any effort into. My first, a VF-25G, was a test build of sorts, and I'm using it to test out ideas on, like the wing/leg tabs I added. I also plan on using it as a testbed for when I try and make a fully swappable set of super parts, but that's a ways off. Now, the key here is I'm putting effort into this build, not money. I'll be honest, I have an airbrush and compressor ready to go (gift from a short while ago), but at the present time, I don't have the space to run it, or the motivation to learn everything I need to know about using it. On the other hand, I already have a bunch of paints, brushes, files, etc. for building a kit... so, I want to see what I can do with a minimum of money spent. Basically, all I bought specifically for this kit are a couple paint colors, and a brush or two, and only because the ones I had already were bad. Also, just because I want to try it, I'm taking my dislike of Bandai's dot-matrix decals to the rather silly extreme, and painting everything by hand (short of text, which I might just use stickers for). And since I don't have any masking tape, this should be very interesting. Since masking tends to fail on me when I hand-paint things anyway, I'm going to see how long I last before breaking down and buying a roll of the Tamiya stuff. This isn't really going to be any kind of part-by-part build-up, since I'm sure you've seen that already, and the instructions make that part a breeze. What I'm going to focus on is how to maximize the effect you can get with very simple building tools and materials. First up, the nose sensors. I've seen many people give these a colored wash to turn them purple, but I've always been a fan of painting the back side of clear parts to color them (old habit from Star Trek kits). I may still coat them very lightly later on with the purple coloring I found, but for now I like the effect I've gotten First trick for nice looking sensor windows: cut the pegs off. They're not needed at all, since the piece is held in tightly by the upper nose panel. Those pegs bugged me for a while, because even with the entire sensor area painted solid lavender, those pegs will show up as big dark spots in the window. So, I cut them off and sanded the underside of that piece smooth. To make sure to get the brighest internal reflection on the sensors, I painted the entire area around them. May seem a bit overkill, but that way you aren't getting any light absorbed by the underside of that nose piece. Once I had everything dry, I put it together and just wiped away the paint from the windows themselves (I'm starting to love acrylic paints).