Chronocidal
-
Posts
10112 -
Joined
-
Last visited
Content Type
Profiles
Forums
Events
Gallery
Everything posted by Chronocidal
-
I'm not saying it's re-released, what I'm saying is that these VF-1Ds are ones that came out of the mold later. Whether they're called a "re-release" or not, they're from later production runs. The longer you produce things out of the same mold, the more problems those molds are going to have. HLJ has run out of stock of the VF-1D several times, and has been restocked. Call it an assumption if you like, but unless Yamato is sending out restocks in an order that doesn't match the production order, the ones people bought recently came out of the molds later than the previous restocks did. That puts mold degradation high on the list of probable causes for this problem. We've already seen this happen with Yamato on other toys over time, so it's by no means a stretch to think it could happen again. I would agree with the measuring the tabs, although according to what's been said, they might be pre-damaged from the factory assembly. Someone mentioned that when they finally managed to pry their intakes loose, they noticed the tabs were misshapen, as if they had been forced into a hole that was too small. Some pictures of those tabs would be very helpful for comparison. I don't want to start a panic either, but I guess my thought is that the last time we panicked, it had a good effect, and Yamato took notice. In the end, we got a nice batch of shiny new shoulder hinges, and Yamato redoubled their efforts to make sure the shoulders were assembled with the right parts. It might not be anything they can fix this time around, but it would be nice to hear an official word from them about what causes this issue. At the very least, they might amend their instructions to change how it says to detach the intakes, or add a warning to mention how the tabs can break if handled too roughly. In the meantime, I'd say if the intakes don't disengage easily by the normal method, the best course is to lift up the chest plate, and use some tool to push the intake tabs down from above. It may take some disassembly to get at them, I haven't tried it myself. Once they're out, filing down either the tabs or the inside edges of the holes should help a lot. Also, for those afraid of filing the tabs too much and making the intakes loose, remember they're still held on by the underside clips, which should be plenty (gerwalk might be a little floppy, but fighter should hold fine from the other tabs). And if you make them too small, remember, you can always beef the tabs back up again with something like a thick superglue that you can sand to shape once it dries. It might take some trial and error, but you can make it work.
-
That's all well and good, but that's not my point. Just because you have not witnessed an issue personally does not mean it doesn't exist. First off, the crotch has never been a reliable indicator of release date as far as I know. I have early releases with it, and recent releases without it. The crotch fix hasn't been consistently implemented. No one is asking you to make assumptions. You've already stated that you don't have any problem with the VF-1D, and neither do I. But this does not change the fact that some people DO have problems with them, regardless of what the ultimate cause of the problem is. It could be molding problems, it could be too much paint, it could even be clumsy people on the assembly line mashing the pegs up. In any case, HLJ has been shipping replacement legs out, so it's at least fixable. I just hope we don't see any more reports like this. If it is a molding problem, that doesn't bode well for any more V.2 reissues. Now, this whole topic should probably be moved to the other discussions on this subject so we can get back to drooling over the stuff we've ordered. In my case, I'm picking up my VF-0S after work today, so I'll have a fresh report on how the new reissue stock compares to the old VF-0A.
-

What's wrong with my Yamato, Bandai, etc.
Chronocidal replied to UN Spacy's topic in Hall Of The Super Topics
That's kind of what I've suspected might be the problem. If the intake molds have degraded, they're going to get sloppy in areas like that tab, and the tabs are going to grow. Even if the metal plate doesn't change, those tabs are going to get bigger and bigger over time, and the tabs will always give way more than that metal plate, which is why they can still manage to mash the tabs into their slots. You had the right idea pressing the tabs down from above the intake plate, that's probably the only way to pop the legs out without snapping off the tabs. The issue is a difference in the direction of force on the tabs.. pushing the intakes upward into the plate is just direct pressure on the tab, but the method of rotating the legs inward to pop those tabs loose puts a twisting and shearing force on the tab, which is much more nasty on the plastic. The only way to ensure they don't get stressed is putting pressure on the tabs from directly above, using some kind of tool to press the pegs out directly through the metal plate. -
I think you're continuing to miss the point they're making about the recent batch. Just because the ones you bought in the past don't have any issues does not mean issues will not develop in the future, and this is what they are concerned with. THE MOST RECENT RE-RELEASE VF-1D COULD BE FLAWED. Whether it's due to decaying molds, too much paint, or whatever else you can come up with, the intake tabs ARE A PROBLEM FOR MULTIPLE VF-1Ds. Angling the intake just right and filing down the tab will not help jack squat if the tab breaks on the first time you pull the leg loose, which is what has been happening. I myself noticed my intakes on my VF-1D were very tight to begin with, and it took some care to pop them loose. If the molds for the intakes have degraded, those tabs could have gotten bigger over time, which would explain this issue.
-
Heh, glad I got an old one then, even if the shoulders did go kablooie. Those Wolfpack markings are awesome. And yep, the molds used on the VF-0 shouldn't make that much difference. The problem was the plastic itself. It was just a bad mixture or something, and actually seemed to form fault lines within the plastic. There were clear stress marks running through it, straight out of the mold. Suppose it could have been a problem with cooling the finished pieces too.
-
What's wrong with my Yamato, Bandai, etc.
Chronocidal replied to UN Spacy's topic in Hall Of The Super Topics
Yeesh.. yep, those first pics are the same place my YF-19's arms failed, straight out of the box. That arm design just sucks. Judging by the texture of that plastic, it's the same explodium as the VF-0's arms, and there is just not enough structure there to hold a screw. What I wound up doing was just gluing the entire upper arm together around the screw. I sincerely hope Yamato remakes the YF-19, it just doesn't hold a candle to any of the recent stuff they have in terms of engineering. -
Official 1/100 BANDAI VF Hi Metal VF-1J Valkyrie
Chronocidal replied to Black Valkyrie's topic in Toys
I still don't understand why no one has the sense to package VF-1s in their smallest configuration, with the tails folded and the wings swept back. Depending on the overall design, you can sometimes get even smaller by folding up the backpack and putting the wings all the way together (this doesn't always work, since the wings sometimes hit the tops of the legs). Bandai had the right idea to start with the old chunky packaging, and did the same thing with the VF-25 packing foam, so why the sudden waste of space? Aside from the packaging though.. now that I see the fully painted version, the stripes on this one have me wondering.. what's the canon marking scheme for the chest plate? Yamato's valks always have the chest stripes painted in a double angle, but this one has the front stripe segment horizontal, like they used to be on the chunkies, JMs, and other older toys. Is there any clear reference in the animation as to which it is, or is this one of those markings that tended to morph between animation cels? -
I dunno, depending on which version you see as more accurate, the 1/72 VF-27 kit is pretty well endowed all on it's own. I mean, look at the size of those intakes! (credit goes to Jarrod for the pic from back in the last bandai kit thread) As for Mac7, I have to confess, I blew through all of M7 in a week or so a while back. I tried catching up to where the thread was, but when I got there I didn't want to stop. Part of it was just because I realized I didn't remember a good portion of the plot after Mac7 got force-folded, and I actually wanted to see what happened. Another was that, even as corny as Sound Force was in some ways, the plot really starts picking up speed there. It's just much more interesting to me to see a group fly out with a purpose, instead of Basara running wild while the rest of the cast looks on and goes "Huh?" Most of all though.. I think I just wanted to hear something other than Planet Dance and Totsugeki Love Heart for the umpteenth time. Seriously, I think my favorite moment in the entire series is when they use Holy Lonely Night for the first time. I mean.. all the songs up to that just seem so... happy.. I think Holy Lonely Night is the first song they play that's actually in a minor key, and it feels so much darker... it just fits the situation so much better in my mind. Shoot, I play that song sometimes playing combat sims myself, it just feels right. I guess in a way it's kind of the same way that Aimo O.C. feels so different than when Ranka sings the normal version, or the Bird Human version. It's a different tone entirely, and just feels right at home as a soundtrack for a battle, even if it is a weird perversion of the original song. What still makes me sad is that some of my favorite Fire Bomber tracks were never even used in the series. I really enjoy both Tread the Lightless Night and Diamond Calling, and wish they had gotten used. I think Mac7's greatest fault might be that the same music was used so many times. It's not bad, but hearing even your very favorite song over and over and over can make you tired of it. Granted, it makes sense.. I mean, if you traveled with a band, yes, you'd hear the same songs at every concert. Makes me wonder how tired actual band musicians get of their own music after a while.
-
So are tickets to the concert still available? I'm still tempted to try going to this, even if I can't convince some of my friends from up north to come along.
-
I picked most of mine up during HLJ's sales, so I lucked out on cost, but these are by no means a cheap kit, especially when you start looking at the armored one. I definitely want to get one some day, but right now I don't feel like dropping the $80 for an armored Ozma, considering it'd be easily close to $100 US after shipping. That being said though.. as frustrating as the kits can be, they make for a very nice challenge, or at least a challenge very different from any other plastic kit I have. I'm torn between all the different ways I want to build them up, whether to paint them, etc.. I think painting some of them will be worth it, but it will definitely take practice and patience. Speaking of building, I need to get back to finishing my Alto kit. It's been sitting collecting dust for the past couple of weeks now, so hopefully when my new paints arrive next week I can get to touching up the things I'm not happy with.
-
Sorry not to reply about that more earlier, I really haven't had any problems with mine in that area. Honestly, those aren't tabs so much as stubs, and even if they do wear down or break off, I don't see it causing a problem. Really though.. I don't see any reason that bit should be stressed in the first place, unless you're pulling the plates straight down at the front instead of rotating them to open them. Now, as for the bottom plates, there's a few little things I've noticed that seem to help those fit better. First off, make sure to check how your shoulder covers are rotated. They can move back and forth a little over the shoulder, and they need to be aligned right before they will fit well next to the legs. Second, yes, it's essential that that metal bar across the back snaps over those screw mounts fully. That will stop the back plate from lining up correctly. One thing I did notice that might not be able to corrected.. whether those belly plates fit can depend entirely on how the rear engine plate is shaped. On my YF-21, I noticed the belly plates just would never sit correctly if the rear tabs were correctly inserted into the undersides of the engines. When put in there, the plates would be bent upwards at the rear, and the rear set of center alignment tabs would get stressed if I tried to push the plates together. Eventually that led to the middle tab breaking off. So, I've just had to live with the gap there. In comparison, both of my VF-22s have perfectly fitting plates. They mesh together perfectly at the rear, and there's no stress on the plates in the closed position. In fact, there is actually a little wiggle room for them, so they definitely are under no stress. What I'm pretty certain causes this.. I noticed a long time ago that the upper engine plate (the one that slides) on my YF-21 was not level. If you look at it from the rear, you notice the upper flat surfaces of the engine nacelles both lean inwards. Because of this, the engines are actually rotated a little, and the end result is that the places where those tabs on the belly plates go are higher than they should be. The belly plates mesh together fine if you don't insert those tabs under the engines, but putting them in correctly makes the plates bend from being forced against the legs. On the other hand, the engines on both of my VF-22s are much more flat on top, and the belly plates fit fine. I'll have to have another look at this later to be sure I'm not missing some small problem inside, but I've gone over the YF-21 several times, and never seen anything else that could cause the plates to bend that way.
-
Those tips have always been yellow, as they should be since they all were like that in DYRL. The only reason they appear red on the Hikaru box is because Yamato didn't feel like taking a separate picture of the Hikaru, and just photoshopped a picture of Roy to swap the yellow markings for red. The skulls on the booster packs should be red too, but I'm pretty sure they're black like Roy's.
-
See, on the rare occasion they choose to use it, their time-paradox shipping is top notch!
-
Phew, was worried for a moment that VF-0S wasn't gonna happen.. Checked my order status last night, and it was down to low stock, with no notice that my order had processed yet. Come this morning, looks like it's being readied for shipping though, so looks like I lucked out. Plus, I got one of those spare sets of decals which I'd actually forgotten all about. Dunno if I'll use them or not, but depending on if they fit, I might use them to turn one of my 1/48 Hasegawa Vermillion Squad kits into a DYRL 1A.
-
Since the only 1/48 I have is a Super Hikaru 1J, I can't compare releases, but I can vouch for it being very sturdy. You might have a very hard time finding the version with fast packs now though, I don't think it was ever reissued. The only issue I've ever had is that the fit between the intakes and cockpit section is a little off, so it either sits with the intakes dropped a bit from the upper plate, or the nose section gets angled down a little. Now, comparing to newer releases, I would say the new V.2 1/60s are definitely more refined in terms of engineering than the 1/48, with a much higher level of precision. Comparitively, the 1/48 looks much more rough in terms of molding. But with that roughness also comes a lot of strength*, and you won't find any shoulder hinges shattering on a 1/48. ____________________________________________ *On a completely different note.. stupid language question.. I found myself wanting to say the 1/48 has a lot of.... well, it's sturdy. In the same way calling something "crappy" implies it is made of, resembles, or contains crap, does calling something "sturdy" mean it's made of "sturd?"
-
That is the one thing I always worried most about on ths kit.. the pieces fit so tightly, and the tolerances are so miniscule, how is there supposed to be room for you to paint it? I think when I finally get my Alto kit put together, I'm going to work it around for a while to and actually just see where the paint scratches. Afterward, I'll just sand down the areas that rubbed, and repaint them. That should give a little room, and it'll give me an excuse to repaint the areas I'm still not happy with. Really glad I managed to grab a nice set of tamiya acrylics from HLJ's free shipping sale, including some clearcoat I can brush on over the tender spots.
-
Heh.. I certainly hope so. I had thought some people got the 0S from HLJ recently, and had confirmed it was the fixed re-issue. Considering how long HLJ had it marked as sold out or even discontinued, I'd assume that anything they're selling now would be a reissue. If not, I suppose I'll just have to deal with it. I was able to fix up the arms on my 0A decently enough. Frankly though, even with the shoulder issues, the only thing that really stopped me from getting one before was the price. I rarely if ever buy Valks unless there is some sort of sale going on (think the ONLY exception to that is my V.2 1/60 M&M pair), and in all those Yamato sales from the past couple years, I never once saw any VF-0 discounts. I've been waiting a long time for a VF-0S sale, and I'm not gonna miss it now that it finally happened.
-
They're back up now, I just made an order there that I never thought I'd make: just paints. I don't need to be spending any more on any valks for a while, so I just bought a small stash of the currently stocked tamiya acrylics, and a big bottle of thinner for them. Now that I think of it, I could have probably tacked on a VF-25 kit (still want at least one armored Ozma), or maybe a Hasegawa, but I've got plenty of stuff to build as it is. Ehh screw it. I'm getting that VF-0S before the sale ends. Hopefully they'll combine the two orders in the morning.
-
1/48+fp's, 1/60, And 1/72 Picture Gallery Pt 4
Chronocidal replied to VF-18S Hornet's topic in Hall Of The Super Topics
Well, the one advantage to the VT-1 in terms of broken shoulders... I can't recall if we ever saw it use its arms in DYRL to begin with. It might have popped them out for a second during the rescue sequence, but it pretty much stayed in fighter or half-gerwalk for the entirety of the movie. Nice job on the weathering too. I pretty much keep mine fresh out of the box, but I'm tempted to sticker mine up now. I don't know why I've got such a soft spot for the VT-1 honestly.. maybe it's just a thing for dedicated trainers.. or maybe it's one of those weird fantasies of being stranded on an abandoned planet with both a beautiful woman and a robot fighter plane at the same time. Which reminds me, at some point I need to come up with stranded Hikaru and Misa figures for mine. -
Coming from playing Bridge Commander way back when, the ship designs and lack of variety were kind of what turned me away from STO in the first place. Really, the only place I've ever really seen a ST game shine is once it's opened up to the modding community. Given this is an MMO, I don't see that happening any time this millenium. If the game ever starts opening up to fan-contributed content, I'll probably be all over it. I frequented the Bridge Commander modding community for a good few years, and was able to make a few contributions, but the sheer amount of fan-made material is what made that game, as well as ones that came before it (Klingon Academy, the Starfleet Command series) so fun. Bridge Commander had a lackluster single player campaign, and very simple multiplayer at the start, but once the fans got a hold of the SDK, the content exploded to include mods and patches that went above and beyond the original game's scope. We're talking saucer separation, beaming commandos into enemy ships to capture them, custom made bridges and interfaces, and more ship variations and weapon types than you can count. The material is out there.. I just wish more developers had the passion to pursue game development to half the extent the fans do. Granted it's not always financially feasible, but for something like an MMO, with a relatively continuous cash flow and maintenance requirement, I'd think there could be tons of opportunity to add more content.
-
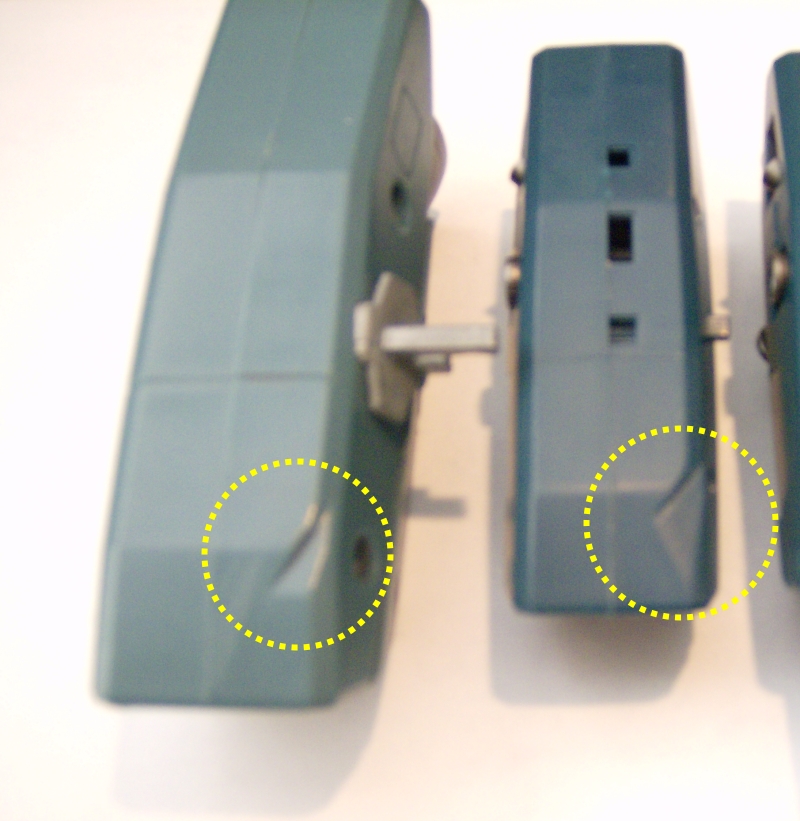
Mostly I just used a set of small hand files I bought for modeling a long while back, the kind that has assorted shapes for different jobs. I don't know if I would recommend something like a dremel though.. unless you go very slowly, you may just sand clear through the plastic. I'm really not sure it's a huge problem in the long run. What this does do is give a little breathing room so the antennas are not forced against the tails so much, and it lets the boosters sit more level, since you don't have the tail pushing up on the front of the left booster as much. Before I did this, I always noticed the tip of the left booster was angled up compared with the right one, and it doesn't happen any more. Before anyone starts worrying, this isn't worth panicking over. These things have been out for a long while now, and it hasn't actually caused any serious problems for anyone yet, outside of a little scratched tail paint. Mostly, doing this is just to help protect that paint a little more, and make the boosters finally sit level. The tails still touch the antennas, since all this does is lessen how far the tails are forced down. What I've done to help is file down the smaller of the two antennas a little. Since the bigger antenna is still there, it kind of helps keep the tail from hitting the smaller one. So, instead of scratching paint in the middle of the tail, you might scratch it at the edge. For M&M valks, the back edge is unpainted, so this works well. I guess personally, I prefer a small scratch on the edge than a worn spot in the middle of the tail. As for why this happens... really, yes, the tails should fold flatter, but even if they did, it wouldn't fix this. The boosters are mounted too low on the backpack. The only reason this is a problem at all is that the booster is pressing down on the tip of the right tail in the folded position. Because it's the tail you fold first, it's underneath the other one, and pressing on the bottom tail has a nasty leverage effect, forcing the other tail even further, and right against those antennas. Remember, without the left booster attached, the tails don't even touch the antennas. The tails are just fine as they are, and they fold plenty for clearance. The boosters are just mounted too low for the left one to clear the tail like it should. To permanently fix this, you would need to add material to the booster mount to raise the boosters, and then completely relocate the existing tabs on the boosters that attach to the backpack. I know some people here are perfectly capable of that too, it would just involve removing the old tabs, drilling a hole, and making a new tab that's lower.
-
What's wrong with my Yamato, Bandai, etc.
Chronocidal replied to UN Spacy's topic in Hall Of The Super Topics
Which attachment point are you talking about in the first part above? If it's the rear joint that you disengage for gerwalk (the one where the fast pack or leg snaps underneath the wing), I've always had a tried and true method for doing that without just pulling. Basically, I pull the wings out, and press the tip of a thumb into the small crevice between the fastpack or leg with my fingernail against the leg, and press down gently with my other fingers near the foot. The finger acts like a wedge to disengage the big tab, and it generally pushes the leg down without much trouble at all. -
Right now, I've got a small strip of scotch tape covering the spots those antennas hit, and that's working okay it seems. I actually considered just clipping them off before. My biggest concern for this kind of mod is that someone will wind up cutting clear through the bottom of the booster. It might still hold together okay though, and I guess it wouldn't be visible anyway with the tail there.
-
Well, I think my engineering background has a lot to do with it, but it's definitely a compulsive tick I have. I try to avoid putting anything under stress it isn't meant to take. Like, I won't set a valk on it's belly without landing gear or something to keep it from resting on the leg fins, that sort of thing. Heck, I avoid a lot of common "special" ways Lego bricks can be attached, just because they can break from the stress over time, and I've had it happen. I'd assume the tails can take it, given how many people have reported theirs snapped in half... if it was more prevalent, I'm sure there'd be at least a dozen threads about it by now. I would like to hear from people who leave their valks displayed with the packs for extended periods though. I know paint scratches can be a problem, but I've never heard anyone say whether the tails will warp over time.
-
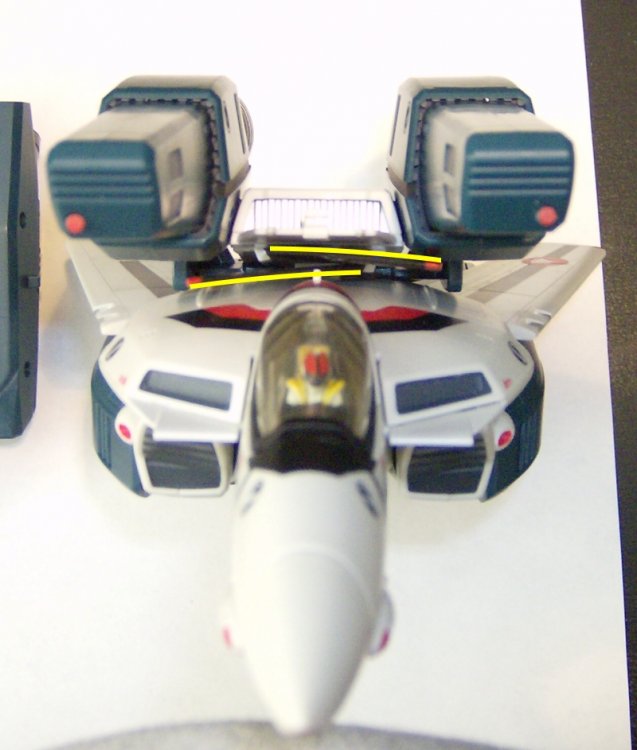
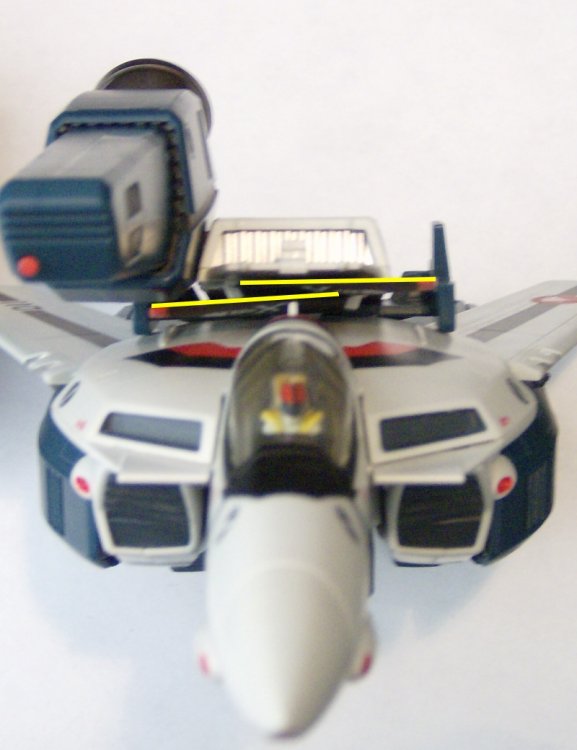
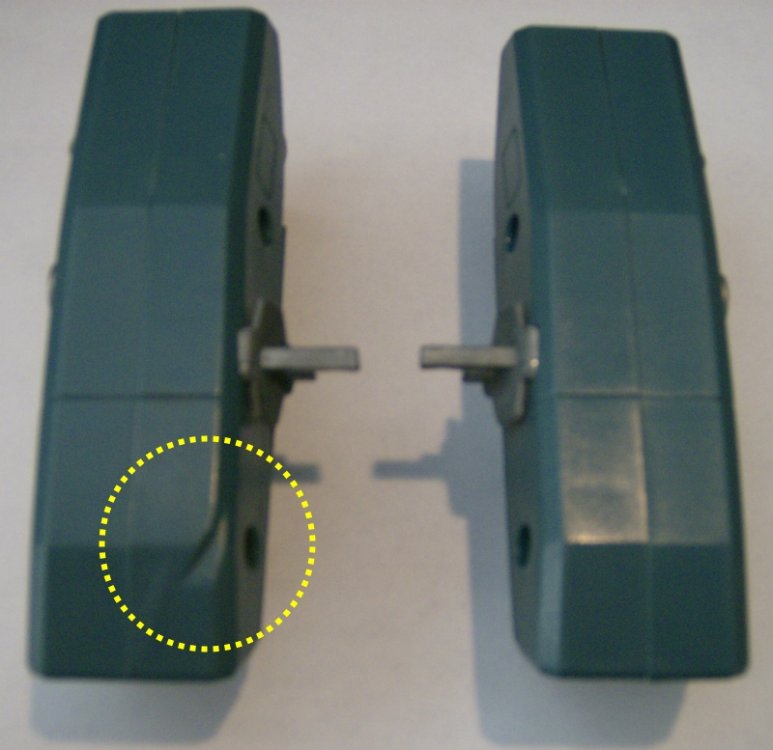
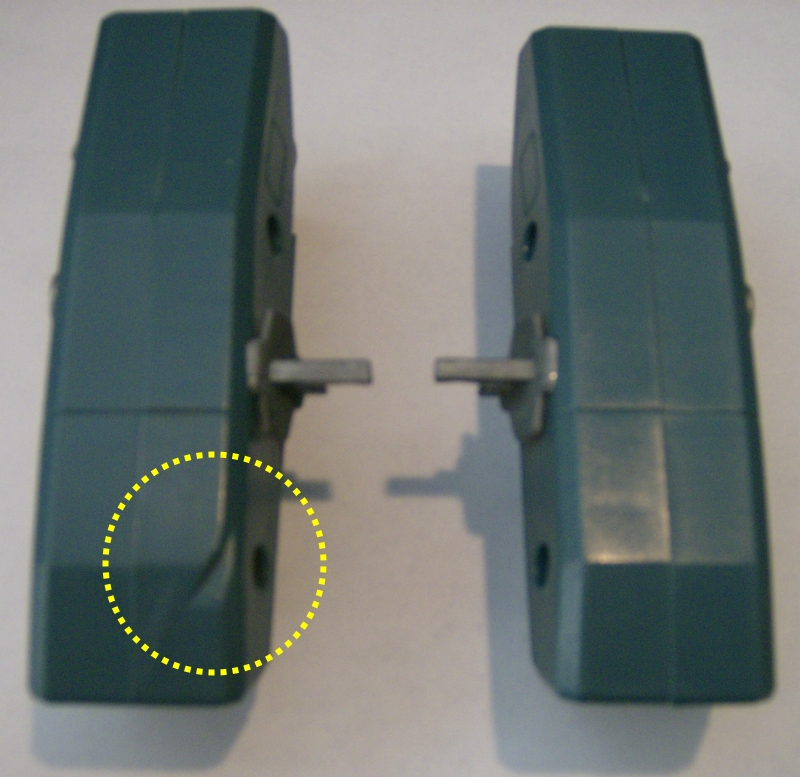
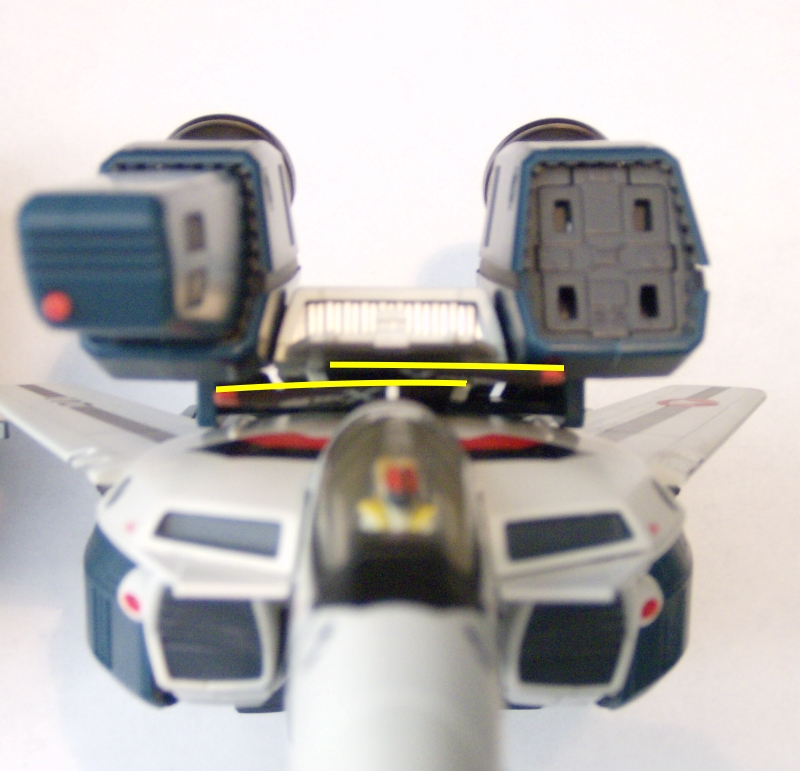
Please note this might go better in the Modification/Customization area, but I wanted to run it by the widest audience (to make sure I'm not just nuts for thinking this is a problem). From the day I got my first V2 VF-1 (a strike Roy) something has really worried me about the fast packs. Anyway, I'll let this picture summarize. Those curvy lines are highlighting the tails. When I first saw how the fast packs force the tails to bend, I was a bit scared. I don't know if it was an intentional feature of the design, or if Yamato just didn't think it would be a problem. Due to the fact no one has reported any tails snapped in half, I'm assuming it's probably the latter. Either way though, I've never felt comfortable leaving the packs on for display. On top of that, this bending is the reason that the antennas on the backplate have a tendency to make nasty scratches in the tail markings. I even noticed that the force from bending the tails that way pops the front of the left booster up, knocking the missile packs out of line. The problem is really only the left booster. Remove it, the problem goes away, the tails stop bending and sit flat, and there's even space between the tail and antennas. This problem got me to thinking, and I remembered that my old 1/48 Hikaru's fast packs had what looked like a mold flaw that I never really paid much attention to. After looking a little closer at the packs when mounted, I realized that gouge was on purpose, to keep from forcing the tail down like on the 1/60. Since the backpack folded so tightly on the 1/48, it was pretty necessary. Well, suffice to say, the 1/60 packs obviously don't have that cutout. Or, didn't yet. I grabbed my files, and went to work. The cut away area had to be quite a bit larger on the 1/60 pack, since they seem to sit a bit lower on the backpack. I essentially filed a straight edge, cutting across one of the beveled edges of the underside of the booster. Given the option, I would have liked to make the cut even deeper, but I started to get concerned I might file clear through the plastic, since I don't know how thick it actually is at that point (lots of structure inside that panel). The end result is quite a bit easier on the tails, and even leaves a tiny sliver of room above the smaller antenna. I get the feeling I'm being slightly paranoid here, but so far I'm liking what this does. The left booster stays on better now too, and stays level with the right one. The tails still bend some, but I don't know if I could make that cutout any bigger without ripping right into the bottom of the booster, and I really don't want to do that. I might modify the rest of my packs to match this one, but I doubt I'll do any more unless I can pick up a spare half dozen sets or so to experiment on.