

captain america
-
Posts
3549 -
Joined
-
Last visited
Content Type
Profiles
Forums
Events
Gallery
Everything posted by captain america
-

1/6 MOSPEADA Rider Project Proposal
captain america replied to captain america's topic in Anime or Science Fiction
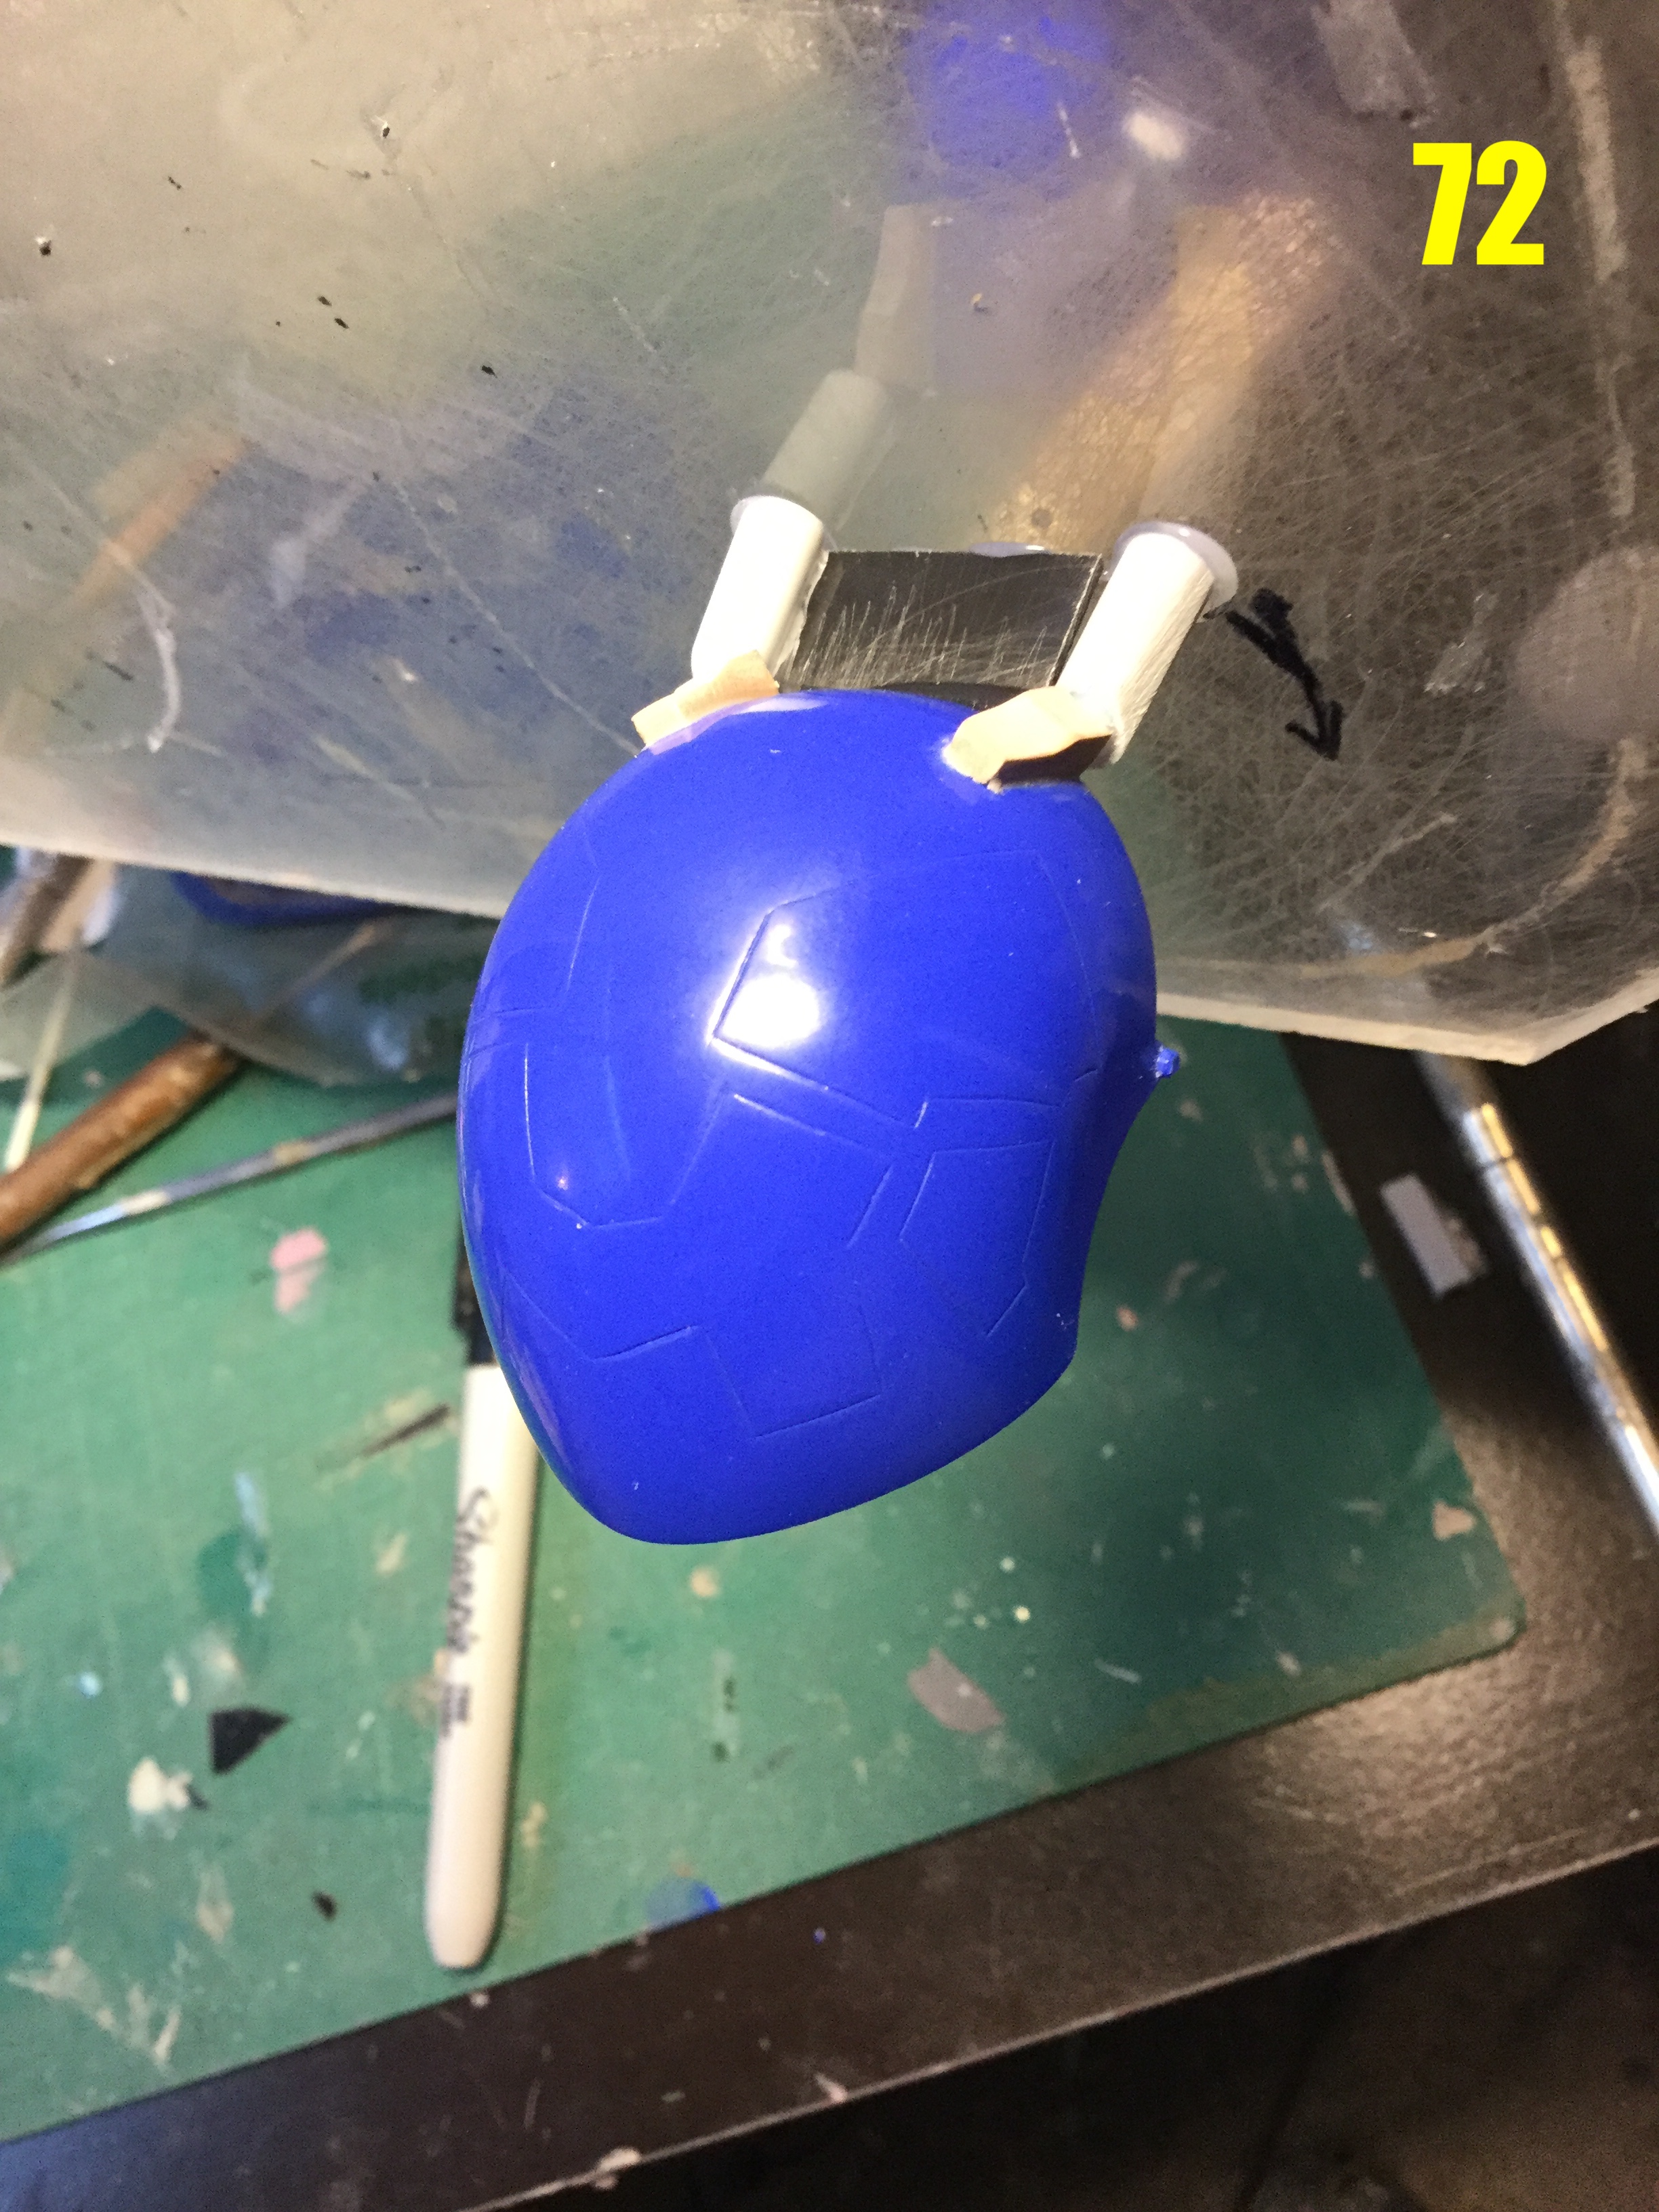
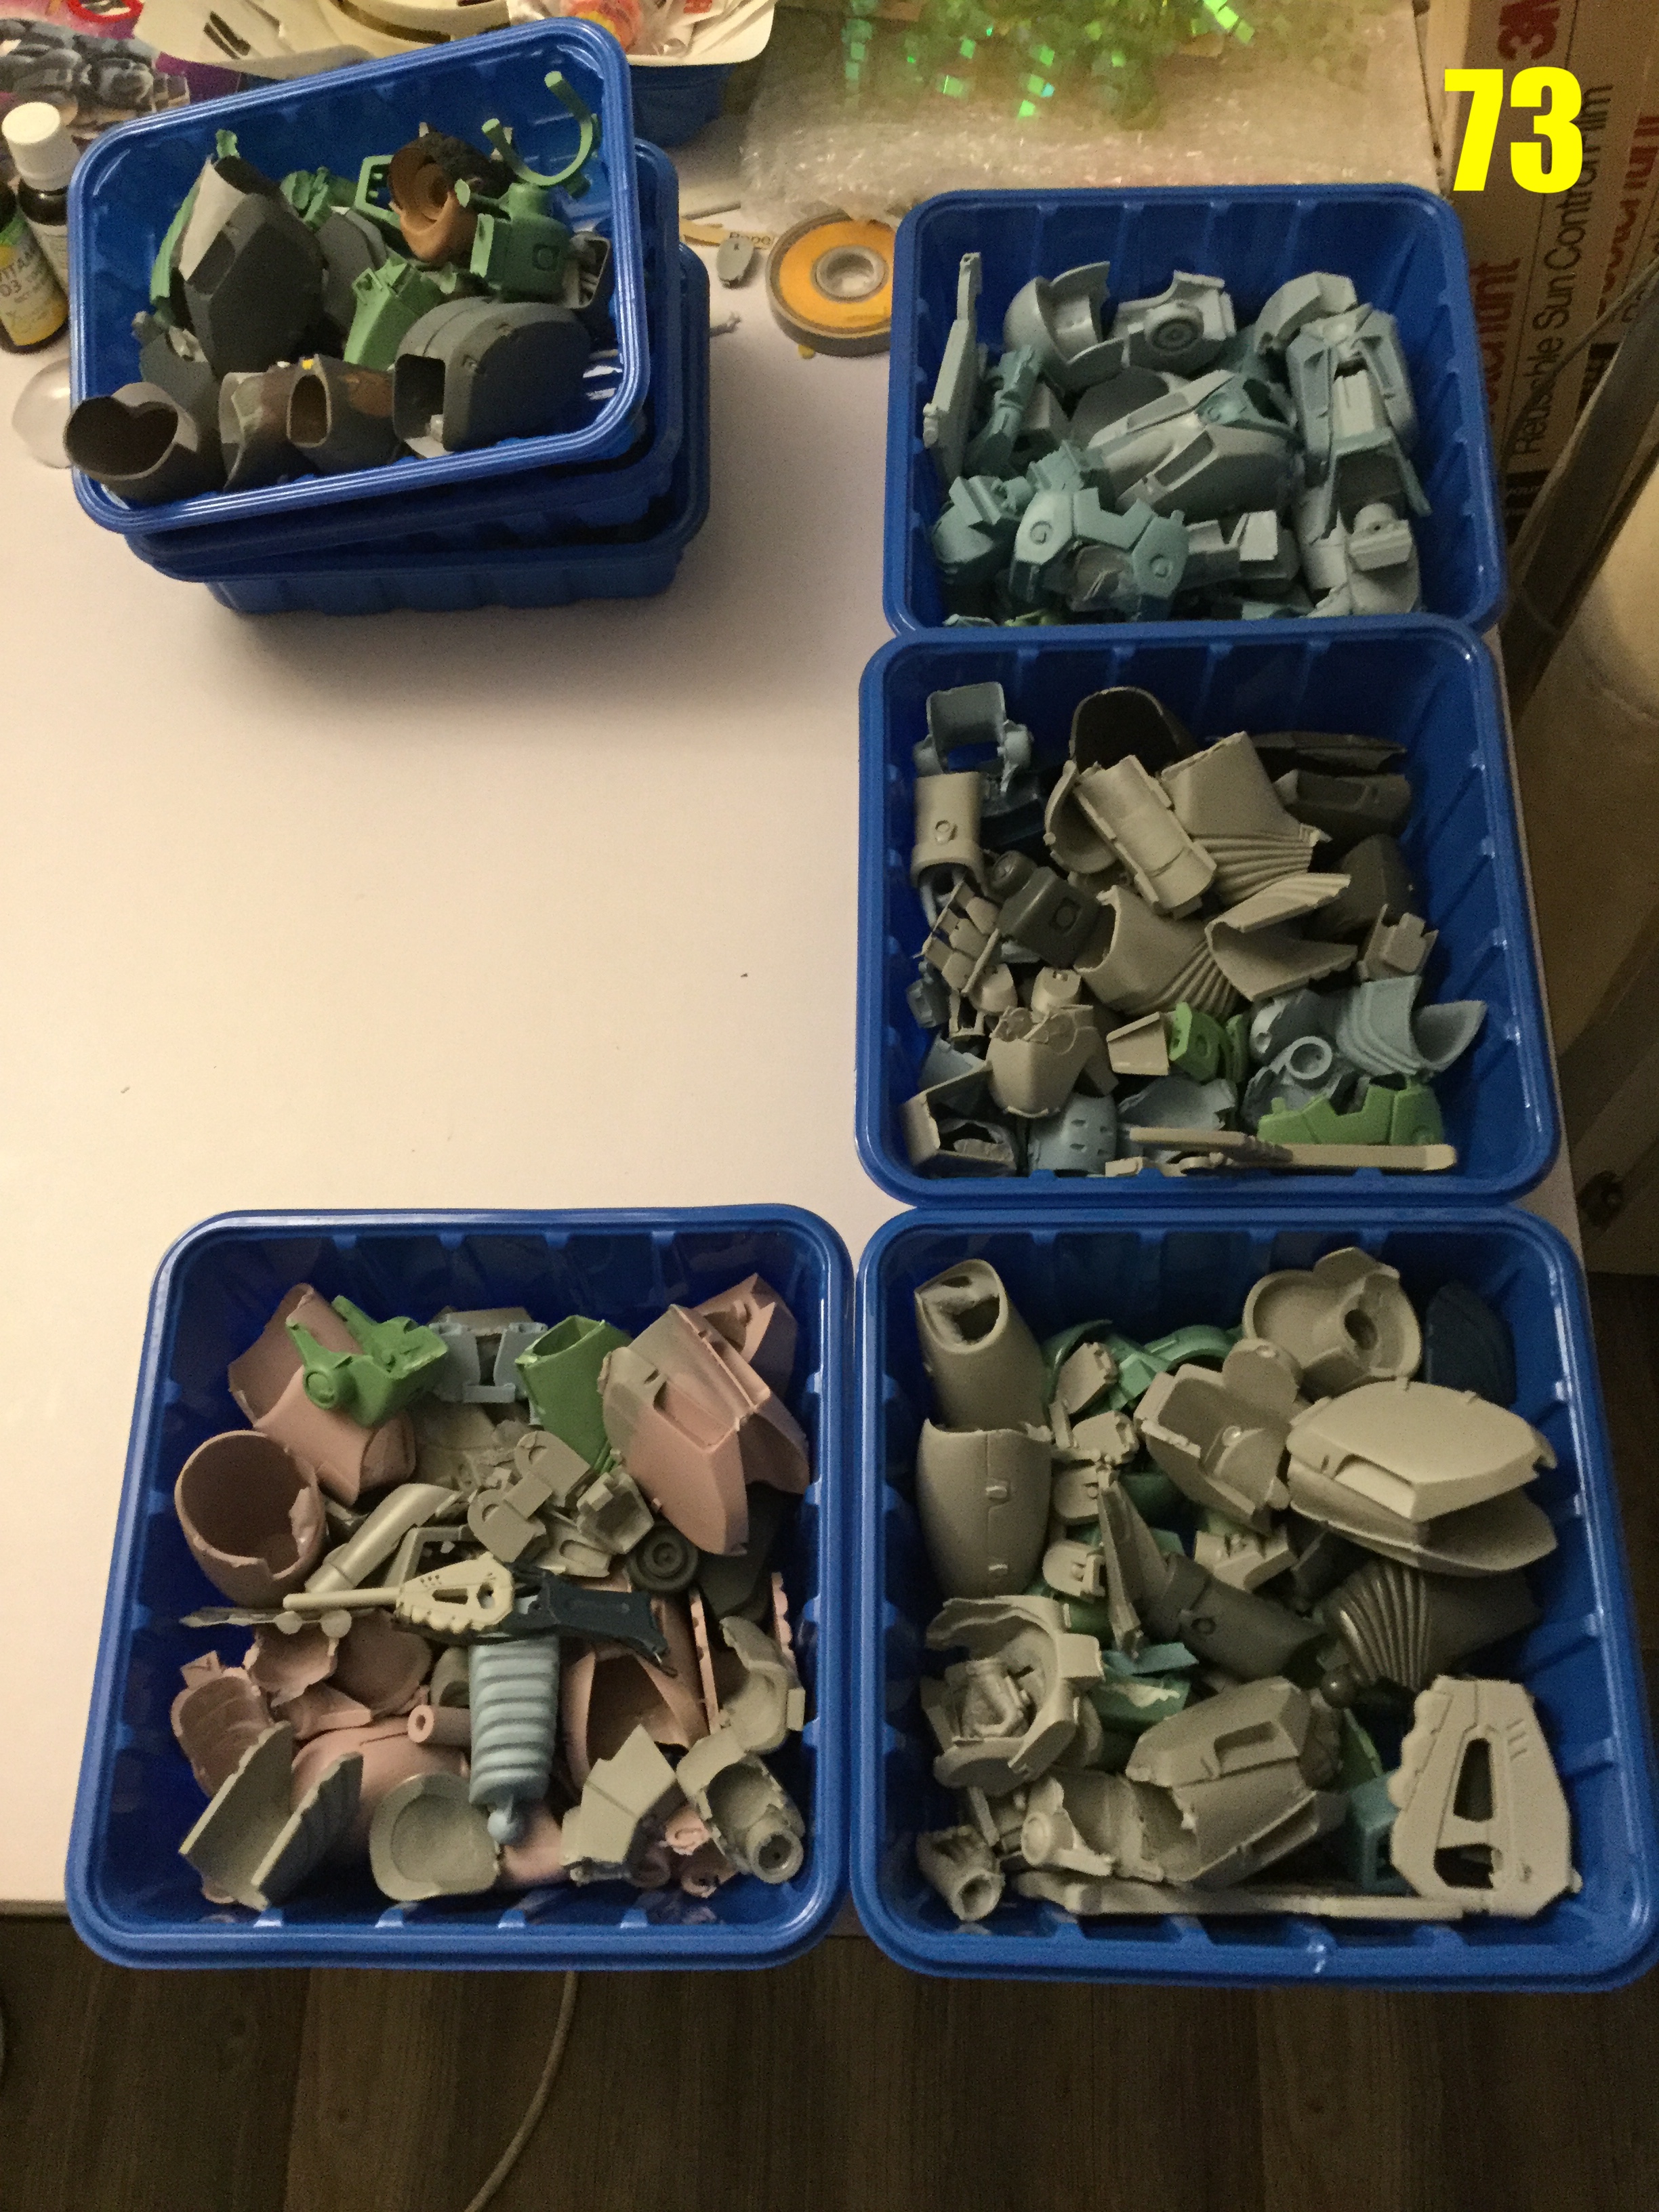
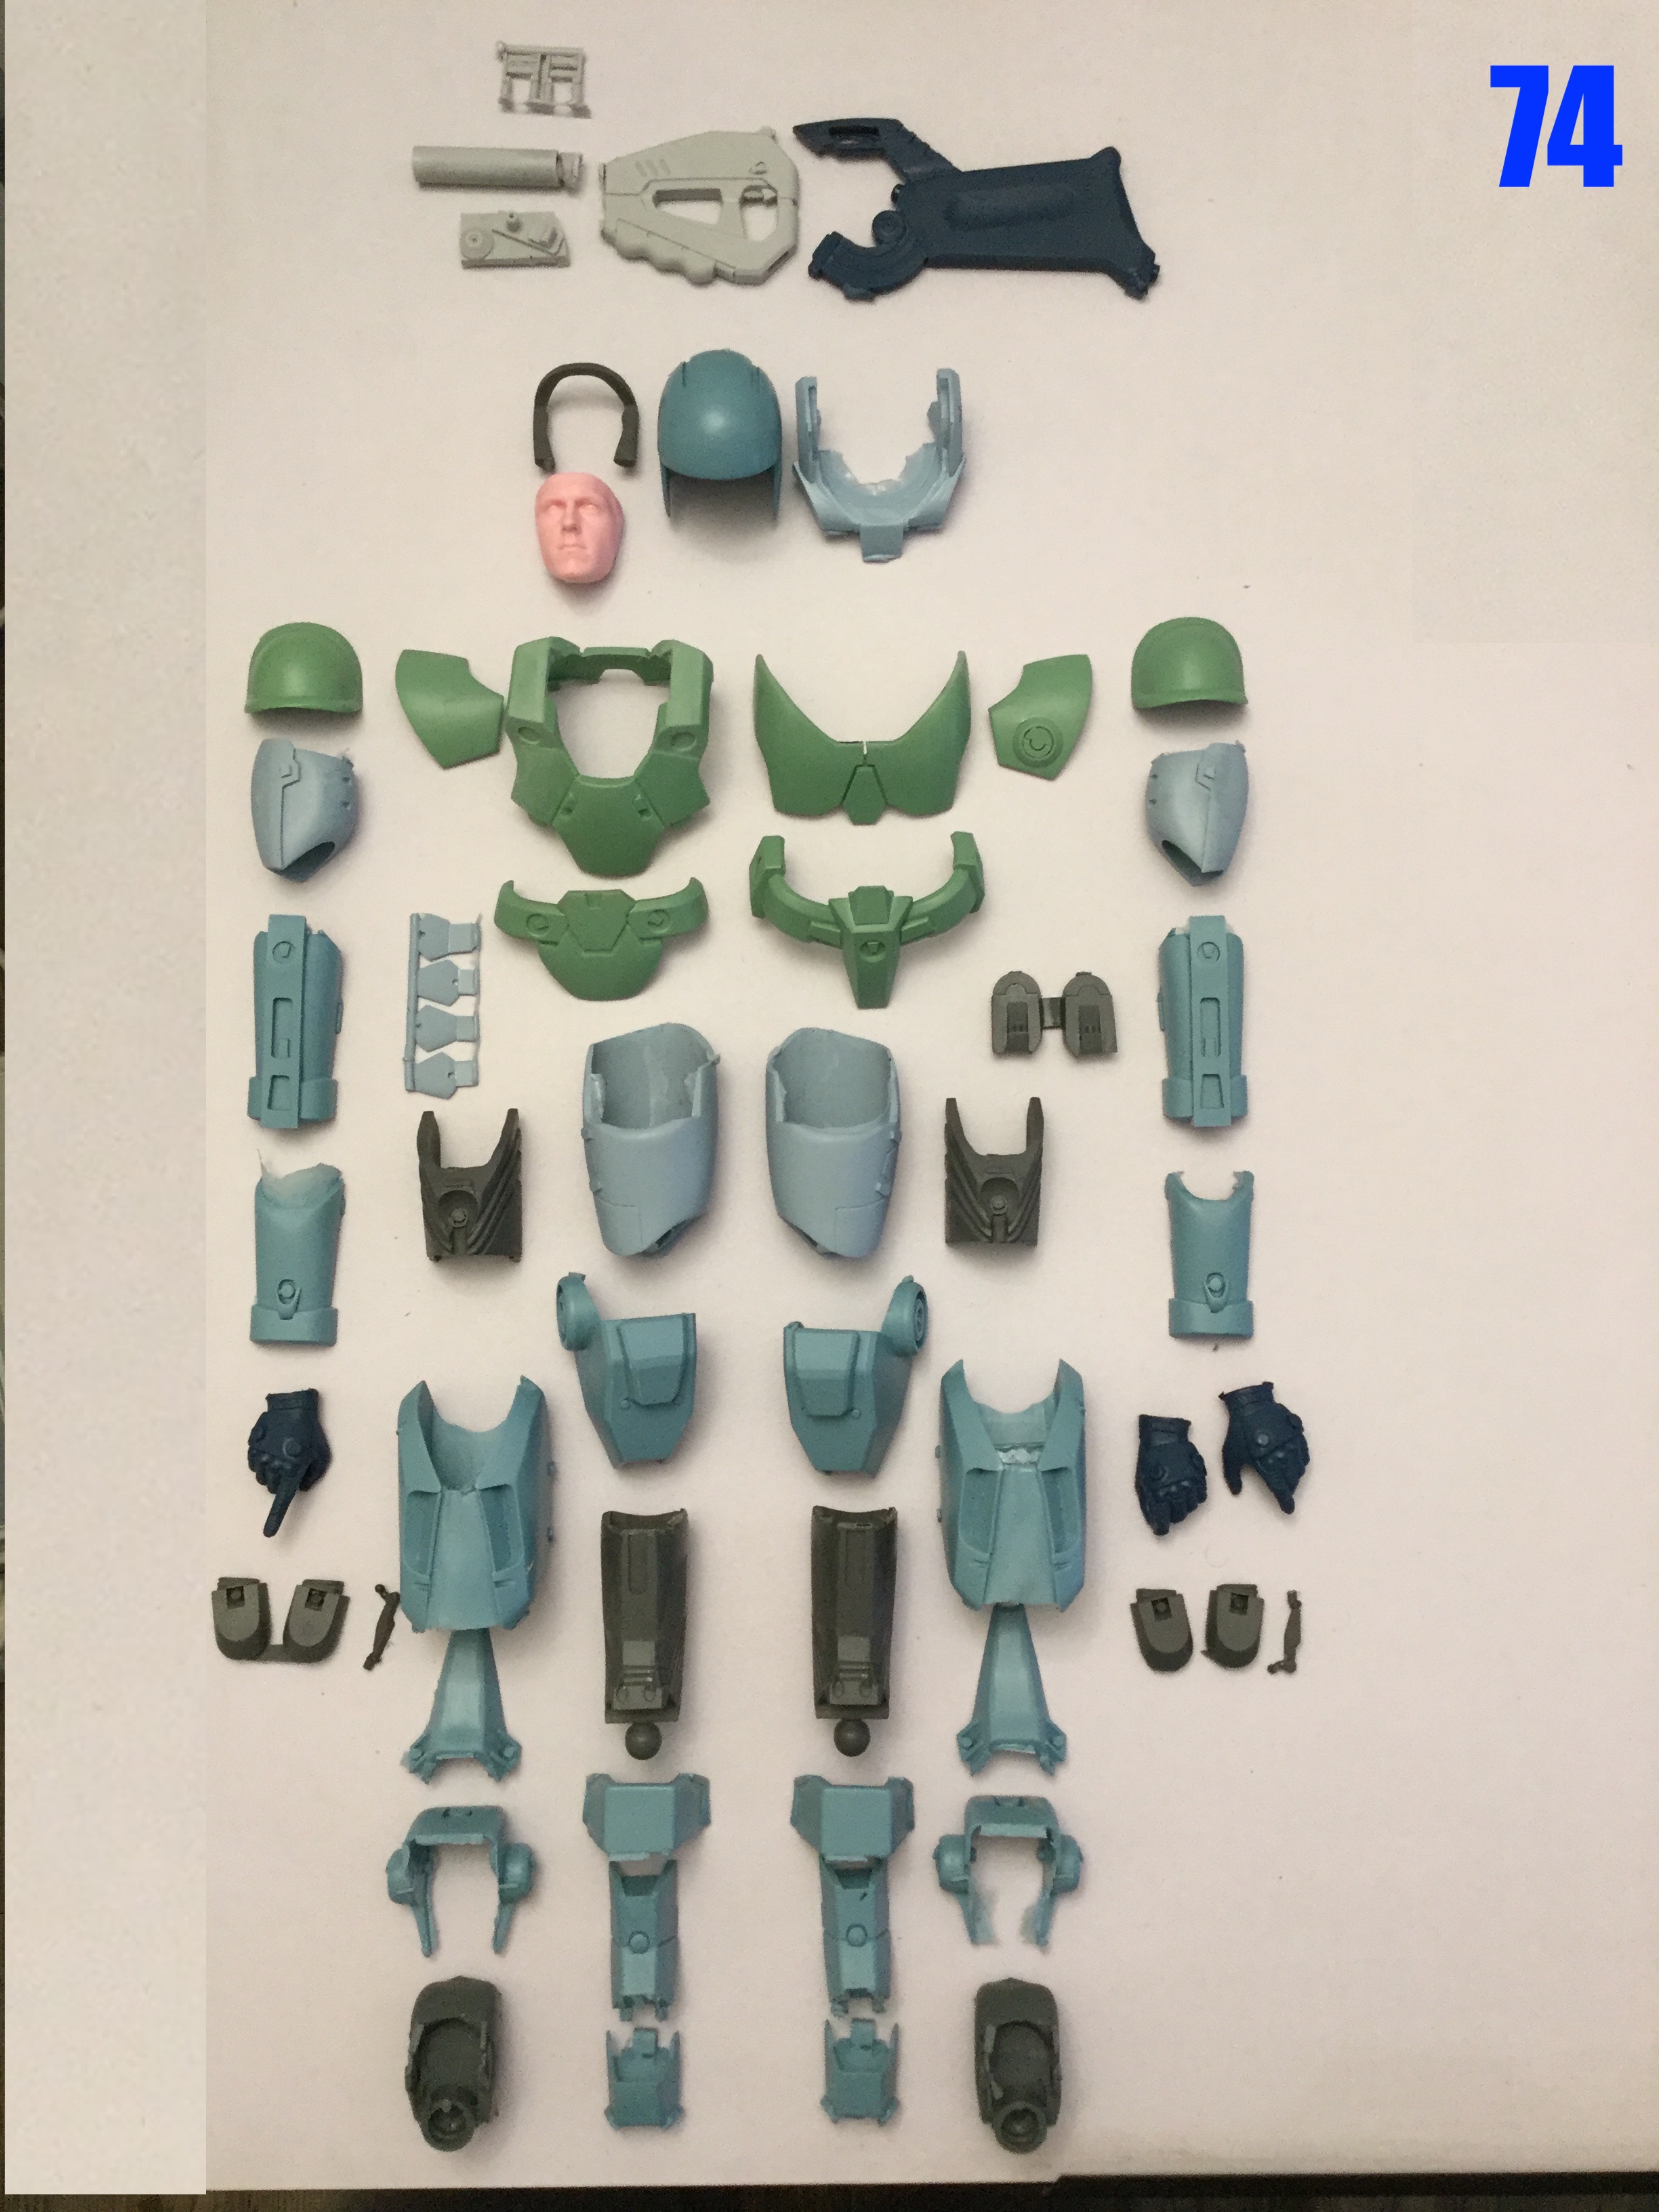
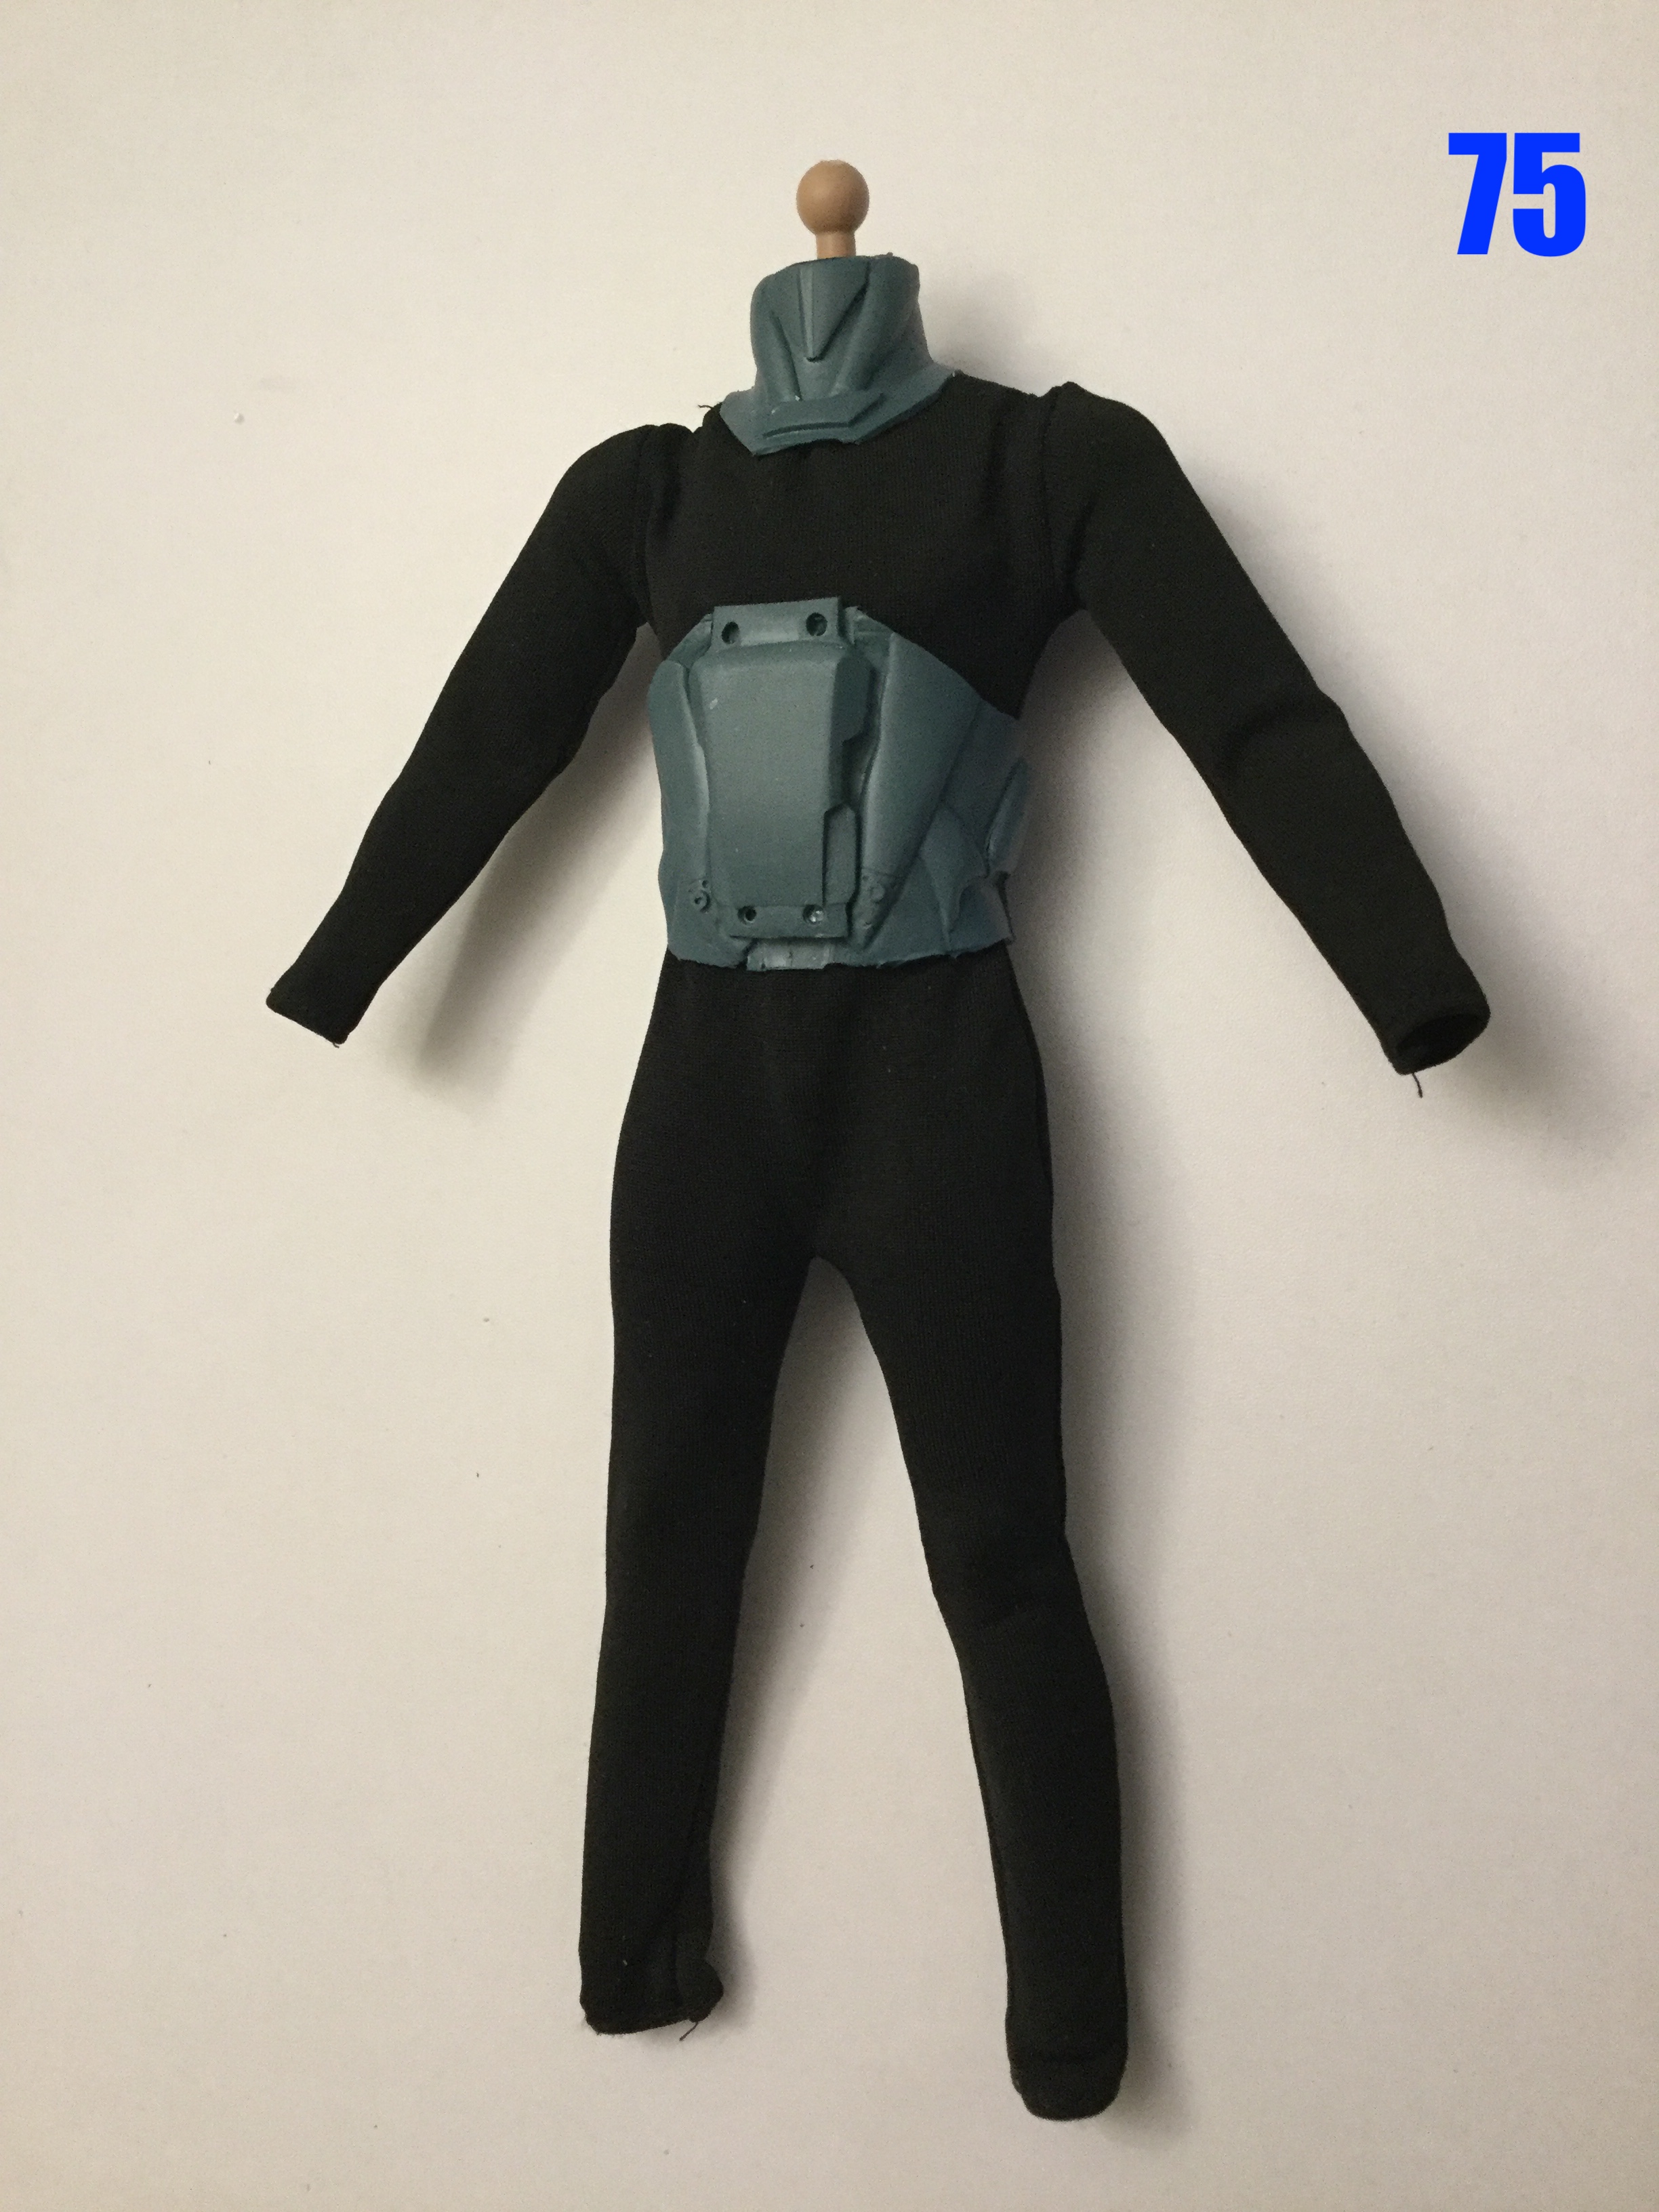
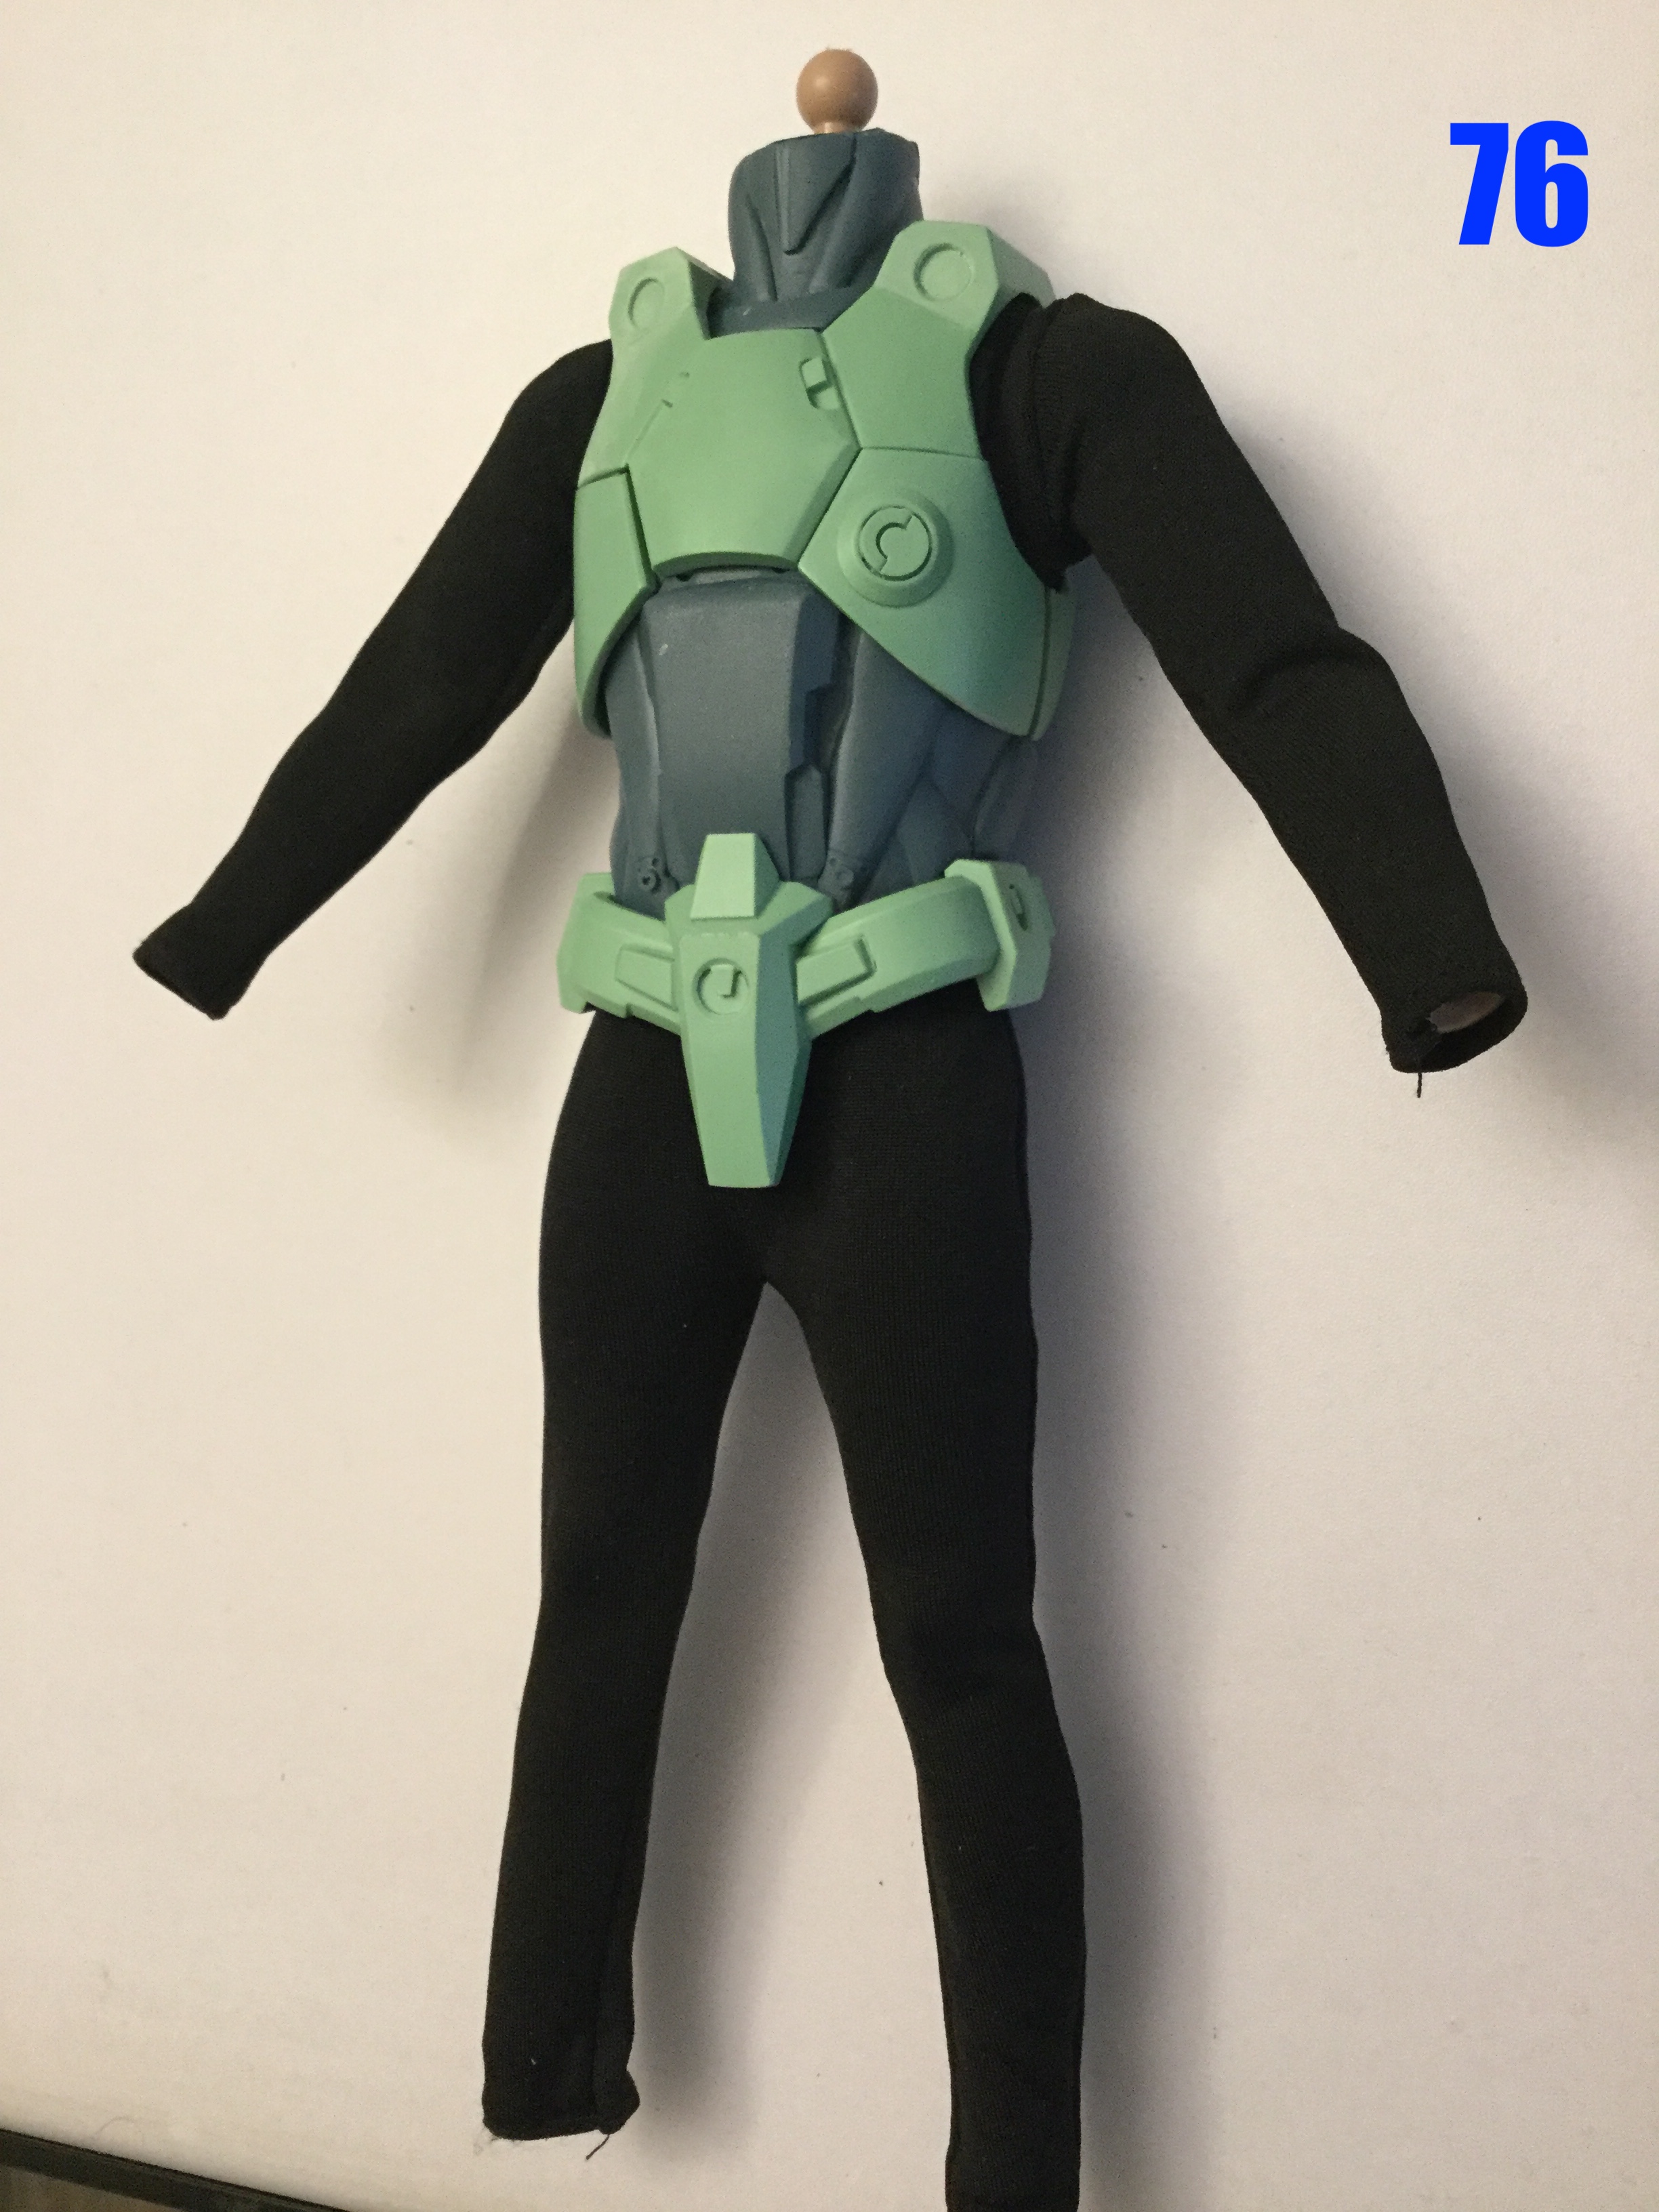
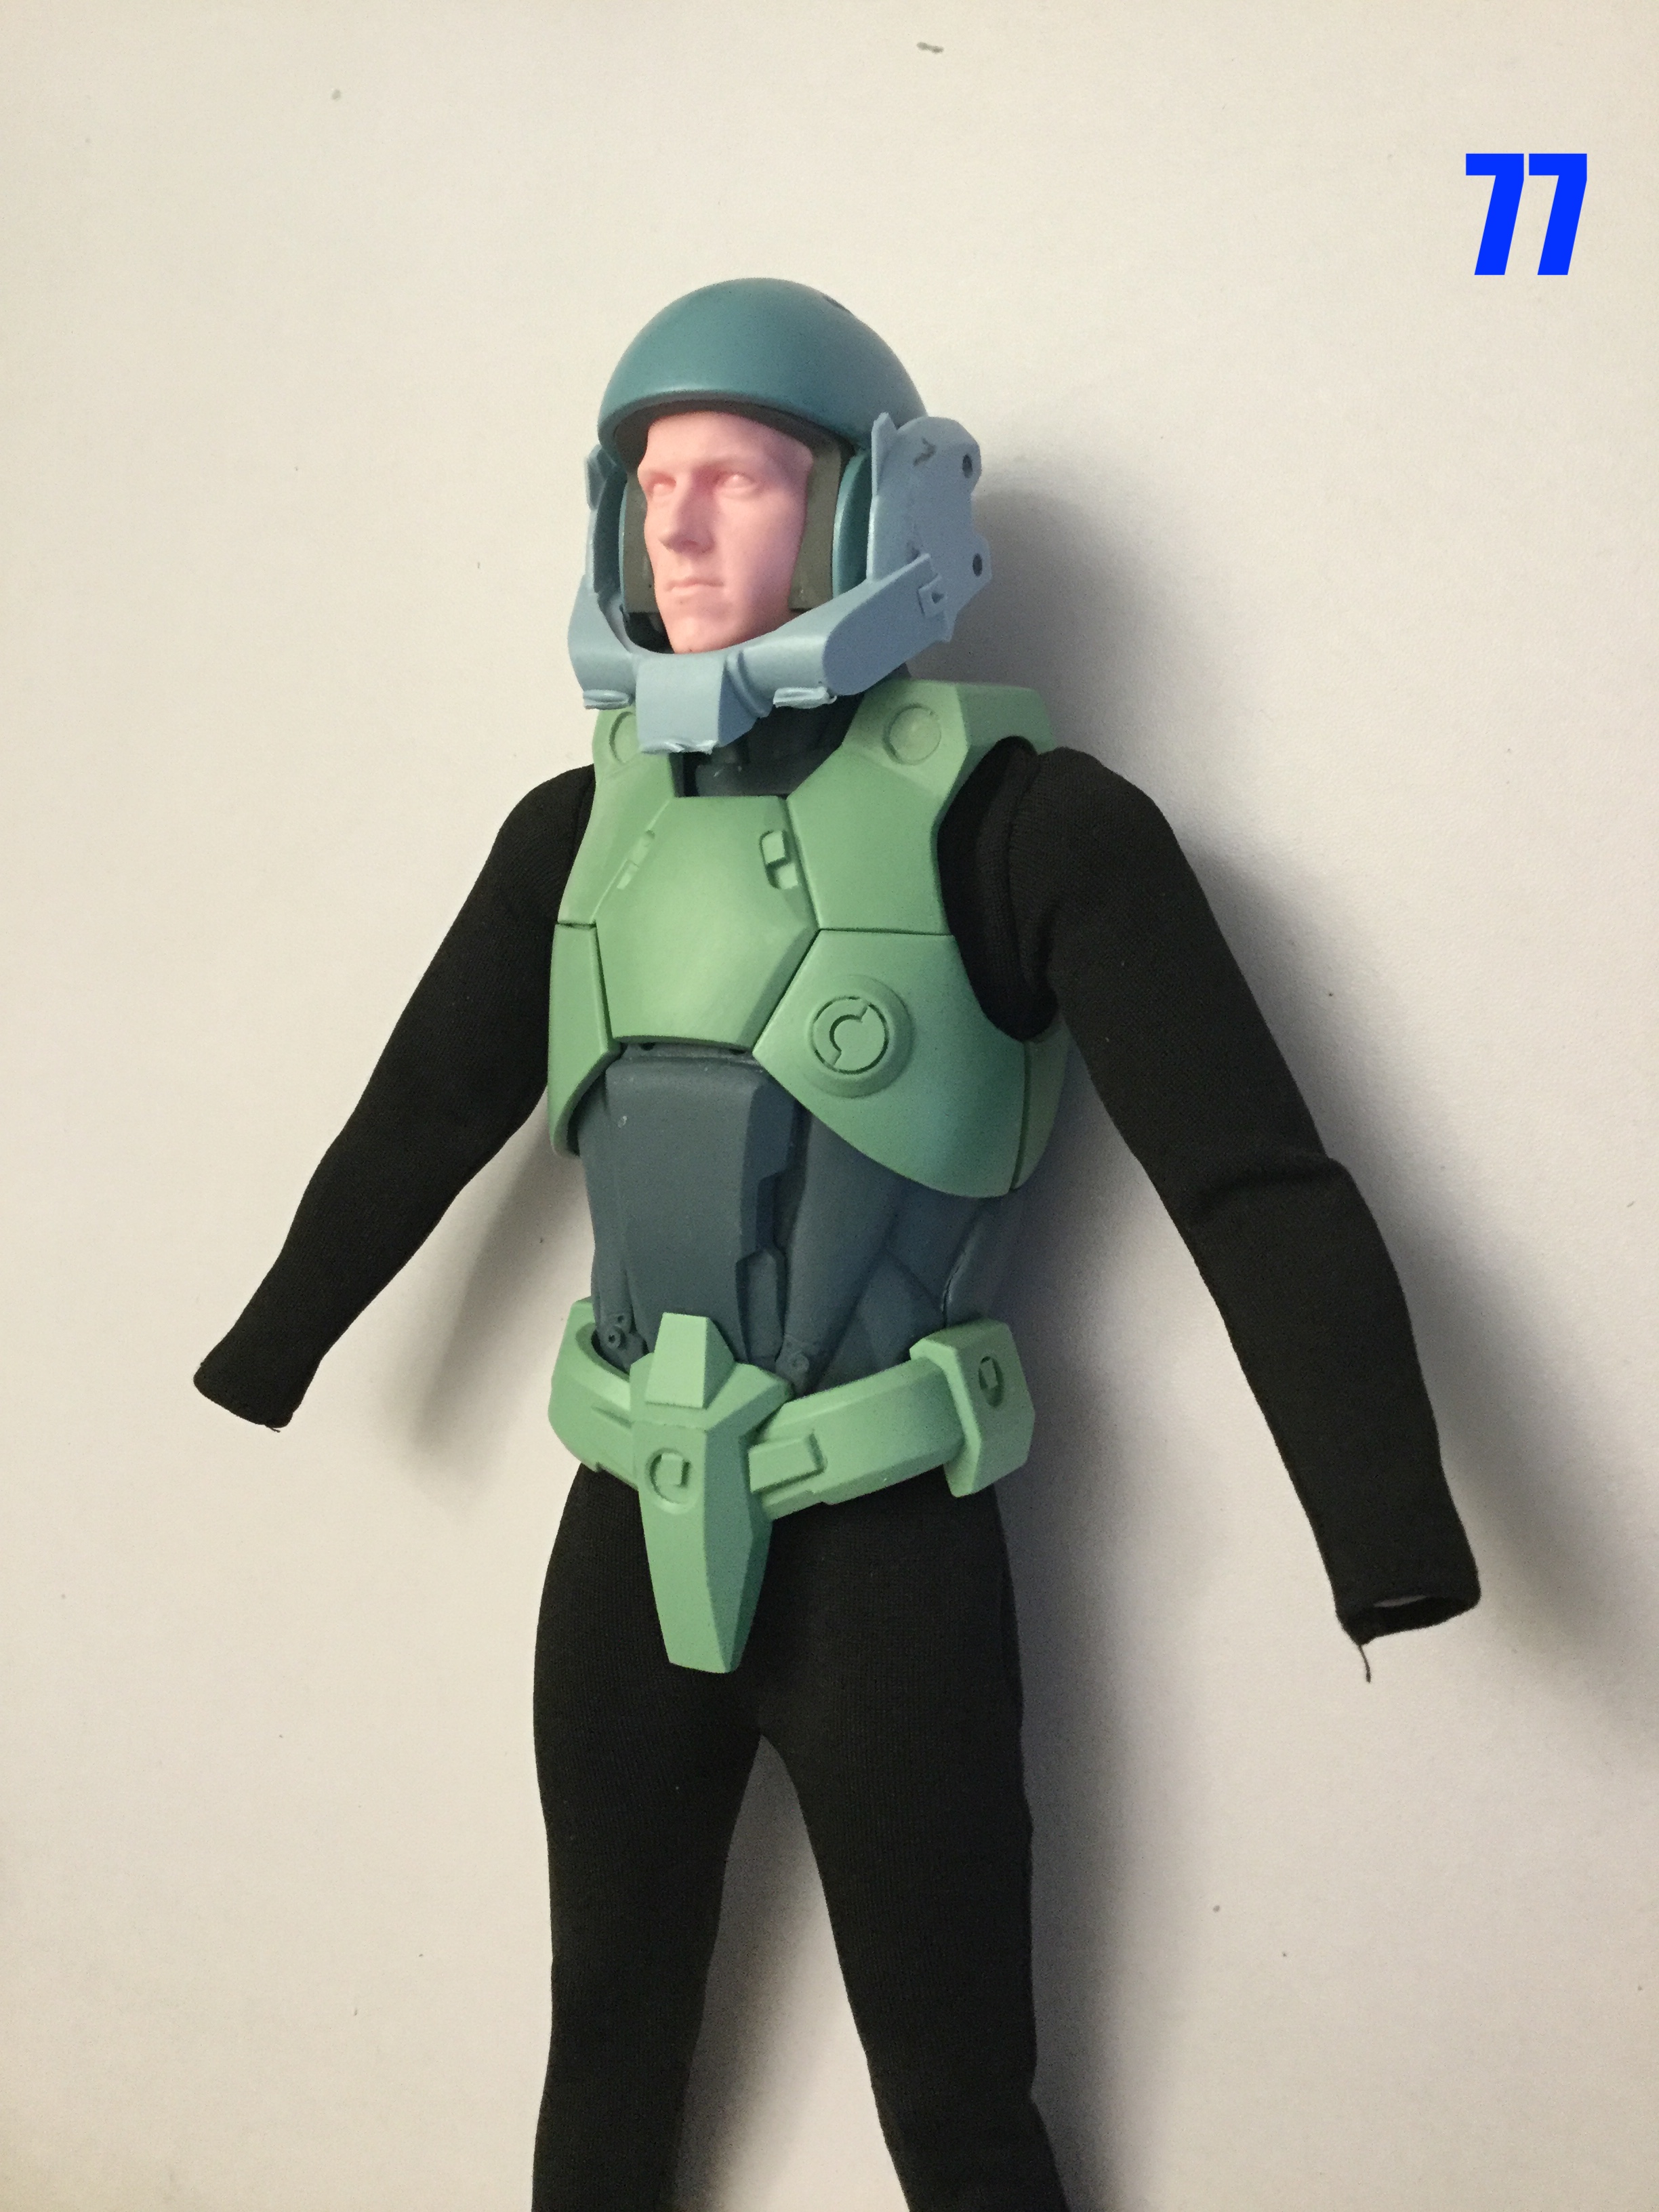
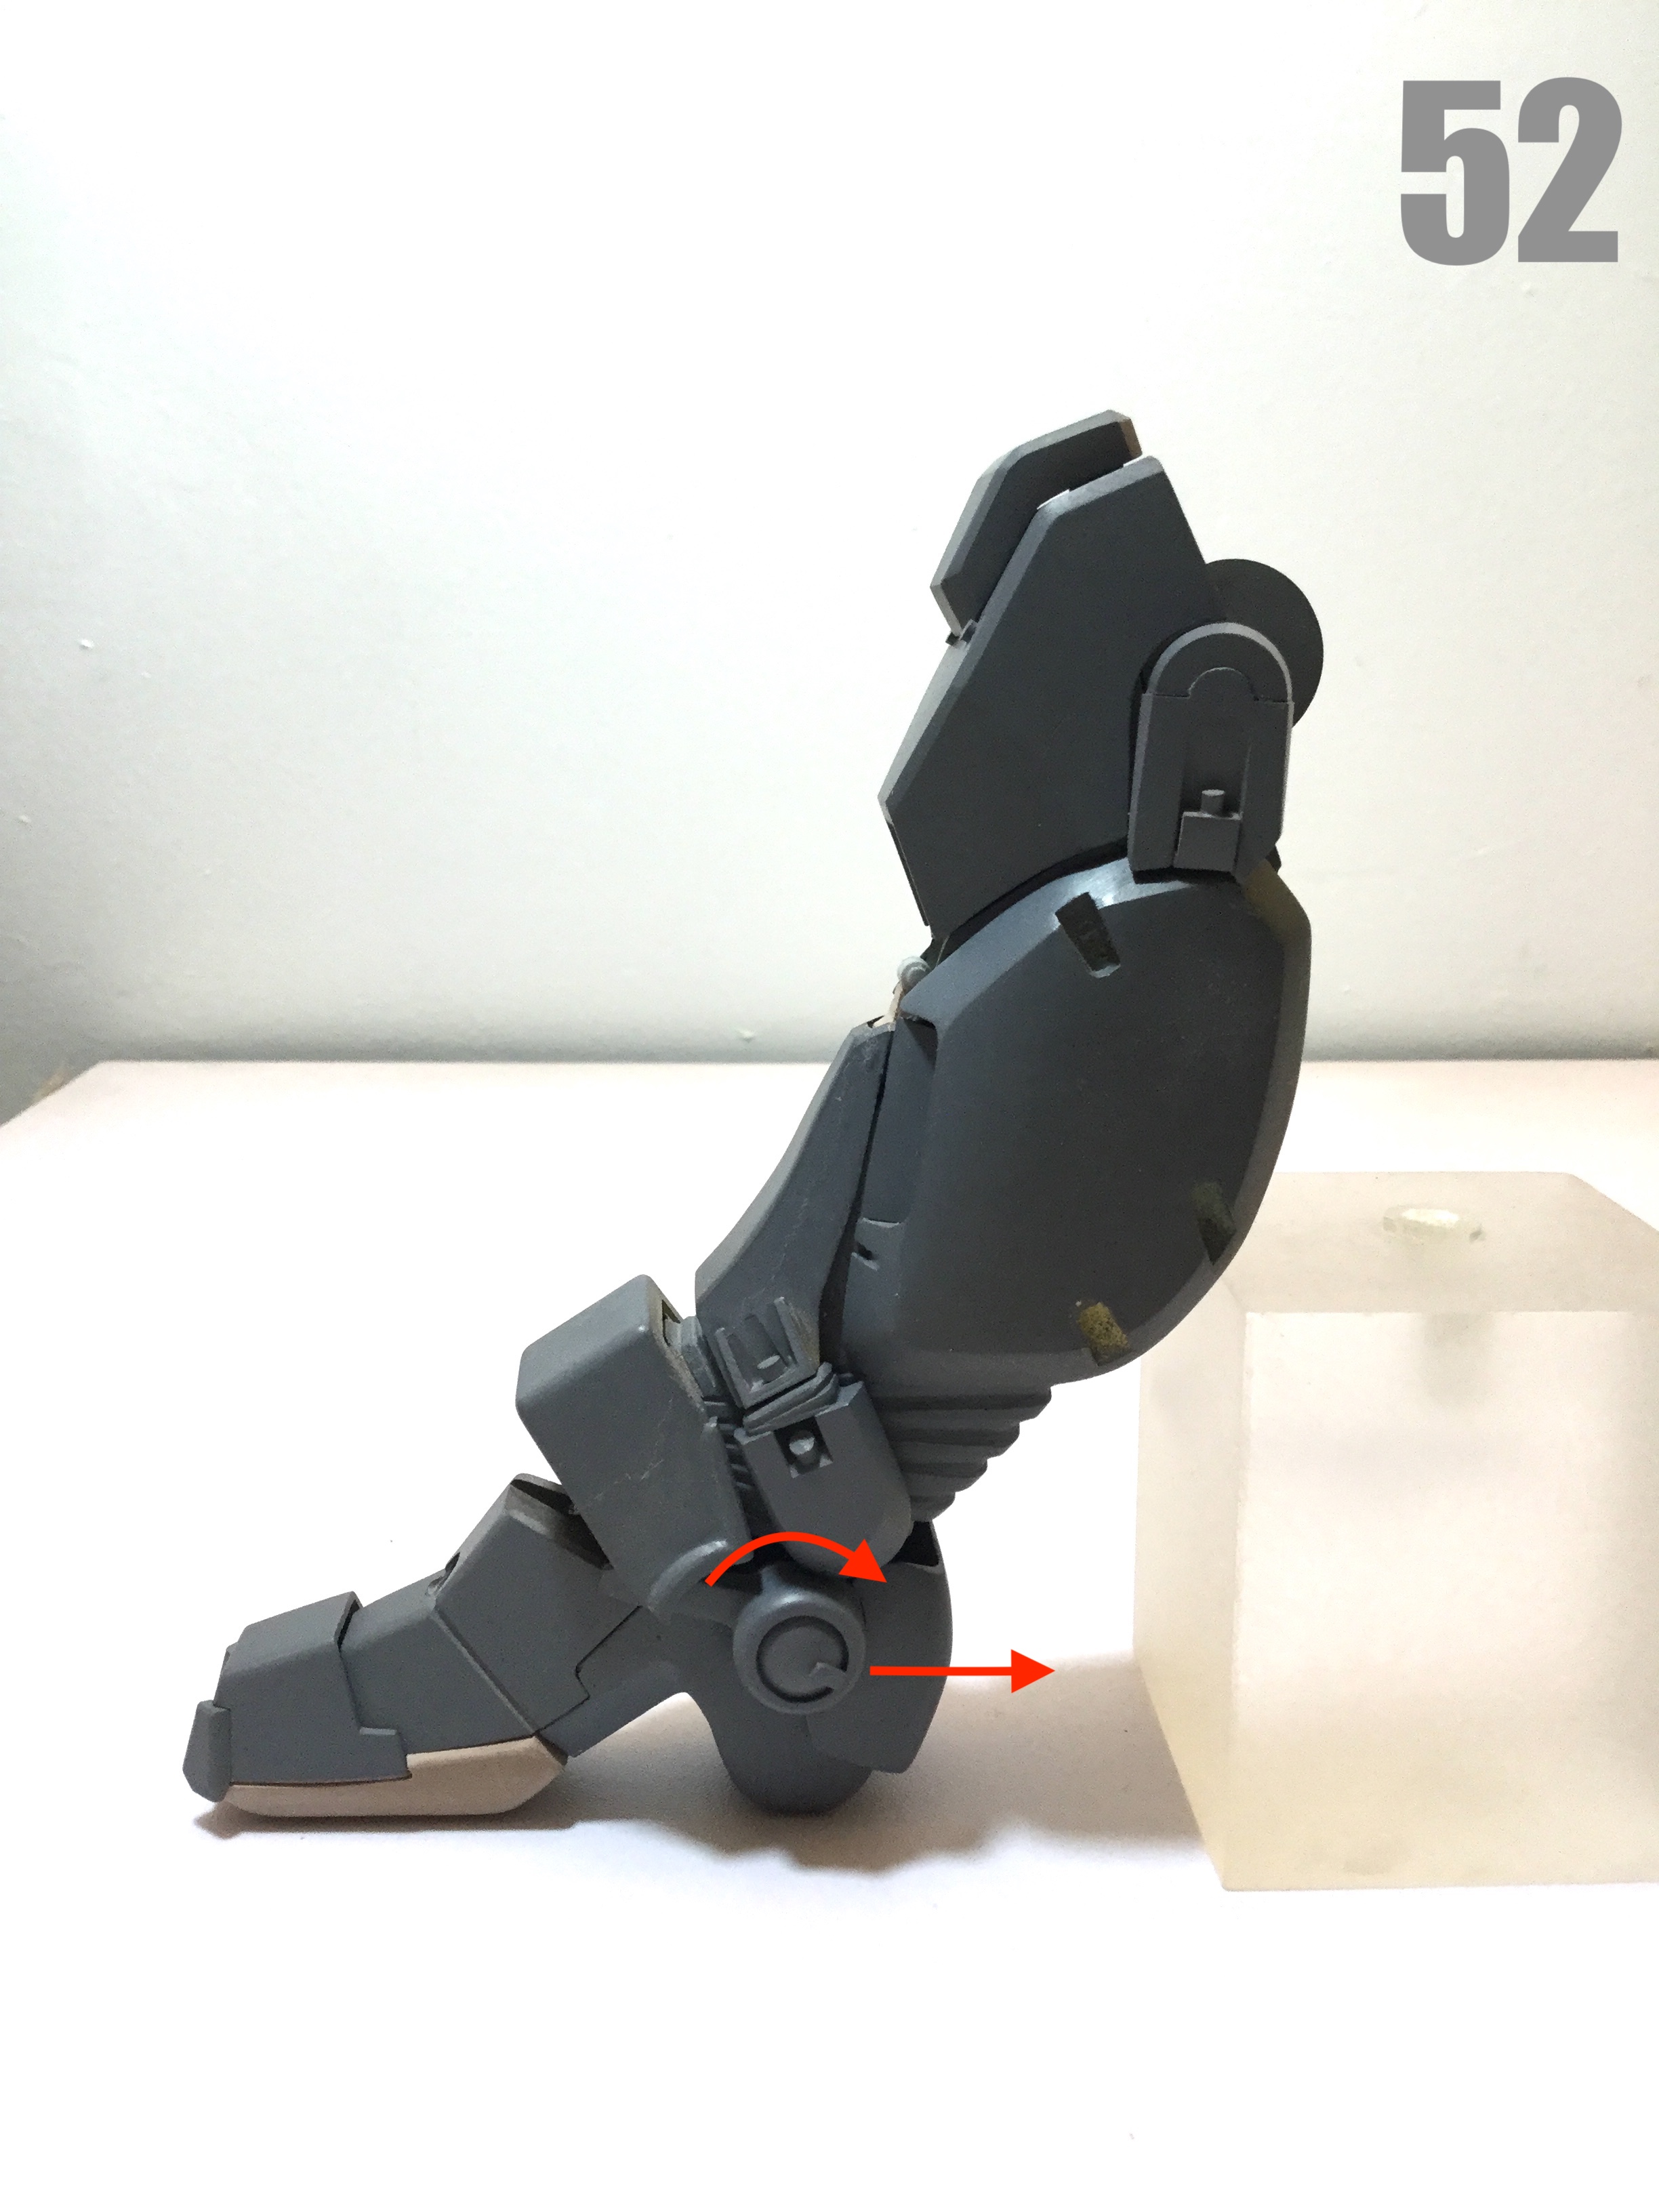
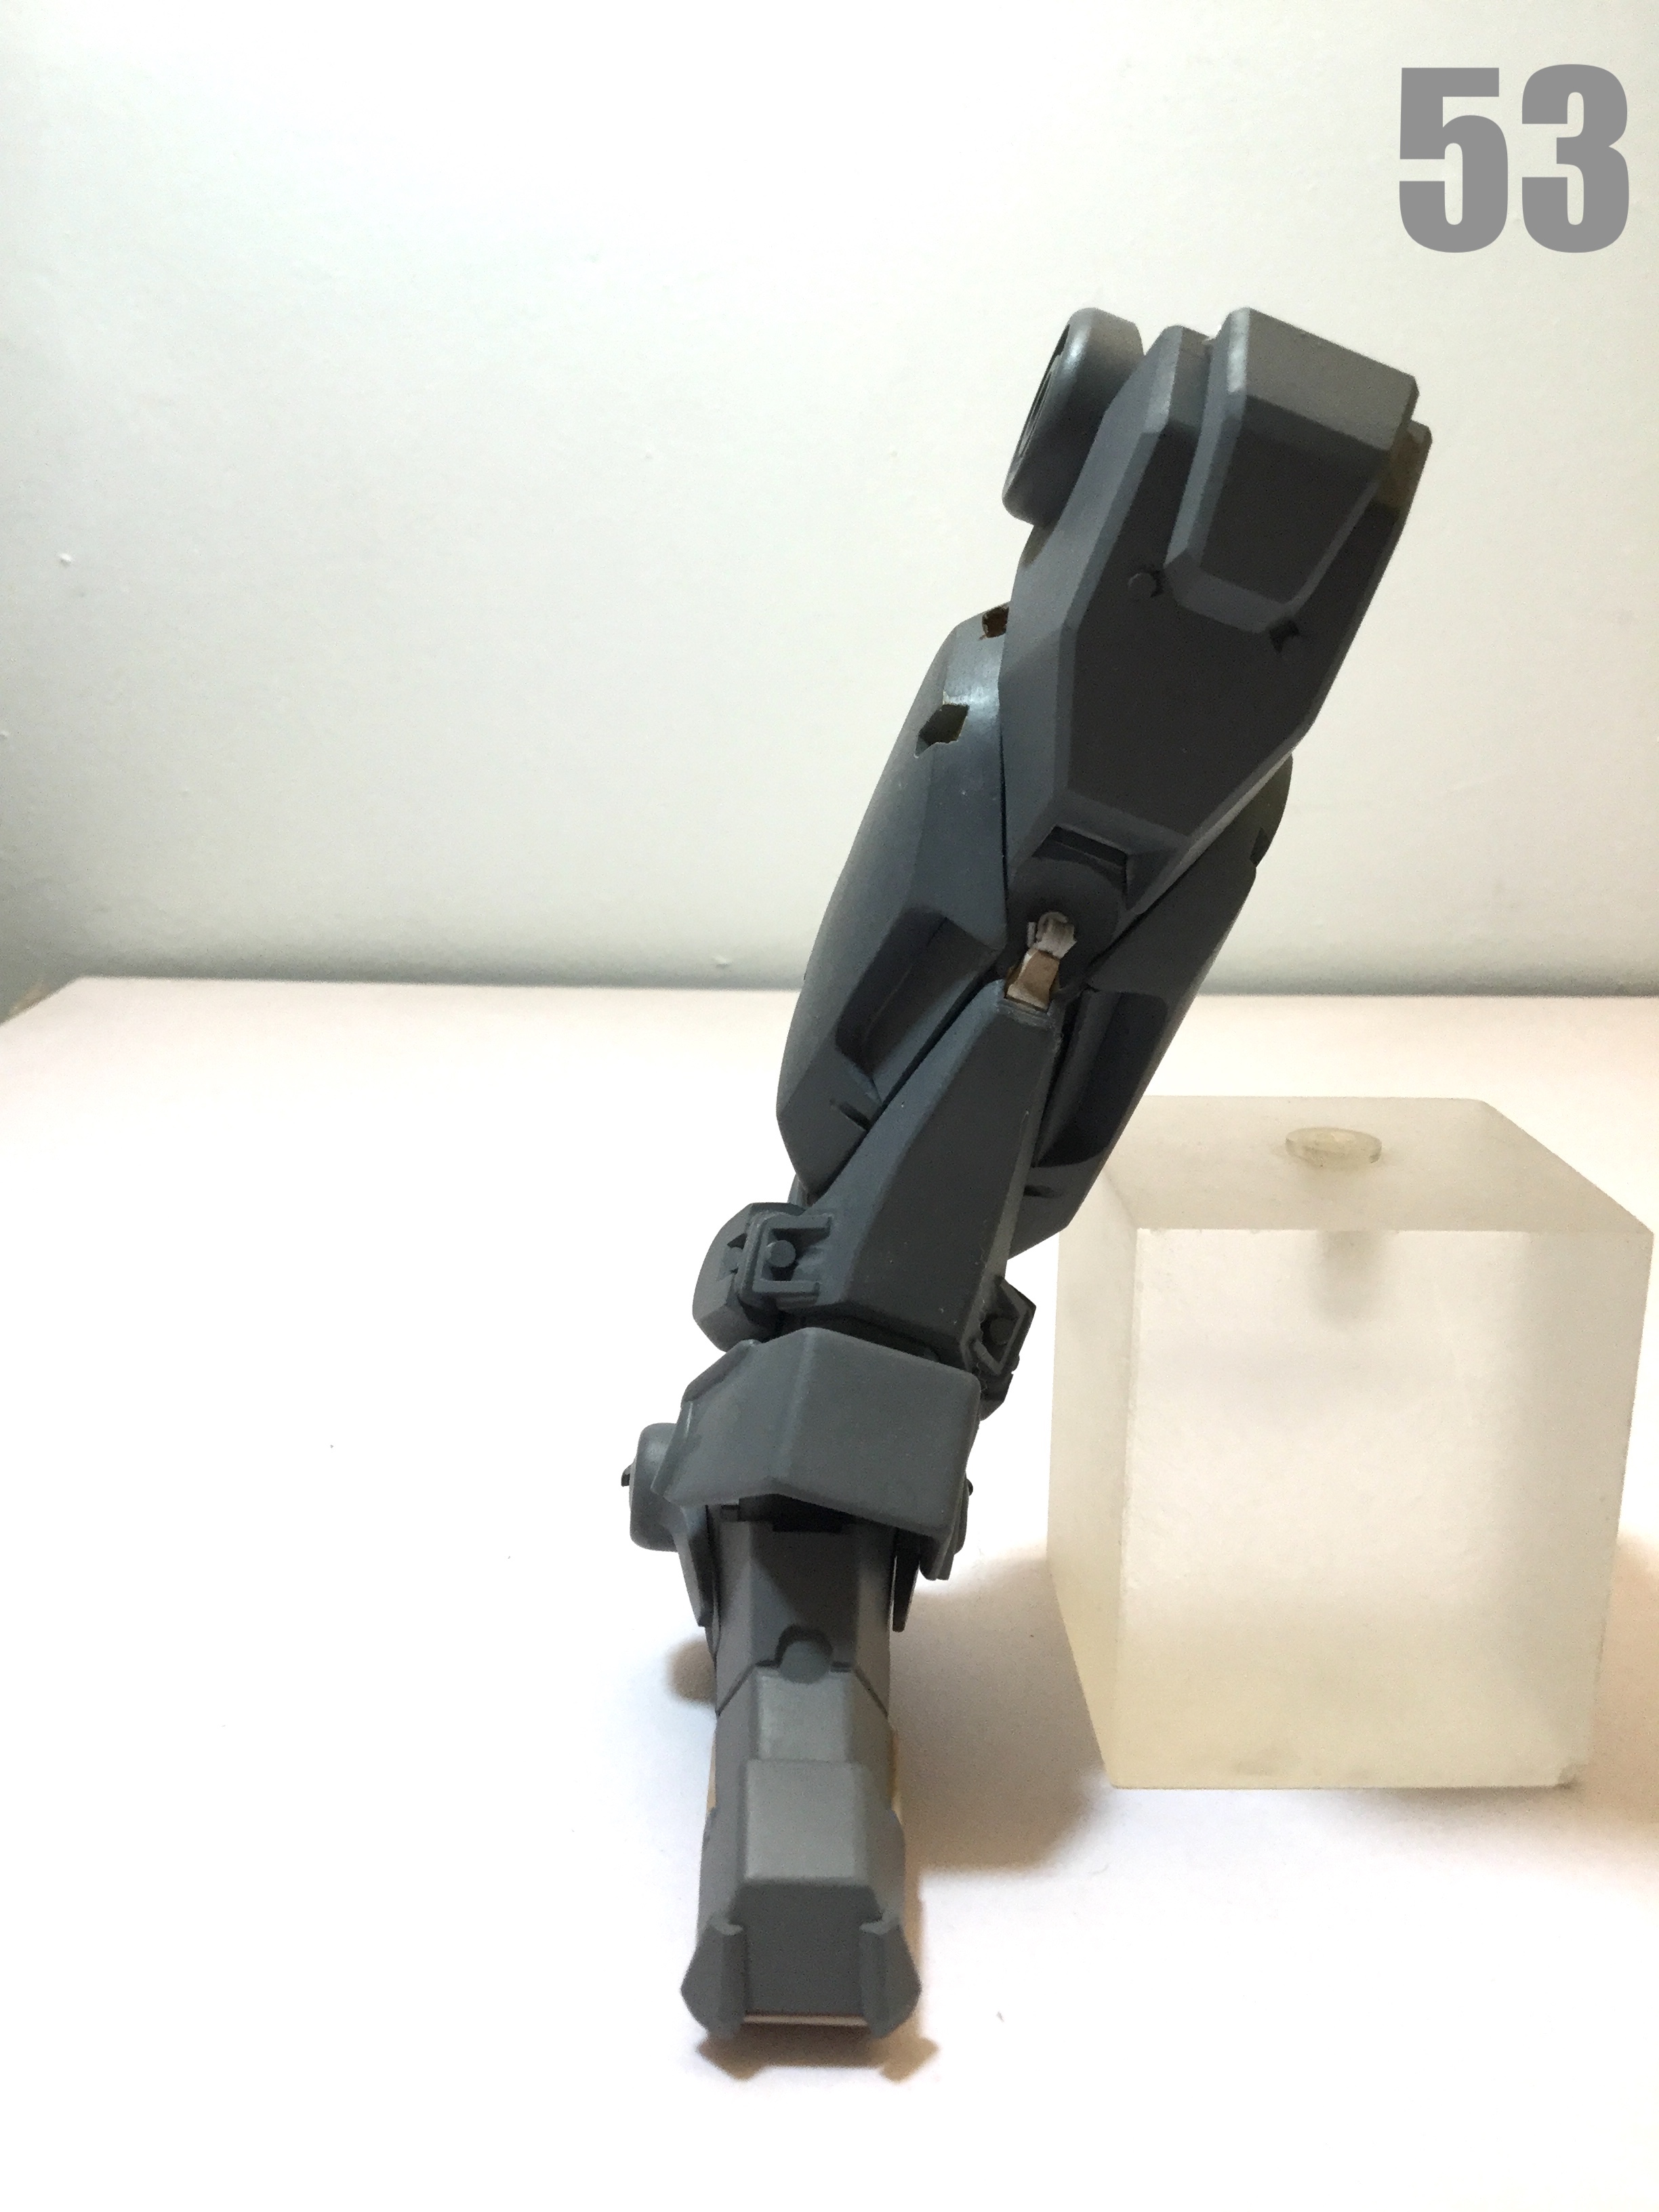
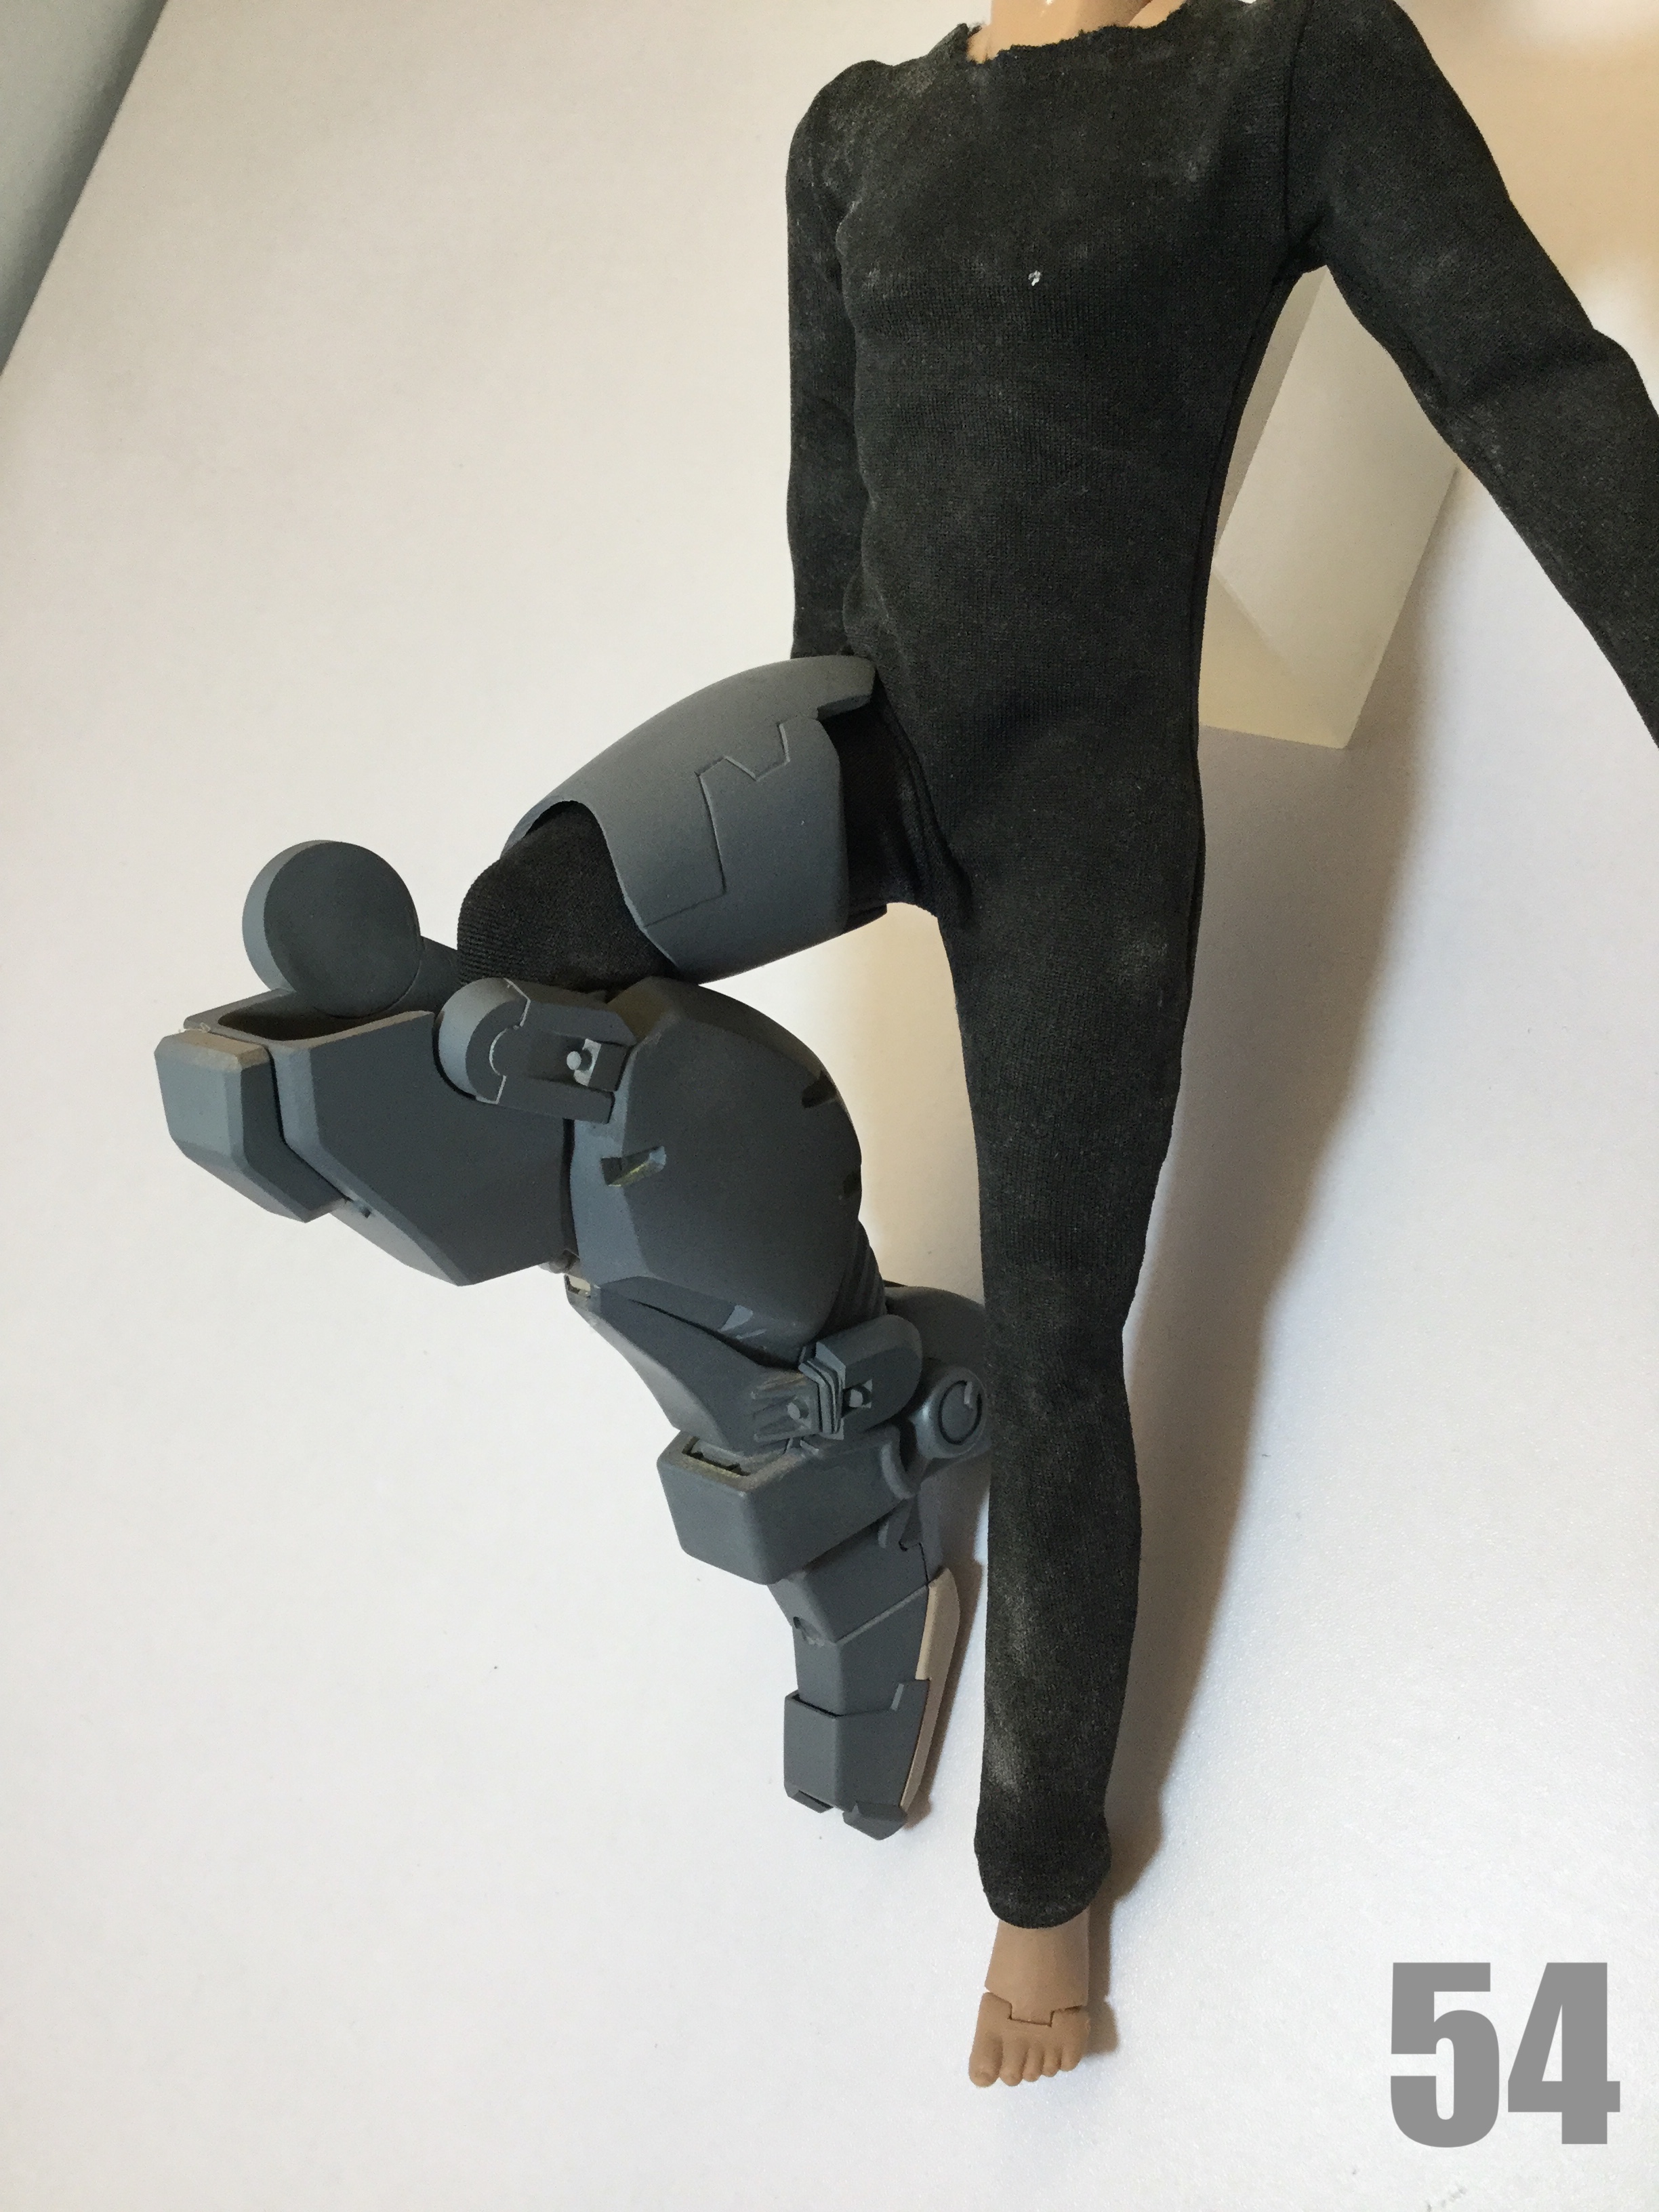
1/6 Motocycle Freak Scratchbuild Project Captain's log: Thursday January 12th, 2023 -Decals from Devin have arrived, and looking excellent! (pic 71) -Visor has been molded (pic 72 shows the original master, before the mold goo was poured) -First kits are being cast (pic 73) -My own kit, color-coded, as this will help with paint calls when making the instruction sheet (pic 74) -Flexible parts installed—check! (pic 75) -Flexible parts, armor parts and onesie interfacing perfectly—check! -Beginning to assemble my own figure for publicity shots—check! Next week, you'll be able to see the full figure in all its glory!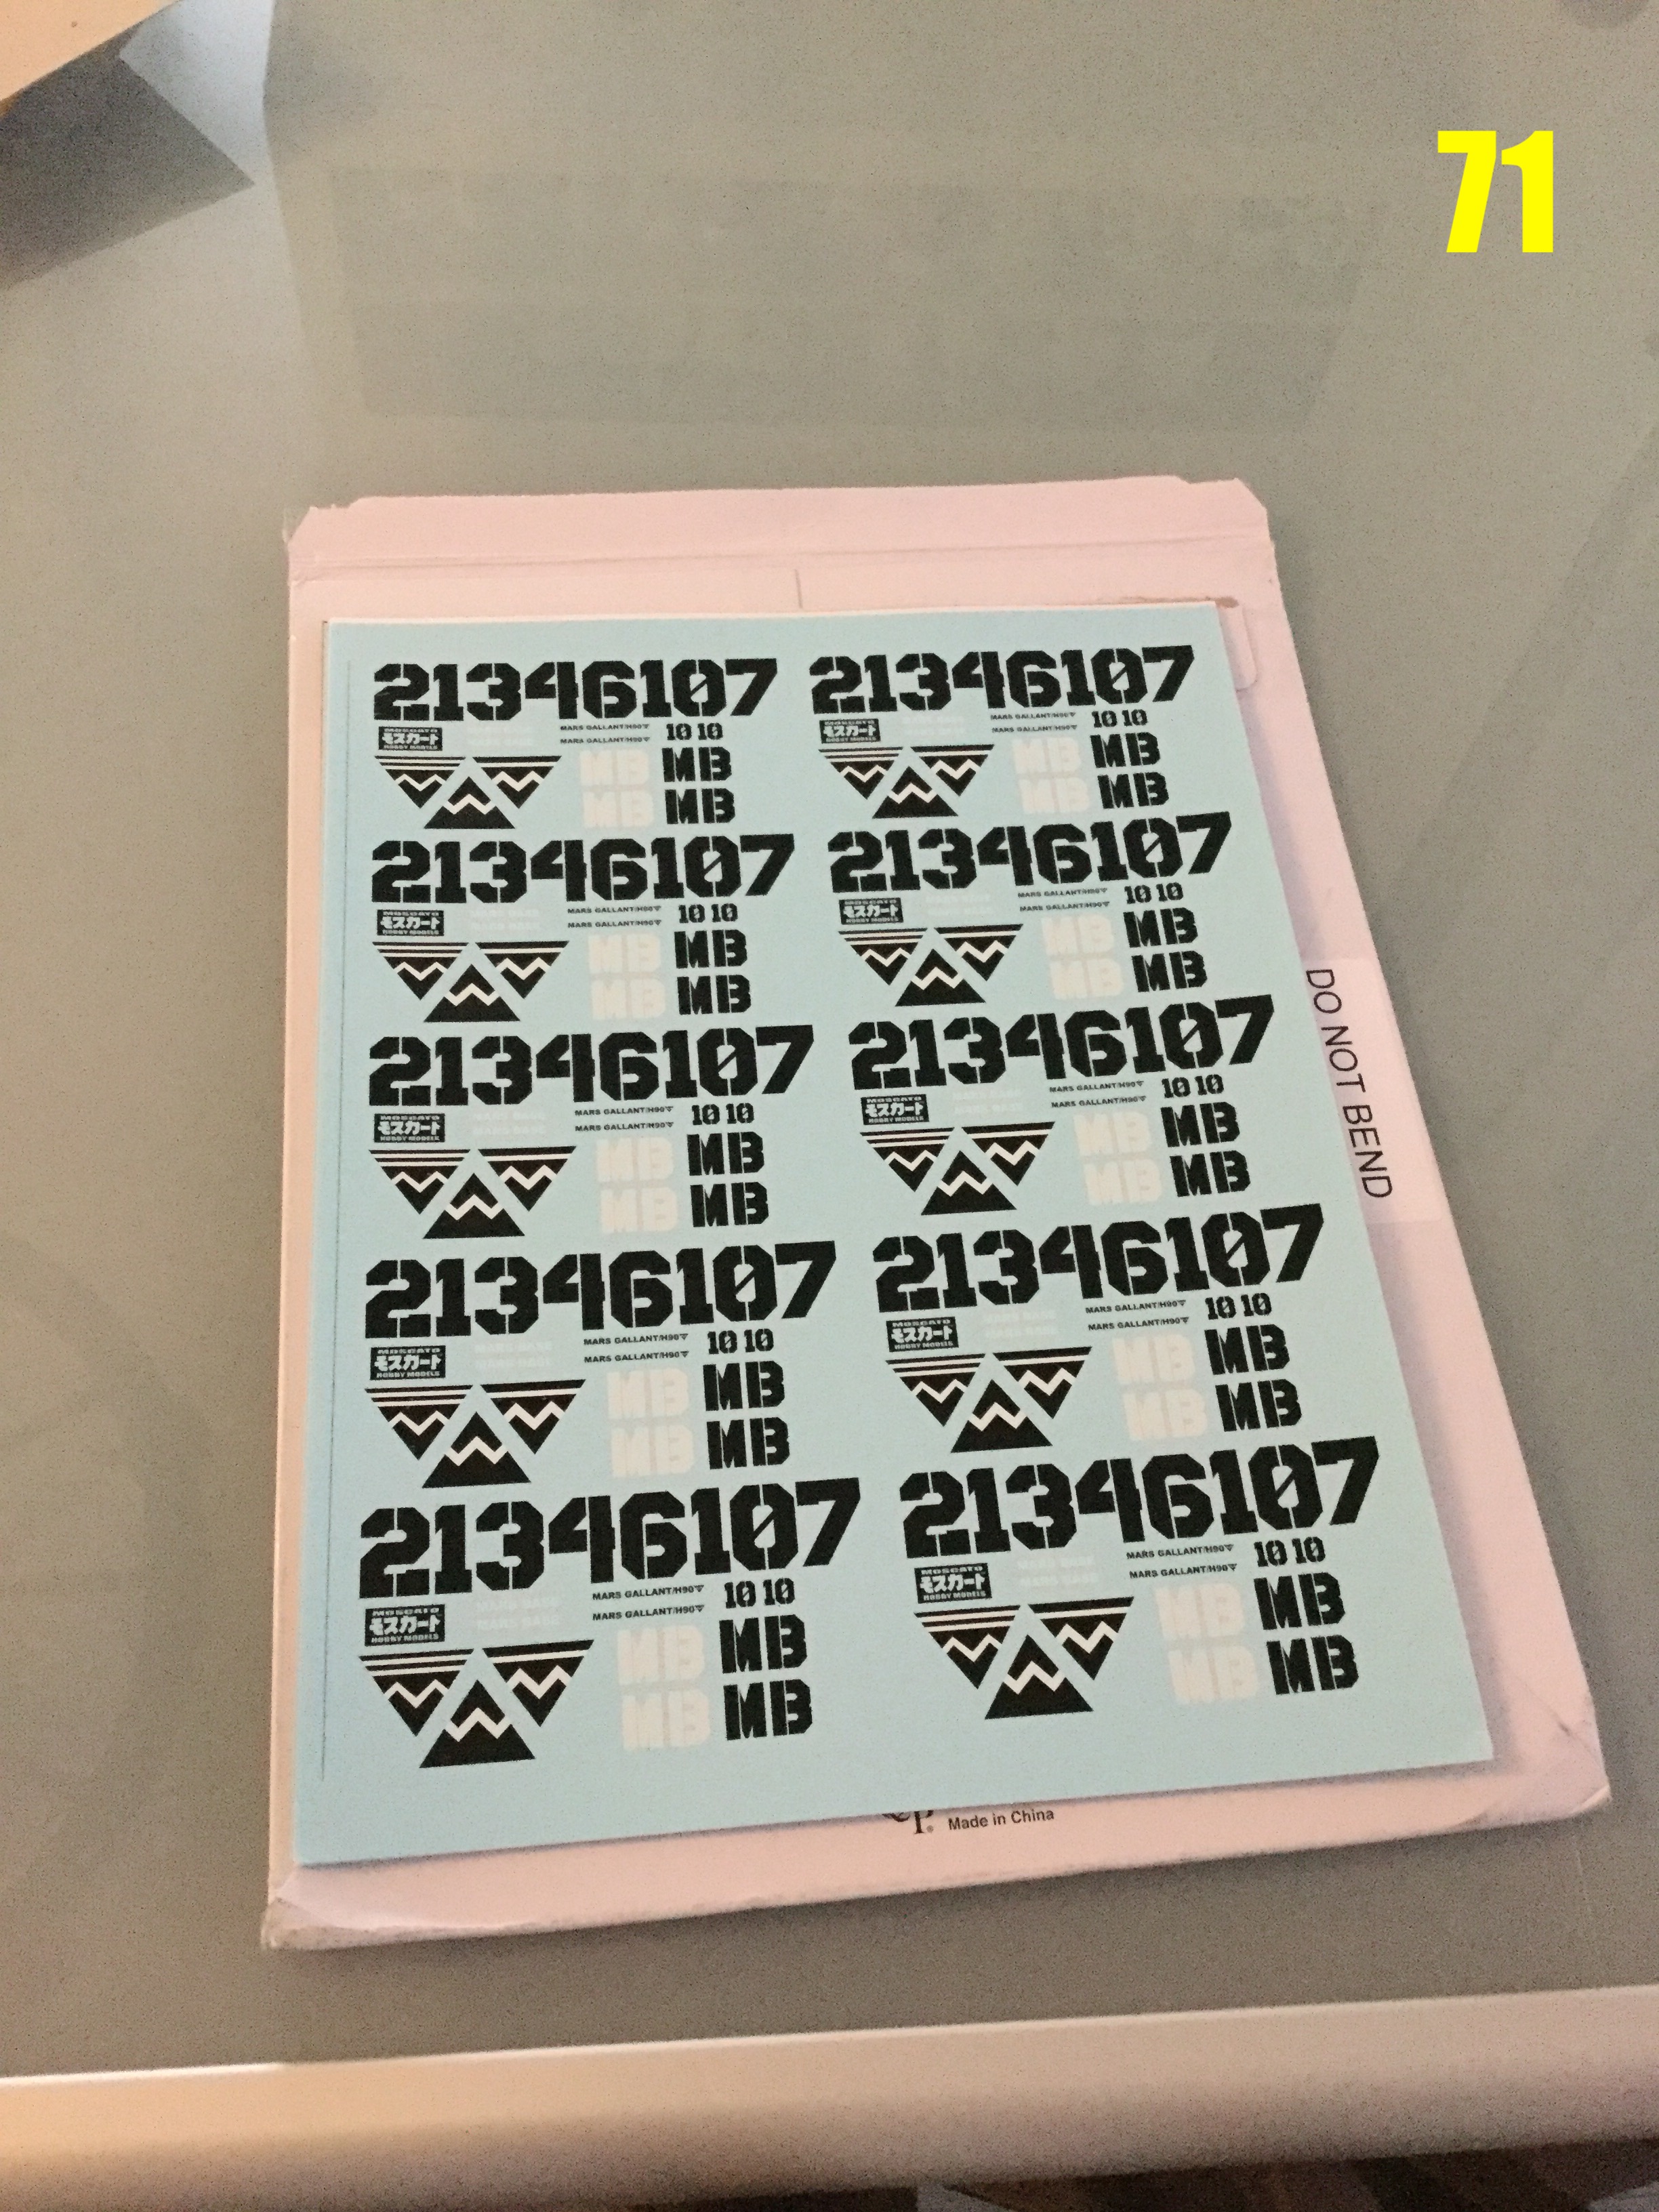
-
Fang of the Sun: Dougram
captain america replied to DestroidDefender's topic in Anime or Science Fiction
The Bigfoot looks even cooler than the Dougram. -
1/6 MOSPEADA Rider Project Proposal
captain america replied to captain america's topic in Anime or Science Fiction
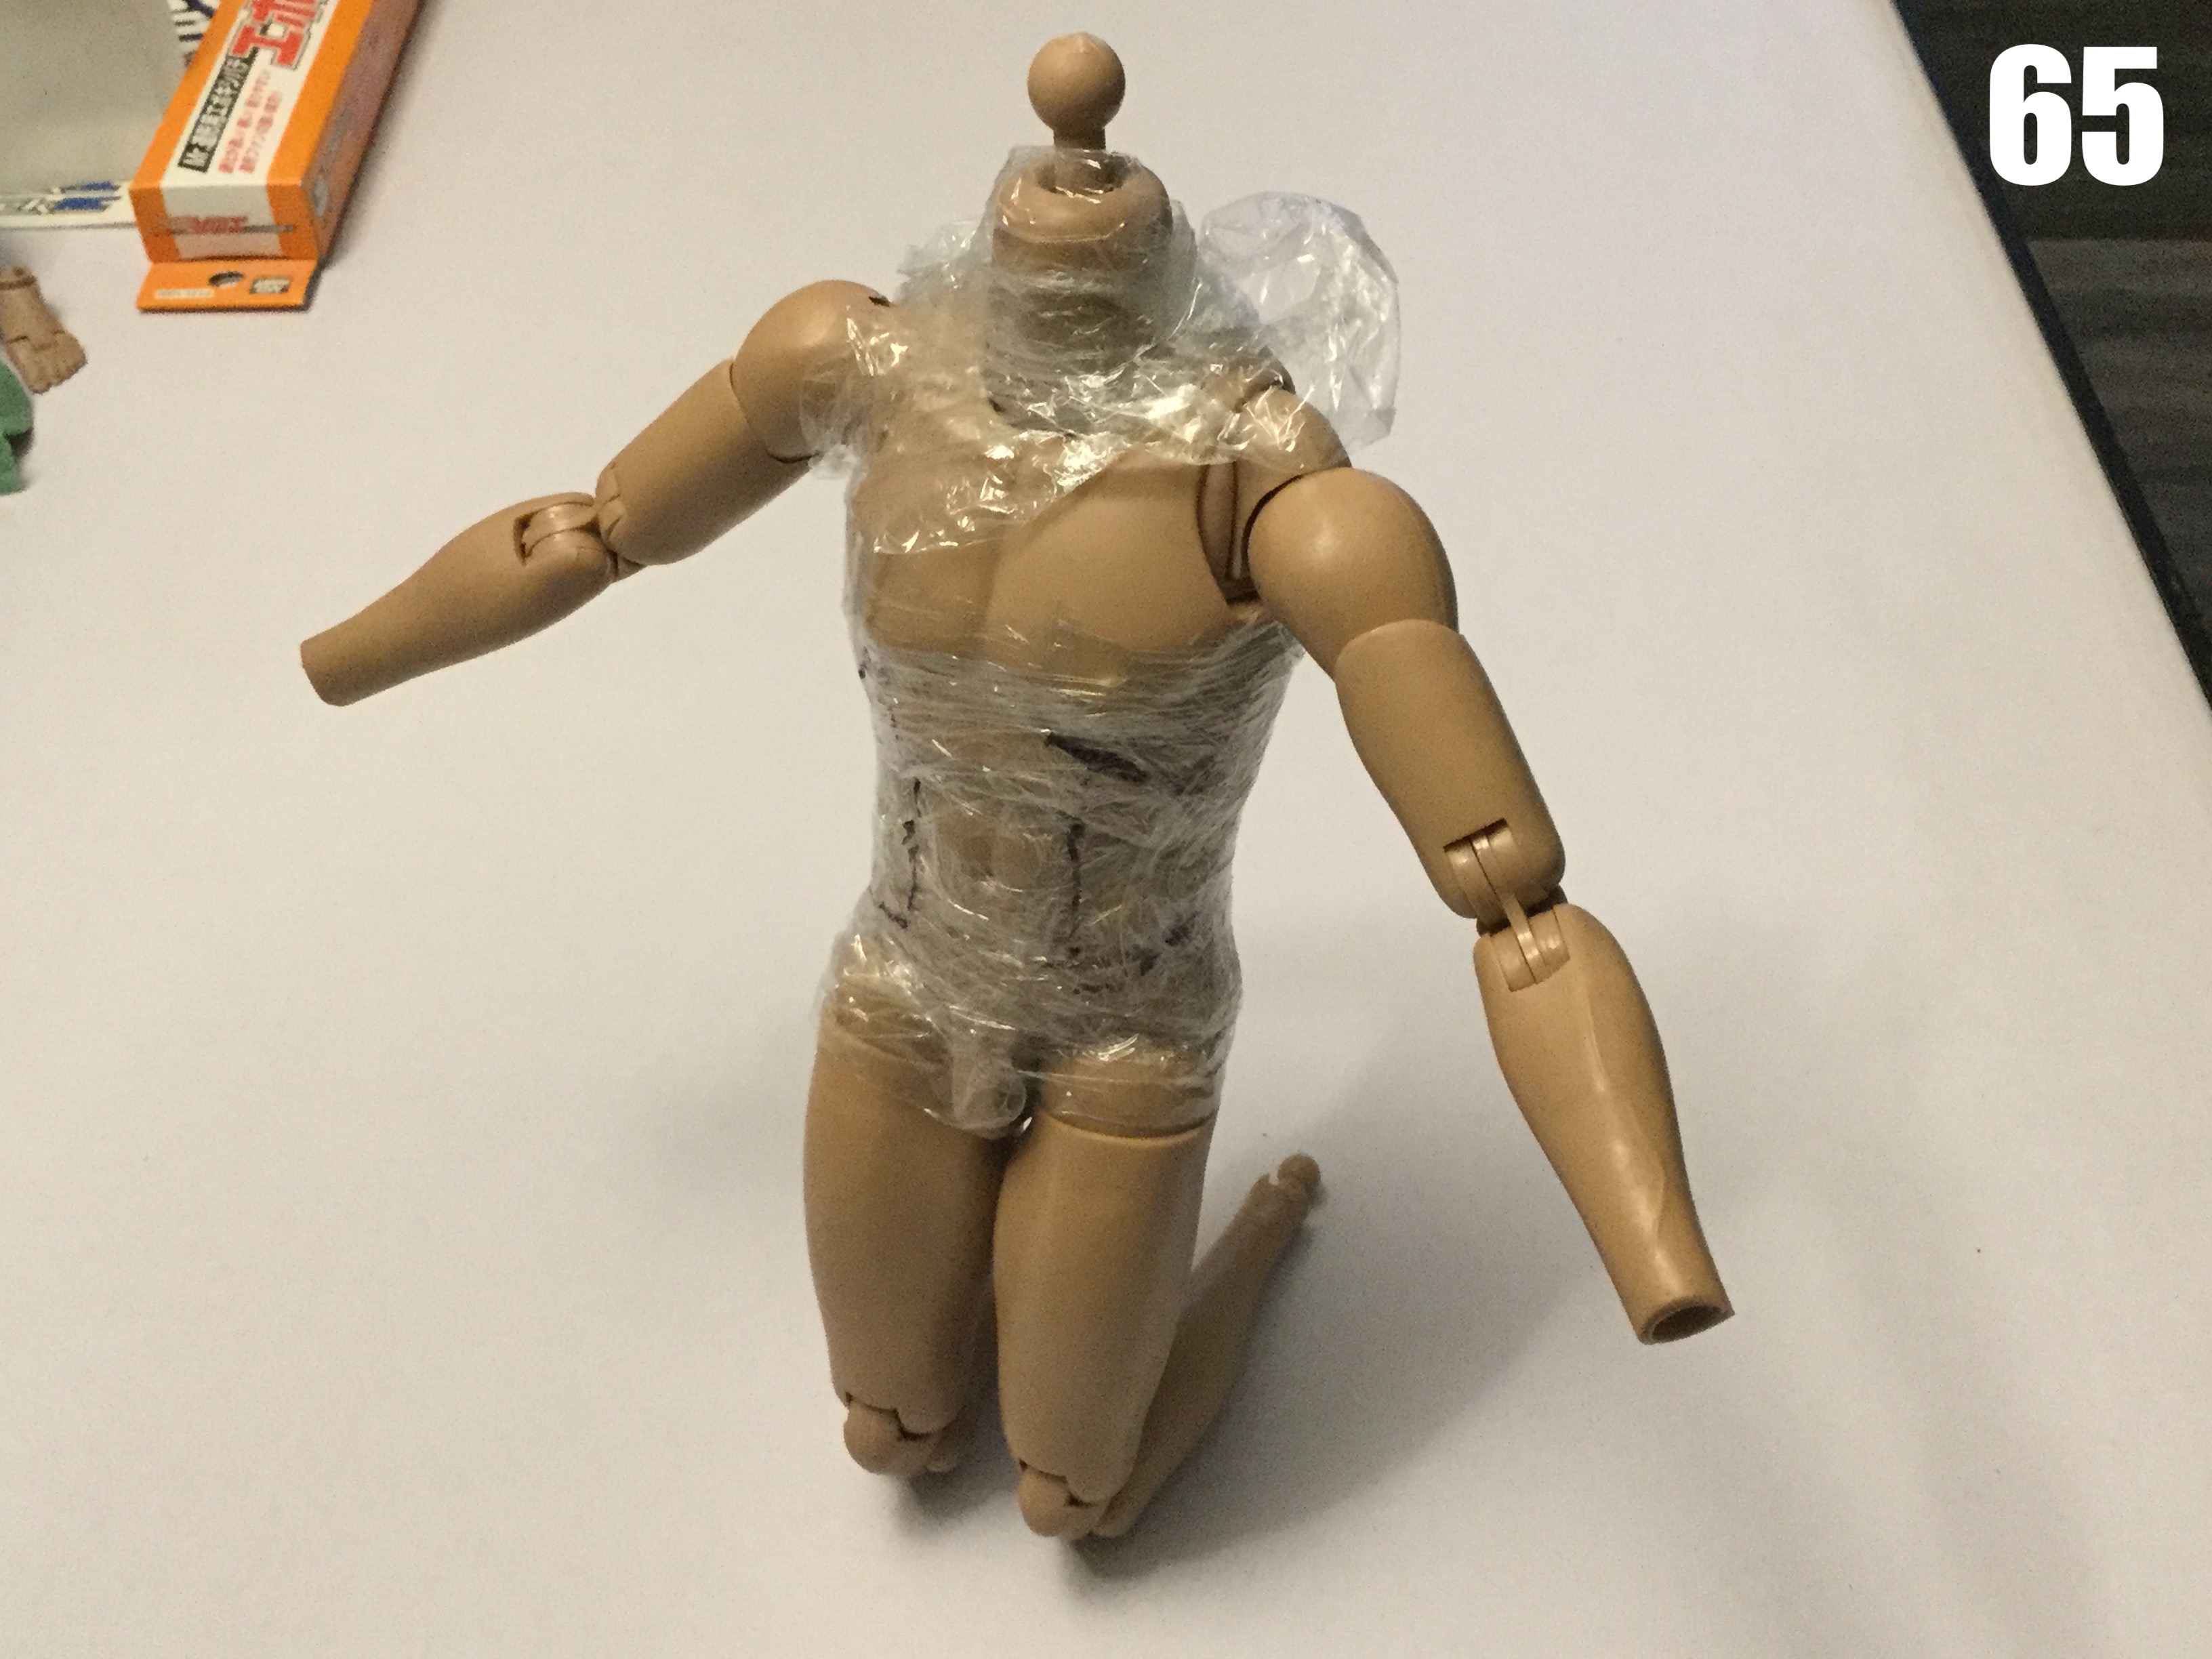
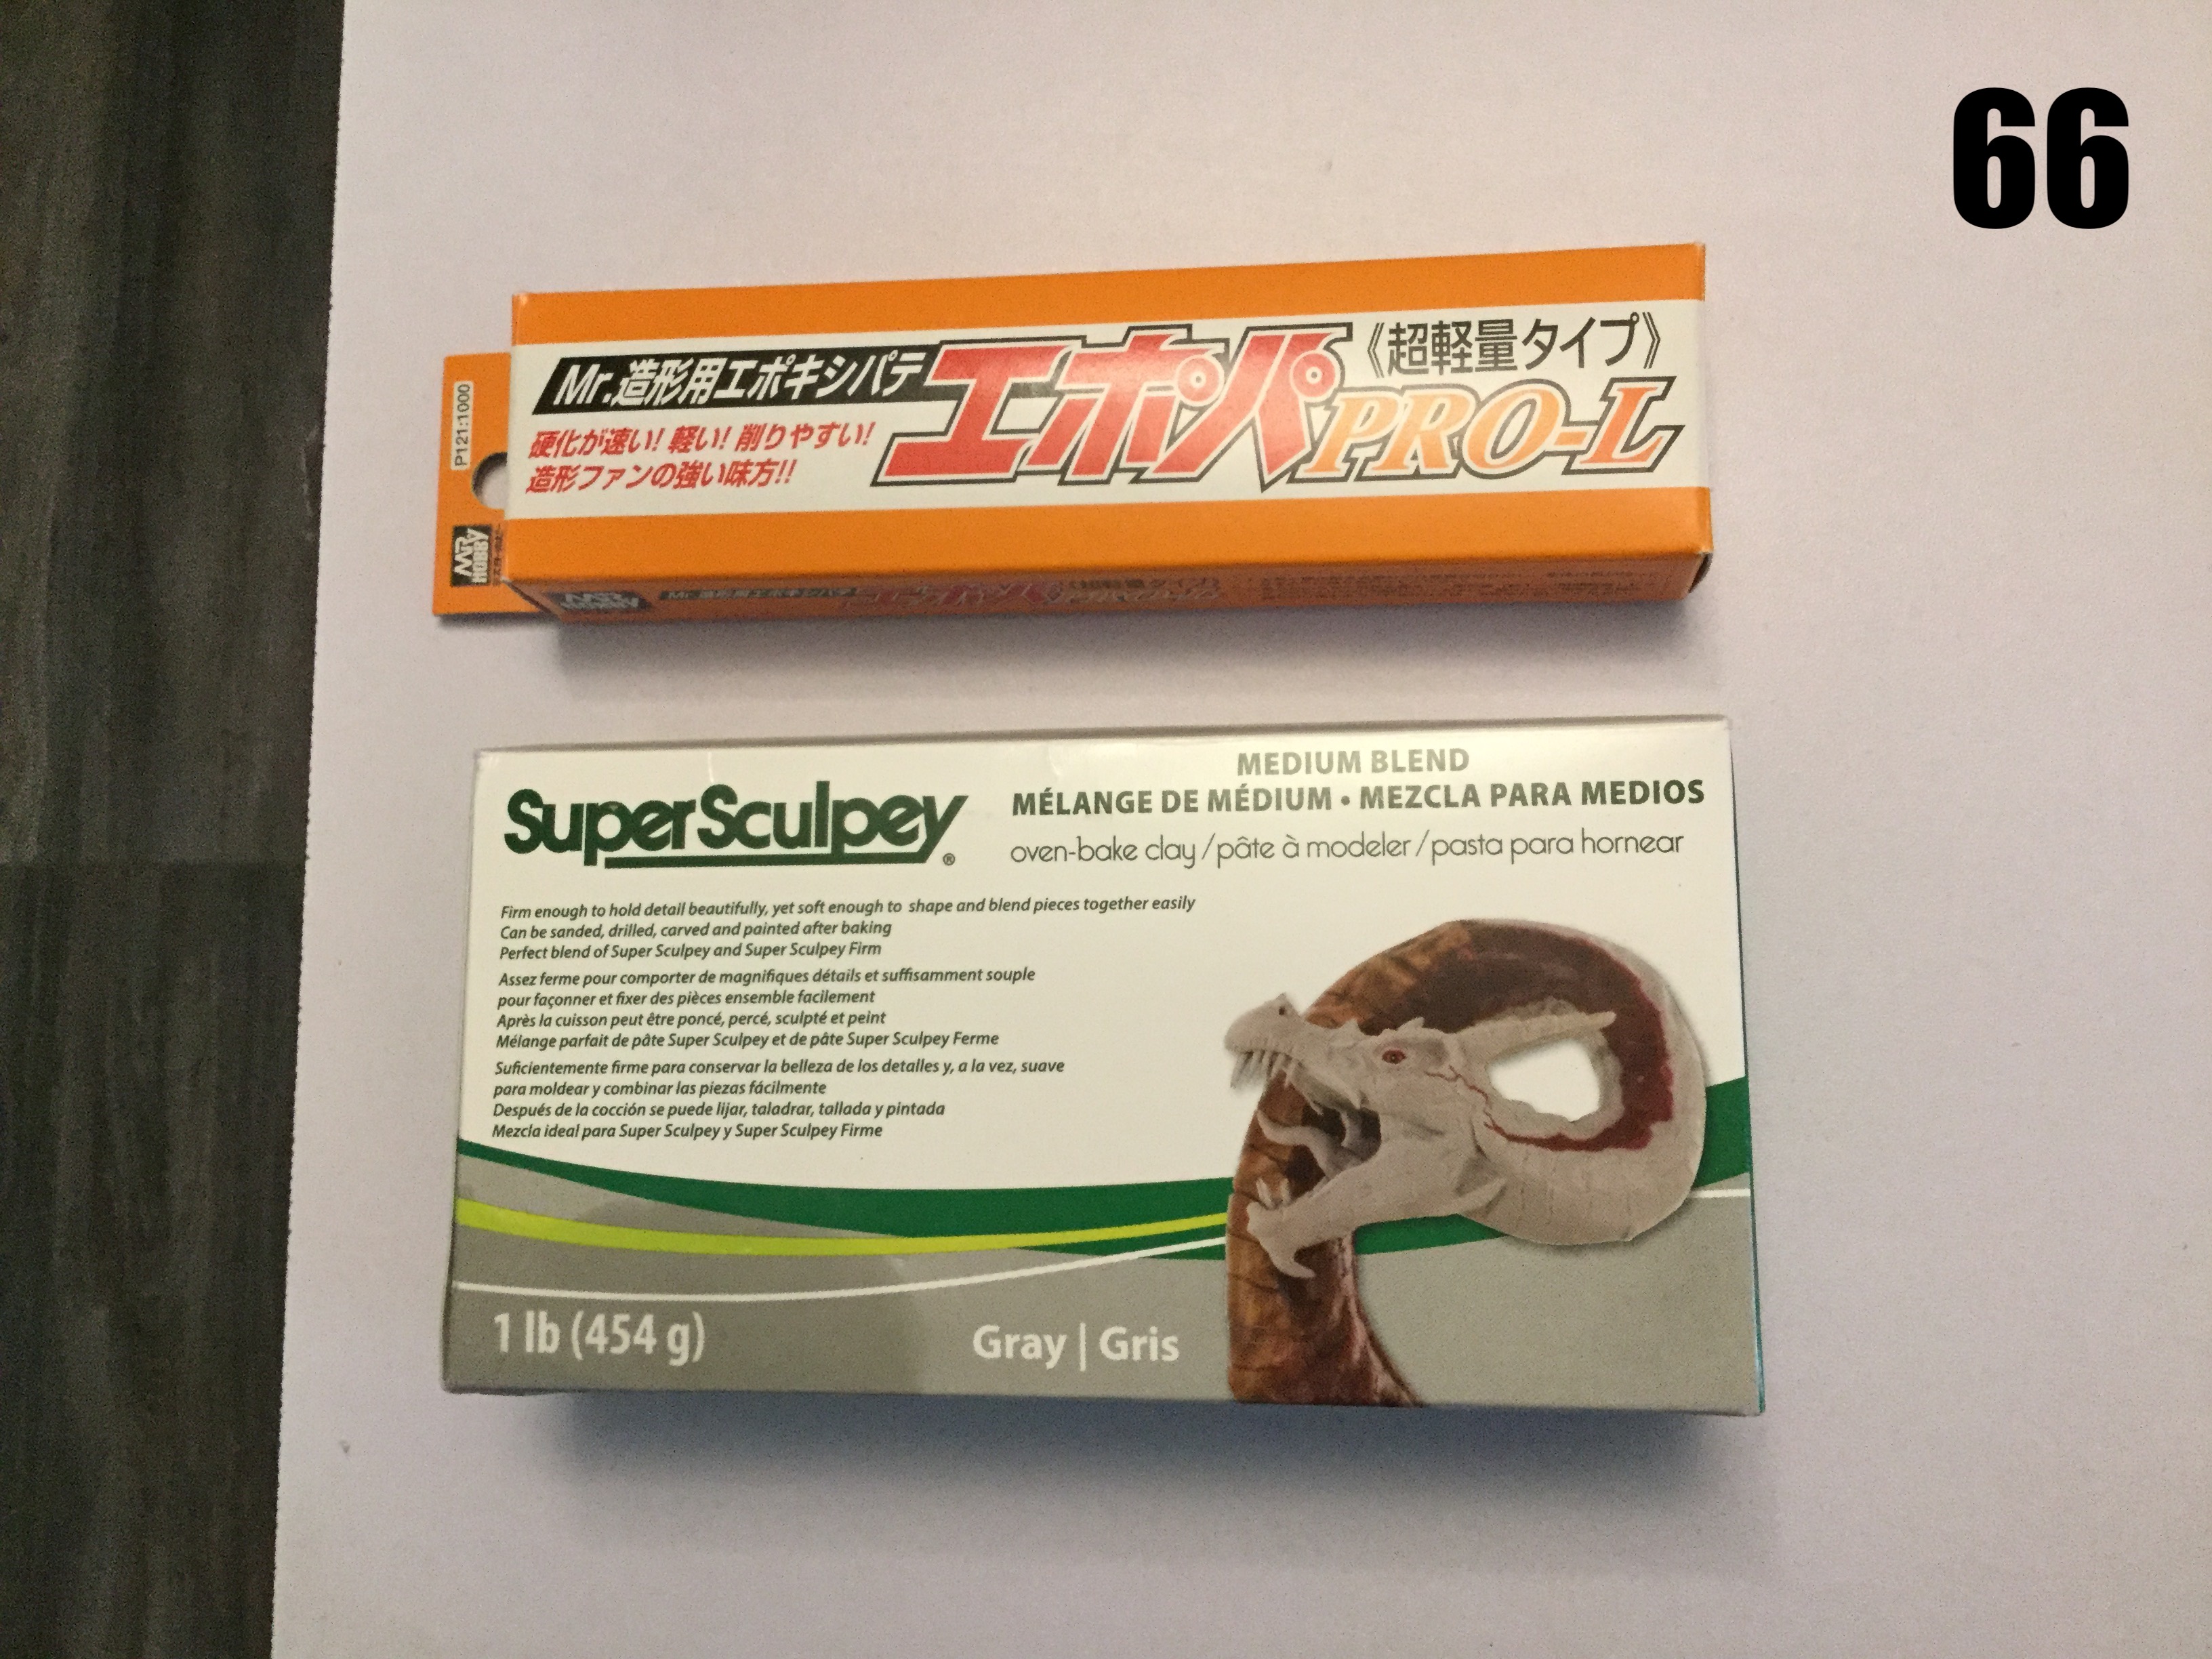
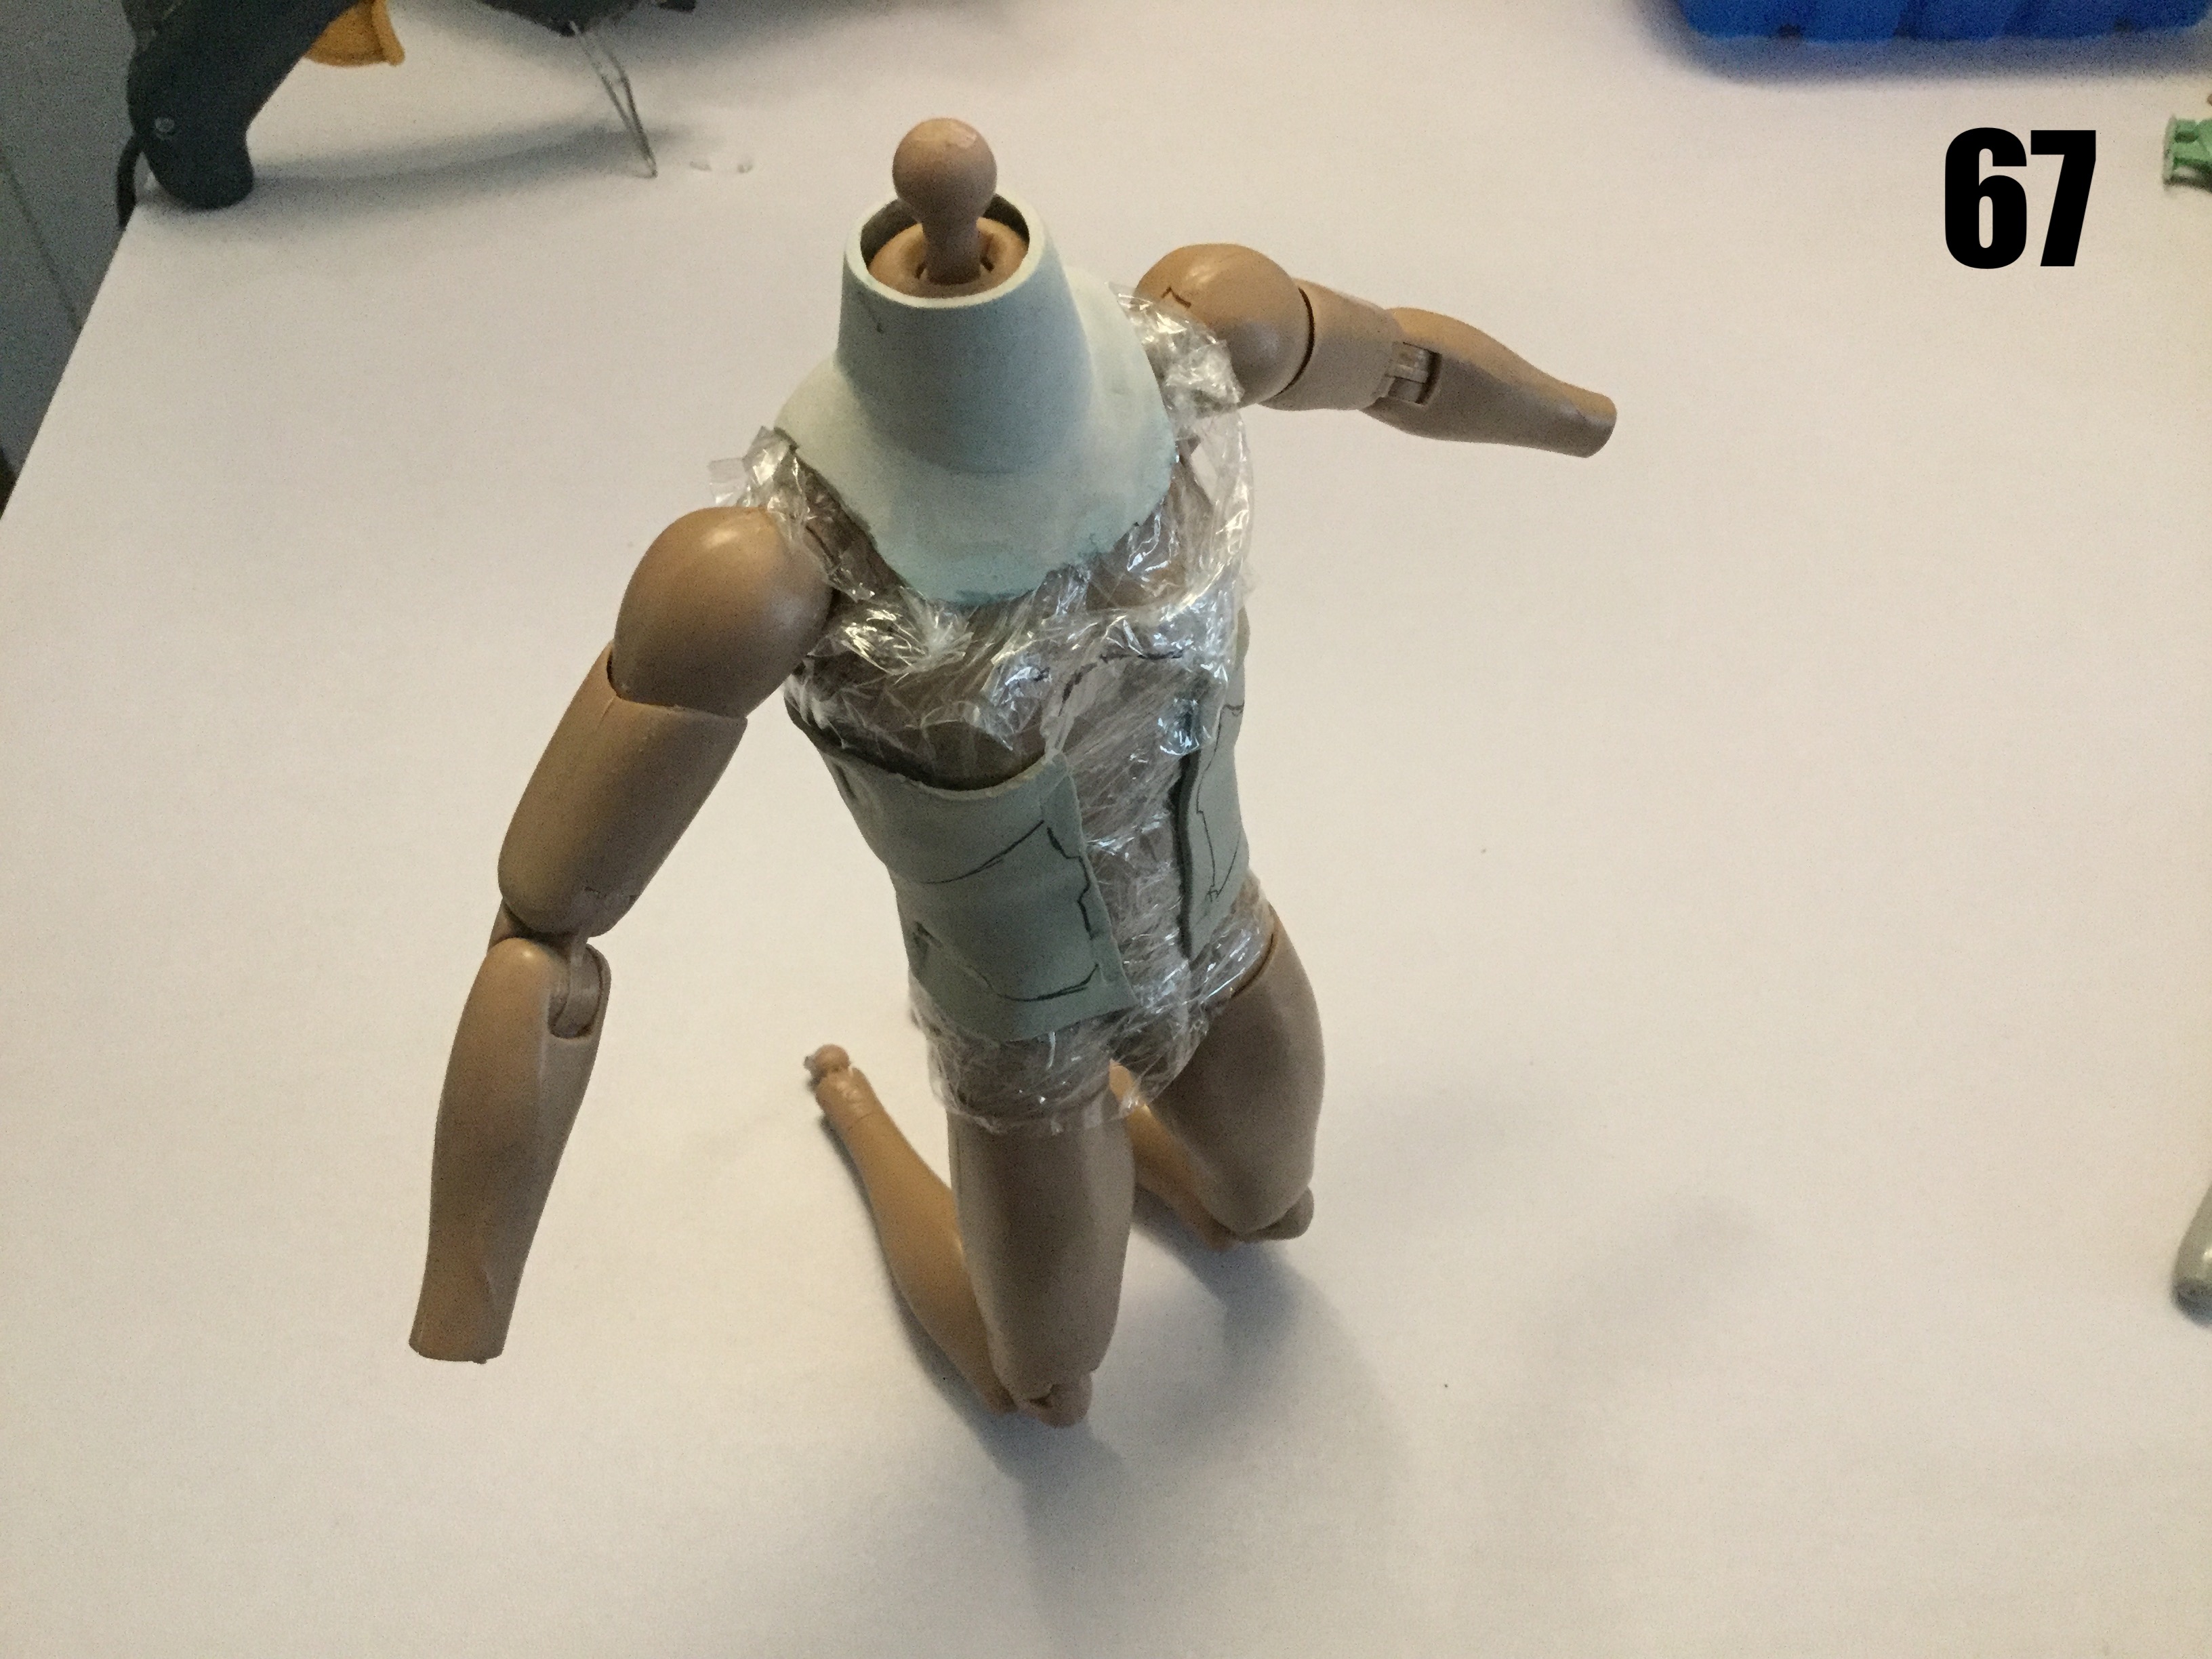
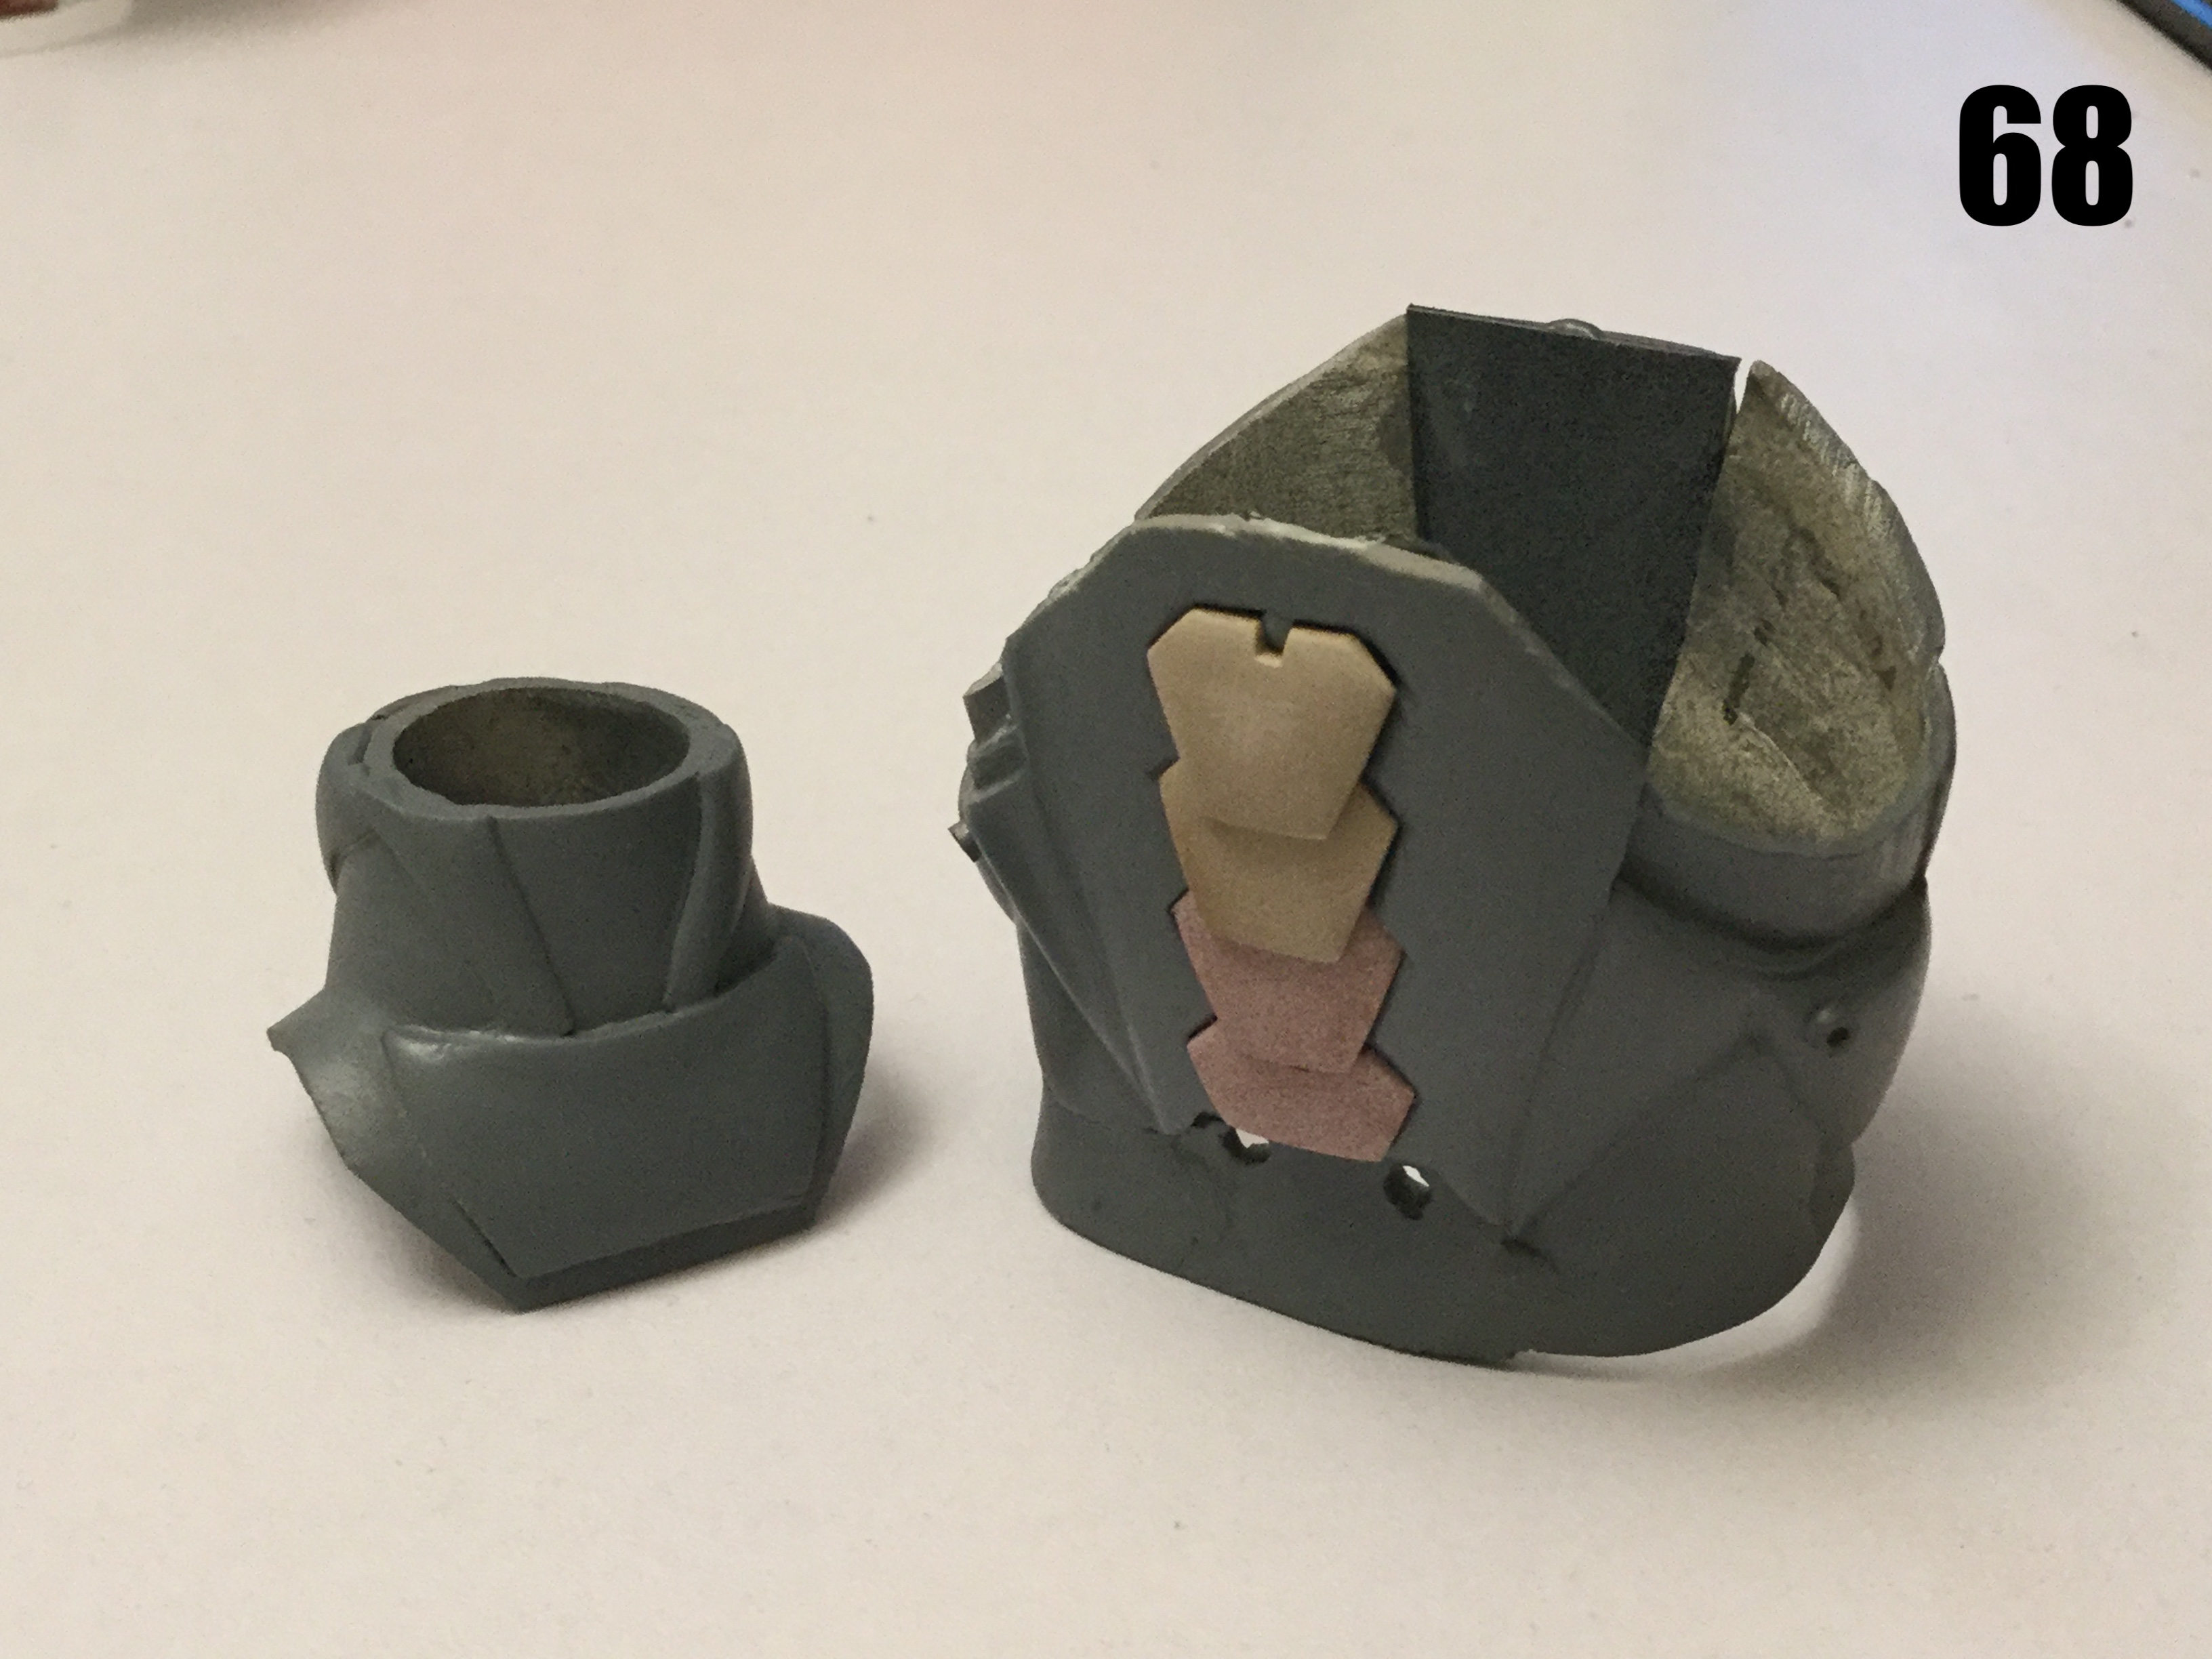
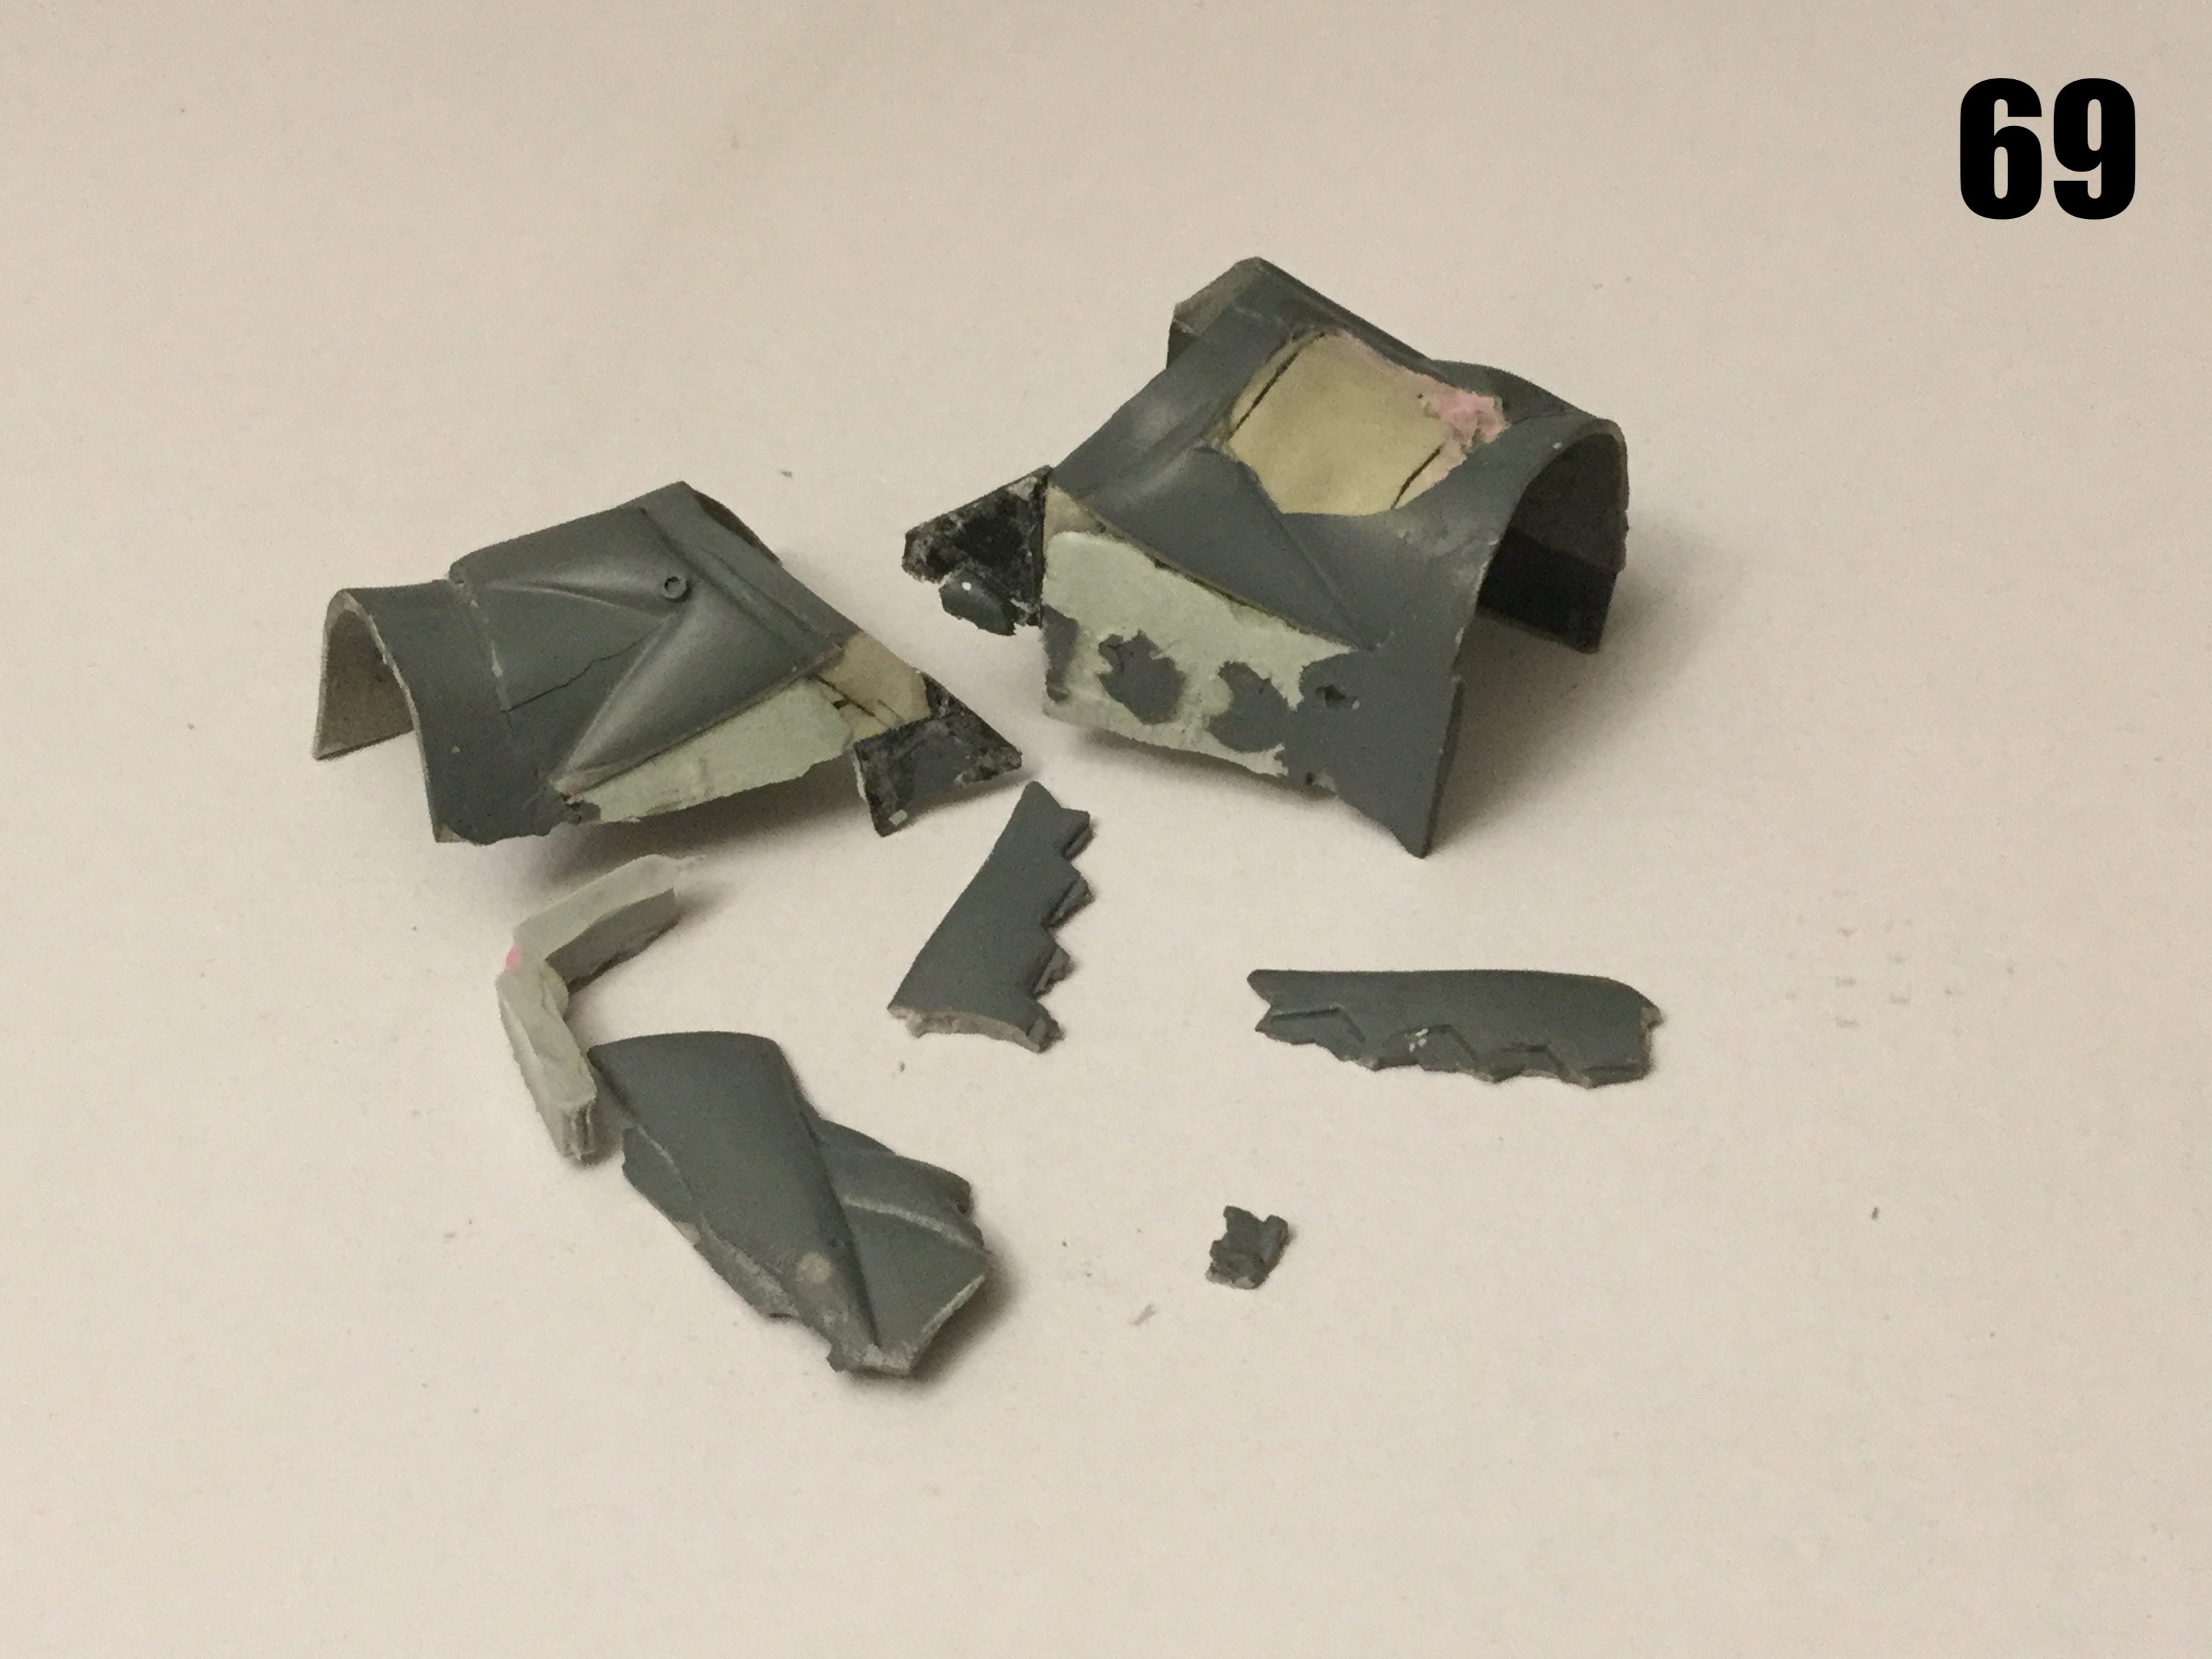
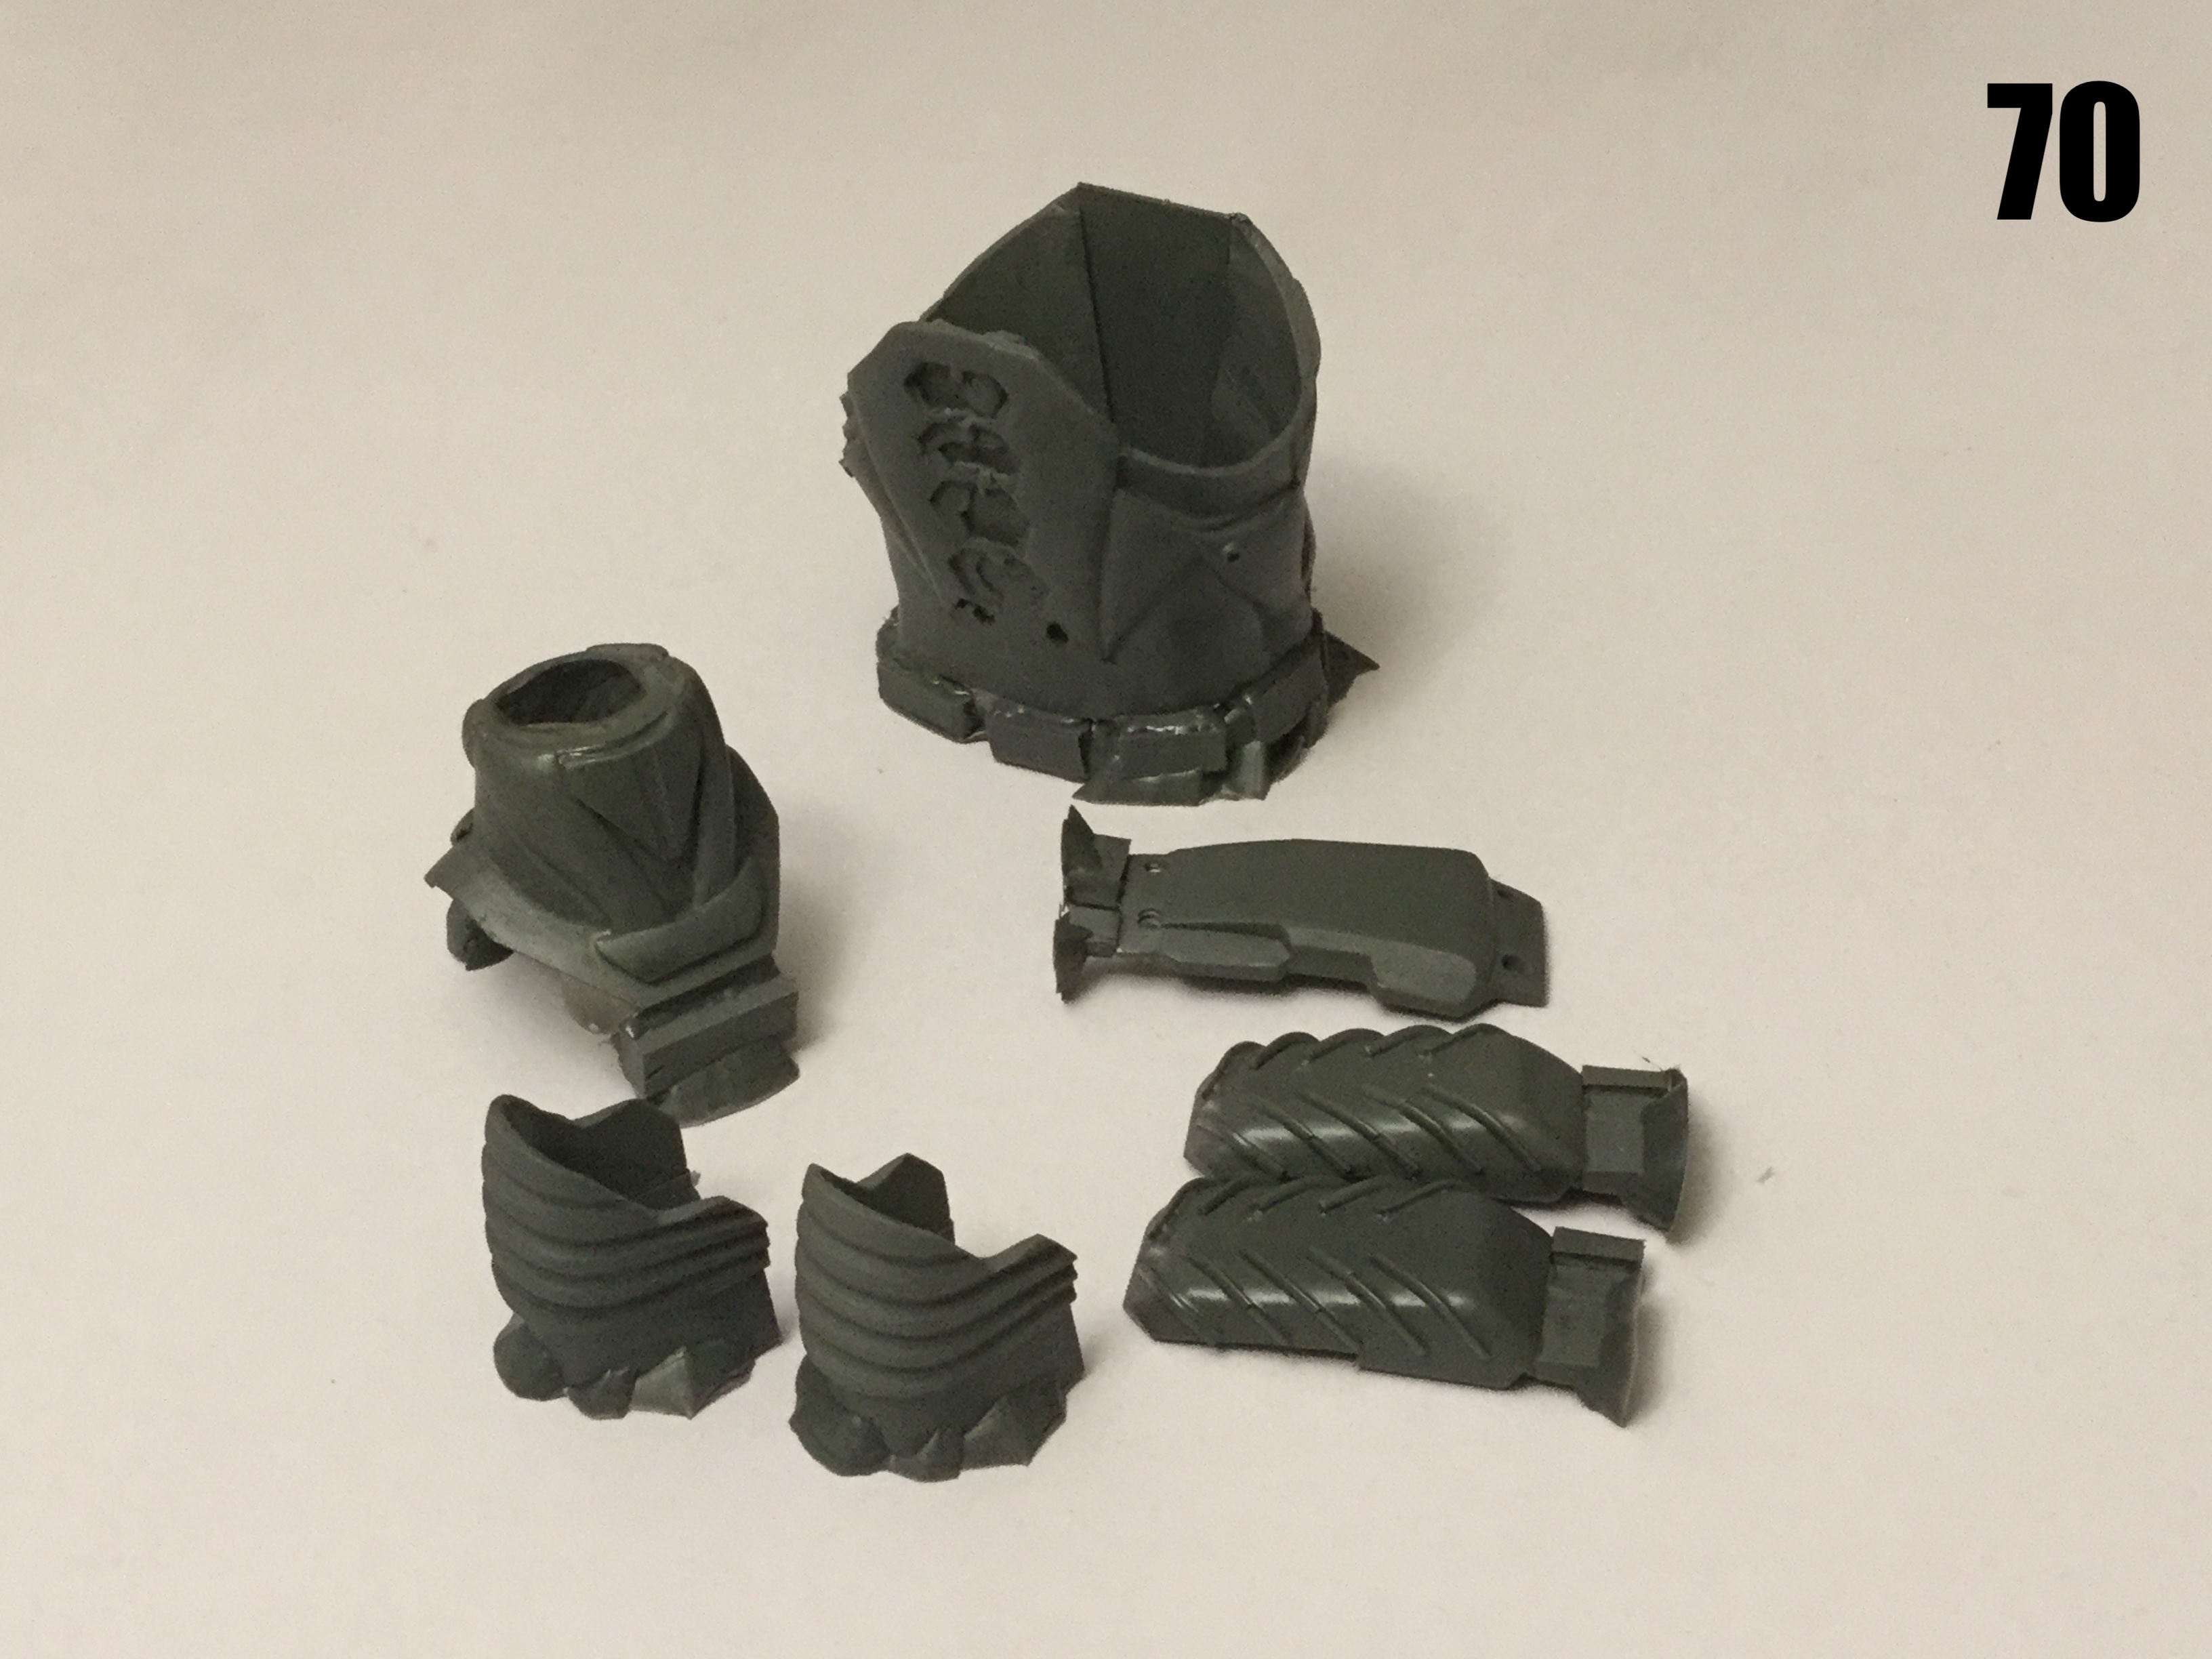
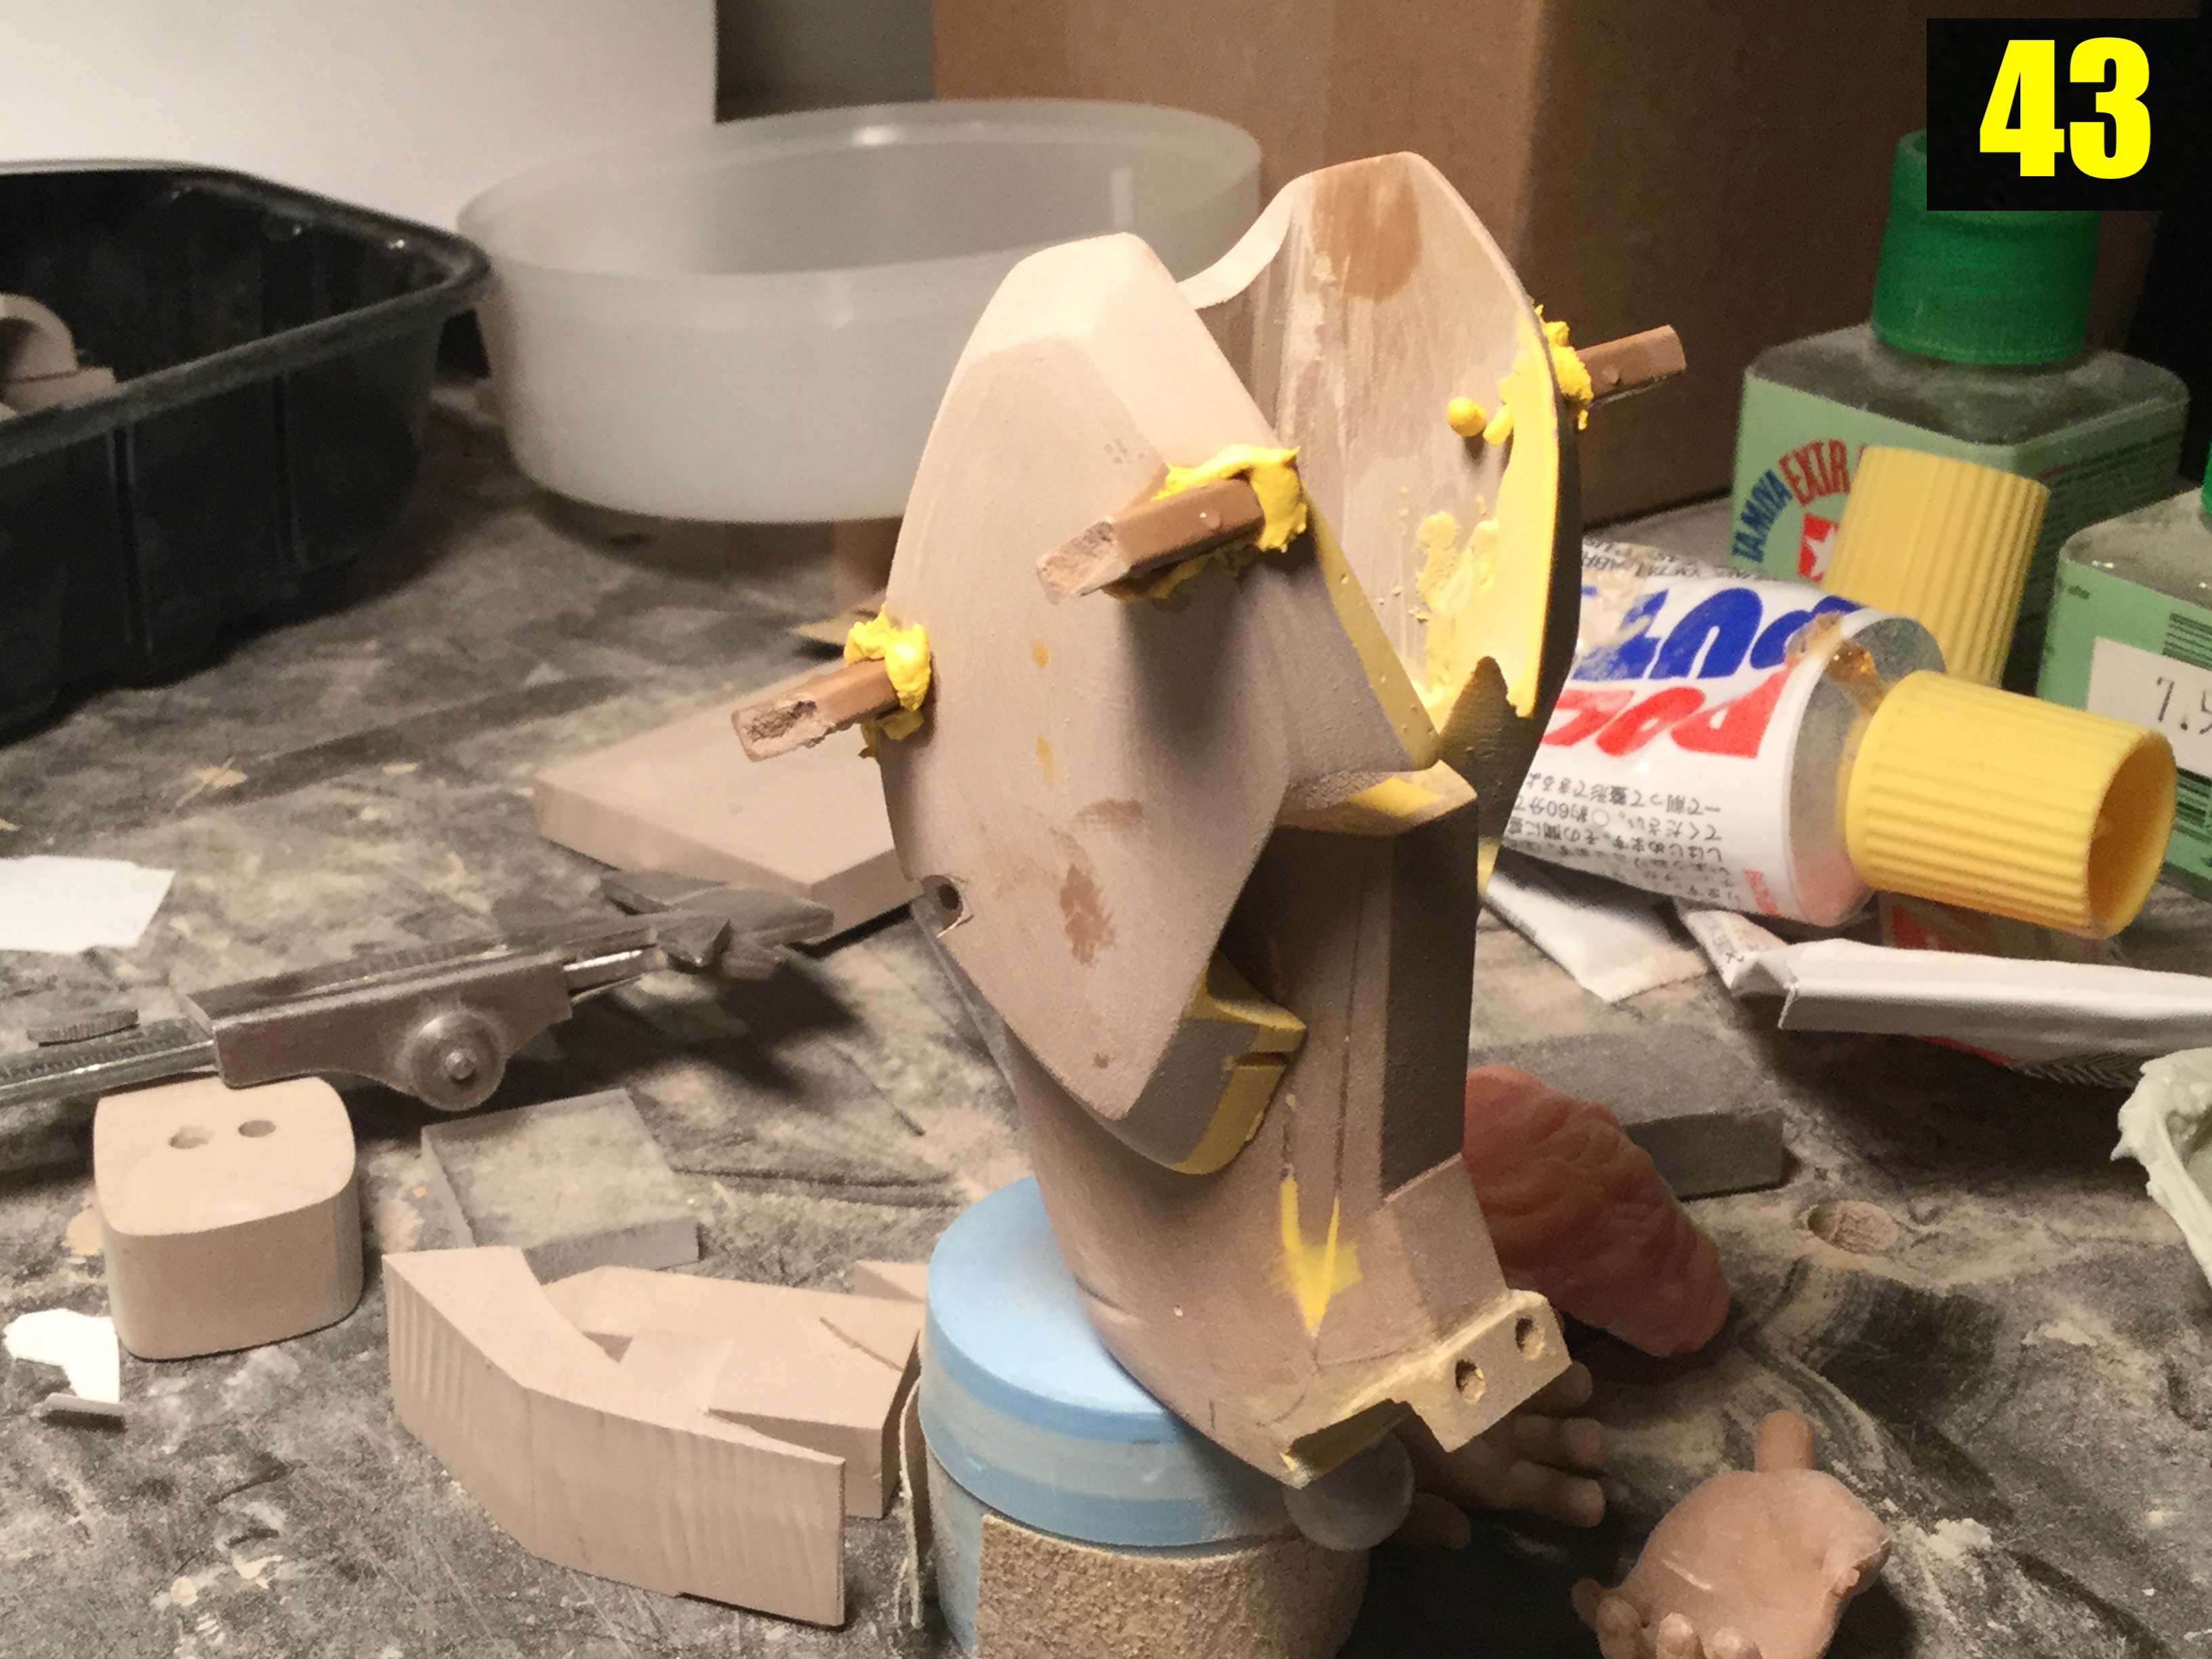
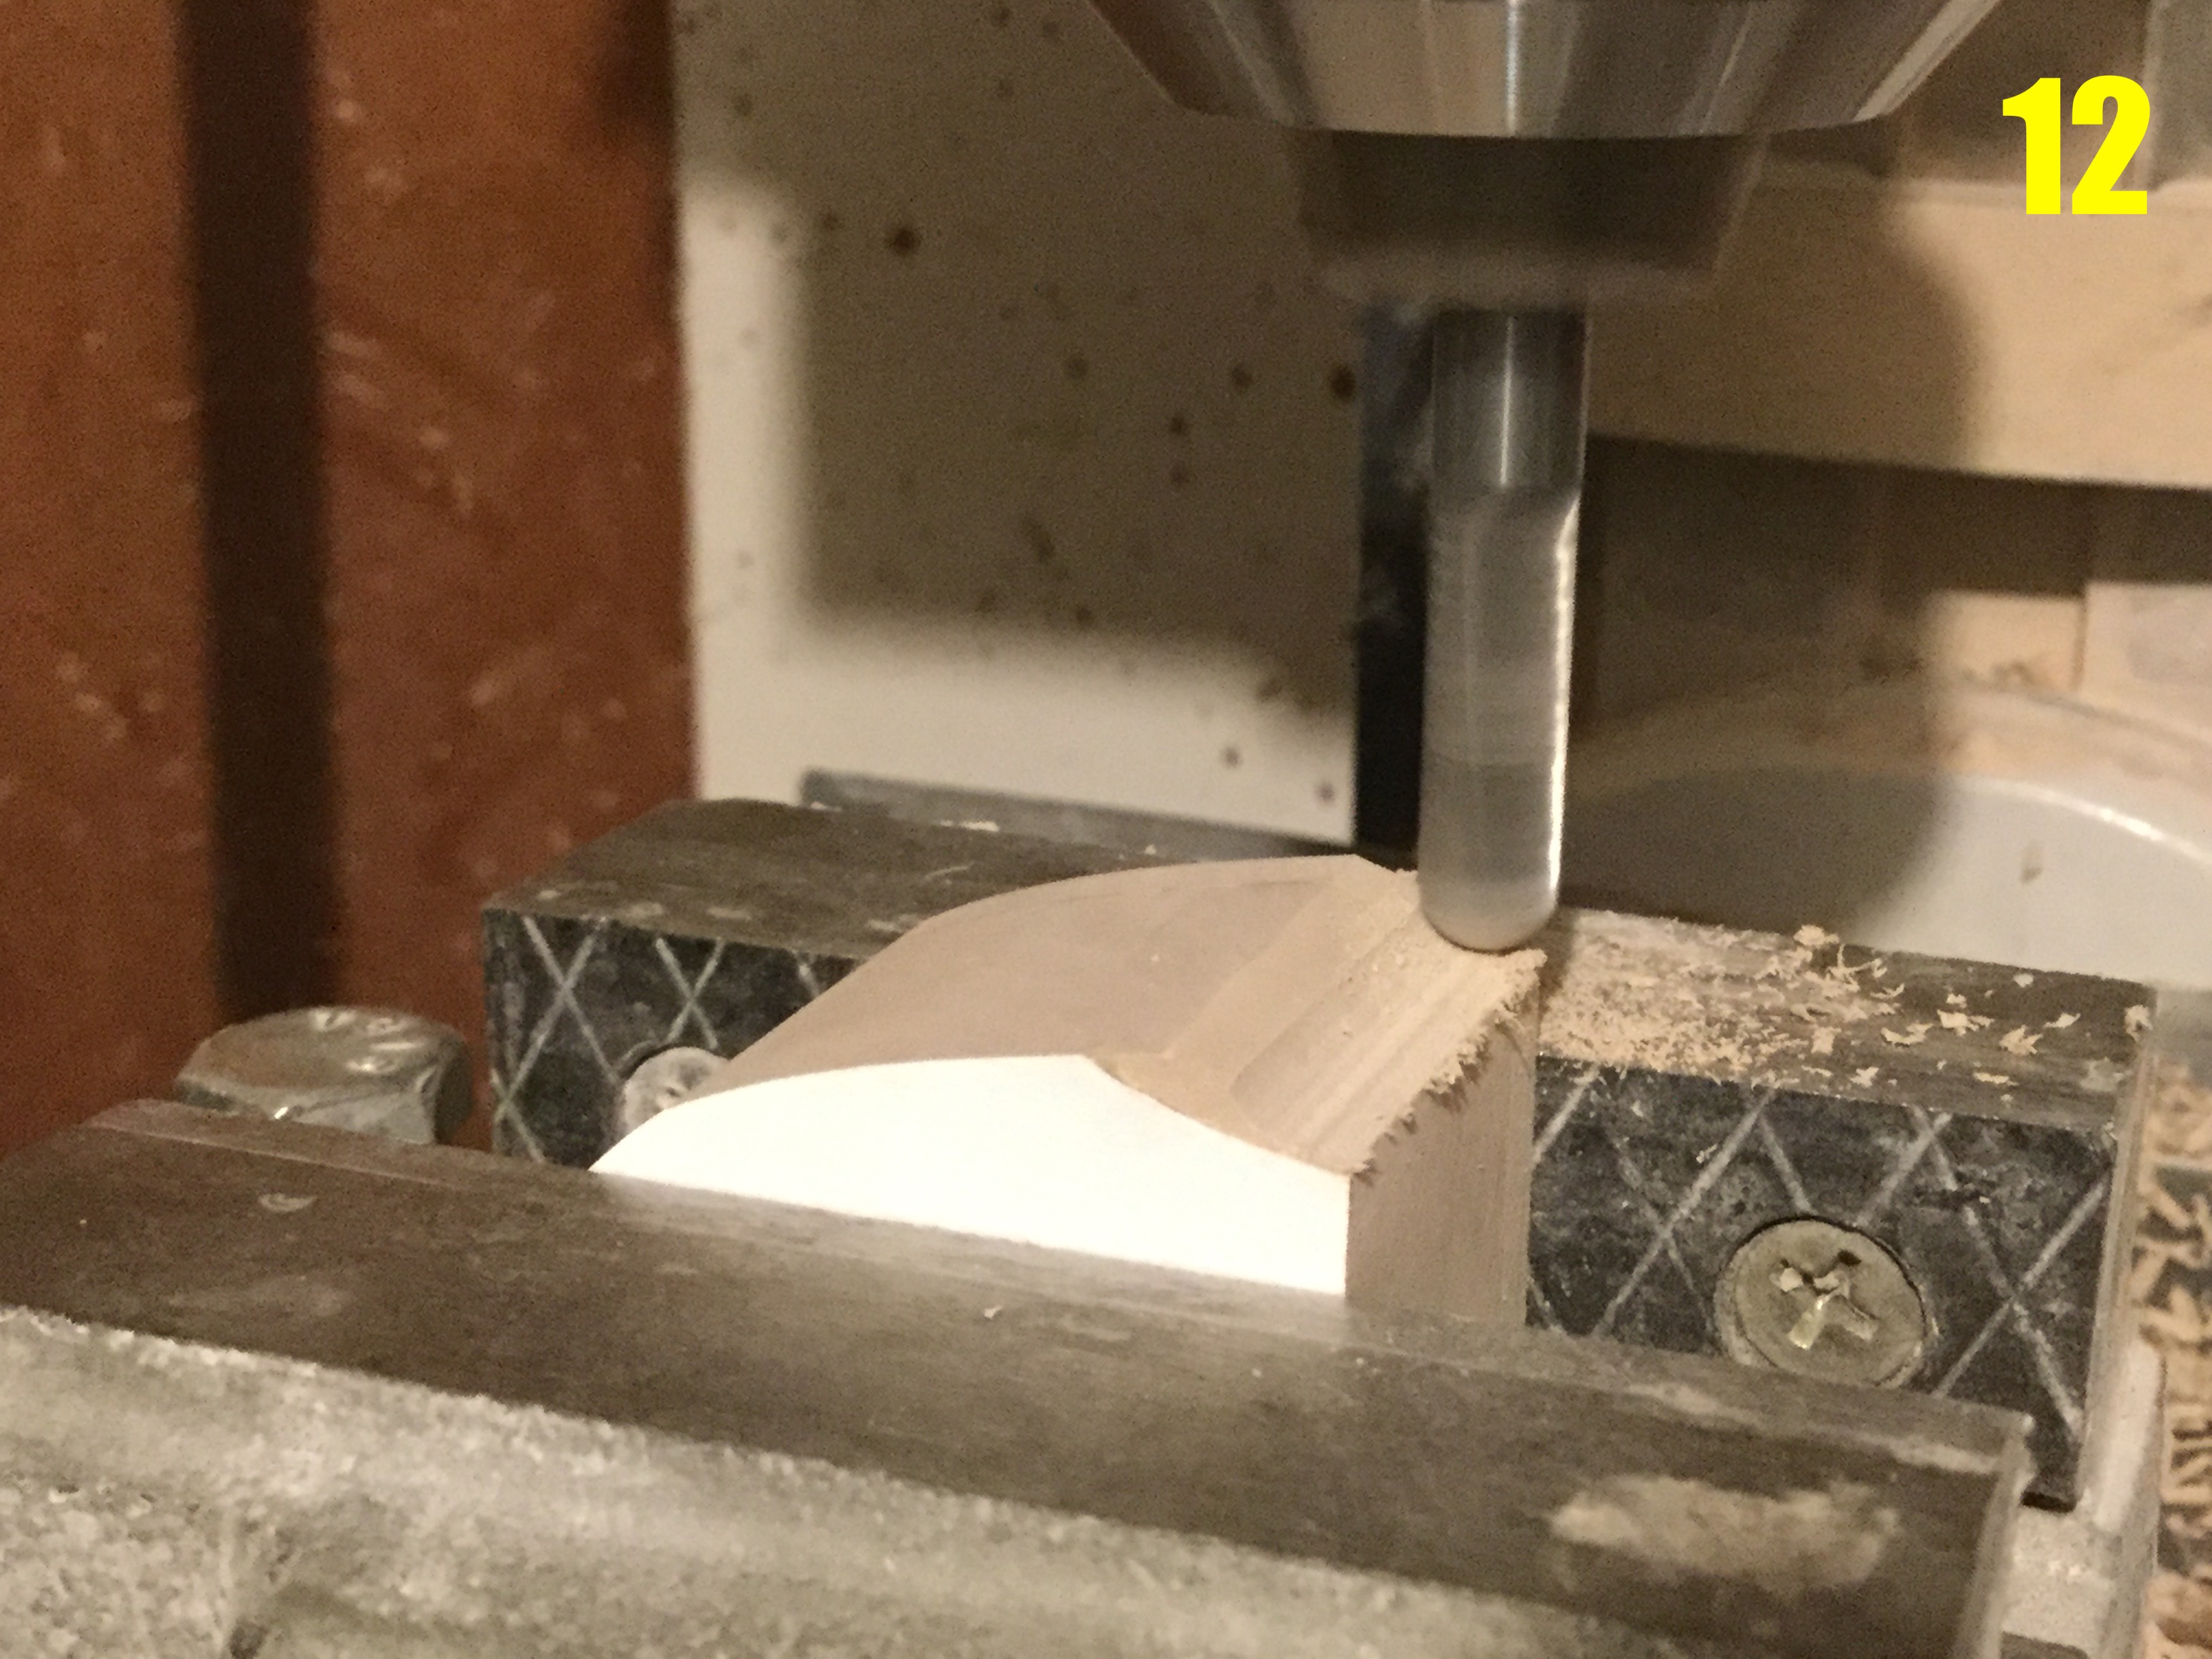
A belated Happy New Year 2023 to all of you! I've been quiet, but that's only because I've been working behind the scenes, making all... these...molds! Like 12 pounds worth!! In fact, I've already begun some casting work while the final detail parts were being prepared. It's a very unconventional (and exhausting) project, but the best is being saved for last. While the vast majority of parts are being molded, I still have to tackle probably the trickiest aspect of the build: the flexible abdomen girdle-- that brings us to pic 65. I've wrapped the figure with cling wrap to protect the parts from sticking to it, but I also need to replicate the thickness of the onesie over which these parts will go. In addition to the abdominal area, I'm also making a neck piece, ankle shrouds, and the soles of the boots, but these last parts were relatively simple to master compared to what I'm about to do. Pic 66 shows the materials I'll be using: a Japanese epoxy clay, and Super Sculpey for the details. The former will be used as a base, because it's a more durable material, unlike the Sculpey, which is extremely brittle when hardened. In pic 67, we see the layer of epoxy clay hardening in place; I usually let it sit overnight, just to be safe. Pic 68: you have NO IDEA how tedious this was to make! The girdle had to be made on either side, then combined without distorting the parts, and since it's all rigid, I'm not able to do the final fit on the figure itself. By the way, the spinal armor plates are all separate... what's four more pieces, right? Everything's gonna be O.K.! ...Or not. Pic 69 shows what's left of the girdle pattern after it shattered during extraction. All is well, I assure you! I was planning for this to happen: it's very common for very delicate Sculpey parts to be destroyed upon molding, which is why I pay particular attention to the production of the mold. Pic 70: these first castings have become the new masters, and they're significantly more durable. The big downside to these flexible parts is that it takes almost 24 hours for the rubber castings to set, so I have to prepare several sets of molds—hence the long period between updates. I've already begun cleaning a set of castings I'll be using for the beauty shots and the instructions—teaser pics coming Jan 13th, so stay tuned!
-
1/6 MOSPEADA Rider Project Proposal
captain america replied to captain america's topic in Anime or Science Fiction
I'm not sure I understand your question. What you see in pic 62 are two of (probably eight) similar molds, each of which makes anywhere from three to over a dozen pieces. I generally try to group pieces to be molded by size, but also by complexity. Some pieces need their own, individual mold box, just because they're complex, and the rubber has to be sliced from so many sides that placing other pieces in the mold box causes problems. -
You may not need to completely disassemble the figure to paint it, just be very patient with your masking. The printed stuff you'd have to reproduce as decals, but still very much worth it for the end result.
-
1/6 MOSPEADA Rider Project Proposal
captain america replied to captain america's topic in Anime or Science Fiction
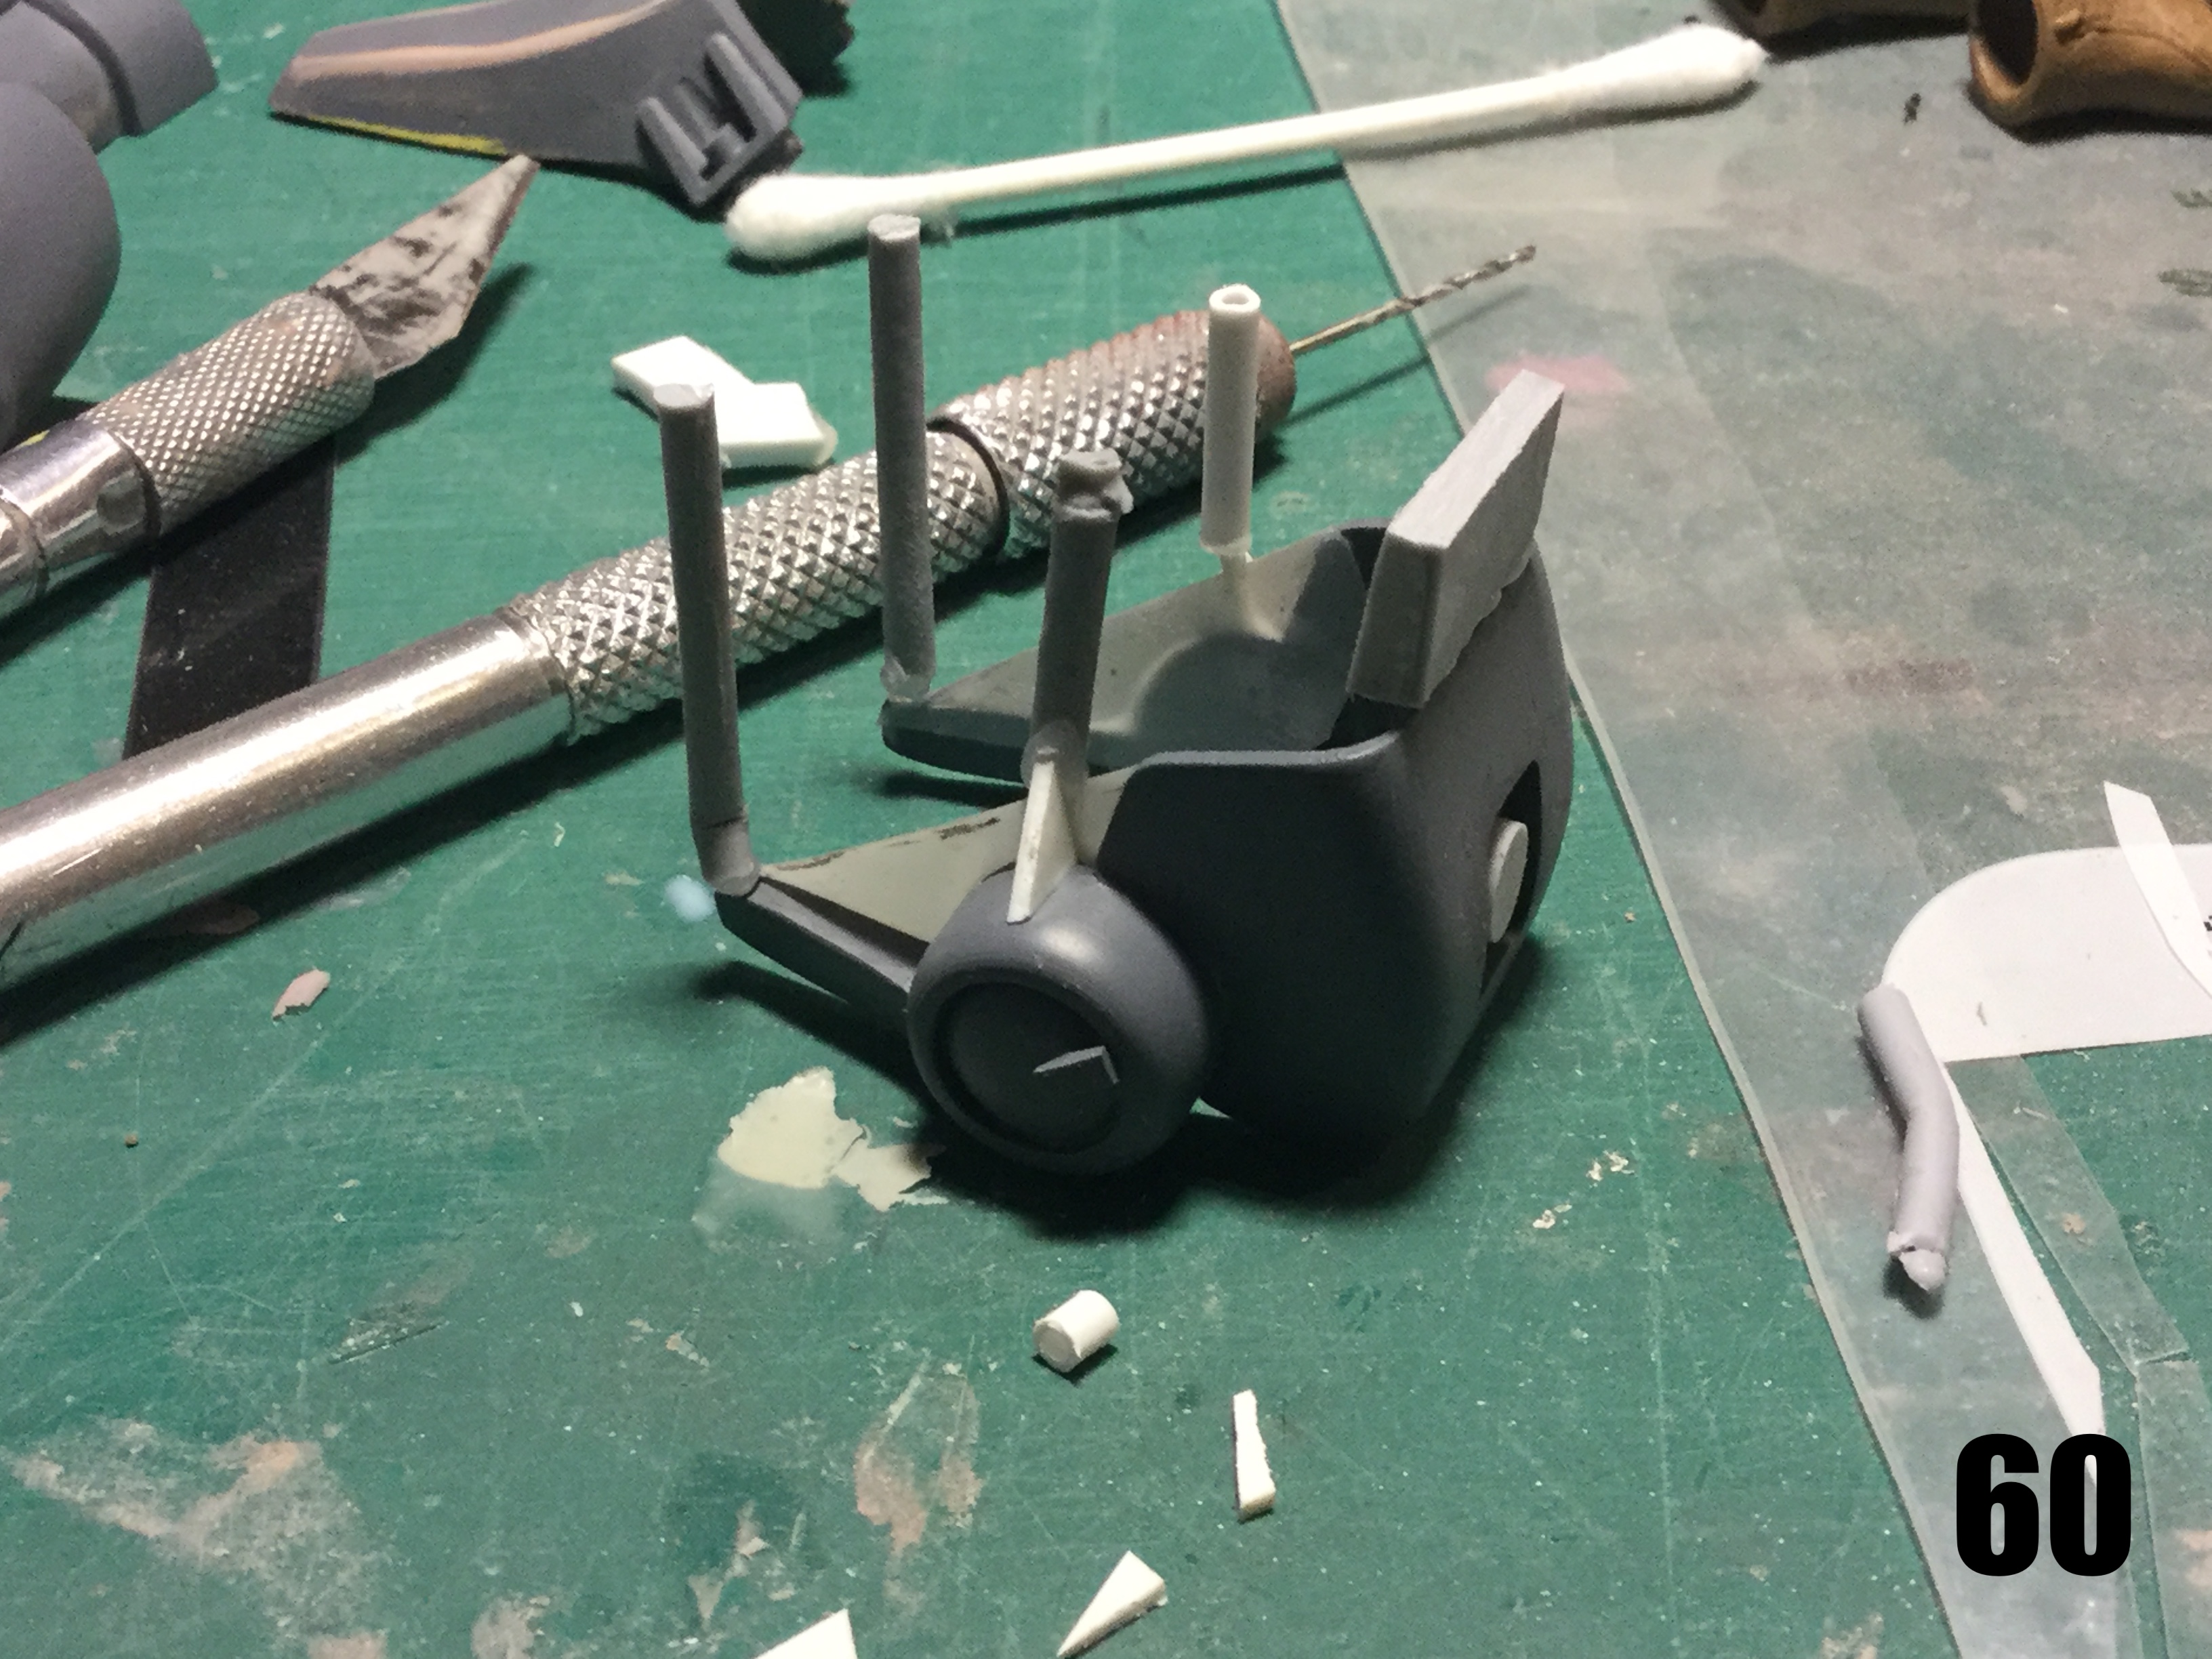
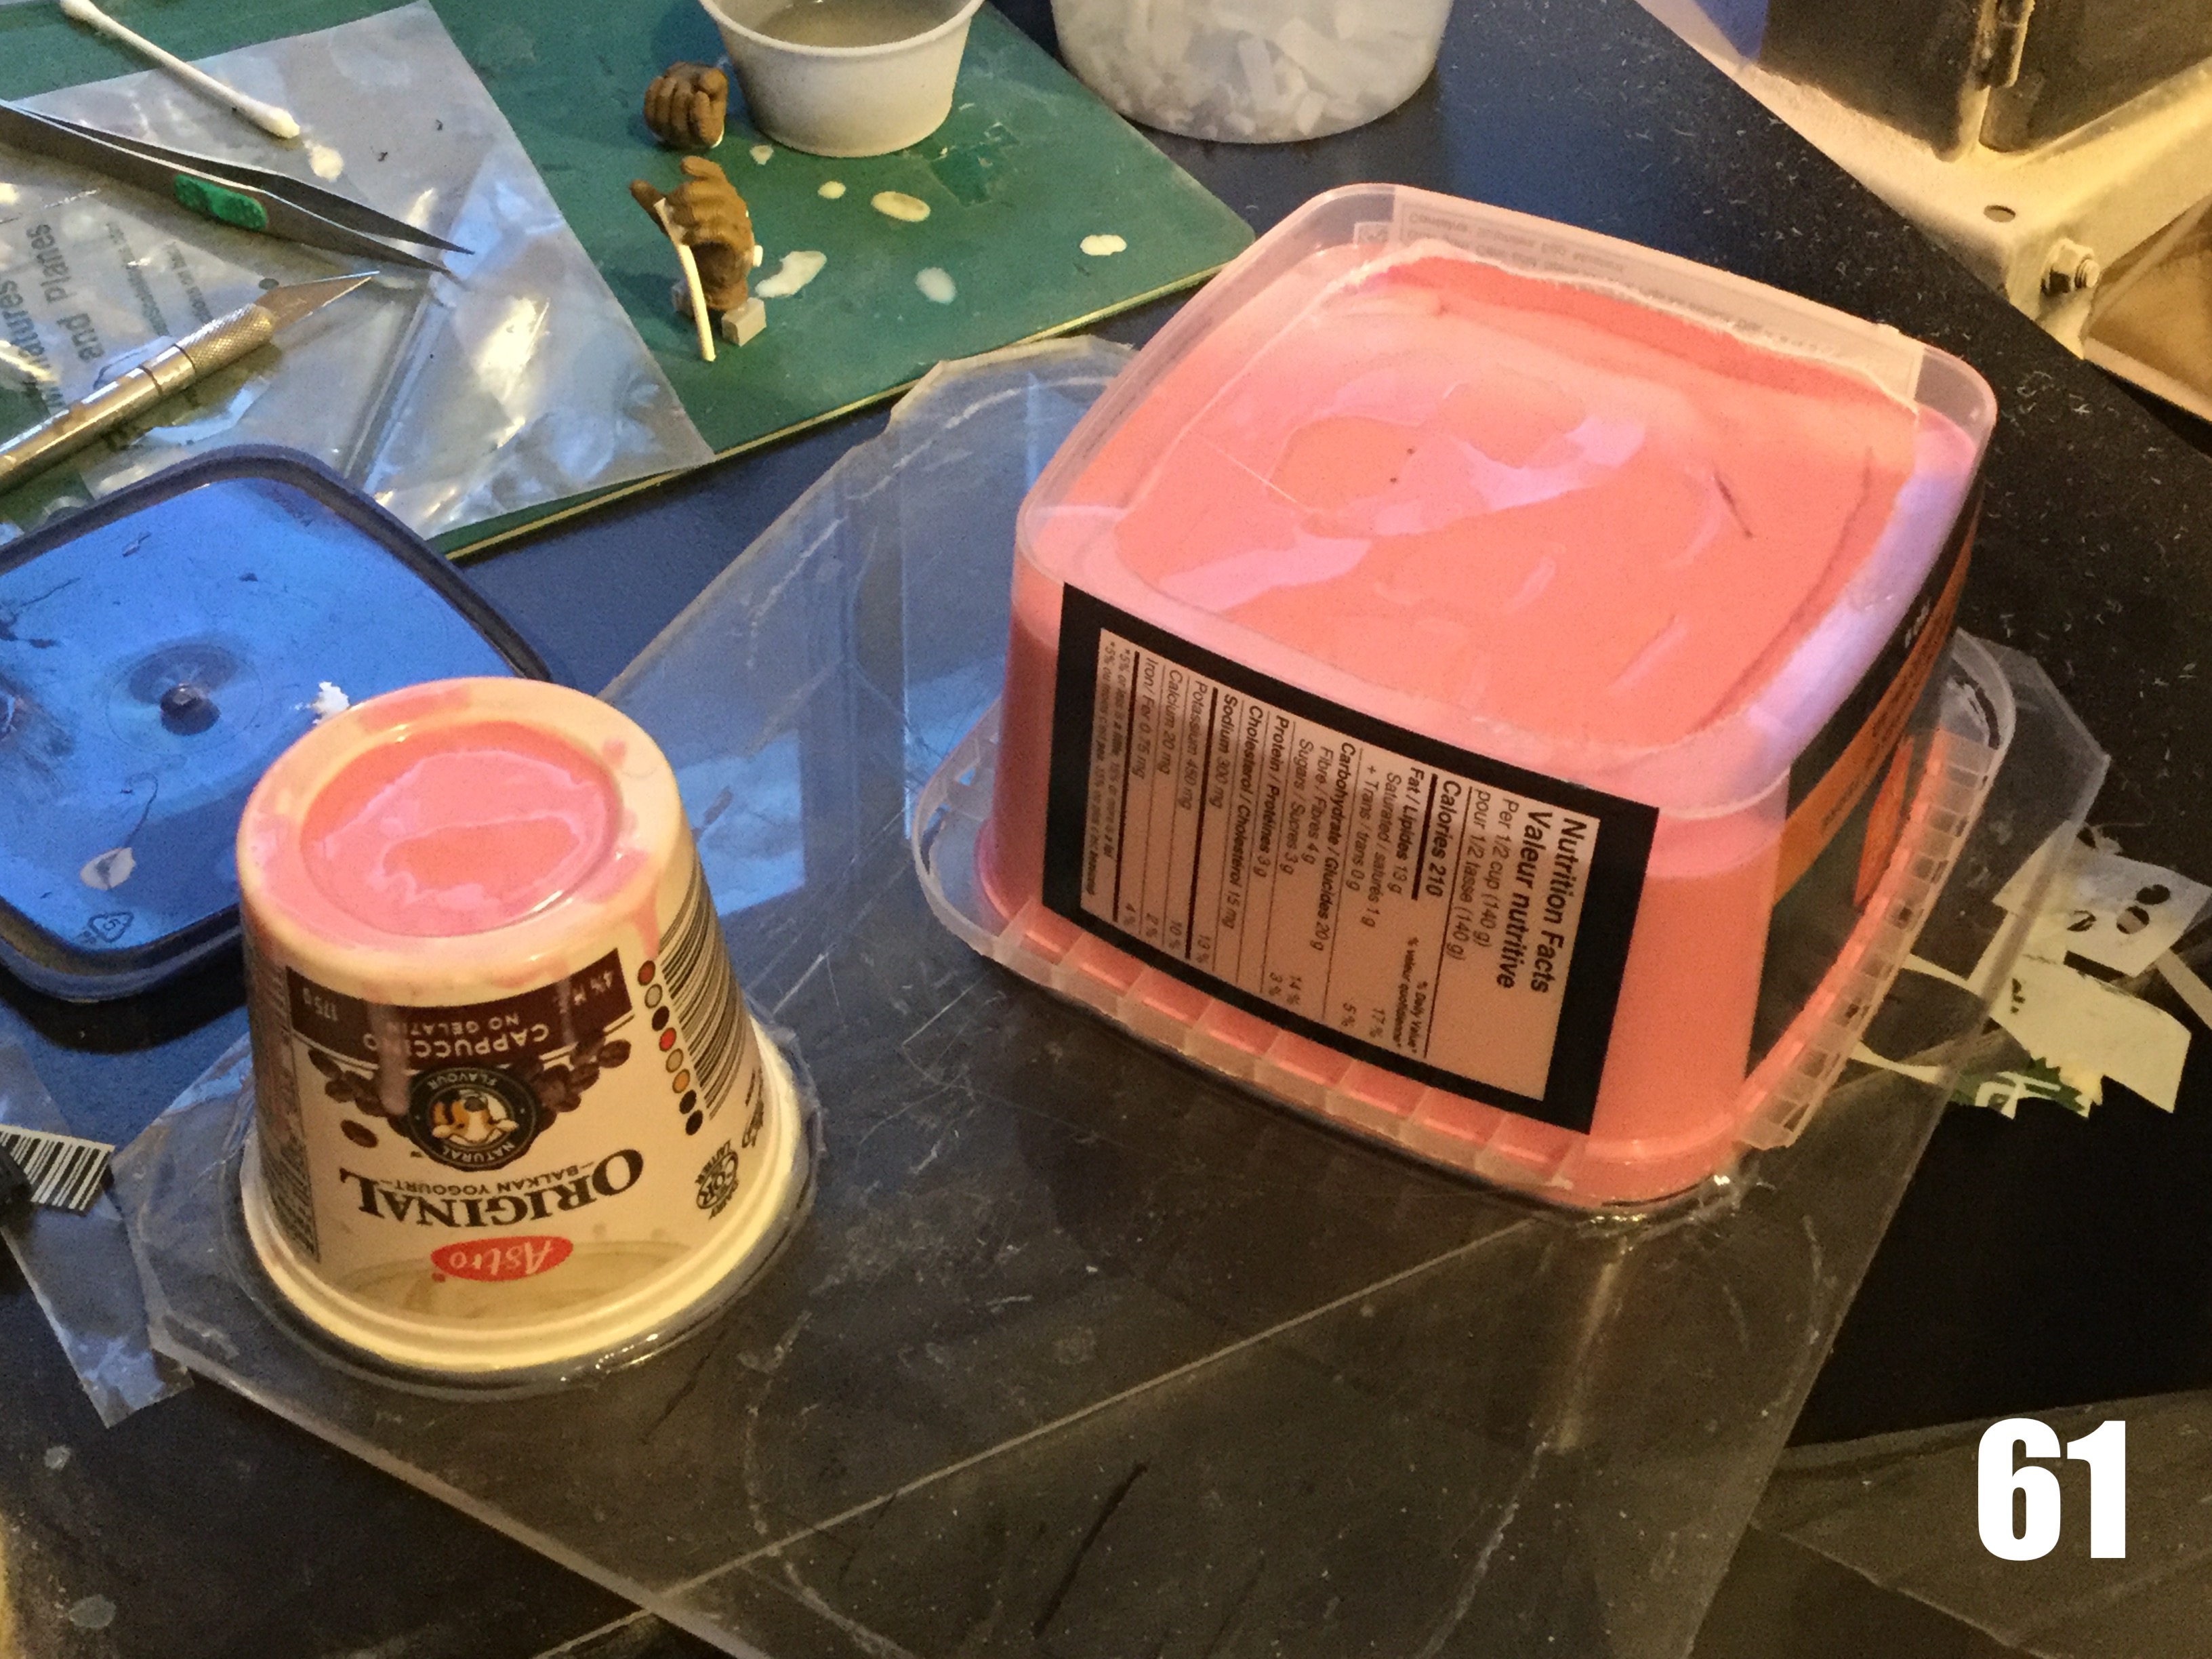
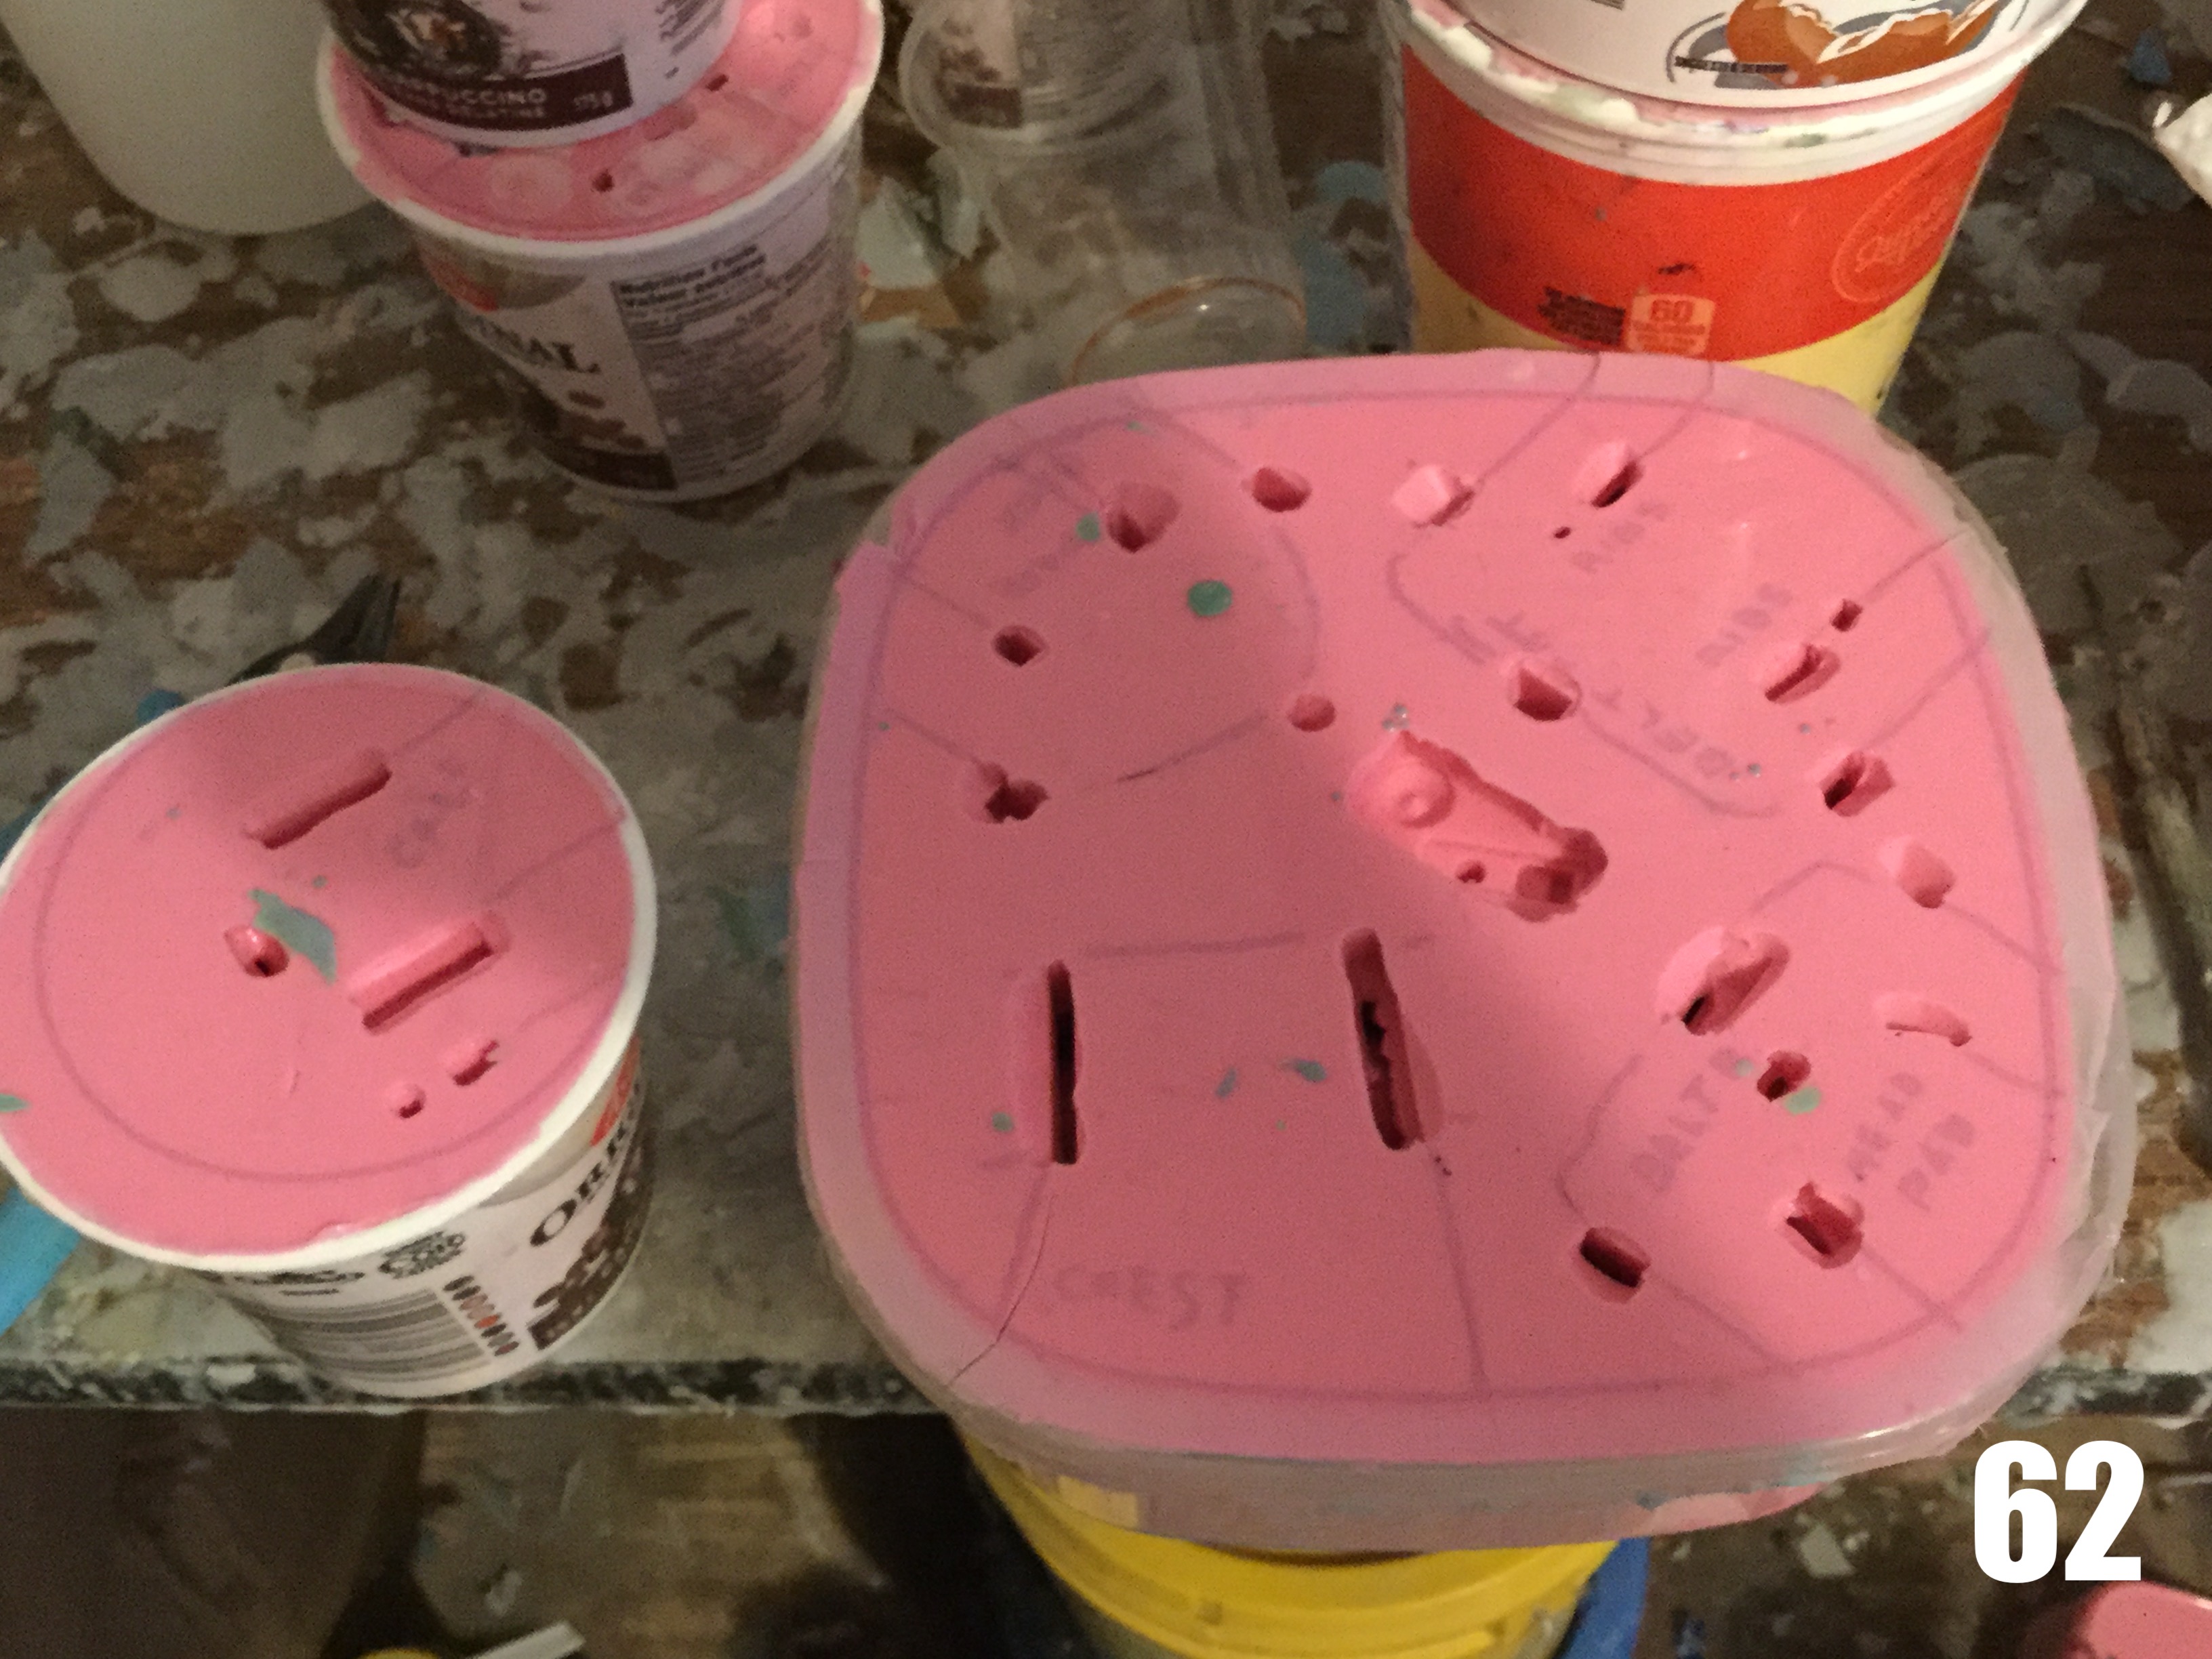
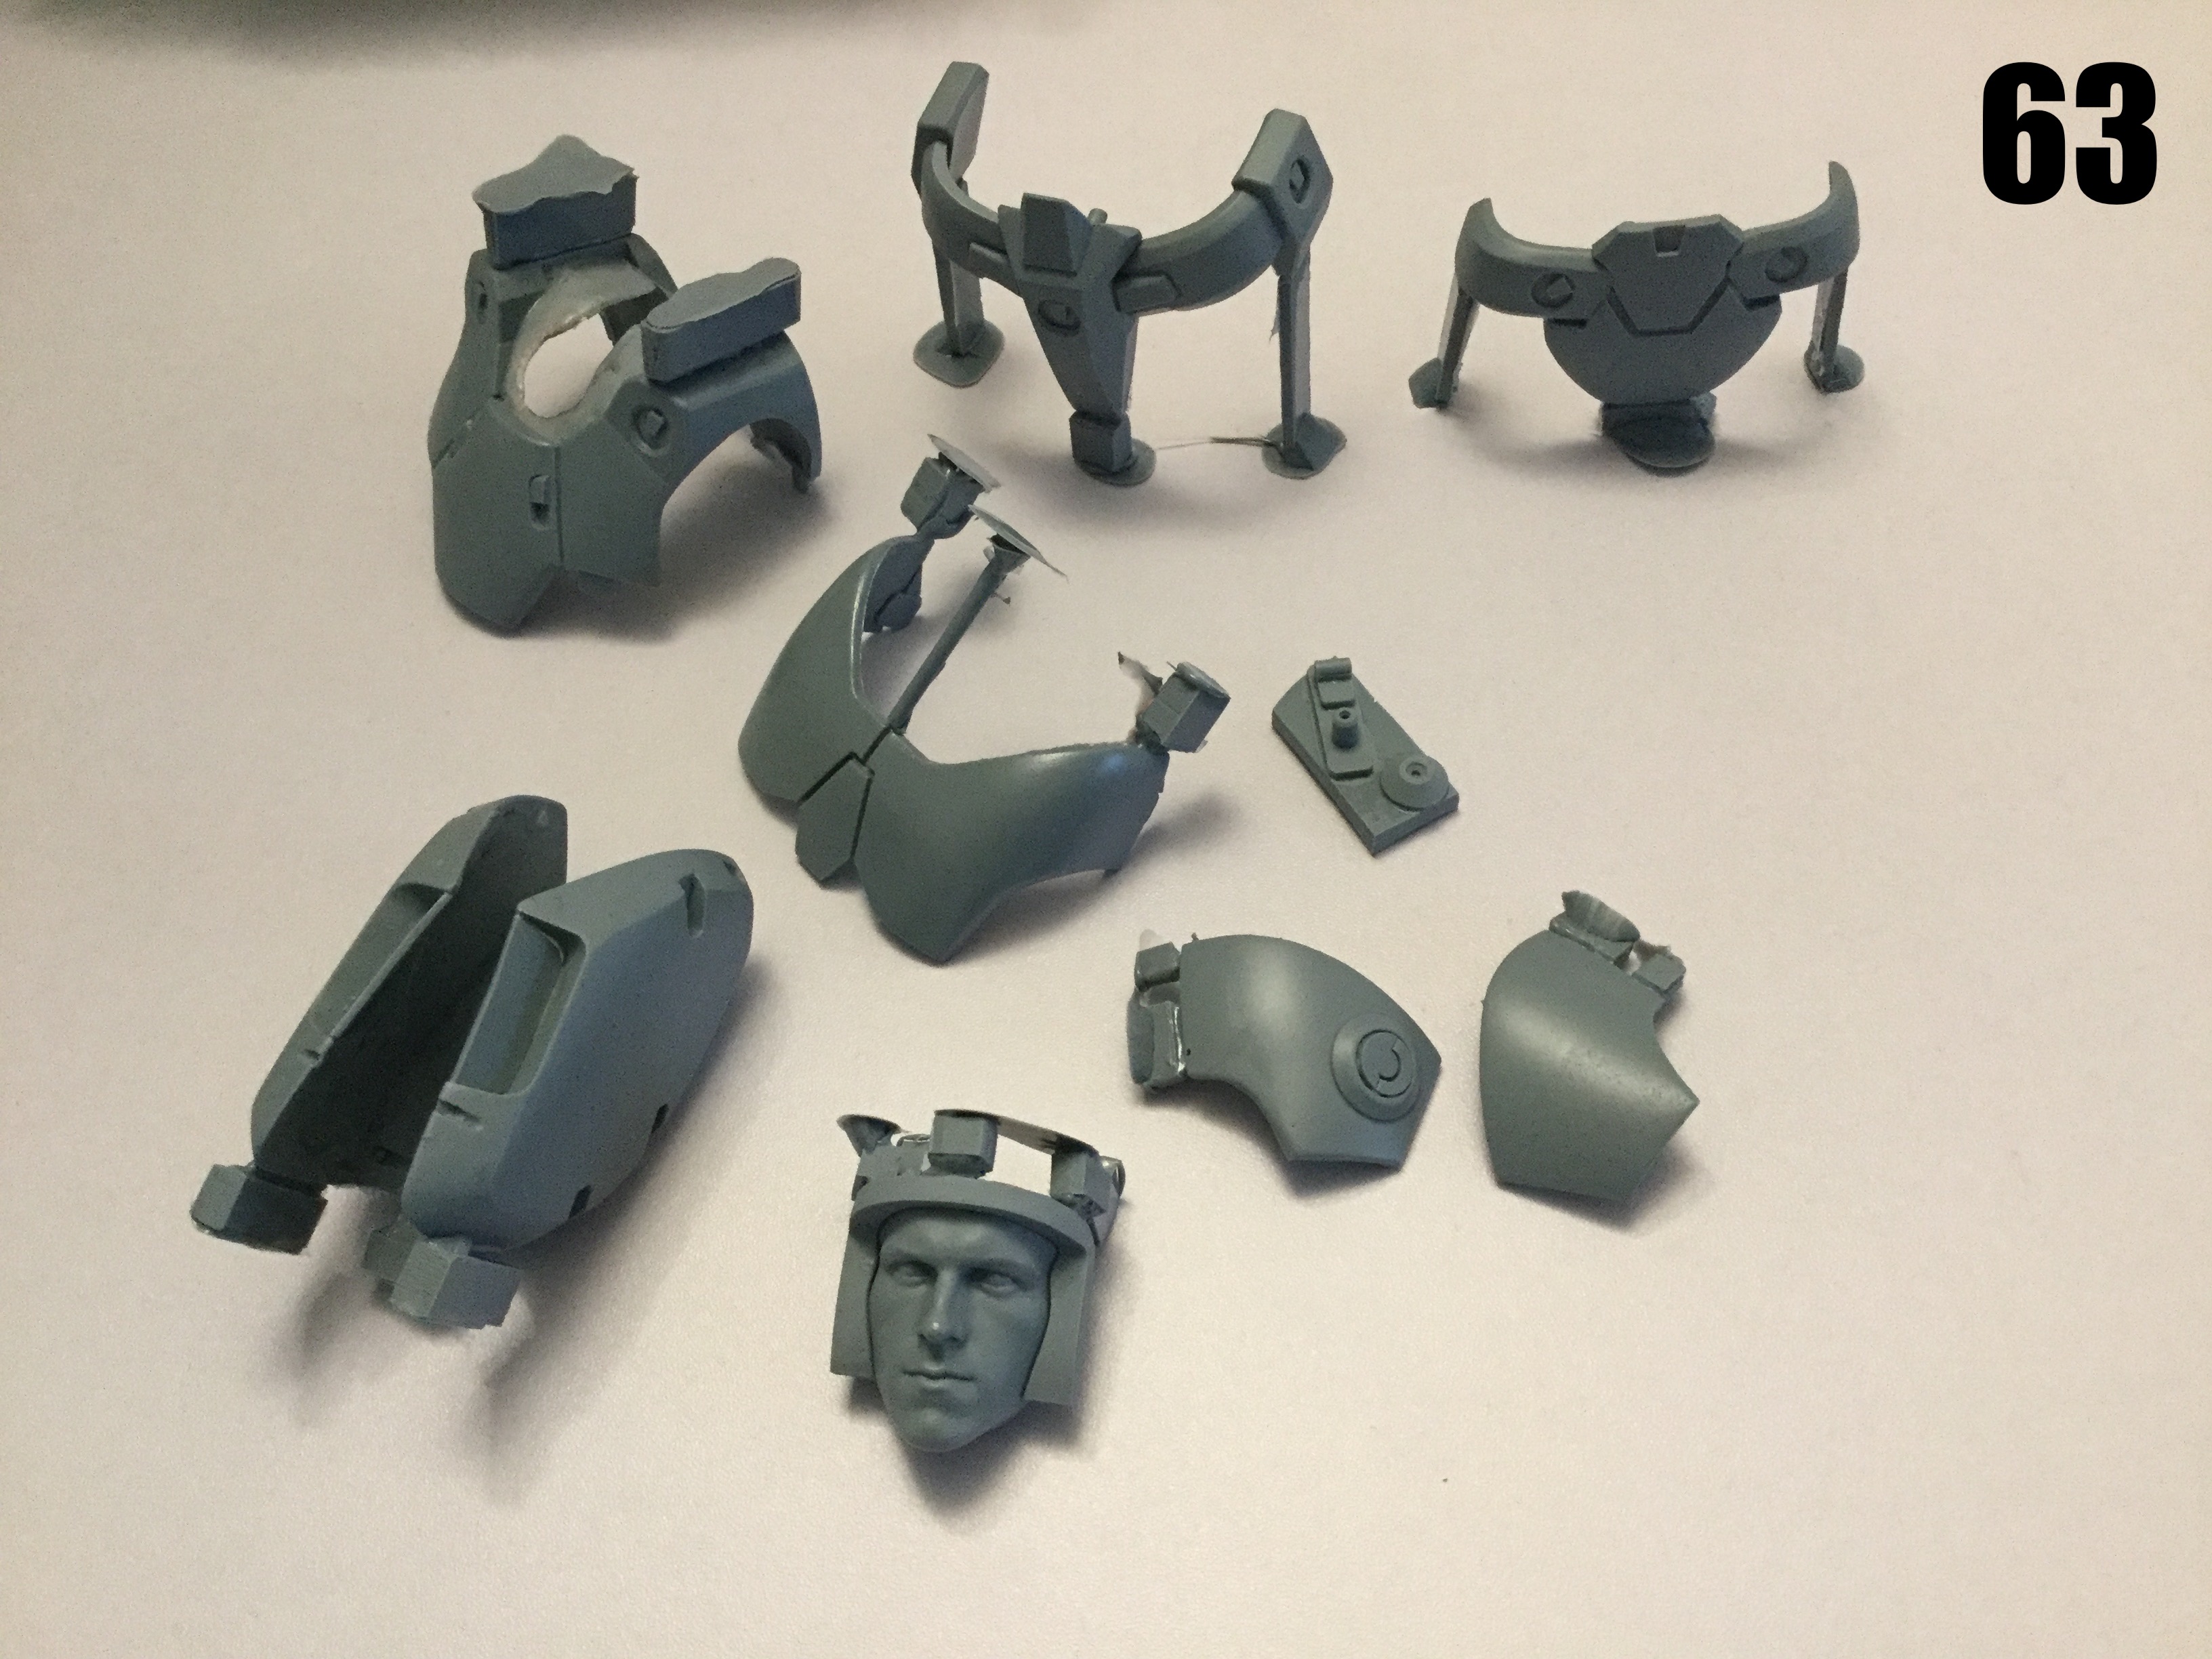
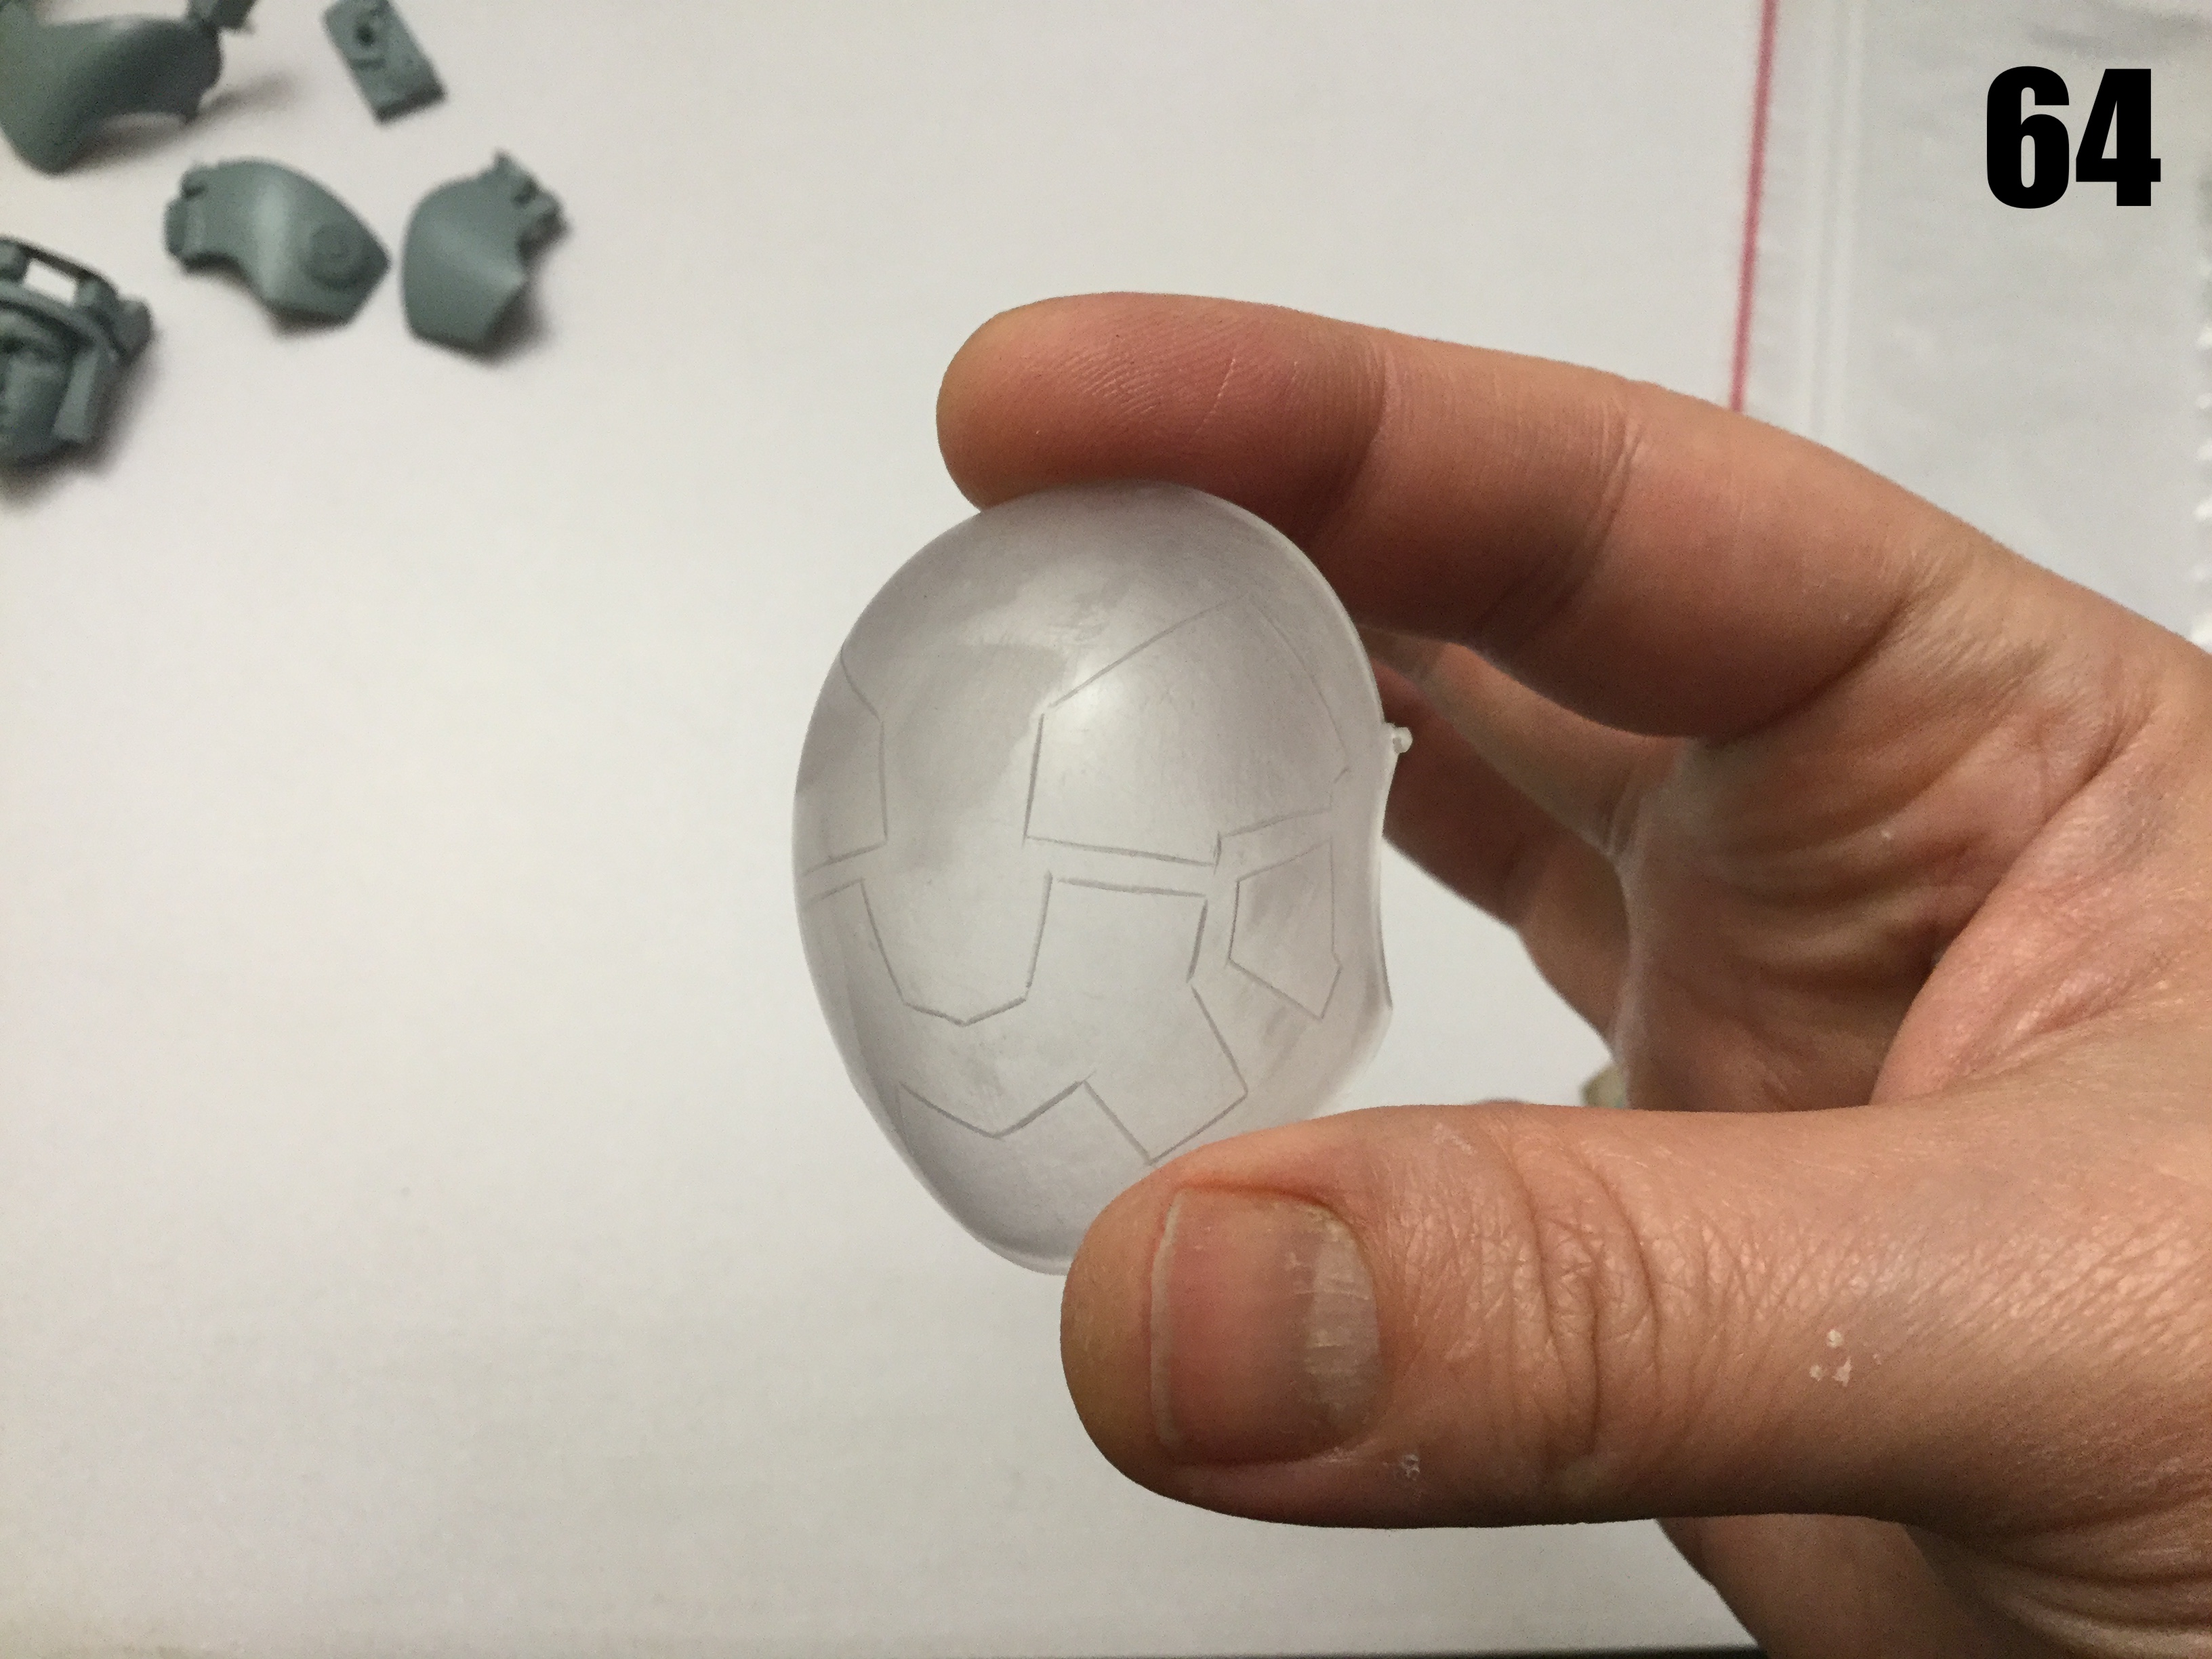
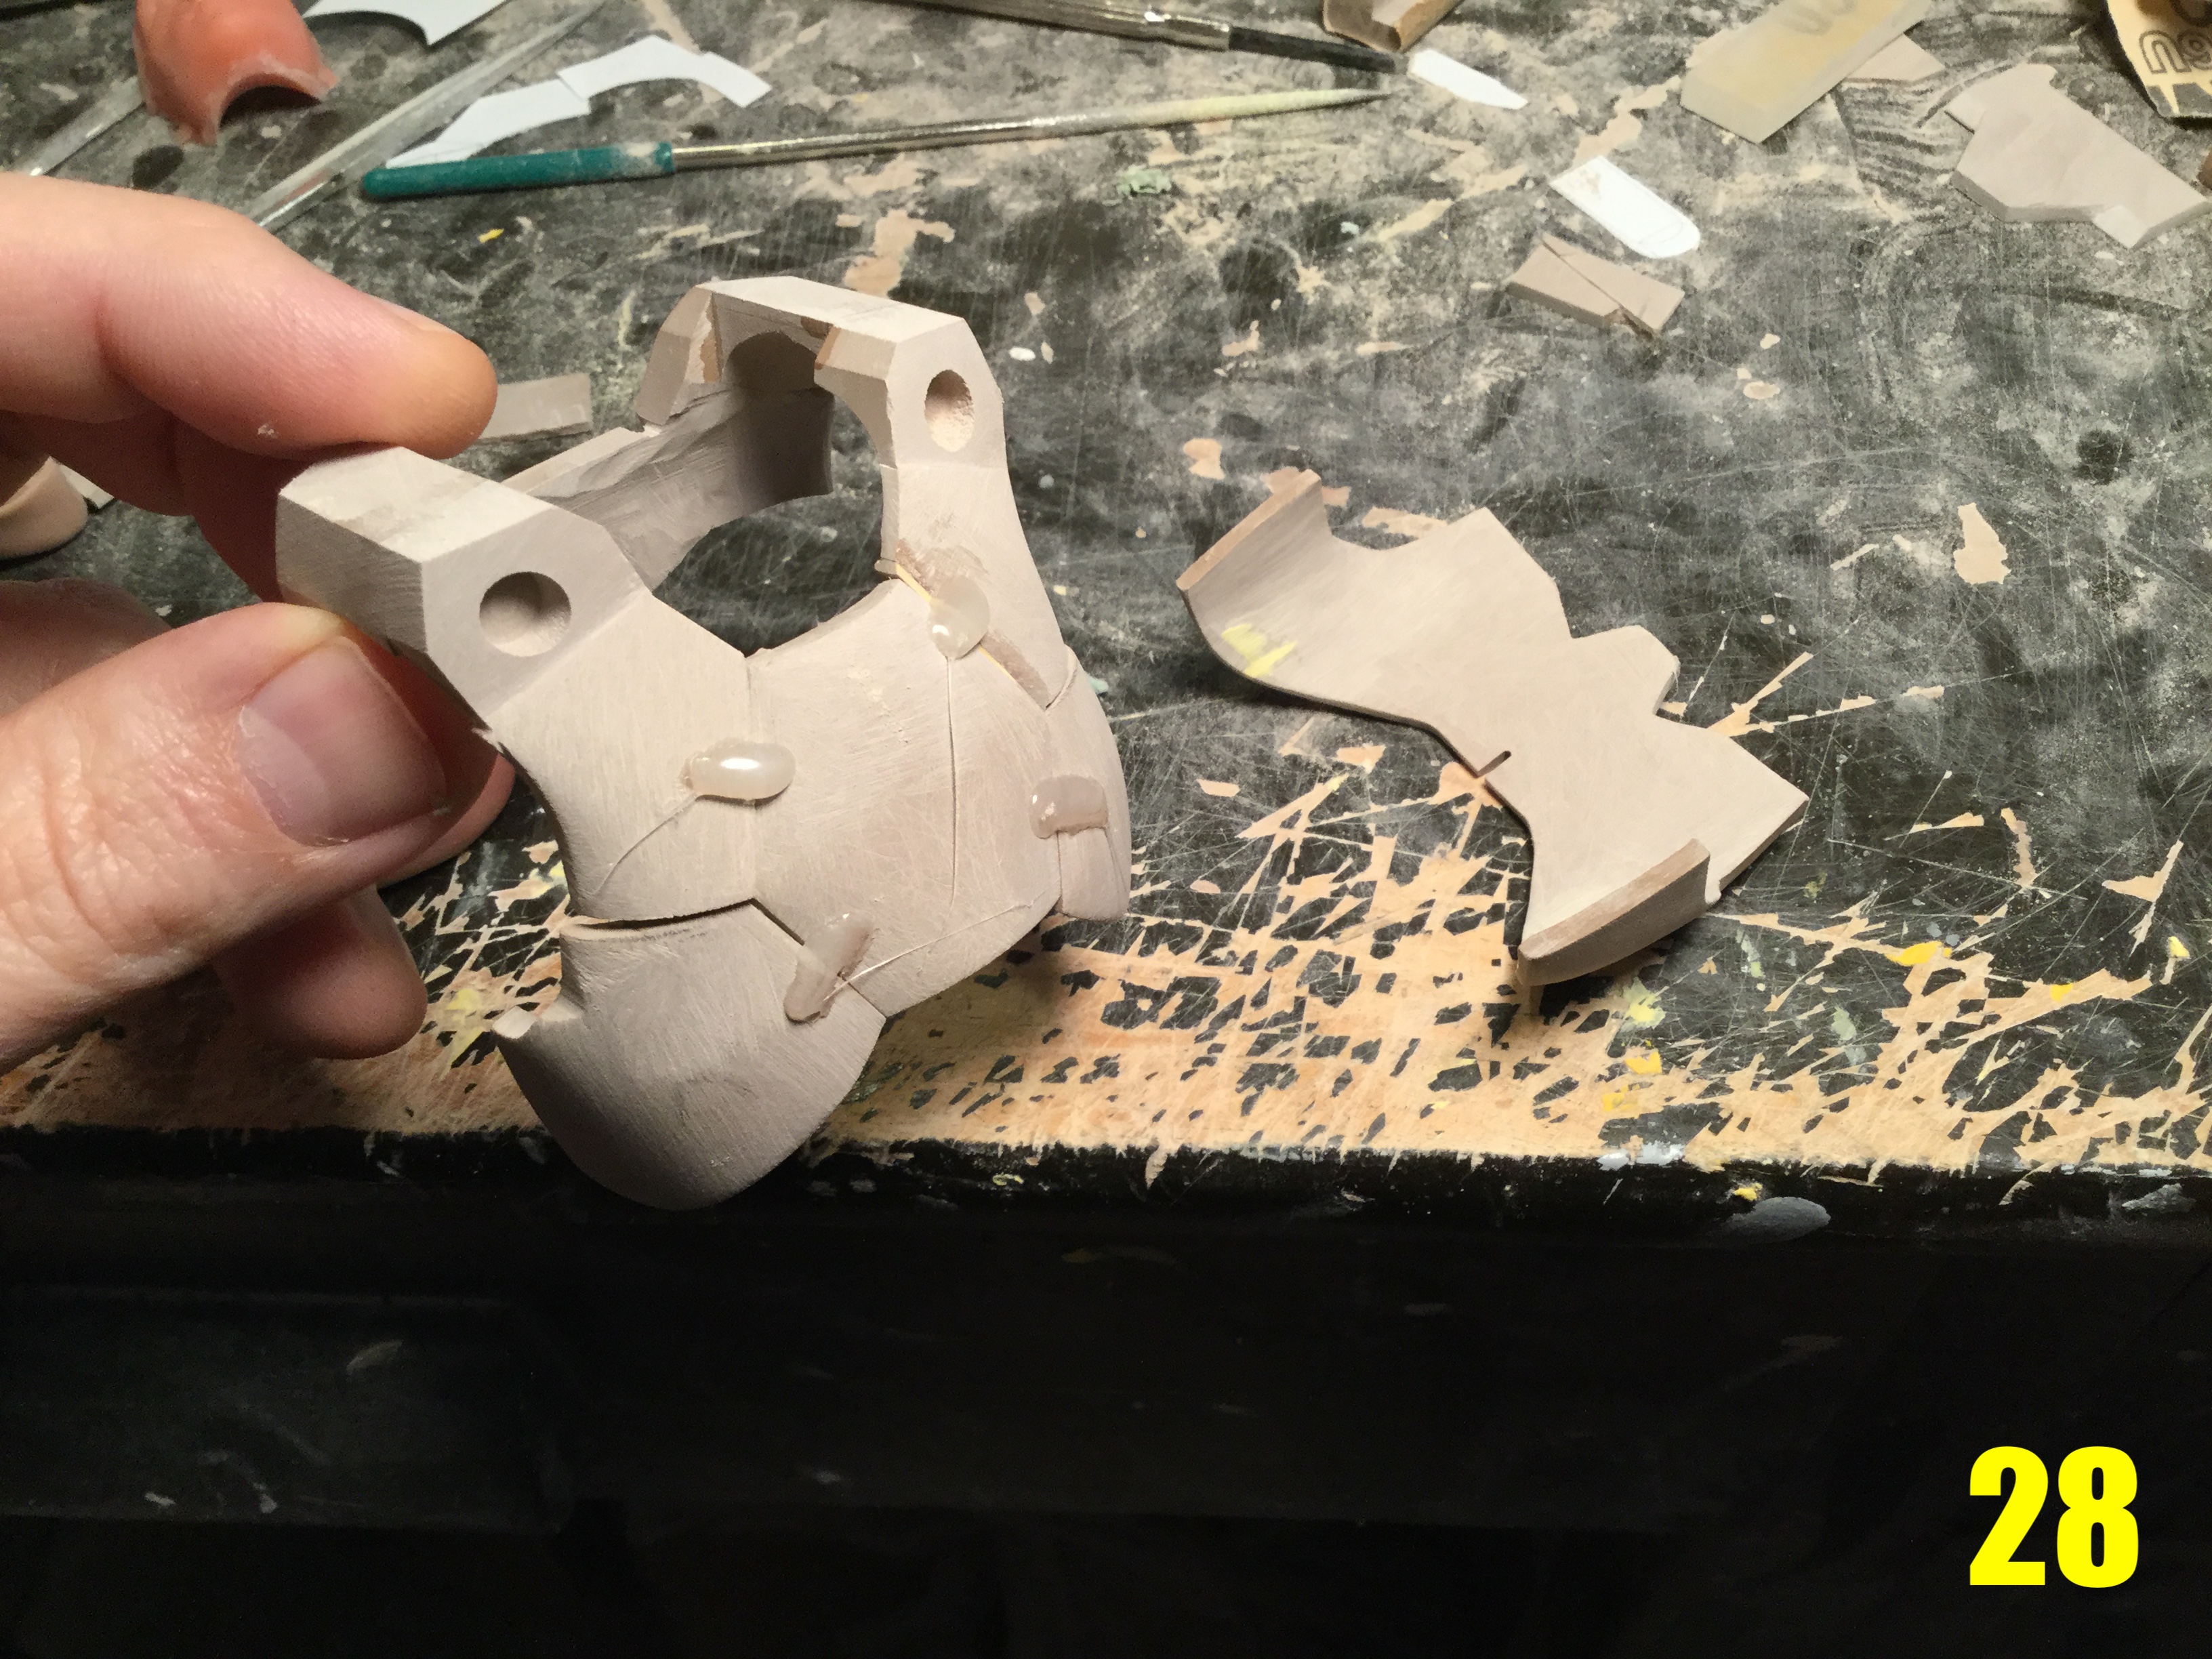
1/6 Motocycle Freak Scratchbuild Project Captain's log: Friday, December 22, 2022 Absurd! That's how I describe the mold-prep needed for these masters. The delicate nature of the parts means I have to take great care and extra time to add de-molding aids, otherwise, I would end up destroying the parts when I slice and pry the molds open. In pic 59, you can see some of the more notable offenders: the chest armor components, which have details on multiple sides, and large openings in the middle of those parts—all things which mold makers dread. The white additions you see are either paper or plastic sheets, designed to create an expendable partition in the mold itself, so I don't have to torque it when I remove the masters. Pic 60 shows the dreaded ankle armor pivot. Another one of those parts I end up looking at in retrospect and say to myself “What in the world were you thinking?!?” Alas, there's no turning back now! Once the mold rubber is poured (pic 61) it's too late for regrets. I leave that to set for 24 hours, then the extraction process begins. Pic 62 shows the completed molds, looking very excellent indeed! The time and effort spent preparing the parts paid off, and save for 1 or 2 parts which will need repair (that ankle pivot came out of the mold in 3 pieces), the masters came out largely intact. Pic 63: the fruits of all that labor! The parts are just excellent, and very clean. Now that some of the hardest pieces are molded, the rest of the molding should go smoothly. Pic 64: the visor is now scribed and undergoing polishing. Unlike the Sentinel figure, the visor lines will be muted, just like in the Aramaki illustration. I'll take a few days off for the holidays, so my next update may tarry. Until then, Merry Christmas and Happy New Year to you all! 🎅🥴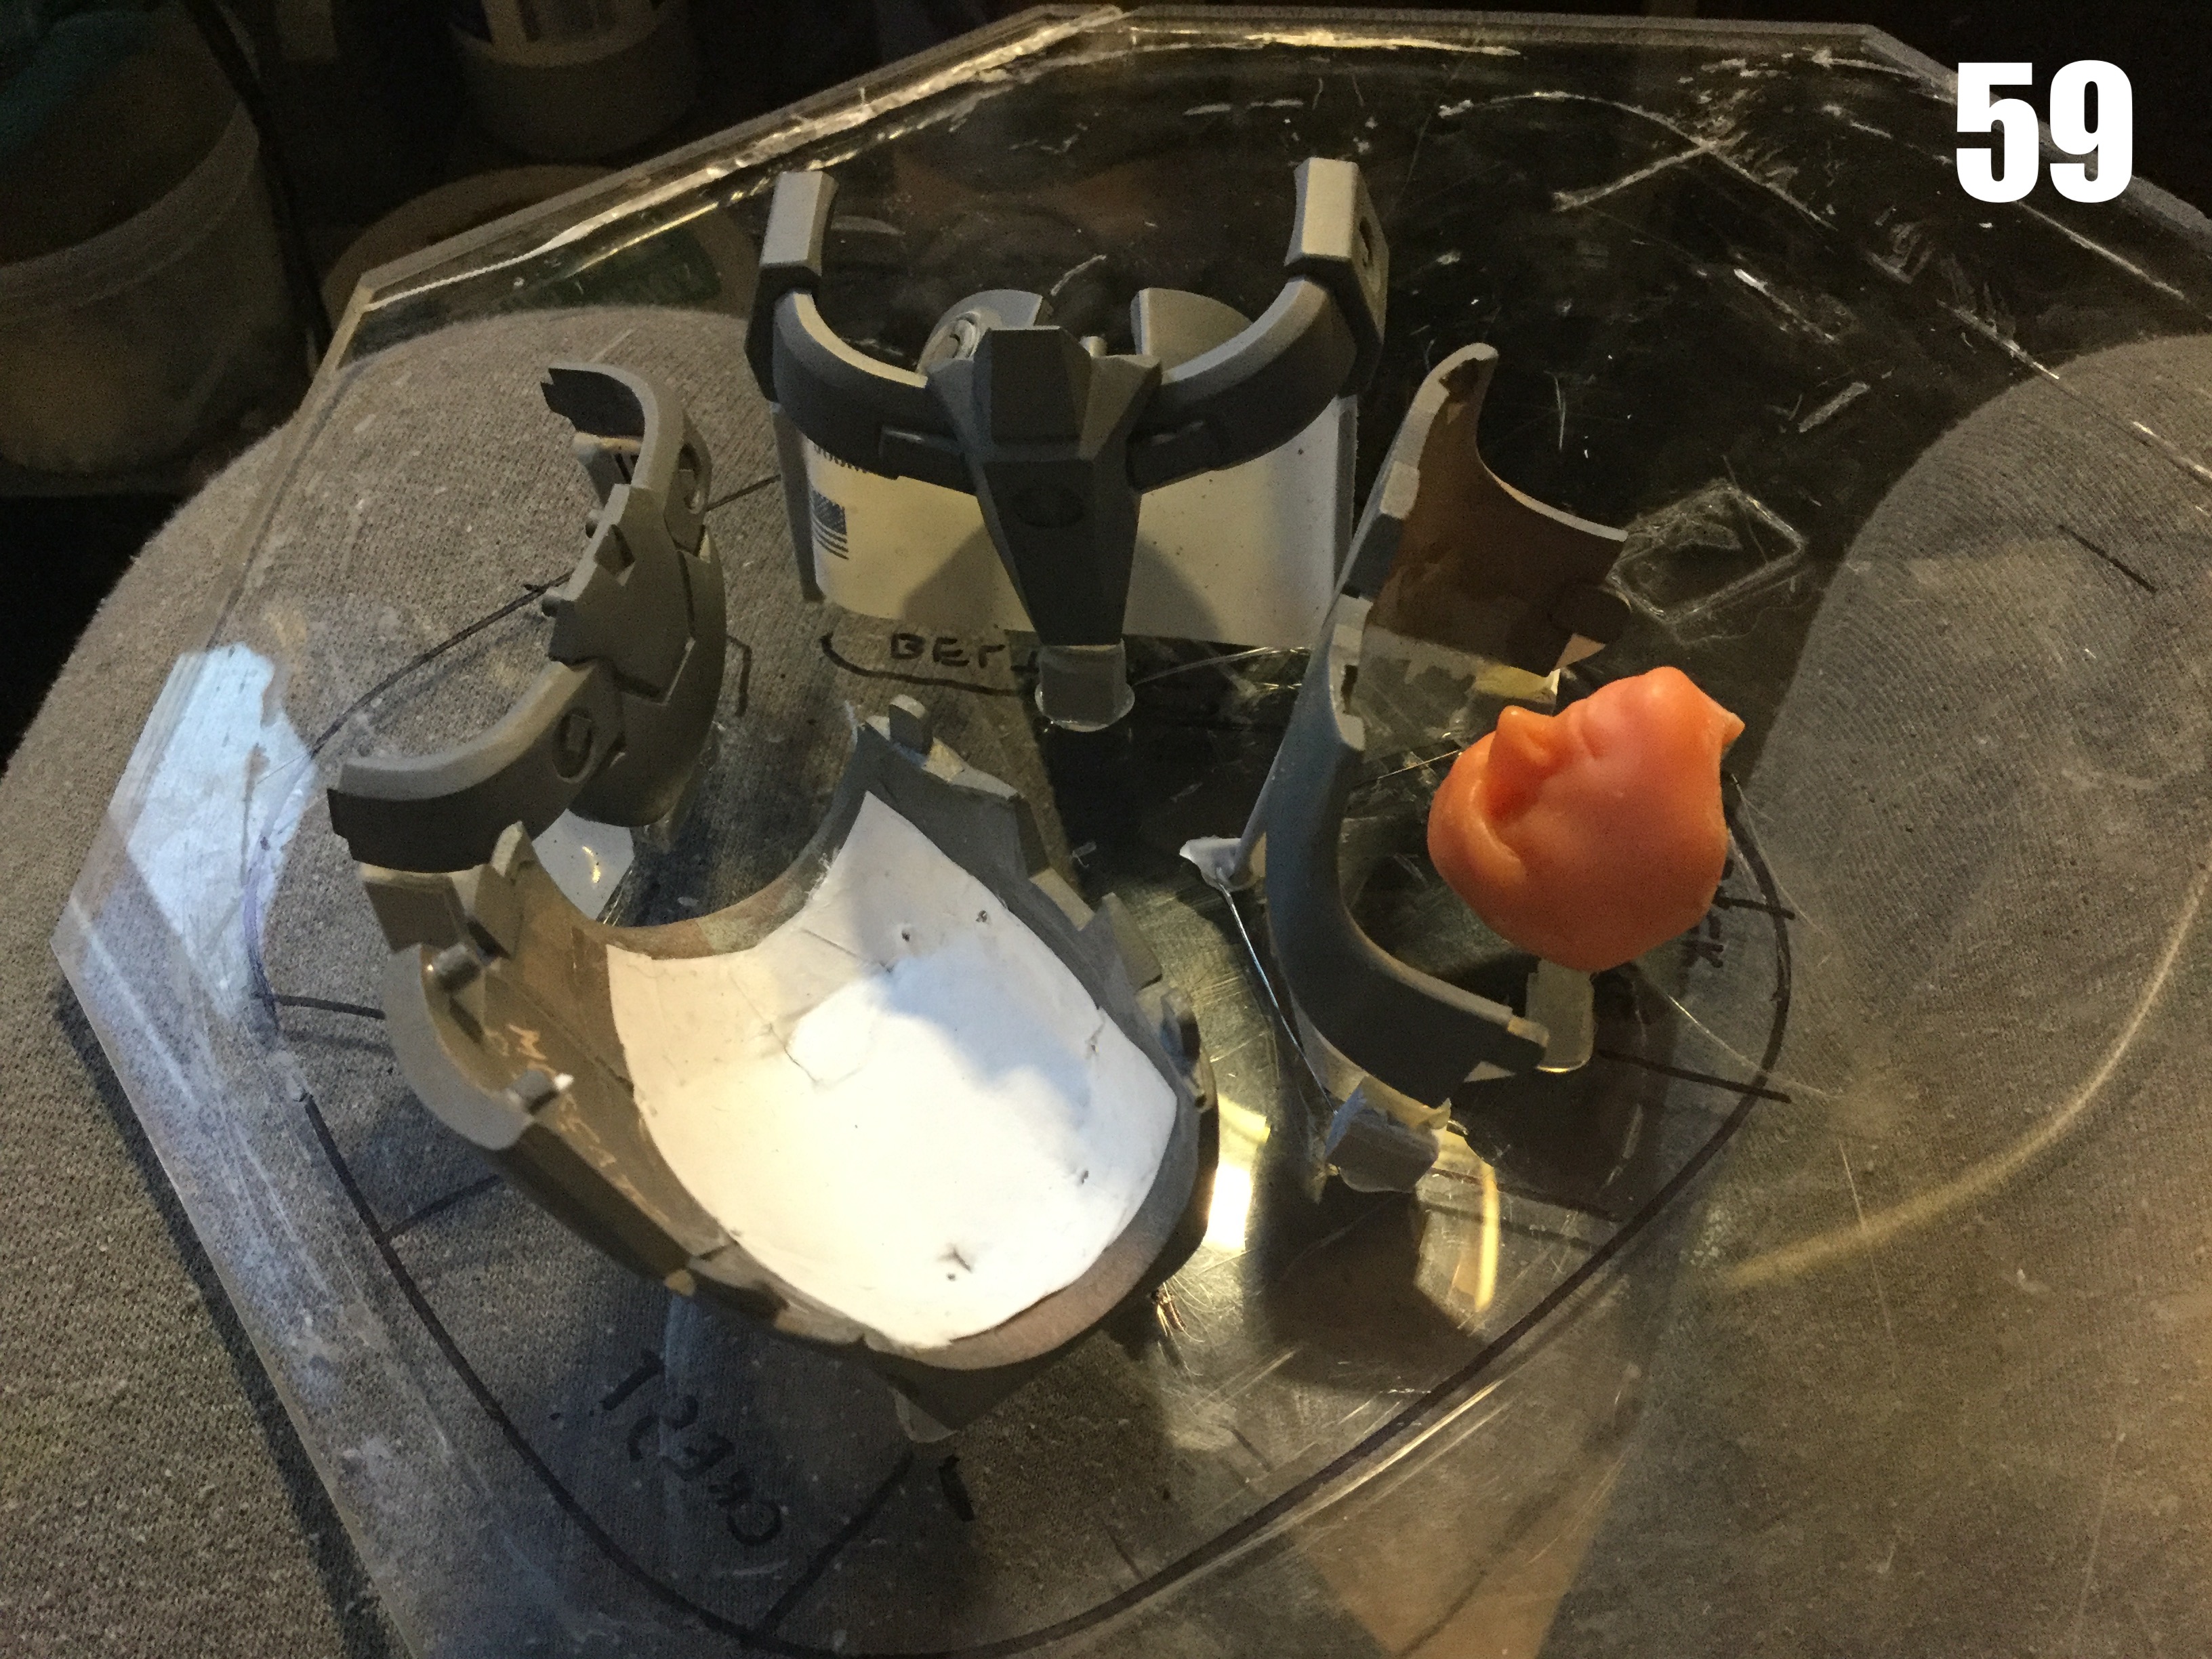
-
Kudos for your restoration work, and fixing those fabric sections must have been an interesting challenge. Have you considered painting the plastic parts since you're already disassembling them? It would resolve the yellowing issue once and for all.
-
1/6 MOSPEADA Rider Project Proposal
captain america replied to captain america's topic in Anime or Science Fiction
Those accessories might come later if there's enough demand. -
1/6 MOSPEADA Rider Project Proposal
captain america replied to captain america's topic in Anime or Science Fiction
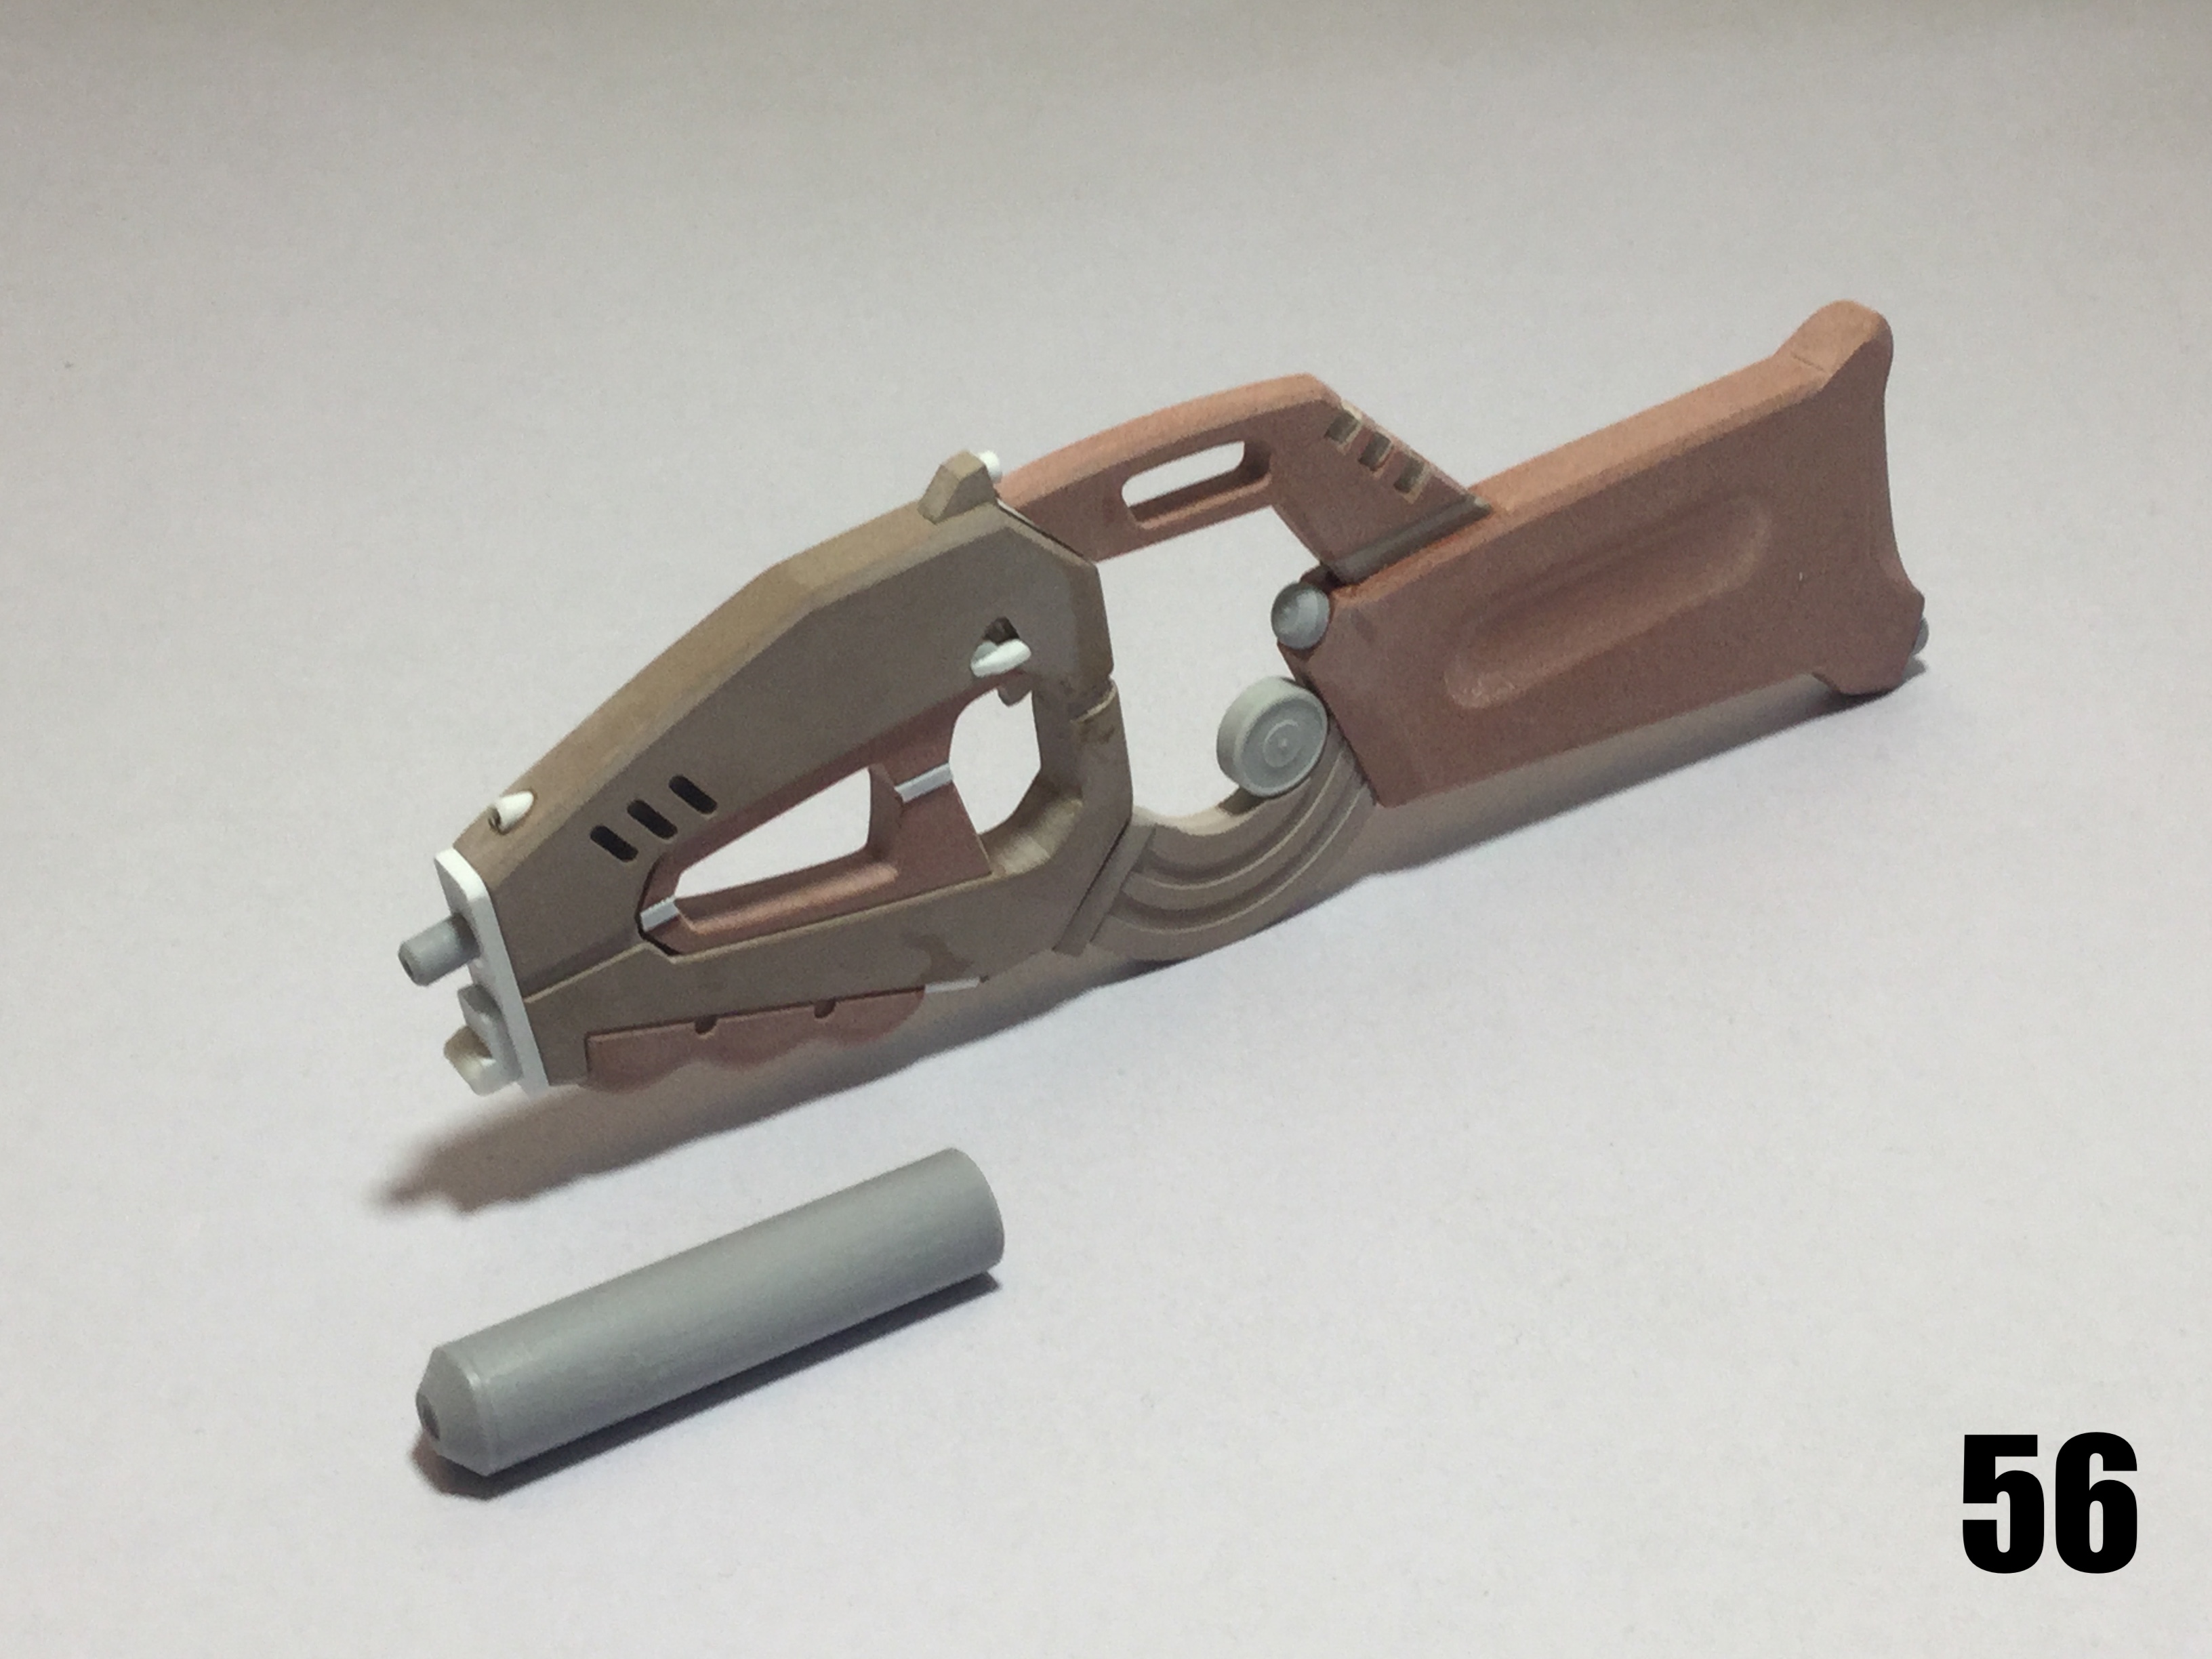
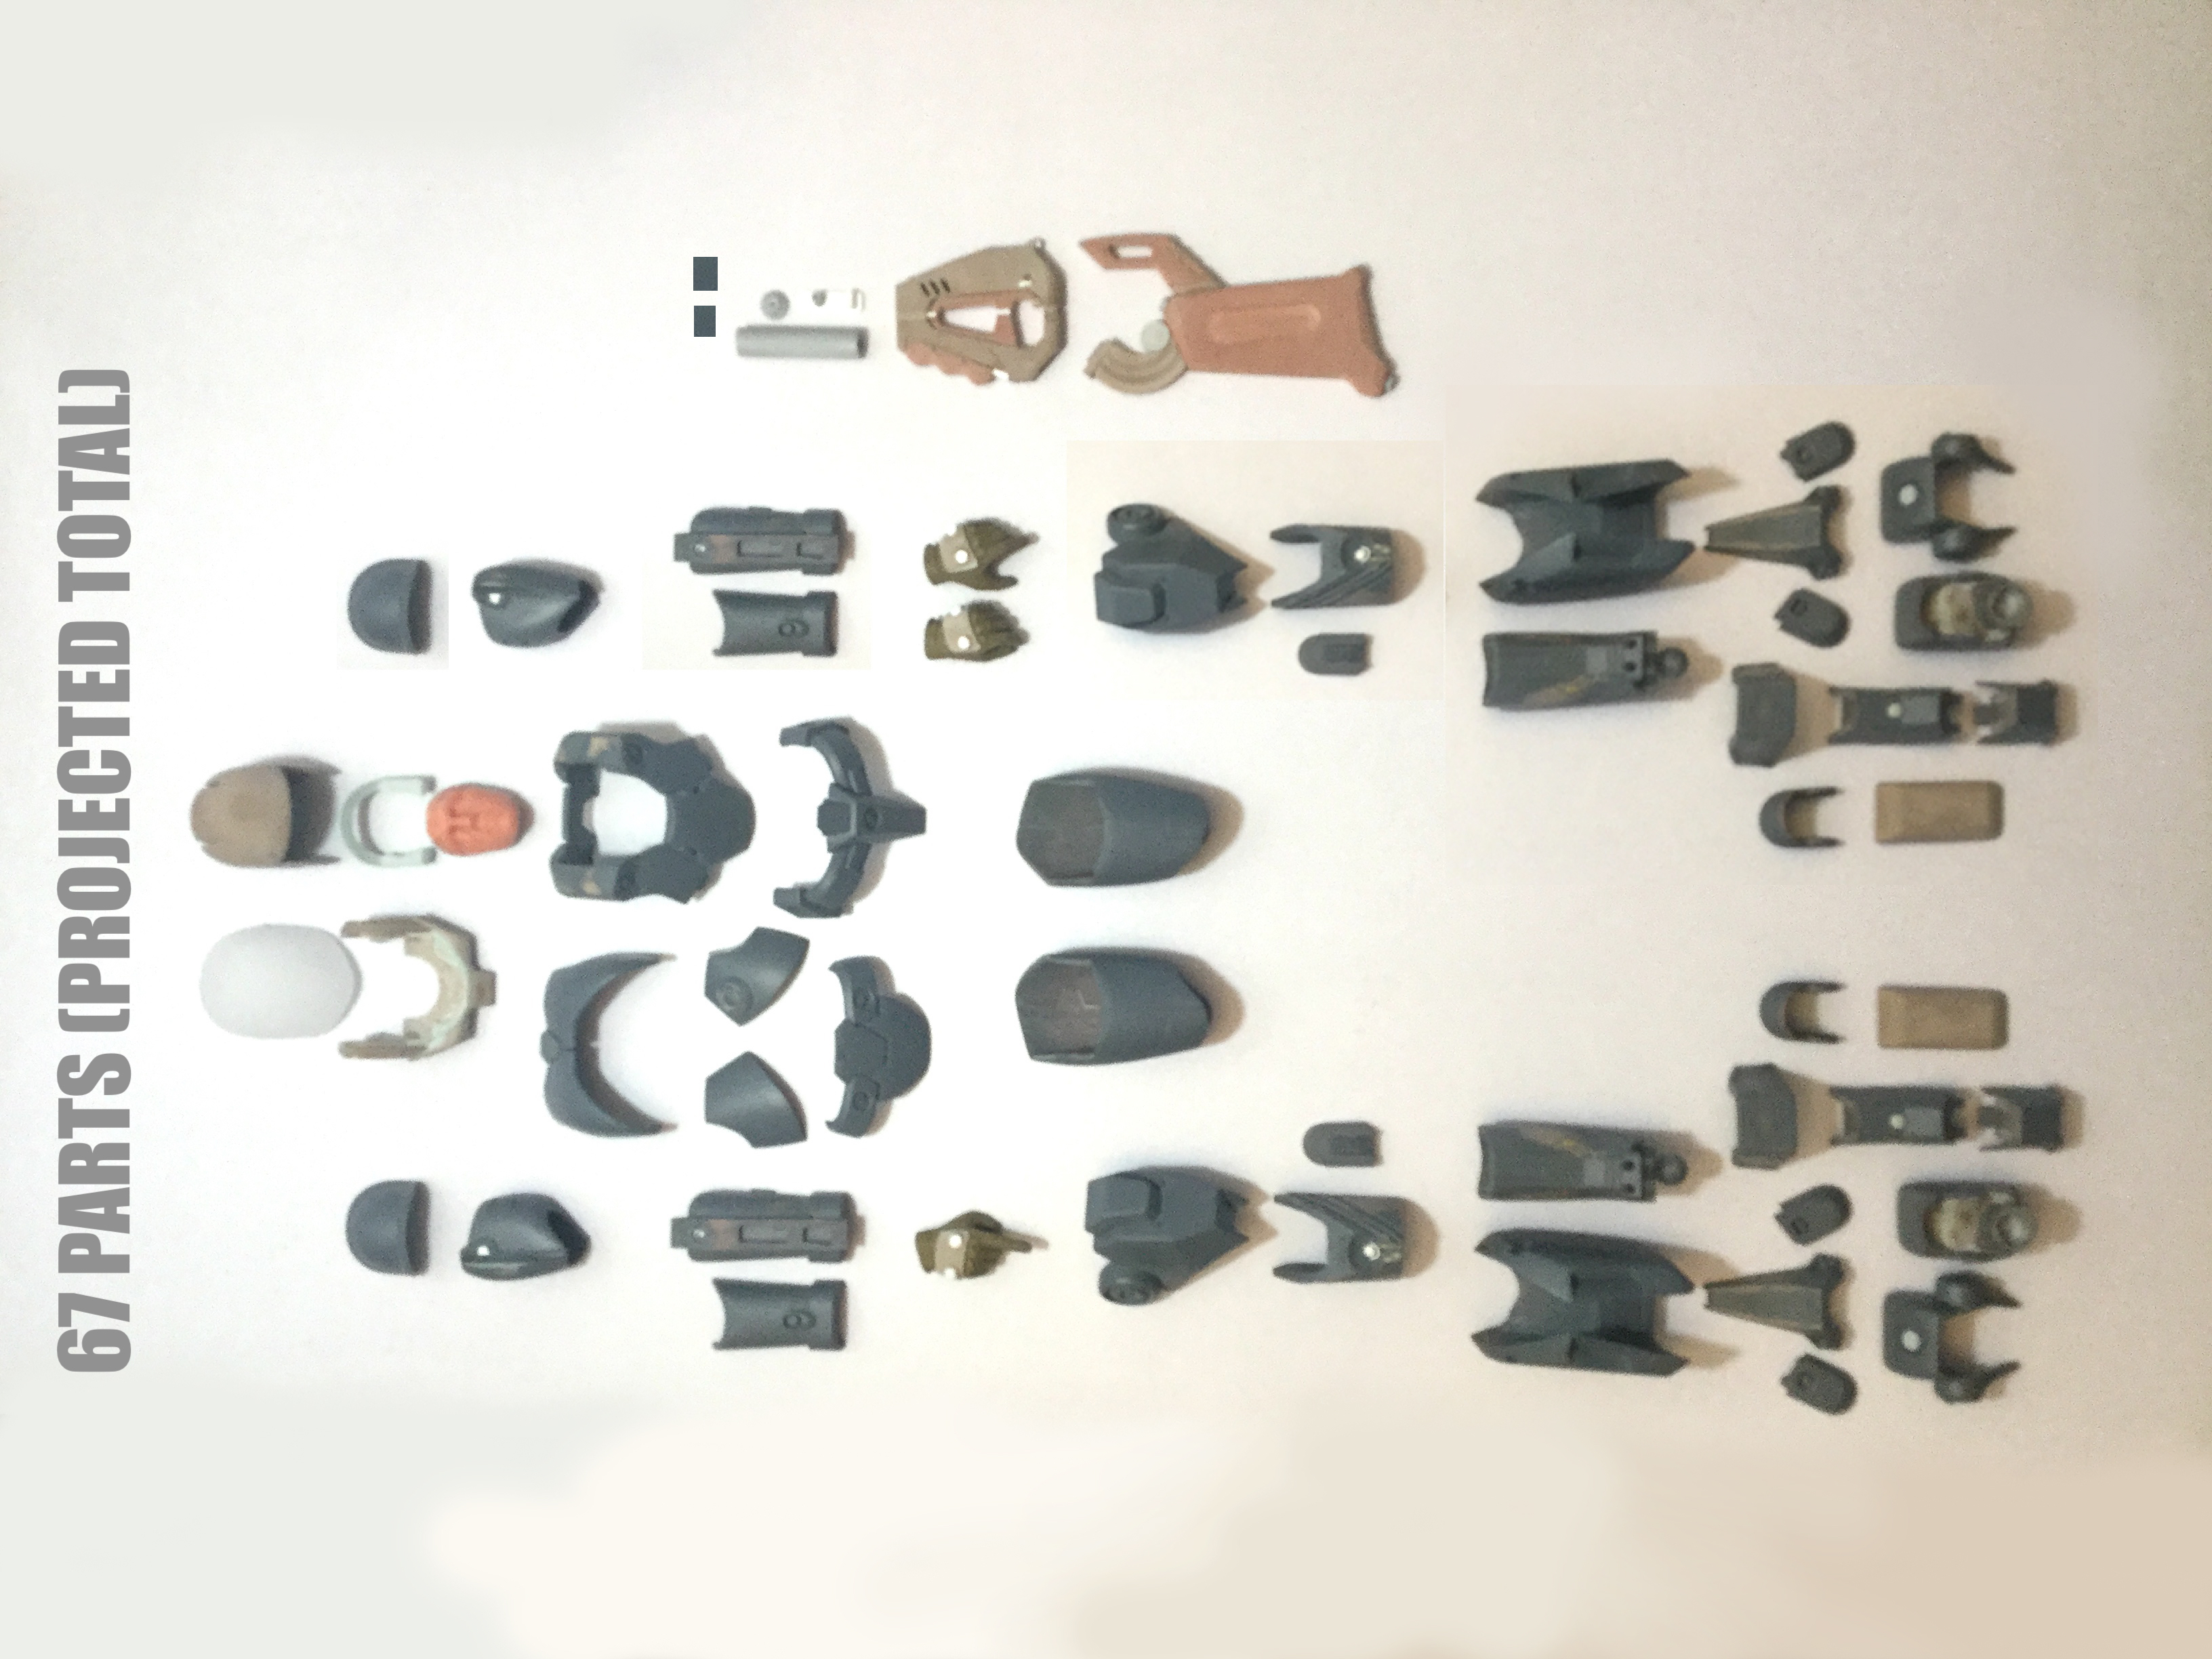
1/6 Motocycle Freak Scratchbuild Project Captain's log: Friday, December 16, 2022-- a short, but necessary update. Mold-prep of most components has already begun. While there are still some pieces to finalize and detail, namely the synthetic muscle corset, but since these components must be fitted to the already fragile torso armor, I thought it best to mold the latter and use the much sturdier castings of these to complete the corset. As such, glam pics will take longer, but they'll be worth it. This kit won't have a particularly high parts count, but virtually every part will have been meticulously fitted and whittled until it fit just right—in some ways, worse than the Hemoroid!! Pic 55: final fitting and adjustment before mold-prep begins. Pic 56: armed and ready! This pistol carabine is ridiculously huge for the rounds it fires! It looks like it would have respectable barrel length... assuming you don't mind carrying a weapon the size of a medium pizza box. Pic 57: helmet is almost done, too! I sanded down the visor to get rid of the printing texture, and this will make it easier to trace the scribe lines before I re-polish it. Last pic shows all the parts I have, minus the 2 flexible and 3 rigid corset parts. This next week will be a massive crunch for me, but I just enjoy this project so much and can't wait to see it finished!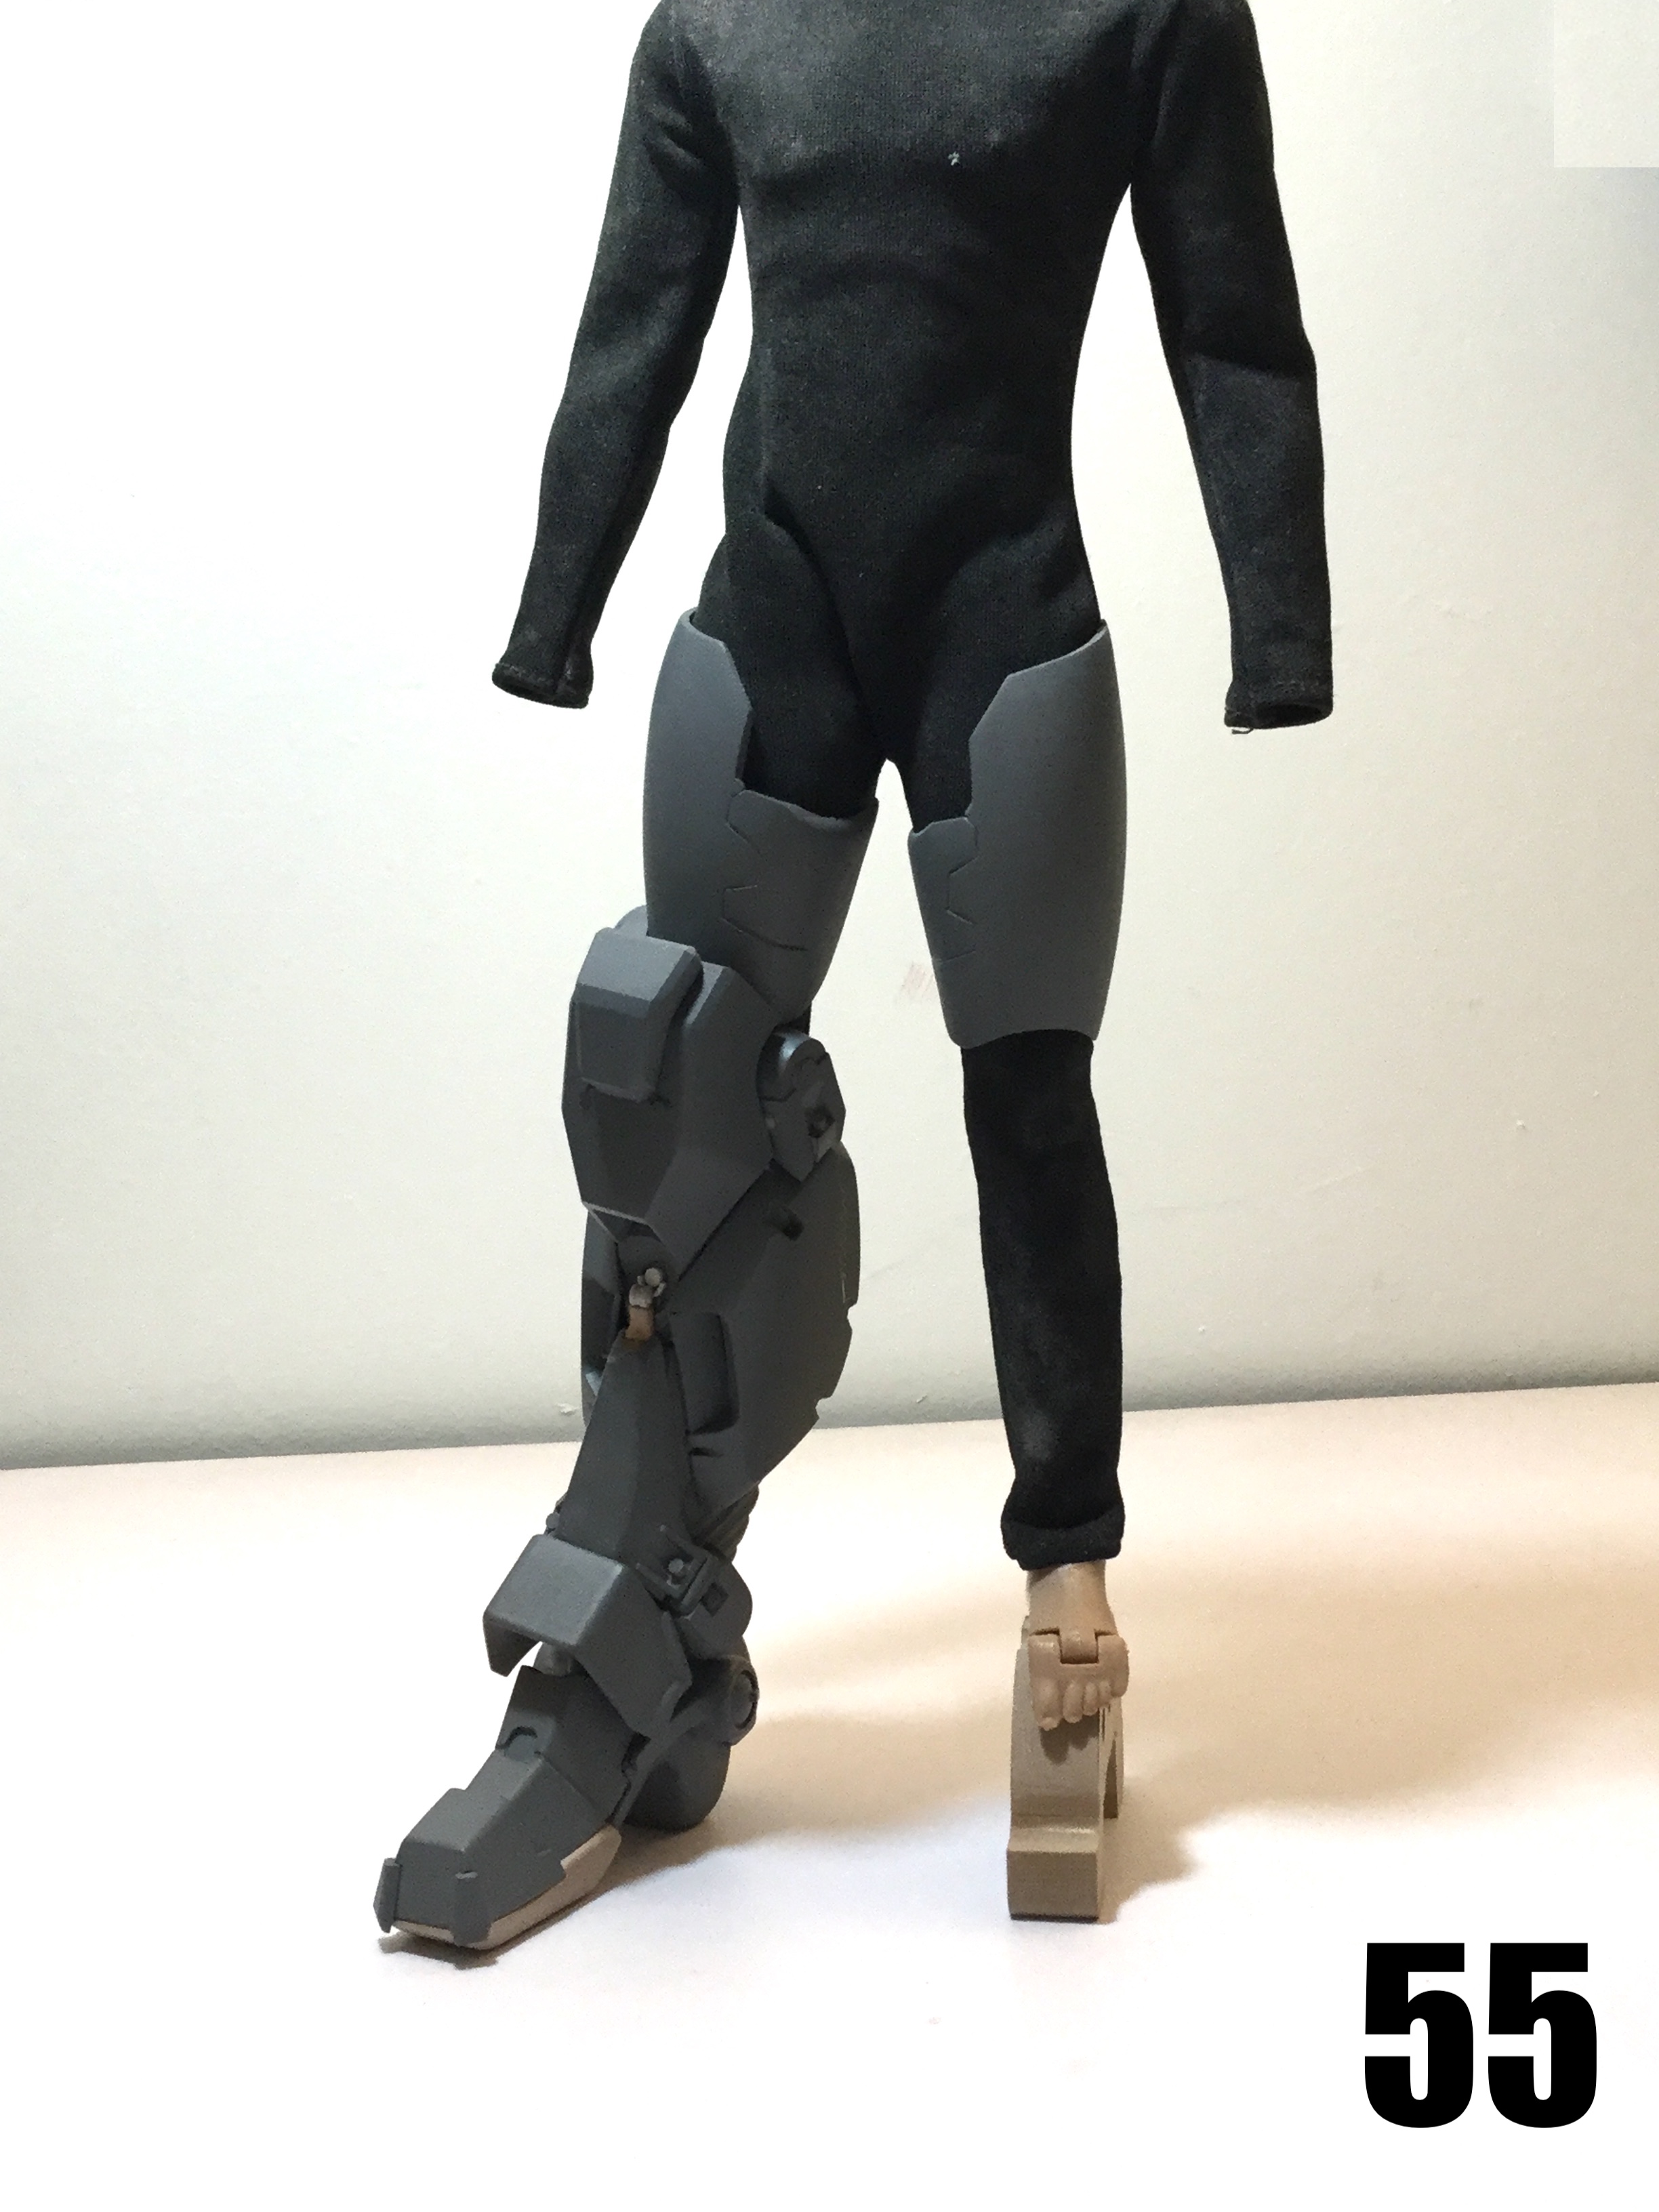

-
1/6 MOSPEADA Rider Project Proposal
captain america replied to captain america's topic in Anime or Science Fiction
I'm hoping the masters will be done before Christmas, and the first kits will be ready early in the new year. -
1/6 MOSPEADA Rider Project Proposal
captain america replied to captain america's topic in Anime or Science Fiction
Visually they aren't extreme, and that's the key: making minute changes in multiple locations which add-up to achieve the desired mobility. It's an art more than a technique. -
Aircraft Super Thread Mk.VII
captain america replied to David Hingtgen's topic in Anime or Science Fiction
Active flow control for the win! -
Aircraft Super Thread Mk.VII
captain america replied to David Hingtgen's topic in Anime or Science Fiction
Be prepared for the possibility that it will have no control surfaces. 😎 -
1/6 MOSPEADA Rider Project Proposal
captain america replied to captain america's topic in Anime or Science Fiction
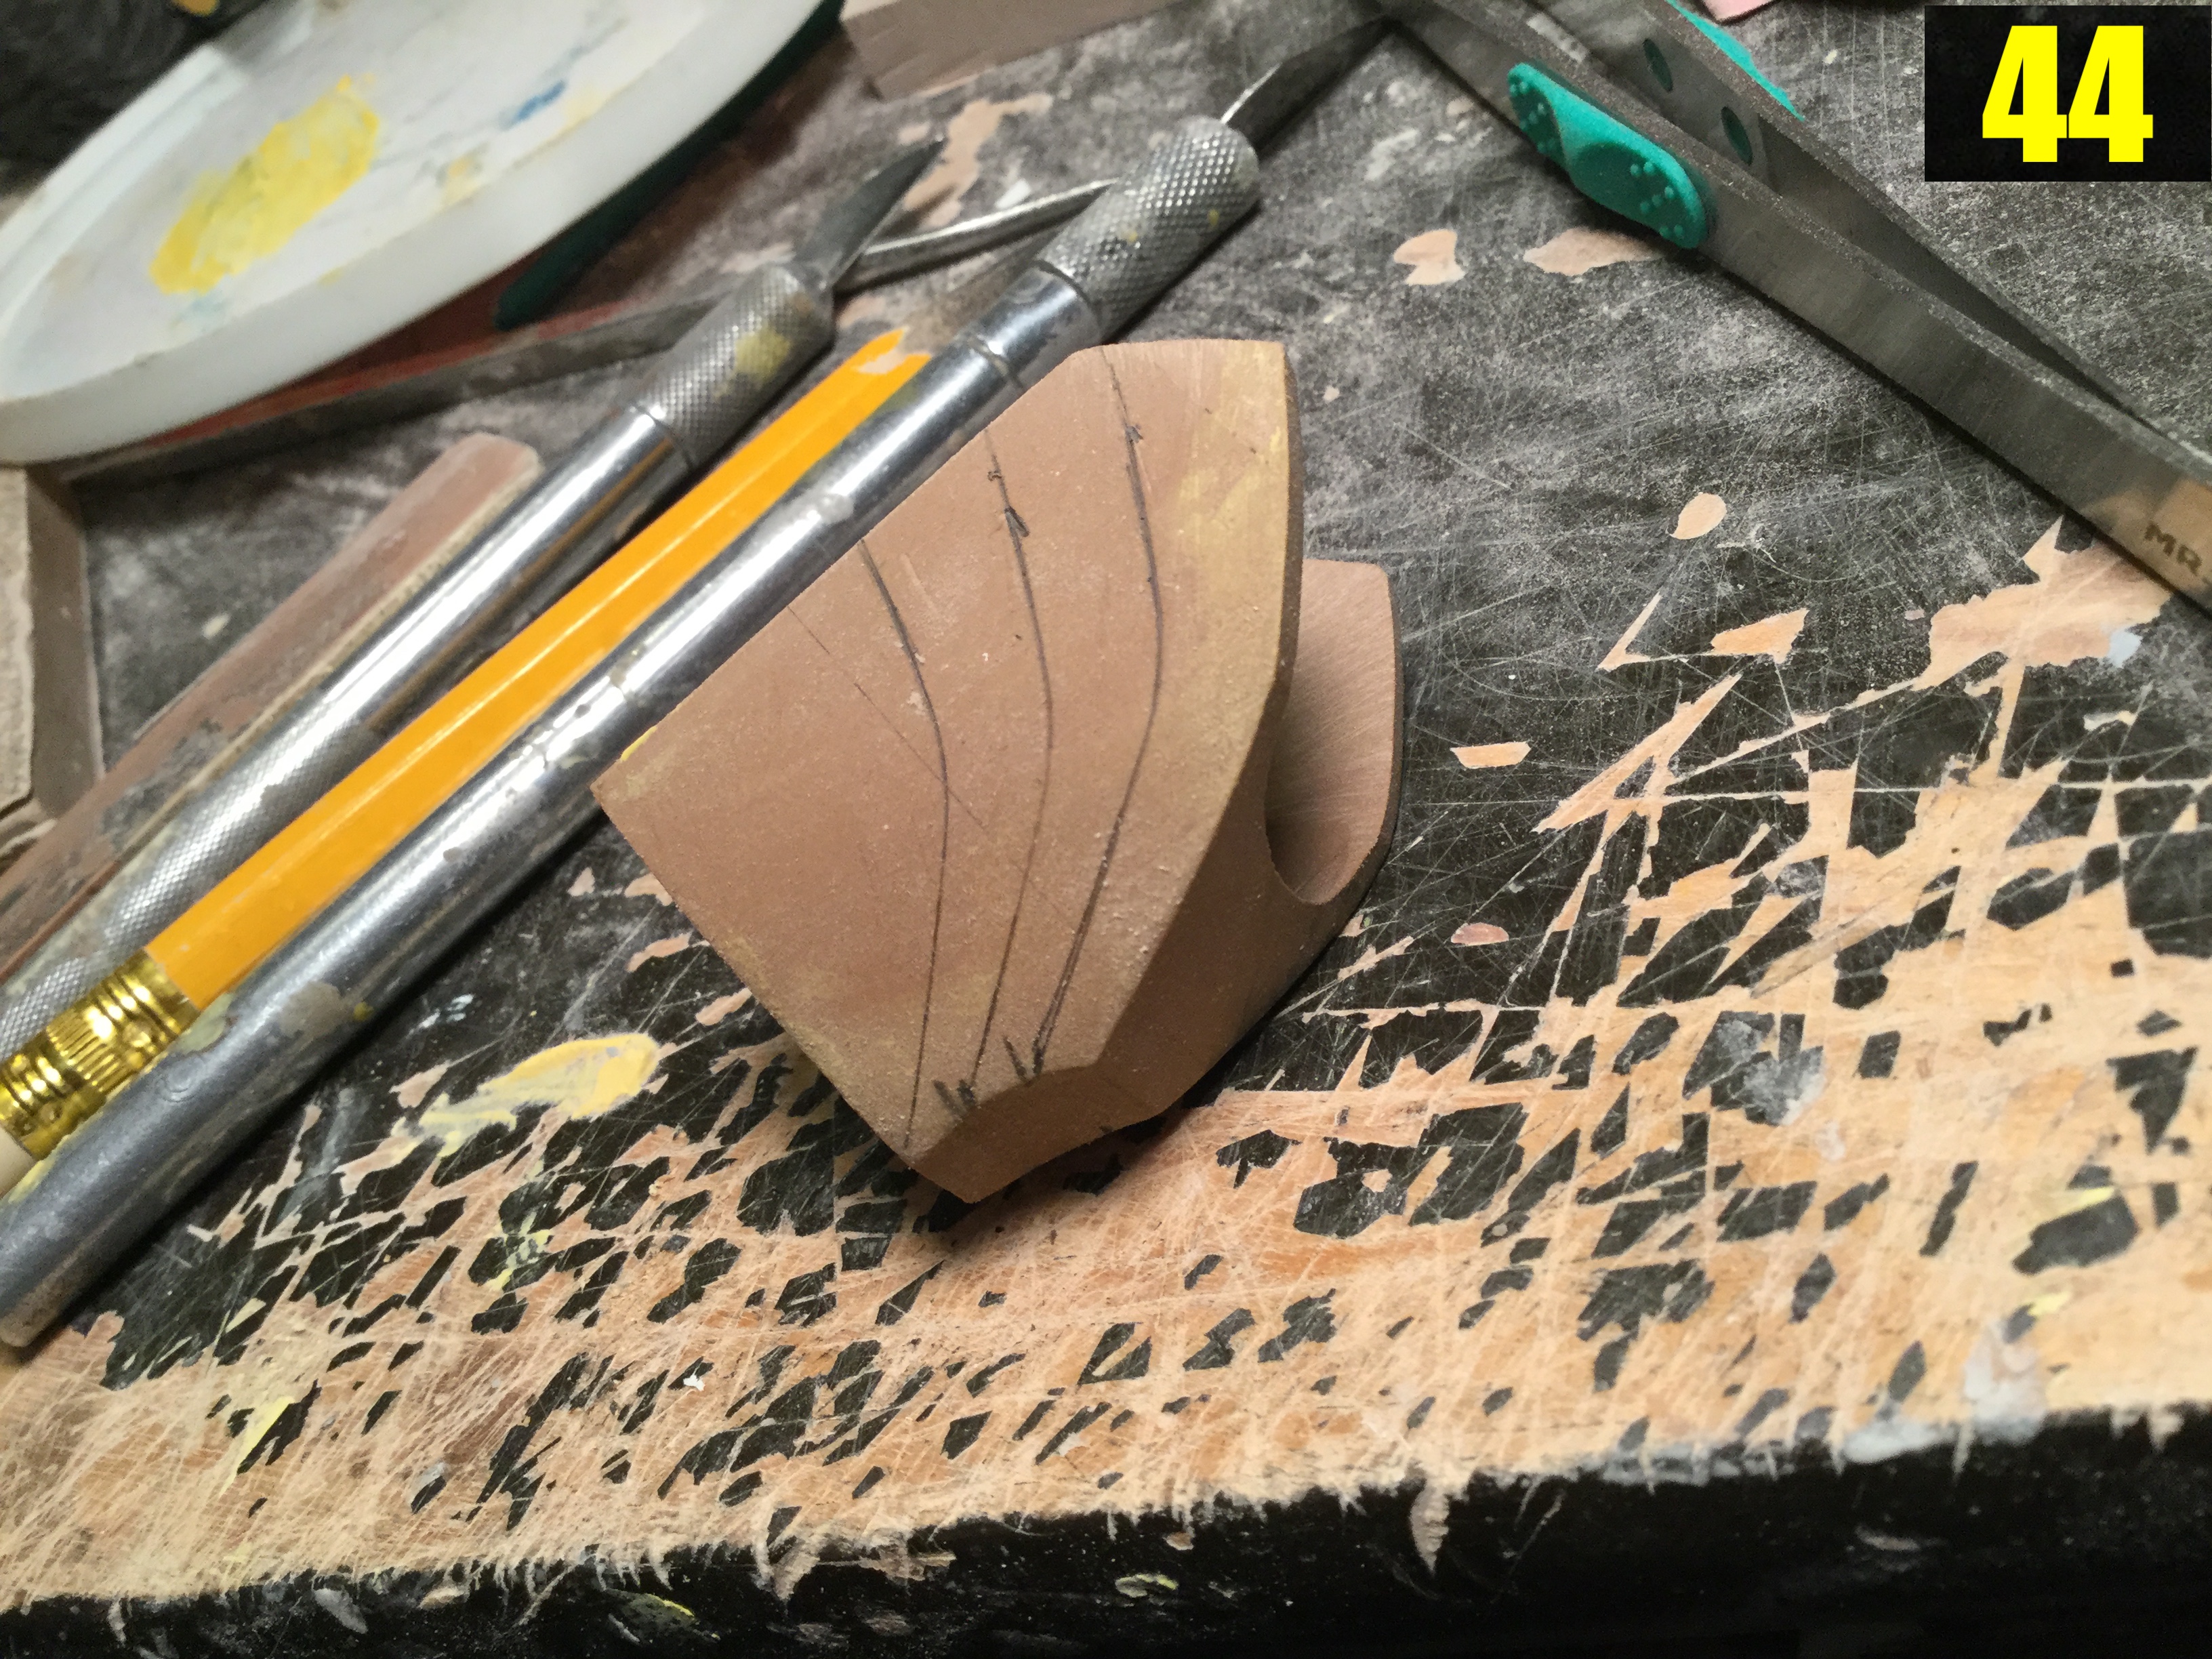
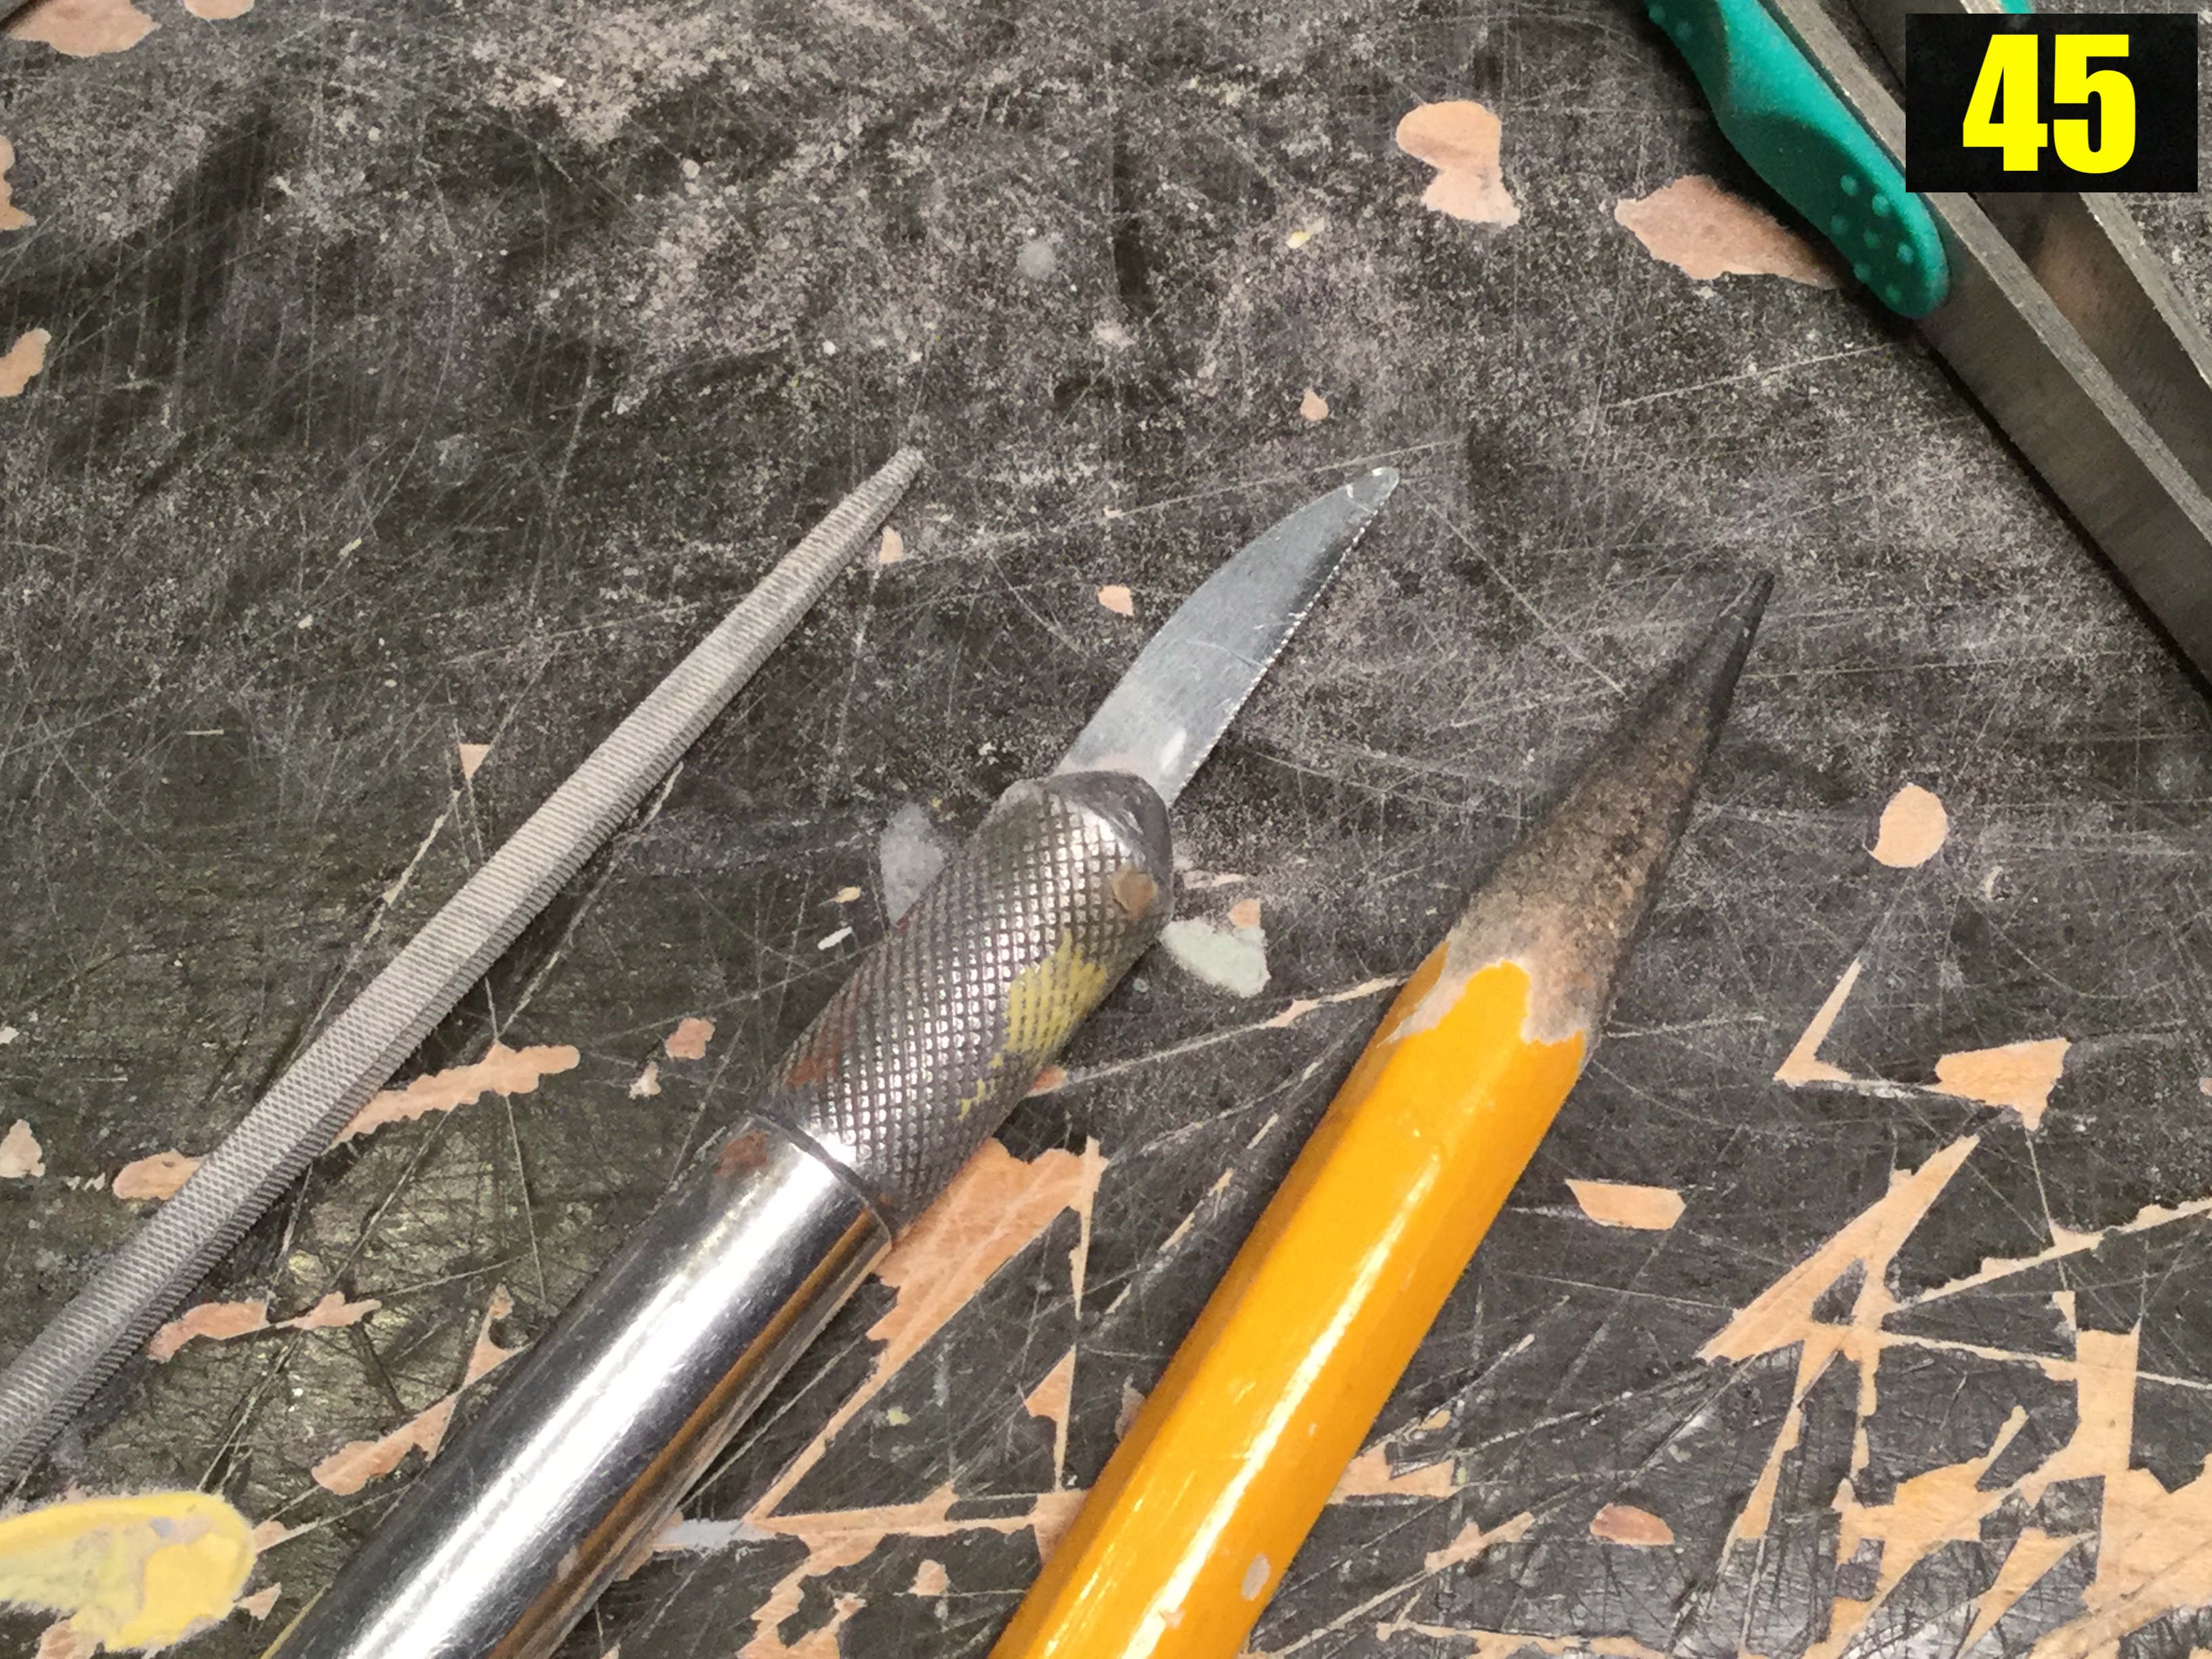
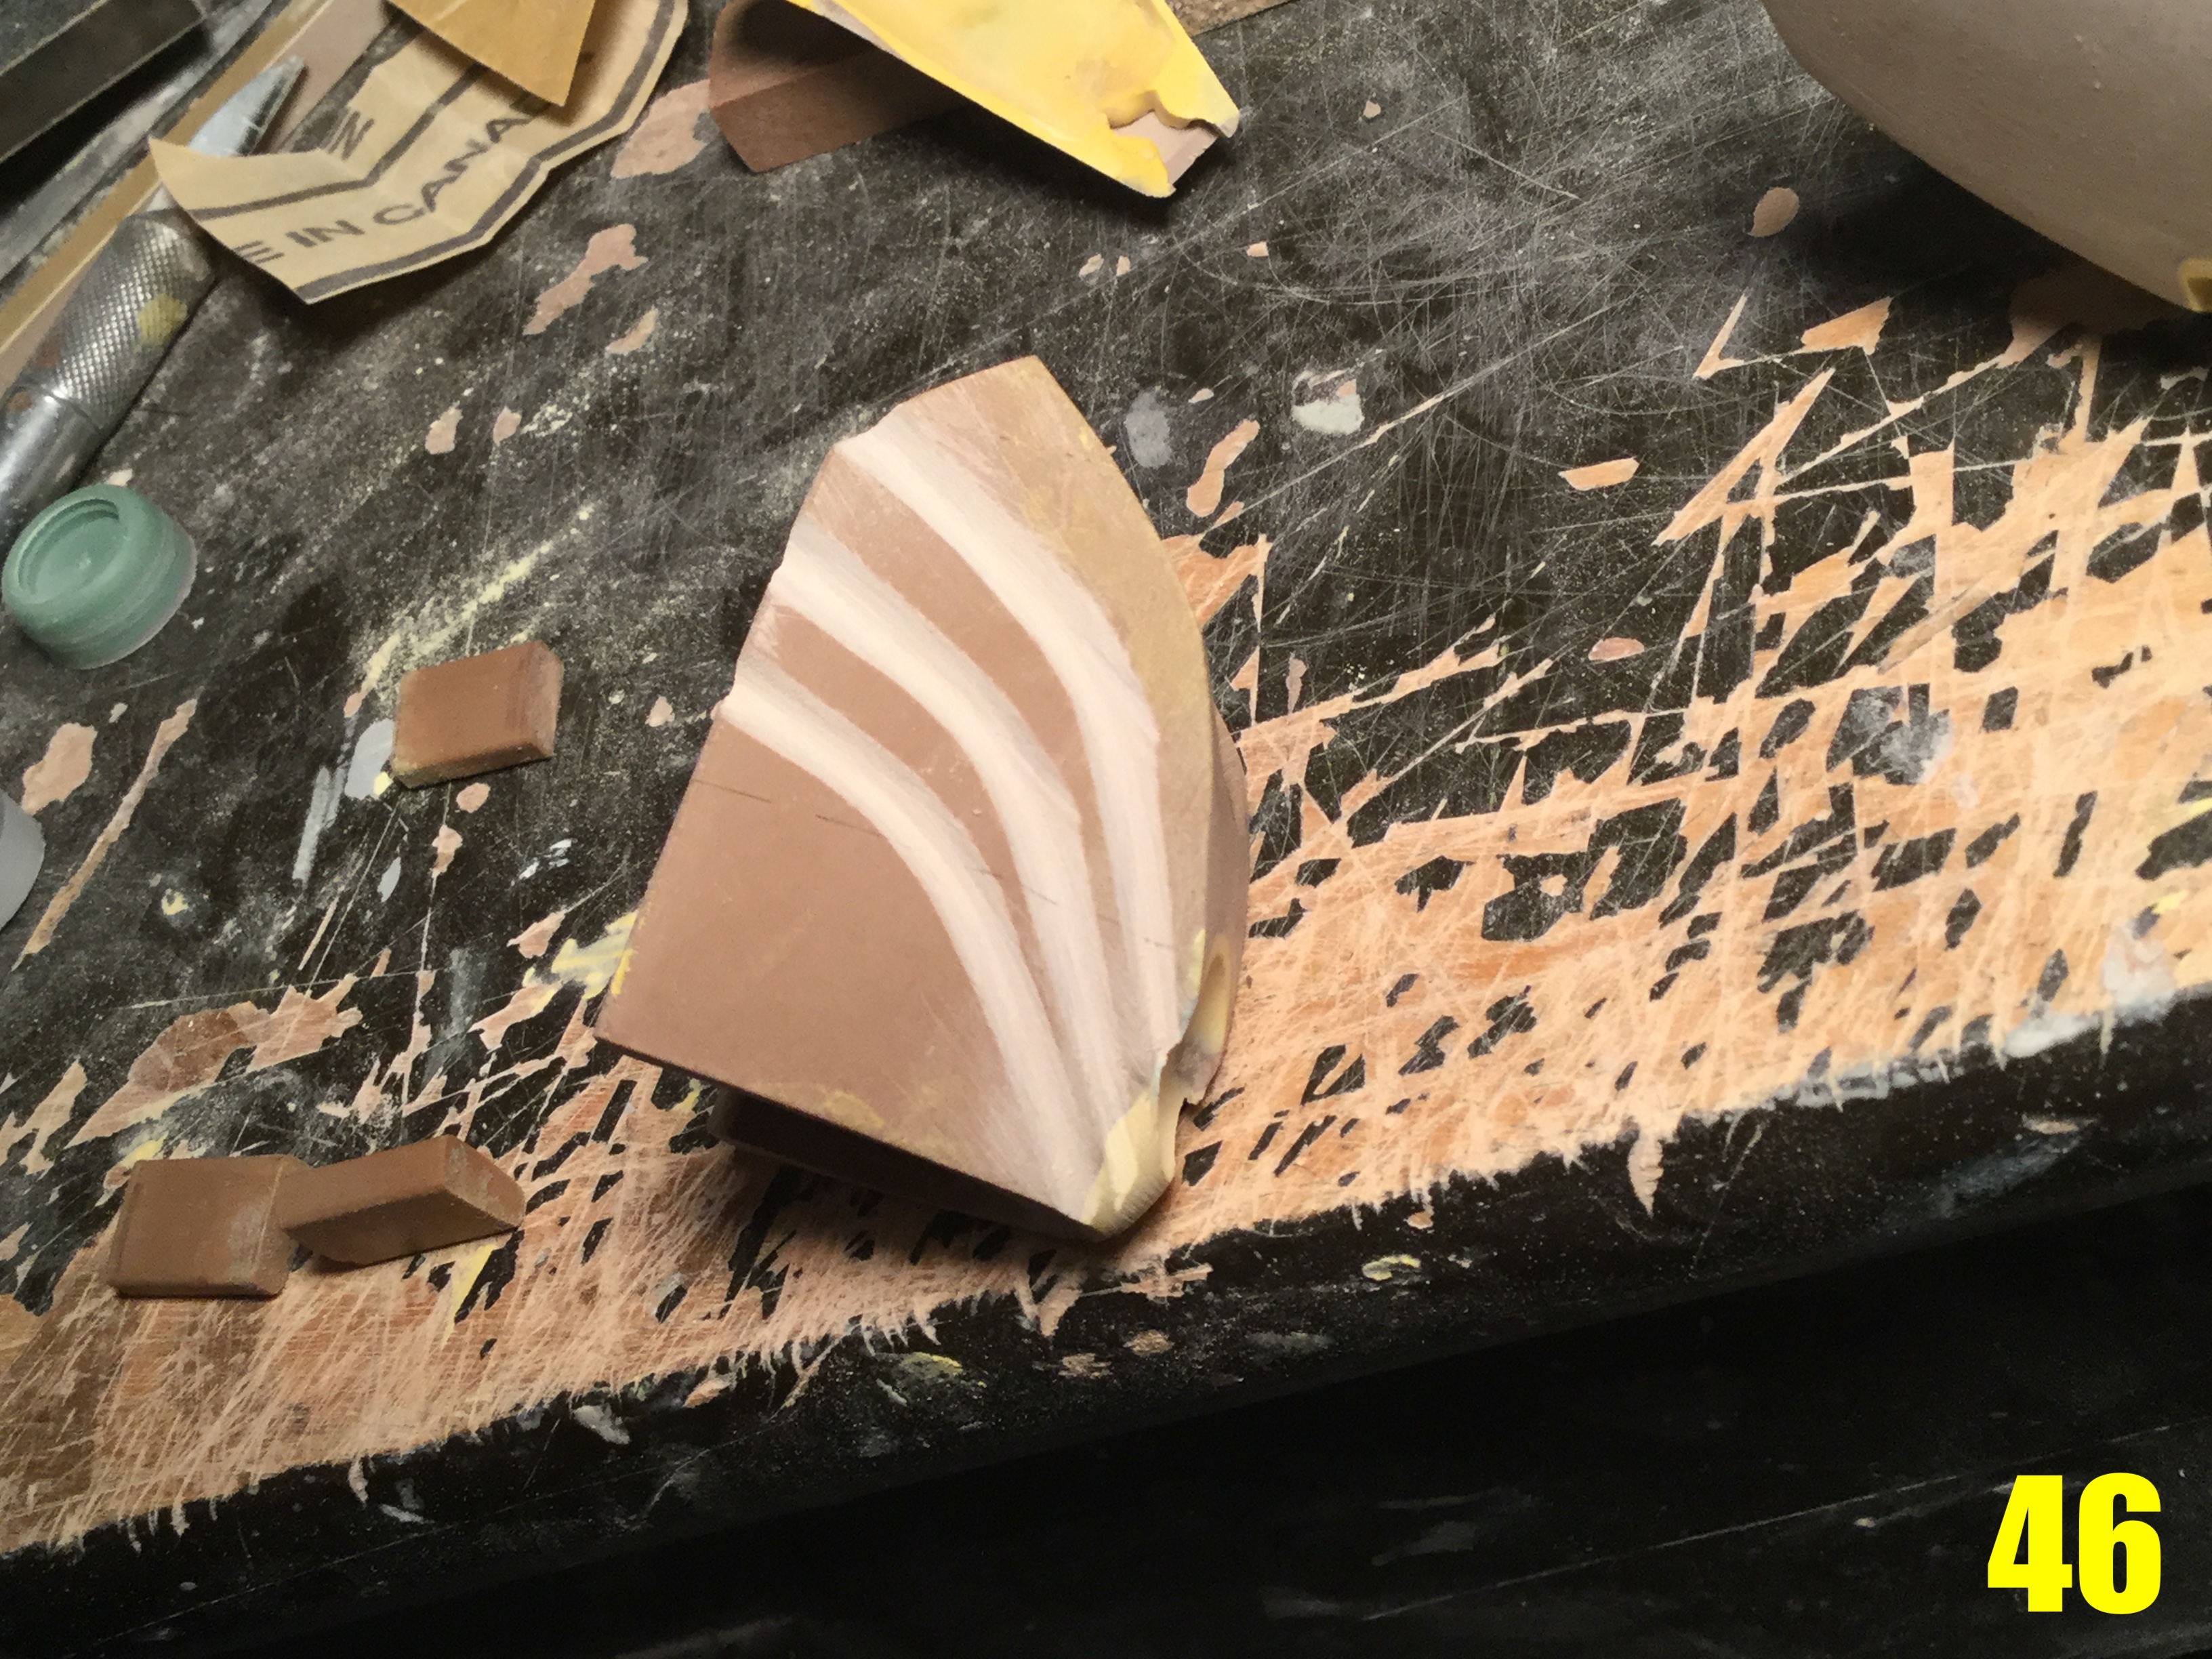
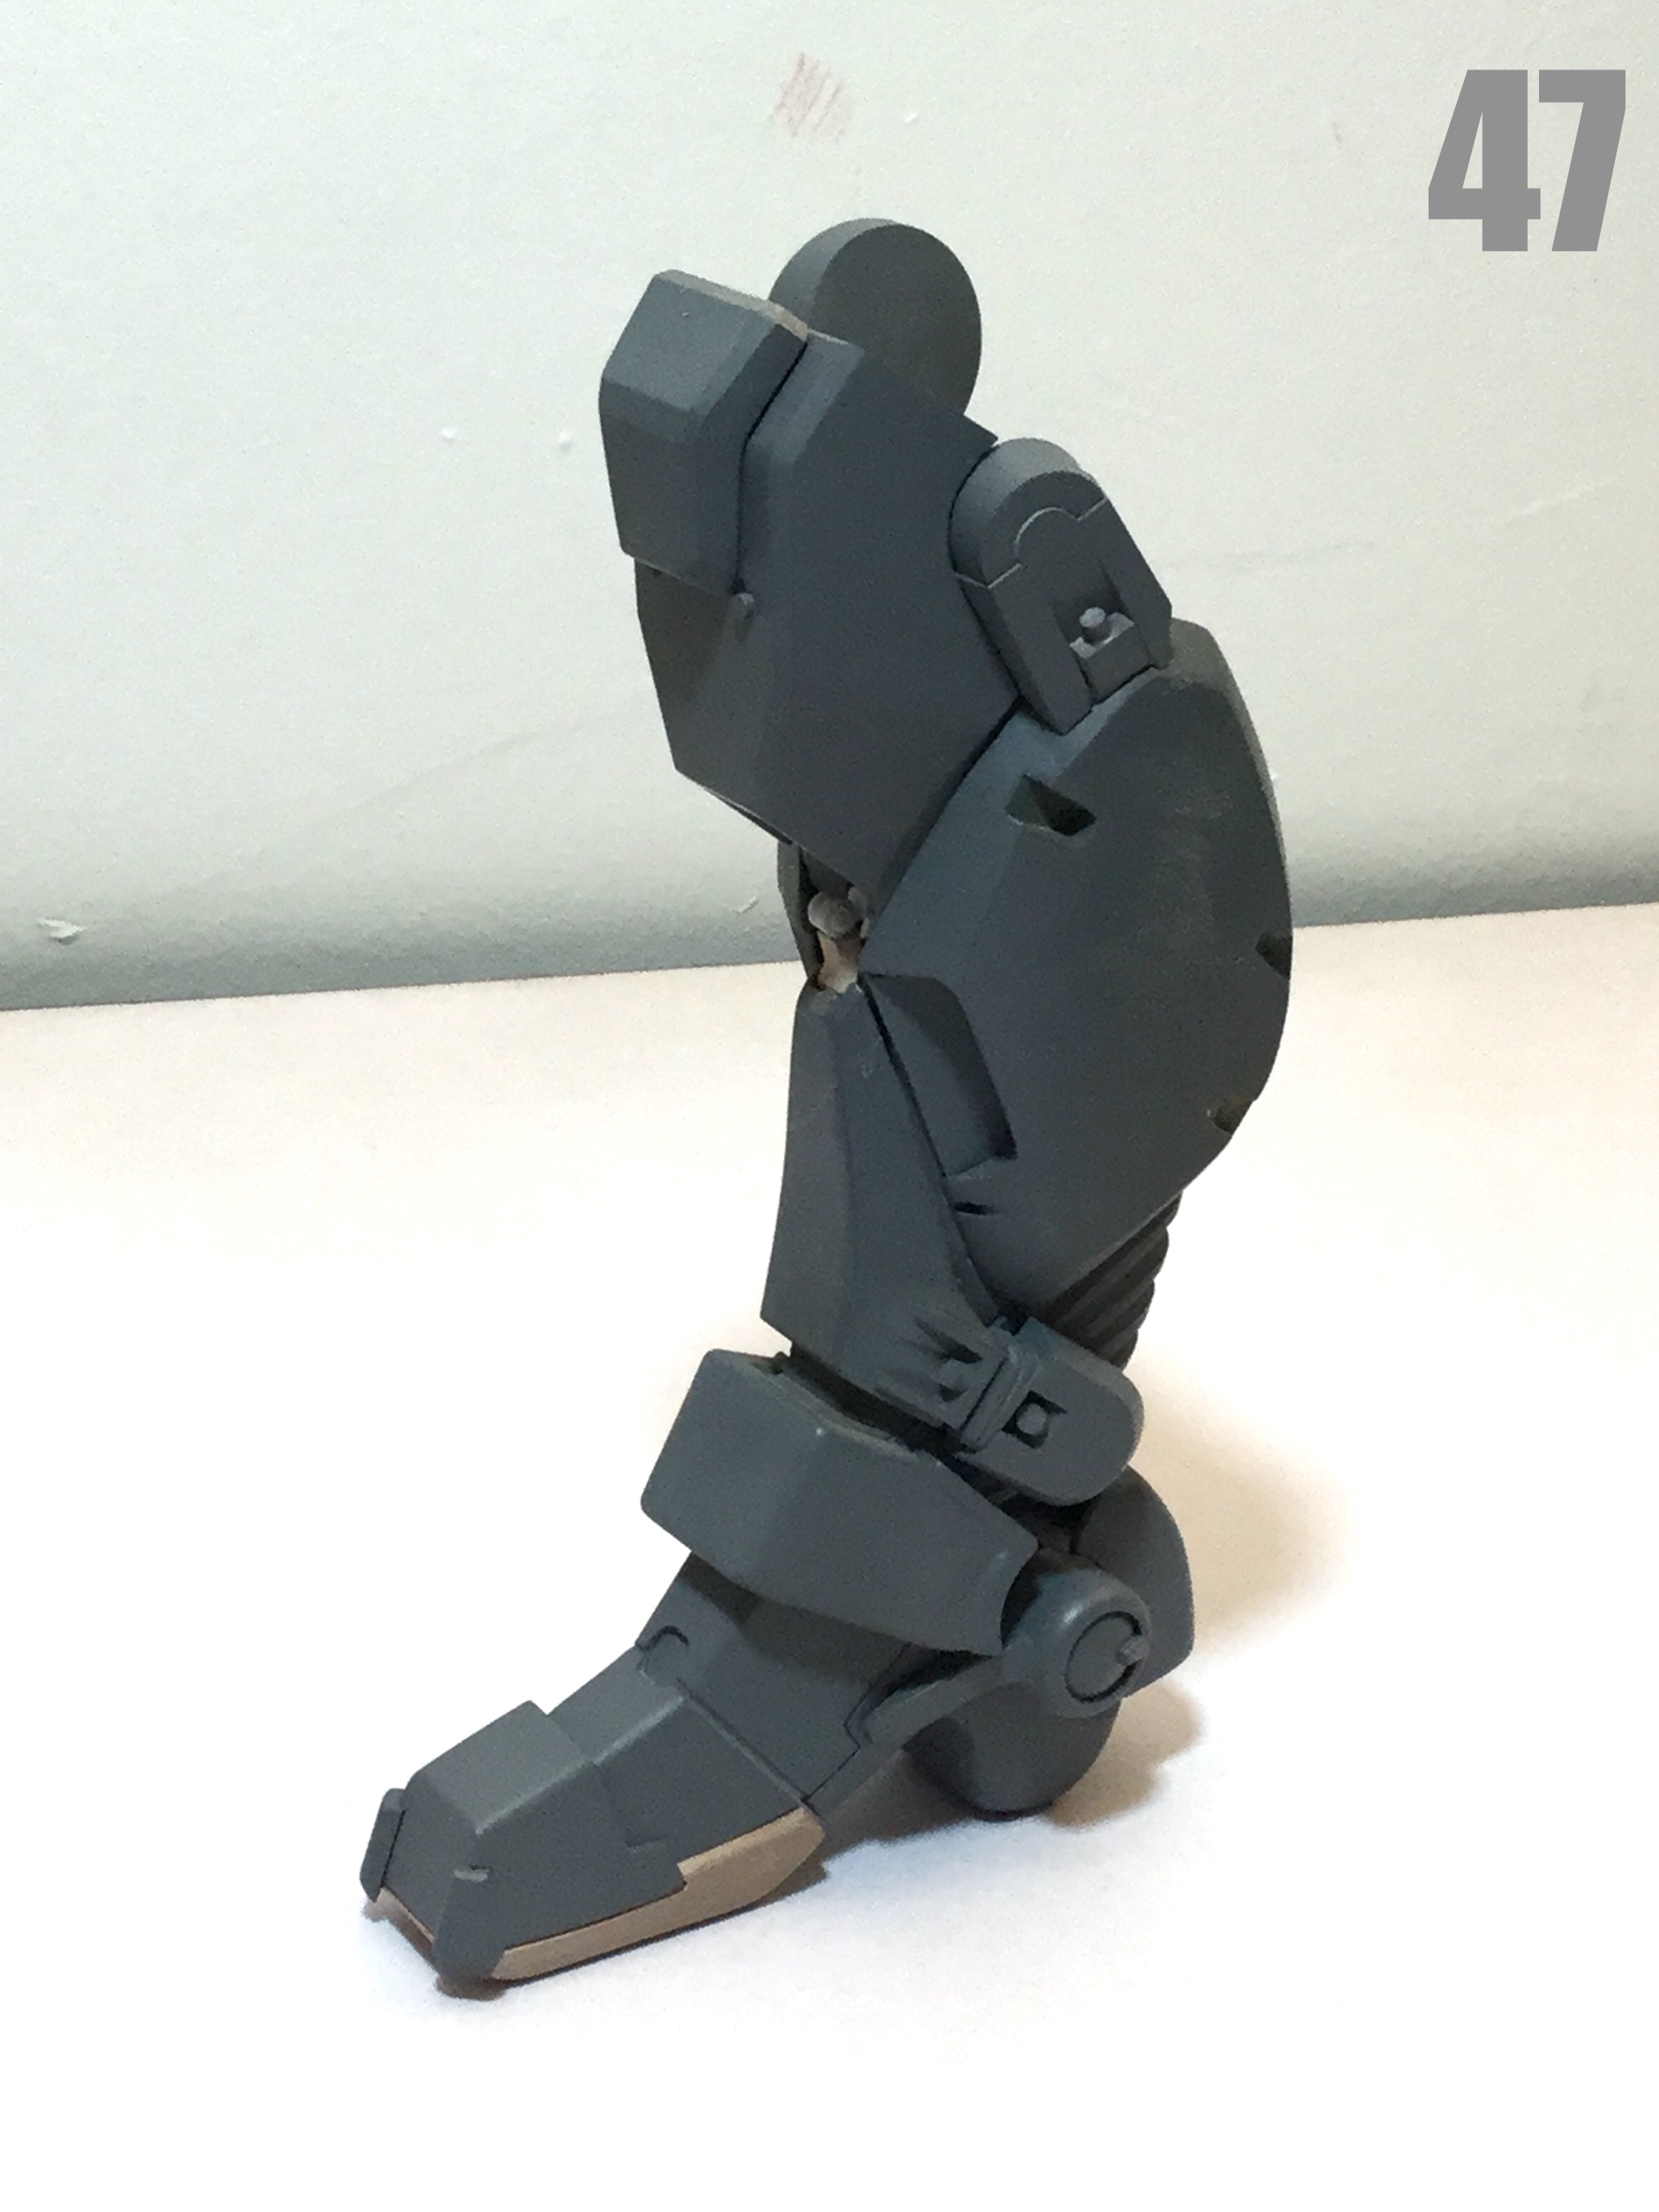
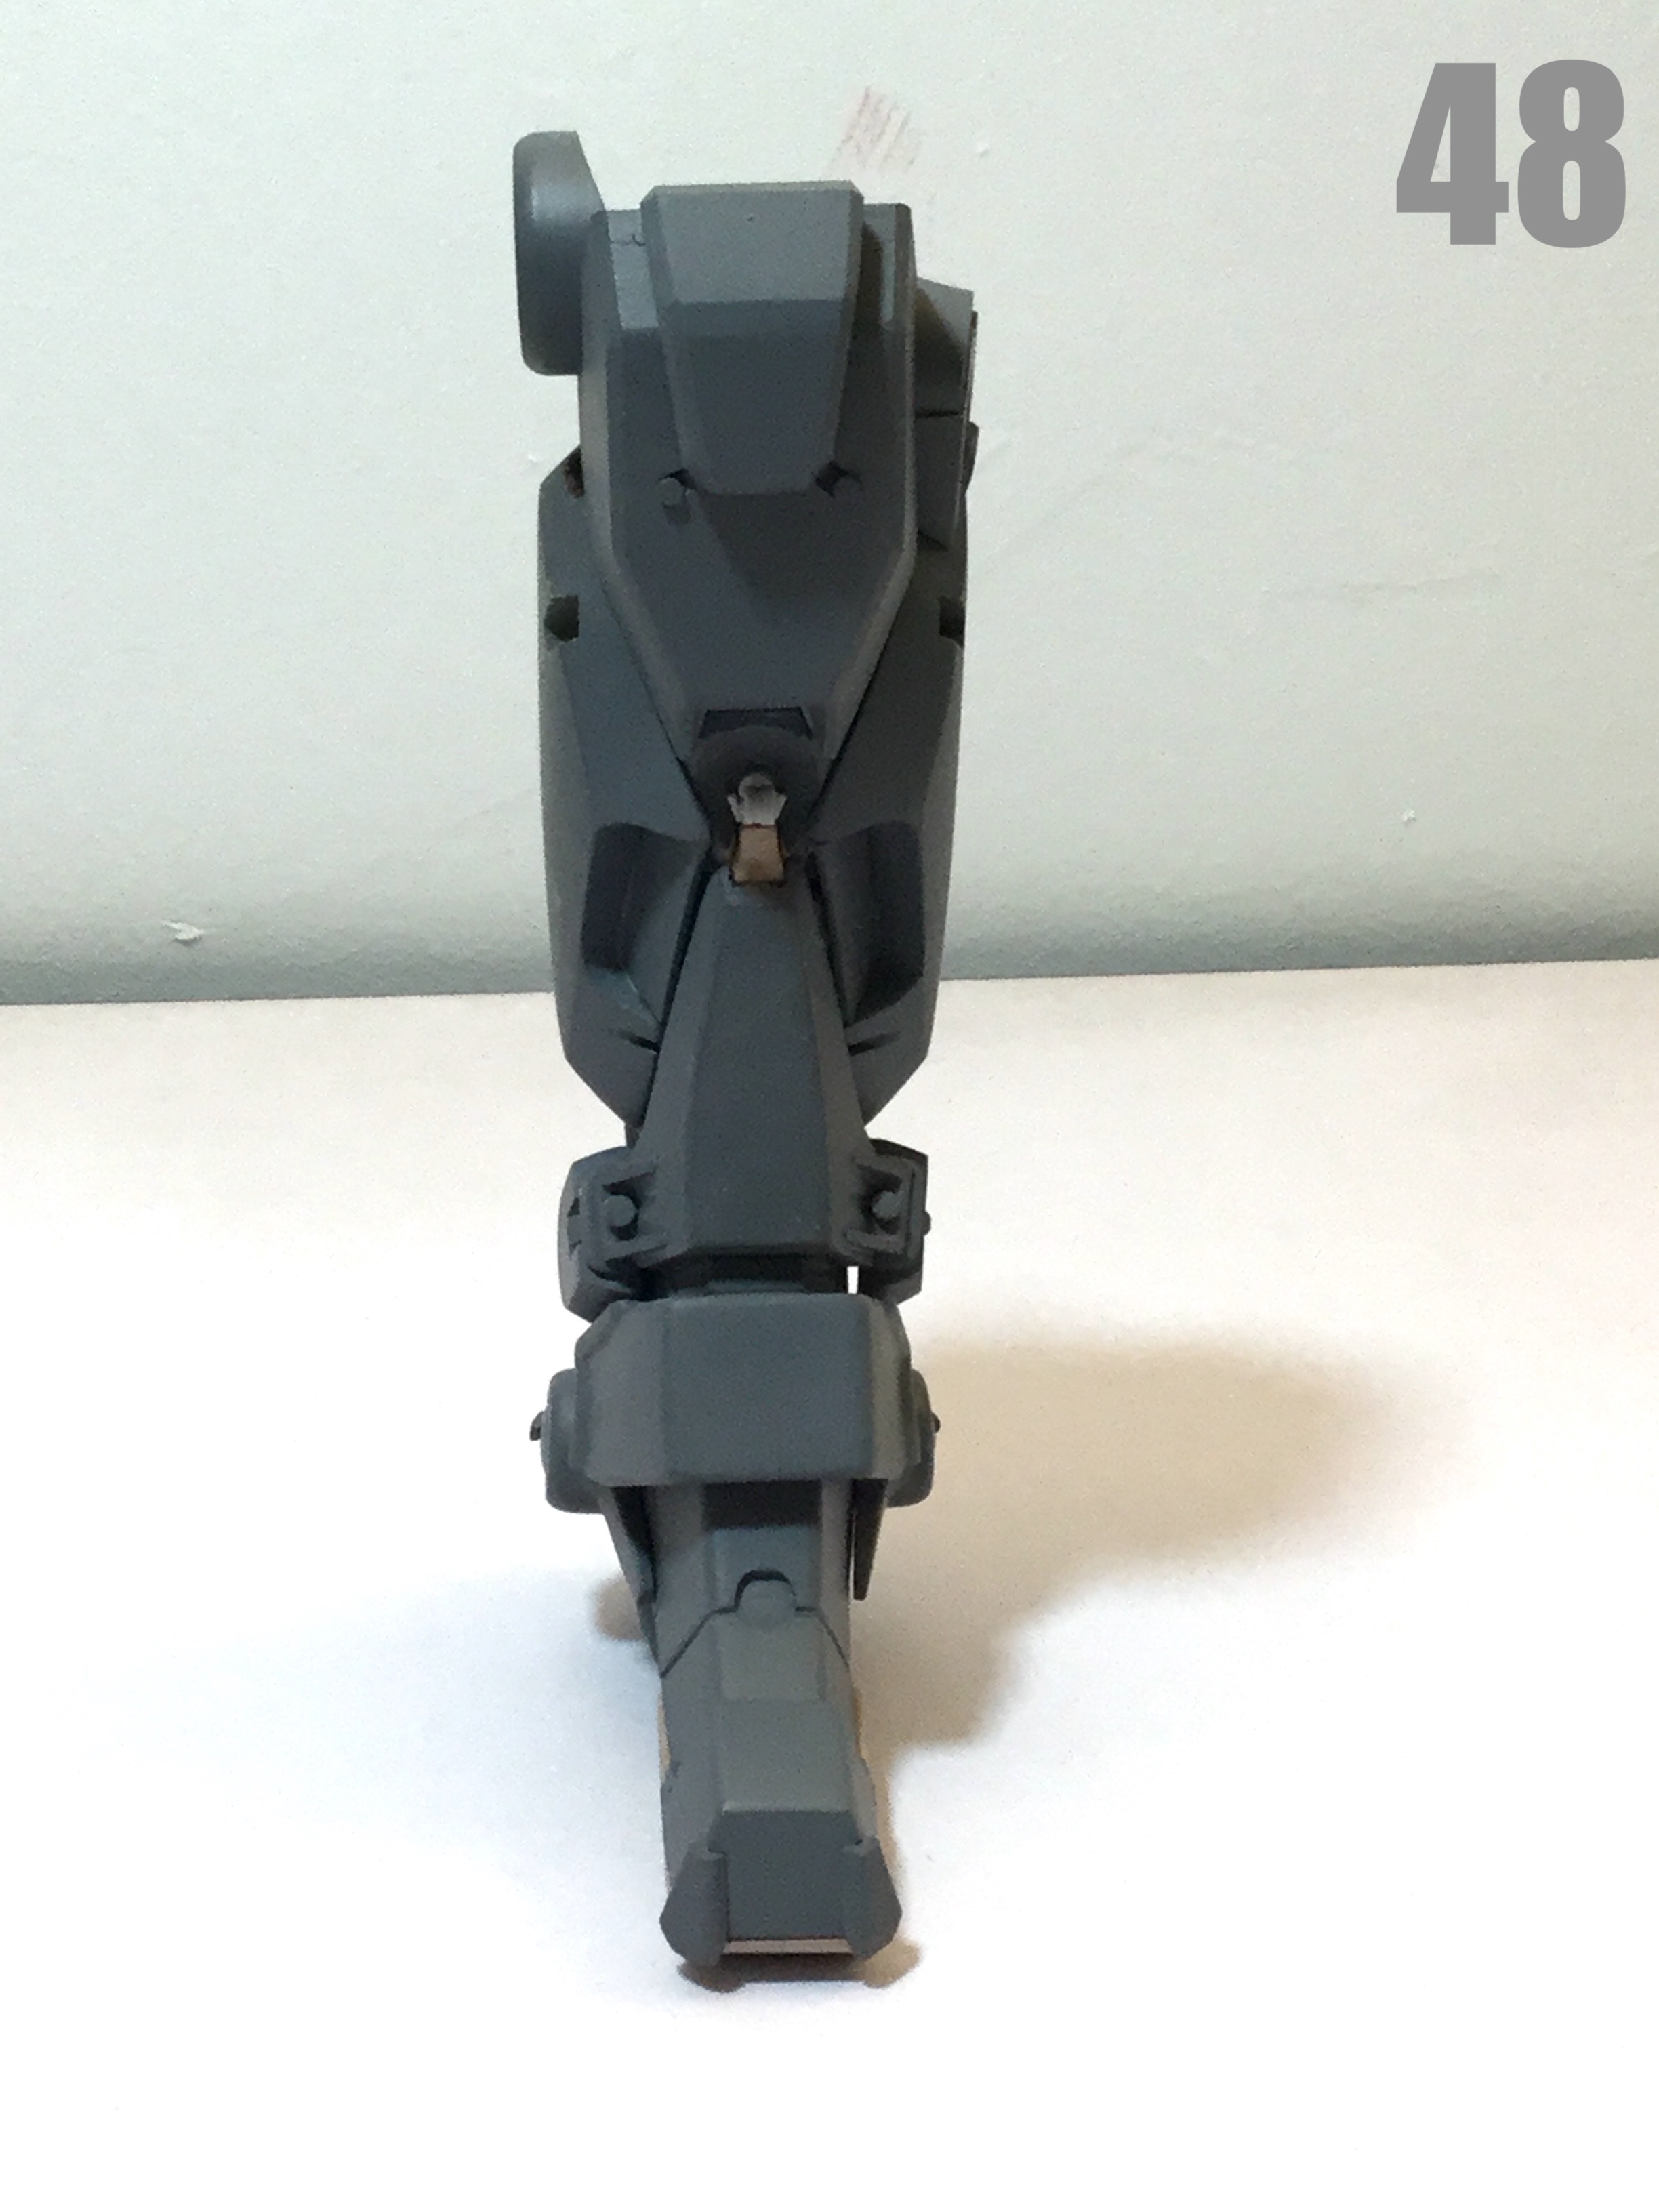
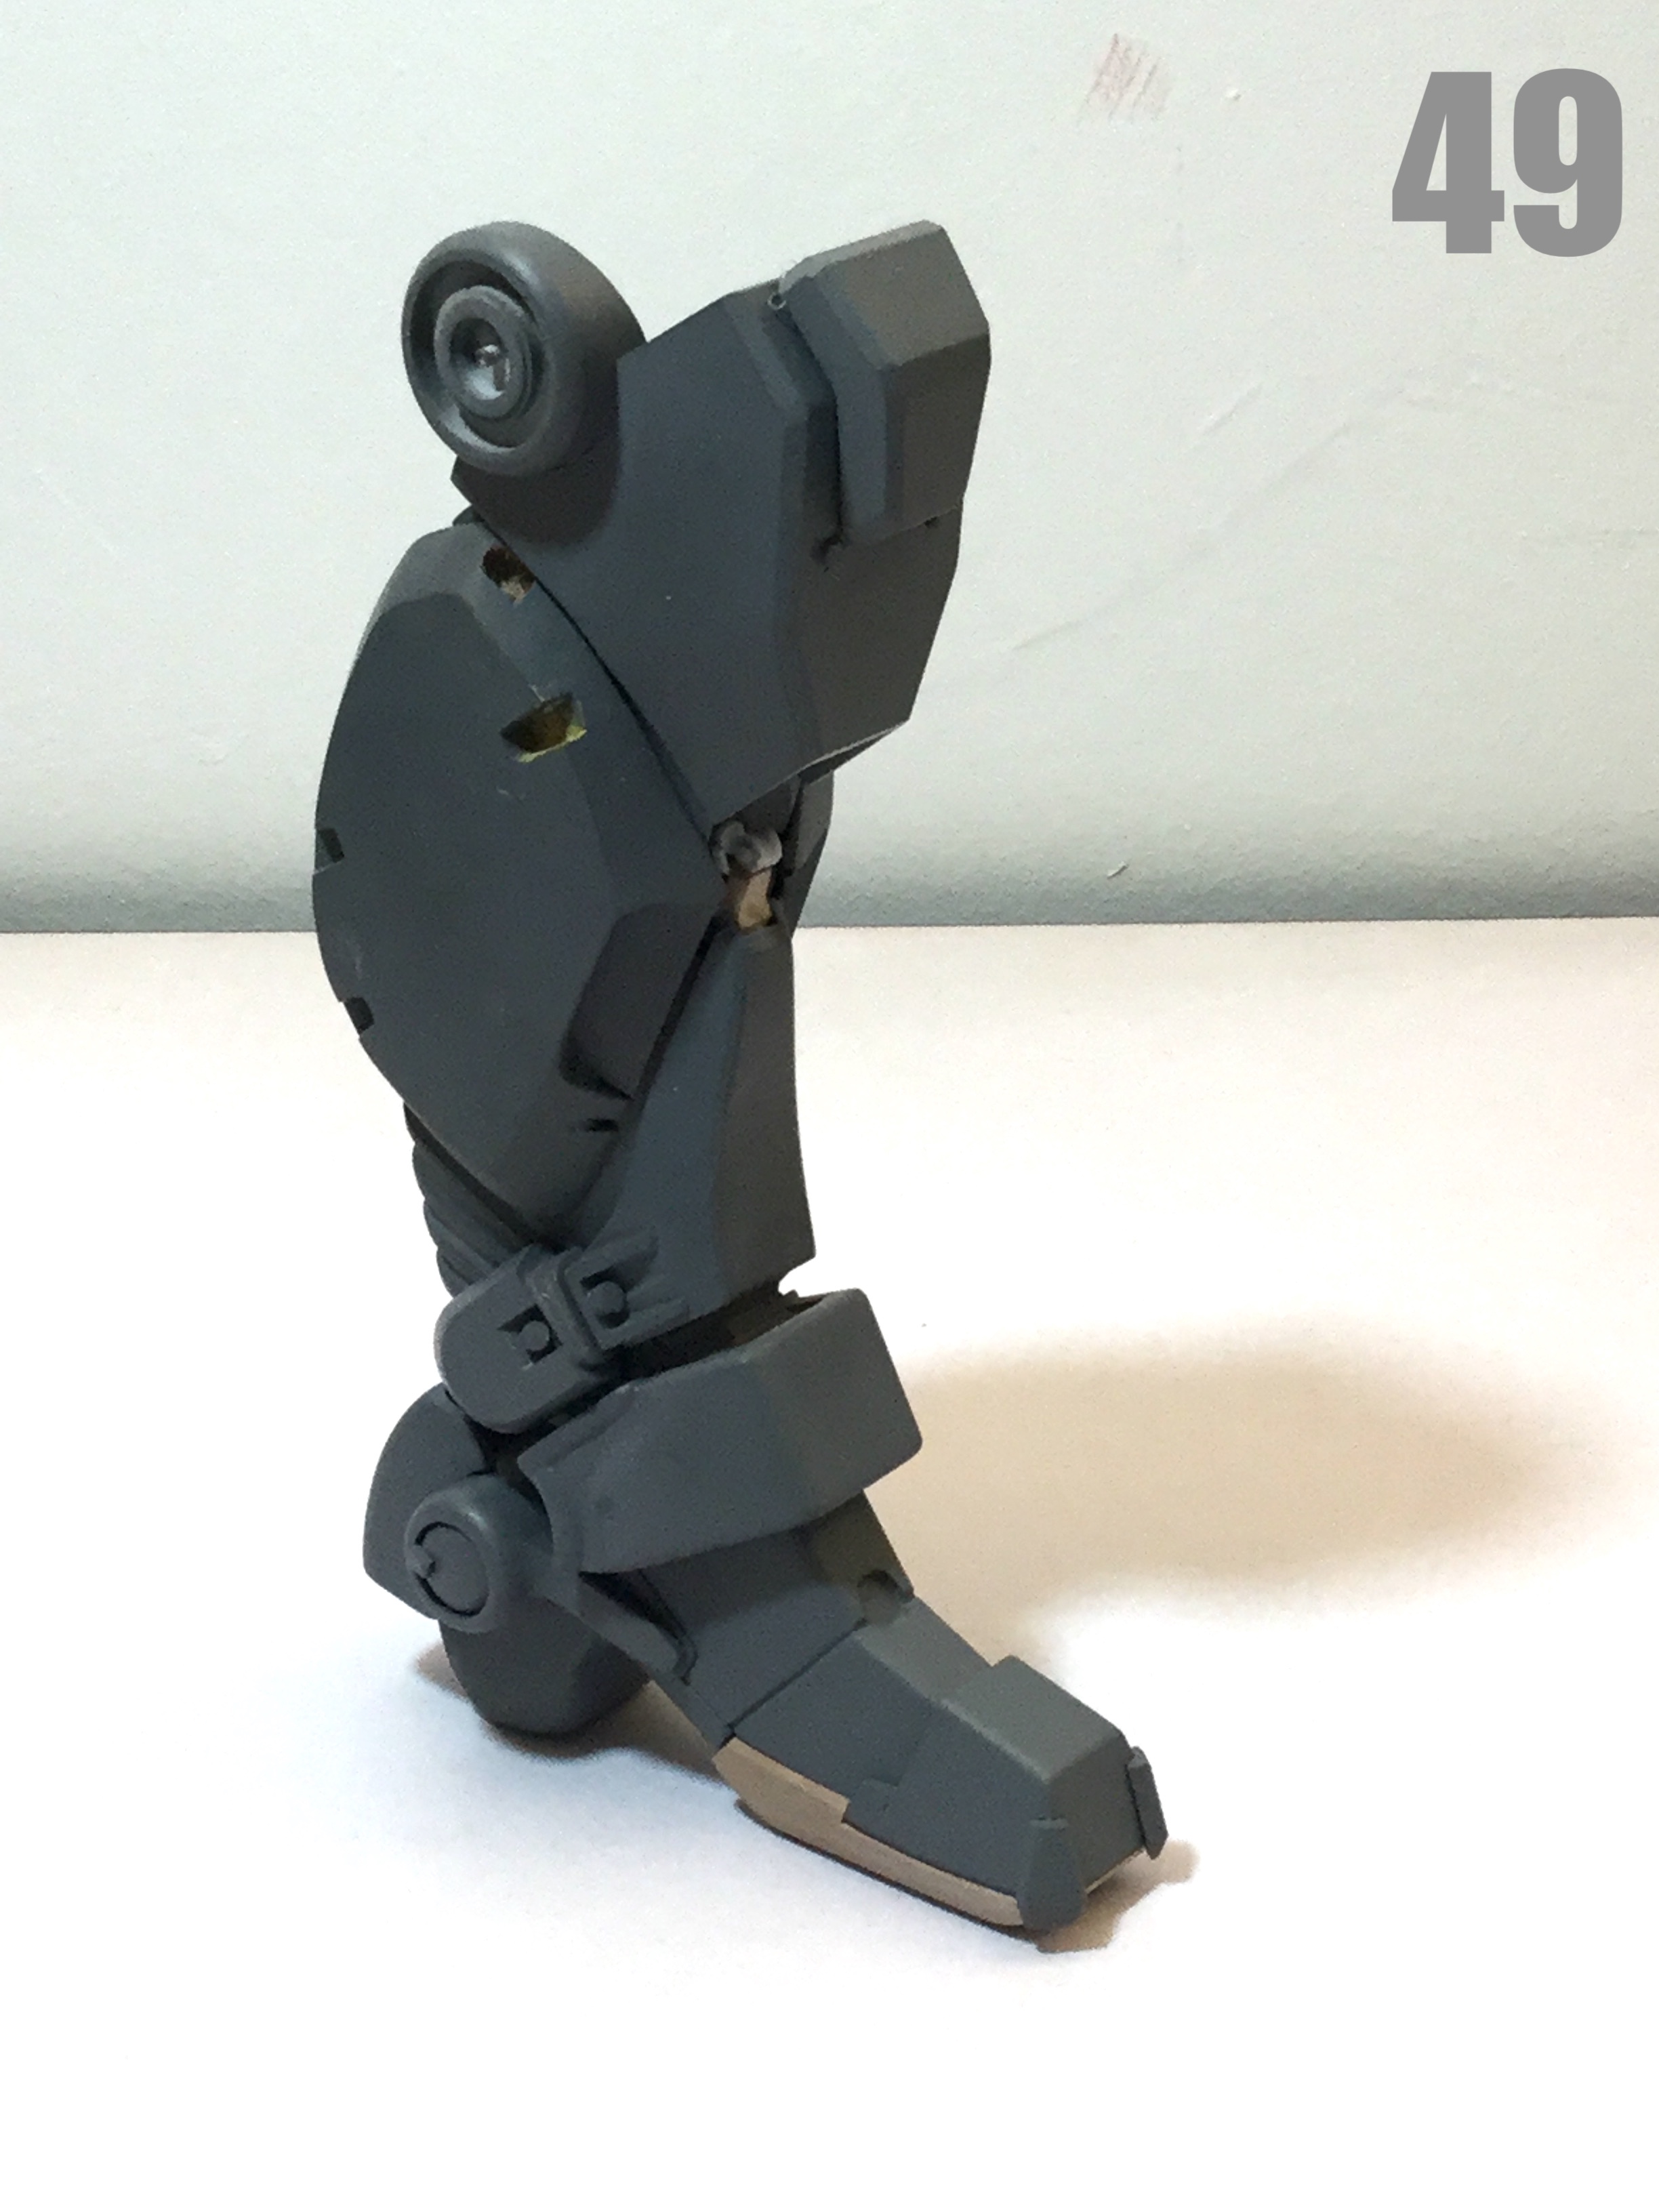
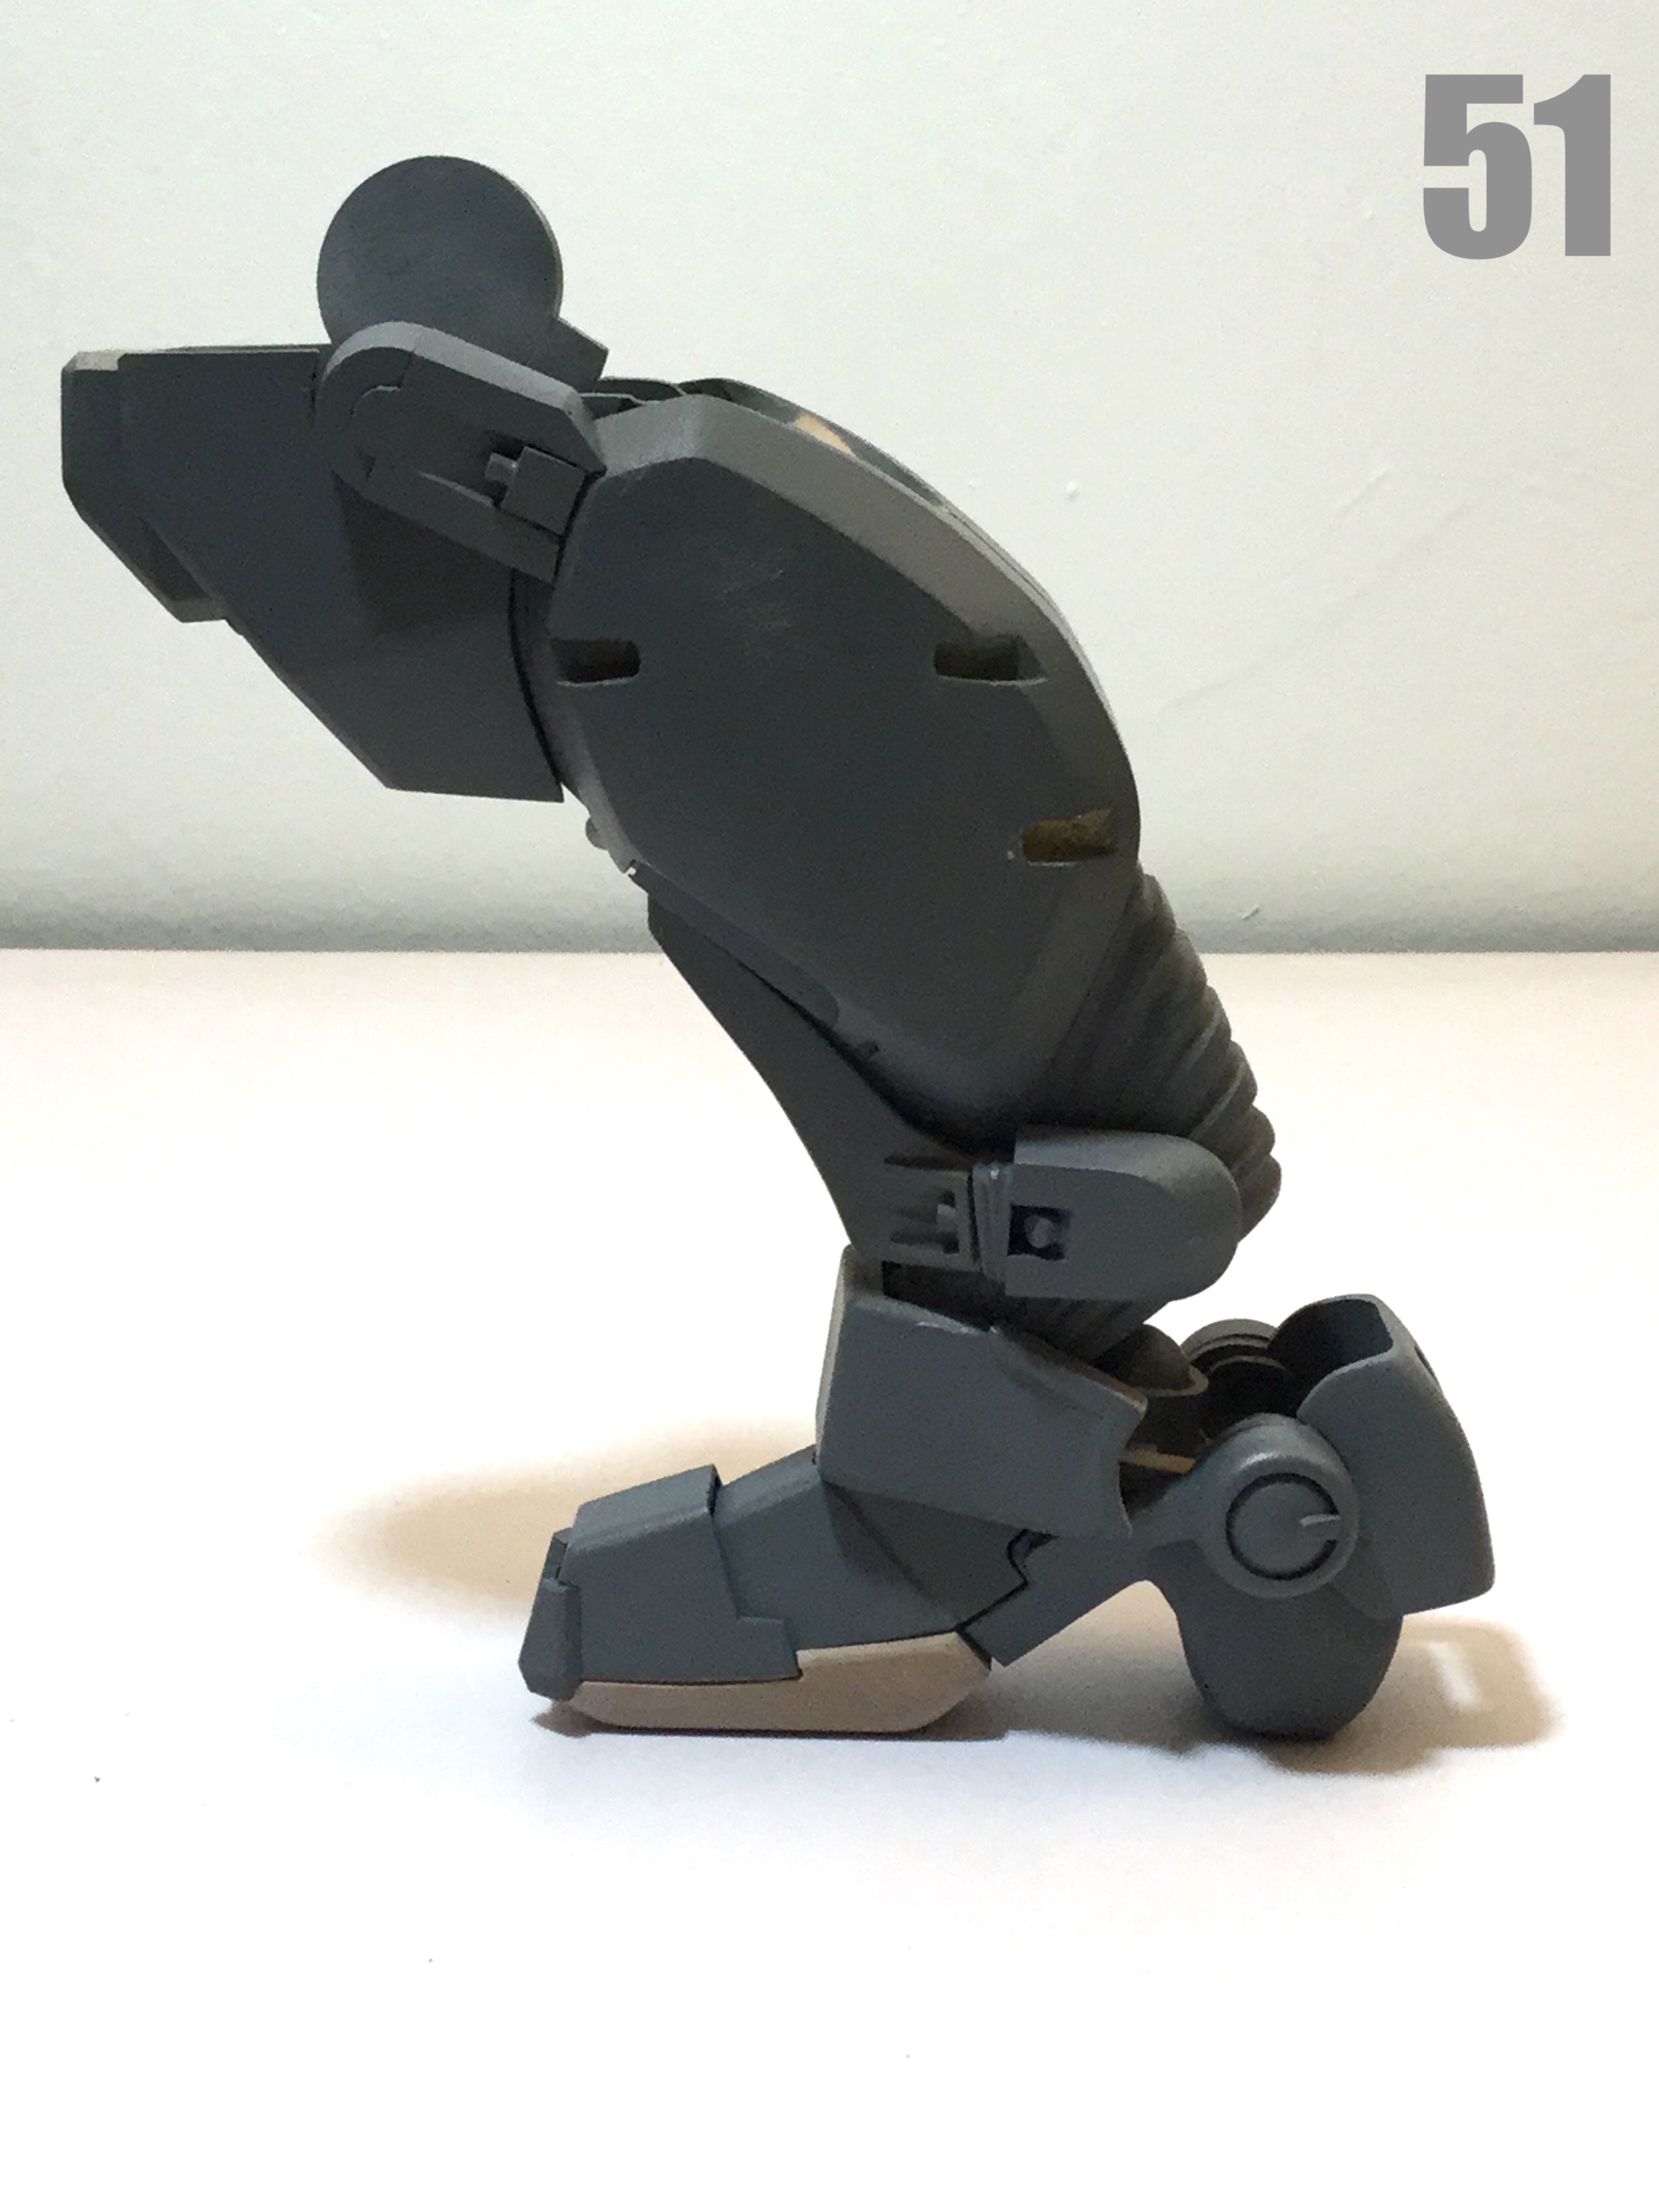
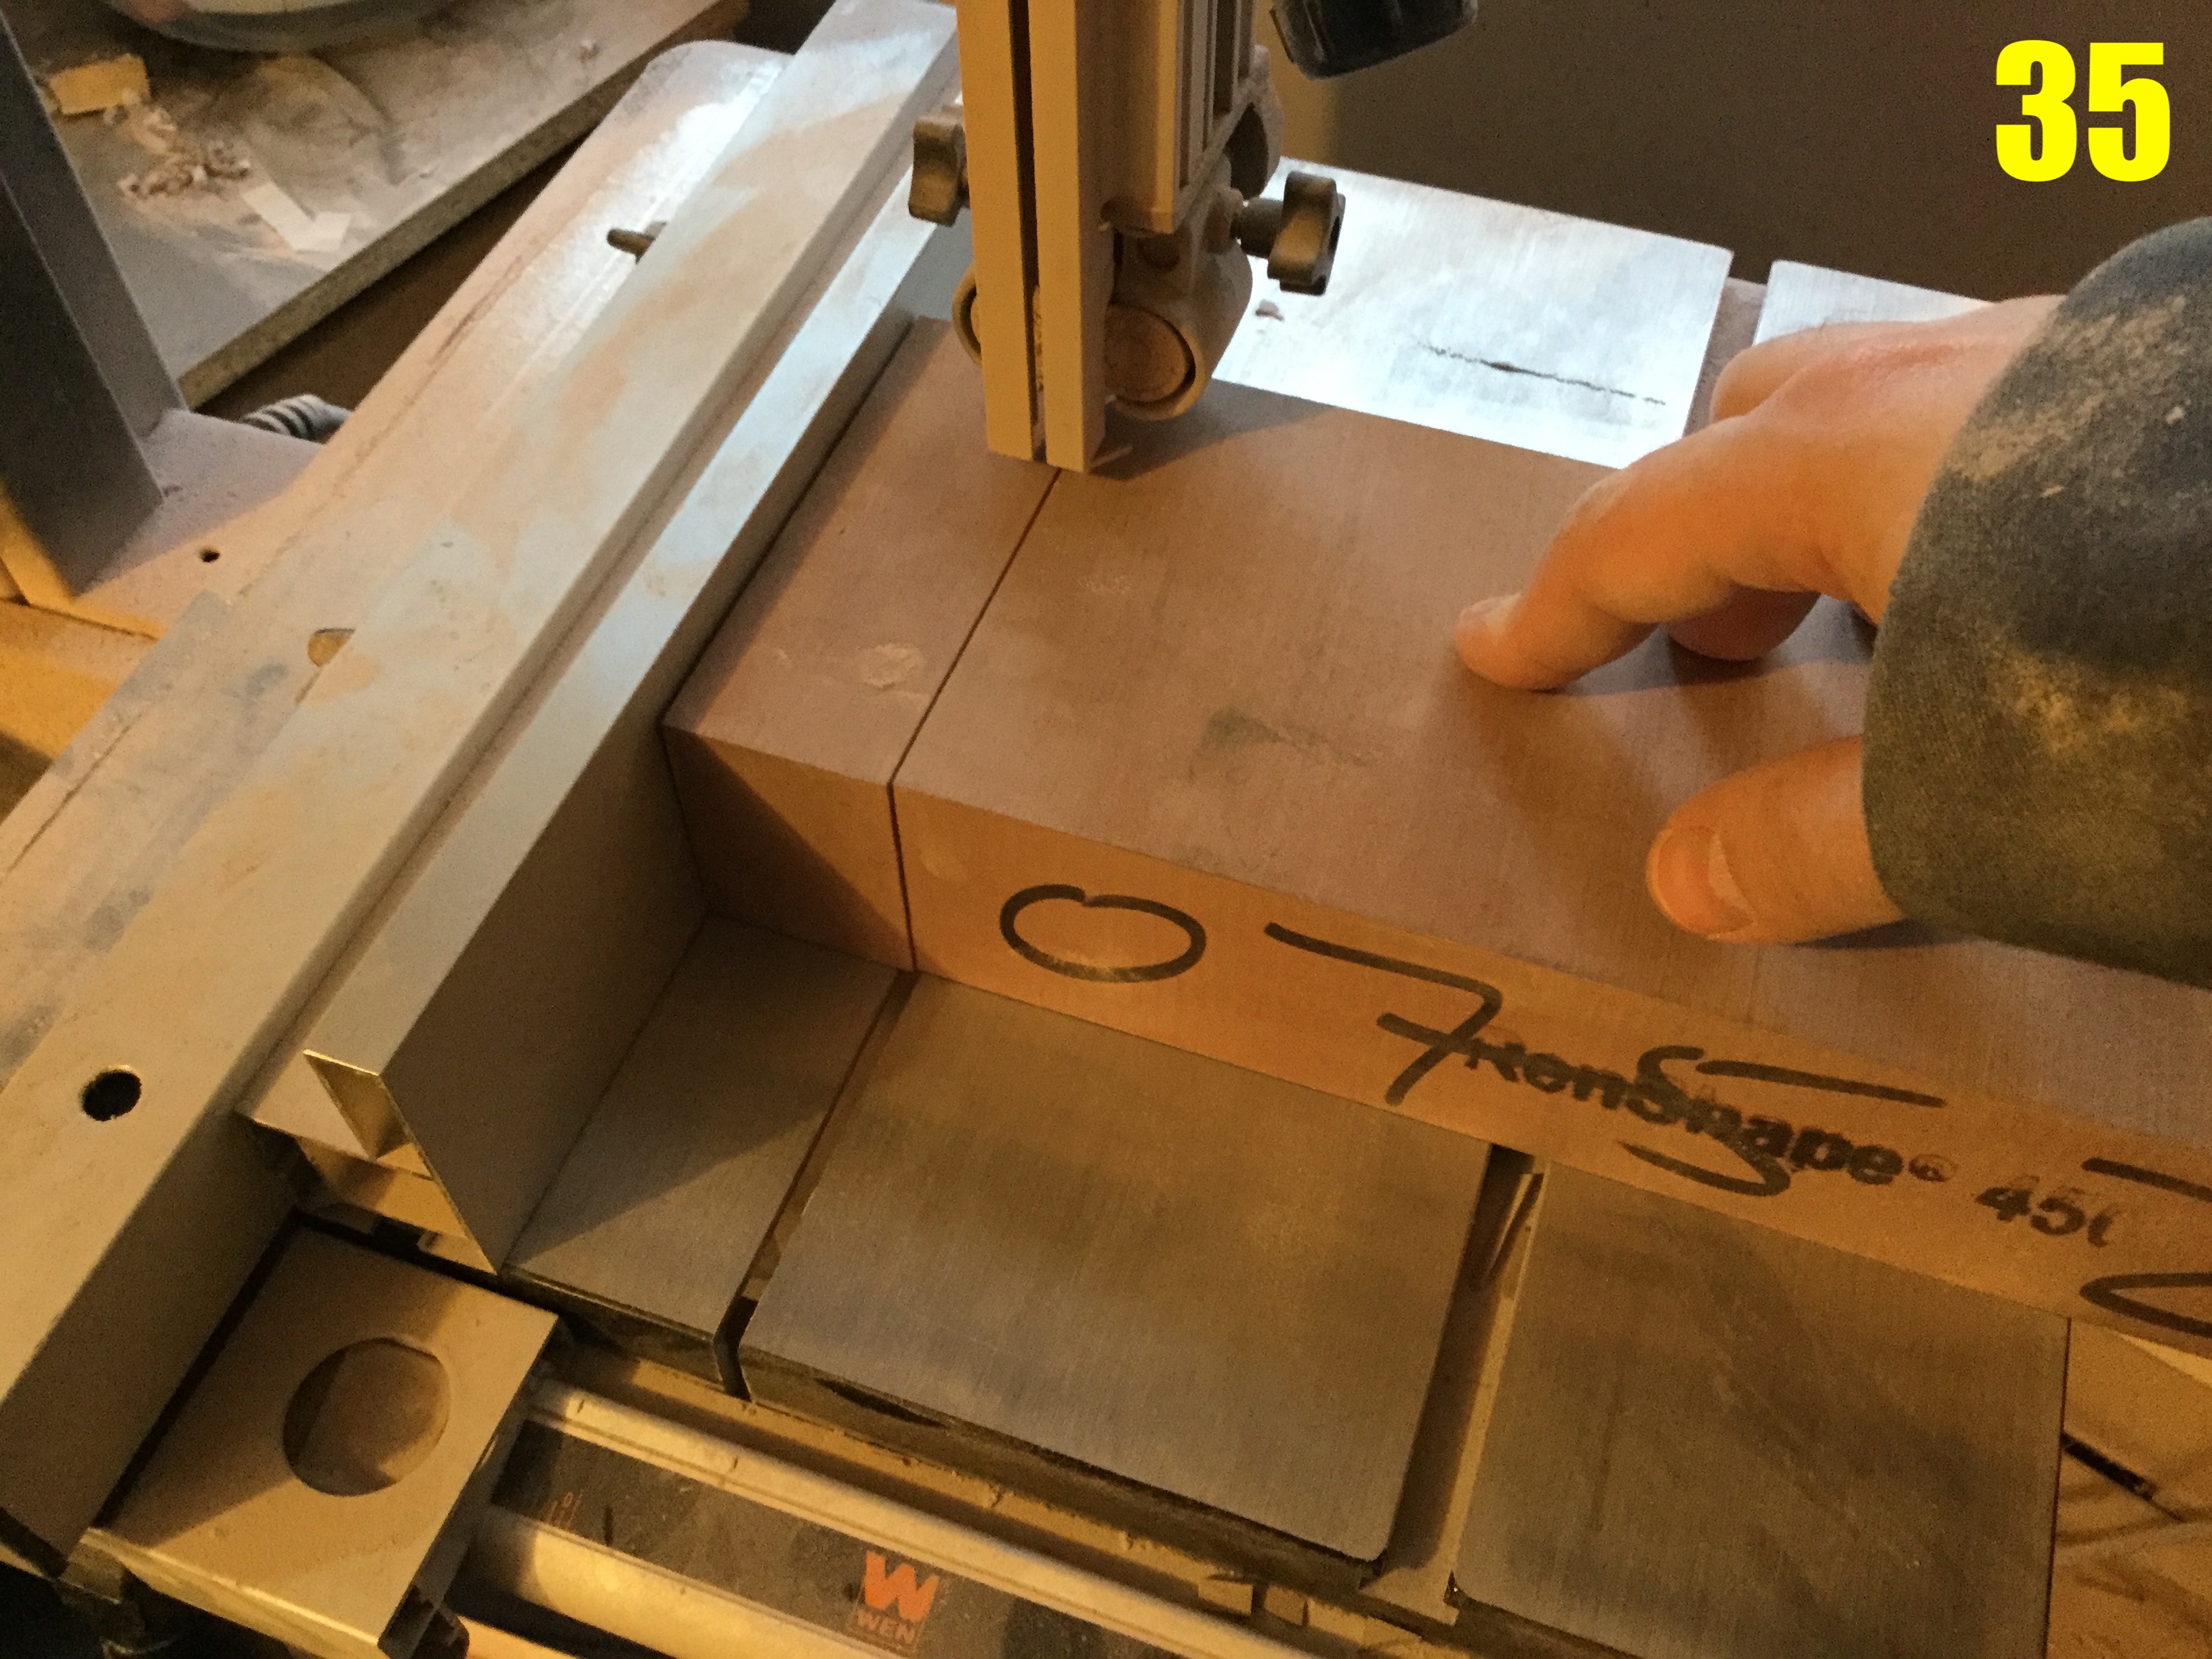
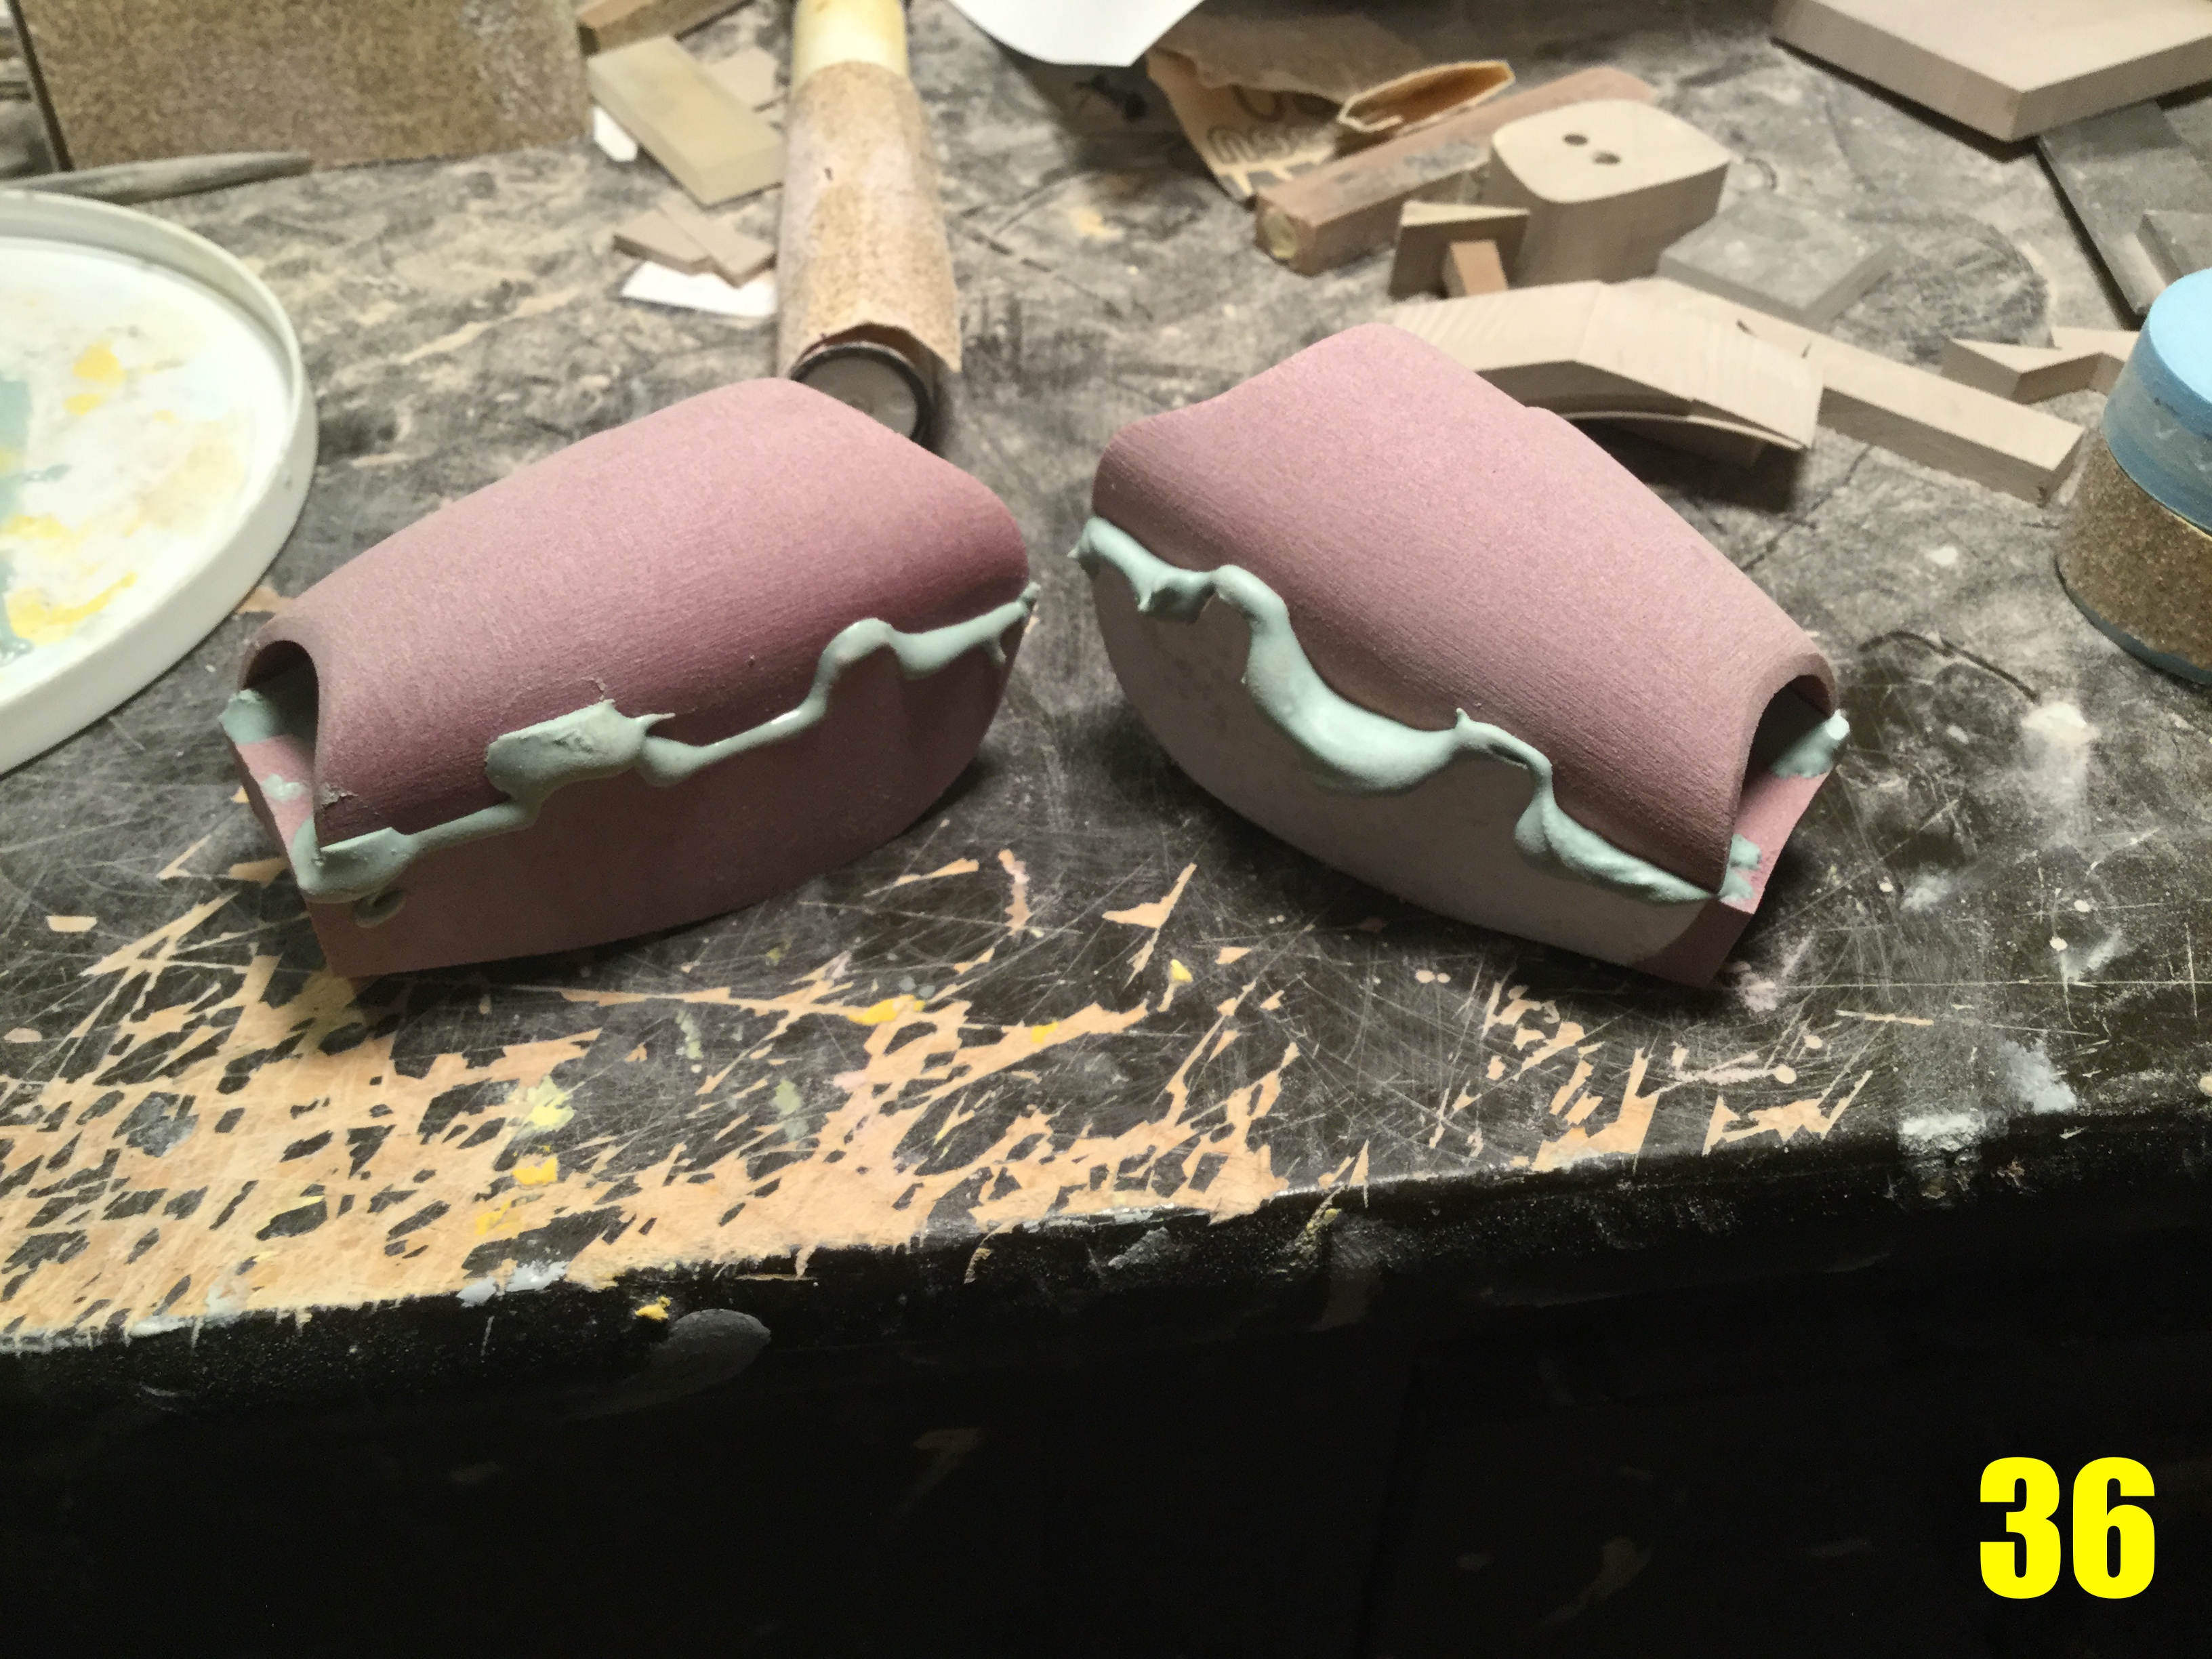
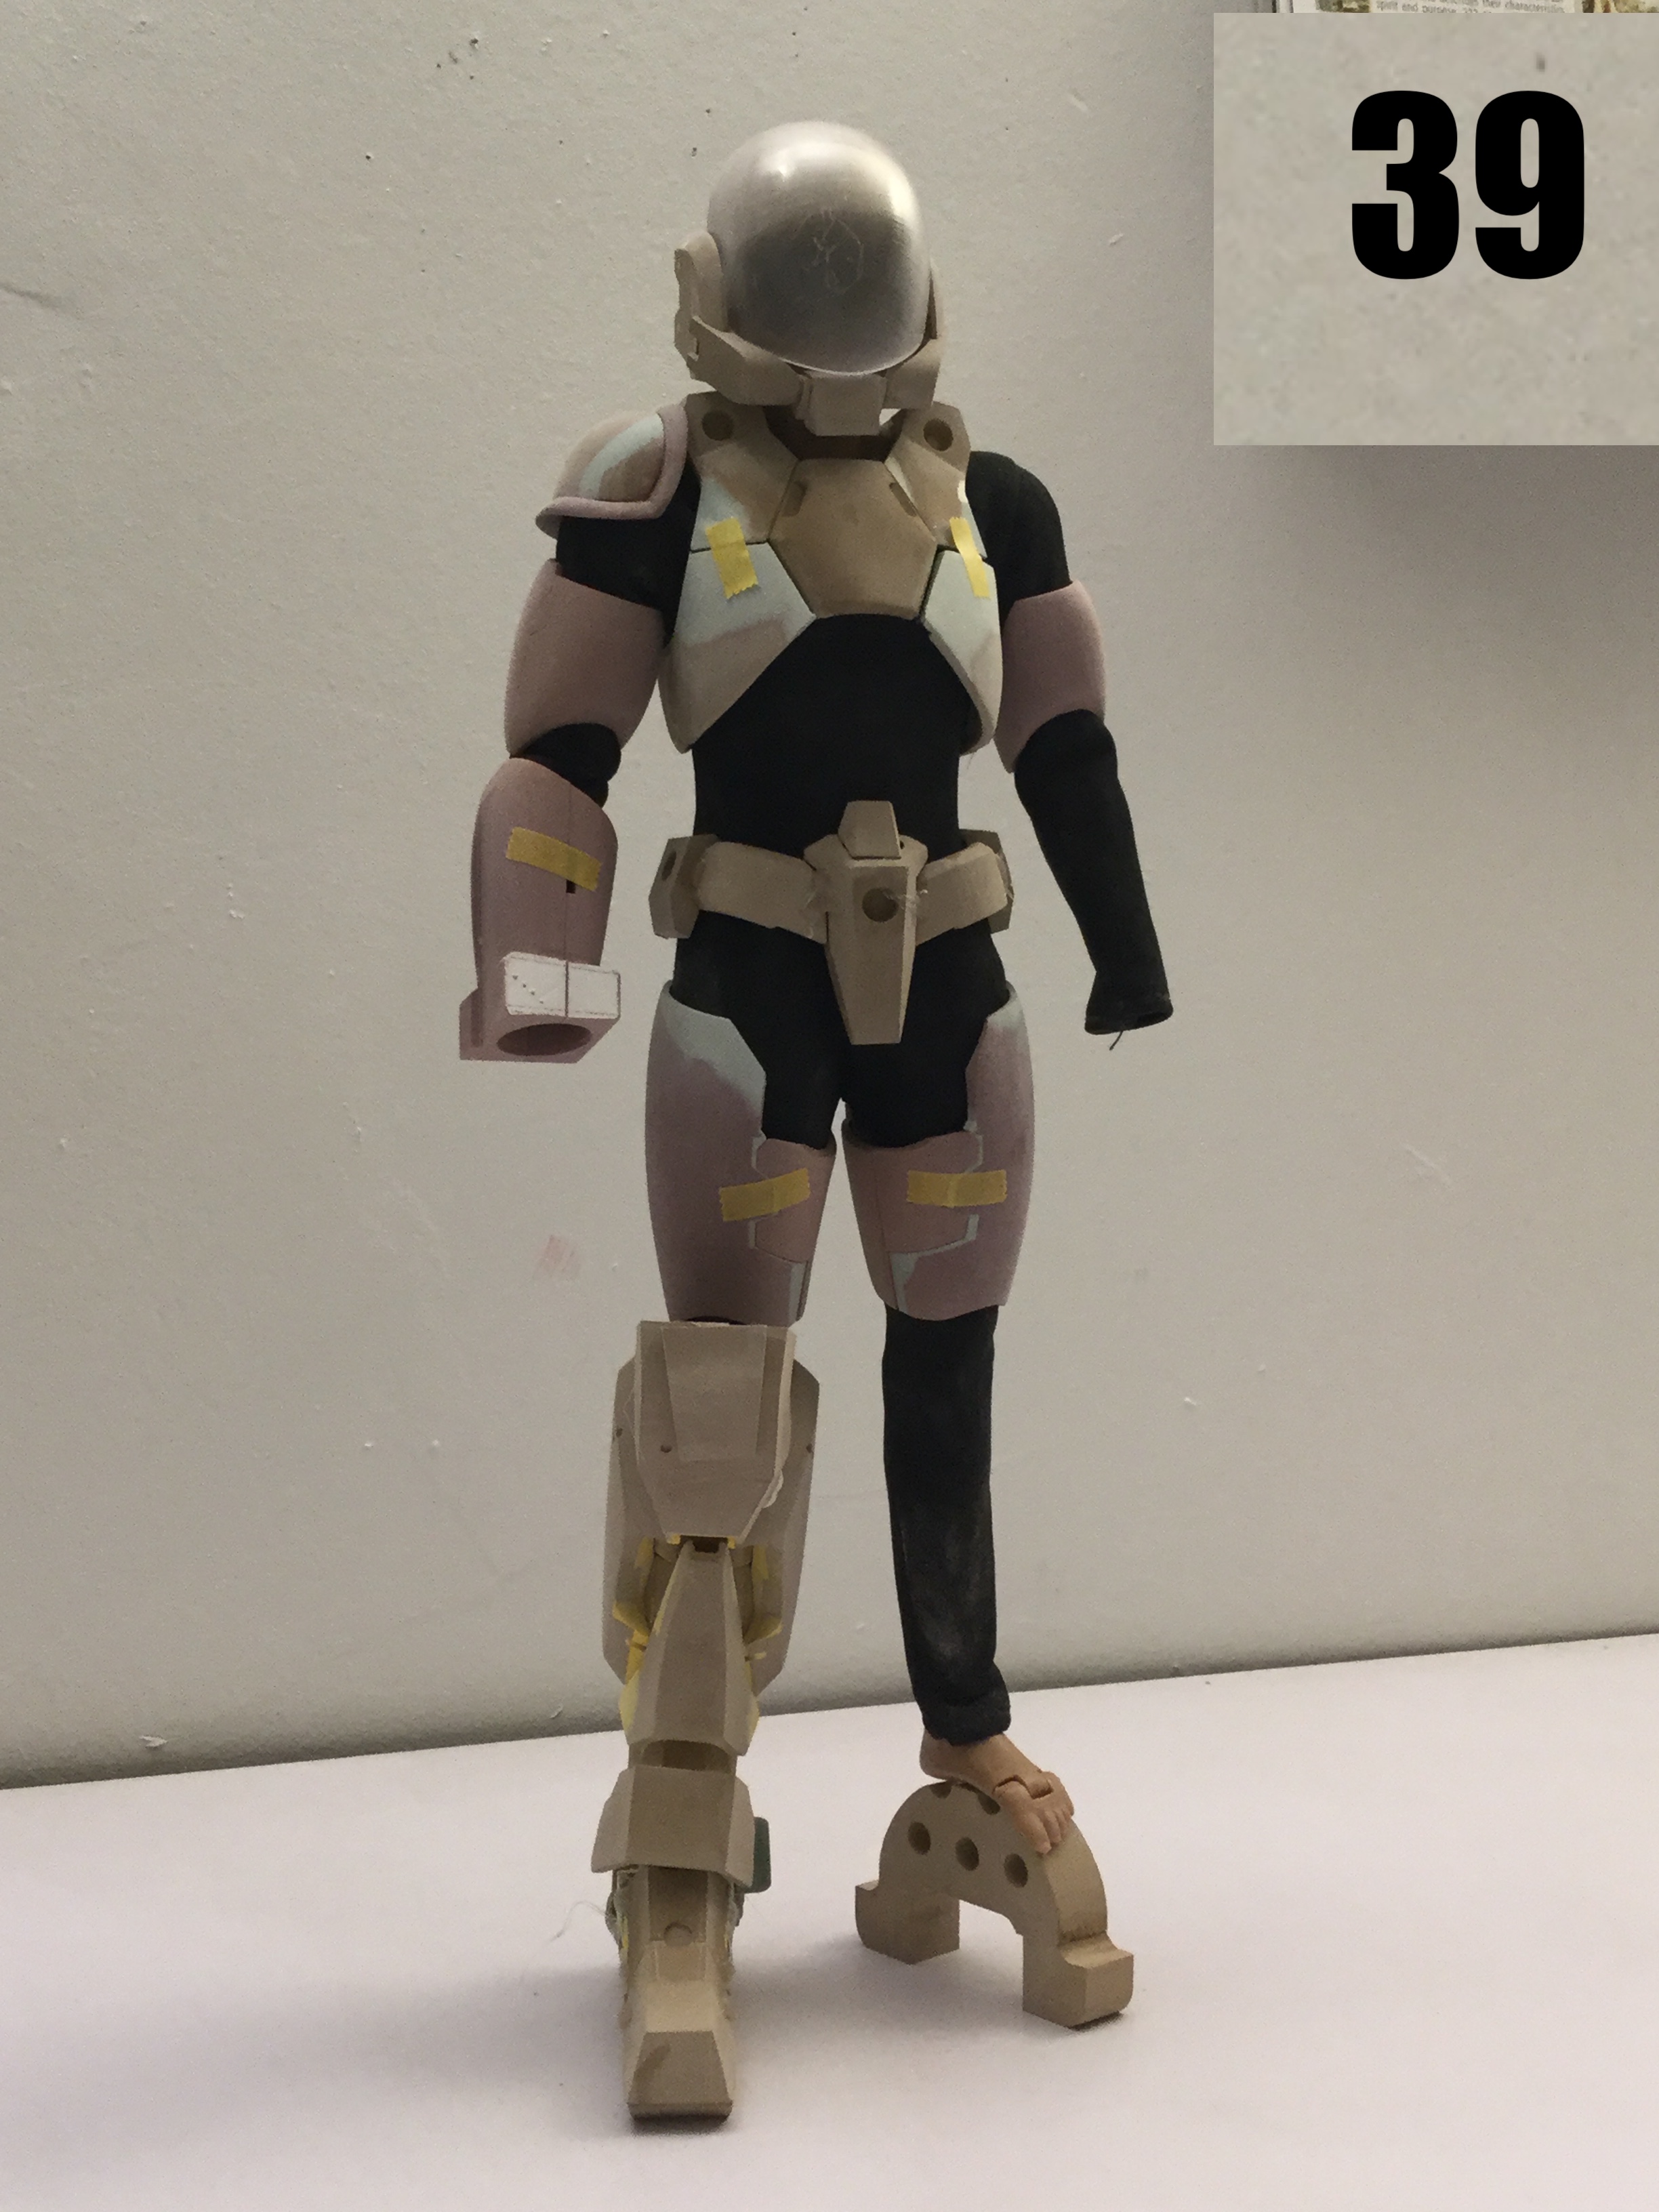
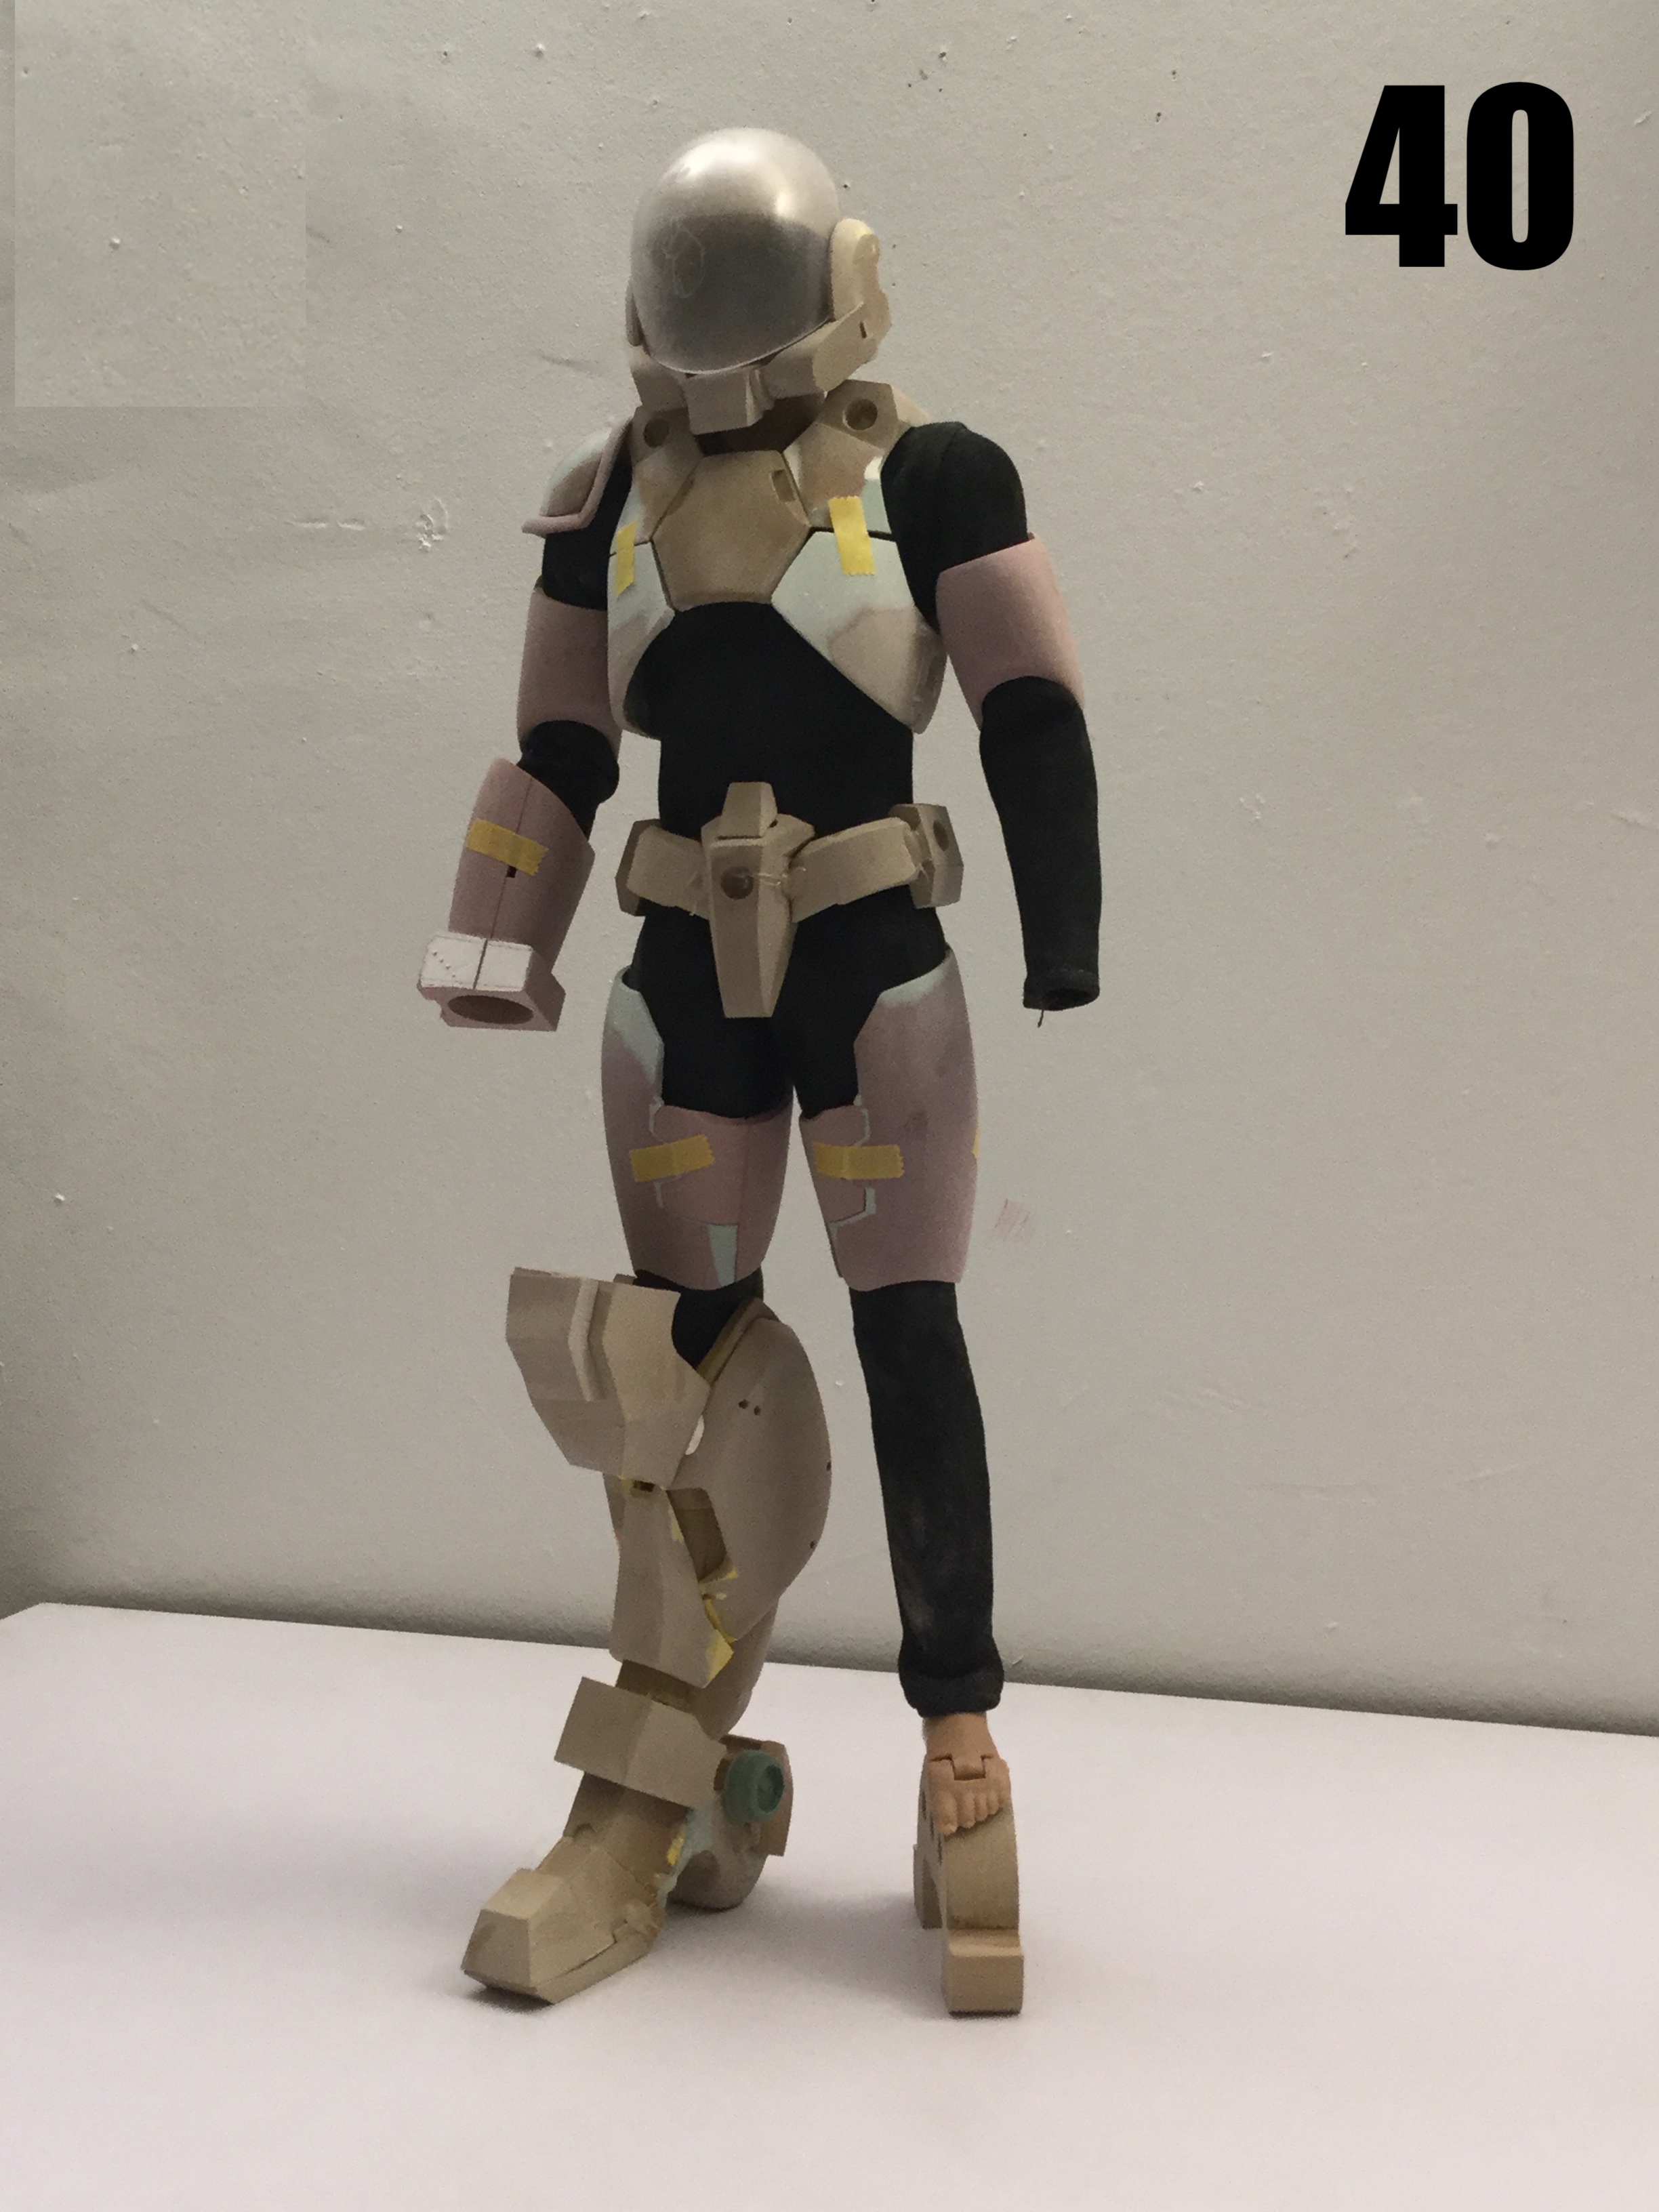
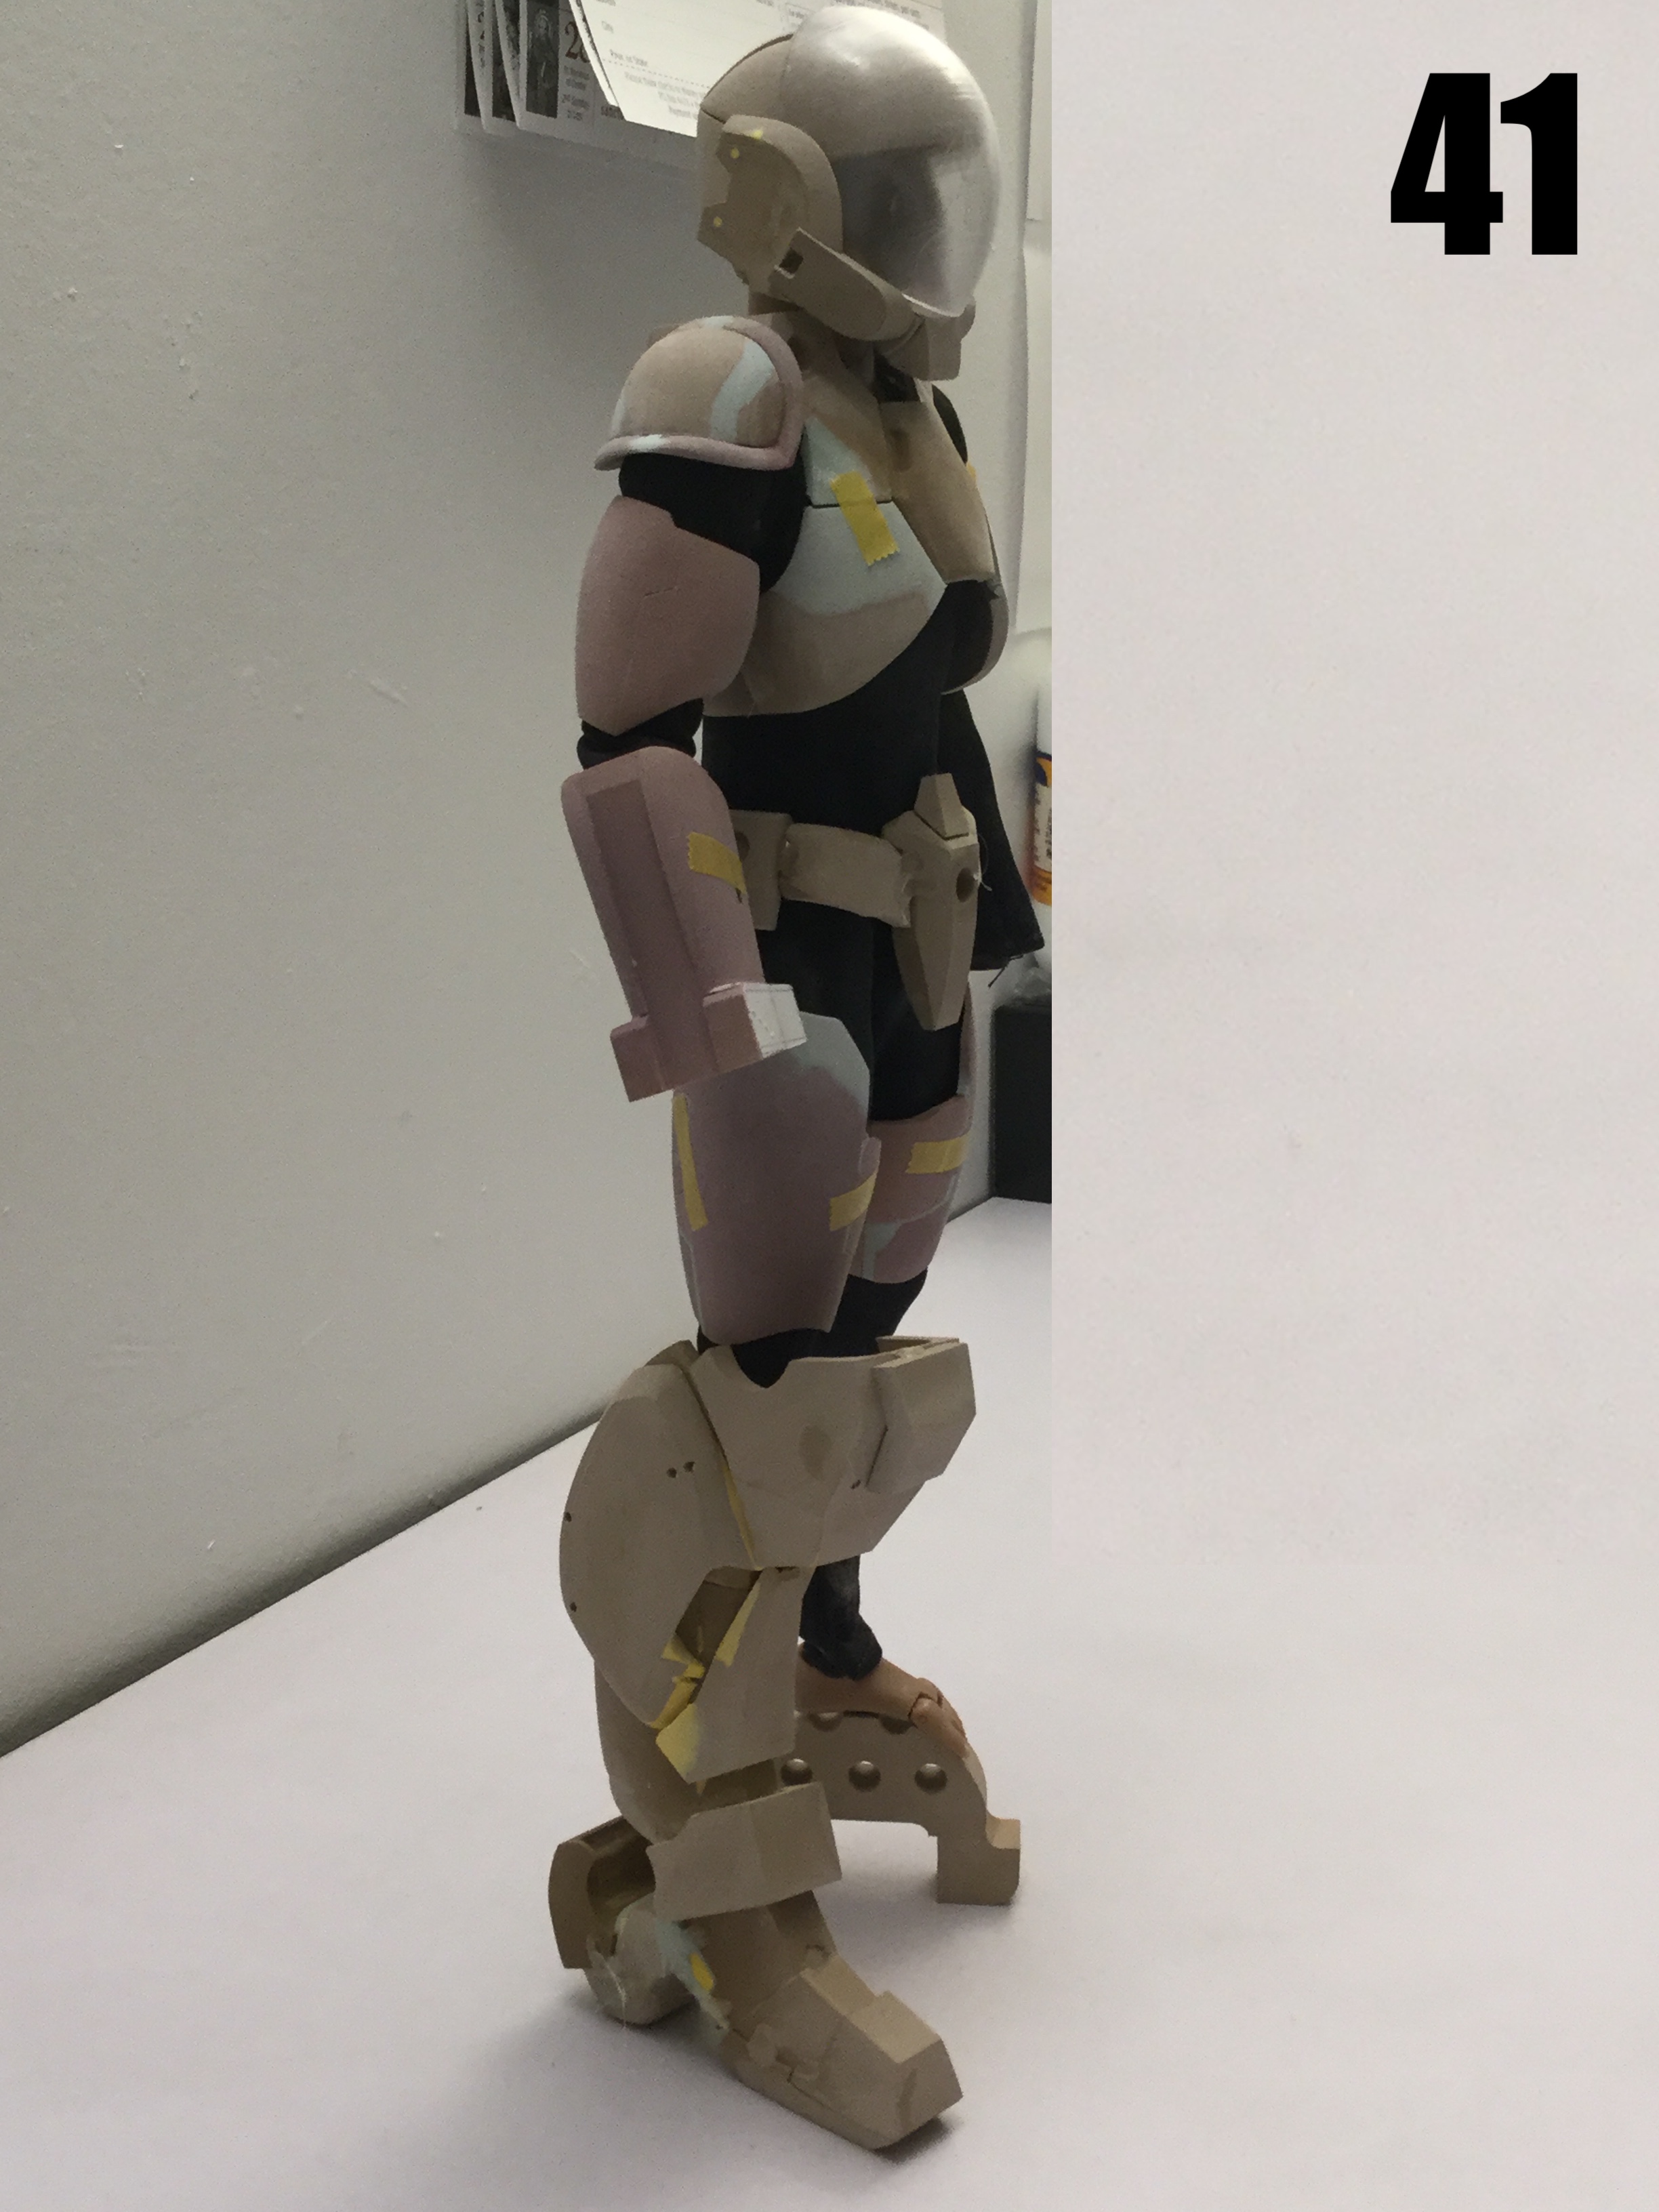
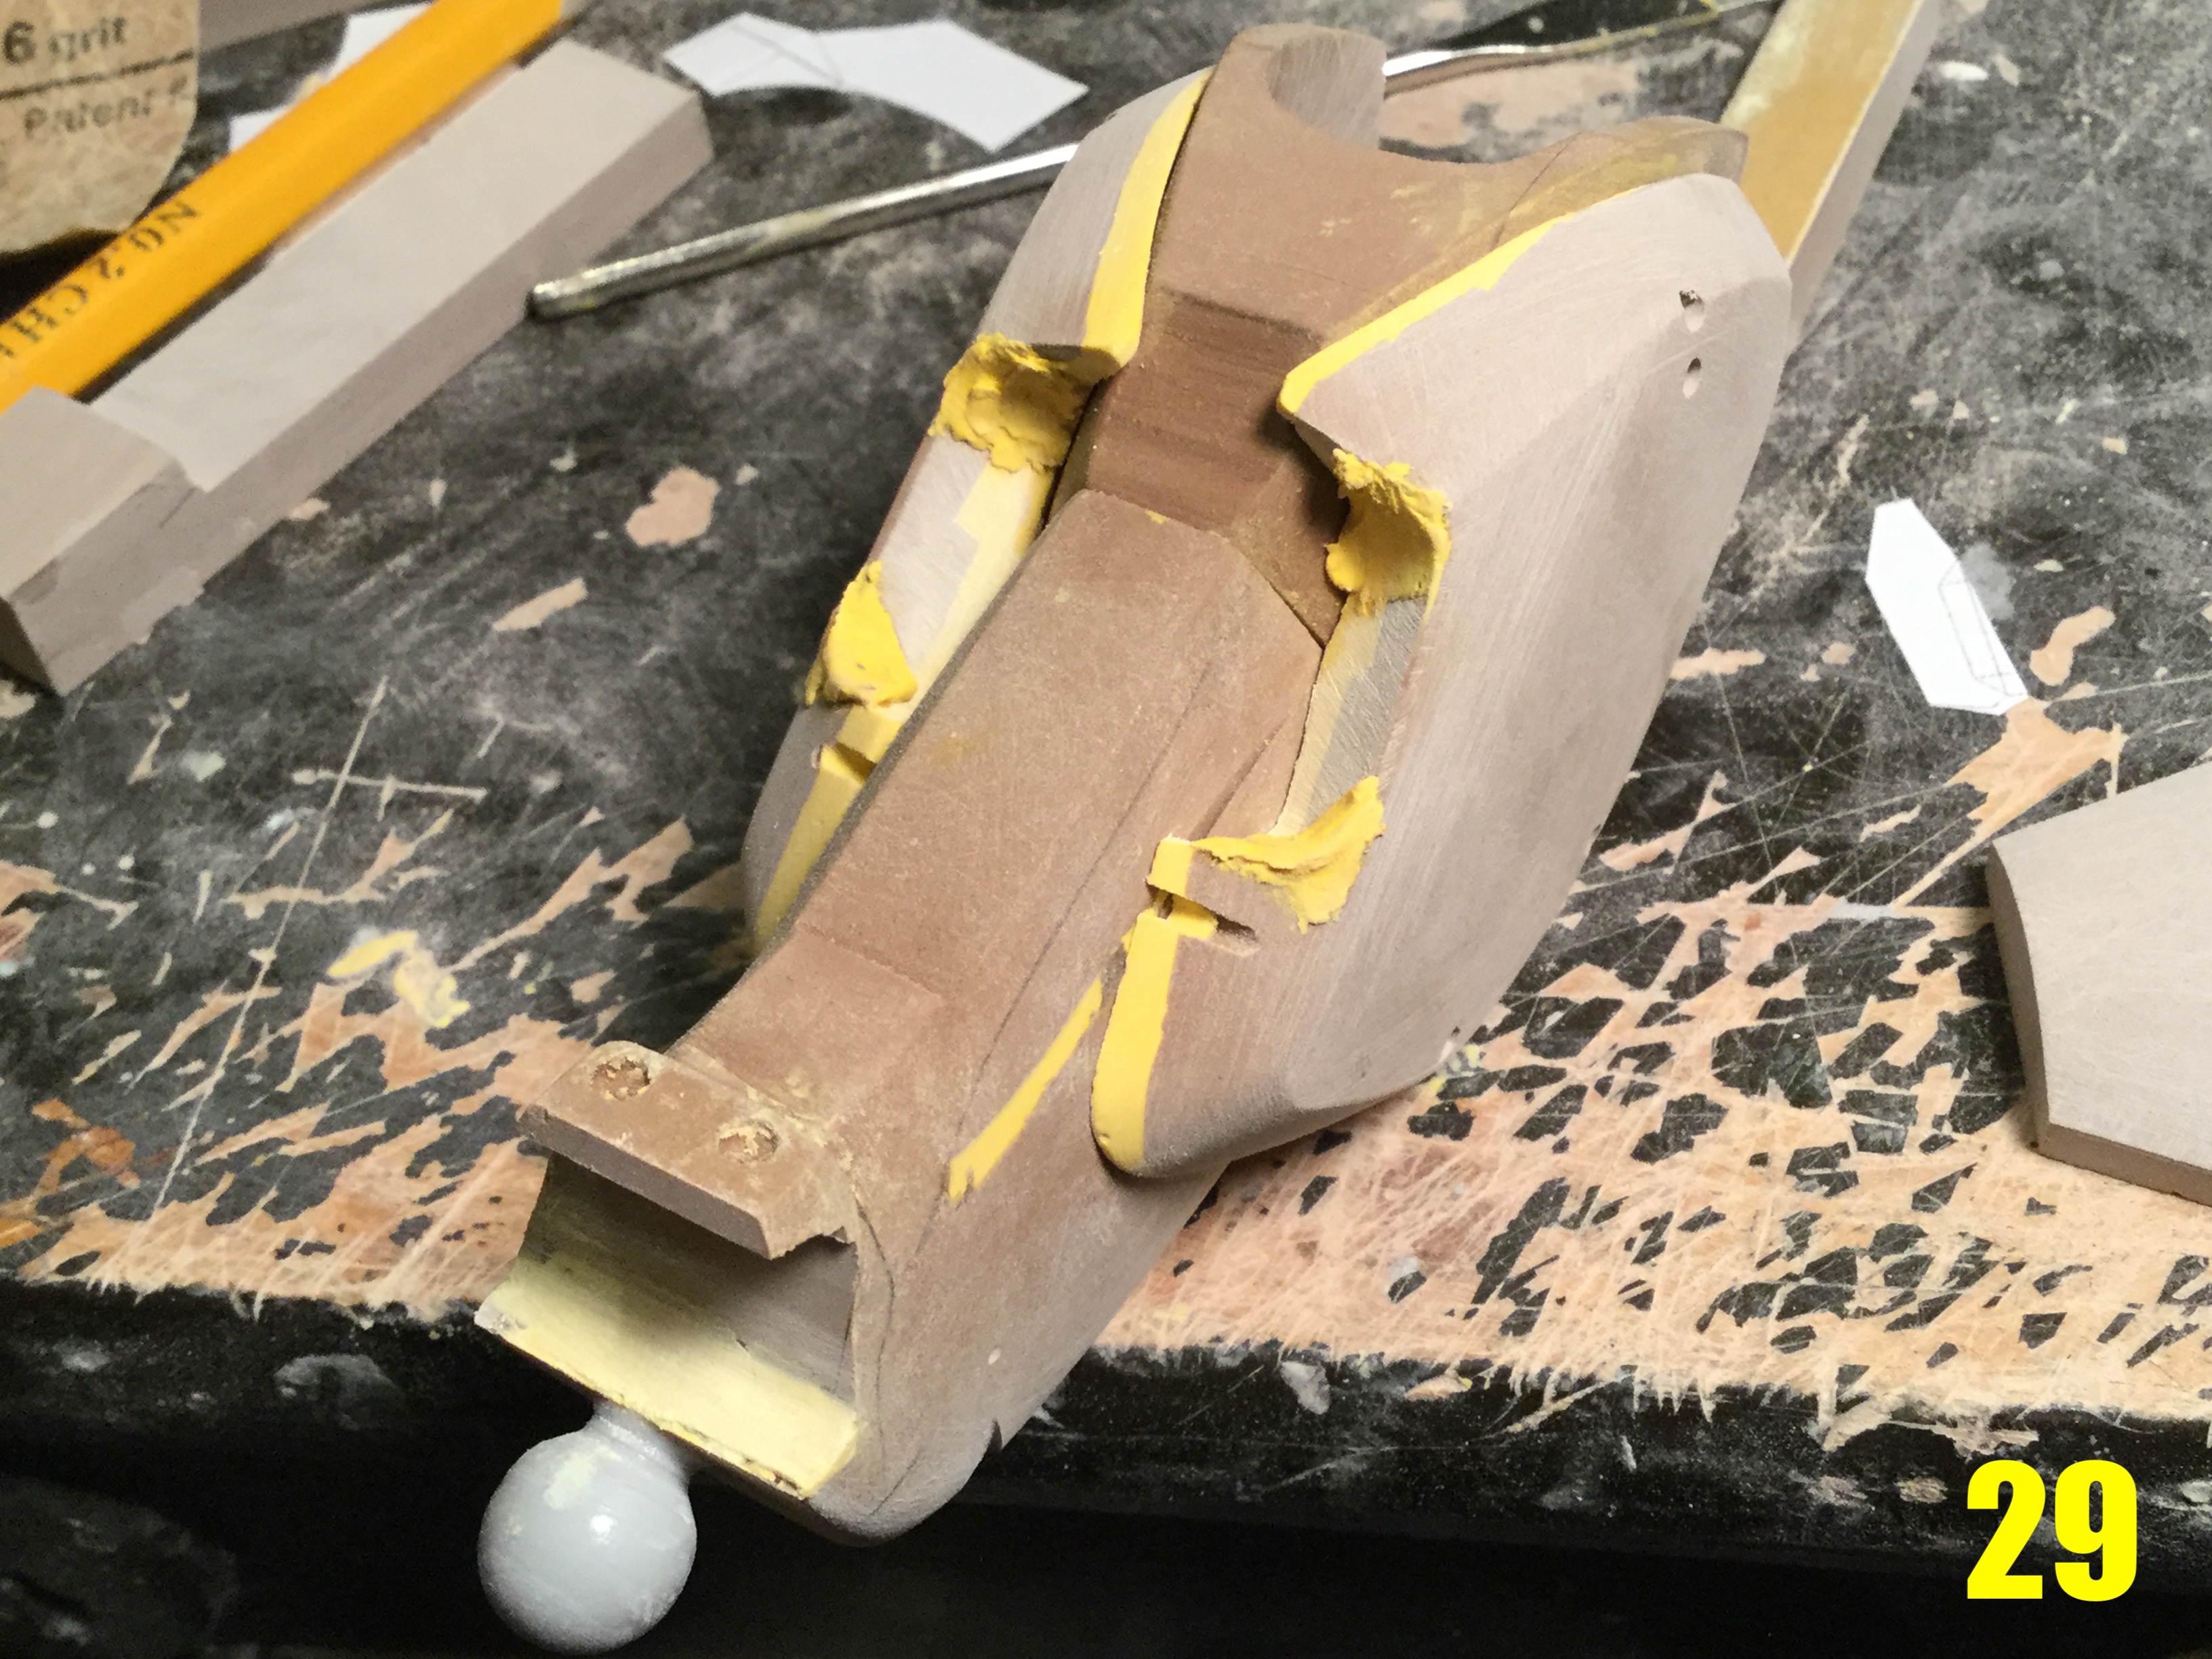
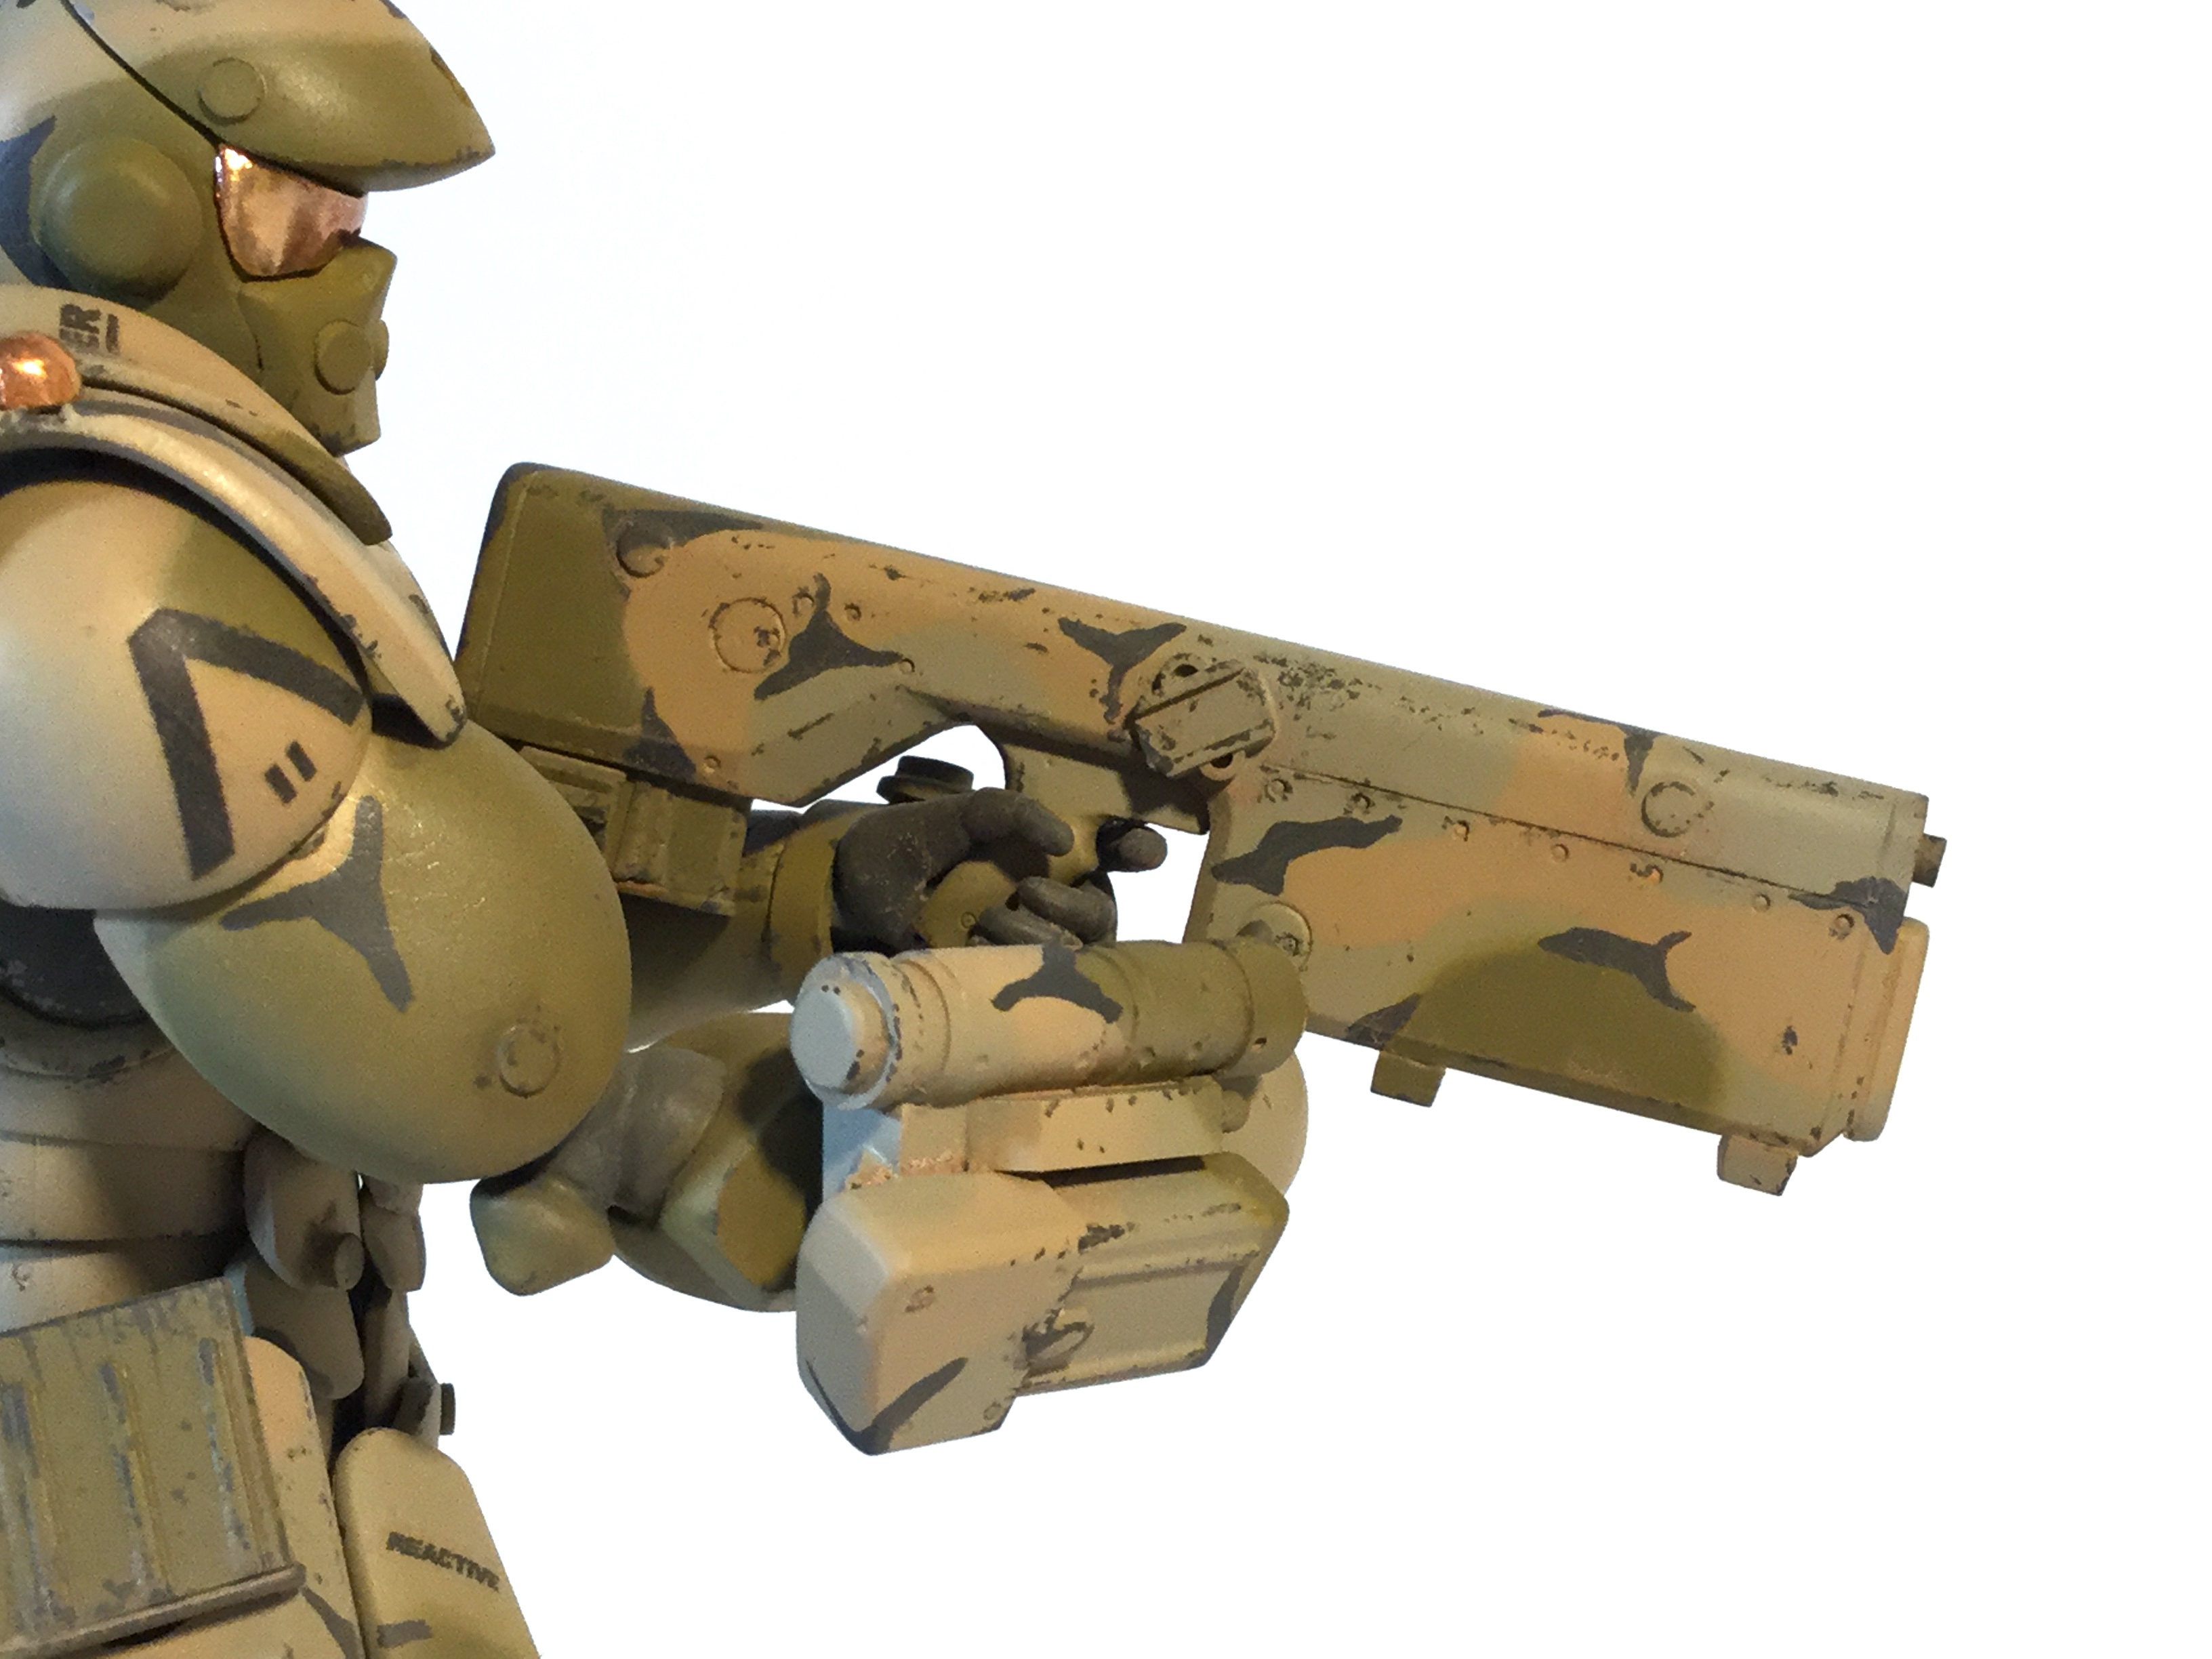
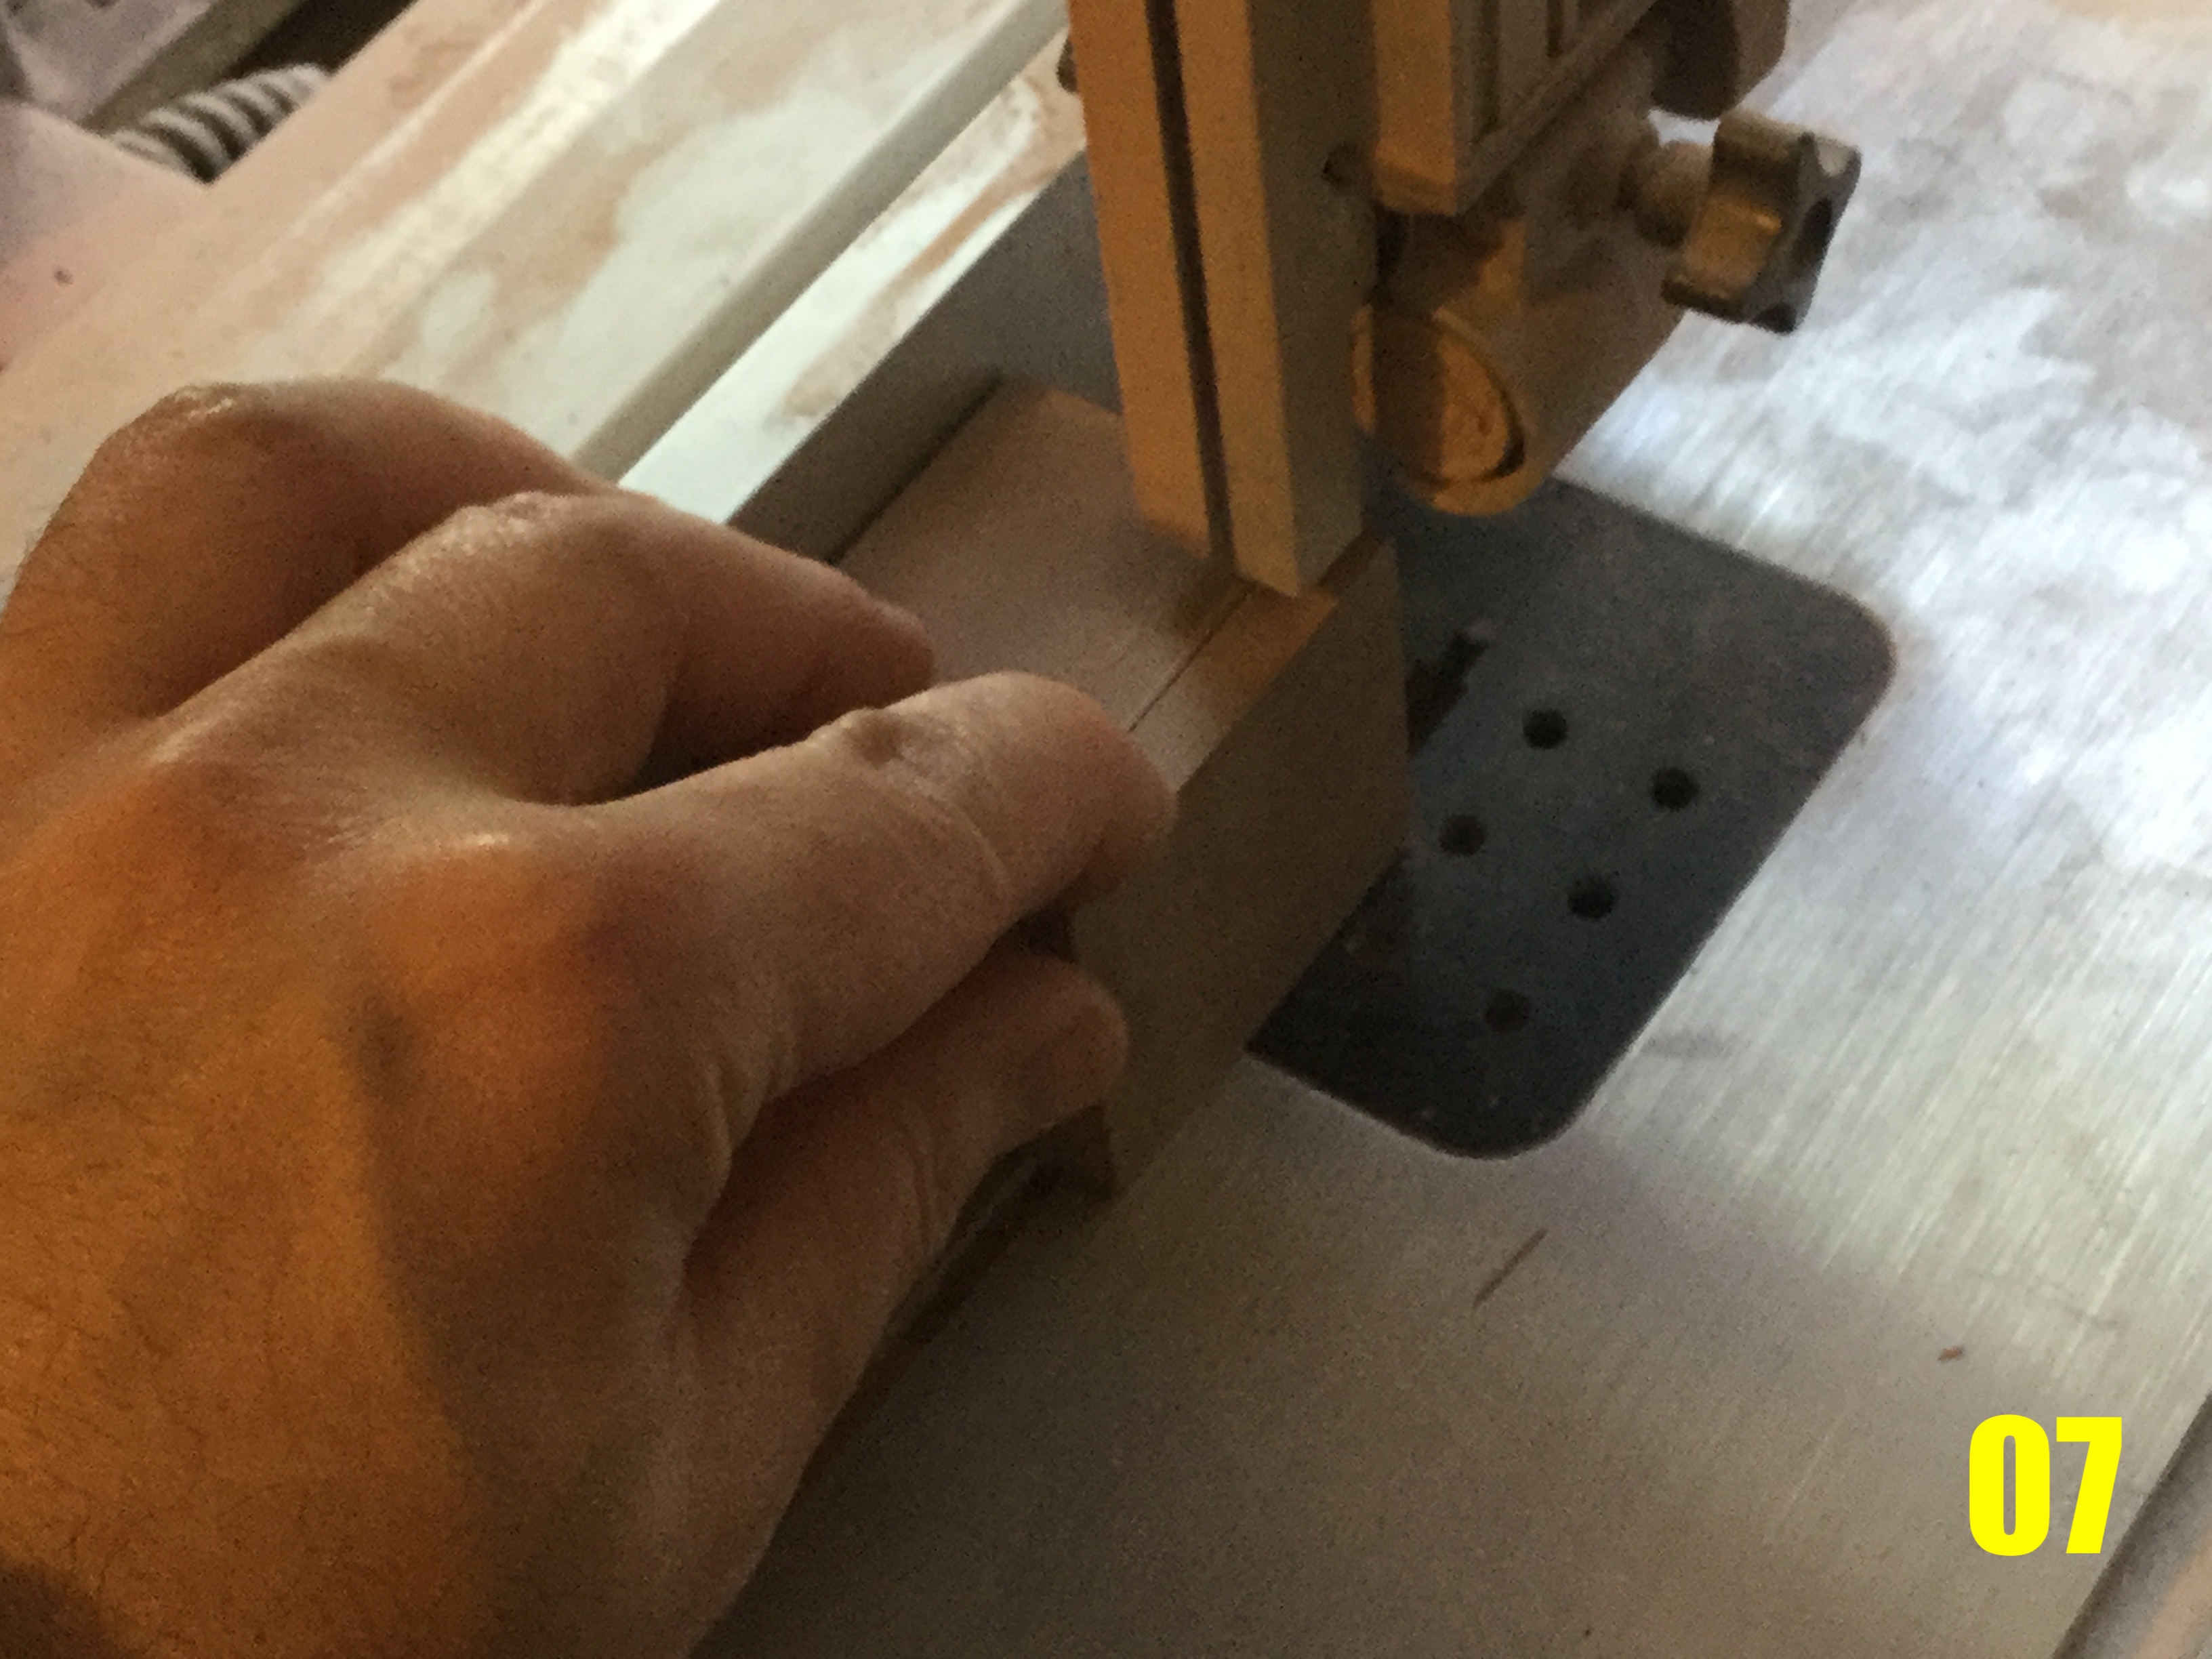
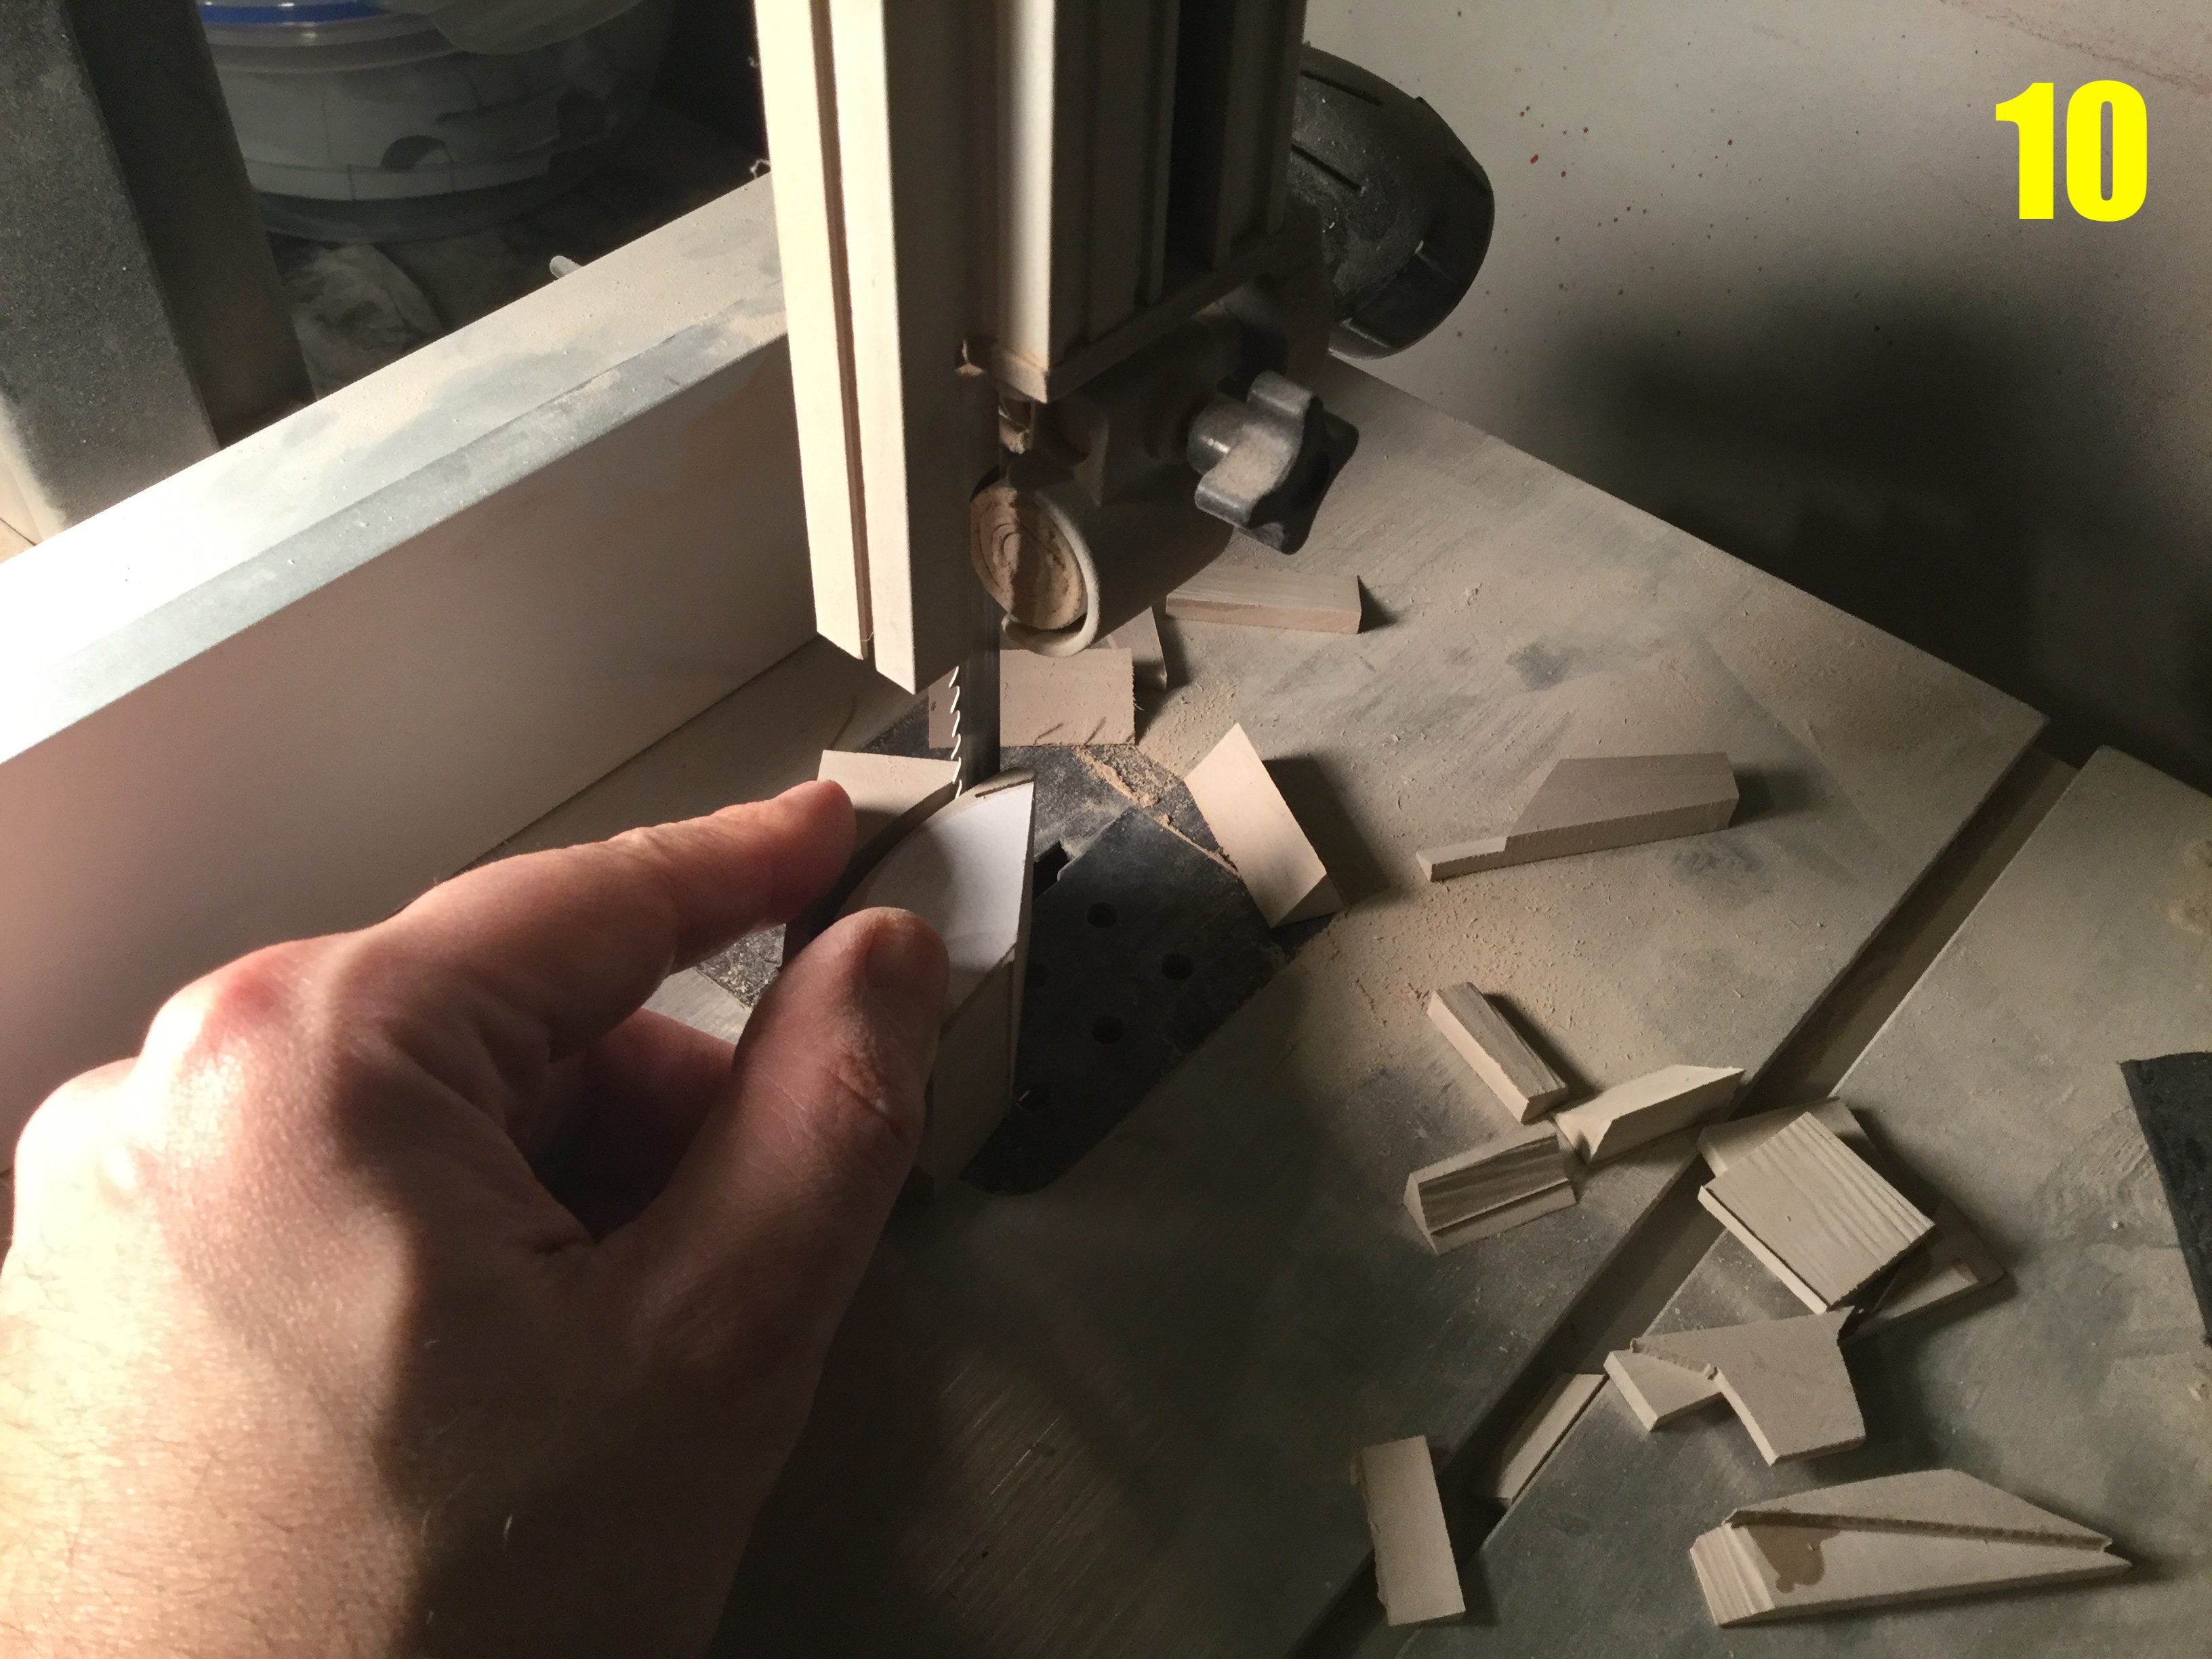
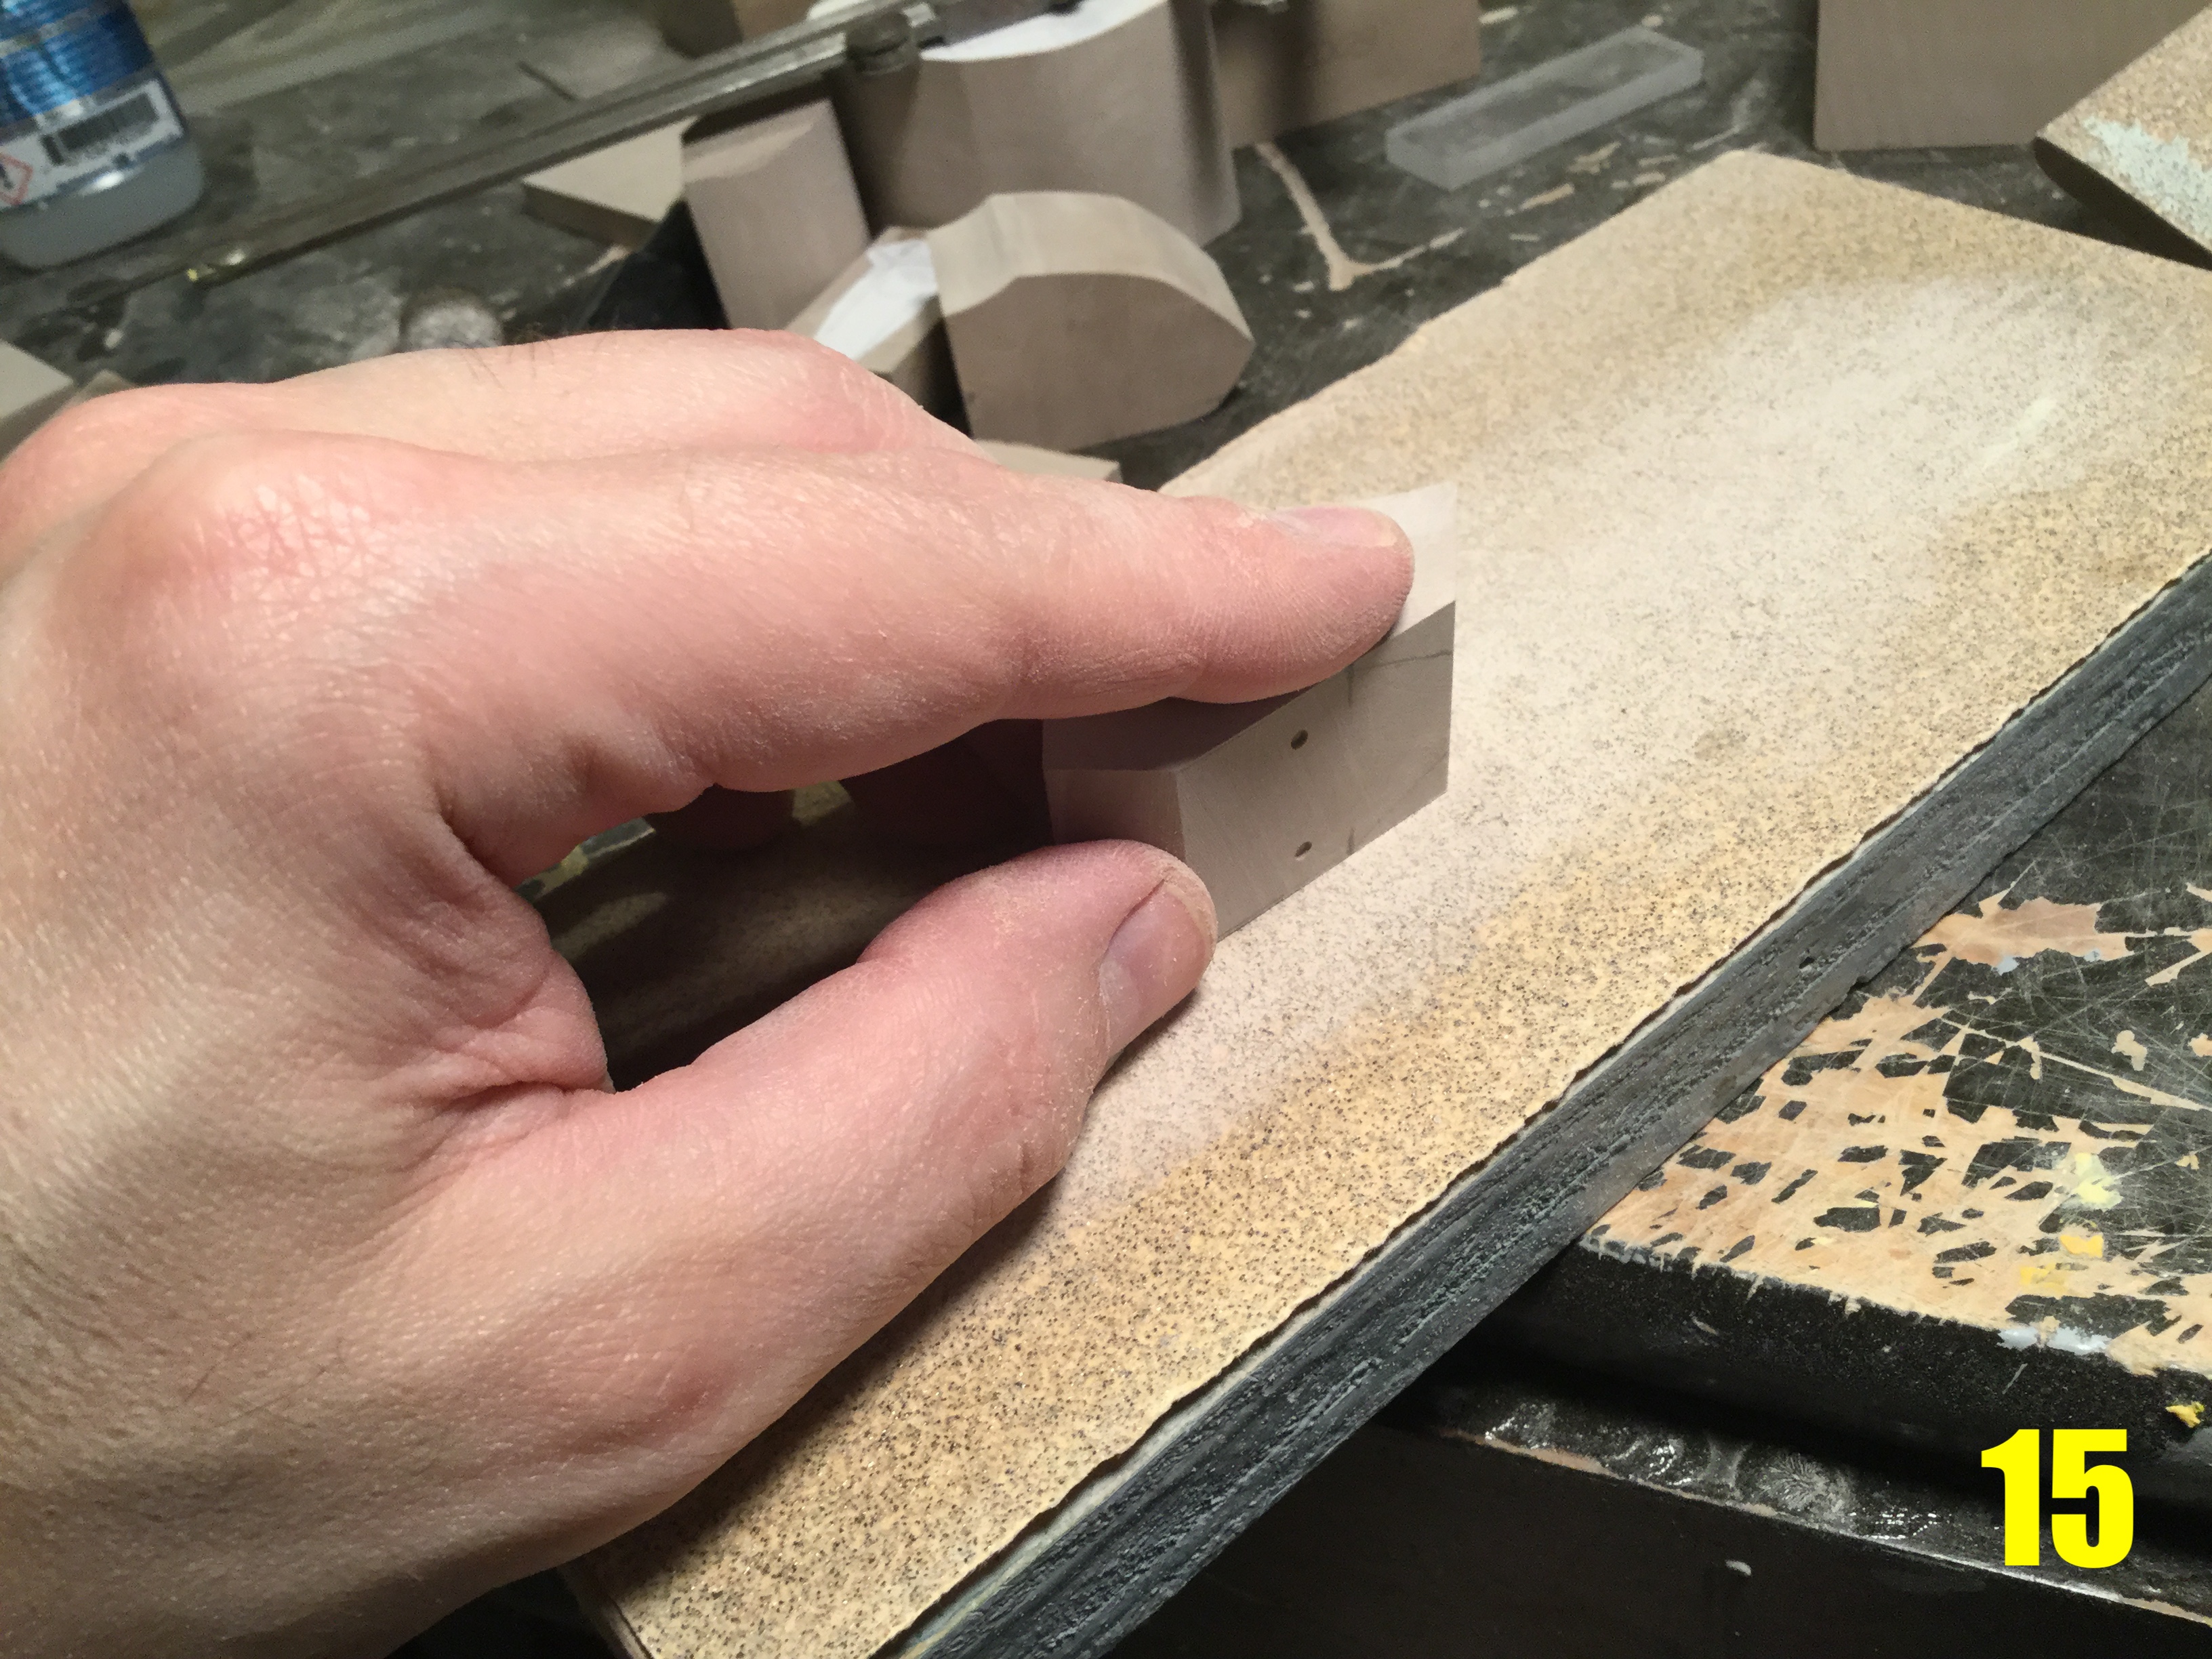
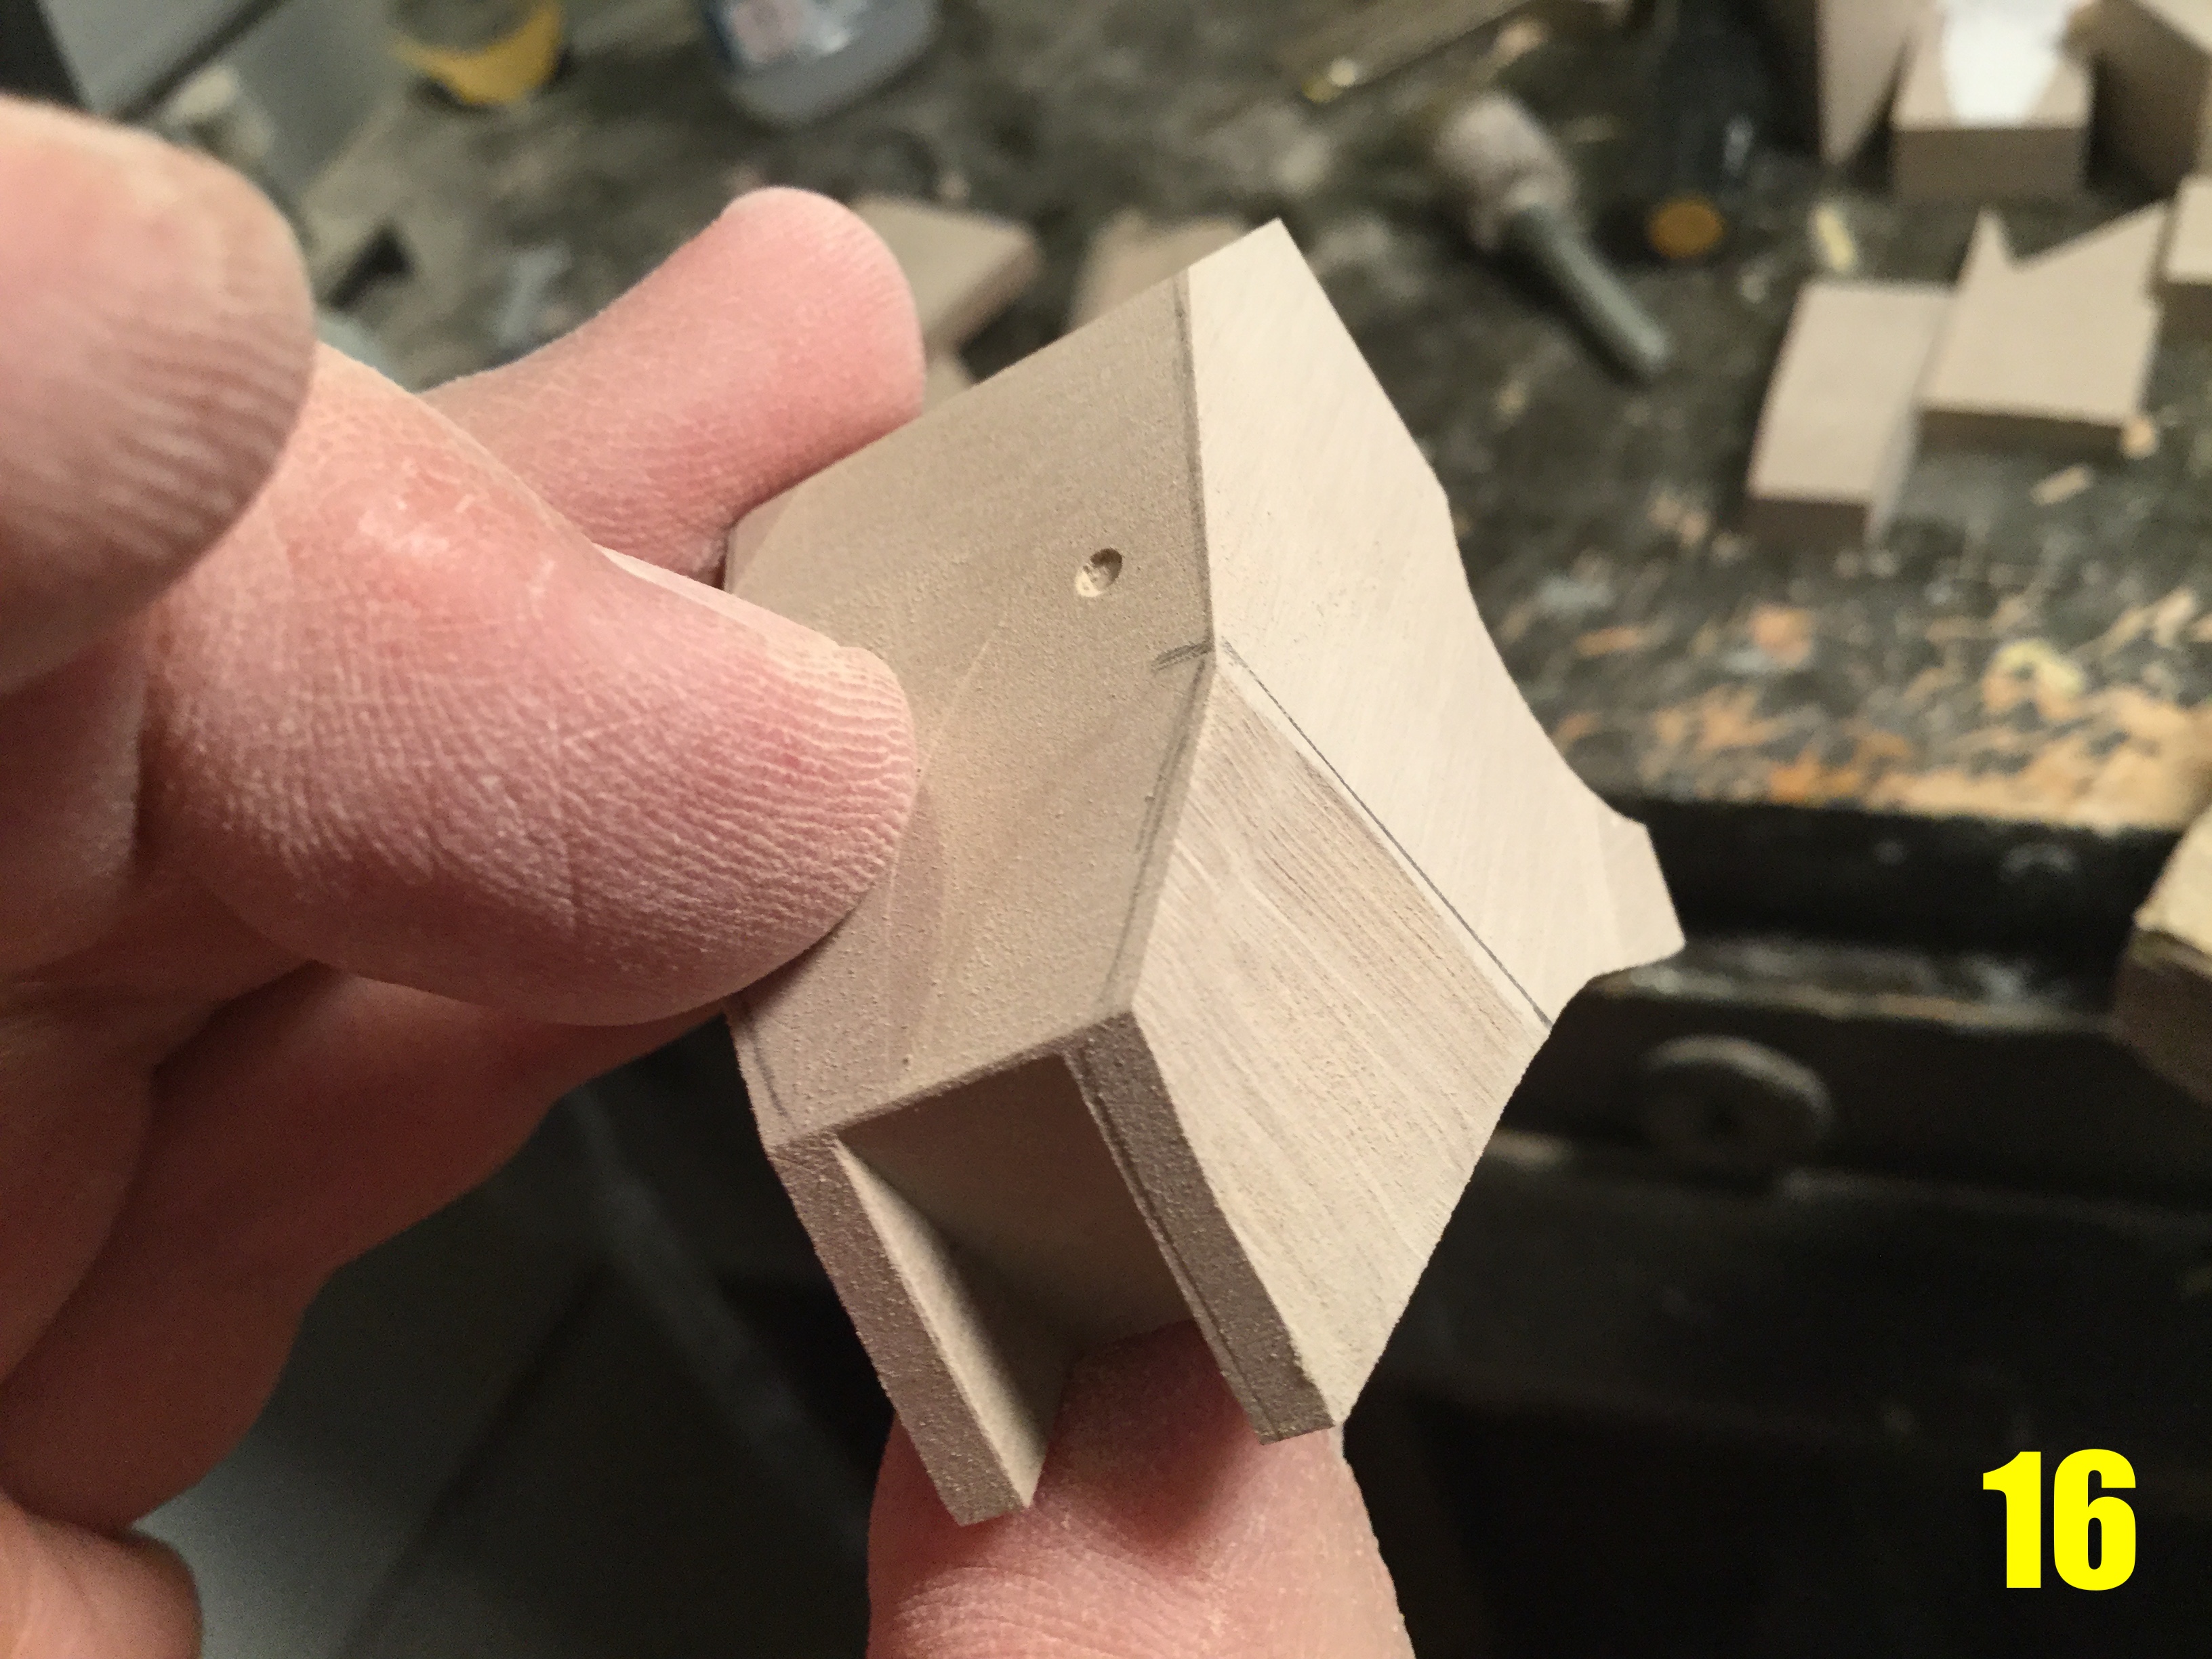
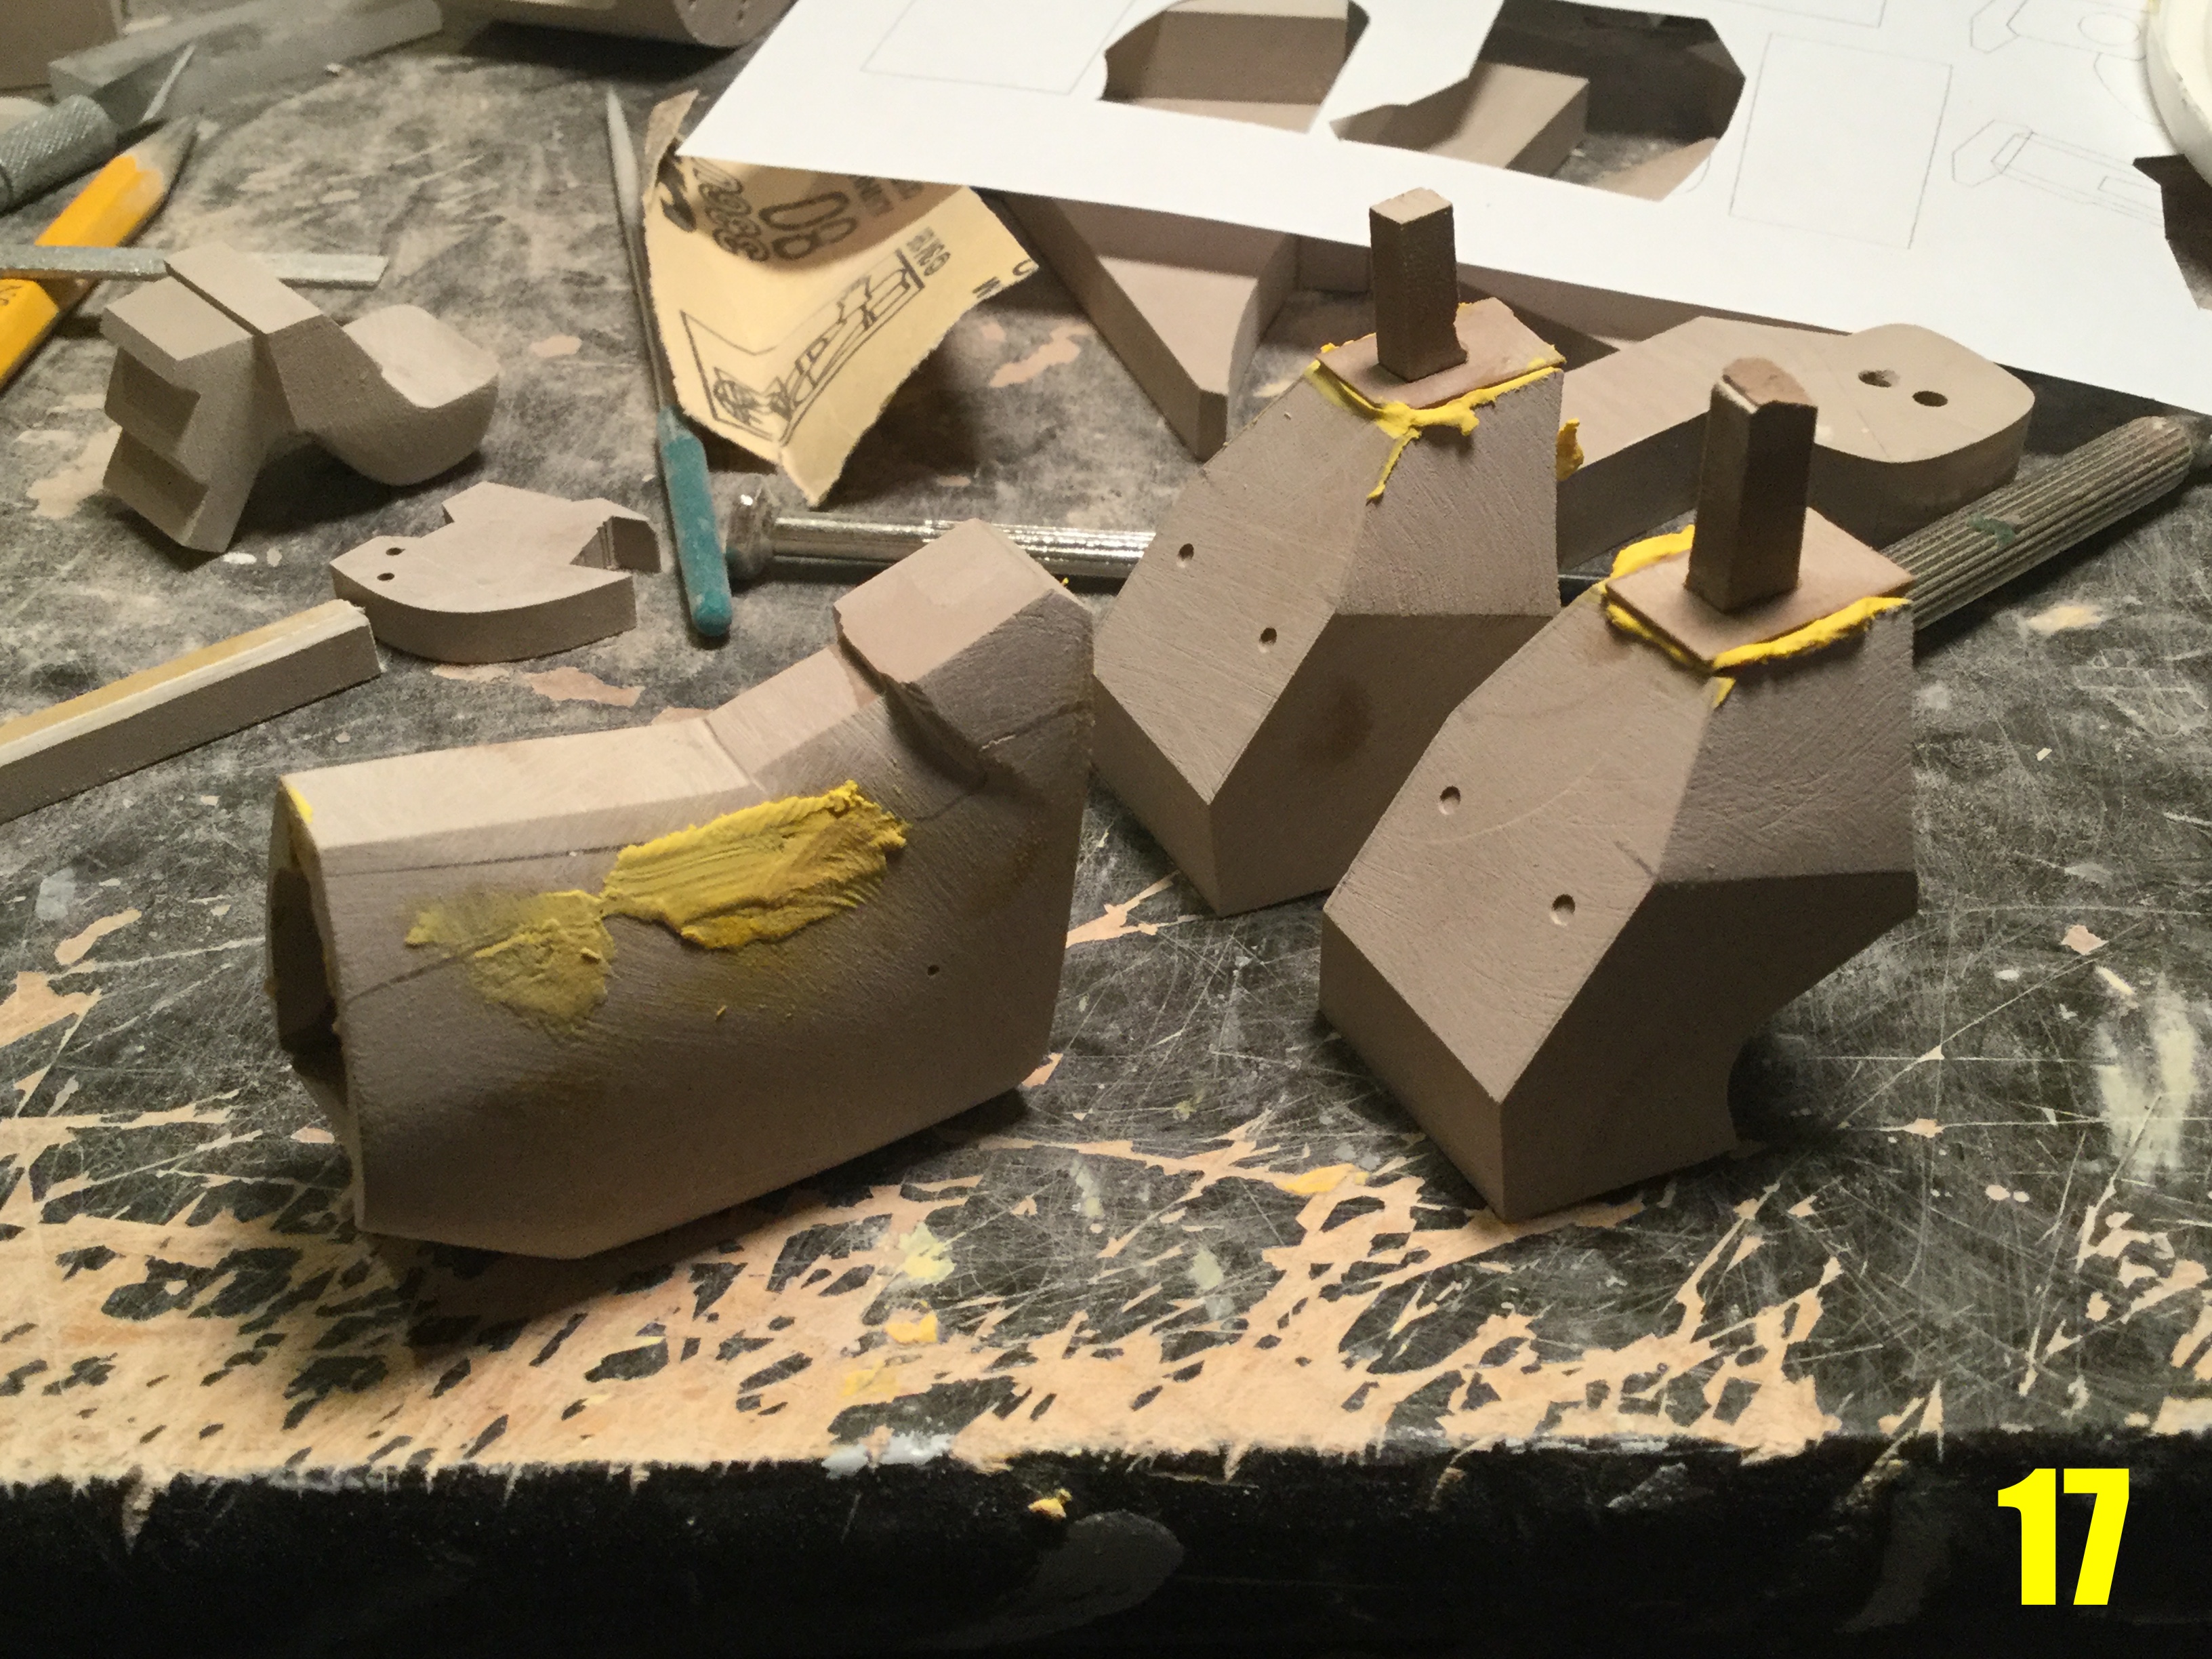
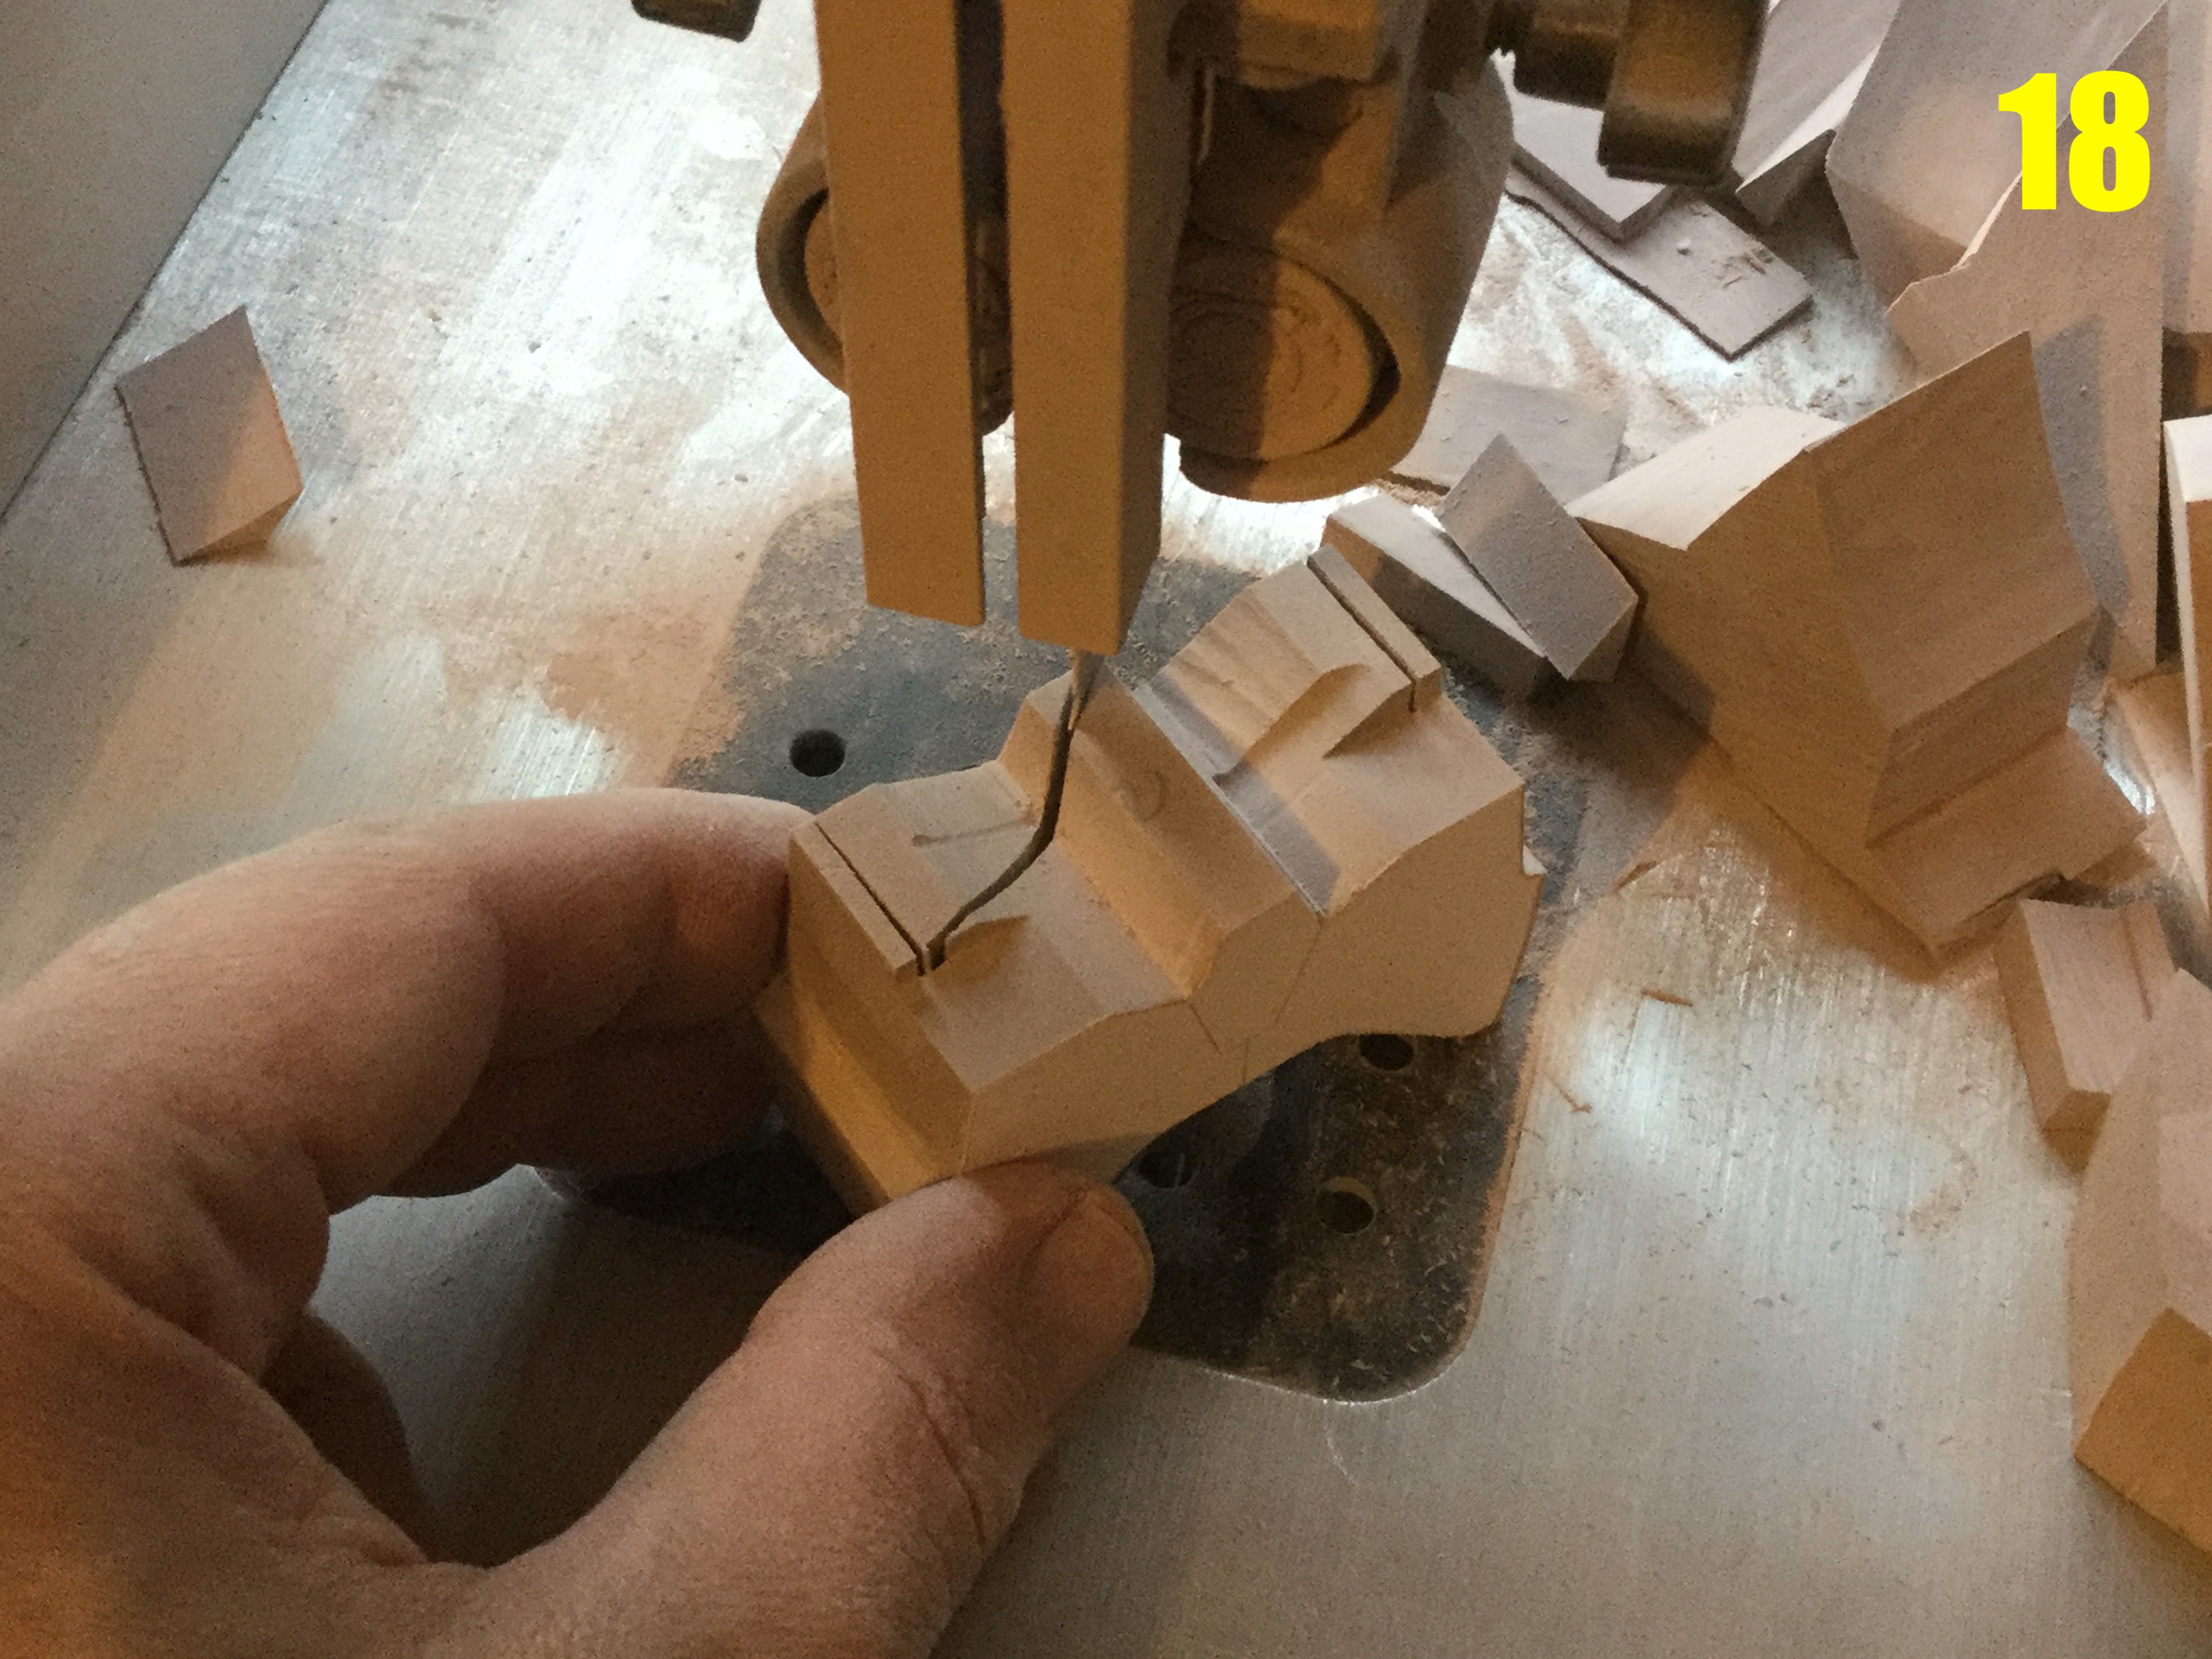
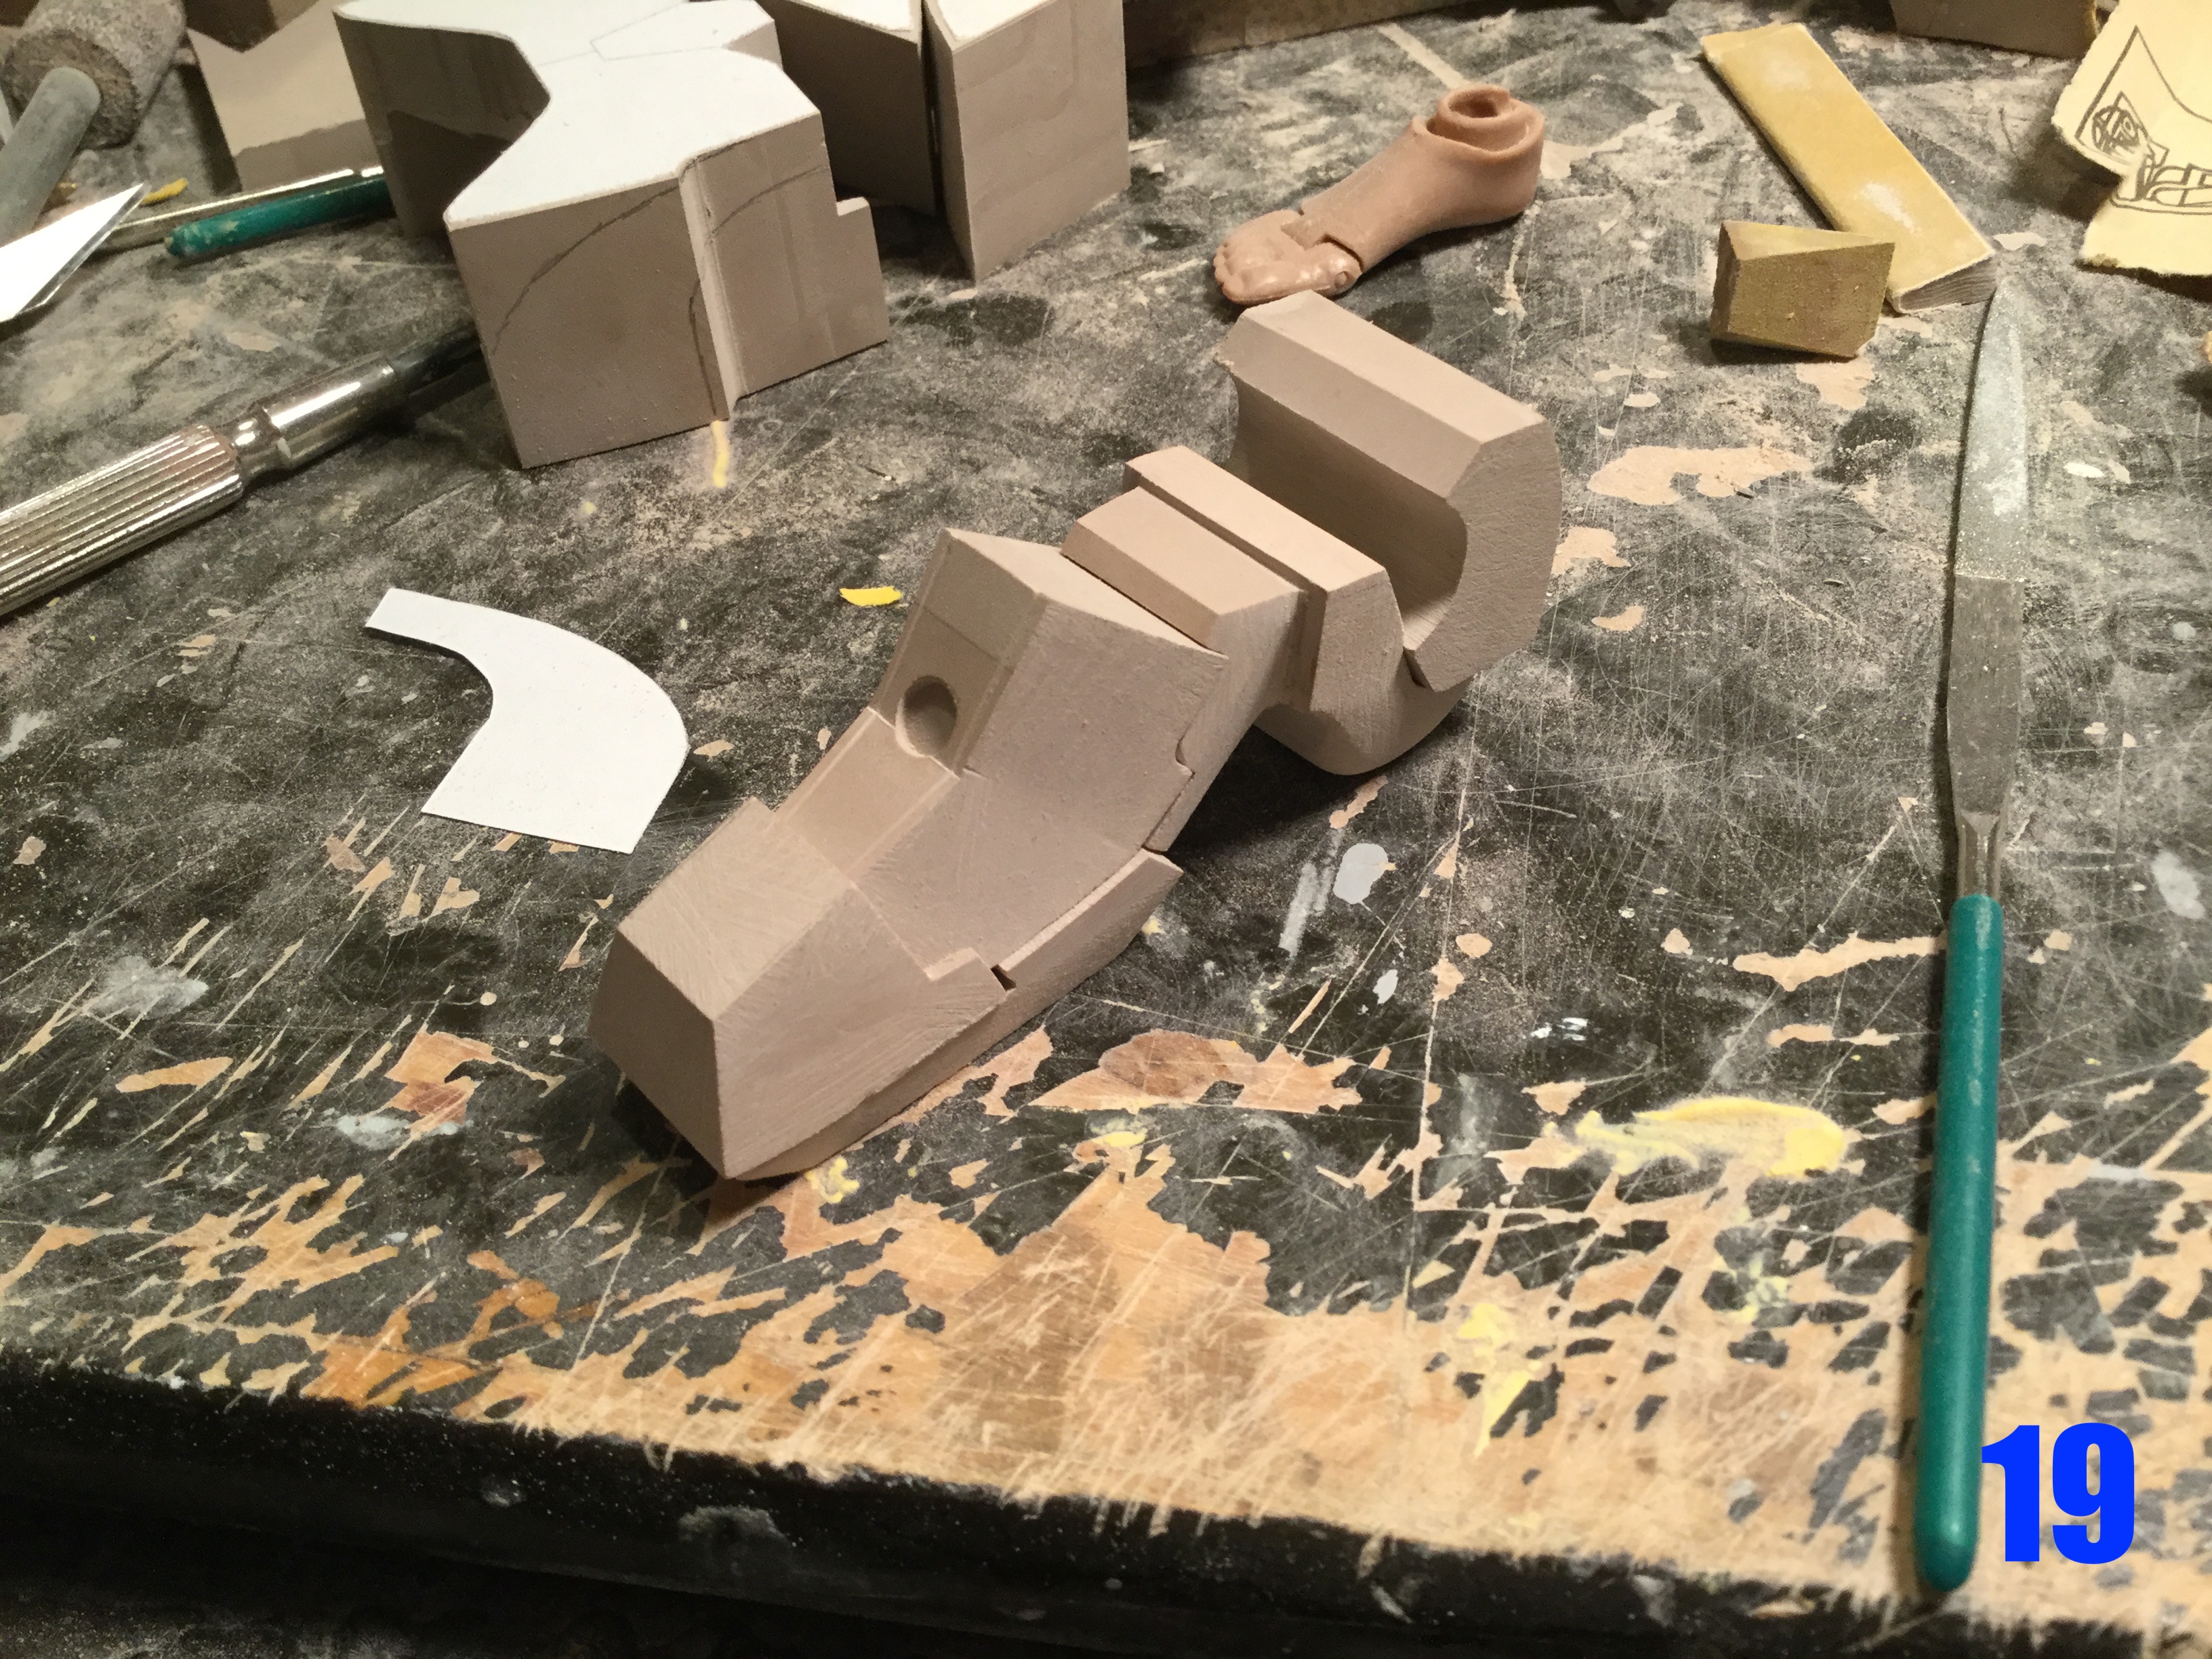
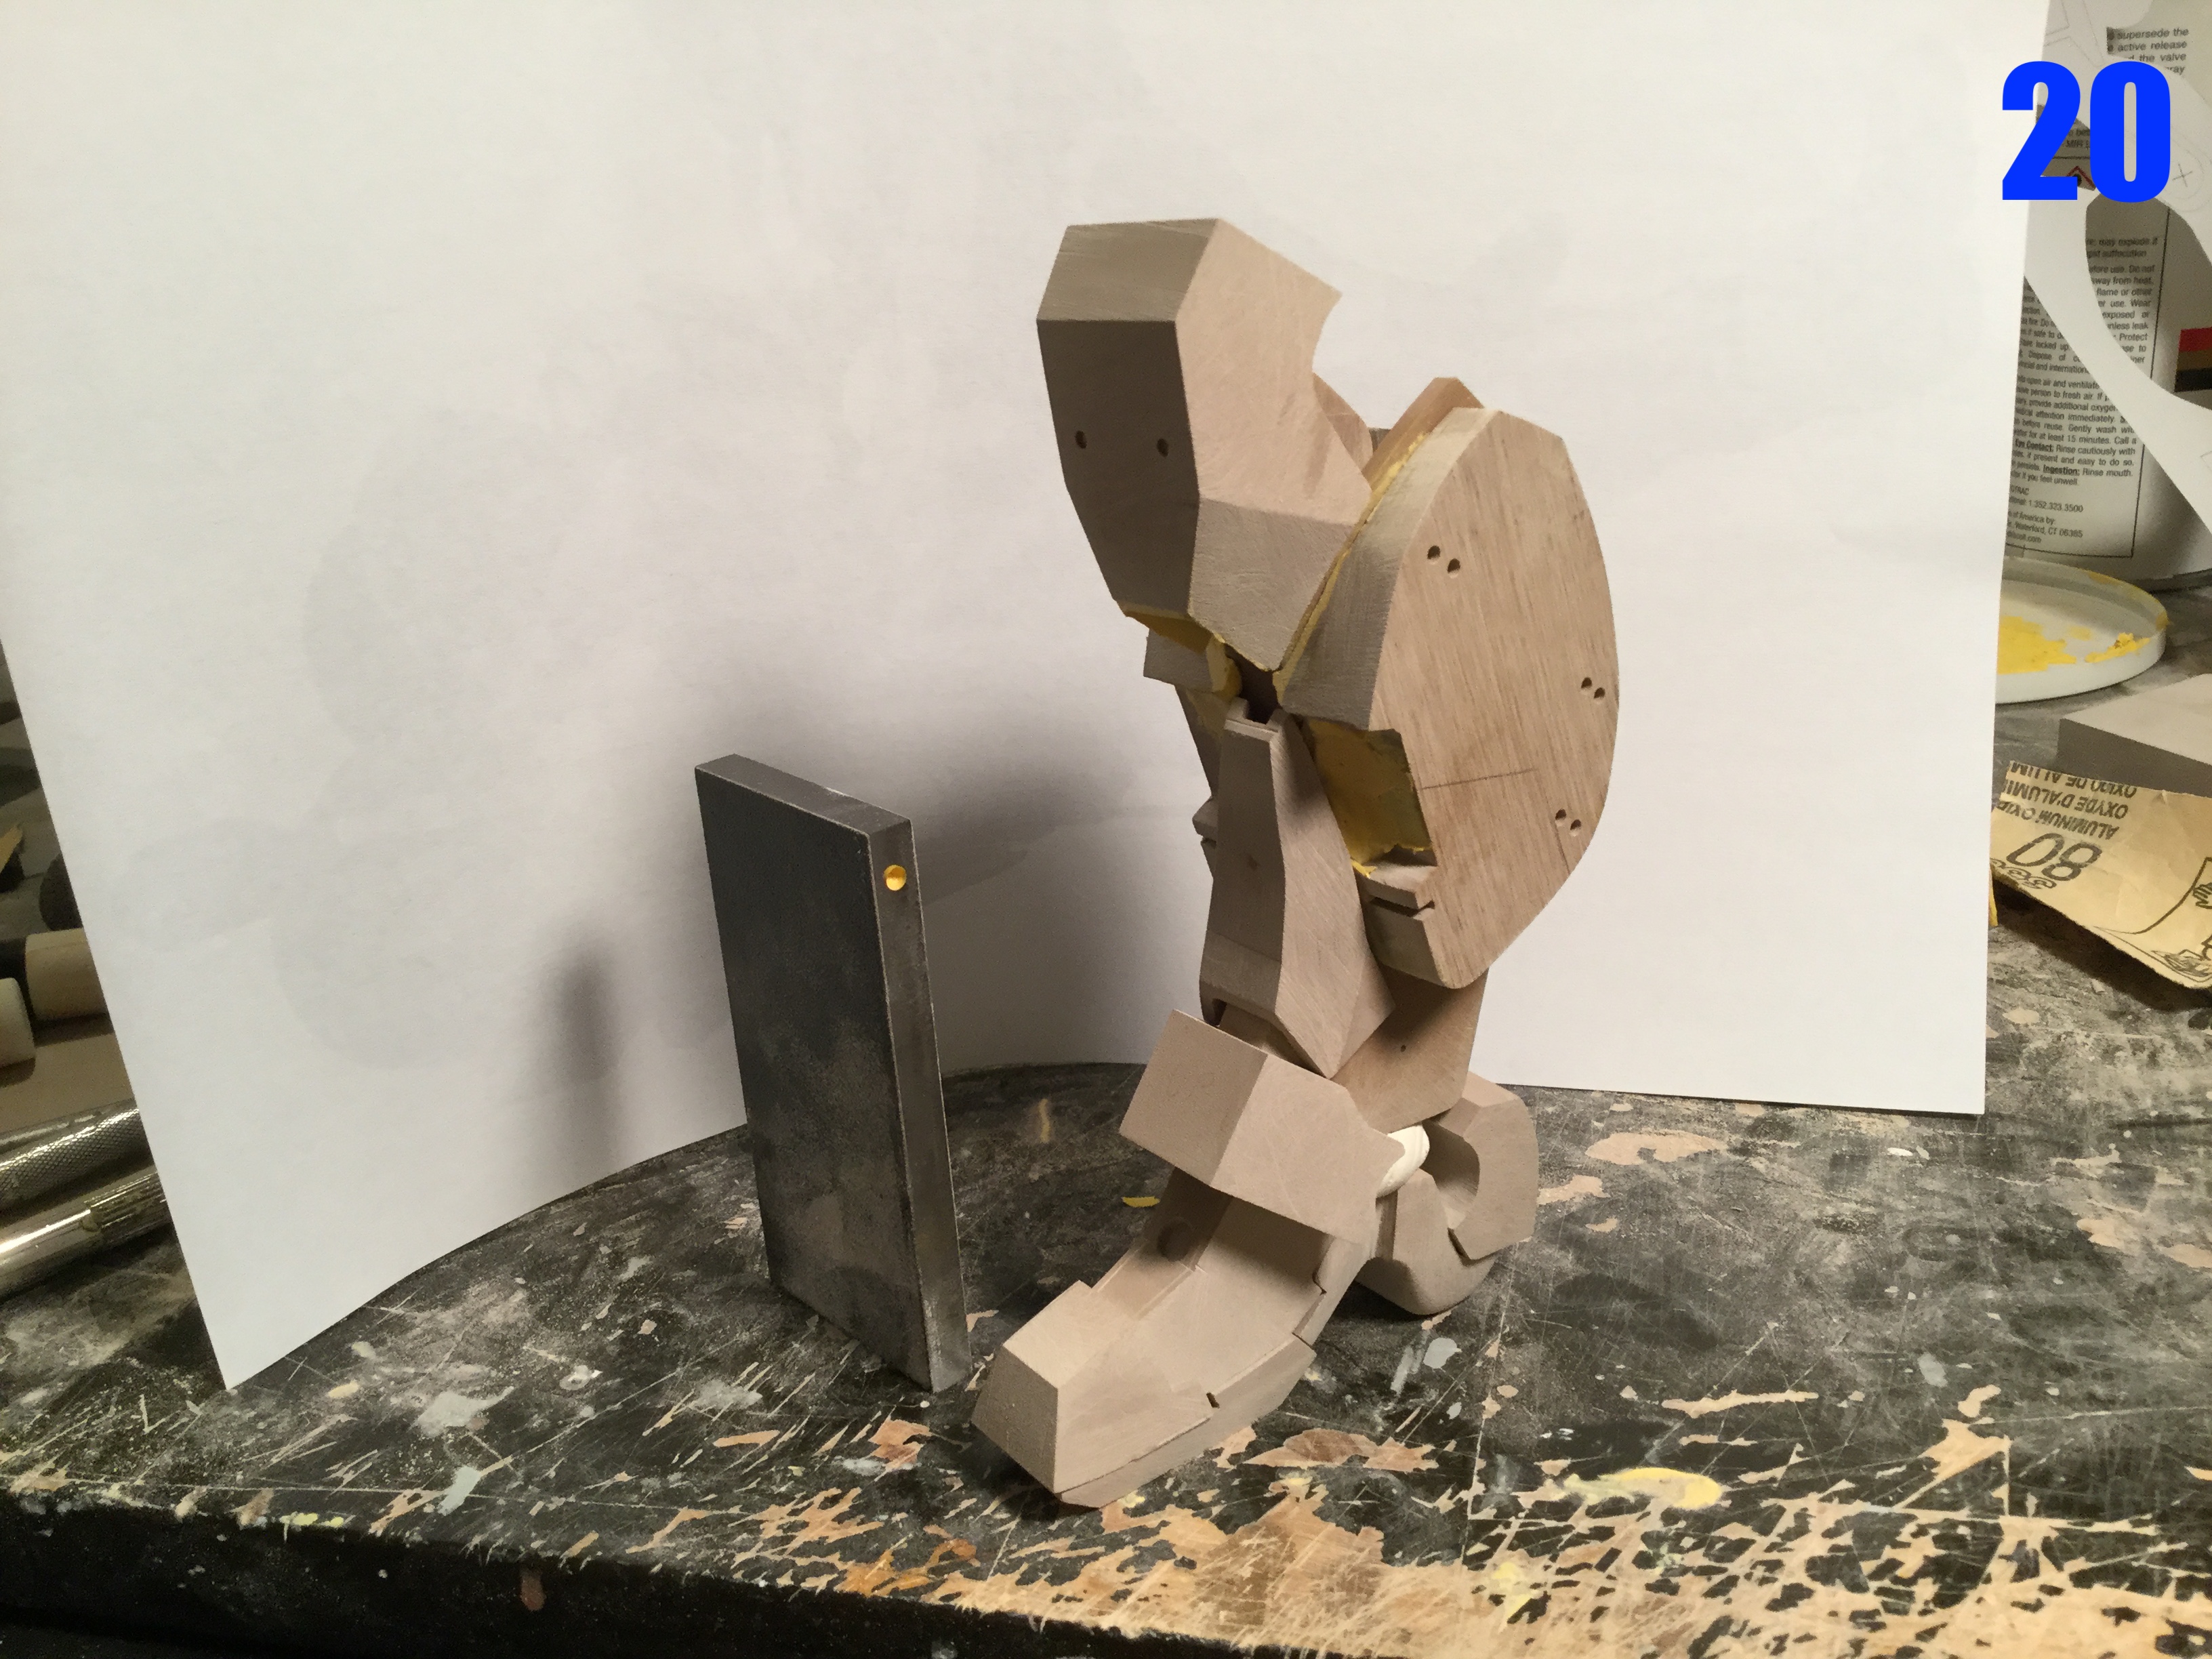
1/6 Motocycle Freak Scratchbuild Project Captain's log: Thursday, December 8, 2022. Aaaah, we're getting close! Pic 43 shows some of the serious putty/plug work undertaken on the calf armor. Theres a lot of this going on for some of the small, dainty components which accentuate the boot structure. In fact, this is what's taking so long. Parts need to be shaped in sequence to fit into other parts, and polyester putty just won't harden fast enough for my liking. It's all part of the job. Pic 44 shows the part of the knee which extends in armor mode. This will be hidden in ride mode, but it has some interesting ribbed detail which I've traced onto the part using a plastic, hand-shaped template and a pencil. Pic 45 shows the tools I will use in this procedure. First the pencil to mark off the groove lines, then the razor saw, with which I create a fine “ditch” along the pencil line, and then the file which will be used to carve-out the groove. This is a meticulous process, and quite challenging due to the curvature in both the surface and the direction of the grooves themselves. Pic 46 shows the partial result. I've opted for diamond files to speed-up the process here, and will alternate between these and metal files to get the channels just right. Having studied the Aramaki rendering quite thoroughly, the way the boot extends in armor mode doesn't work in the illustration, which is why Sentinel took some liberties with the figure. Having said that, I believe my solution just plain looks better. You don't have to believe me, see for yourself. Pics 47-50 show the boot nearing completion. I'm sorry for the dark primer, which makes photography tedious and doesn't do the detail justice—the old stuff I loved so much was discontinued! RANGE OF MOTION Pics 50-54. This is the other part of what was taking so long. Once again, the Aramaki illustration, while beautiful, doesn't allow for much (if any) mobility because all the armor parts are so tightly packed. This is why some of the parts pop-off on the Sentinel figure when you hit deeper poses. As such, I had to add mobility where normally there shouldn't be any. If you look at plate 52 for instance, pay attention the the ankle pivot module. I made it such that it must both slide backward and pivot down to allow clearance for movement! And that huge gap in the ankle—so unsightly, right? Well you needn't worry, there will be a flexible shroud in the kit to cover the gap. It wasn't shown installed to avoid damaging the part prior to molding. More parts are ready than I'm willing to show right now, but it's getting so very close to complete. If I skip next week's update, it will merely be to get everything finalized before Christmas.

-
1/6 MOSPEADA Rider Project Proposal
captain america replied to captain america's topic in Anime or Science Fiction
Today's update postponed to next week; need to do some intermediate molding. -
1/6 MOSPEADA Rider Project Proposal
captain america replied to captain america's topic in Anime or Science Fiction
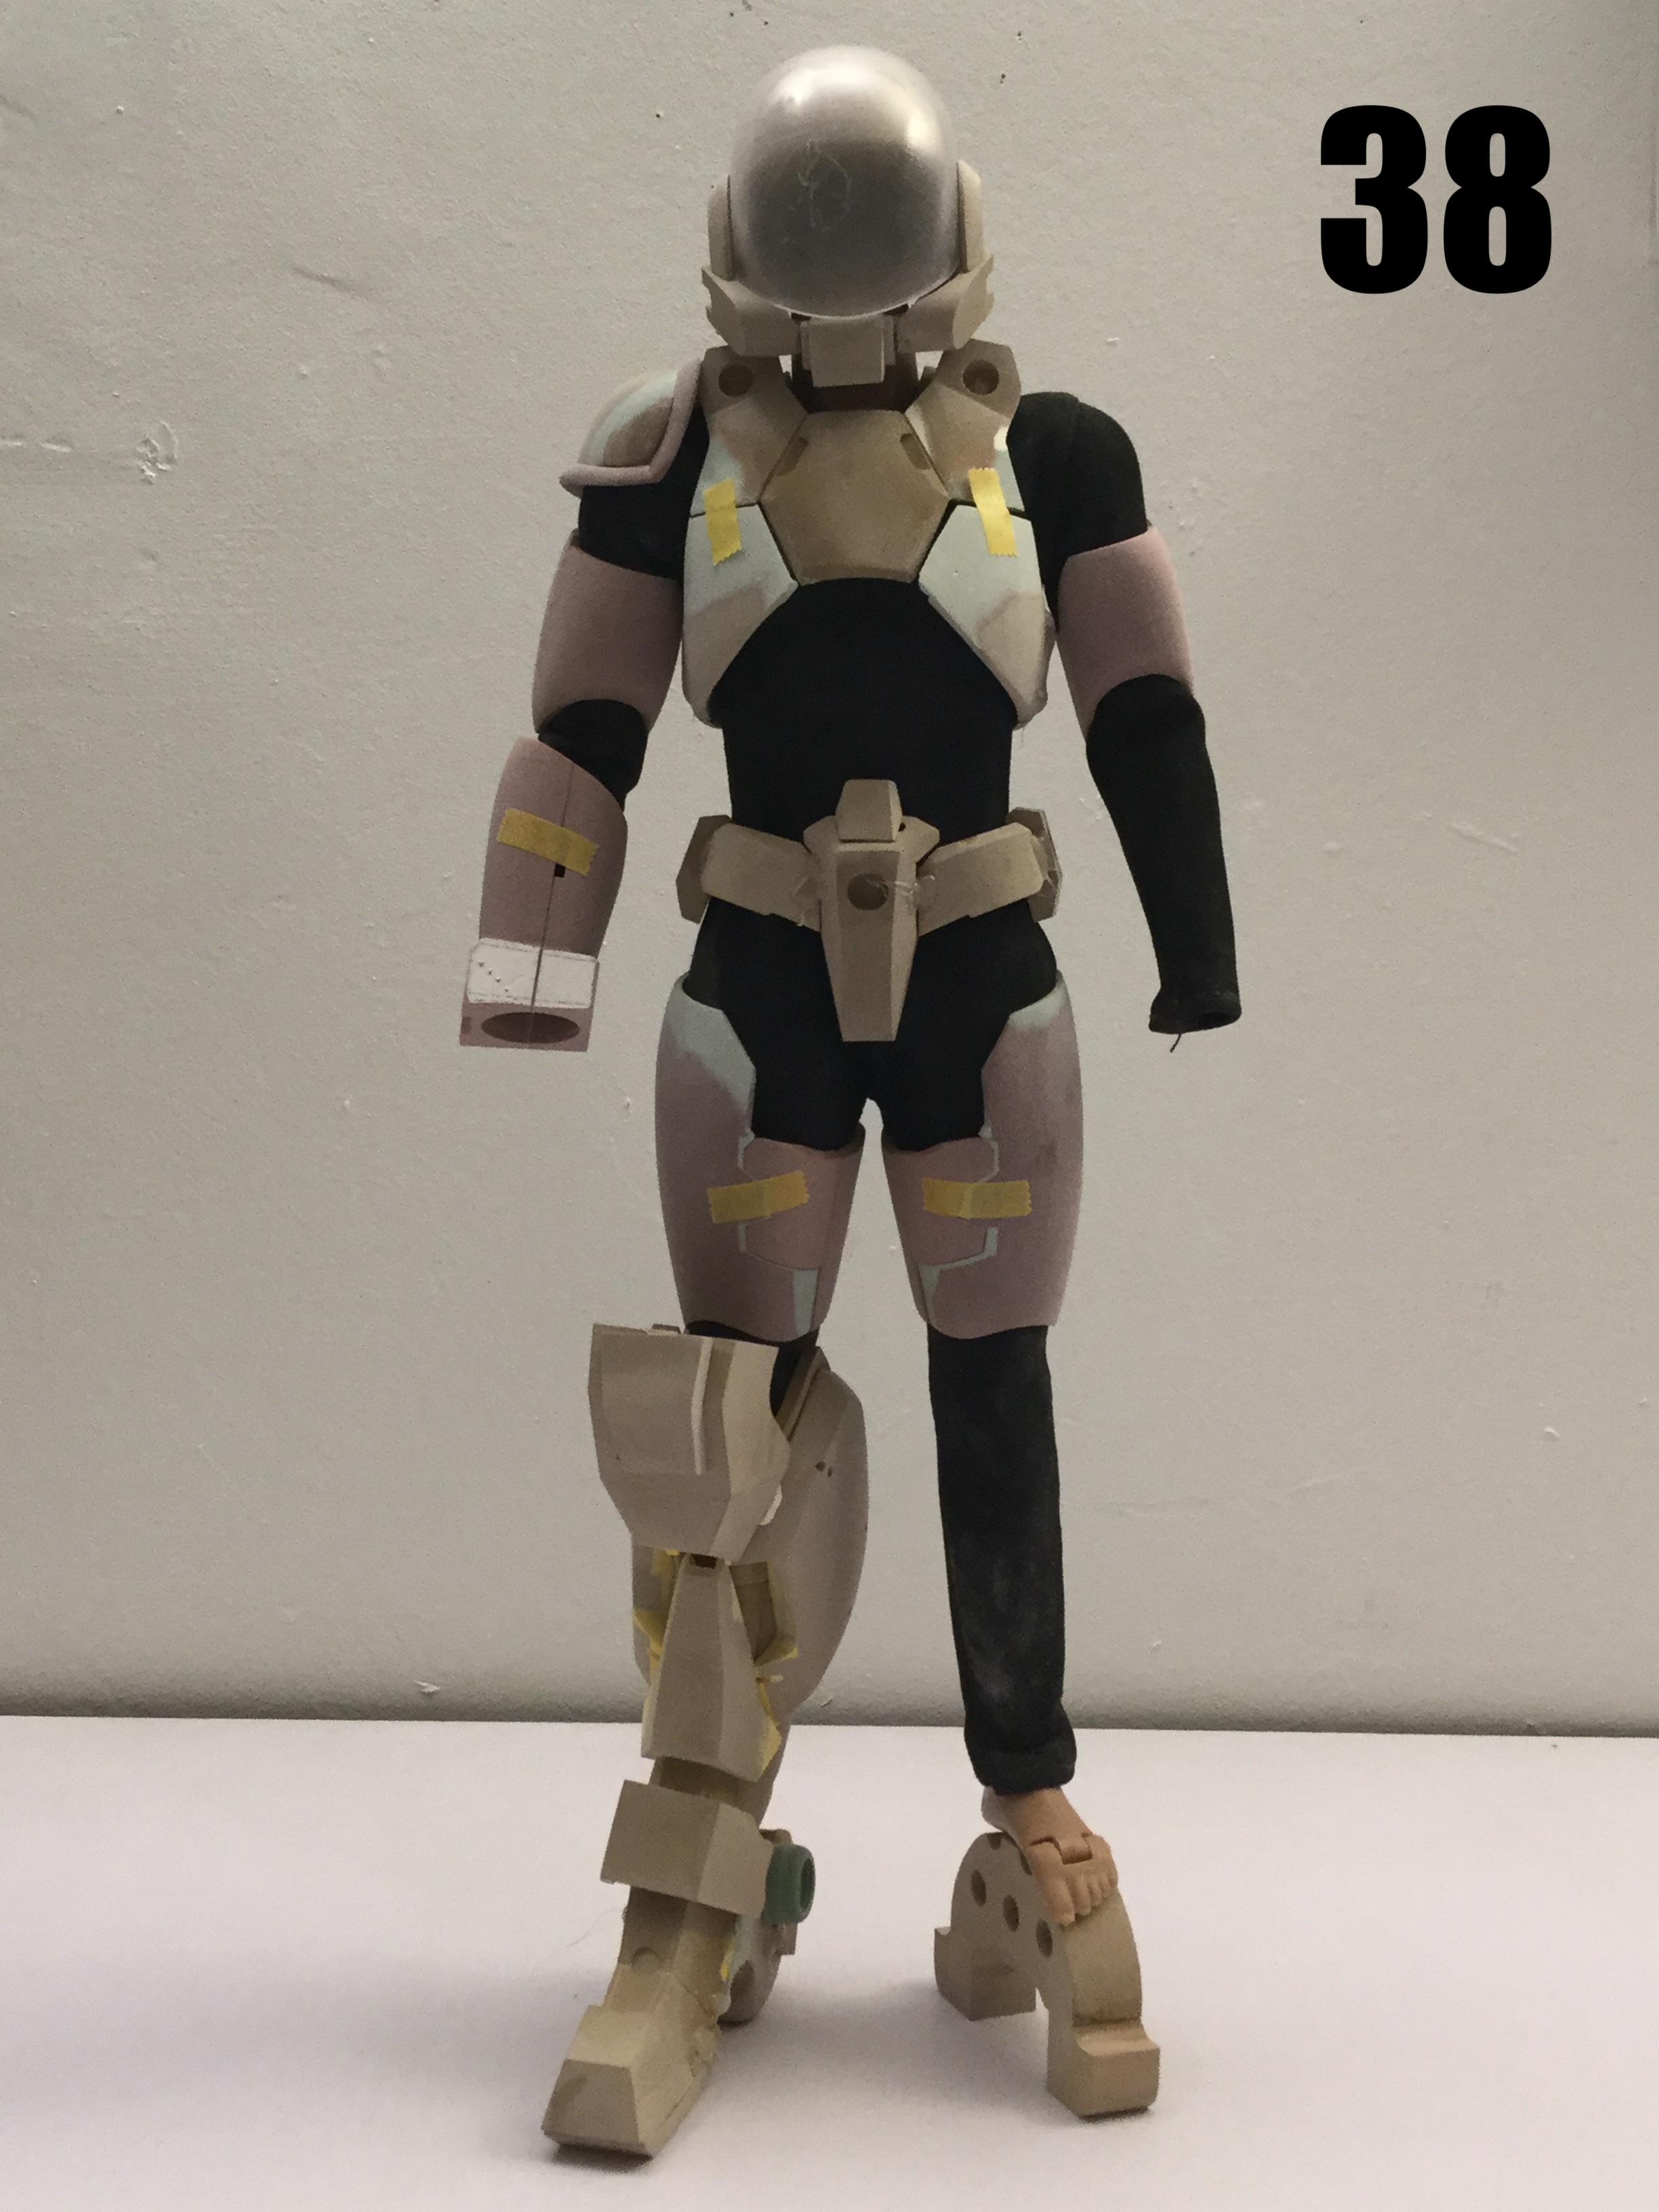
1/6 Motocycle Freak Scratchbuild Project Captain's log: Thursday, November 24, 2022. Happy Thanksgiving to all my American friends!! By 10pm Eastern Time Friday, the pre-orders will be closed. While the project proceeds exceedingly well, I was starting to run out of modelling board, so I ordered a new 60 inch slab, which is what you see in pic 34... maybe I get too excited about things like that. Pic 35: for those who constantly point to my tutorials and accuse me of carving things in wood, there you have it: the Renshape name and grade is stamped directly on the material! Alas, this is a slightly different density, but it works just as well. Pic 36: these things that look like peppermint ice cream paninis are actually the components of the thigh armor, which are undergoing shape alterations. One of the best ways to create a seamless fit between two parts is to first refine one part as closely as possible, then apply mold release to it. You then apply polyester putty to the other part, and squeeze it against the first. When the putty is just hard enough, the parts are separated, allowed to fully harden, then sanded & finished for a glove-like fit. Pic 37: the chest armor undergoing another round of putty refinements. Thankfully, the worst is over for this component, and I can now move on to some detailing work. Pics 38-41: I was able to test the armor fit over the onesie, and it's just superb!! However impressive the 1/12 figure may have seemed, it just can't hold a candle to this hand-made beauty. The next week will entail lots of little datail work, and making fine adjustments to the armor, and then I have to start molding parts to be duplicated, so stay tuned!
-
1/6 MOSPEADA Rider Project Proposal
captain america replied to captain america's topic in Anime or Science Fiction
I don't think there are any "brands" to speak of, just get one that looks like it fits very snug; there are plenty on eBay to choose from. Color is another matter, and if you want something outside the generaly available colors, you'll invariably have to use dye. -
1/6 MOSPEADA Rider Project Proposal
captain america replied to captain america's topic in Anime or Science Fiction
Fixed it for you. 😆 Some designs are better than others. The SC Bioroids were hands-down the worst offenders, whereas something like this is the result of some more careful consideration and went through an extra level of refinement by Aramaki for the modernization, which helps a lot. The ankle joint seems to be the worst of it; the rest is just tweaking aesthetics and the slow process of making any body-glove armor fit properly. Thankfully, it's a big scale. -
1/6 MOSPEADA Rider Project Proposal
captain america replied to captain america's topic in Anime or Science Fiction
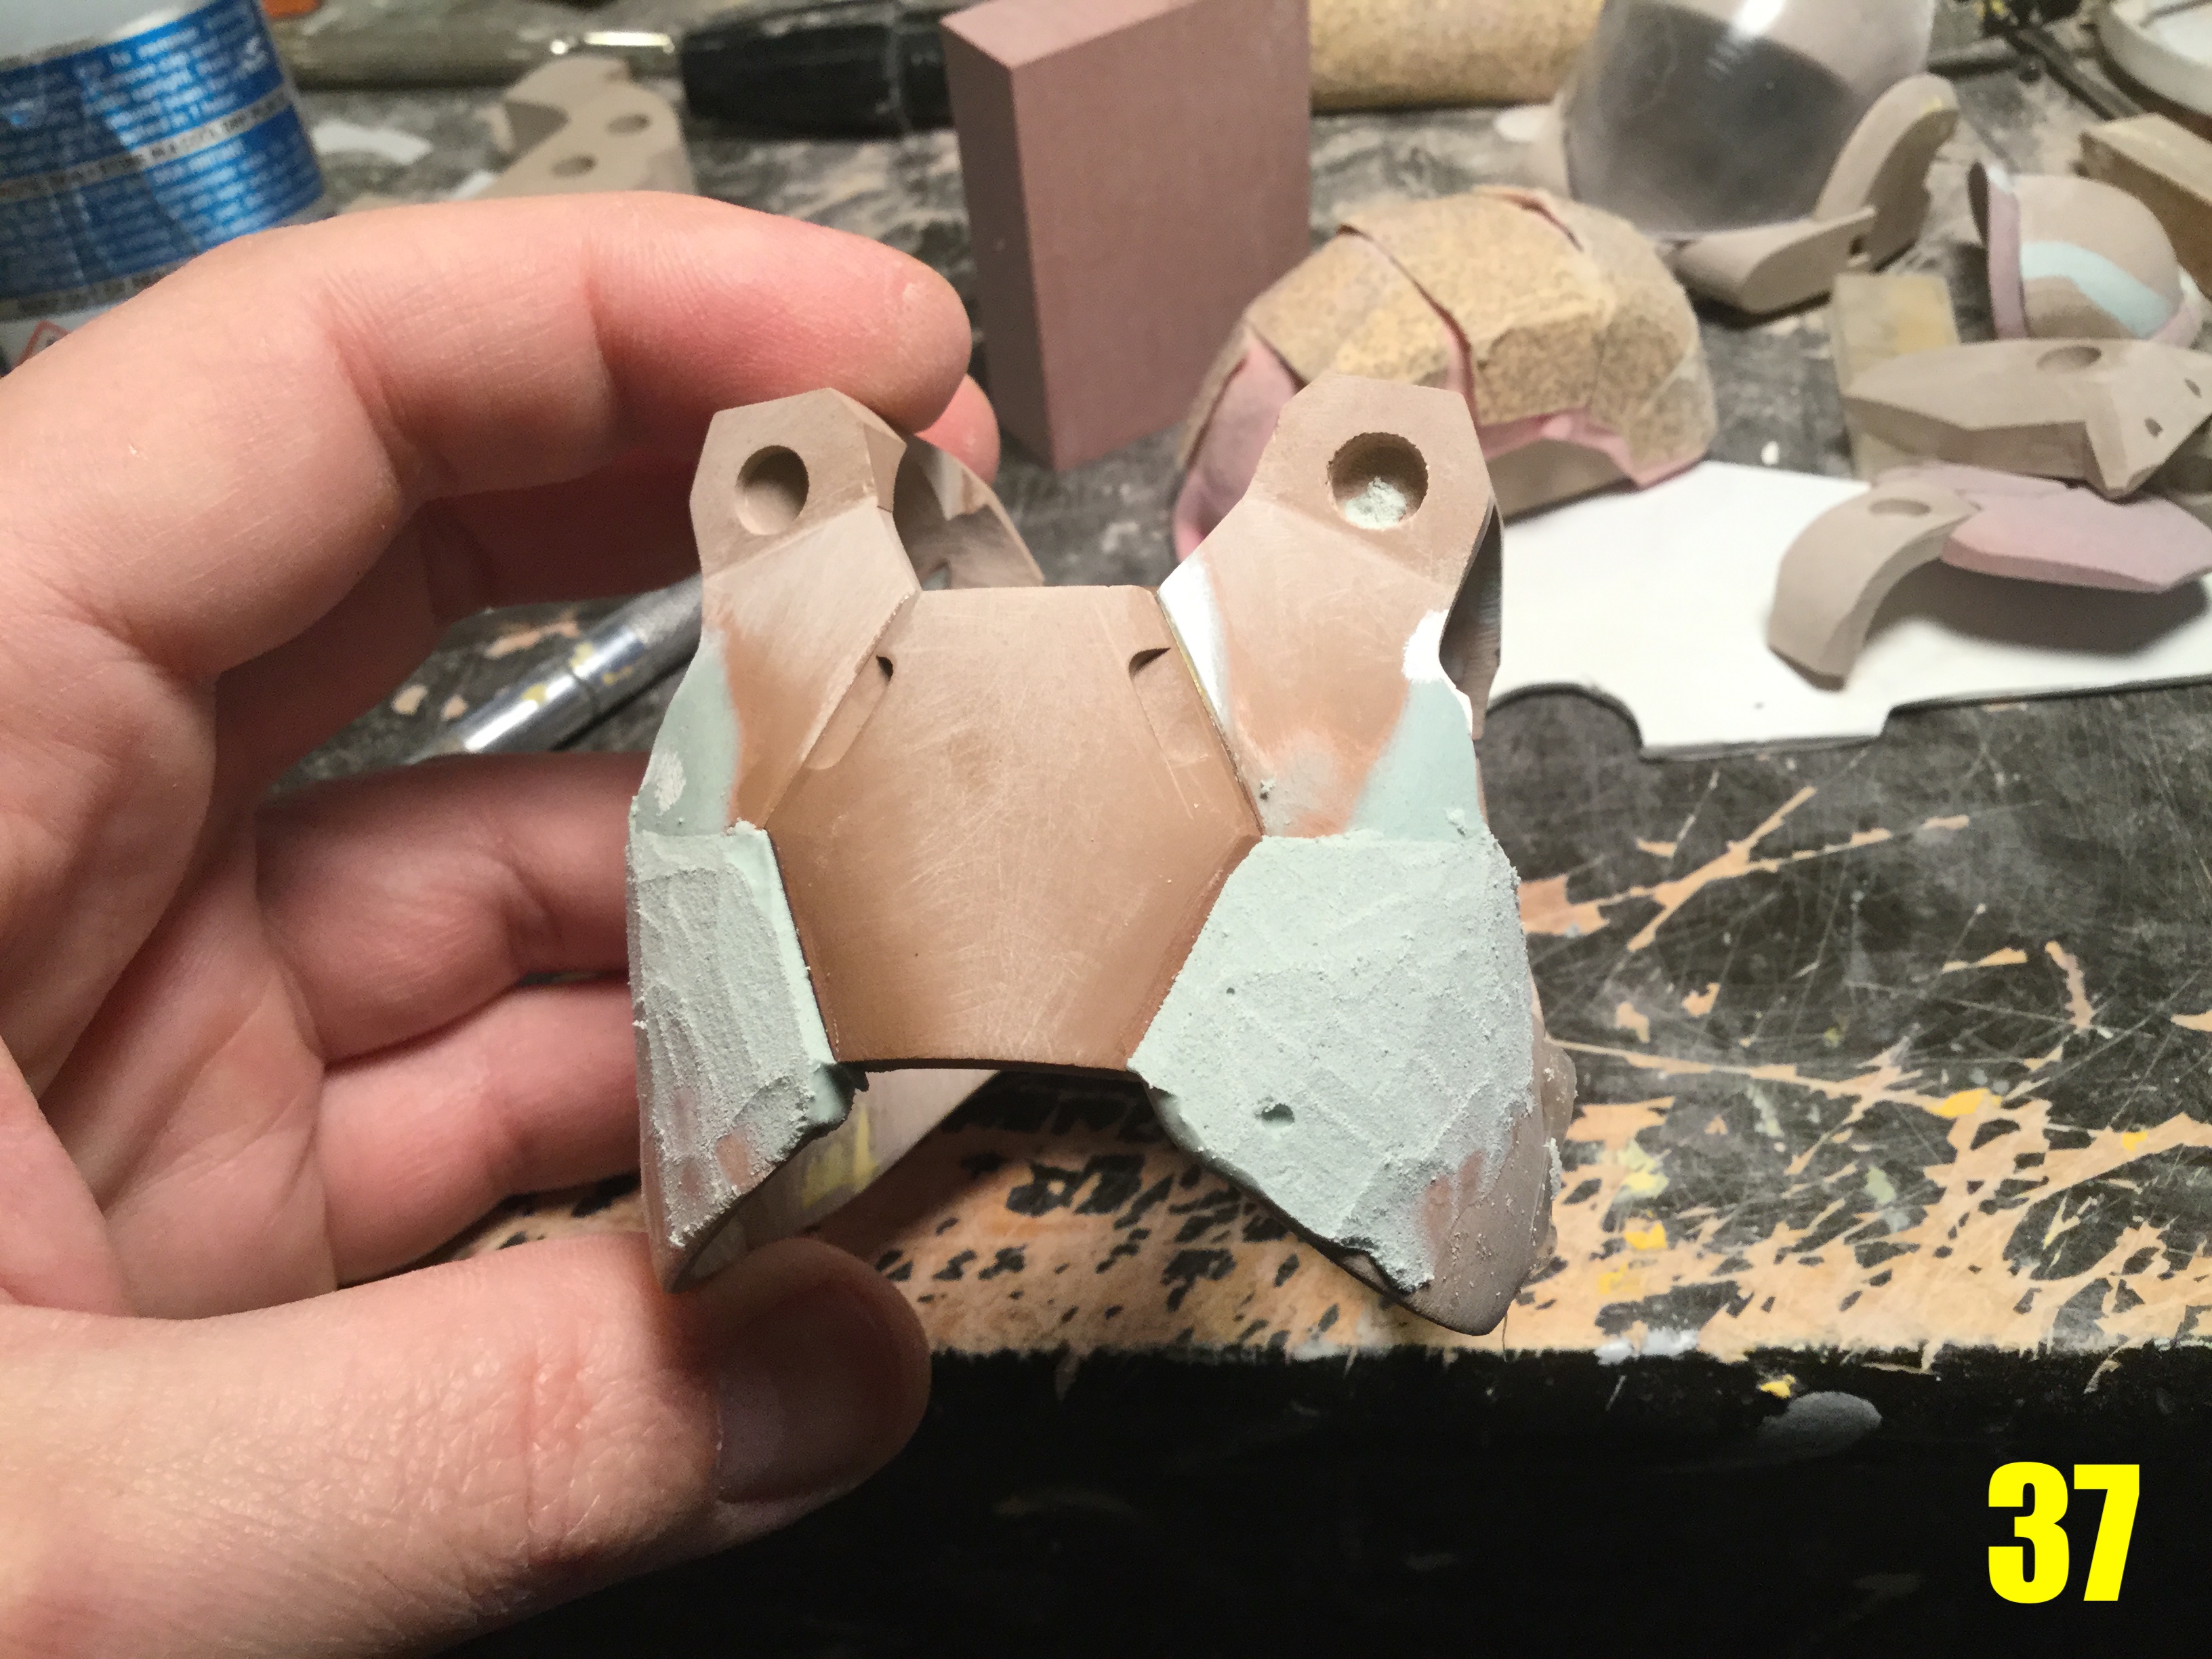
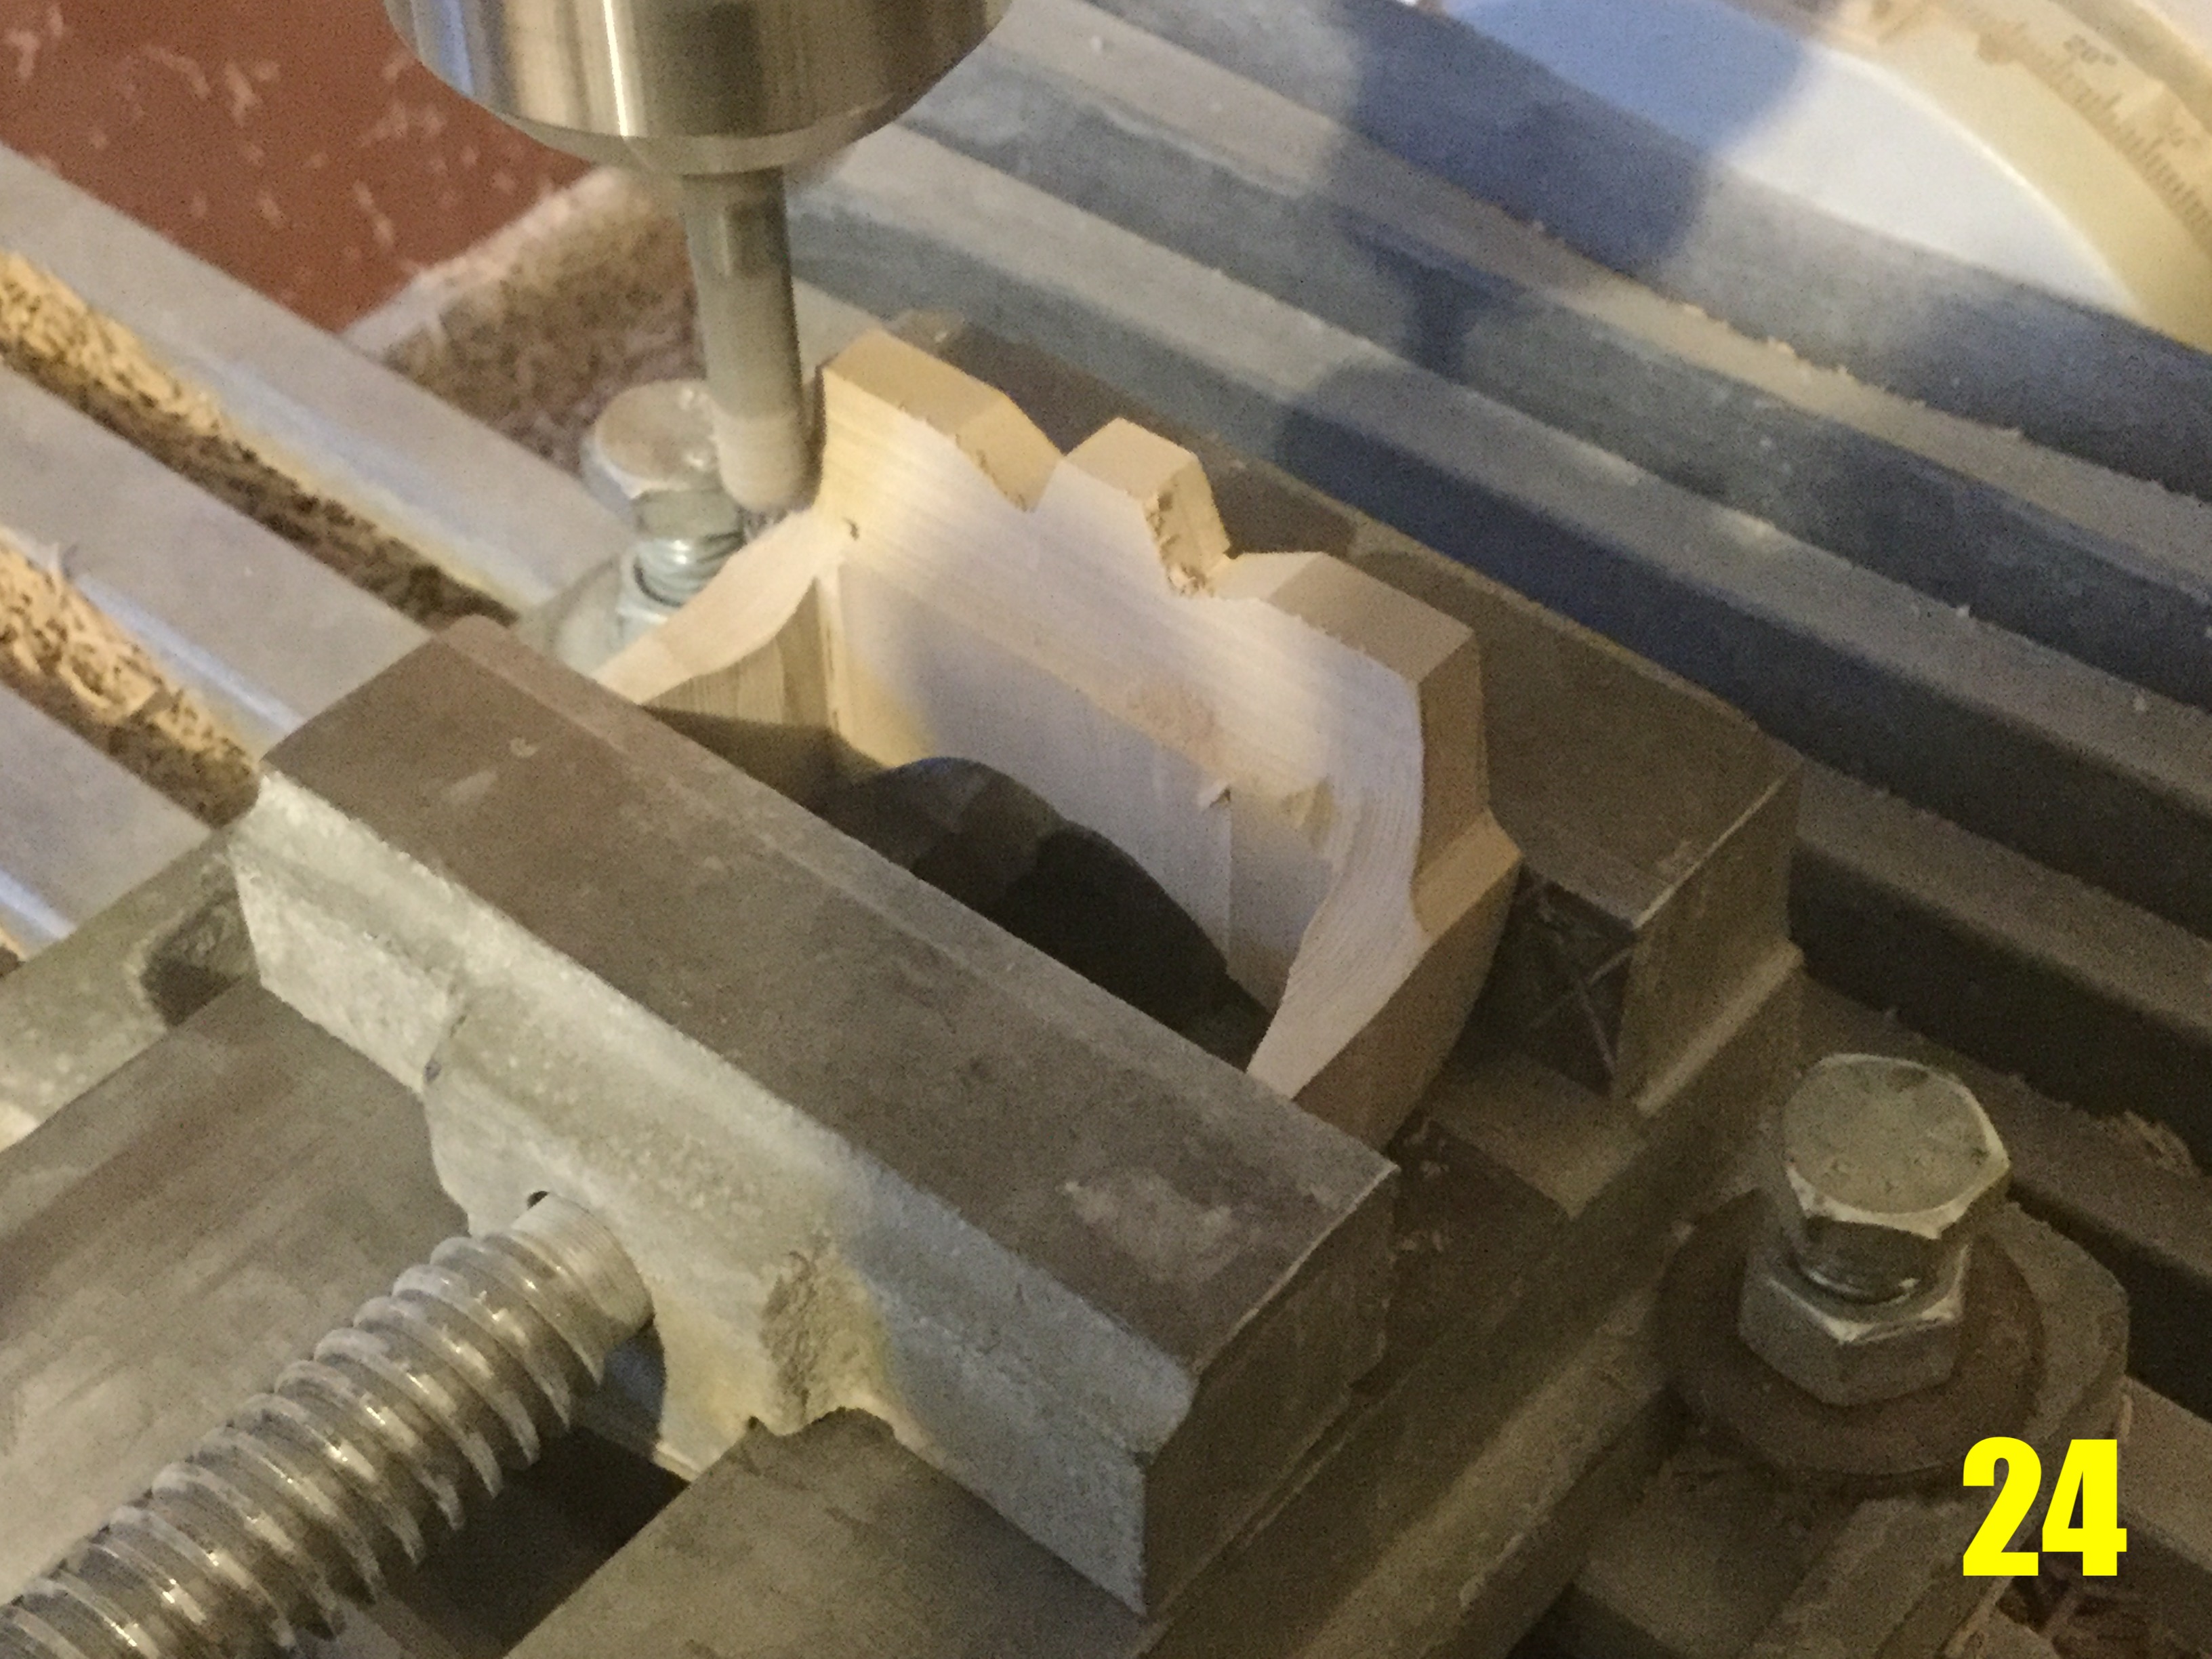
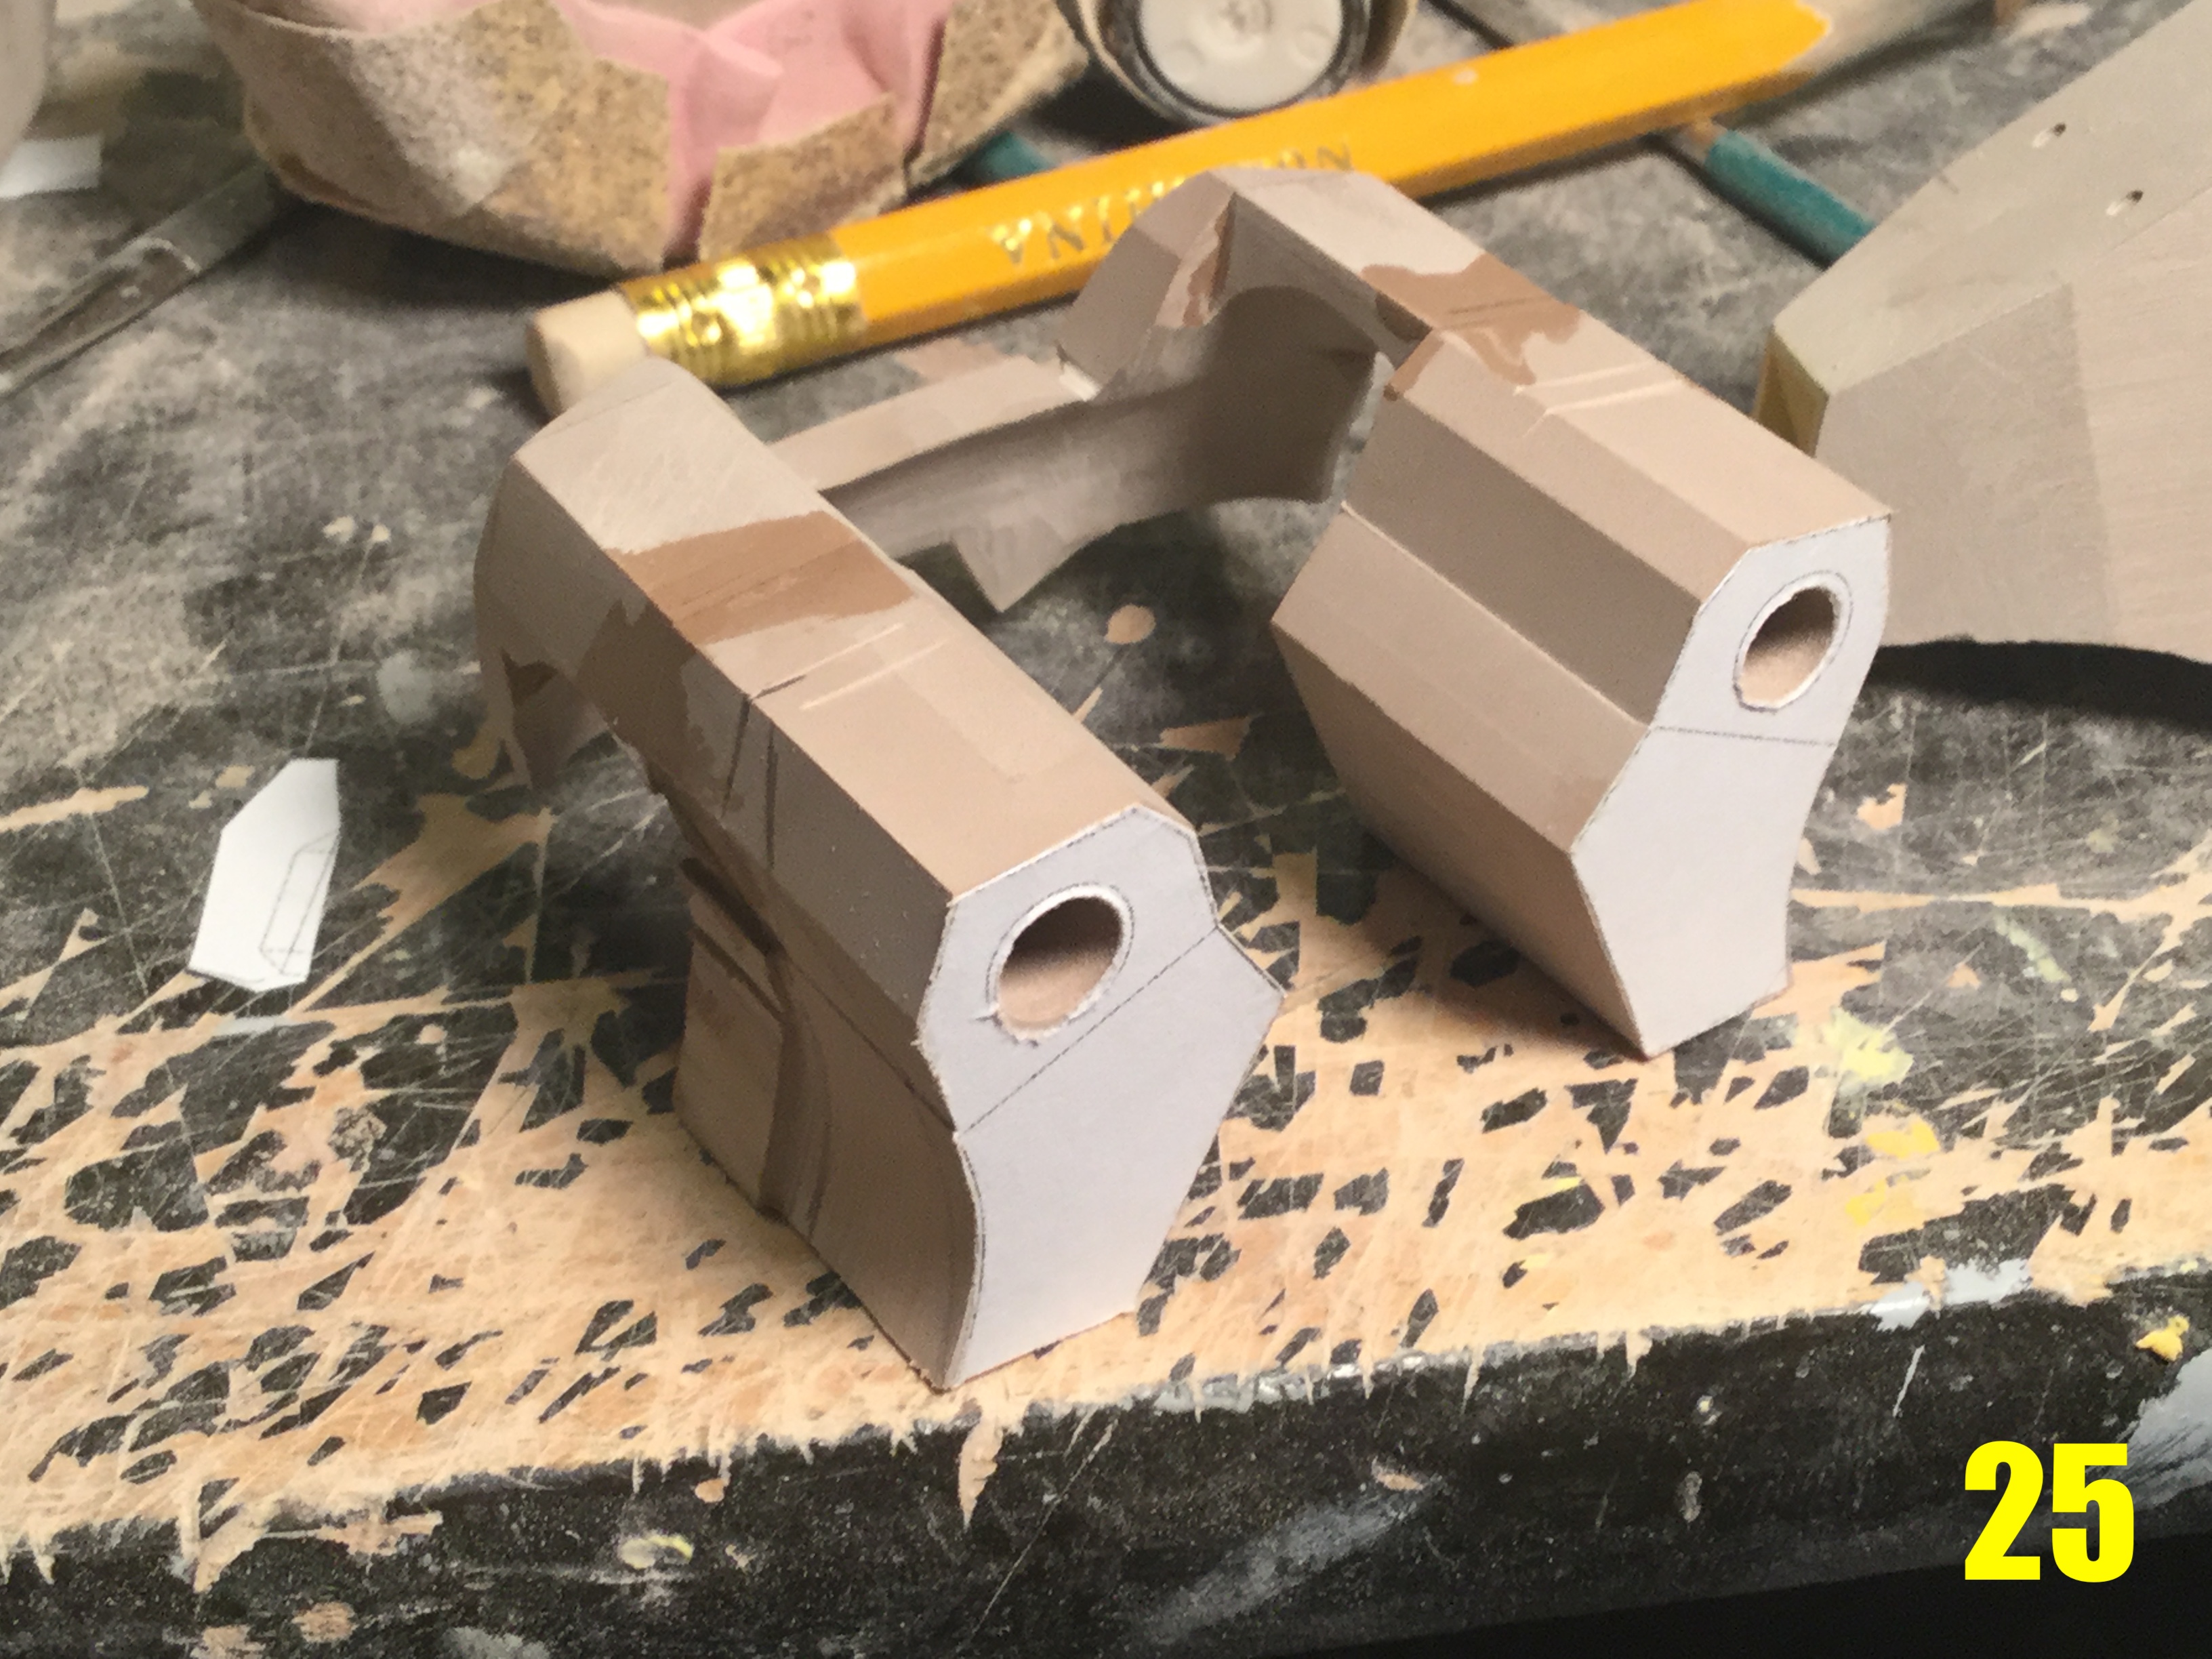
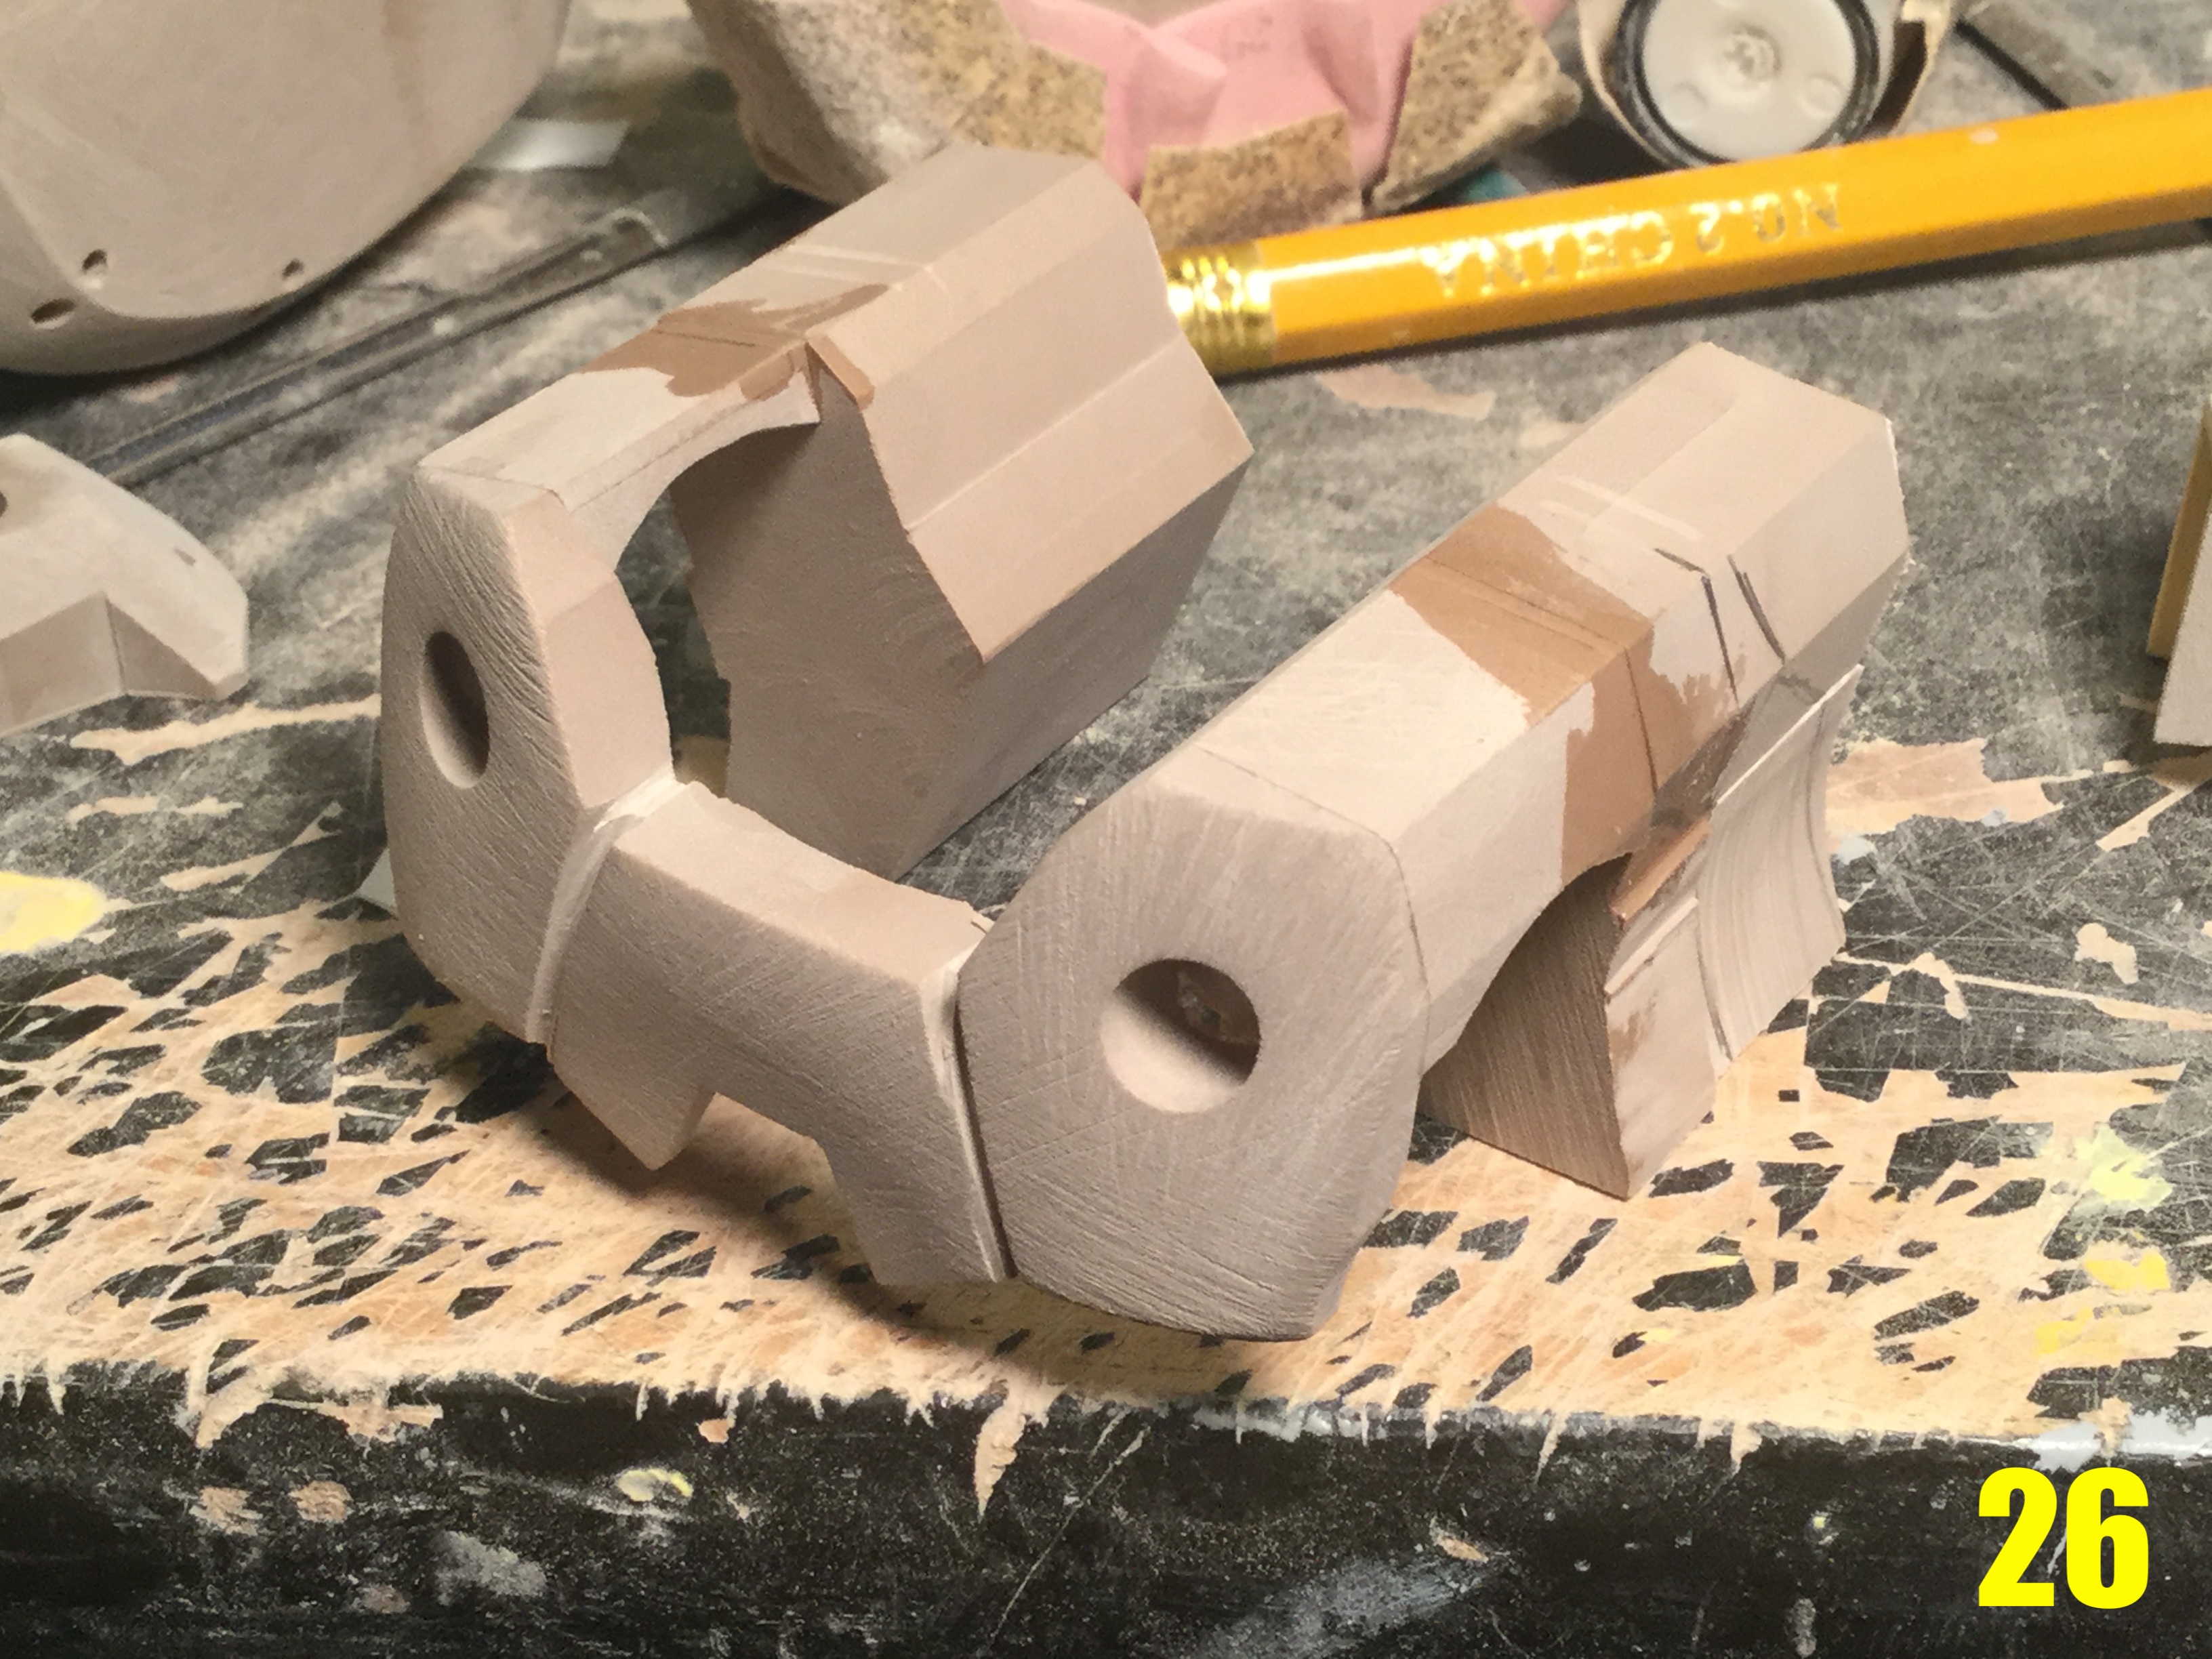
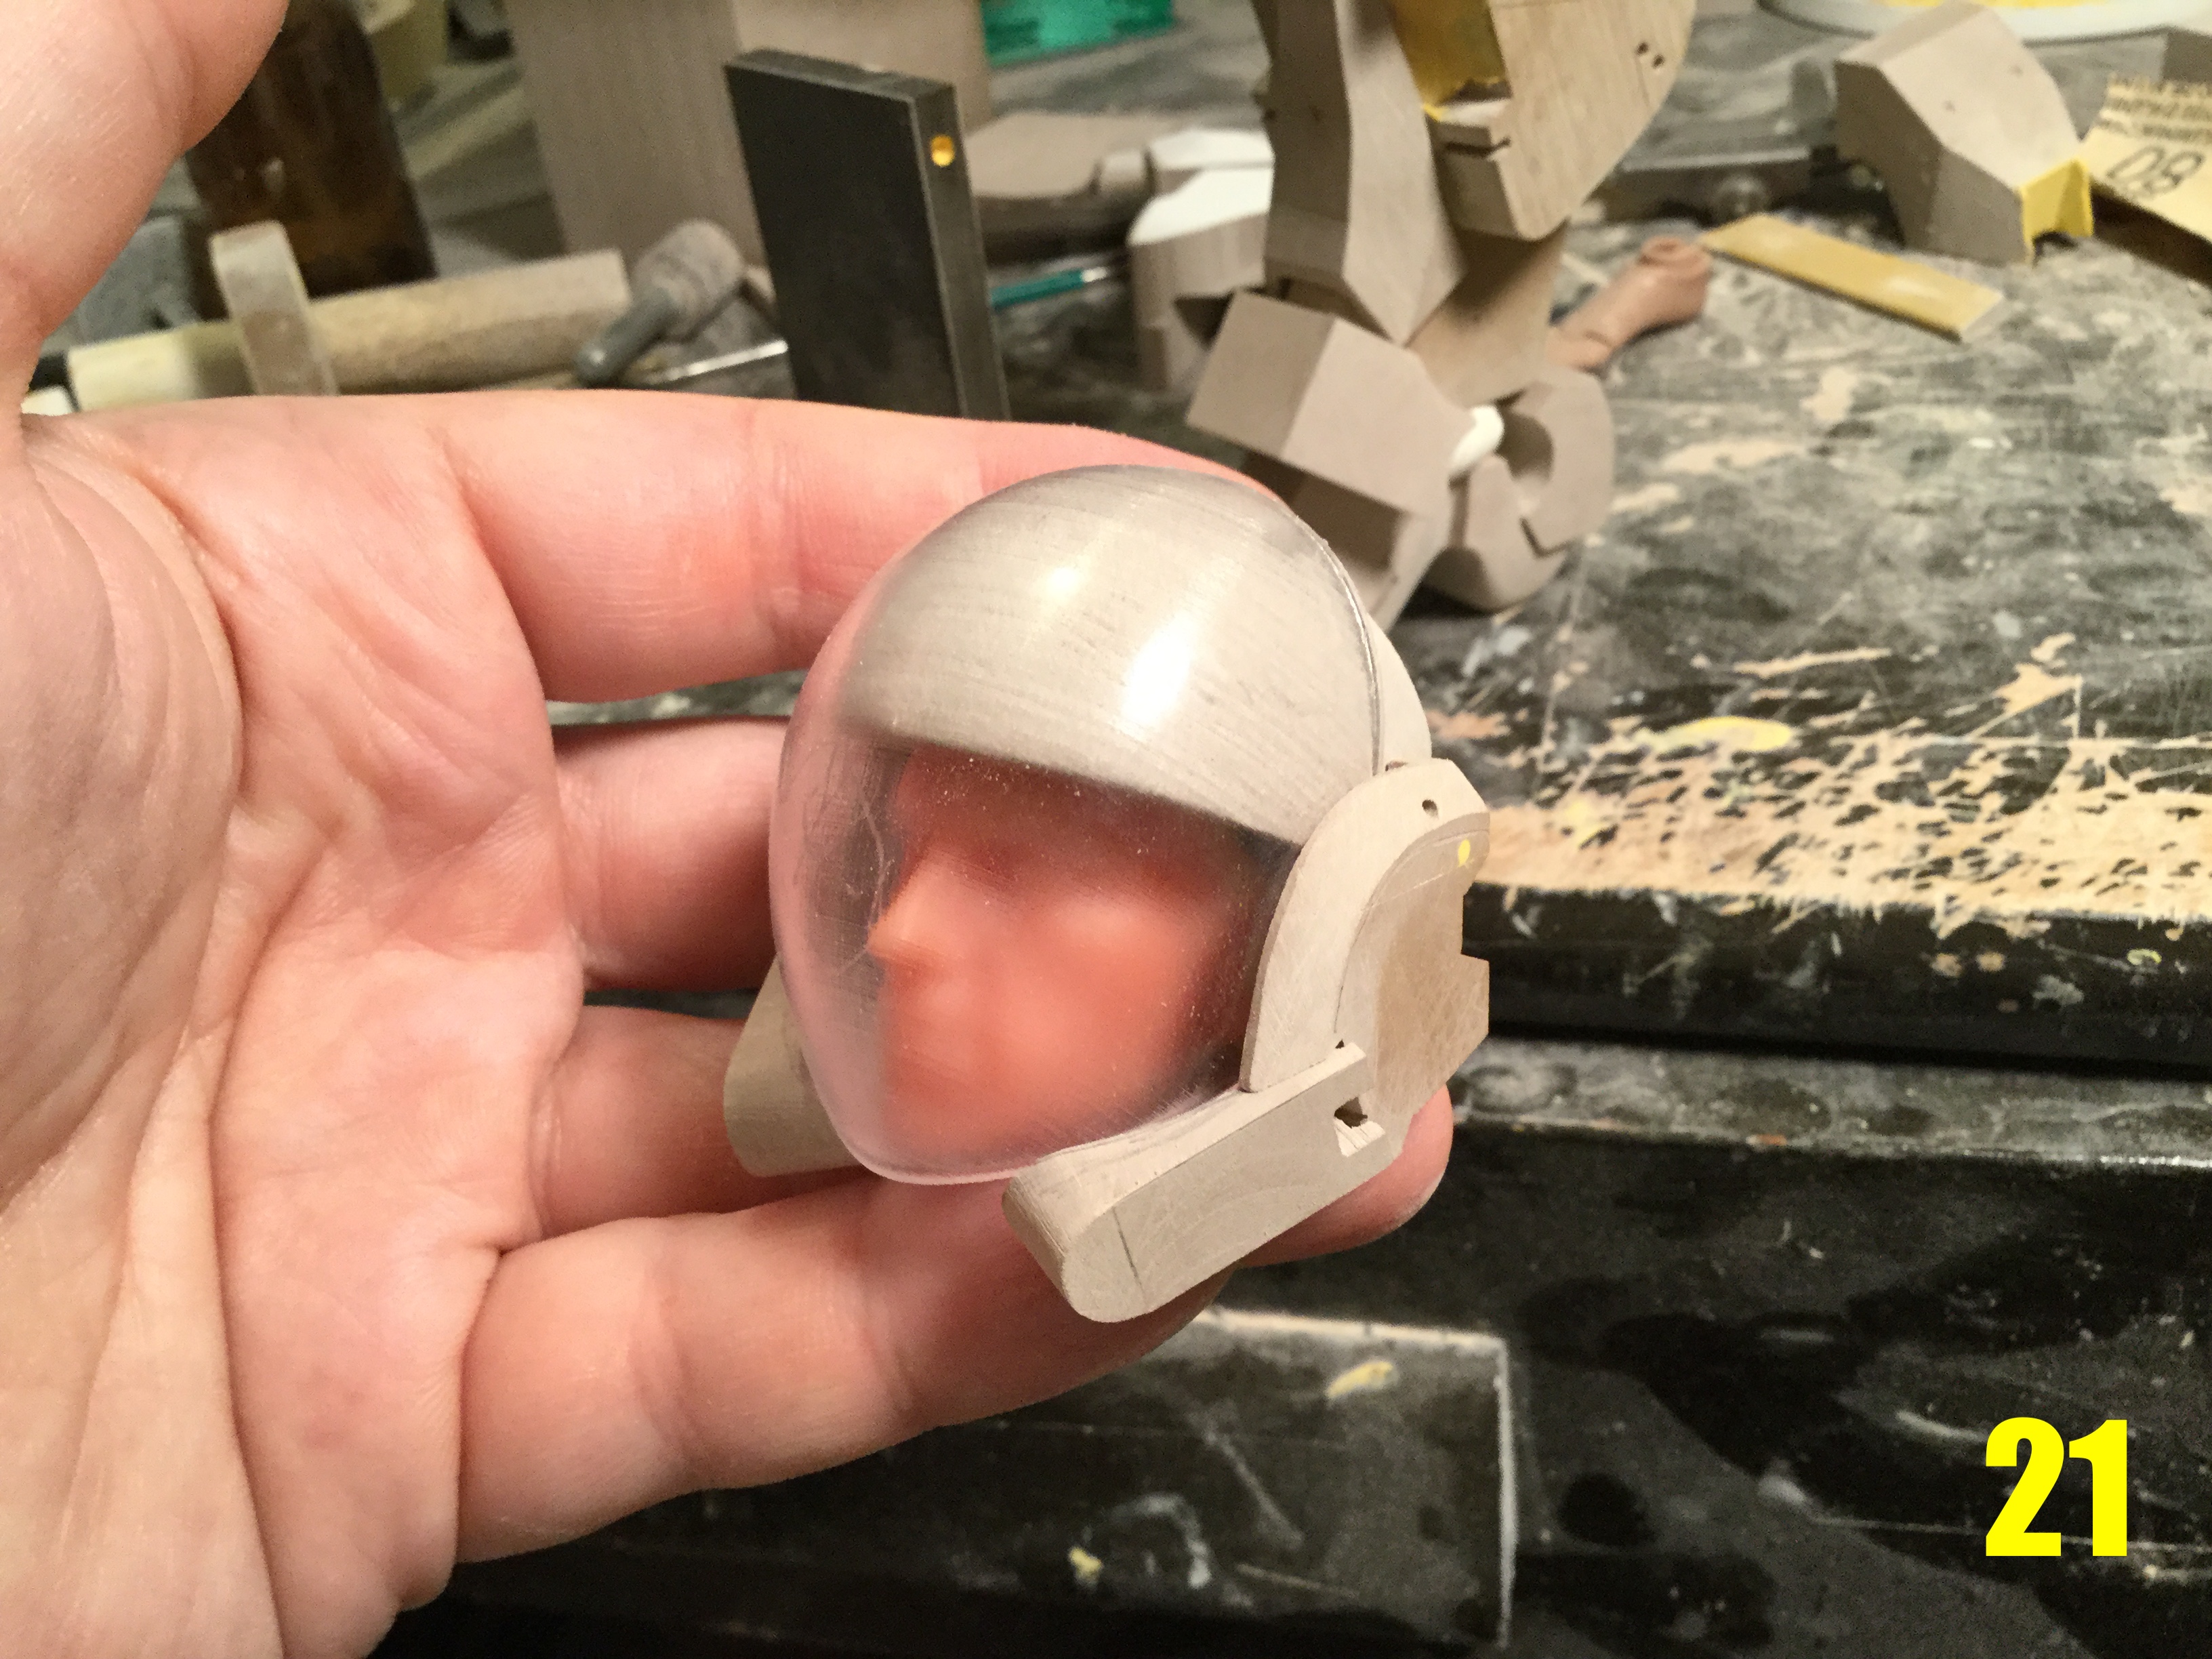
1/6 Motocycle Freak Scratchbuild Project Captain's Log: Thursday, November 17, 2022. Now that I have most of the boot fleshed-out, I need an ankle joint. Admittedly, the artwork shows all the components fitting tightly together, which does absolutely nothing to promote mobility. Once again, I've carefully crafted some strategically located gaps to remedy that problem, and now in pic 23, I've turned some resin stock on the lathe to create that much needed joint. Agin, because everything is so tight, I couldn't use an existing ball/socket joint because the ones I'd made previously weren't the right size: too big won't fit, and too small won't be able to manage the load, so that's why I don't cut corners on details like these. Pic 24 shows the abdominal armor being machined. This is a direct succession to pic 18, in which I removed as much of the inside cavity with the band saw, and now back to the mill for some more precise work. Pic 25: the upper component, because of its complexity, was initially segmented into front and back sections for individual machining, and has now been recombined. Pic 26: I took the time to begin shaping the upper back, now that I can hold the combined part sturdily. It may not show, but once again, I have to be exceedingly careful with the shaping of these parts: there are compound curves everywhere that have to be identical left & right, as well as interface with each other. Pic 27: the back of the abdominal armor, looking very nice! A few little fit issues, but nothing I can't adjust. Pic 28: the frontal area of the abdominal armor. You have no idea how trying and tedious this module was to make! In fact, this is probably one of the most delicate and complex parts I've worked on in recent memory. I'm using hot glue on the outside to hold the parts together because there's no way to tack them from the inside and still fit over the mannequin properly. Pic 29: the boot assembly has seen a lot of refinement since the previous update. Lots of puttying and re-puttying to get shapes just right in a long and frustrating process that yields great finished results. Pics 30-32: now it's starting to look like a Motocycle Freak! You can see how all the armor components fit together beautifully. Crotch armor is also well underway, and will be another tedious unit to adjust in conjunction with the upper abdomen unit, because these two will form a cohesive trio with the flexible midsection, and all these have to fit over the onesie. For those who are curious, the figure will stand at just about 34cm tall: the enhanced MOSPEADA boot adds about 9 inches, plus whatever the helmet also adds. By the time the next update comes around, the pre-orders will be closed. You'll still be able to get the kit and the rifle upgrade, it'll just be $35 CAD more. Stay tuned!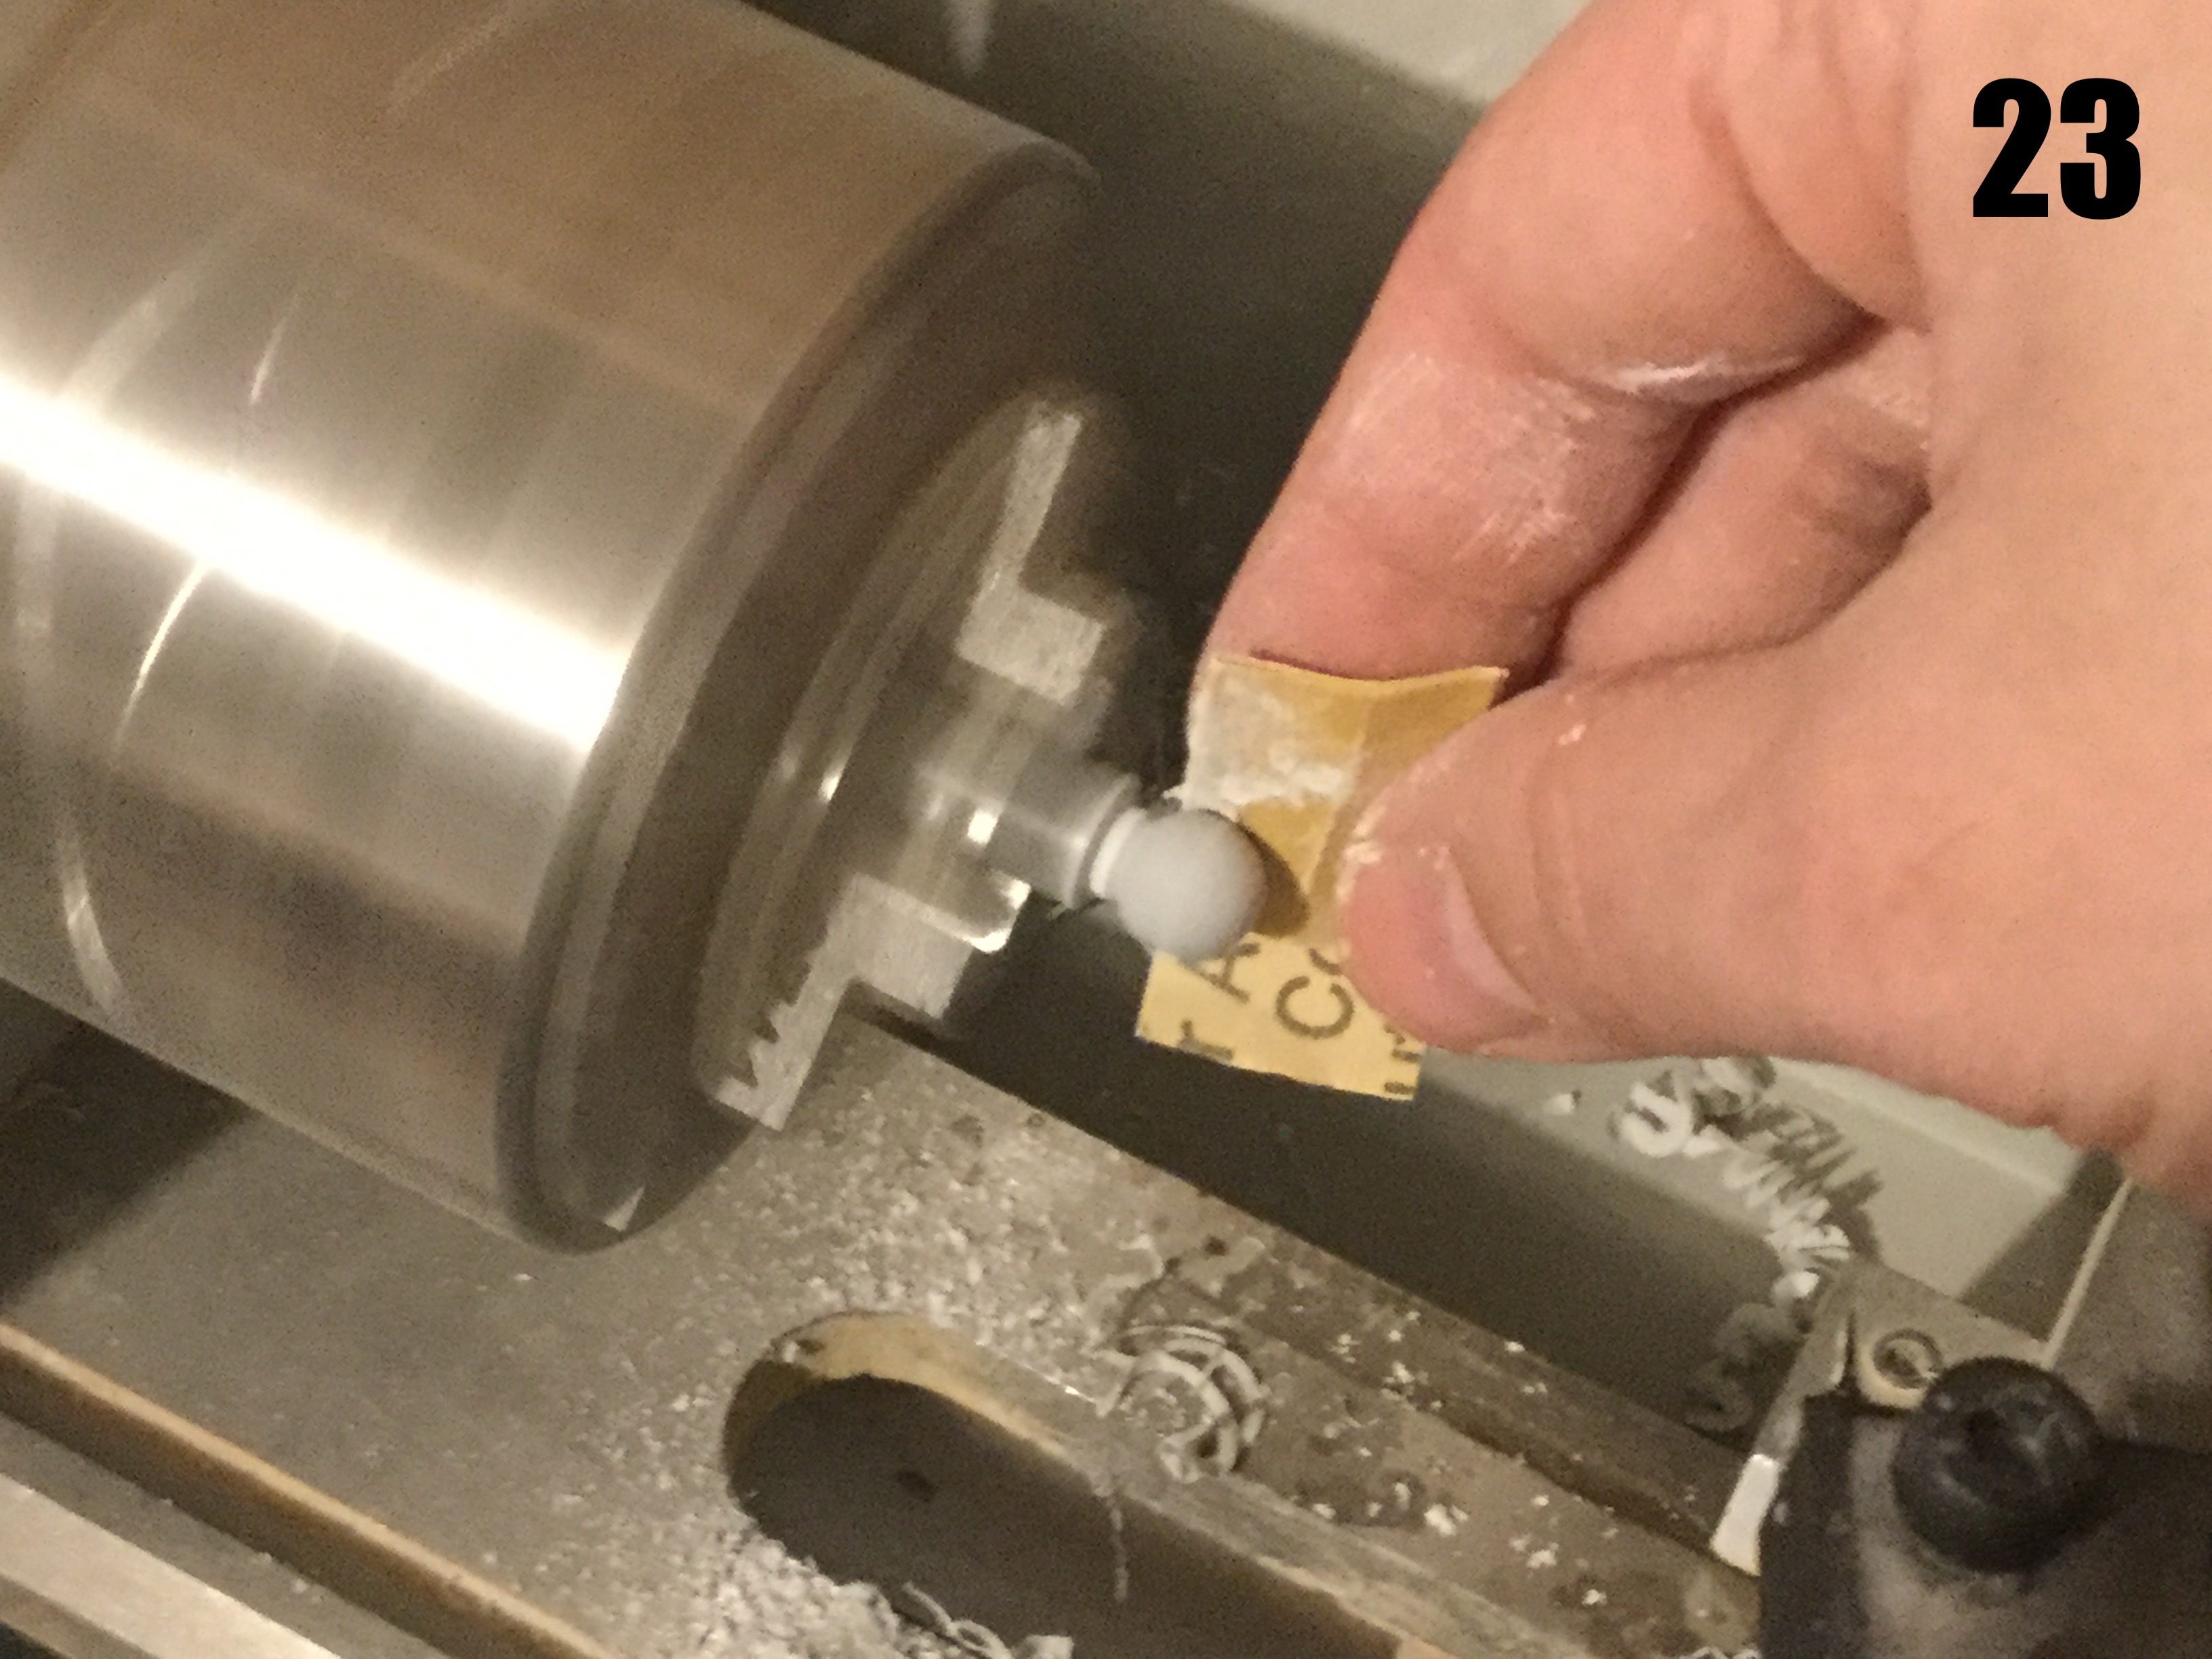

-
I realize we're talking about transforming motorcycles here, and left realism in the rear view mirror, but I just... Why does the pilot's helmet have a crash bar right in the pilot's line of vision?!? Shameless plug: there are ways to design a helmet that offers impact/crash protection without obscuring visibility... if only they'd try a lil' harder.
-
1/6 MOSPEADA Rider Project Proposal
captain america replied to captain america's topic in Anime or Science Fiction
I've done something "interesting" with the foot on this figure, because of the need for good overall mobility of the soldier, in spite of him/her being on stilts! I've made the toe of the boot separate, which will then be hinged. Then, I will mold the sole in rubber to allow it to flex without compromising the aesthetics, just like a real steel-toe boot. -
1/6 MOSPEADA Rider Project Proposal
captain america replied to captain america's topic in Anime or Science Fiction
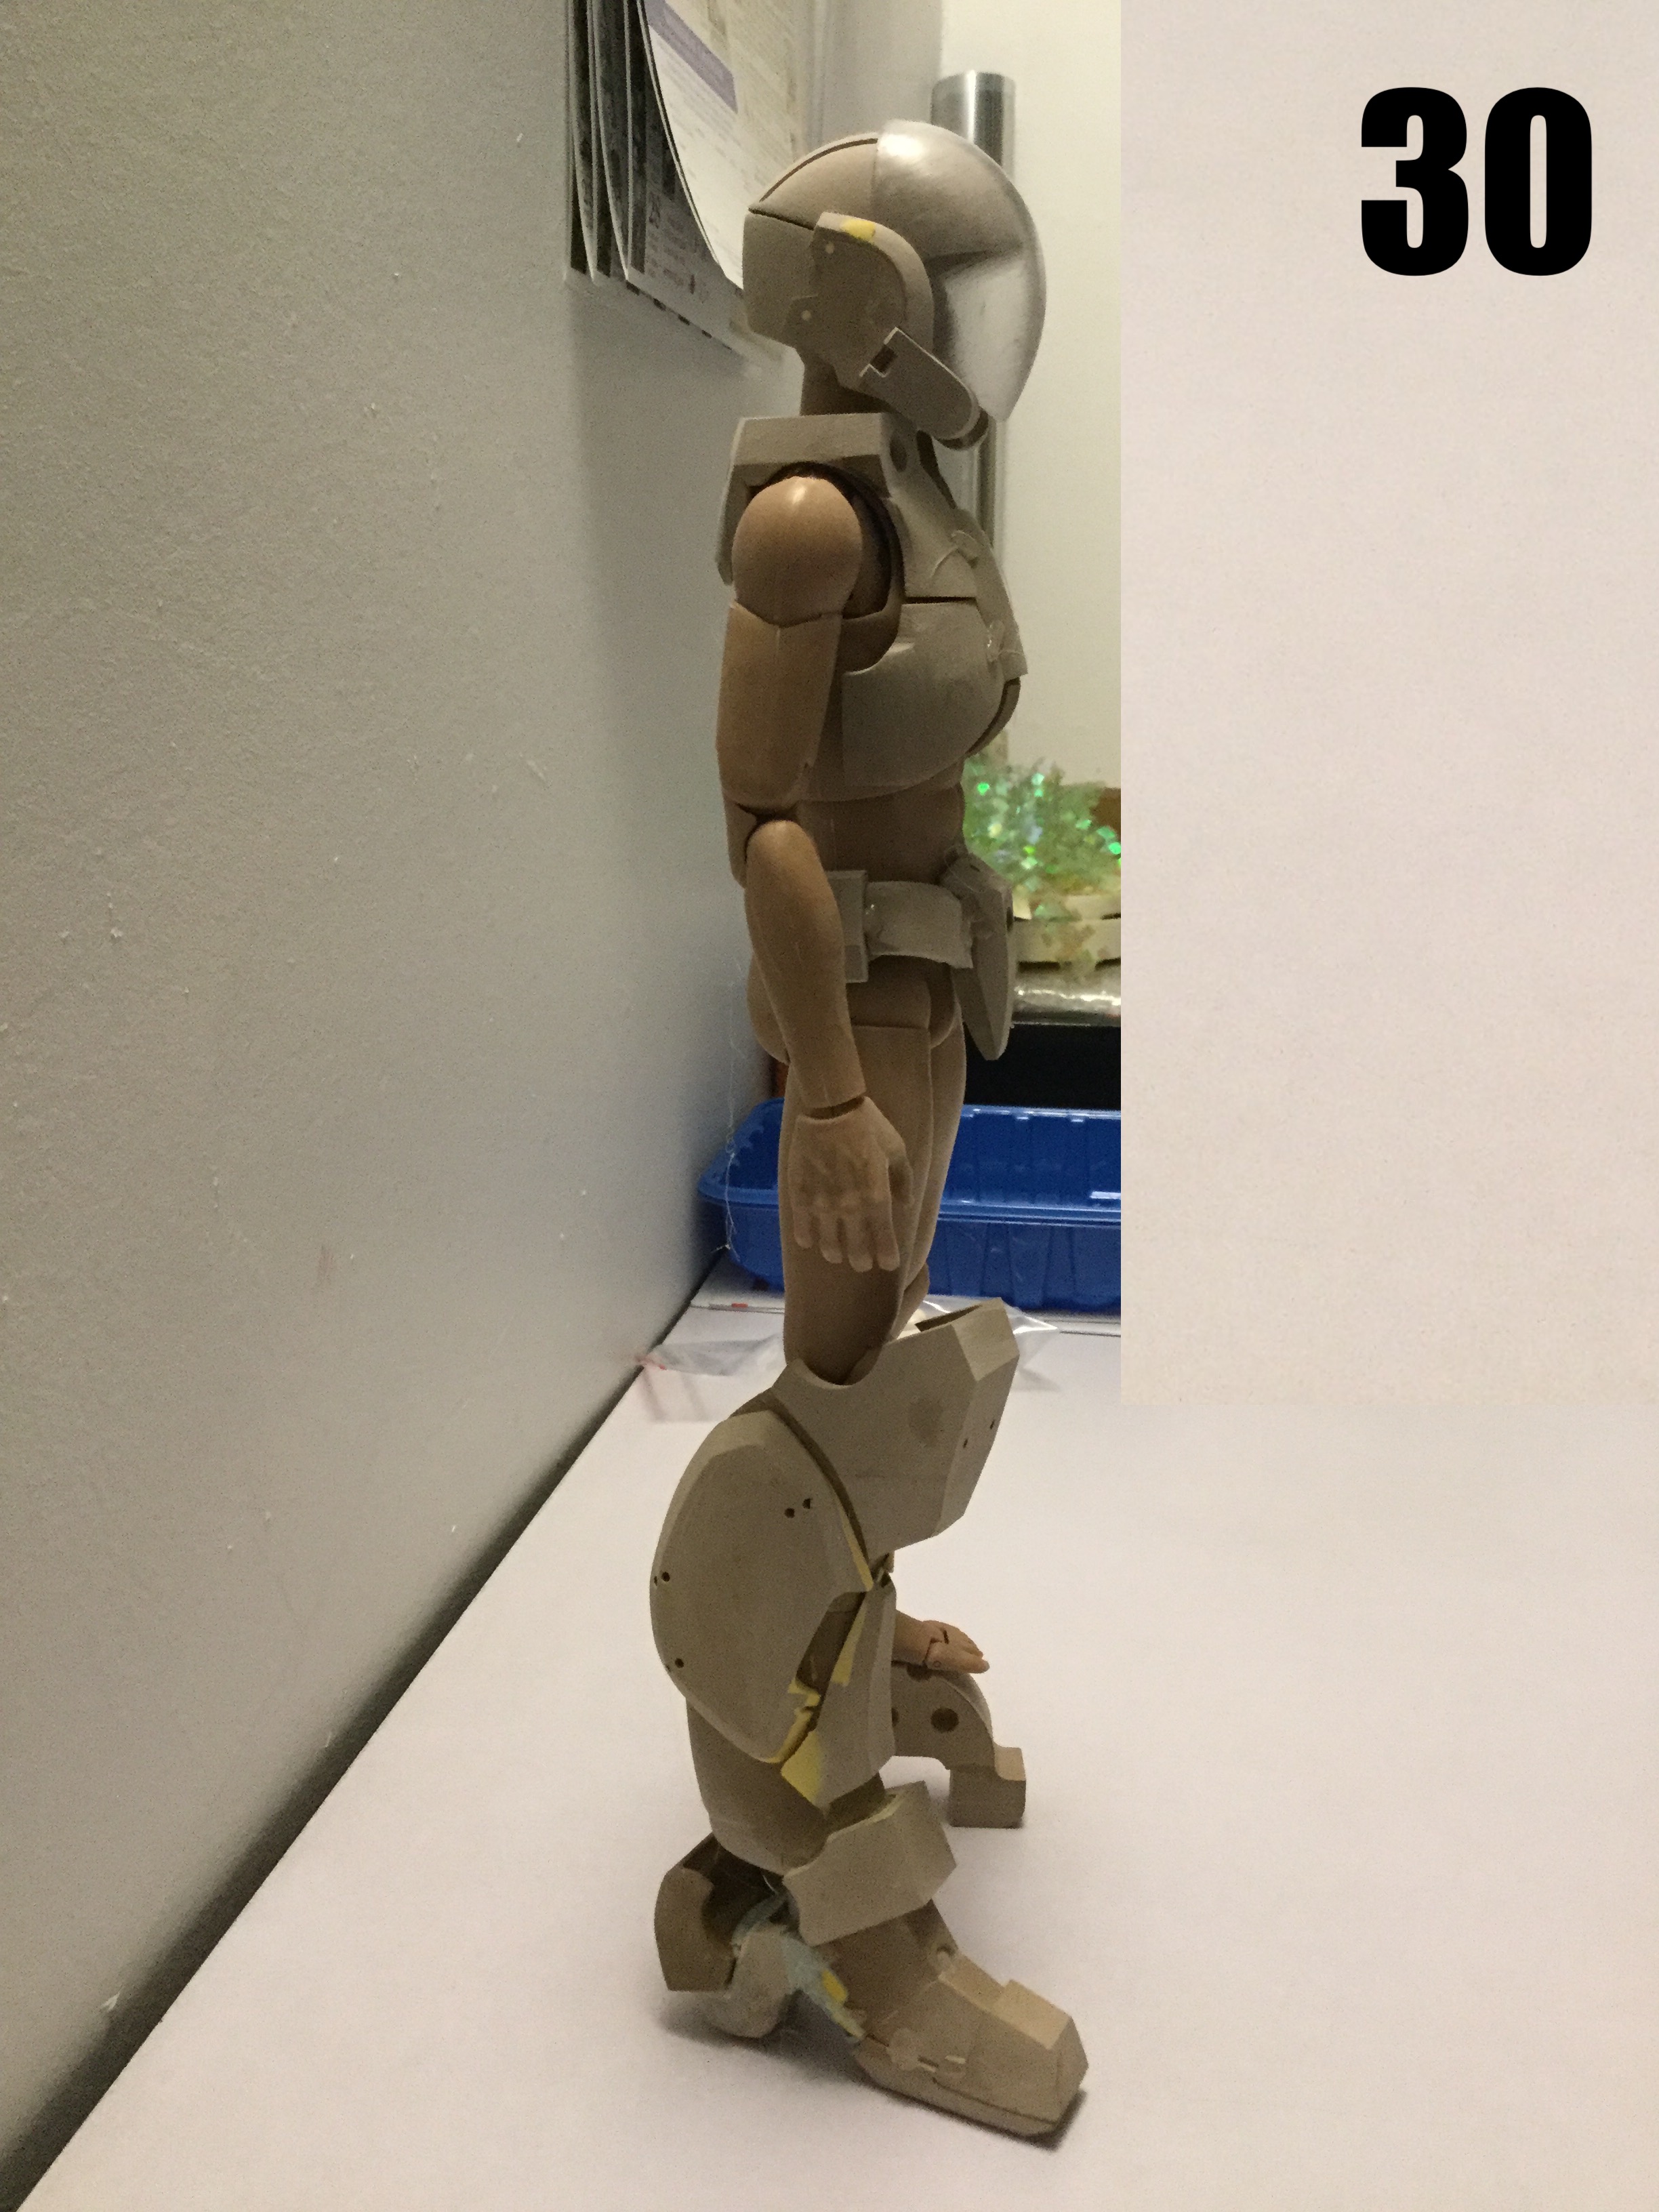
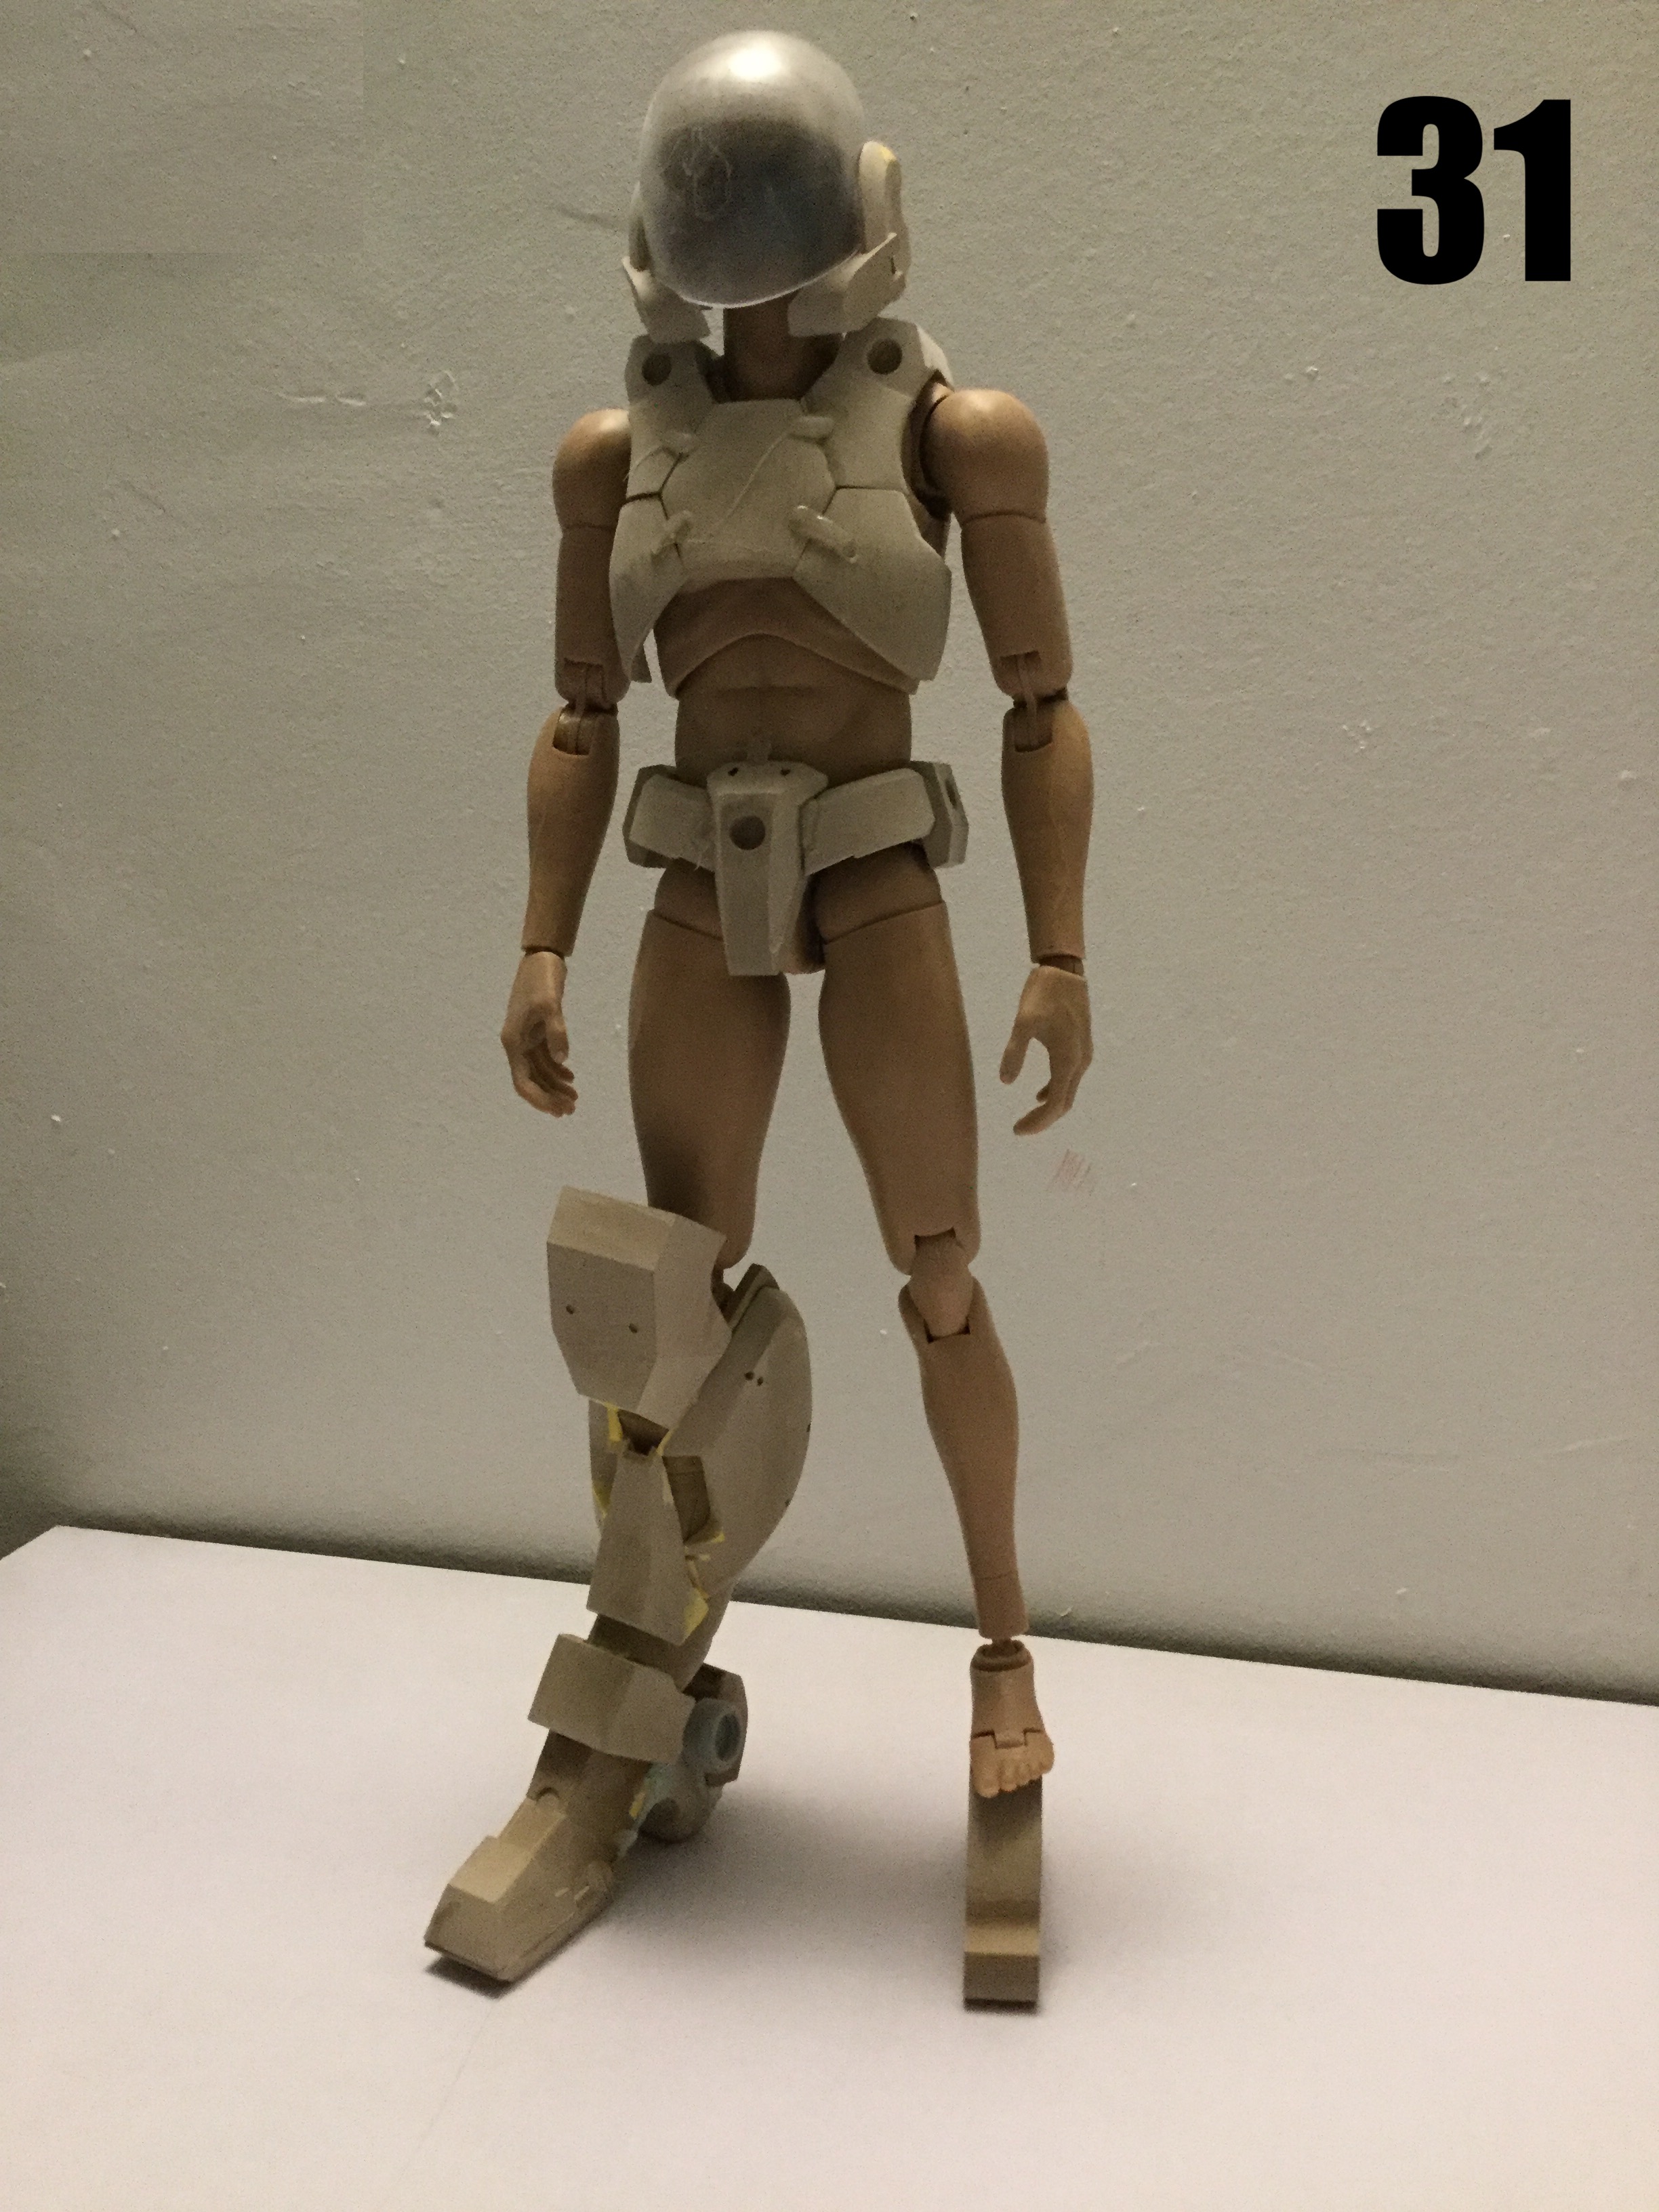
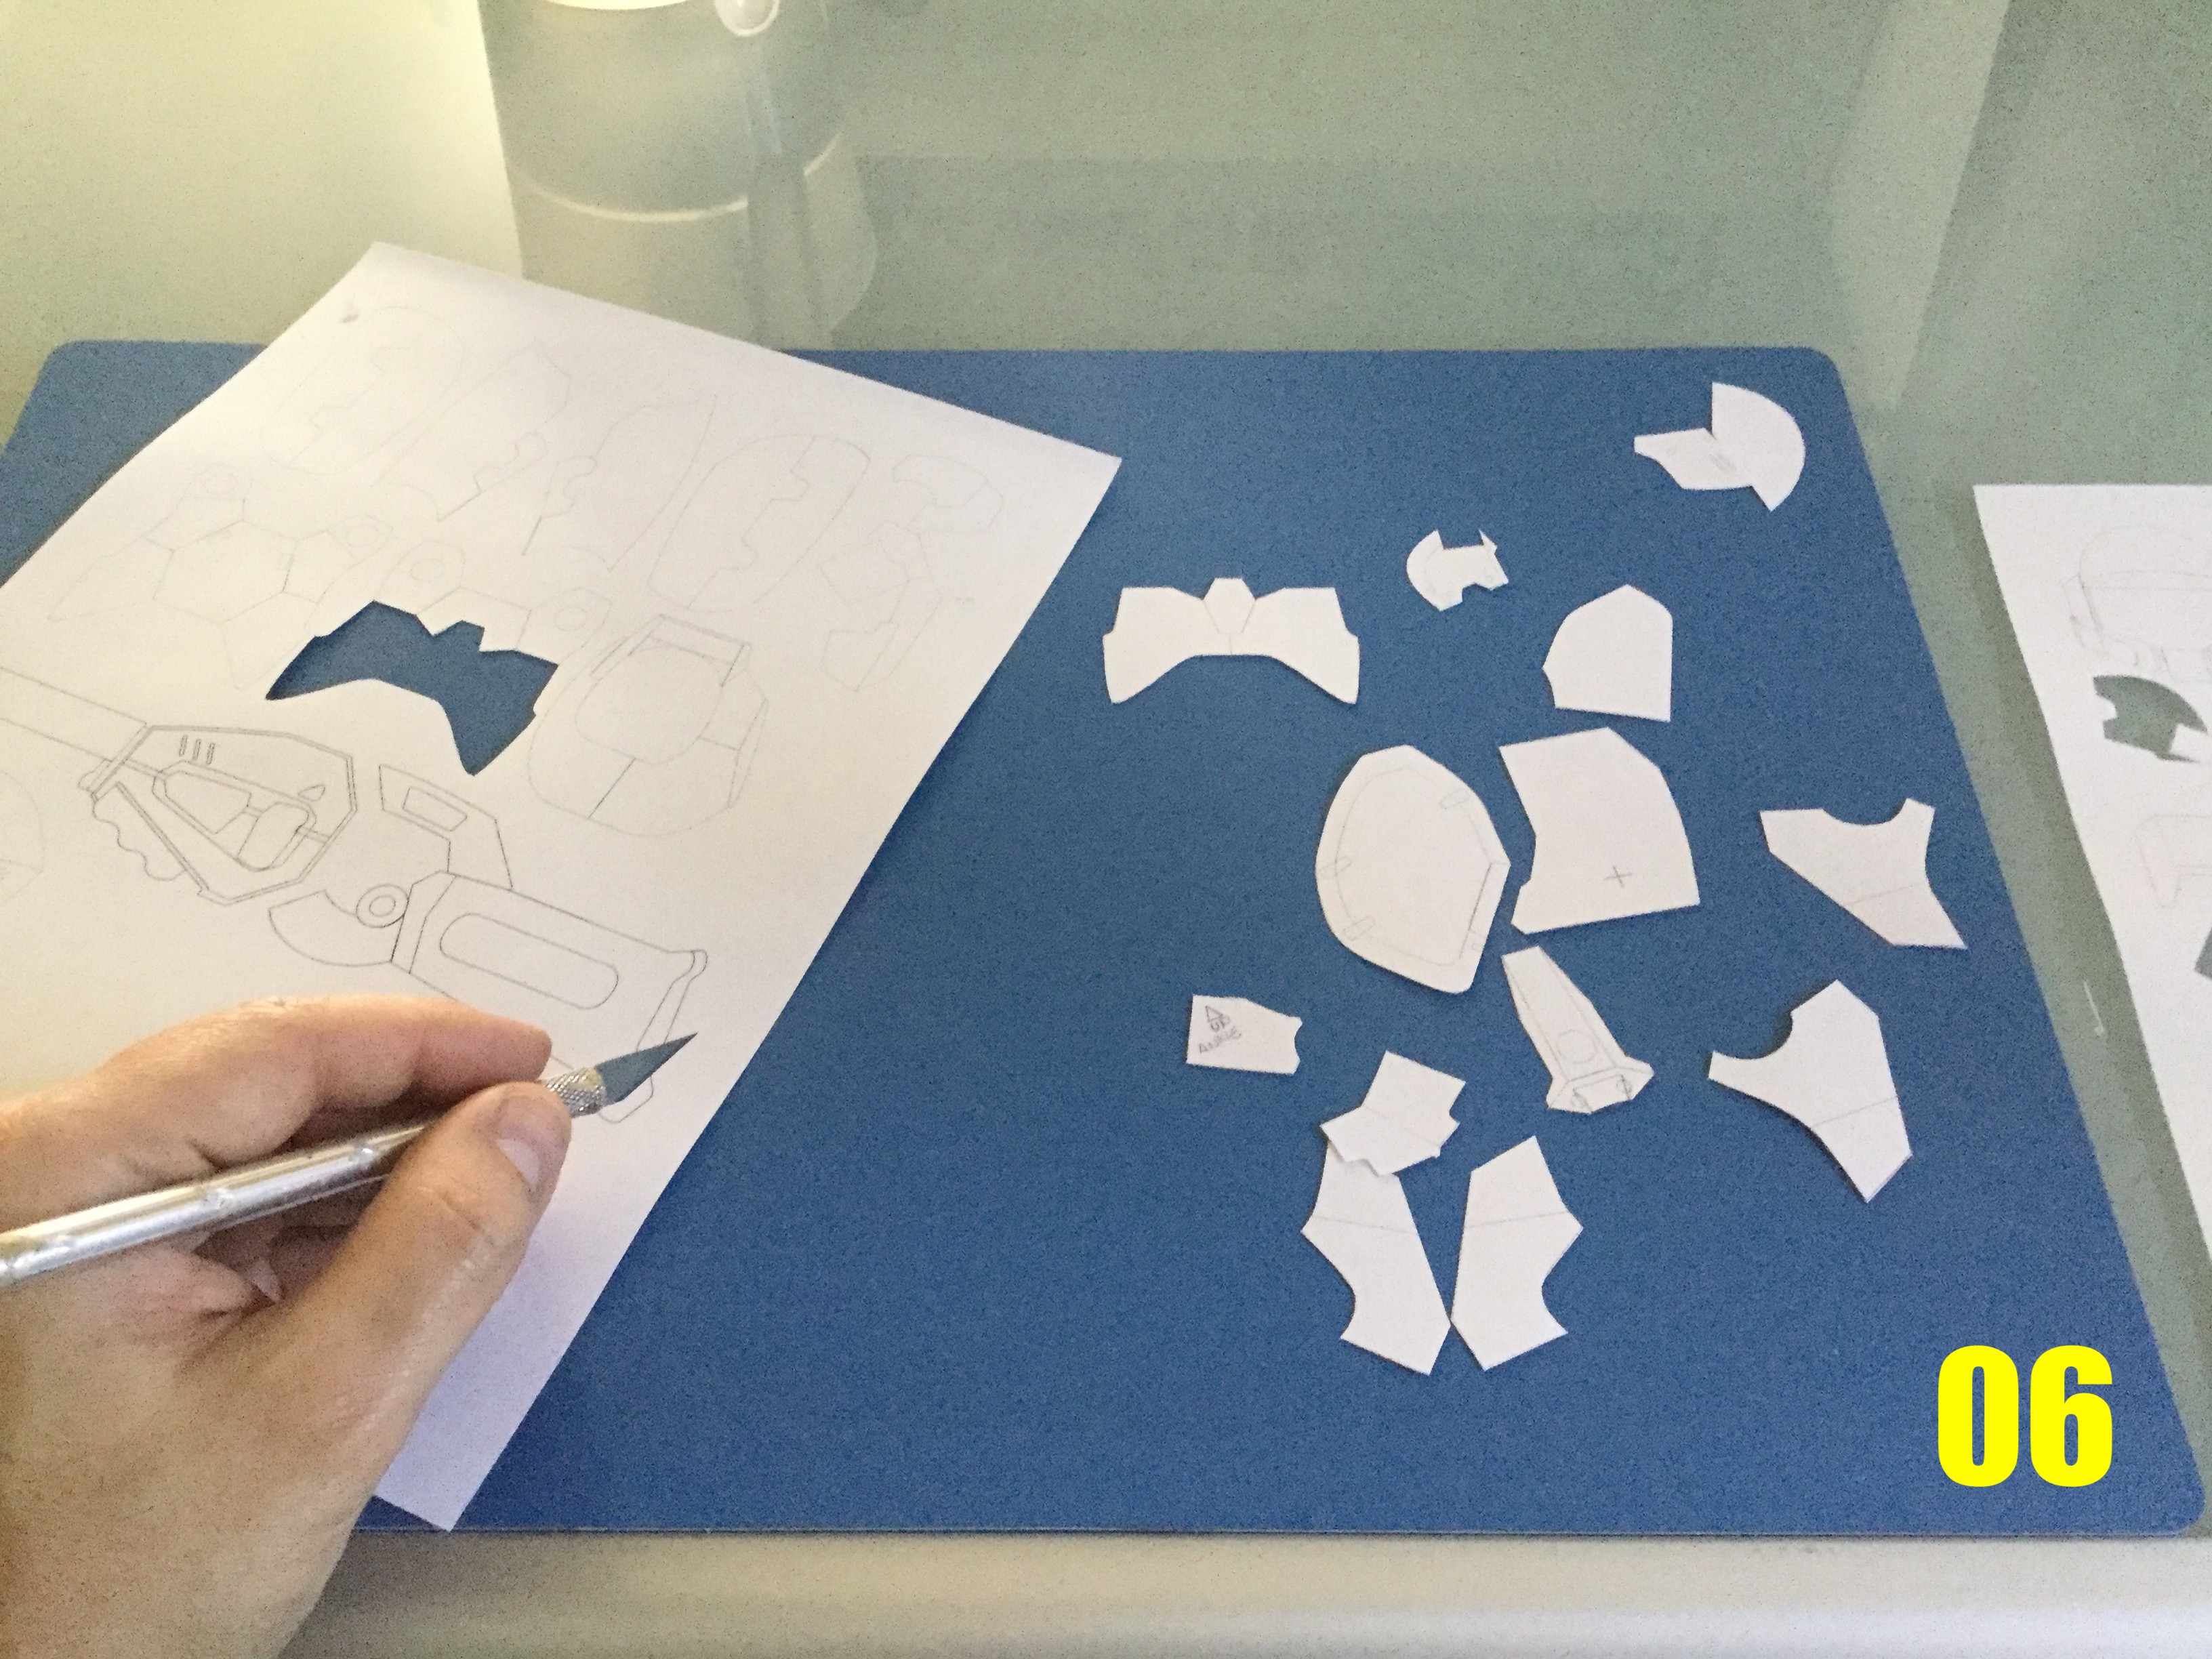
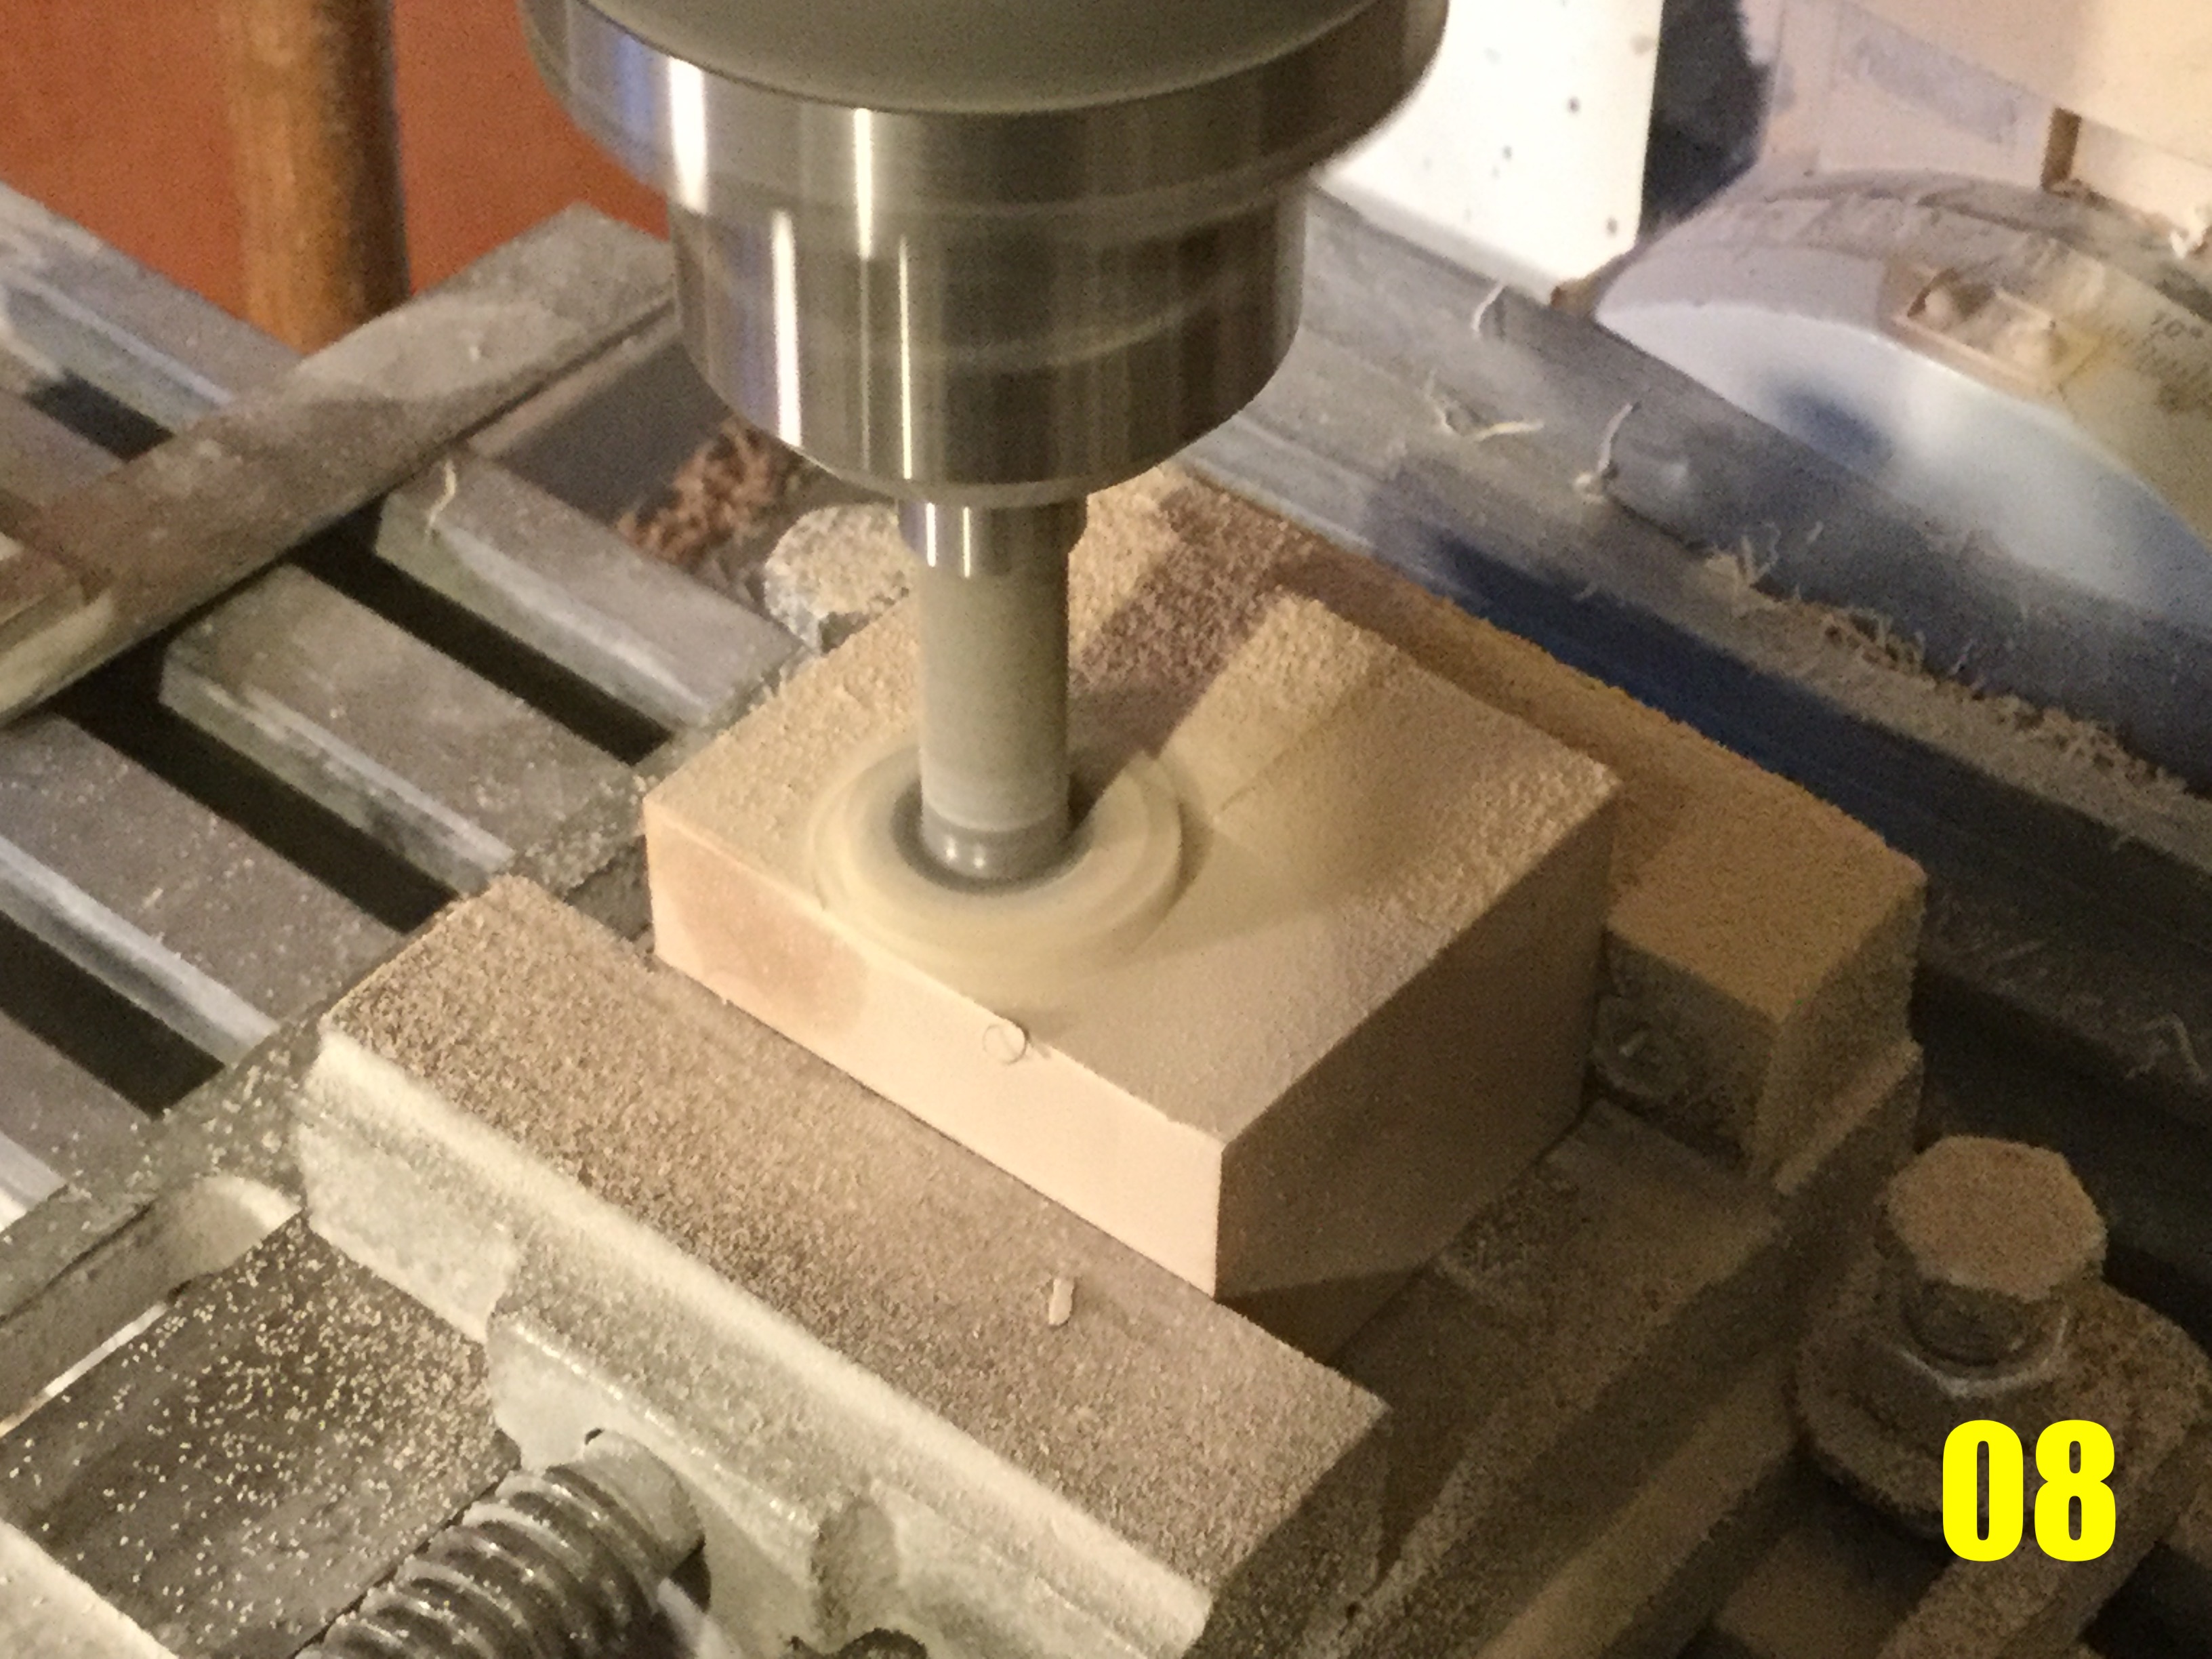
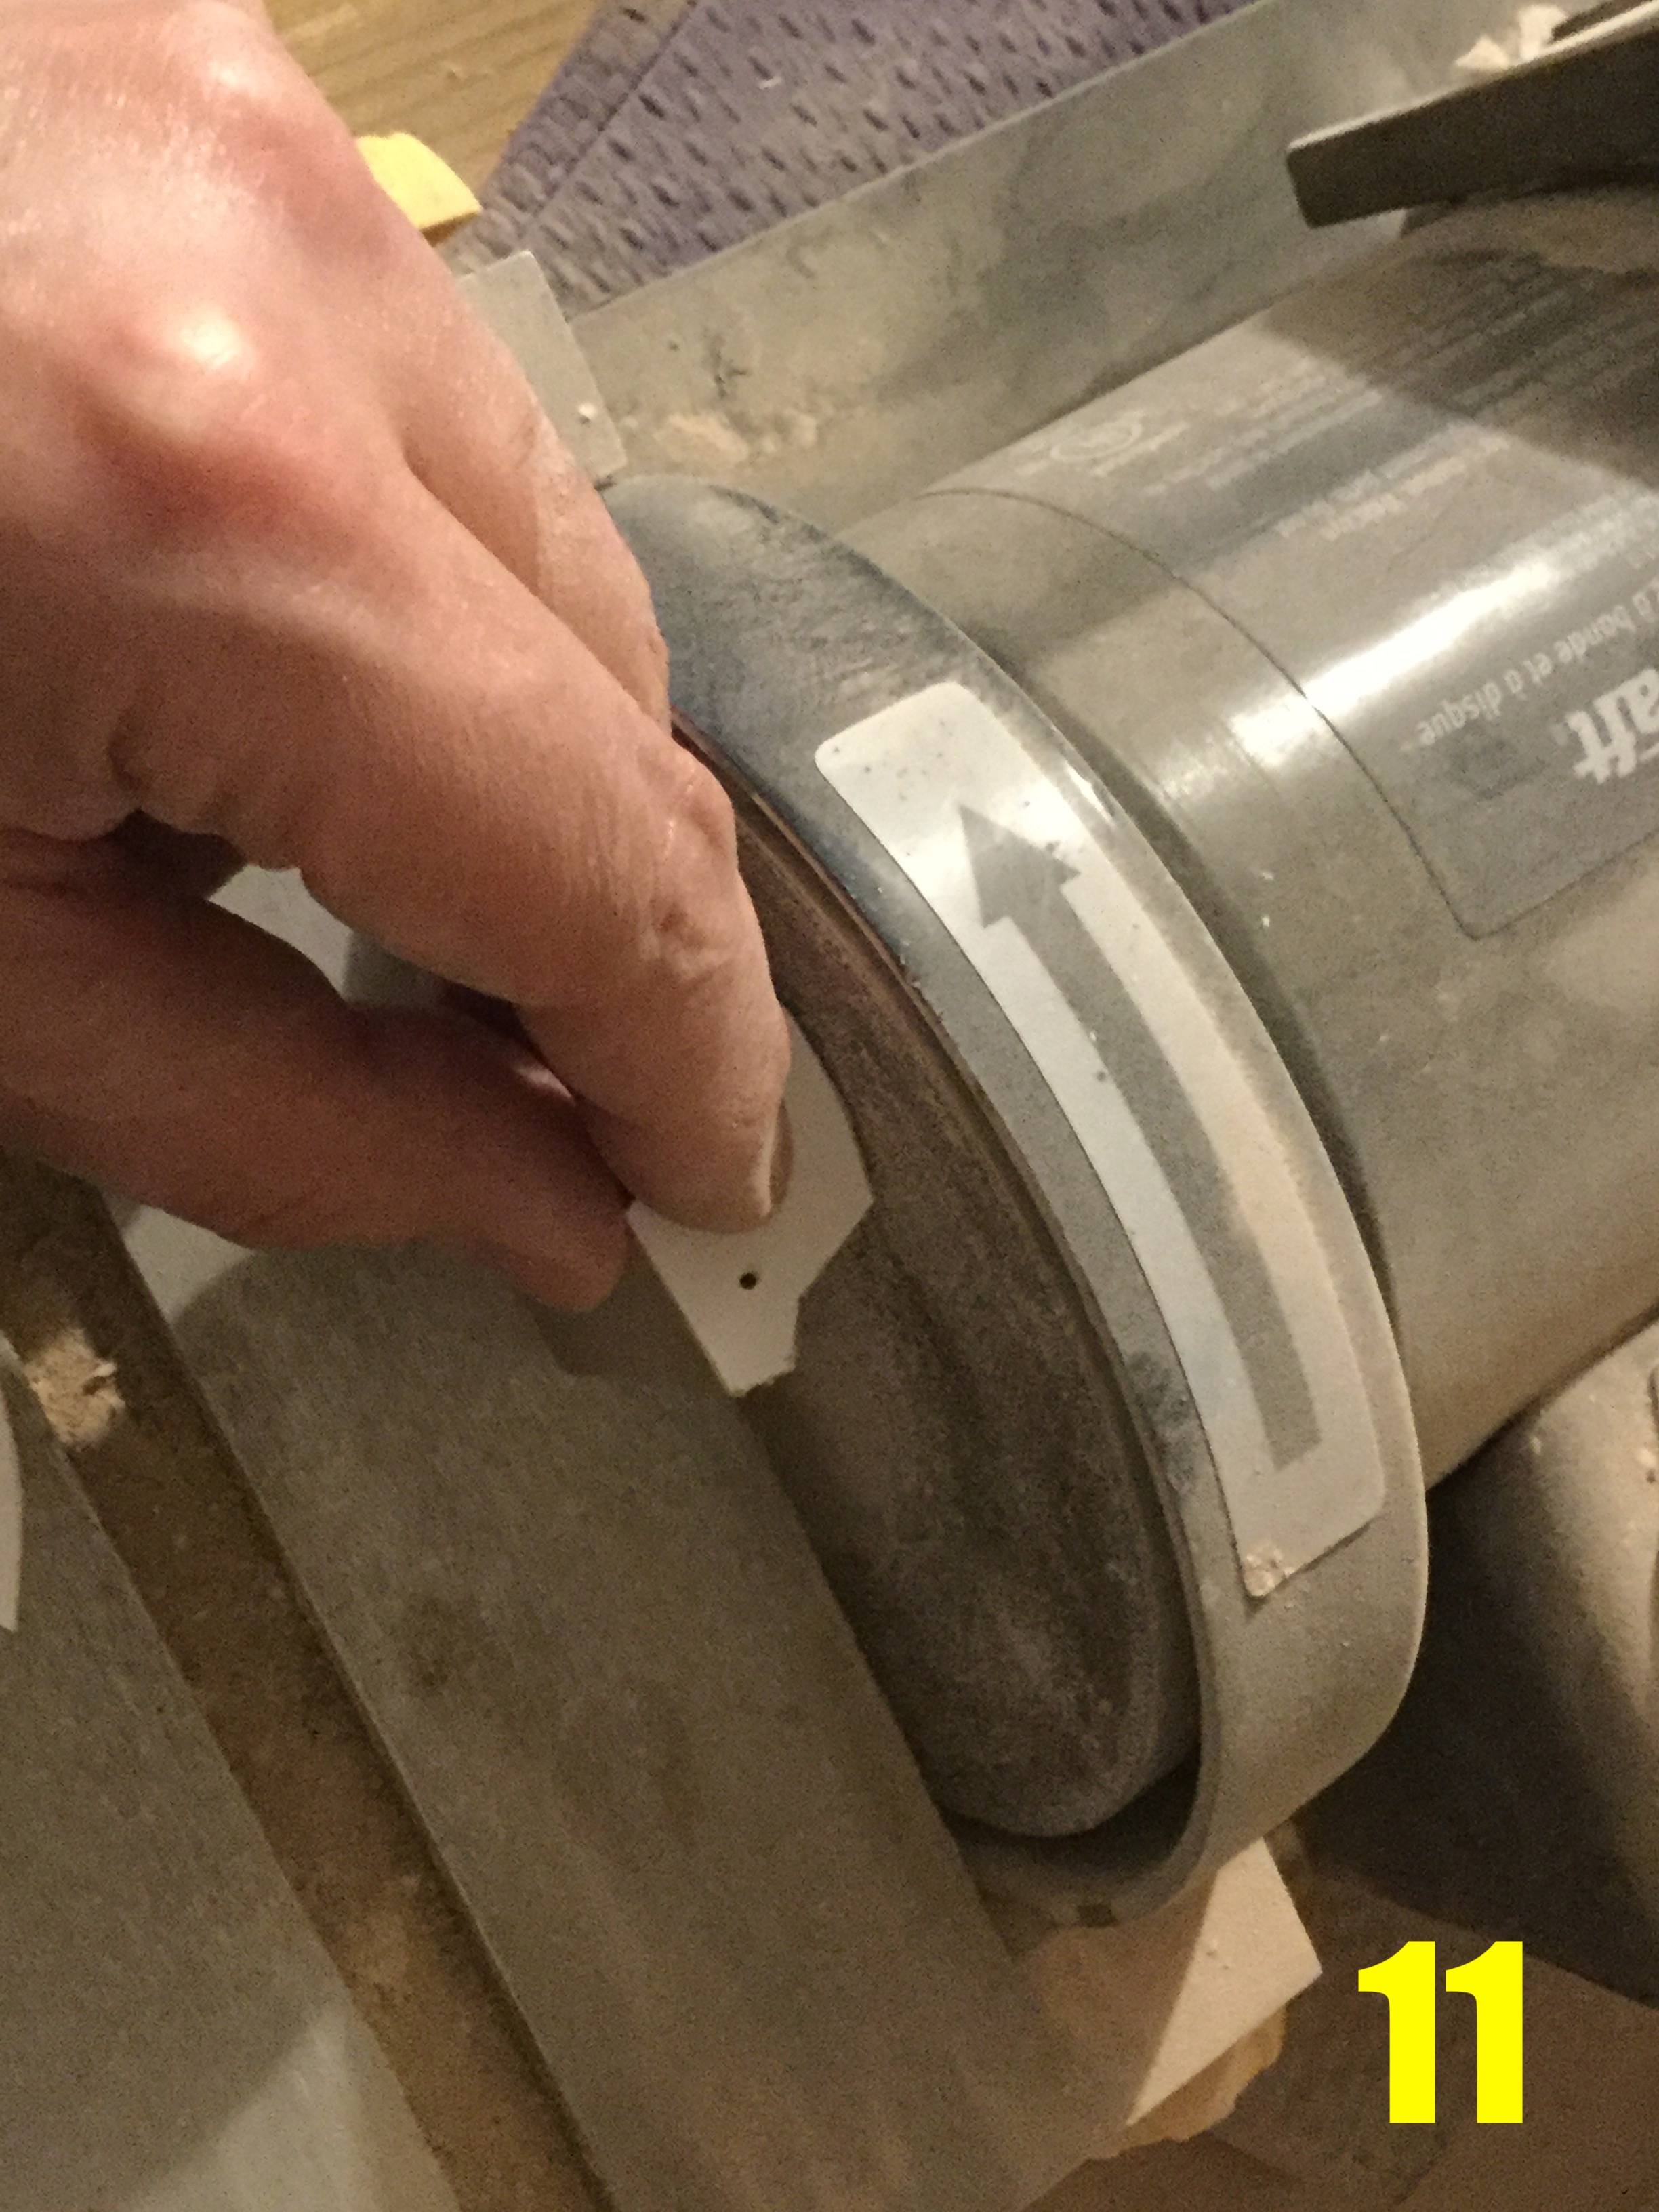
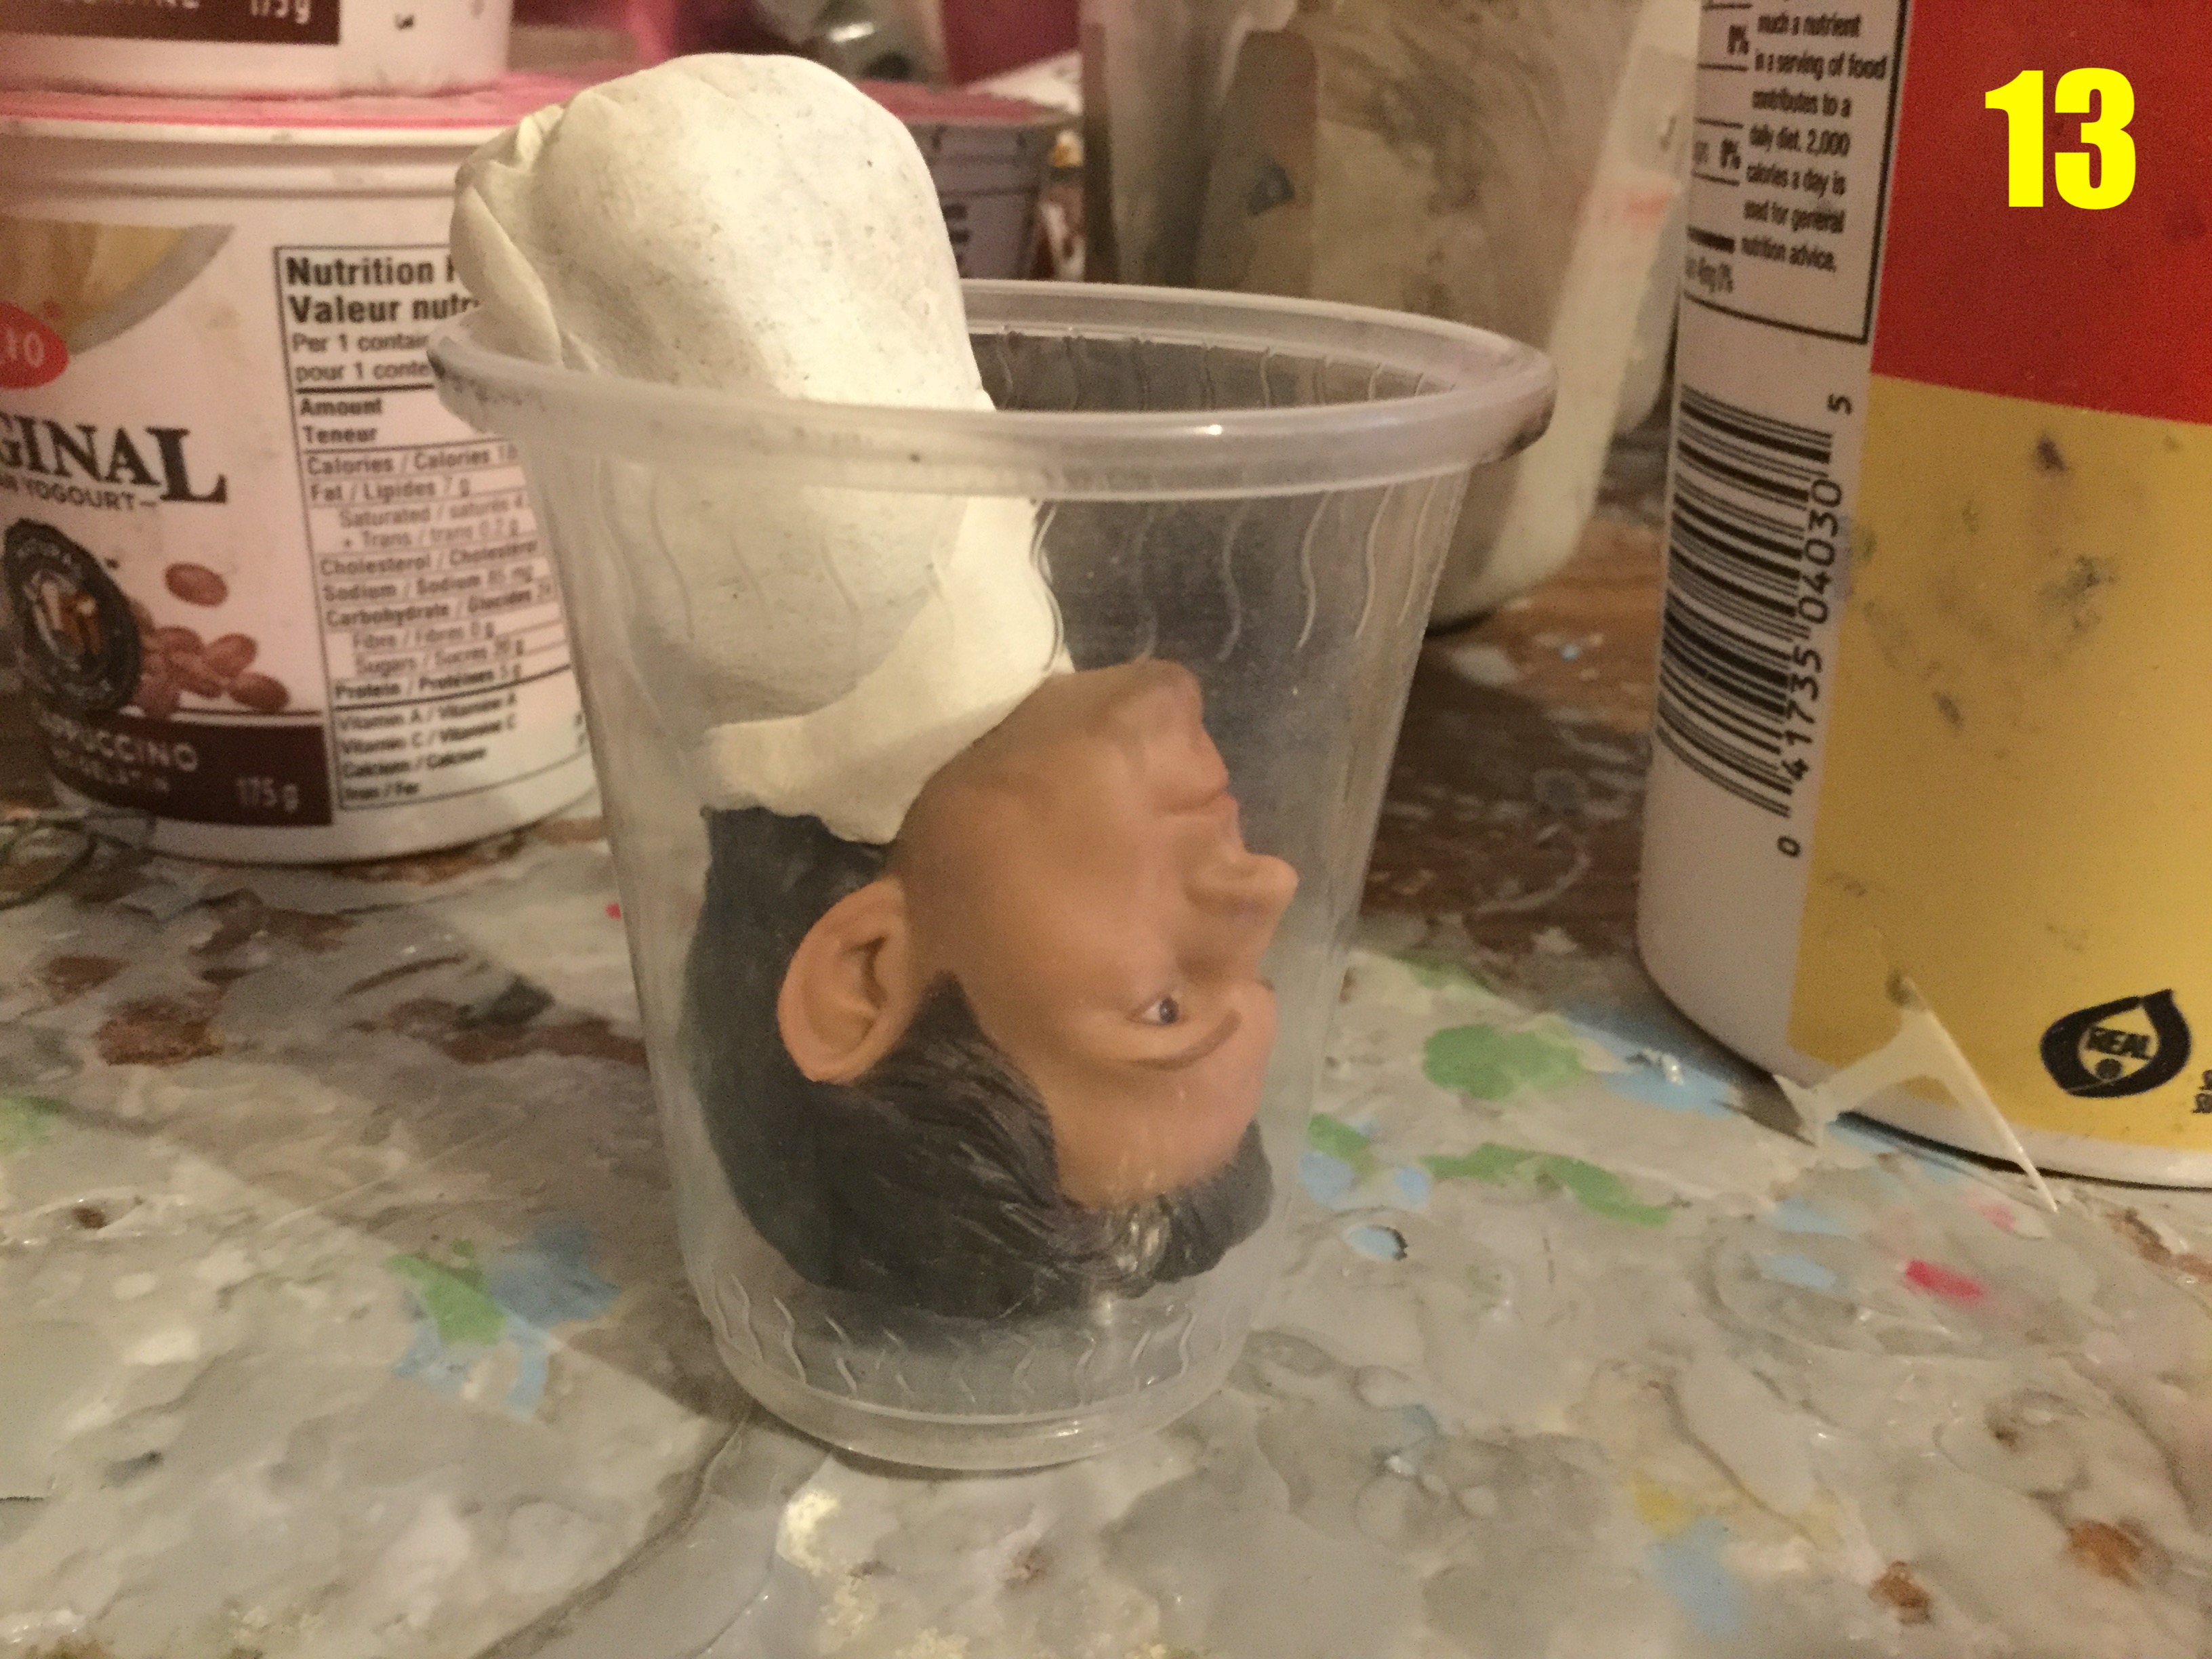
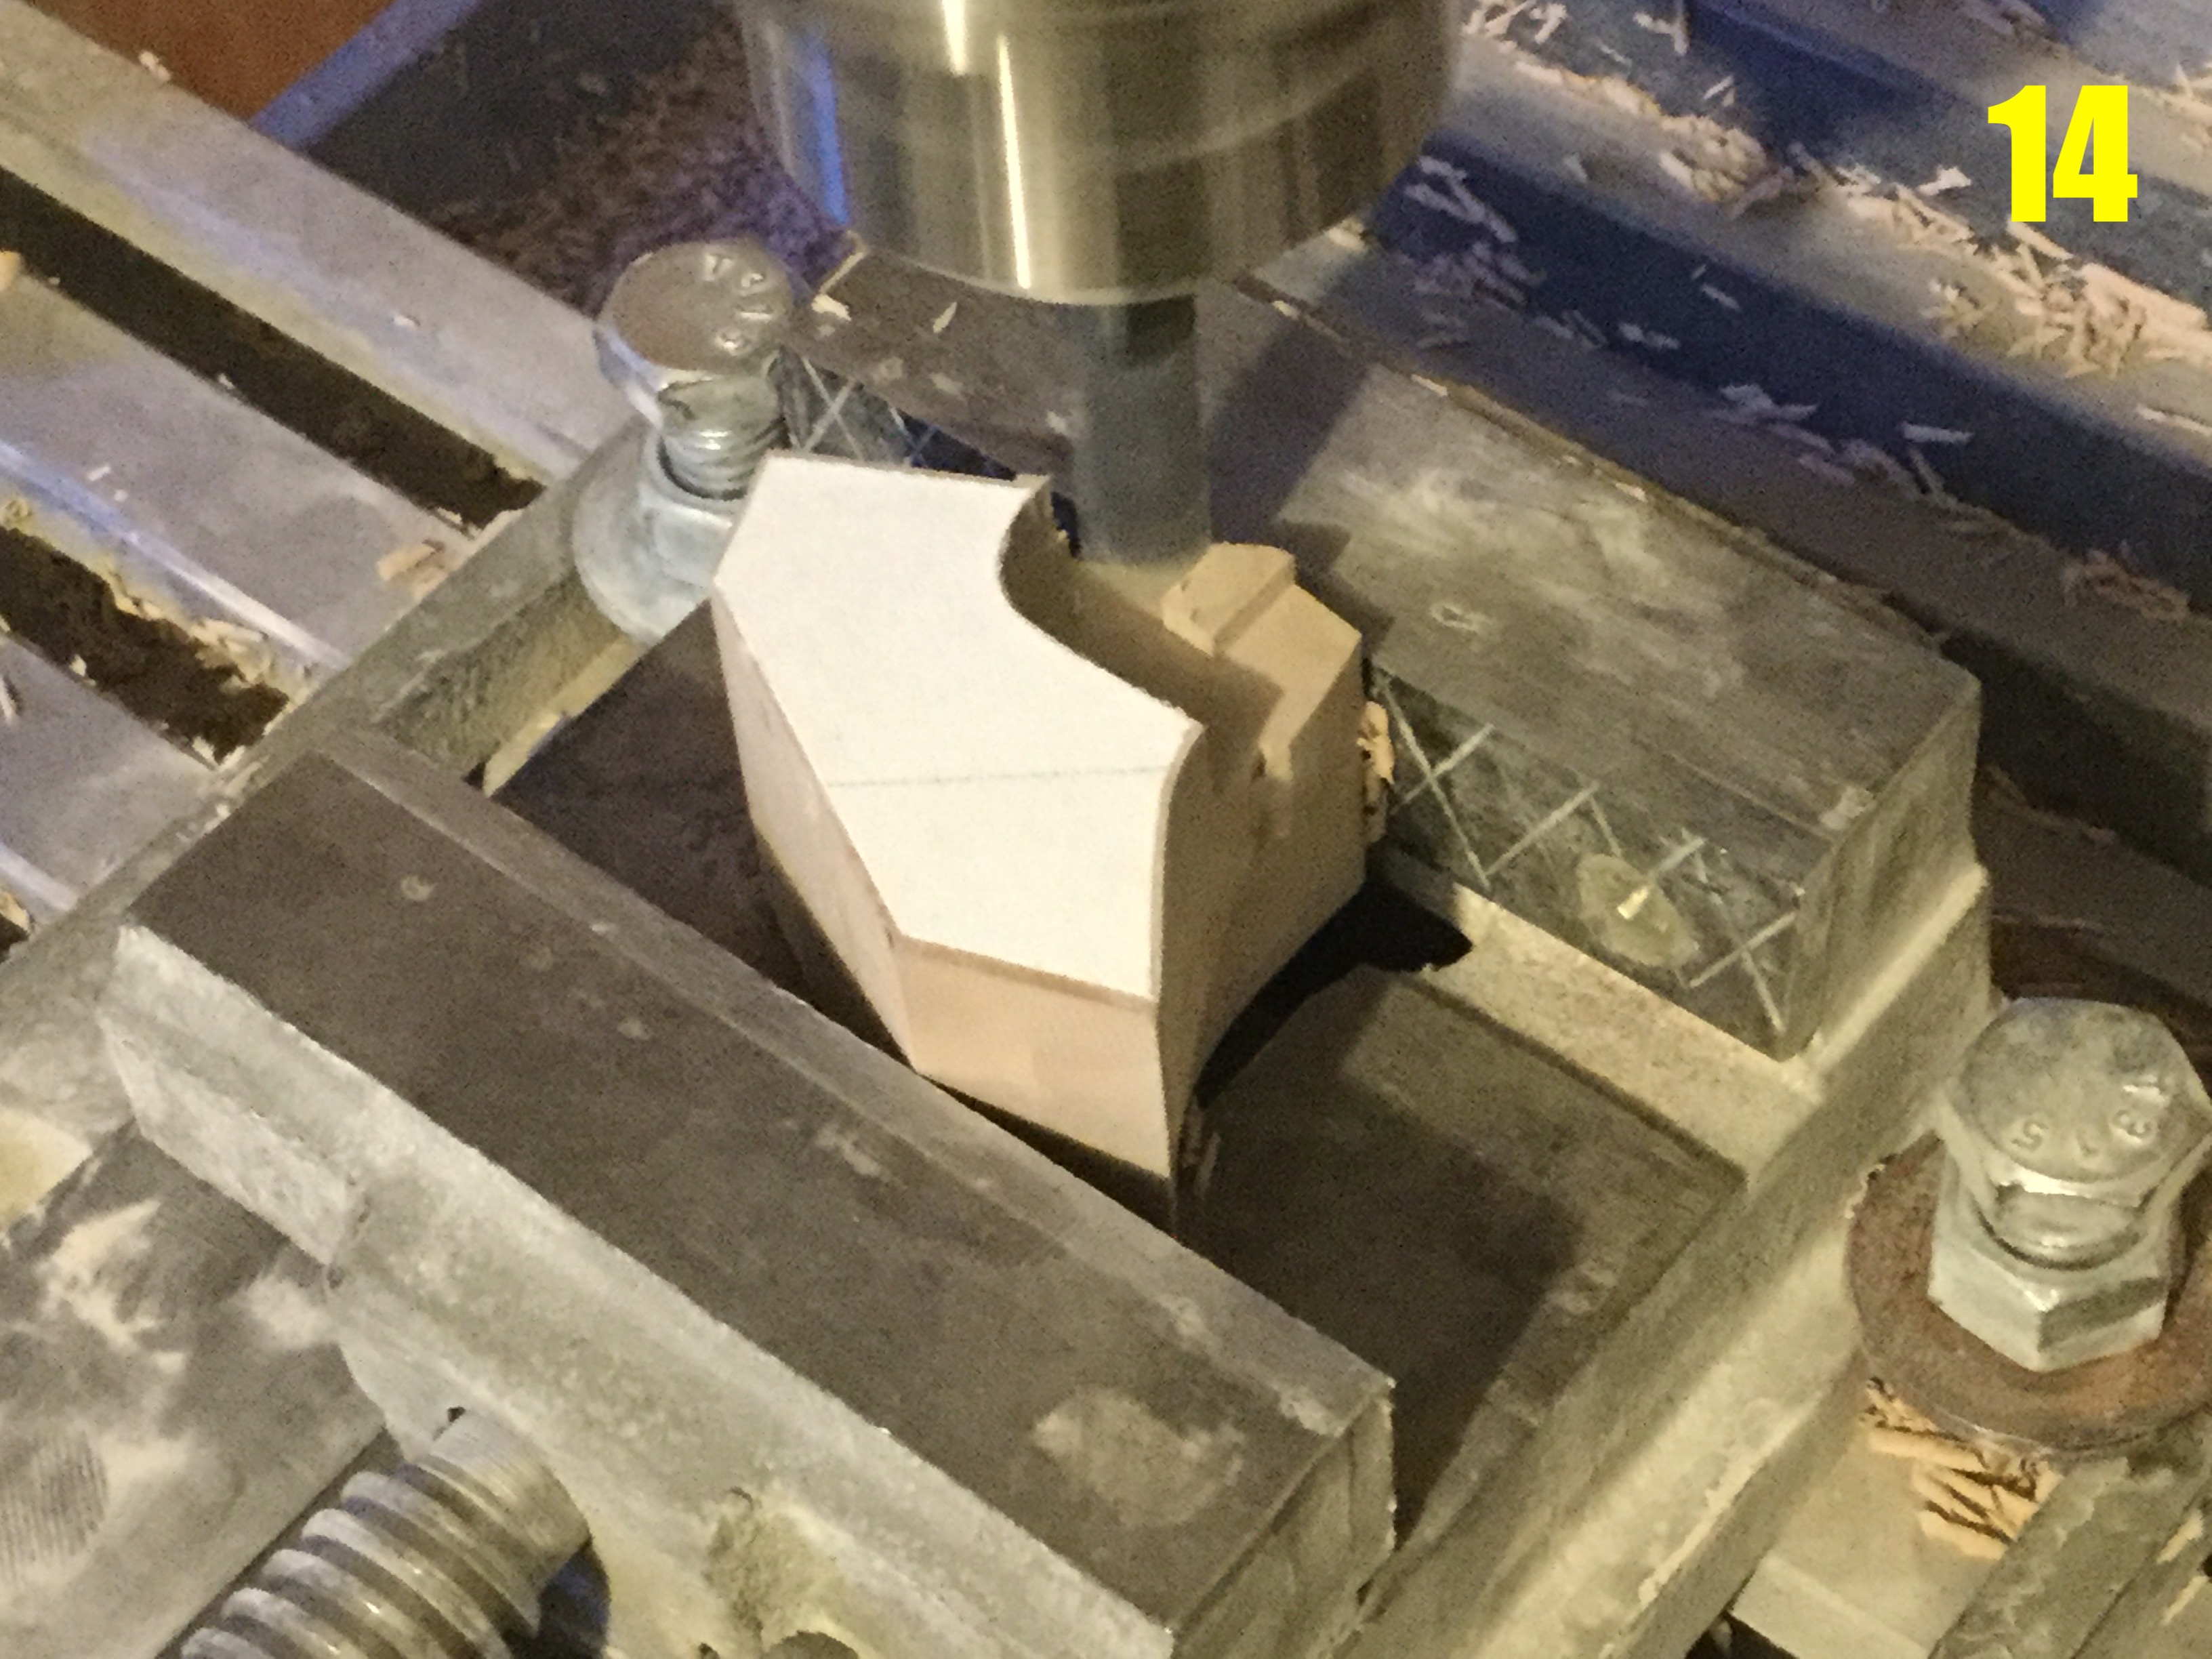
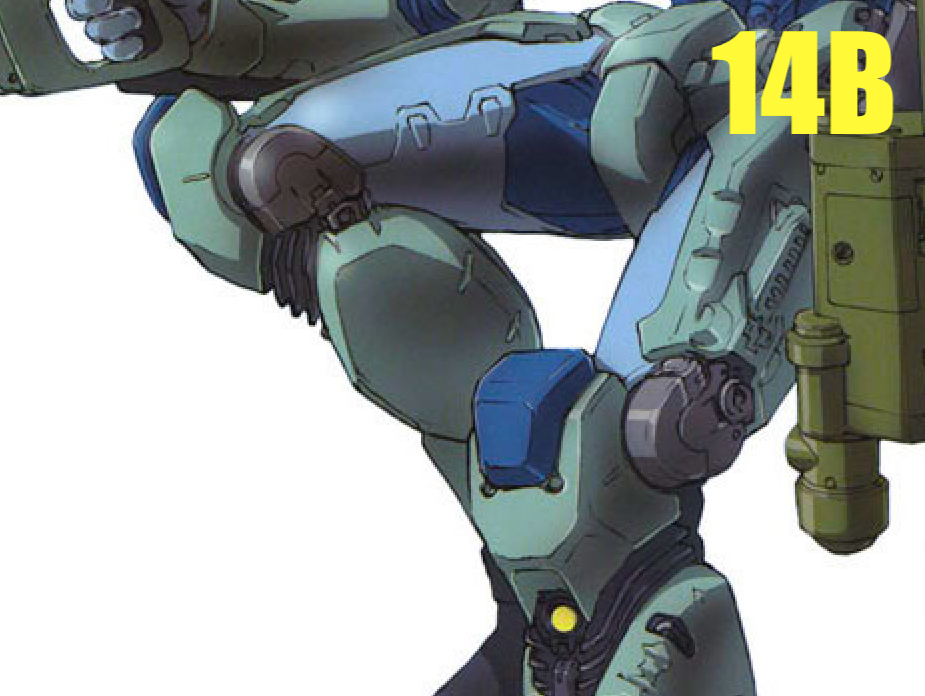
1/6 Motocycle Freak Scratchbuild Project Captain's Log: Thursday, November 10, 2022. Construction goes forth at a break-neck speed. Thanks to the time I invested in the diagrams earlier, I was able to begin the building process with confidence. Pic 05 shows the customary basics from which each mode is birthed: some pieces of modelling board, and printed diagras to be used as cutting templates. Pic 06: the first order of business involves cutting out the templates I need for certain parts. I avoid cutting them all at once, otherwise I'll lose them in the process of preparing the carving blocks. Pic 07: to avoid wasting material, I measure the rough size of the parts needed, and trim the blocks accordingly. This actually saves time too, because I don't need to spend extra time removing excess material from the blocks in the sculpting process. Pic 08: the surface of the block left by the saw blade is rough, so each new cut part goes under the face end mill to be smoothed out. The large cutting area of this tool is also a big time-saver. Pic 09: some of the major components are now ready to be trimmed. This is phase one, and most parts only require one template, but some of the more complex pieces will require a secondary template. I'm thinking specifically of the multi-component chest armor. Pic 10: in this initial stage, as much of the excess material is removed with the band saw. I go the extra mile here, because it produces less dust and saves time. Pic 11: here's a bench sander I don't use nearly often enough! This comes in handy for convex curvatures, provided the curve isn't too tight. Pic 12: once the part has been sufficiently trimmed, it goes to the milling machine, where more precise operations are performed. Pic 13: here I'm preparing to make a mold of Mr. Holland's head, so that I can get a face inside the visor of the helmet. The mold setup is crude, but works perfectly. Pic 14: while that mold cures, it's back to the milling machine I go. This is the outer knee armor assembly. You may not have noticed, but in Aramaki-san's original artwork (pic 14B), the knee geometry is different on the inside and outside, so I need to make mirror parts. Sentinel took a more “efficient” route by making the knee identical left and right, and just inserting a different part for the inside and outside. Pic 15: that same knee part is then given a quick bit of sanding in the right places, and chamfer lines are added with a pencil... Pic 16: then comes the grinding tool. I almost always need about ½ mm of material, which I will then remove with manual sanding for better control. Pic 17: on the left, the lower boot structure and the knee modules on the right, undergoing a quick putty repair. Pic 18: this is the upper body armor plate which covers the back, and is one of those parts which requires more than one template. Because it will be a crude C-shape, careful removal of the innards is needed, and I have to perform some unusual cutting with the band saw. Pic 19: so far, this is what the foot looks like. Pic 20: a crude mockup of the lower leg. This part was absurdly complicated to make, but it came out great so far. Pics 21 and 22 show the helmet coming along nicely! The 3D printed visor fits like a glove, and is being kept in its raw form the time being. I'm still adjusting the position of the face, and will then create the necessary molding around the perimeter. The face itself will be separate, so you'll have the option to put a different one in there to avoid clone syndrome. That's it for this week—stay tuned for another exciting update next time!!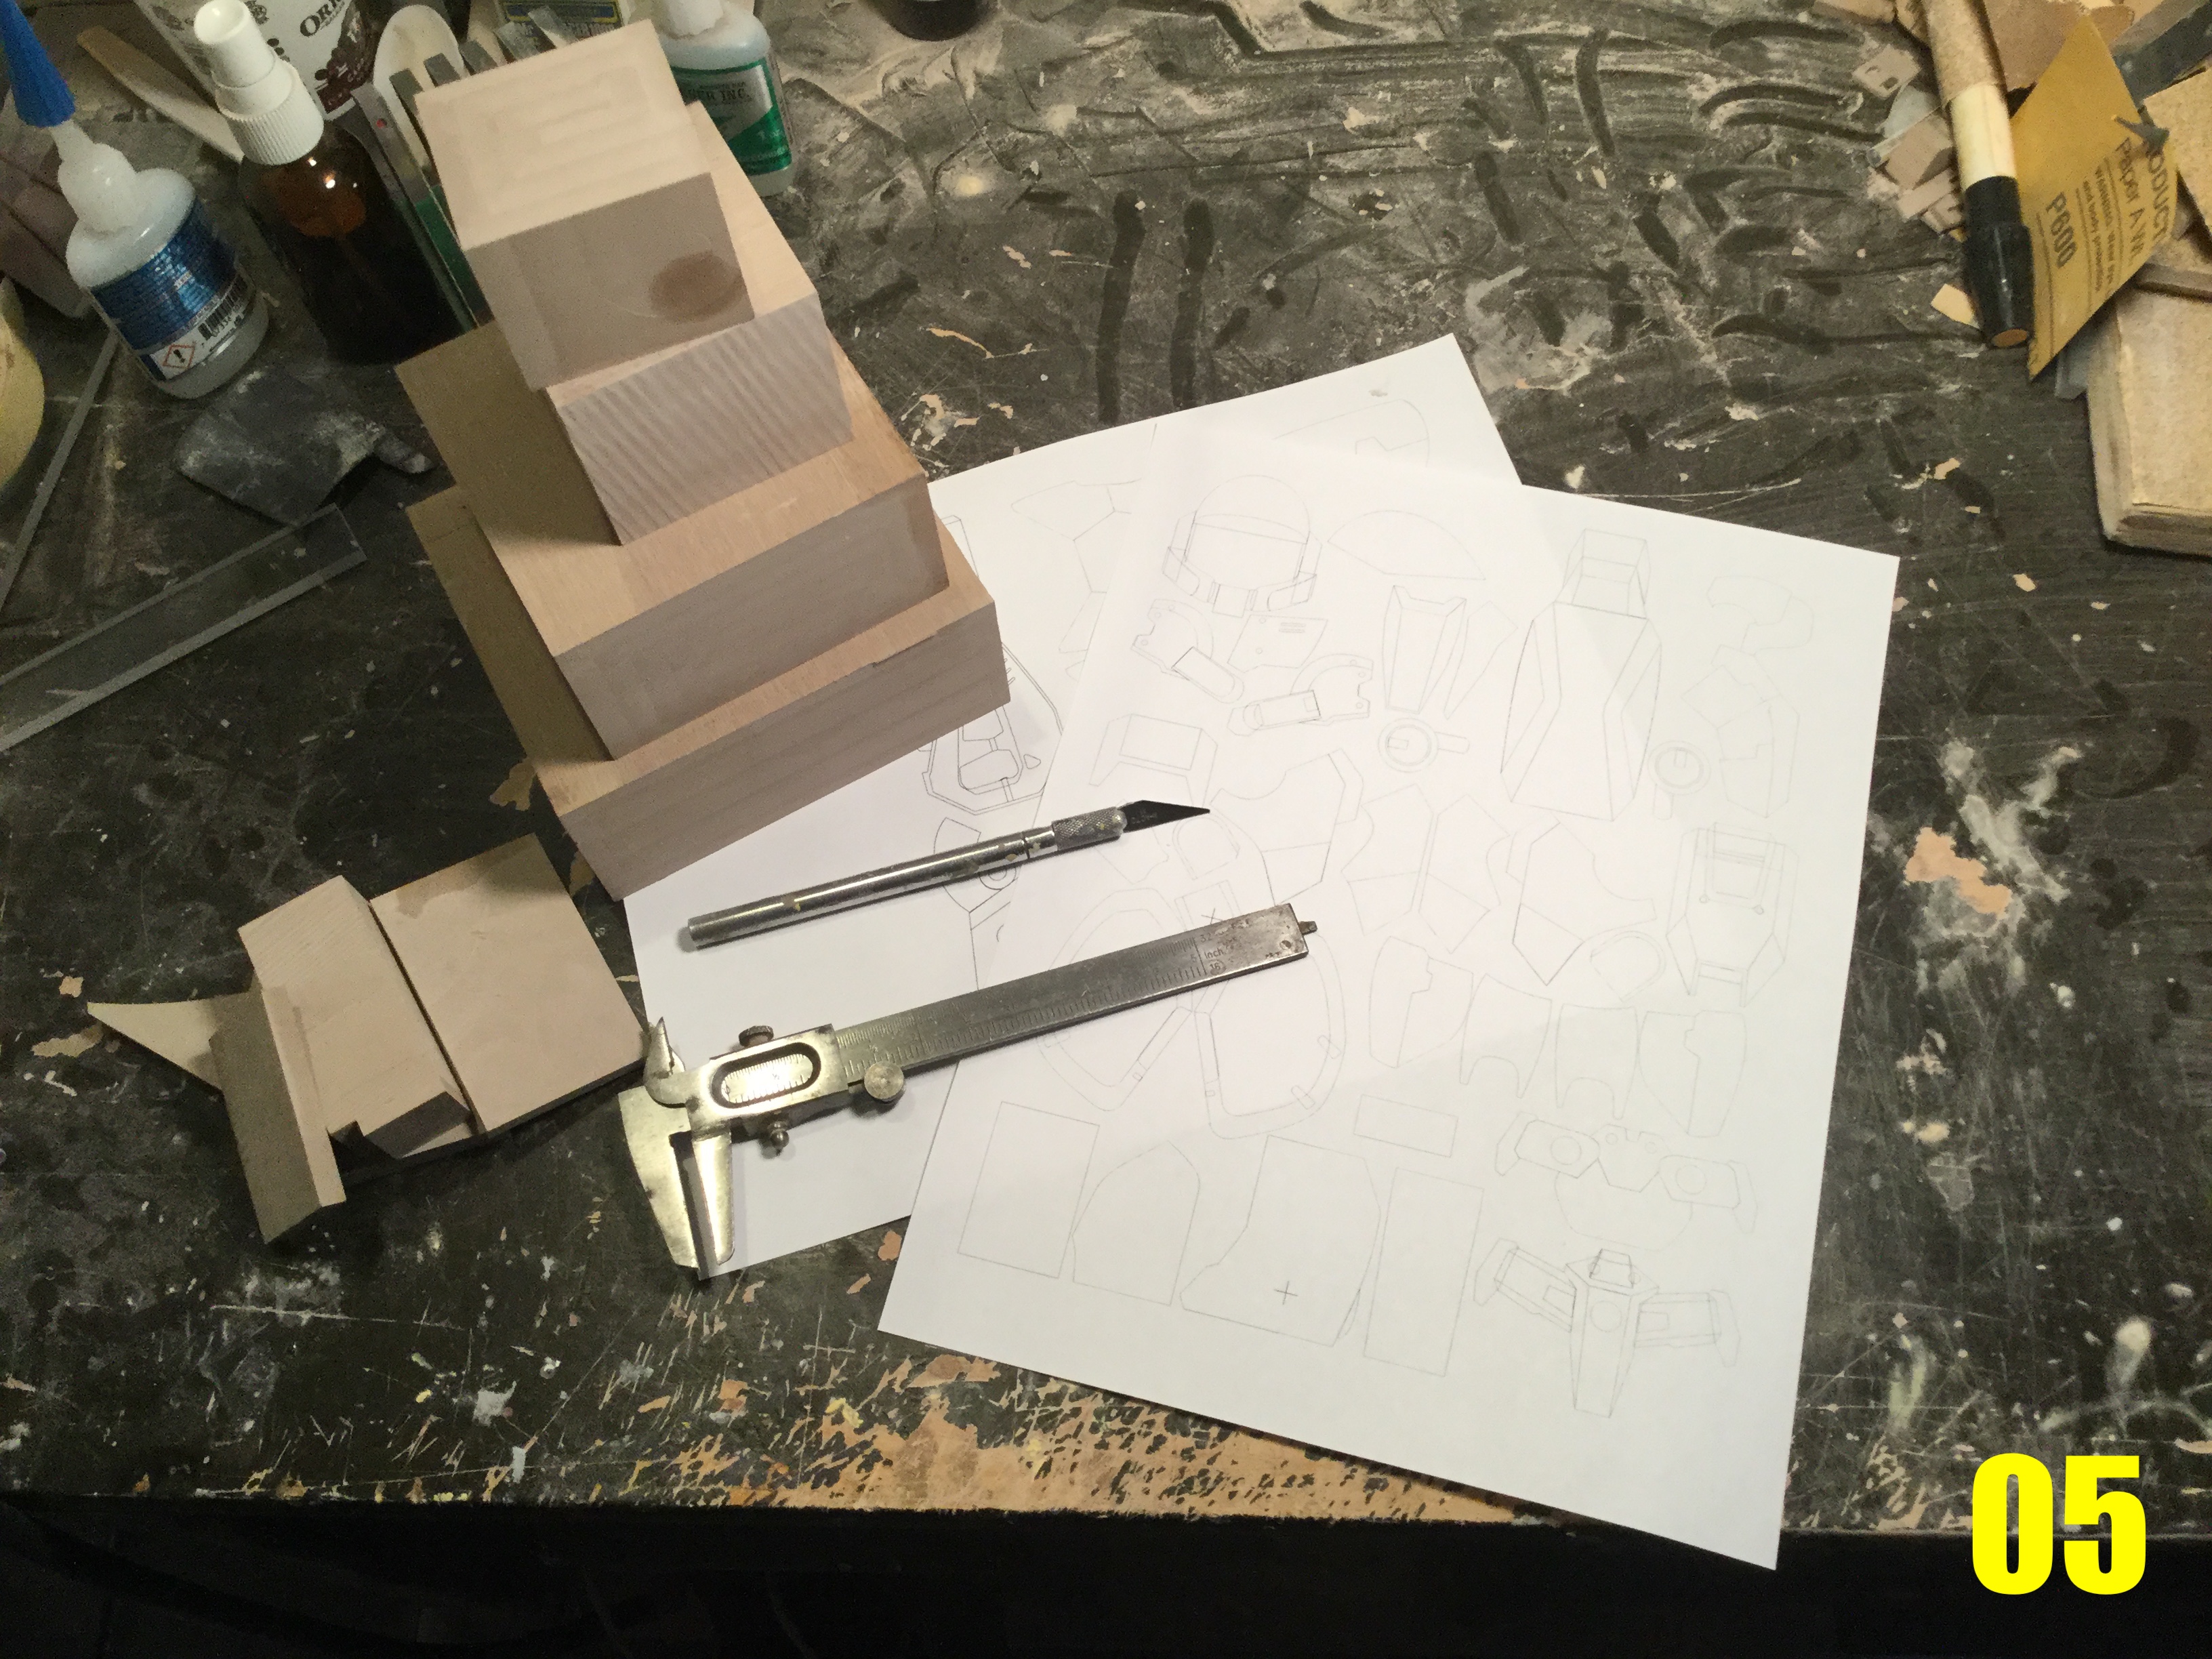

-
1/6 MOSPEADA Rider Project Proposal
captain america replied to captain america's topic in Anime or Science Fiction
Pre-orders are now half filled. -
1/6 MOSPEADA Rider Project Proposal
captain america replied to captain america's topic in Anime or Science Fiction
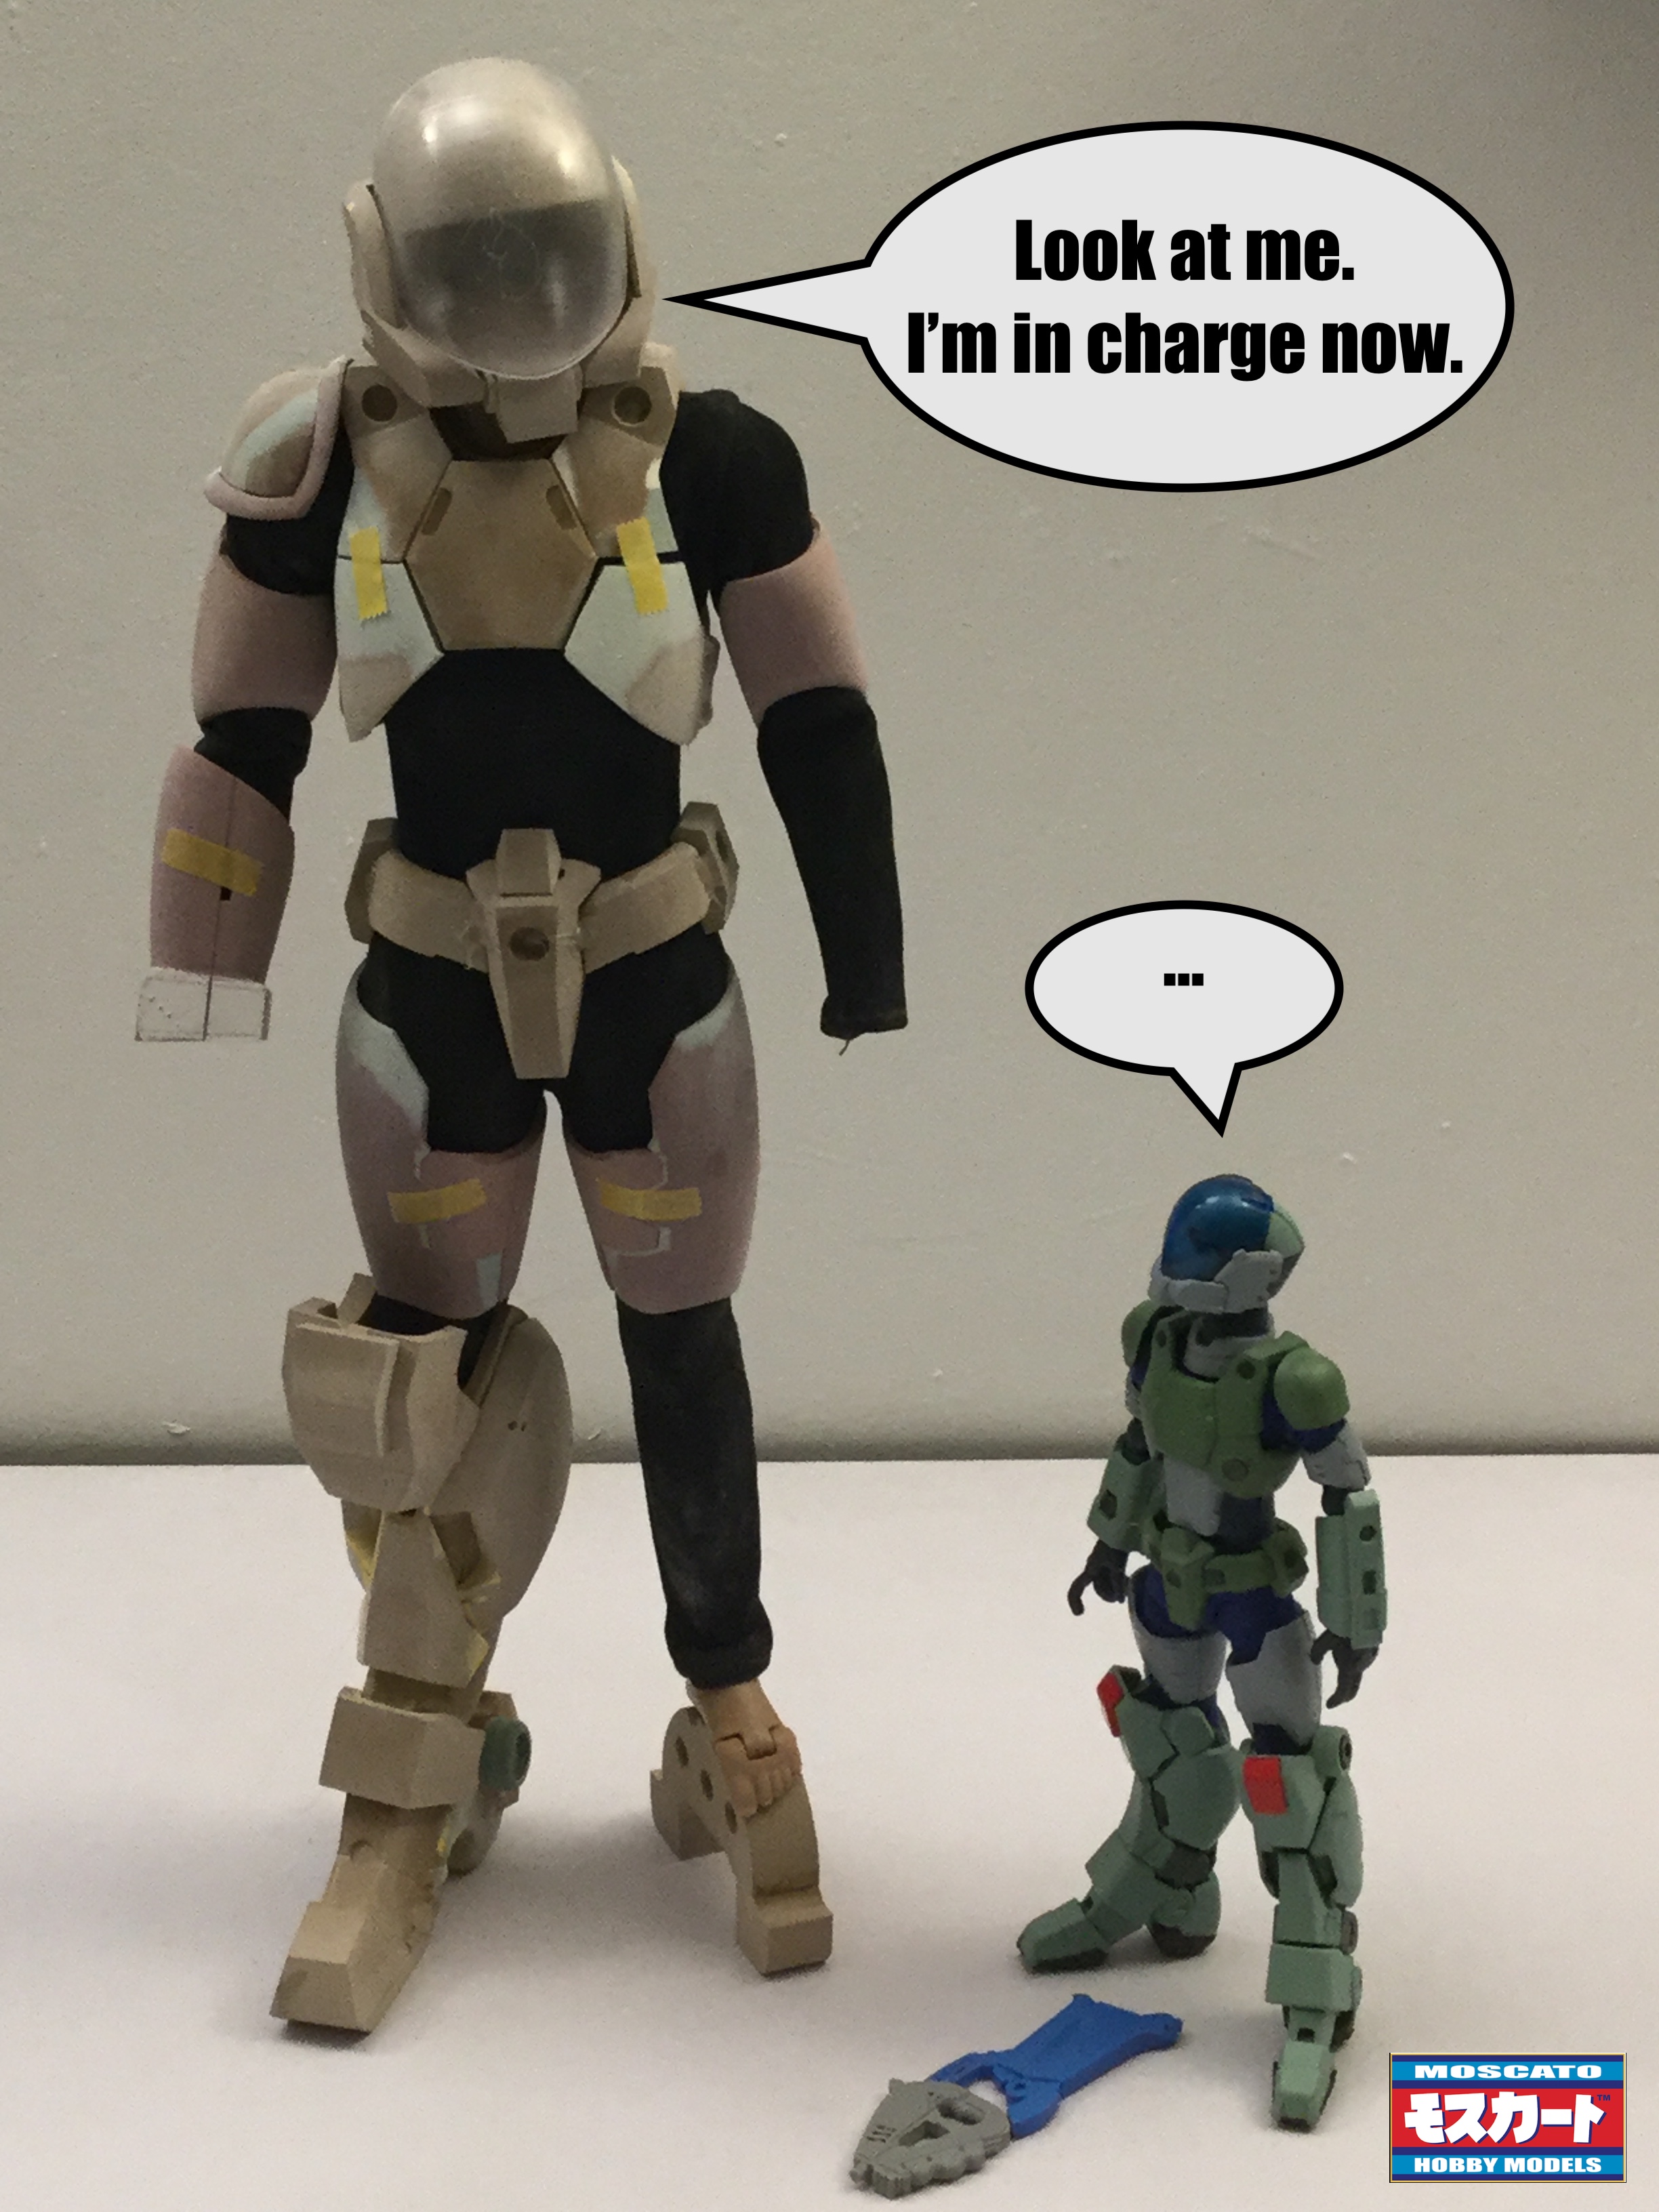
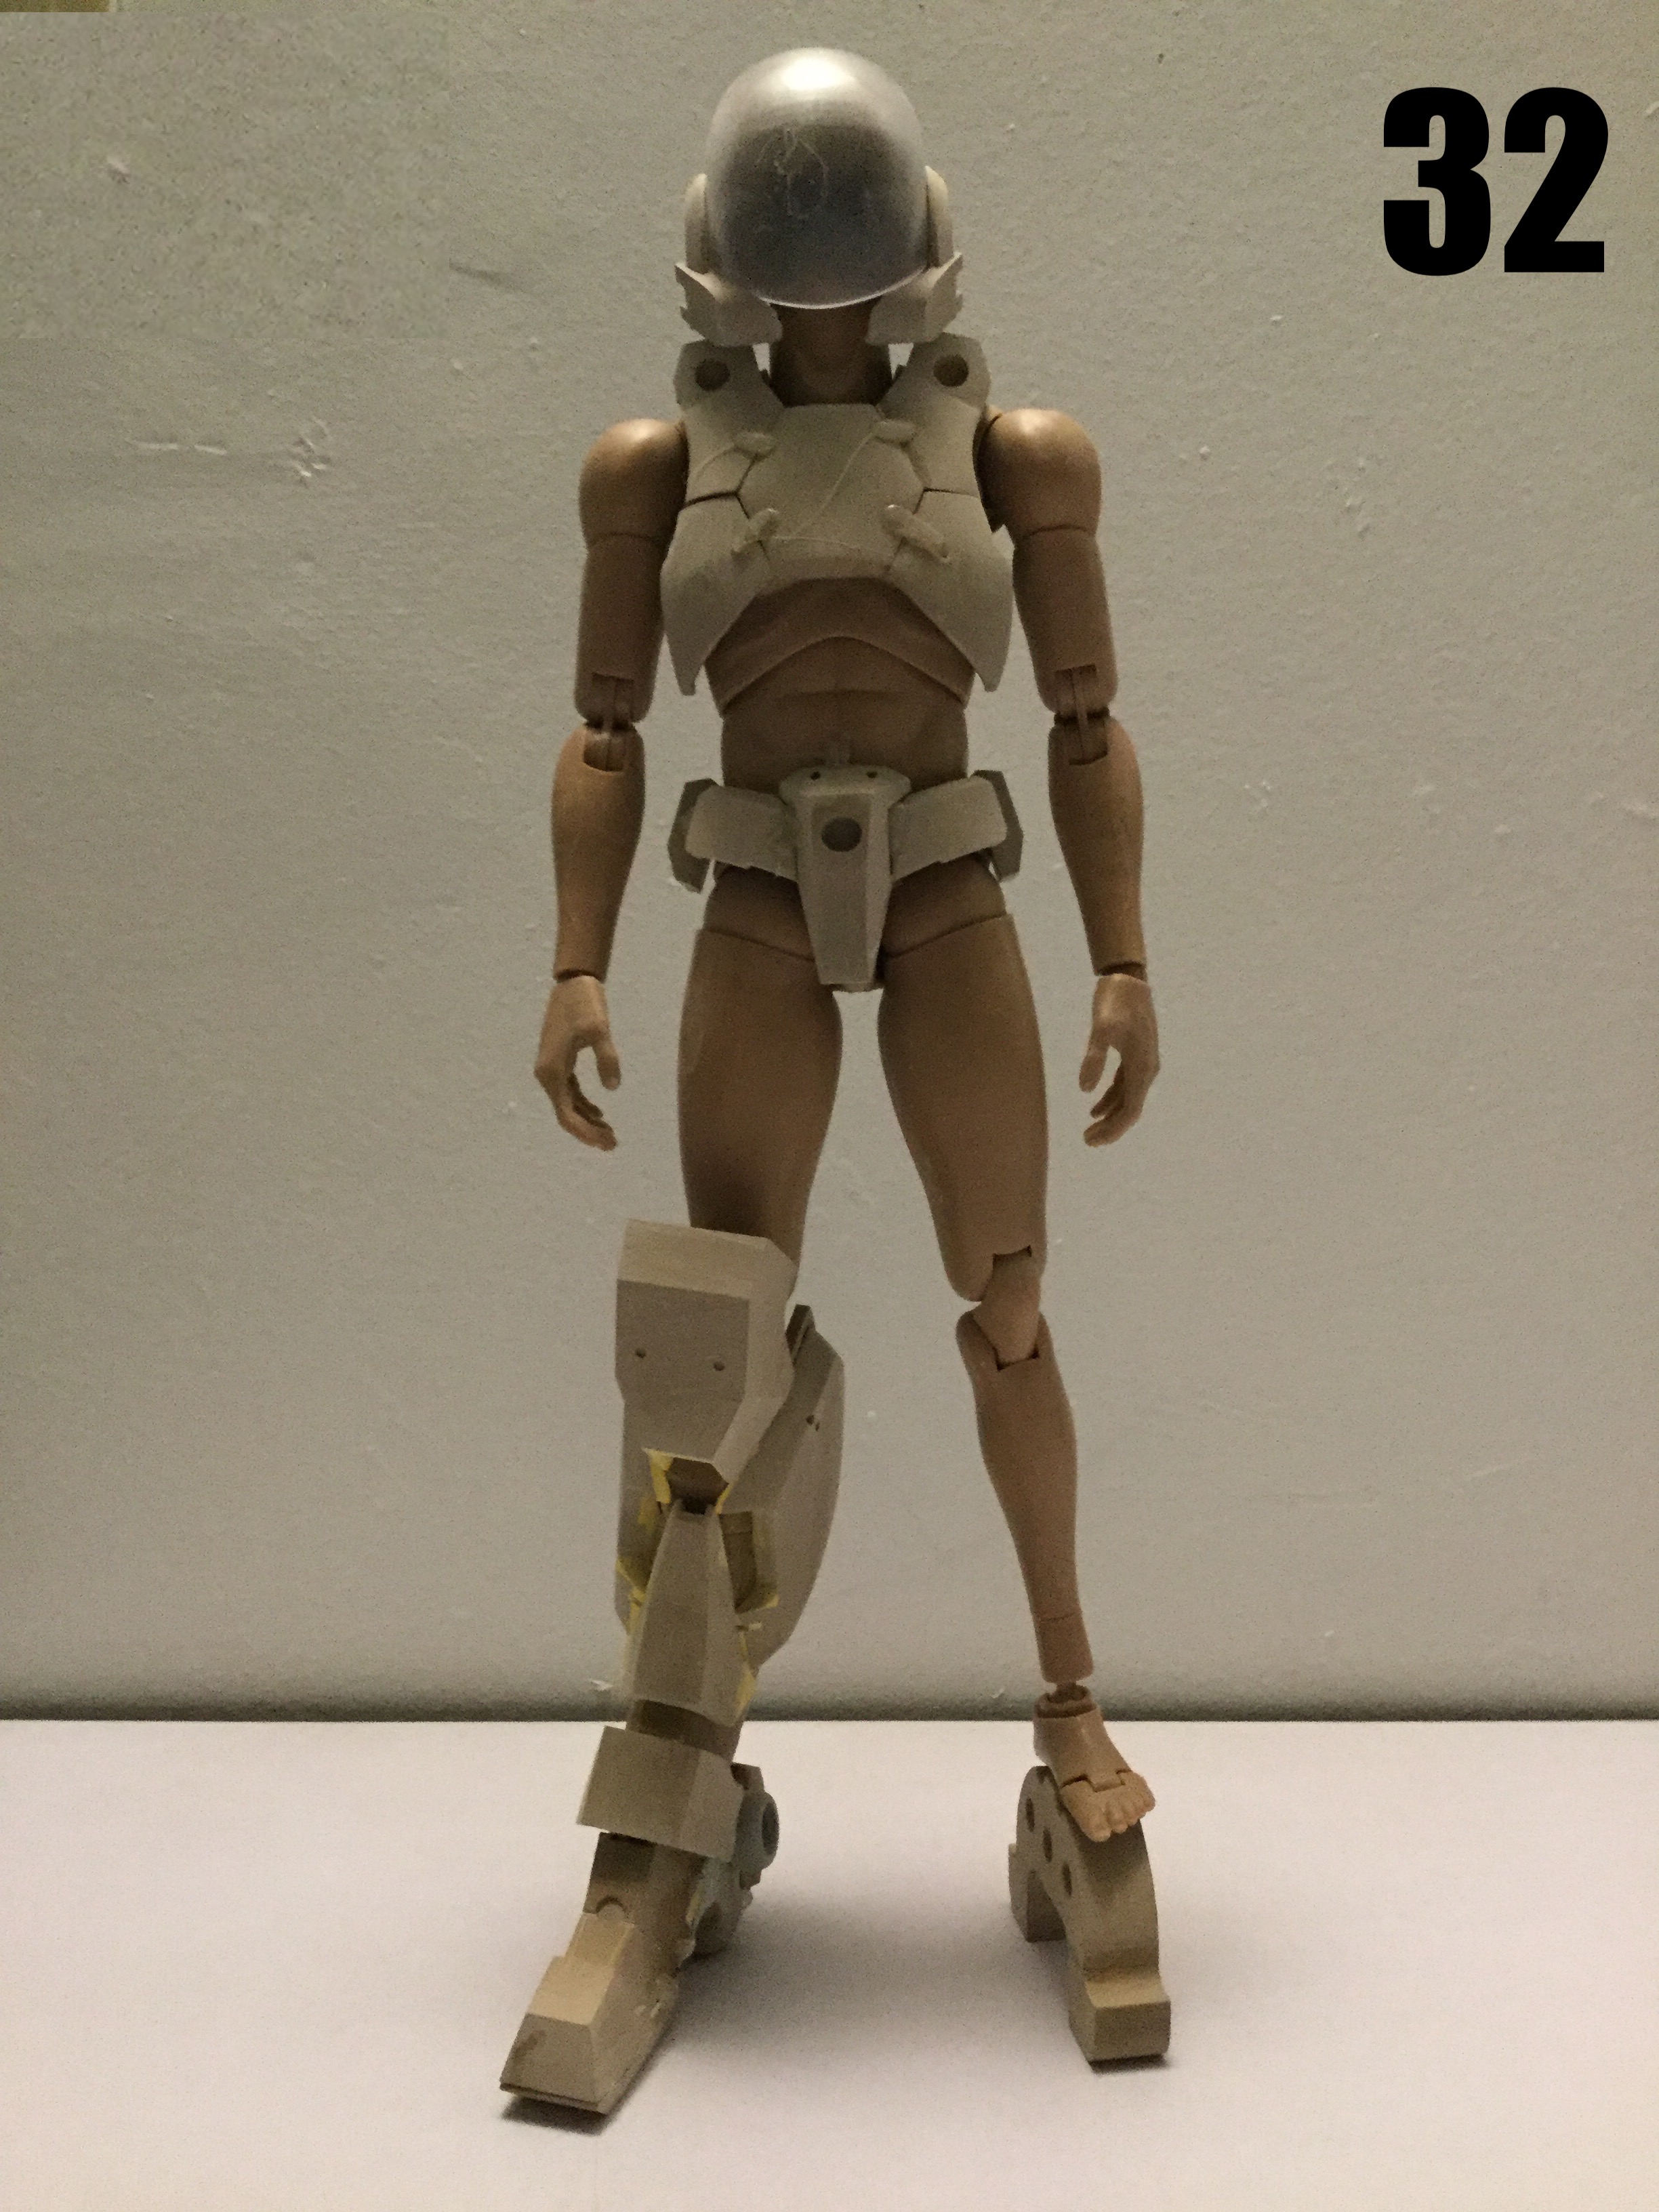
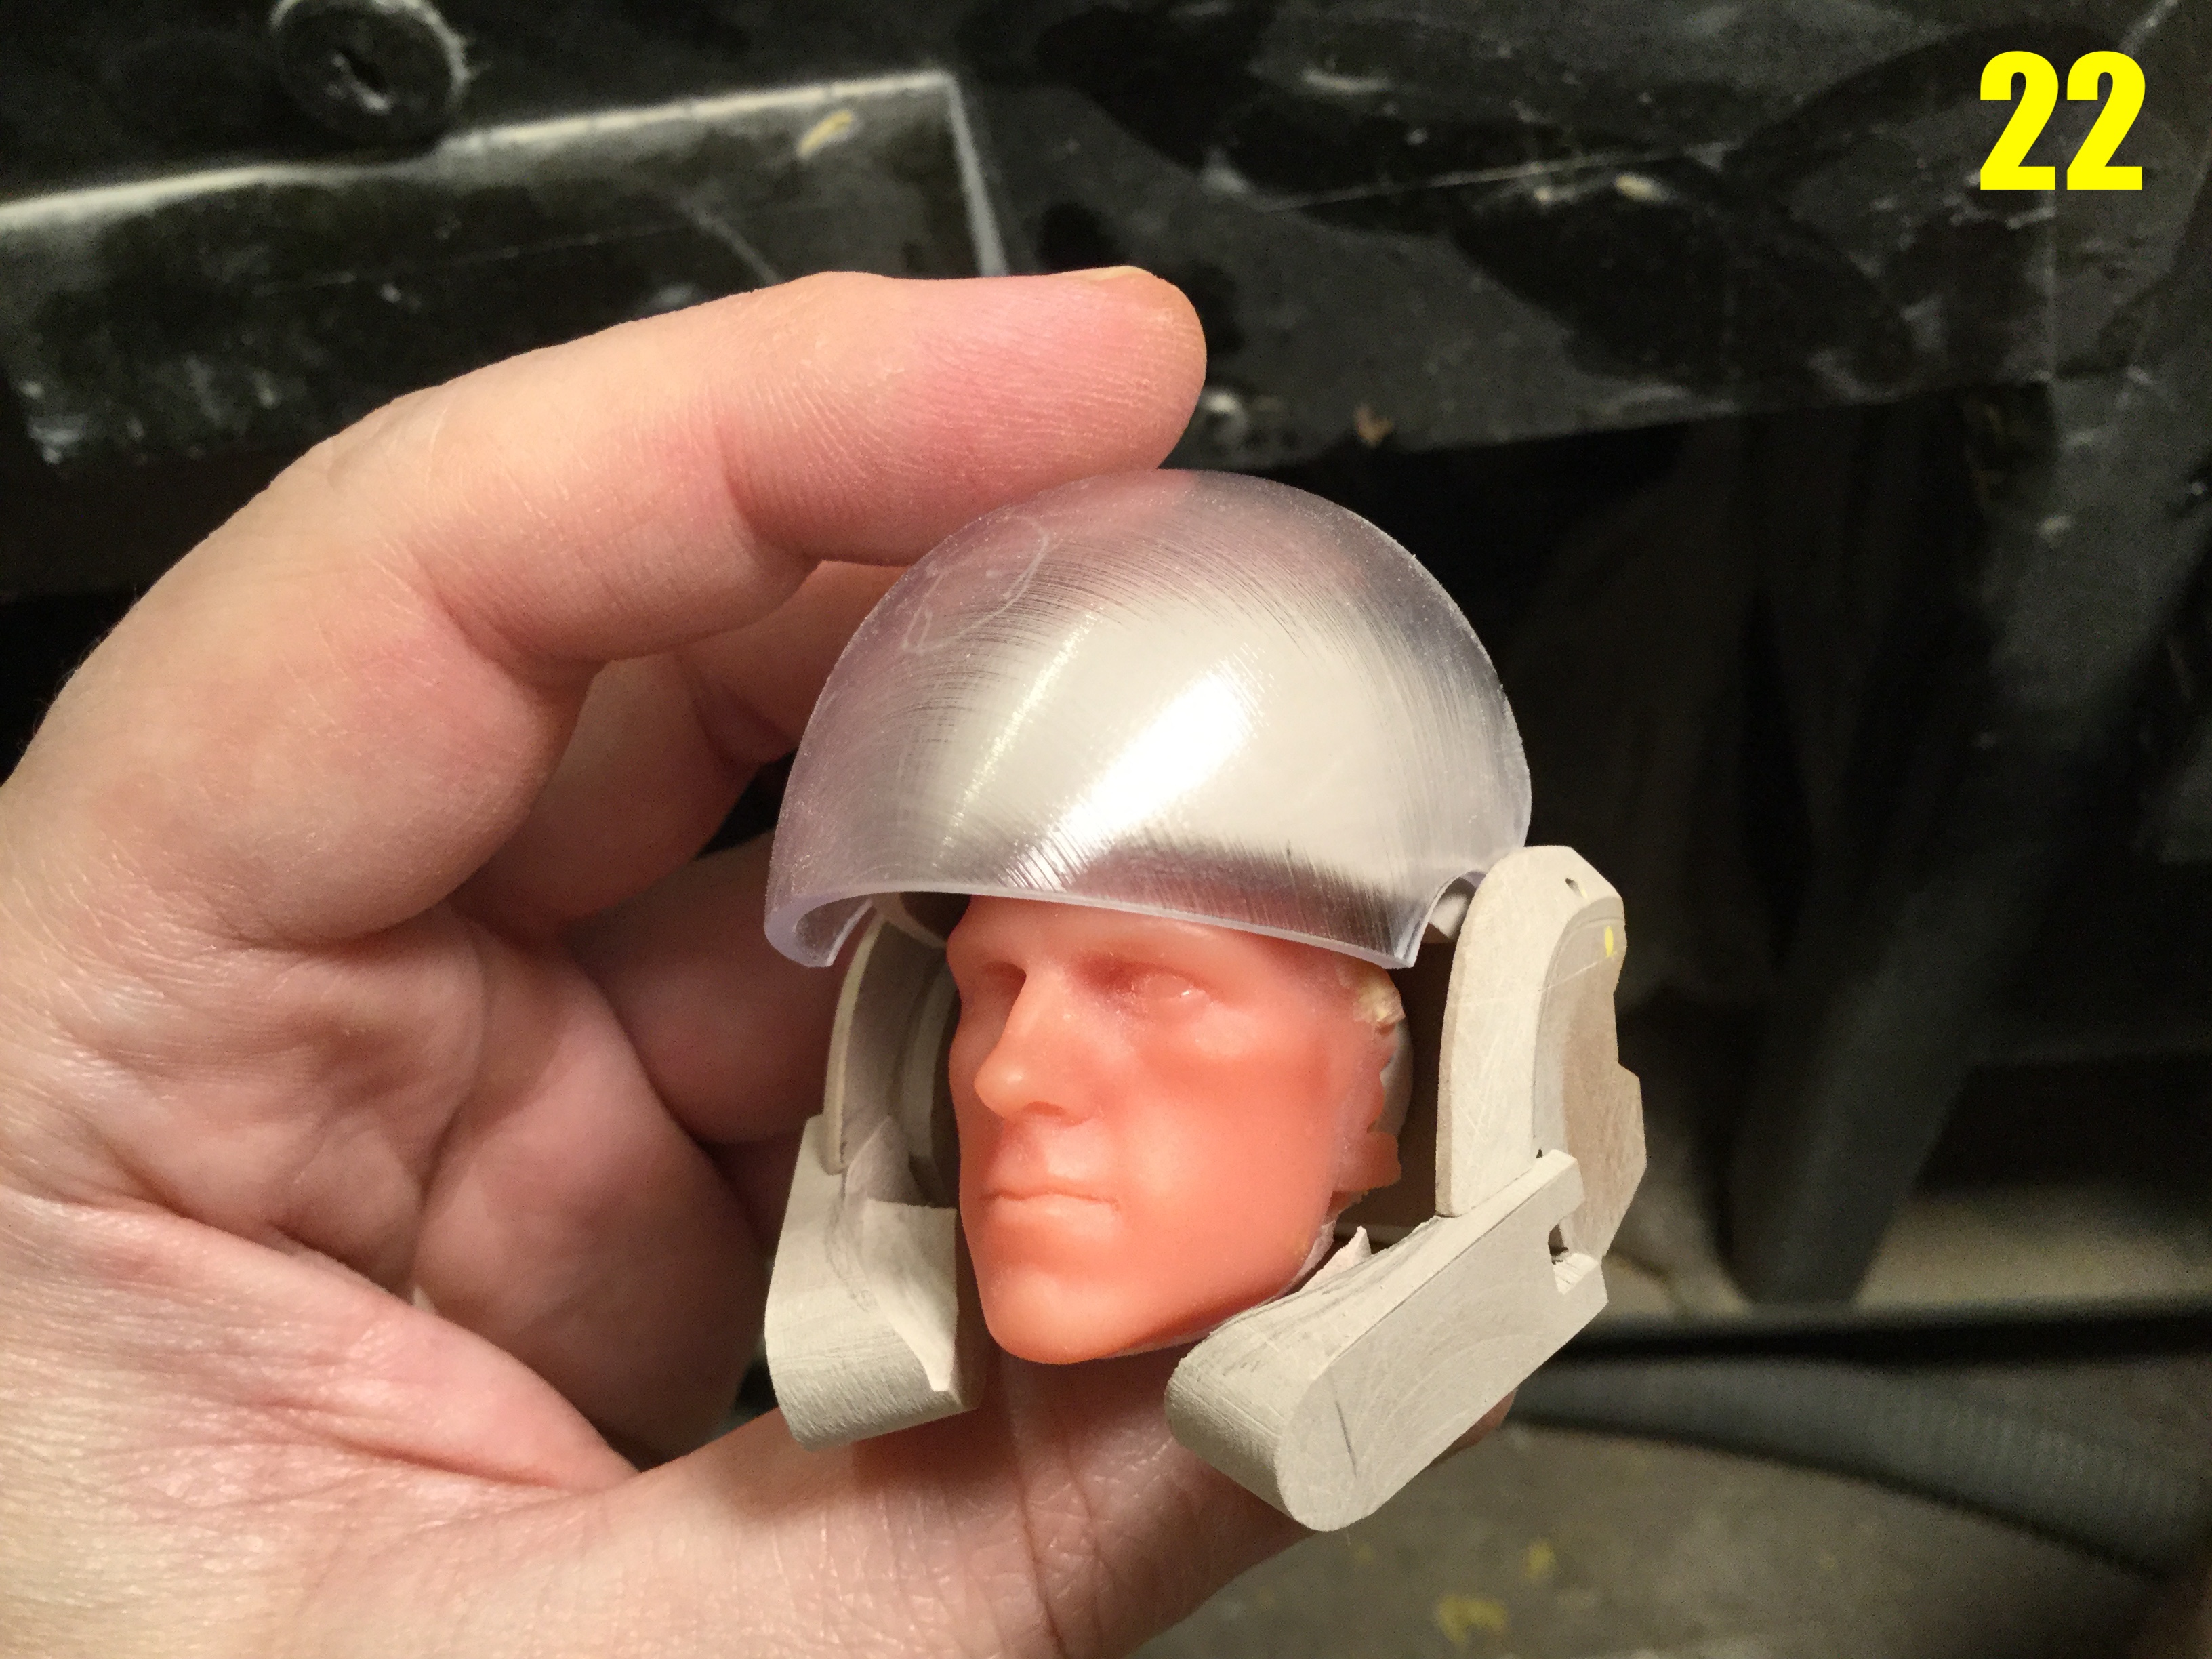
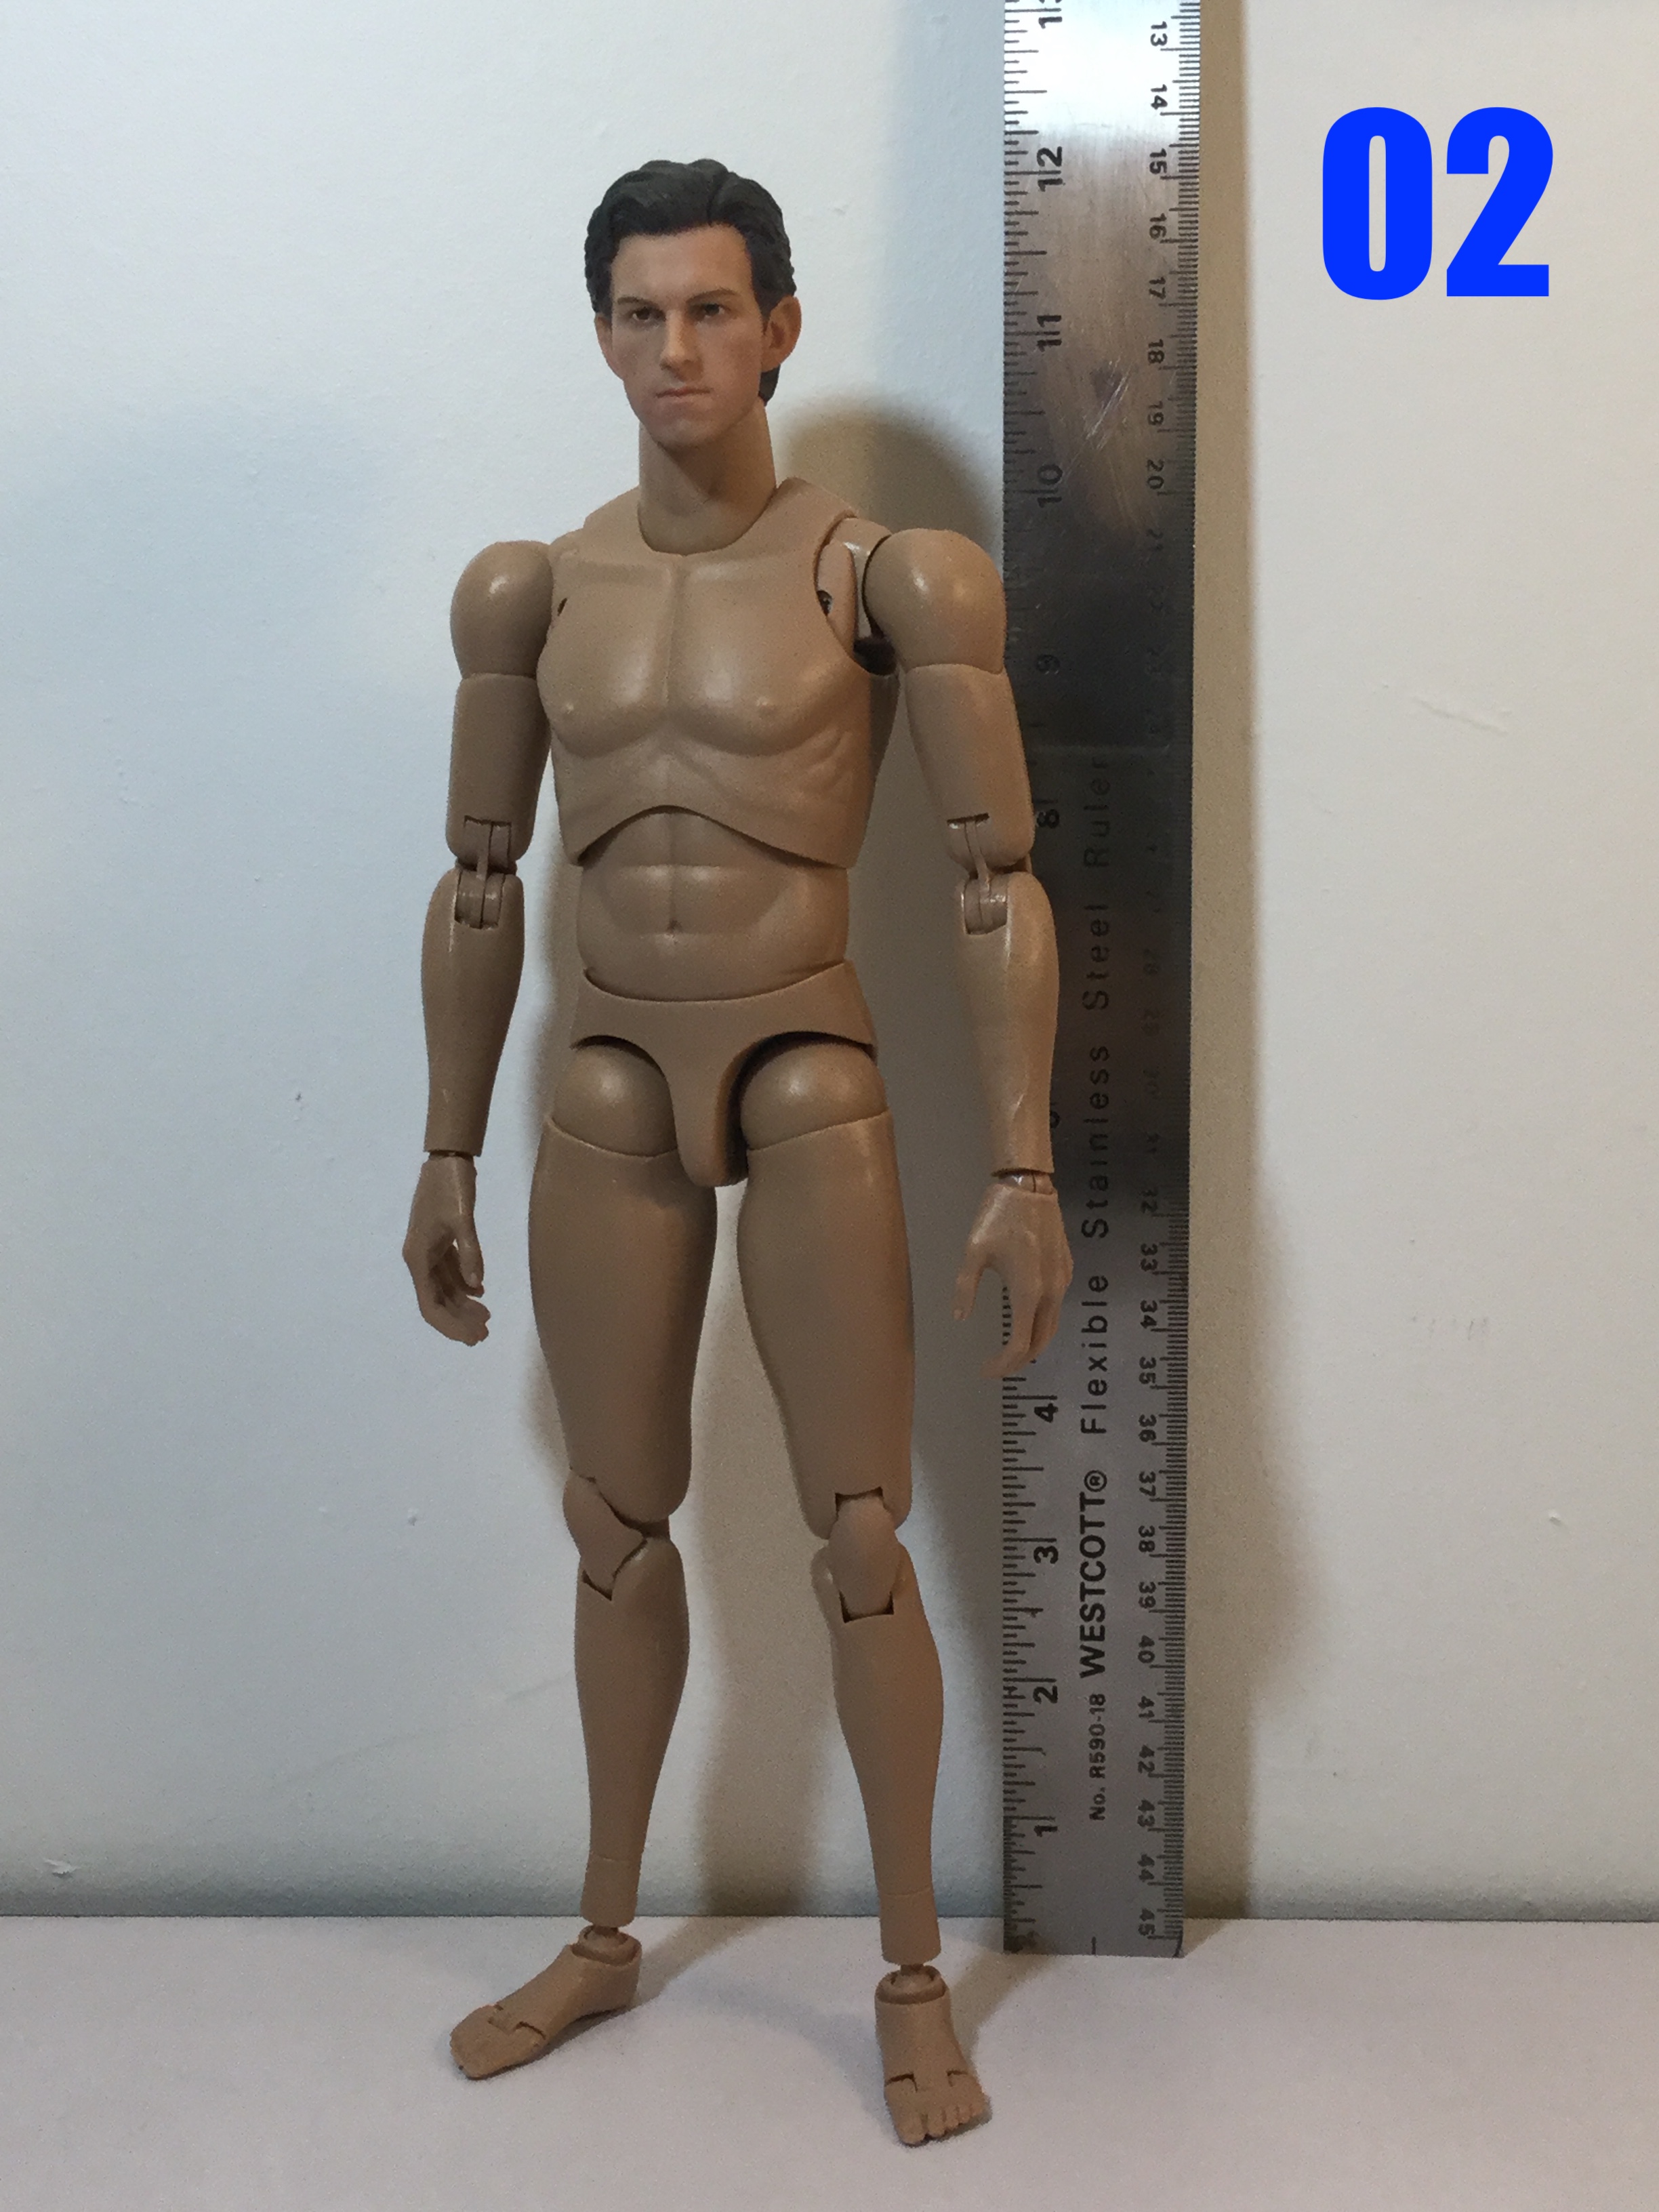
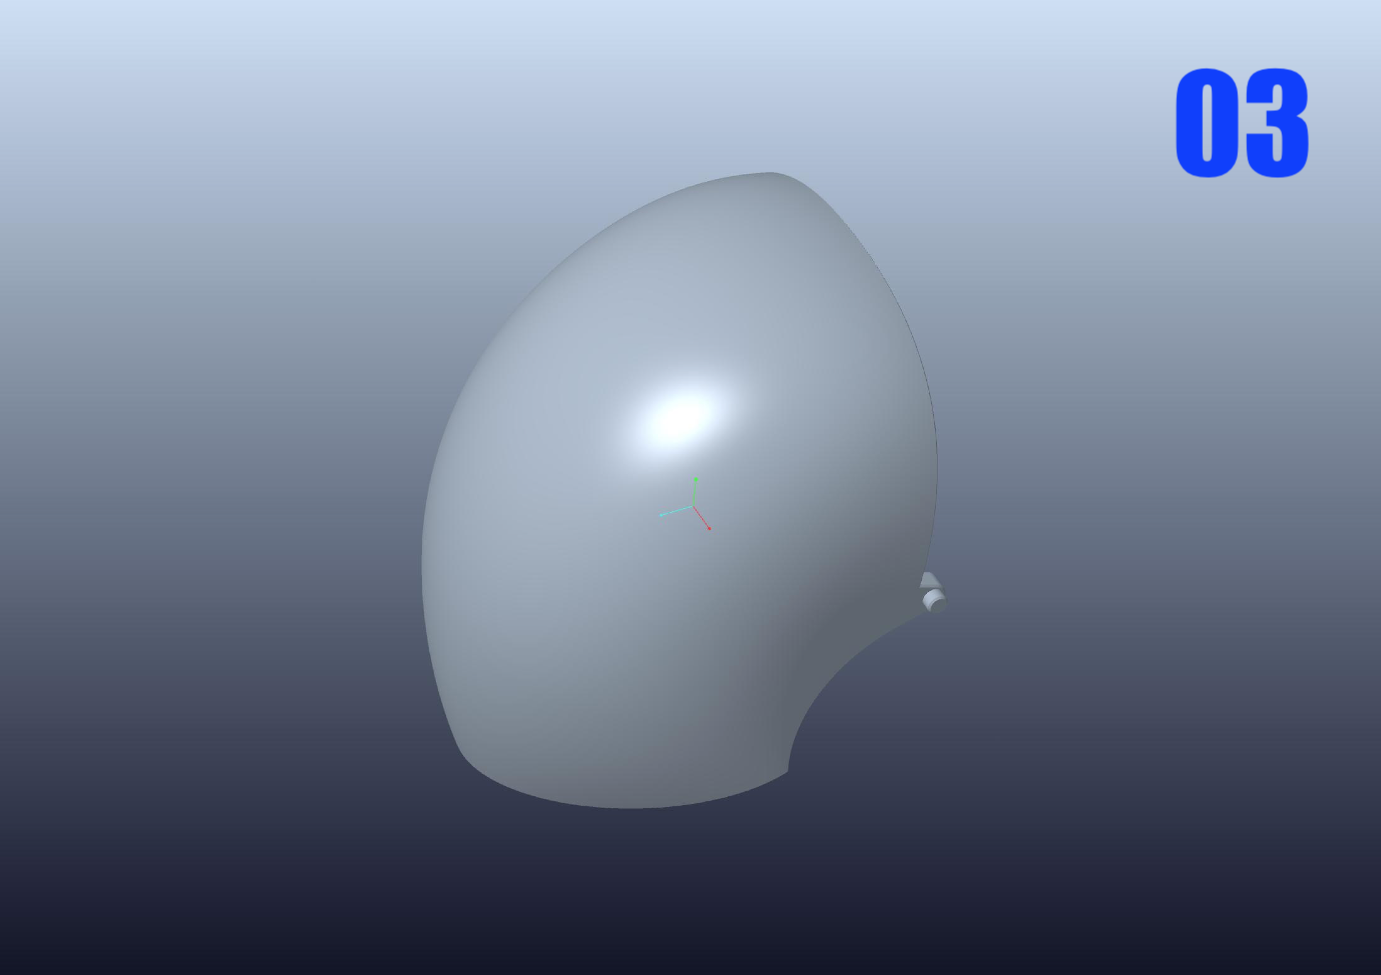
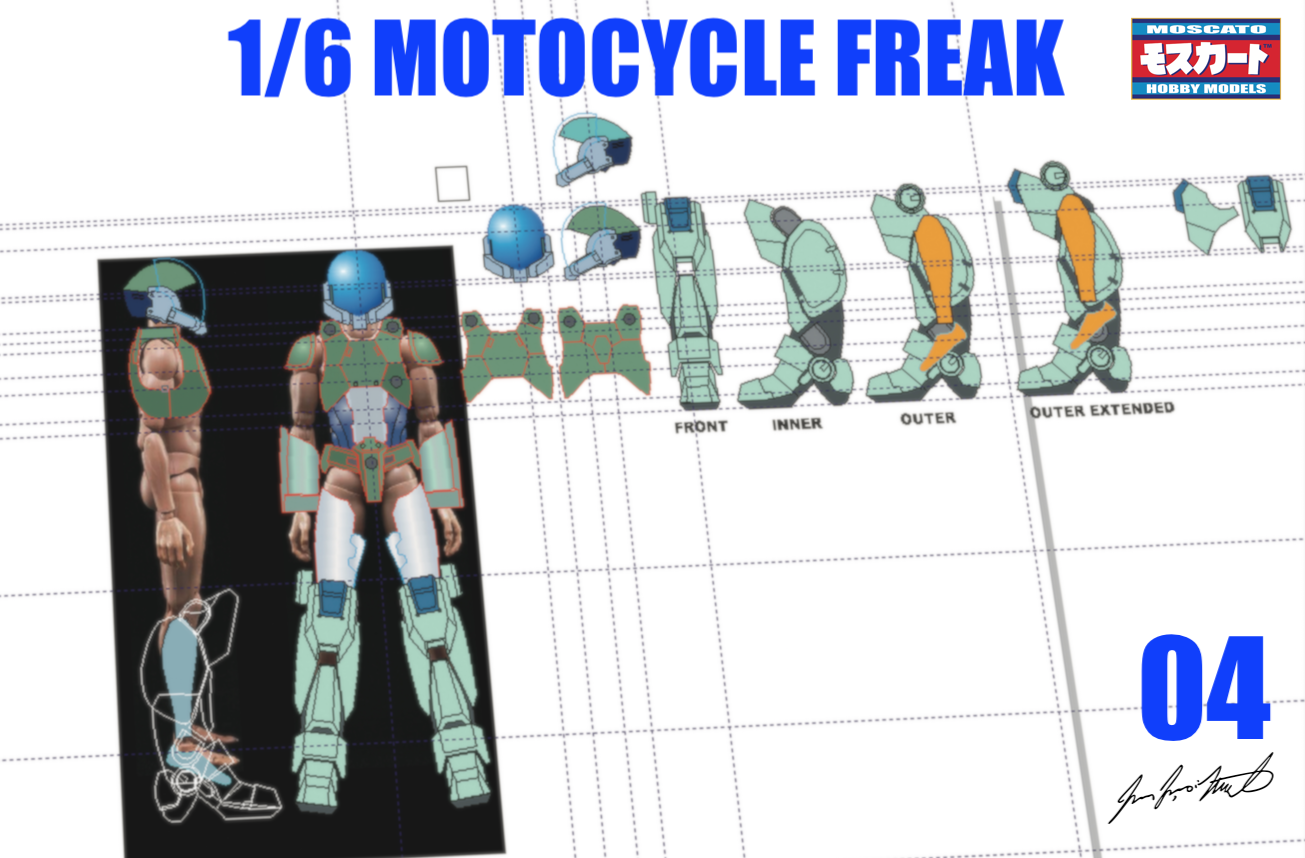
Captain's log: Friday, November 4th, 2022 I've been secretly churning out technical drawings for this new project for the last few days. I've decided to work directly from Aramaki-chan's MOSPEADA COMPLETE ART WORKS cover illustration, and as such I was confronted with quite a few discrepancies between it and the actual Sentinel 1/12 figure. While the latter is still very nice, it cuts quite a few corners on detail. As such, this 1/6 version will not be a purely upscaled figure, but a much more authentic and accurate three-dimensional rendering of that artwork. Also, because the 1/12 Sentinel figure took some, er—creative liberties with human anatomy, there will be some other, subtle, but very important alterations to this 1/6 model. Let's begin by looking at pic 01: on the left, the Sentinel figure with battle armor. On the right, a 1/12 Body-Kun figure. These are both in the same scale, with the major joints of both figures lining-up almost identically. If I scale-up the Body-Kun, it produces a man who would be roughly 171cm, so a bit on the short side. As best as I can discern, the pilot's feet do not extend all the way down into the armor boots, but more on that later. By contrast, let's look at pic 02. This is an MX02-A figure with an aftermarket head, which at full size would stand a hair over 177cm. It wasn't as easy as doubling the Sentinel figure dimensions, so I worked from scratch to create armor adapted specifically to this figure and its body proportions. As stated above, based on what I've gleaned by watching the original series, building the kits and examining the line-art, the pilot's feet only come down to roughly ankle level in the armored boot, with the boot foot being a prosthetic of sorts. Aside from giving the soldier an impressive appearance, I do believe this boot concept offers some notable advantages: the most obvious being protection from mines or other buried explosives. From a pure model standpoint, this will make the figure extremely tall, exceeding 13 inches (32cm) in height, and that's without the boot extension that happens in Armor mode! One of the first orders of business was designing a helmet and visor, with special emphasis on the latter. I want the visor to be as good and optically clear as possible, so I enlisted our very own Macrossworld member Sergio D (mechaninac) to help me with creating something that has just the right shape, and he does not disappoint! Pic 03 shows the almost complete rendering of the part, which will then be printed and cast in optically clear resin. Pic 04 shows the results of my drafting, which is still a work in progress. Here you can clearly see how the pilot's foot would fit inside the boot. While the MX02-A allows you to pop the feet off the figure for easier mounting, I still wanted to design something as realistically as possible, and take all those tolerances into consideration. Though there's still quite a bit of tweaking left to do, I might be able to start cutting as early as next Friday—stay tuned!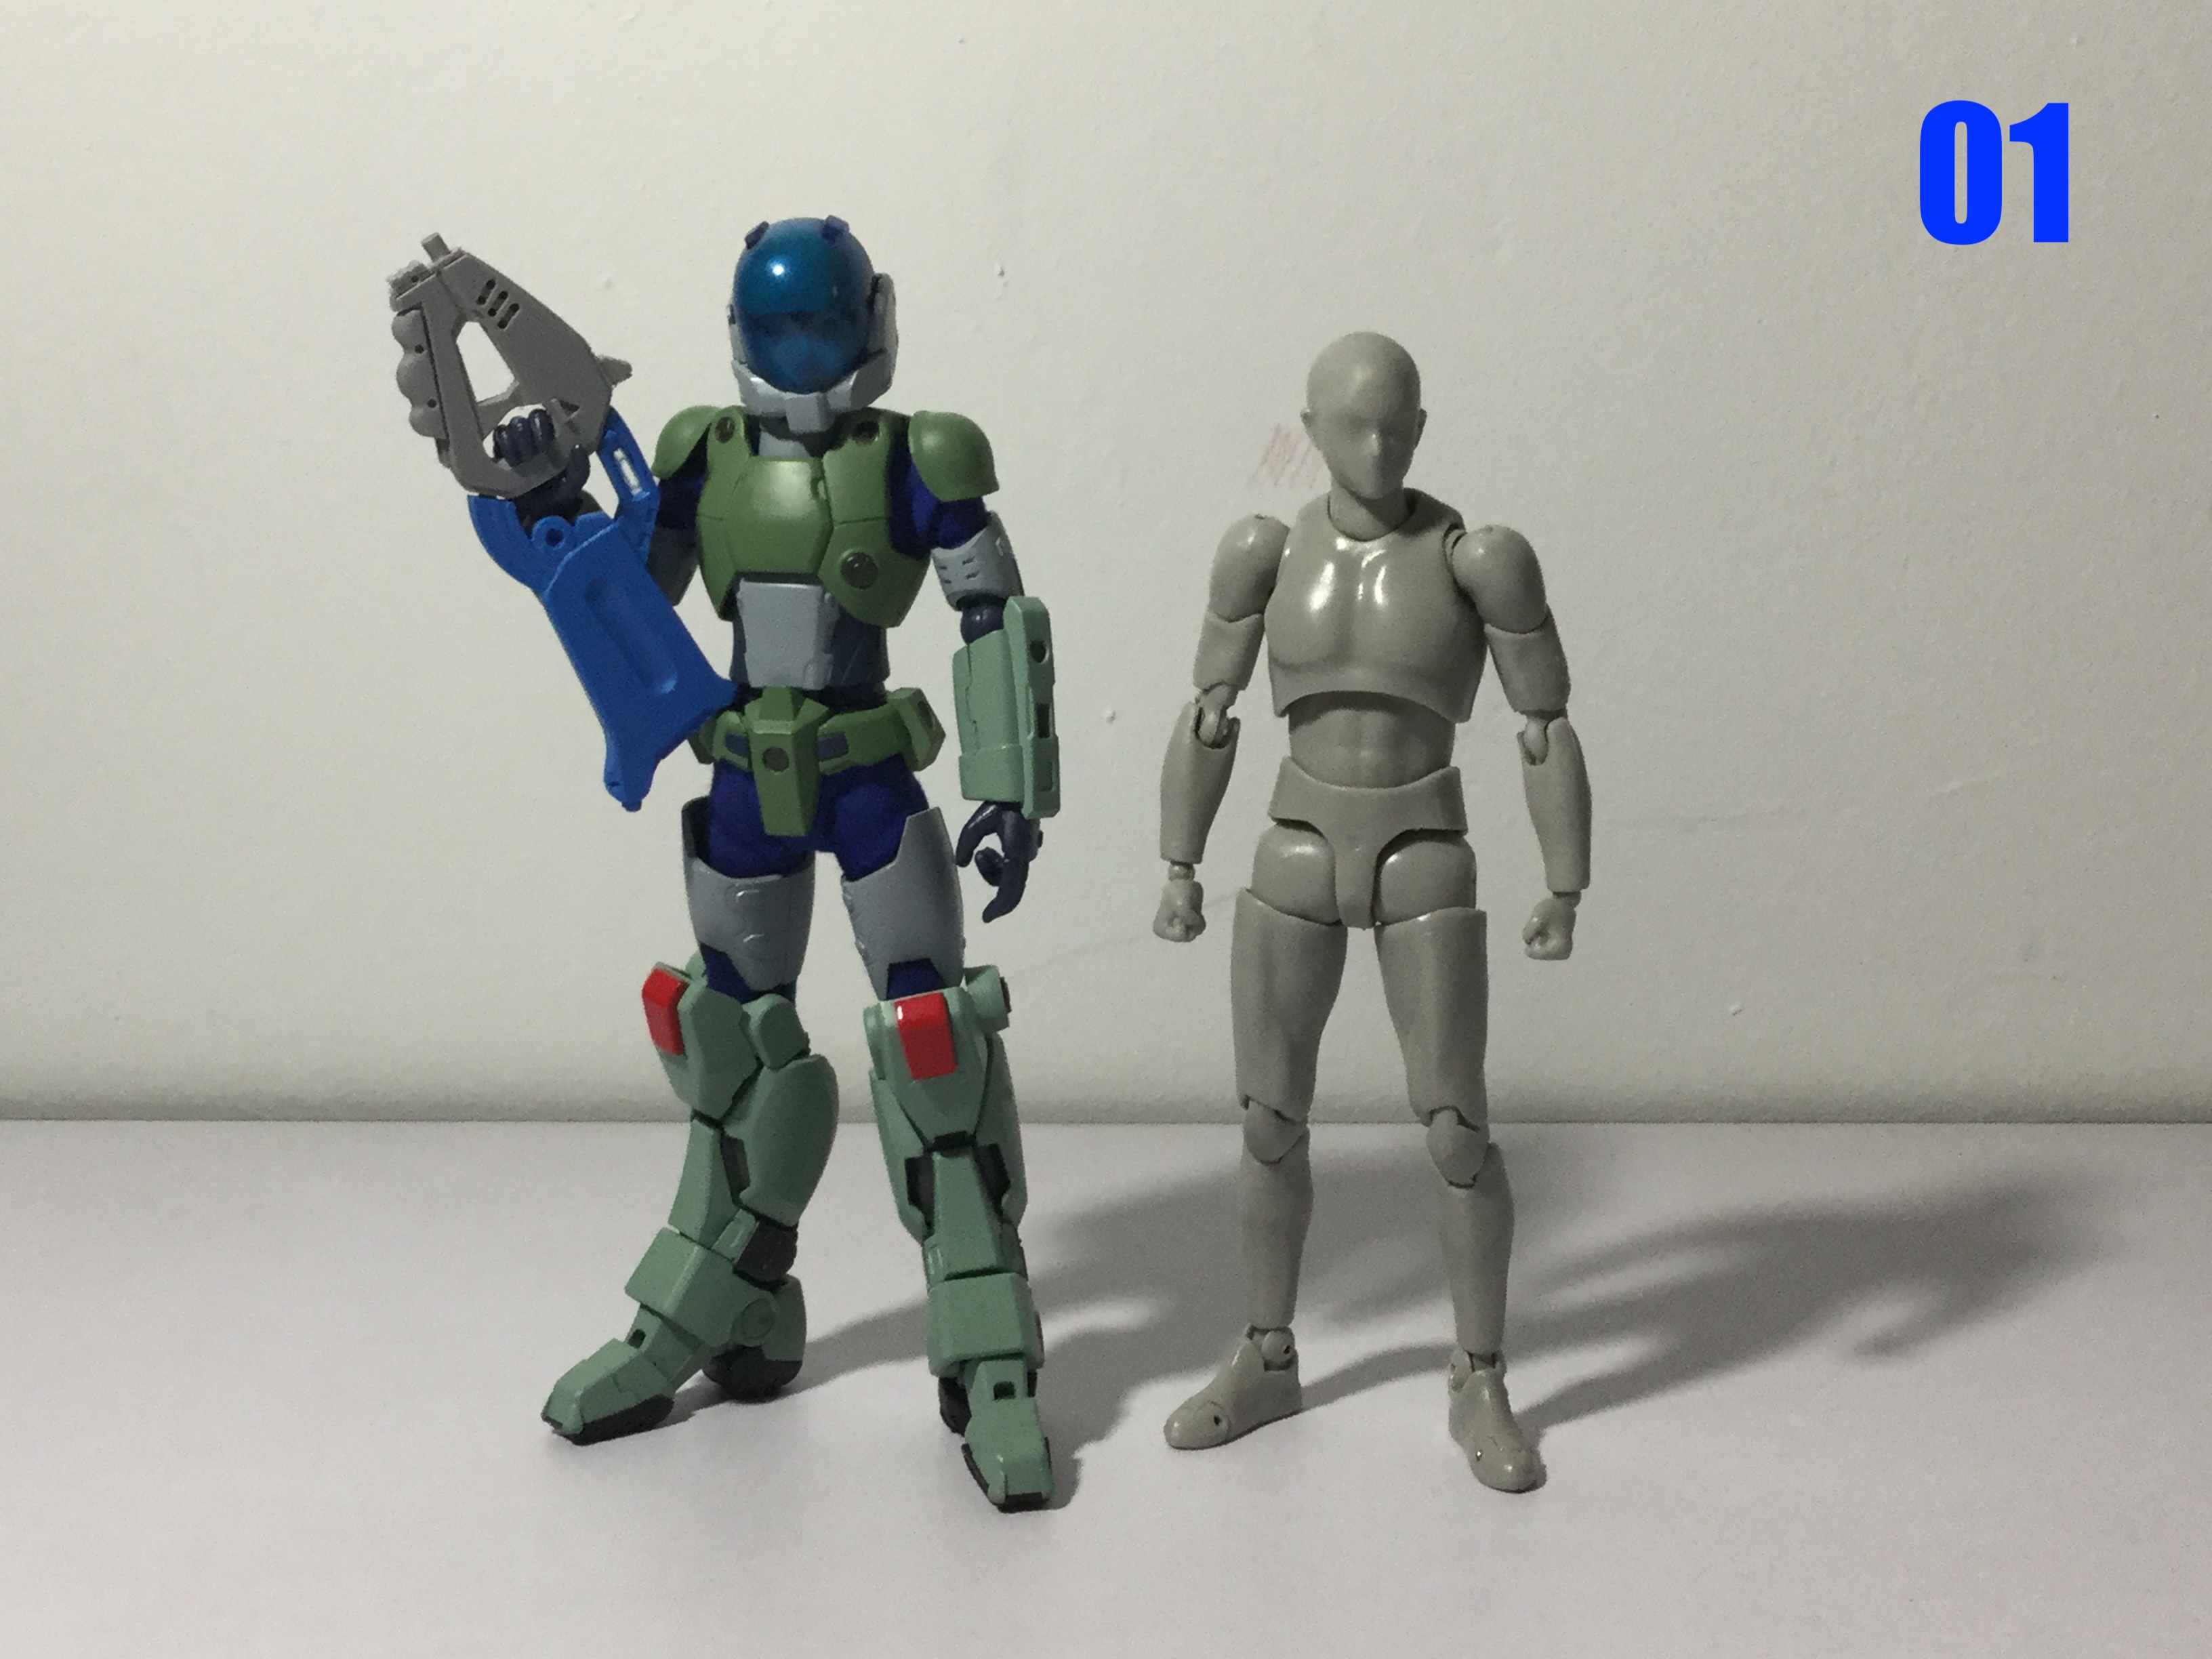
-
It can transform into a pile of parts if you hit something hard enough at speed! 😆
