Lolicon
-
Posts
7375 -
Joined
-
Last visited
Content Type
Profiles
Forums
Events
Gallery
Everything posted by Lolicon
-
That's looking fantastic. On the red parts, did you just paint it straight on or did you need to use a silver or other undercoat? @Maxtype Hey if you can handle a MG Gundam kit, you can handle a Frontier kit. They're about the same in terms of complexity. The real trick is lining everything up in fighter mode without totally scratching up the paint and decals... the VF-27 fighter mode nearly broke me...
-
Let's see some progress pics! I want to see your completed work before I start on my 25G. Here, I'll post all the progress I've made on mine since February.
-

Bandai 1/72 Scale Macross Frontier Model Kit Thread Ver.3
Lolicon replied to azrael's topic in Hall Of The Super Topics
I wish Bandai would've released fixed mode fighter and battroid kits of their Frontier line. Cheaper to produce and easier to build. What could be better? No one who wants to preserve their work is really going to transform them. -
Bandai 1/72 Scale Macross Frontier Model Kit Thread Ver.3
Lolicon replied to azrael's topic in Hall Of The Super Topics
It's because Bandai hates you. Unless you plan on painting it, it's better to go with the DX anyway, because the model looks crappy if stuck together "right out of the box". I would've picked up the DX if it didn't have such a weak paint app. Now I'm busy working on a second model so I can keep one in fighter mode. -
Bandai 1/72 Scale Macross Frontier Model Kit Thread Ver.3
Lolicon replied to azrael's topic in Hall Of The Super Topics
Yeah that's the kicker. The 27 uses all new parts for the crotch/hip bar. The nose does look pretty long in the battroid pics, though I like it in fighter mode. The big air intake covers and upper legs are what mar the fighter looks. In fighter profile, it's a fat bulge in an otherwise sleek profile. Bandai probably could've tooled it a bit more to get the proportions better... but that costs money! If there's a task that must be done, Don't turn your tail and run, Don't pout, don't sob, Just do a half-assed job! If... you... cut every corner It is really not so bad, Everybody does it, Even mom and dad. If nobody sees it, Then nobody gets mad, It's the American Bandai way! If... you... cut every corner, You'll have more time for play pay, It's the American Bandai waaaaay!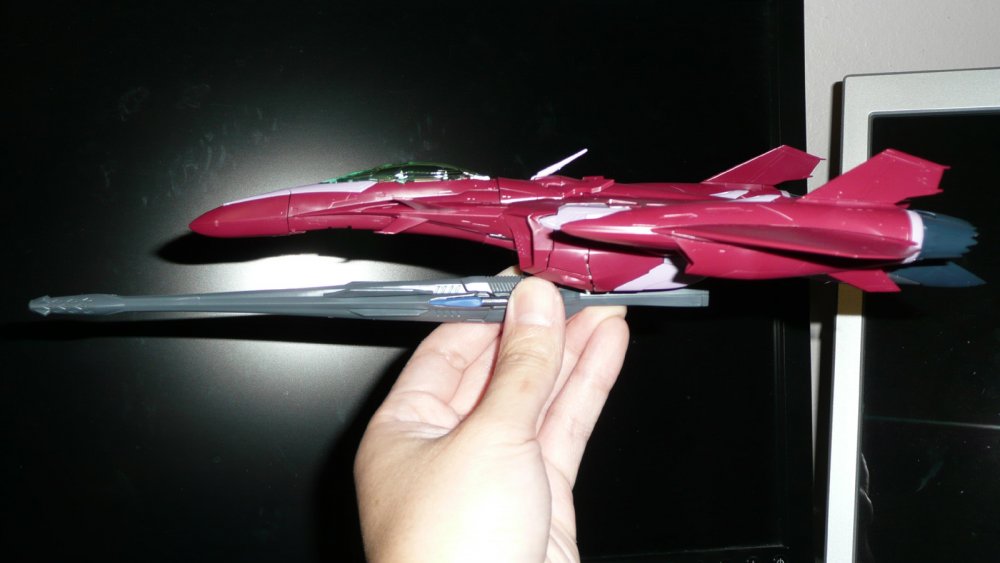
-
Bandai 1/72 Scale Macross Frontier Model Kit Thread Ver.3
Lolicon replied to azrael's topic in Hall Of The Super Topics
VF-27 has a virtually identical transformation to the VF-25, so Bandai recycled quite a few parts from the 25 design, including the lower hip placement, which looks pretty low. The air intake covers are problematic too (the actual air intakes remain on the leg; why would anyone separate the air intakes from the engines?) because they look kinda elongated on the model, but shortening them would also mean having to make the upper legs thinner, and shrink or squash the air intake fans to accomodate it. I'm unsure how else one could get around it. I haven't bothered doing a freeze frame comparison to see just how big they're supposed to be in the anime.
-
Official Bandai 1/60 Scale DX Toy Thread Ver.6
Lolicon replied to Duke Togo's topic in Hall Of The Super Topics
Yamato releases a toy with manufacturing flaws? They suck! I'll never buy a Yamato again! Bandai releases a toy with manufacturing flaws? It's perfect! Yamato could learn a thing or two from them! Damn shame about the weak paint app and chipping problems on what is otherwise a great looking toy. It still boggles me that that's an issue in this day and age. The 27's price approaches the high end Yamato items, and though I don't have exact production figures, I can't really see the price per unit skyrocketing past Yamato's stuff if they switched to a flat finish plastic instead and got rid of the mold release or whatever that residue is. -
Official Bandai 1/60 Scale DX Toy Thread Ver.6
Lolicon replied to Duke Togo's topic in Hall Of The Super Topics
I'm sure it does cost more. I meant does it cost so much more that it's prohibitively expensive? I don't know what the costs of these molds are. Would adding the texture raise the cost per unit more than 1000 yen? 2000 yen? And so on. -
Official Bandai 1/60 Scale DX Toy Thread Ver.6
Lolicon replied to Duke Togo's topic in Hall Of The Super Topics
Why doesn't Bandai just use flat/matte plastic like Yamato? I can't imagine it costing that much more, and would probably solve most paint chipping issues. -
Official Bandai 1/60 Scale DX Toy Thread Ver.6
Lolicon replied to Duke Togo's topic in Hall Of The Super Topics
Doh! Oh well no biggie waiting for restock. -
Official Bandai 1/60 Scale DX Toy Thread Ver.6
Lolicon replied to Duke Togo's topic in Hall Of The Super Topics
So I just had a most unpleasant dream. I ordered the DX 27 from HLJ (and I hardly buy anything from HLJ, so we know this has got to be a dream) and naturally, since I have a job, I wasn't home to sign for the EMS slip. So I go to pick it up at the post office the next morning. When I get the package, I find that it's already opened, all the packing material is gone, and the 27 has been taken out of its box.... in pieces, with large sections of paint scraped off every part. It looked like it had tied to the bumper of a pickup truck and dragged for a few miles before being mauled by a tiger. I asked the postal employee wtf happened to it, and she just shrugs and walks off. That wasn't the worst part of the dream. The worst part, the part that disturbed me so much that I woke up, was the thought that I'd have to contact HLJ customer service for help. So anyway, I think I'll order from Amiami... -
Official Bandai 1/60 Scale DX Toy Thread Ver.6
Lolicon replied to Duke Togo's topic in Hall Of The Super Topics
Damn that's nice. Paint and printing seem pretty solid/not prone to chipping? -
Official Bandai 1/60 Scale DX Toy Thread Ver.6
Lolicon replied to Duke Togo's topic in Hall Of The Super Topics
Wasn't there a VF-27 fold booster protoype/mockup shown way back in antiquity? I vaguely remember people complaining about the pink color. -
Official Bandai 1/60 Scale DX Toy Thread Ver.6
Lolicon replied to Duke Togo's topic in Hall Of The Super Topics
Not sure why you keep bringing the model kit up, seeing as I have not once compared the DX 27 to it, favorably or not. The model kit isn't perfect either, as it uses a few cheats for its transformation. All I have done is remarked that the DX 27's legs (or rather hips) are mounted as high as the 25, and the thighs are higher than the anime, both of which are true. If that's too much for you to comprehend, then that's your problem, not mine. All the long-winded rants in the world will not change that. I haven't bothered making any remarks as to whether this is good or bad, as the fighter mode is what I like best about this DX. Some people get too uptight when people don't agree with them and simply will not tolerate dissent. -
Official Bandai 1/60 Scale DX Toy Thread Ver.6
Lolicon replied to Duke Togo's topic in Hall Of The Super Topics
Thanks Graham! VF-27 is looking better and better. If the positive reviews continue, I might just cave and pick one up. My first DX... besides the Quarter. -
Official Bandai 1/60 Scale DX Toy Thread Ver.6
Lolicon replied to Duke Togo's topic in Hall Of The Super Topics
You're the one assigning value judgments, not me. I'm simply making observations pending further reviews by others. Since you've now admitted that the legs are high, saying it's only "a little high" doesn't really contradict what I said, does it? And the size of the crotch and the height of the legs are quite noticeable to those of us who actually notice details. So now you're resorting to calling anyone with an eye for detail "anal retentive"? Nice. What's next? Anyone who doesn't like Bandai's DX toy line is a communist? Posting a CG pic that looks different from the DX and presenting it as irrefutable proof that the DX is somehow more anime accurate than other incarnations of the VF-27 is wishful thinking at best, an outright lie at worst. -
Official Bandai 1/60 Scale DX Toy Thread Ver.6
Lolicon replied to Duke Togo's topic in Hall Of The Super Topics
Yay more pics. What does "Better than the anime setup" mean? -
Official Bandai 1/60 Scale DX Toy Thread Ver.6
Lolicon replied to Duke Togo's topic in Hall Of The Super Topics
The DX still sits noticeably higher than that CG pic and what's seen in the anime. Not to mention the gigantic crotch. If it sits higher then the 25, then it's not the same. Yet you say it's supposed to be the same. Make up your mind. -
Official Bandai 1/60 Scale DX Toy Thread Ver.6
Lolicon replied to Duke Togo's topic in Hall Of The Super Topics
The tailfins are supposed to slant inwards on the VF-27. The leg placement looks to be the same as the VF-25. It just doesn't look as bad because the air intake covers separate from the actual air intakes themselves, which I see are not molded into the top of the leg at all. -
Official Bandai 1/60 Scale DX Toy Thread Ver.6
Lolicon replied to Duke Togo's topic in Hall Of The Super Topics
On the fence if I should get one or not. Waiting on more reviews, especially regarding durability, QC issues, paint app (does the paint chip if you look at it the wrong way?), etc. Being told it's just like the VF-25 is pretty damning. -
Gloss White or Flat White for VF-1-Which Do you Prefer?
Lolicon replied to modcineaste's topic in Model kits
Far be it for me to contradict the many pro modelers on these boards, though I think a lot of it boils down to personal preference. For military vehicles I generally think flat paints give a more realistic appearance. But for anime mecha I like using a semi-gloss finish, seeing as the subject material is animated and doesn't actually exist in the real world. I guess for me it's just a compromise between the animated world and the real world? That doesn't mean the models I've seen here with flat finishes don't look great! -
Bandai 1/72 Scale Macross Frontier Model Kit Thread Ver.3
Lolicon replied to azrael's topic in Hall Of The Super Topics
Holy ****! HLJ having a sale on a bunch of Macross items, including the Frontier model kits. Time to finally round out the SMS squad! http://www.hlj.com/hljlist2/?DisplayMode=i...0Special%20Sale -
Bandai 1/72 Scale Macross Frontier Model Kit Thread Ver.3
Lolicon replied to azrael's topic in Hall Of The Super Topics
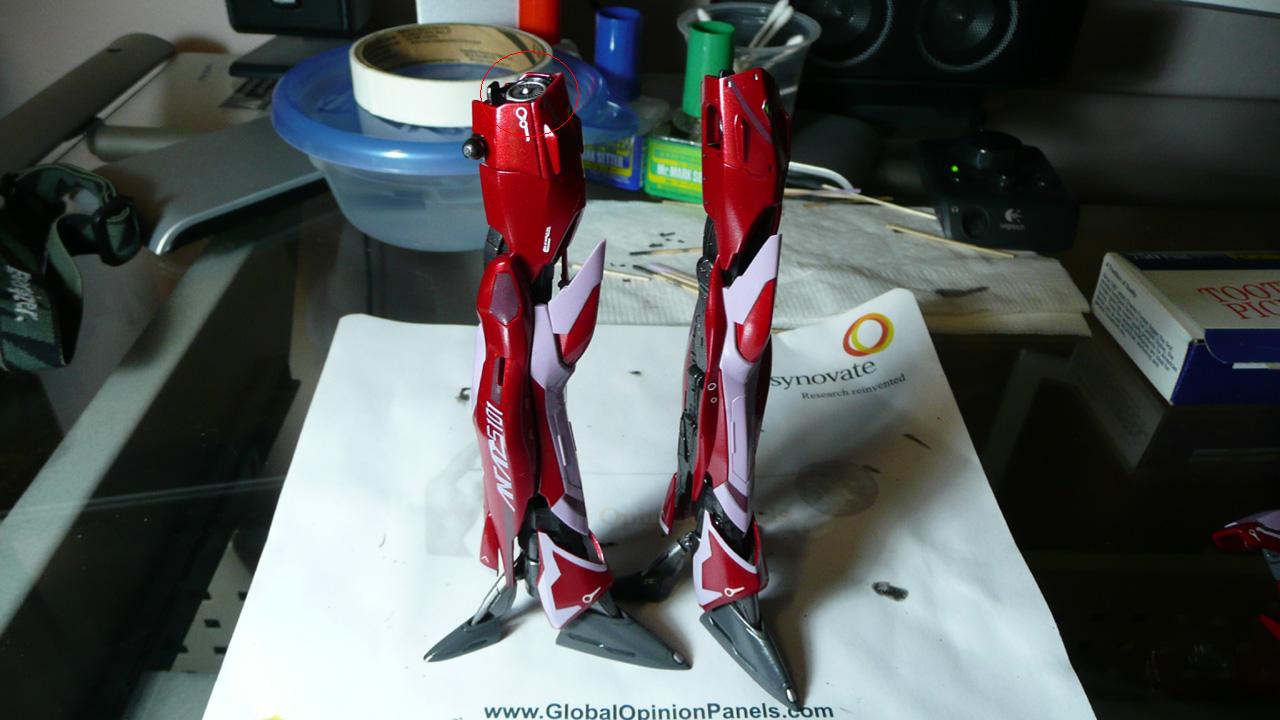
Off the top of my head... Most of the light pink parts are unpainted. The face consists of one big clear green piece that you have to paint across the middle. I lack that psychotic level of skill, so I just painted the foil sticker instead. It's sealed in so no worries about it peeling off. The jaw area has no real guidelines with which to follow; you just kinda have to follow the curvature when painting. I tried masking it but brush painting gets under the tape anyway. So I just gently scraped off excess using a toothpick till I got the look I wanted. Yay acrylics! Similar principle was used on the crystals at the ends of the rifle barrel. Filling in panel recesses is a great way to cover up painting mistakes! Scope lens was painted using a Gundam marker. The temples are trimmed decals, though I wish I had just painted it because they were damaged during assembly. -
Bandai 1/72 Scale Macross Frontier Model Kit Thread Ver.3
Lolicon replied to azrael's topic in Hall Of The Super Topics
Ahhh good to know for future projects. -
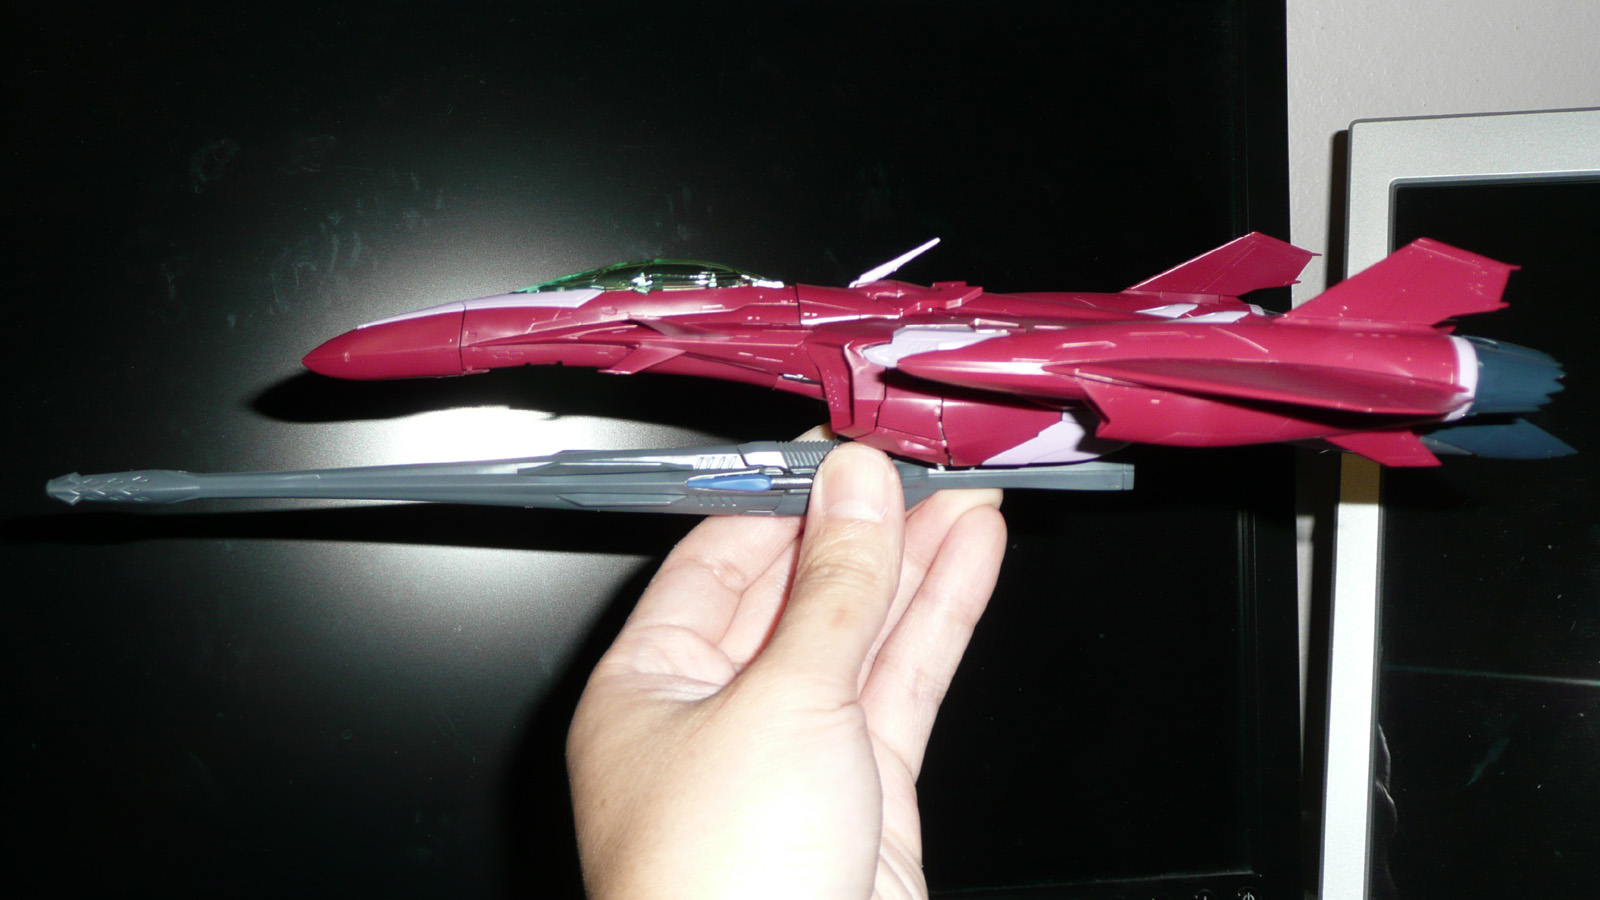
Bandai 1/72 Scale Macross Frontier Model Kit Thread Ver.3
Lolicon replied to azrael's topic in Hall Of The Super Topics
It's Tamiya mica red. I didn't even know it was metallic till after I tested it; I thought it was just dark red. Got lucky. Hey I have you to thank for this, for pointing out the glaring inaccuracies on the face and showing that a gloss finish actually looks nice on Brera's unit, seeing as how I'm having a severe shortage of semi-gloss coat atm.