

Goodman Models
-
Posts
364 -
Joined
-
Last visited
Content Type
Profiles
Forums
Events
Gallery
Everything posted by Goodman Models
-
00100lrPORTRAIT_00100_BURST20200630194228816_COVER.jpg
Goodman Models posted a gallery image in Macross Models
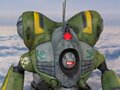
From the album: 1/72 Queadluun Rau Gallery
© Goodman Models
-
00100lrPORTRAIT_00100_BURST20200630194202845_COVER
Goodman Models posted a gallery image in Macross Models
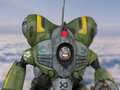
From the album: 1/72 Queadluun Rau Gallery
© Goodman Models
-
00100lrPORTRAIT_00100_BURST20200630192205265_COVER.jpg
Goodman Models posted a gallery image in Macross Models
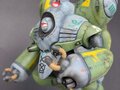
From the album: 1/72 Queadluun Rau Gallery
© Goodman Models
-
00100lrPORTRAIT_00100_BURST20200630192152889_COVER.jpg
Goodman Models posted a gallery image in Macross Models
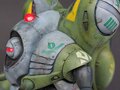
From the album: 1/72 Queadluun Rau Gallery
© Goodman Models
-
00100lrPORTRAIT_00100_BURST20200630192152889_COVER.jpg
Goodman Models posted a gallery image in Macross Models
From the album: 1/72 Queadluun Rau Gallery
-
00100lrPORTRAIT_00100_BURST20200630192152889_COVER.jpg
Goodman Models posted a gallery image in Macross Models
From the album: 1/72 Queadluun Rau Gallery
-
Hi All, I hope somene can point out what I'm doing wrong. I can't seem to upload any photos to my thread - they are approx. 300kb each. The max says about 97MB. I always get the -200 error. what should I be doing in order to get my build log up? Thanks, Anthony
-
Moscato Hobby Models 1/72 Quedluun Rau Build
Goodman Models replied to Goodman Models's topic in The Workshop!
cool, no problem. I plan to build the thread here once I figure out how to process all the picks. It's nearly finished and I took pics along the whole process. -
Hi All, Here's my build up of the fabulous 1/72 Quedluun Rau kit from Moscato Hobby Models. There are some video updates at Goodman Models FB. I need a quick way to shrink all the pics. Any suggestions for batch processing them? Anthony GoodmanModels.com
-
hey Gang, Is there anyway to get this printed out as a high quality poster? Cheers, Anthony
-
nice work!
-
ok, cool thanks Bolt.
-
Hi all, I'm looking for a quality image of the Meltrandi emblem for my Quealuun Rau project. Anyone know what it looks like? I don't think it would be the same as the Zentran one. Thanks! Anthony GoodmanModels.com
-
What is this "Excelsus" plane? it looks to have slightly different proportions compared to the VF-4.
-
excellent job!
-
I was thinking of the one on pg. 79 of the Vf04 master file. I suppose I may just scratch build it!
-
Anyone heard of a release of the gunpod for the lightning? I was dissappointed not to see it included in the original release for $60 odd dollars.
-
Looking good Mike. Did you make any other progress on it?
-
Brilliant work NZEOD!
-
Need Help With VF-1 Valkyrie Identification Please
Goodman Models replied to ChristopherB's topic in Model kits
that is a very interesting scheme...I wonder if it's from one of the Master File books? -
Awesome 3D Printed Snap Tite SDF-1 1:1200 scale
Goodman Models replied to Knight26's topic in Model kits
ya, this is amazing! I haven't explored this avenue yet, but I've been waiting for the TV SDF-1! -
yea! looking forward to these!
-
Awesome NZEOD!
-
Found it! boy that was well - hidden without macross in the title!
-
I can't seem to find the listing for the Master file? Could you post the link please?
