
NZEOD
-
Posts
1960 -
Joined
-
Last visited
Content Type
Profiles
Forums
Events
Gallery
Everything posted by NZEOD
-
The Studio Forge ones ... just wait until me and one other on here get ours. The guy making them has been AWOL for quite a few months so there is a chance you cant actually get these pilots for now. On the Airframe size issue... the VF-0 series is bigger. Think of the VF-1 as a refined version of the VF-0 Prototypes and optimized for Blue Water Carrier Operations where space is a premium. Later VF series were for Space borne ops. F-14s were behemoths compared to the F/A-18s which have replaced them. Big isnt always better. THink of the F-14 as a typical American Muscle car. Huge engine, lots of wasted space just because they can. The F/A-18 is more akin to a Nissan Skyline or hypo Mitsi Evo. Smaller, more compact, more functional, little wasted space yet still as powerful as all hell.
-
Adafruit sell them at 5.95USD per strip and shes still making money some how! A single LED if what will be buried inside each engine. The LEDs are blindingly bright and run 4K colour. Same RGB colour coding as you'd use in Photoshop. Red 0-255, Green 0-255, Blue 0-255. SO pretty much ANY colour can be recreated. Will post a quick video tonight of the Deck light sequence in green then flashing red. The programming takes time to get your head round but when the penny drops and you get it working, damn its satisfying!
-
Nothing like coming into the office on a Monday morning and finding a stack of packages waiting for you. Thunderseeker, 1D and a few Weapon/pilot packs just arrived. Friday I got an Adafruit Fadecandy Adruino board and some Neopixel strips to play with for the Carrier Deck direction lighting. Hopefully in the next day of two my servos and brass bits arrive for the Jet Blast Deflector raising mechanism. Big thanks to nicegear.co.nz for the overnight service on the electronics.
-
Yeah I have a few of these now and had to collect up 8 Weapons kits to fit everything out with pilots. You get 2 in each kit but I have a few two seaters so I used these up quick smart!
-
Tomahawk/Warhammer - I was an oldschool Battletech player before joining the bombsquad and ditching Uni. Valkyrie II due to its lines. No matter what form, Fighter - Gerwalk - Battroid, its just dead sexy!
-
With Radome??? I NEED one Just found the VF-29 and Valkyrie II OVA on that E2046 site so thats another 2 ticked off once ordered. Nothing on the VF17 series though
-
Have a Focus on order and not sure if I want the F14 in the display
-
Only after the Fighter models for now as they are all under perspex displays on the wall down the hallway liked pinned butterflies. Yeah I have the Hi Man misslies versions, the Super and Superstrike versions and some low viz versions of the ones I listed. Thanks for the VF-0A/S with Ghost suggestion. Just found 38 of them and bought one. Yeah they are expensive! $100USD. Are the Bandai YF-25 and VF-27 worth it? I thought they were toys not scale kits? Was there ever a VF-17 or 171?
-
My hallway progect uses 1/72 Fighter mode kits I have the following so far VF-0A VF-0B VF-0C VF-0D VF-0S VF-1A VF-1D VF-1J VF-1S VE-1 Elintseeker VE-1 Ostrich VF-11B VE-11 Thunderseeker VF-11 Nothung II VF-19A YF-19 YF-21 RVF-25 VF-25F VF-25G VF-25S SV-51 Nora Is there anything else out there to fill the voids in a "Development Timeline" display? Garage kit or Commercial ones.
-
I lost 10 years worth of all my Graphics from side projects Slydesigns Race Signs and AsylumArt when my PCs and IT gear was stolen out of a storage lockup off Base while I was on deployment overseas. Gutting.
-
Oh man why WHY WHHHY do you do this too me!!?? I was wondering how a Control Surfaces Check could be modeled too...
-
you donate them to a bunch of kids at the GW stores who are learning to paint their own stuff. I have it in my Will that if I am KIA on mission all my weapons and gear gets sold off away from my family as I doubt they'd want the reminders, my bikes go to my kids, the other hobby stuff goes to worthy people the family find that are doing it hard themselves. Preferably kids. I regularly give away all my 40K Heresy novels to anyone that wants to read them. I guess it depends on why you buy things in the first place. For me its because I want them. So once I have enjoyed them I pass them on as I never bought them as an investment. Its partly a Karma thing I think as all us Bomb Techs are a little superstitious and like to "Pay it forward" to keep the good luck credit in the green.
-
Most should know Harley Quinn as well.
-
This is what I'm trying to emulate. Talking to the guy that made and programmed it, Wile Vale, at the moment. Luckily he is also from NZ so I can go and actually see this thing in the flesh! Some people are just freaky clever.
-
Well I got a lightning fast response from the Amazon Store I bought it through in Japan today. 15mins and I had an answer. They refunded my money in full including the freight costs on the spot with just my word on what had happened! They dont want the Tamiya kit back either so thats going up on the kiwi Trademe.co.nz site. And the money will be back in tonight so I can reorder the correct items! Pretty stellar service I'd say.
-
had to laugh, a set of VF-11 photoetch parts showed up today, along with what should have been a few Valk weapon sets and a VF-11E Thunder Seeker.... what I got was a Tamiya 1/20 scale 1977 Tyrrell F1 Car??? Love ya work Amazon!
-
Most of the weekend was spent out riding, watching the Winter Games and spray painting the hallway. No modelling progress unfortunately. On a plus not, my birthday presents all showed up from the kids... Alclad 9220 Airbrush set - from my daughter. 10 Alclad paints from my son. 1 VF Modelling Manual Master File and an Italeri Aircraft Carrier Deck and Blast Deflector to mold off from my youngest son. All in all, a good weekend.
-
Refund time
-
ohhhhhh.....k
-
Just waiting for a replay to a message I left on the guys Facebook page. Its the only place I can find that he's still active on.
-
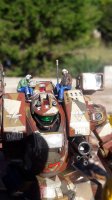
http://starshipmodeler.biz/shop/index.cfm/product/2832_106/172-valkyrie-flight-deck.html I NEED THIS DECK!!
-
I see these pilots are still available for order on your Starforge site so will be buying a few sets of male and female ones this weekend.
-
Recieved my VF-25 set today - damn fine detail on the mesh sections!
-
Citadel is non toxic. I used to paint alot of 40K figures on commission for other soldiers at Trentham and Waiouru camps and had a bad habit of wetting and re-pointing fine detail brushes with my mouth. I'm mostly still ok. Picking up some Alclads tomorrow night from Hobbycity here in Auckland. 101 Aluminium 102 Duraluminium 104 Pale Burnt Metal 106 White Aluminium 113 Jet Exhaust 117 Matt Aluminium 119 Airframe Aluminium 120 Gunmetal 121 Burnt Iron 123 Exhaust Manifold $200NZD! A helpful visual of the effects below...
-

VF-1J “S-FAST PACK” Config. Ver. 1.1 W-St. – 1/72 HASEGAWA MODEL KIT
NZEOD replied to Andrea's topic in The Workshop!
Love this model! You've inspired me to try one!