honneamise
-
Posts
483 -
Joined
-
Last visited
Content Type
Profiles
Forums
Events
Gallery
Everything posted by honneamise
-
Payment sent. Really looking forward to get this kit. What a good idea it was to join MW!
-
Looks even better now, Berttt. I´d say you did a really good paint job. Considering the pics are bigger than the actual model, I cannot say I see anything that could be called a "flaw". Thanks for sharing this great build up!!
-
Well Robert S now that you posted it I remember something about clear parts for the Spiderbug too, although I did a search for this and there was no result. Anyone here who knows about a Spiderbug with clear parts still in production? Or was it just a proposal? I´d really love one with or without those gimmicks as I´m not into lighted models anyways and in this scale just painting the lights will do the job for me.
-
This is really a great piece of work Berttt! Seems you got rid of all the little imperfections that come with resin kits, the (nearly) finished model looks just plain perfect to me. Can´t wait to see more photos. What did you use to get the white finish? Is it a primer or just paint? I´ve been using Citadel White Primer (acrylic) for years but they seem to have changed the recipe for that paint as it does not stick to my resin parts as it did before. By the way, the kit of the Bug is just awesome. Now that you posted these photos I am REALLY SORRY I joined MW too late to get one! Should Gundamhead/Myersjessee consider a new production run I´d be definitely IN! Can you hear me??Please!!!
-

What is lying on your workbench?
honneamise replied to Tuffskull's topic in Hall Of The Super Topics
Well promethuem5, Xabungles are not that hard to find and prices on eBay are pretty low. Bandai have released 12 different types in 1/144 and 10 types in 1/100(same, just bigger, with decals and glass canopies)in this series. I´ve managed to get at least one of each design (though not in both scales) within less than a year and no kit was over 20$, last one I got was TWO kits for 3bucks!!. The Dugger Type is more common in 1/144 because Bandai had reissued this one in 2001 but you can find the bigger one as well. Back in the 80s i didn´t like them but now they are my favorites next to Macross and Orguss designs. Even with their odd shapes they look "real" with nuts and bolts, cockpit details and machine guns. They are much more "Mad Max goes mecha" than Gundam. And I like the fact that all the types are different, even the sizes range from 7cm to 21cm within the 1/100 scale range. -
What is lying on your workbench?
honneamise replied to Tuffskull's topic in Hall Of The Super Topics
Here is mine. 2 Voyager Aerowings (scratchbuild, resin cast) on the way to a decent paint job. I´ll keep one and probably sell the other. 1/500 house, commission for an architect, should be ready by end of next week 1/100 Bandai Xabungle Dugger Type. Want to build a diorama for this but I need ages just to finish the robot alone. The kit is from 1983 but the detail level is better than even modern MG Gundams (though building it is kinda fiddly), I wonder what the guys at Bandai have been doing all the time. Upper edge of pic: these are the feet of a MG 1/100 GM Quel, mostly built and desparately awaiting some paint. Not necessary to show the whole guy. Macross: Once I have the Aerowings and the little house out of my way I will begin working on an 1/100 Oberth ship. And I have a Hase VF-1 A Max/TV, almost finished but unpainted. Hope to finish it within the next months.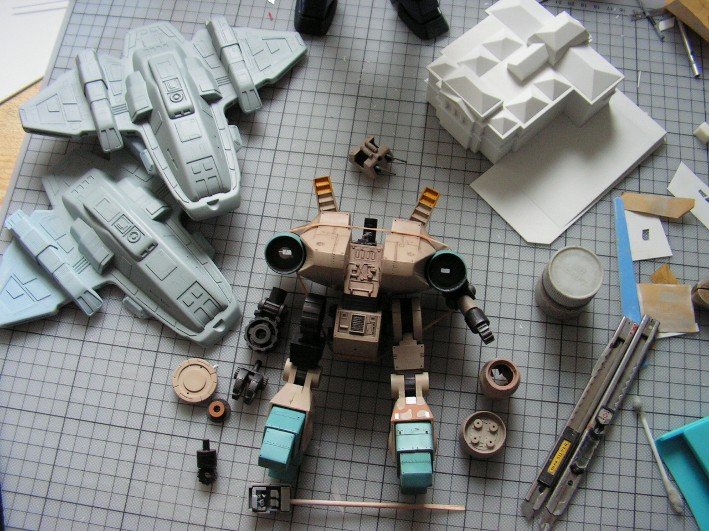
-
Well I think some of the old kits ARE very well sculpted indeed, just the fact they are somewhat small doesn´t prove they are incorrect. I love both versions of the YS 1/1400 SDF DYRL and the older IMAI 1/8000 Storm Attacker and 1/5000 Fortress, they are very detailed for their scale and look good (ARIIs are MUCH worse). But I know what you mean, Evanta. Big ships must look big even as a model. A certain size of the "original" simply demands a bigger kit. Personally I find things like the MPC Star Destroyer, Monogram Galctica etc are all a bit to small to do justice to the design. SDF-1 is my favourite of all the capital ships in ANY movie and I will build one someday - at least I hope so. I guess a REALLY impressive SDF-1 should even be 1/1400 or 1/1000. But going for 1/1700 as you stated will still be big. Just compare this project with the battleships kits some of the bigger garage kit manufacturers offer in 1/350 scale. About the same length, a battleship usually costs between 450 and 600 $, but the SDF-1 will require MUCH more resin because it has many chunky parts compared to just ONE big hull part of a battleship. OK some could be casted hollow but this would still be a lot of resin and require even more expensive molds . Those battleships usually come with photoetched detail parts and you will need some for the SDF, too. In this size all the antennae etc around the bridge must be there or this thing will just be a big toy. And in this size all modelers demand excessive surface detail as in the shots seen in the final episodes and in various books. So where do you stop working? Destroids for the surfaces? Open missile launchers? I guess those masters will be a hell of work. My guess is a really accurate and detailed SDF-1 will be in the region of 800 to 1000$ even with over 50 preorders. I´d love such a thing but as a modeler I´d be frightened by the cost and the length of the project and as a customer I´s swallow hard on the price tag I think.
-
Outstanding work TSP! First I too thought the battroid legs look a bit too big but now, after the colouring, everything matches perfectly. You really did a good job in bringing out all the tiny detail. I thought of building this kit too but as I collect "normal" planes in 1/144 too, I was too disappointed with the Bandai Kits compared to what Revell/Dragon/whatever can achieve (and already had achieved in the early 90s when the Bandais were brandnew). But you really show that with skills like yours these toylike playthingies can be made into cool looking replicas worth adding to a collection. Can´t wait to see more buildups, keep up the good work!
-
I have always built all my Valkyries with the lettering right side up, took me a long time to notice something did not work with this. My guess is none of the creators bothered to think about this. There are hardly any sketches showing any markings at all and in the animation you don´t get to see them either. I just speculate but maybe these markings even had their debut with the first Imai/Arii kits and they were only included to make the models look more realistic and impressive. In the 80s it was a standard to have big white "VF"-Markings on the lower front side of both legs....they seem to have completely dissappeared from nowaday´s newer VF-1 kits - just want to point out there is no canon on every little thing here. So you could go both ways: logically thought, choose ONE position and stick with it. Or apply the markings the way you think it looks cooler. OR go with the thought that there is some revolving mechanism within the gunpod which makes the part with the lettering rotate 180 degrees when transforming so the letters will always stay upright. If everything transforms why not add this little feature? Maybe Kawamori has designed it that way but the artwork has been lost:lol: Whatever you decide, neither way will somehow ruin your model. Most people will not notice anyway and all the insiders here will know you went with ONE of the possibilities and that should be OK.
-
Well I´ve been fiddling around with mine for some time and decided to build it in static battroid mode. As has been stated elsewhere the battroid looks ok but for a fighter or gerwalk I find the legs and most of the parts aft of the cockpit far too chunky. Compare the model photos on the side of the box with the top illustration and you know what I mean. Building the model is fairly easy, transformable or not, haven´t finished mine but there seem to be no pitfalls. But if you really want to go into building model kits I´d recommend glueing, sanding and painting. Even if it does not look perfect in the end you will get a lot of experience. Much more rewarding than just snapping off pieces and sticking them together.
-
Well macroadster I can tell you it took me a LONG time to get a supplier for SMALL amounts of resin. Here in Germany it is impossible to find this stuff on the shelves of even the most specialised hobby stores. They only sell this clear stuff or some cold-cast-porceline but this shrinks too much. I checked out the site of my supplier but he has NO representative in the States, nearest one is in Mexico. Look at azrhinos reply. I checked the link to Ace Resin and it appears it is exactly the same stuff I have over here just mine is not white but slightly cream coloured. Urethane resin is the magic word-this is the stuff all the good quality garage kit makers -and Verlinden etc. use. I´d give Ace Resin a try, he seems to sell even small amounts AND you get the proper RTV silicone there, too. Prices seem OK, I don´t get it much cheaper over here and the minimum amount I have to order is 1kg.
-
Hello macroadster! From my experience clear resin is a hell to work with. Yes you have to stick EXACTLY to the ratio of catalyst and resin as stated by the manufacturer. I tried to make clear resin pieces and gave up after LOTS of trials. After a while I got decent looking, bubble free parts but they did not fully dry in months so I got rid of them. One day I purchased a Starcrafts Star Trek resin kit that came with clear parts for the warp engine collector thingies. They were tinted red and looked perfect. Finally a guy who can actually work with this stuff I thought. Well as always I had no time to build the kit and after a few months I found the clear parts had become sticky and gathered dust (absolutely unremovable). Unusable. Another point of concern is the shrinking factor. While a good brand opaque resin does not have a noticeable shrink ratio, clear resin WILL shrink. At 1/4" this will be not too visible but if you need a perfect fit to other parts you will have to build a master part with an increased size determined by the shrink ratio (and you have to find this out by trial and error). To cut a long story short I ´d avoid the use of clear resin at all cost. I hate this stuff and will never use it again. Don´t let it spoil your first time working with resin. Do you really need it to be clear? If it is a canopy or something similar I would try to smash a heated piece of clear plastic sheet over a master and you will get a good looking part if it is not too angular. If possible use opaque resin. Mix it, pour it and in five minutes you will have a solid part that looks like your master and stays like it. That´s of course just my point of view and I hope it does not seem too discouraging. Maybe someone here at MW knows better. Actually, working with resin can be fun!! (though I alway get sticky fingers in the process)
-
Hello Zeta Otaku, yes HLJ IS the right address for spares, but you can´t order individual parts. Look at the instructions, there should be a drawing of the sprues and you can order every individually marked sprue. If I remember correctly there is also a list where you can see the yen price of each sprue. HLJ offers a service for these replacement parts (you may need a few clicks to find it but it is on their site), but they say it may take a few weeks and you cannot cancel the order once you have placed it. I have not used this service myself so far but HLJ is really reliable so give them a try.
-
I have four different of these kits, the Battleship, a Carrier, a Cruiser and Kamjin´s ship. They are 1/20000 scale and all come with a small Macross in Fortress mode (with no bridge if I remember correctly). The Flagship´s proportions are really questionable. From the side it looks OK but it has to be MUCH narrower towards both ends I think. The other three have the same flaws but the Kamjin ship is slightly better and the carrier isn´t too far off because the design is meant to be squatty. When I bought them many years ago I was really glad to have some more Zentraedi stuff to build but after a closer look at the parts I was kind of disappointed. Looks like the ARII guys did´t spend too long on these molds. Still, the one in the photo does look better than I expected by just looking at the unbuilt kits.
-
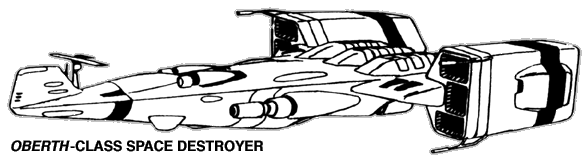
Grayson72 I would love to do a 72nd with officers on the bridge and firing guns, but my secret plan is of course to BEGIN with the Oberth and END with a SDF-1 in the same scale, maybe when I´m retired (or I live forever and build a SDF-2 and then a Megaroad). The 72 scale will be slightly too big then I suppose.... By the way I found out the maximum size for a finished model to leave my workspace is 2m by 75cm or else I need a bigger flat
-
Wow! Thank you guys for all your opinions, statements and support! It seems really hard to figure out who is right because EVERY opinion pointed out here makes perfect sense to me! Well what I intend to do is to build this thing to 1/1000 scale. This seems a good size to me for an individual model (if 21,5cm long it´s not too small and if I go with the 39cm it´s more impressive on the shelf, but still not too big) or- if I manage to get enough time and patience - it makes a cool companion piece for an ARMD Carrier AND -if I don´t lose my eyesight, I could make some scale VF-1 /Lancers and create a little fleet. That´s what I wanted to do and building an Oberth seemed to be the easiest starting point ... then I began thinking about the size... I have now found out that the SDF on the cover of the PM Book is 1/4100 and the four side views of the ships are 1/5750 (if) based on the 512m of the Prometheus. The Daedalus then turns out to be 425m-not too close if it should be 488m-and the ARMD is partially hidden by the SDF but will be MUCH bigger than the Daedalus which is wrong again! Not to speak of the Oberth which is a massive 400m if to scale with the Prometheus. I really thought they were constant scale. Contrary to what has been stated I found out that the 4 side views on the cover are NOT just copies of those in the book - the handdrawn style reveals lots of differences in detail and even in proportions. The side view of the Oberth on page 166 shows all three missile bays in front of the engines while the one on the cover features them further aft so you can see only two of them with the third one obscured by the engines. I thought: cool, Kawamori has drawn them again for the cover to make them more accurate AND to scale, but it turned out to be wishful thinking. Regarding the process of scaling based on known objects or "standard" looking parts, there really seems to be nothing that gives a hint. The missiles seem to be unique to this ship (as are most of the missiles in Macross - to me it seems almost every Destroid/ship/whatever has its own type of missiles), there are no hatches or windows for a good estimate. I guess in the end I will simply base the size of my Oberth on common sense: In the anime an Oberth explodes with an ARMD in the background. Assuming the two ships are not too close together, the Oberth appears more half the length of the ARMD than the same length. The radar tower and the massive guns - I agree, these things appear just TOO big assuming the ship is 390m, so it should be MUCH smaller. And, thank you Nanashi, a crew of 125 points to a smaller ship, not a big beast of 400 m. I WILL GO FOR 215m so my Oberth will be 21,5cm long. No more sleepless nights for me. Thank you all for your valuable input. And I always thought the size-shifting ships were all from Star Trek...maybe it is the class name´s fault
-
Here it comes

-
Yes I thought so too. But look at the visible portions of Daedalus and Prometheus attached to the Macross - they are MUCH bigger than the side views of the two carriers so SDF-1 is NOT to scale with the four individual ships on the cover! At least it seems that the four side views are meant to be in scale, but, knowing the length of ARMD-01 (430m), the length of the Oberth will be more or less about 390metres. But somehow - I´ve got a bad feeling about this....
-
You are right, Zentrandude! After all, that is why I like Macross/Anime models more than others. OK you COULD complain about this panel line being incorrect or too many rivets on that part of the fuselage. But if I want to nitpick, I build a Tank or a real live plane. So my Oberth will be as long as I like it to be, with as many panel lines as I want it to have, and as long as it looks like an Oberth I will be fine. Of course I hope you all will like it too. I´ll post some images of the progress but this will probably be early in may since I first have to finish my latest project (Star Trek Voyager Aerowing, sorry no Macross)
-
Yeah I agree. I guess the smaller length will do for me because it looks more reasonable. I just imagine a VF-1 landing inside the gun barrels of the 390m version-too silly! But-is the Asuka (you mean the M-0 Carrier)really that small? I mean- today´s carriers are all about 330-340 m long, I really thought the Asuka was even slightly bigger!
-
So you´d say I should ignore the "comparison" of the ships on the Perfect Memory cover Art? The ARMD is about 7 cm in length(on the actual cover), so if that is 430m then the Oberth (if 215m long) should be half this size (3,5cm). But on the cover it is 7cm long, just slightly smaller than the ARMD. I am really confused. As you say, I feel the Oberth should be MUCH smaller than an ARMD Carrier, but - If the comparison is meant to be to scale - it is quite a BIG ship....
-
I´m planning to scratch build an Oberth Class ship as a project for the next few months. Just based on the sketches/plans in Perfect Memory with some additional paneling and small details to get a better feel of the size of the "real" thing. But this is where I start wondering just how big is this ship?? UN SPACY Database and some other sources say it is 215m in length while some Robo****-sites claim it is 390m. I´d say I dont´t believe in Roboyouknowwhat and go for the 215m, but If you check the Perfect Memory Cover there are four ships depicted, Oberth, ARMD, Prometheus and Deadalus. Assuming these are the same scale the Oberth will be indeed closer to 390m than just 215m. Do any of you guys know what is the real size? Have there been any "official" stats? Please help me! By the way, I am new to MW and I hope this topic has not been already discussed do death somewhere, but If so, feel free to remove this post.
-
Good to see that kit of the old "naked" Valkyrie back again. Howewer, I´m not sure If I buy one. When the first came out I went crazy and bought 10 to cover all the versions and paint schemes I wanted. I did not even buy the Max/Milia combo because I already had a pile of VF-1J´s at the time it came out. Over the time I managed to build ONE.... For one who has missed the older issues this kit is surely welcome, but I agree Hasegawa could have at least included a more comprehensive decal sheet with ALL of the major schemes to choose from. I mean, two years ago you could get the limited VF-1 D with many newly molded parts, Propagteam decals AND Photoetch for the same price tag...a bargain. But I´m not complaining, maybe I will just get one for the beautiful box art or for Gerwalk Conversion (come on Hasegawa...say I don´t need to do that).
-
I guess if you´re only after the best possible models/toys it makes of course sense to sell all the Bandais. When the Hases came out they outclassed the old Imai/Bandai and I too wondered what to do with all the old stuff. Well I decided to keep them because they are really not all that bad. As a modeler I do not want to have them transformable (built three of them in the 80s - of course paint chipped and parts were falling off/breaking constantly) - but with Hase obviously not intersted in making Gerwalks I will either build them in this mode or at least use arms and legs with a Hase fighter. The VF-1 is a cool design but with its inconsistencies in proportions from one mode to another there is much room for interpretation, so the sleek Hase is not necessarily the only proper depiction. If you remove/rebuild/thin down all those unnecessary parts only meant for transformation I say you are getting a fine looking Gerwalk in the end. And it has recessed panel lines, cockpit detail and missiles so its detailing will not be too bad compared to a Hase. So that is just my opinion and many will say the old kits are not worth the effort, but consider your shelf with all the Valks but none in Gerwalk mode (unless you keep your Yammie in that mode all the time). I´d keep at least one of the Bandais just to have the choice...
-
I also use both tamiya and gunze aqueous. Both are top quality and can be mixed with each other as well as thinned with Tamiya thinner or white spirit, haven´t tried Gunze thinner so far. I have never tried Gunze Mr.Color but yes, from what I heard they are laquer based. I do not use ANY colour directly on styrene, applying a base coat first makes the plastic less see-thru and the paint adheres much better- very important if you´re using masking tape in the painting process. Best primer I´ve tried so far is Citadel (from Games Workshop, comes in white or black, sometimes they have light grey as well) - expensive, but can be sprayed directly from the can (shake long and well!)and does not obsure any detail even after several coats. As for sanding papers, anything capable of wet&dry use will do the job. Used Gunze Mr. Mark Softer for years and it is more or less the same as Micro Sol, works great. I never needed any setting solution though. I have never heard of dedicated vinyl colours, only thing I know is that vinyl models should only be painted with acrylics as laquers somehow react with the vinyl and never fully dry as a result.