honneamise
-
Posts
483 -
Joined
-
Last visited
Content Type
Profiles
Forums
Events
Gallery
Everything posted by honneamise
-
MechTech you are a GENIUS!!!! Awesome models!!! I can´t wait to see your 1/200 Daedalus - the biggest dream I dare to have is a 1/1000 SDF one day but your project seems to be the most ambitious and challenging I can think of. Please make pics of the whole build-up.
-
Hi I´m back after 2 weeks in France . I nearly forgot my own holidays over the Oberth, and when I realised I´d soon be away, MW was down so I could not tell anyone here about the hiatus. I left with an uneasy feeling with MW down for so long but it turned out my favourite site is online again, great!! While I haven´t been able to finish casting completely, the kit is well under way. 21 hulls and most of the smaller parts are ready, as expected the engine mold finished its life way too early and I´ll have to make a new one. Secondary engines and the left and right intakes need new molds, too. I´m currently waiting for more rubber, but I hope I´ll be ready in about two more weeks. I´ll have to find appropriate boxes and make an instruction sheet and then the kits should be ready to ship. I´m just building my own ship right now. Even though I use parts with bubbles or other little defects (the ones I can not sell but still look ok) it seems it is going to be a beautiful model. Parts fit is good although I had to abandon the pins for the nose-hull-assembly - they were impossible to cast but even without them it is pretty easy to align the parts. I´ll soon post pictures of the progress.
-
This is an awesome display stand, Cobywan, much better than my lame proposal. If you´re making these I´m in for two. After I found out the hard way that RTV can´t be properly degassed by pressure and I don´t have a vacuum machine (but like to get one) I tried to simply pressing air onto the surface of the RTV with an airbrush. Works quite well, the little bubbles are almost driven to the surface and vanish quickly. Fernarias that link to the resin casting tutorial is cool. I have got something similar in a Model Graphix Magazine but it is in Japanese so I had to guess from the pictures. As I can see now I almost did it by the numbers so there was no unpleasant surprise here But I´ll have to visit the LEGO store soon...
-
Thank you all for the useful hints! My problem with bubbles were just on one side of the engine and were generated by tiny air bubbles in the mold. Generally the best method to get rid of the bubbles is putting the mold under pressure. Too low pressure and tiny air bubbles rise up and get stuck in the surface of the part (and there are some air bubbles in the mold surface as well). More pressure and the bubbles vanish! The only drawback is that the part has then some tiny bubbles on the outside because the resin gets into the bubbles in the mold as well, but these are easily removed with a light sanding or maybe just snapping them off with a knive. After all, this occurs on only one side. I could have avoided ANY bubble by putting pressure to the RTV silicone while curing, but this failed! I found out this only works with solid master parts. Most of my parts such as the hull or the engines are built up with many pieces and there is of course air trapped inside - and guess what, placing the molds in the pressure pot not only crushed the air bubbles in the RTV, it also drove the air out of the parts itself, creating big bubbles which got trapped in the hardening RTV! Mold useless, so I had to go with the traditional method and now it is somewhat a compromise... As for the heat, the resin poured into the engine mold creates lots of it - it really hurts if I pull the part out too early! As for the price, the 65 EURO is OK (plus shipping of course and this will not be 18 EURO as stated earlier thanks to Grayson72!), wasting RTV while playing around with air pressure comes courtesy of my own wallet of course! By the way, do you all want a display stand? I found the one which comes with the ARII 1/100 VF Fighters quite useful so I could duplicate these (round with UN Spacy sign on it but quite small) but if you all want to make your own it will not be worth the effort. Any comments welcome!
-
Great build, Pazu! These parts look VERY precise and I´m sure your Spartan will be a definite improvement over the old ARII kit. Are you planning to make it poseable or will it be a static display piece?
-
If you want to stick to 1/100 scale you should get one of those transformable Bandai (ex-ARII) kits, they are still cheap (800yen if I´m not mistaken) and have much better proportions (at least in Gerwalk mode)and details than their fixed-posed counterparts. If you abandon the transformation ability and build a fixed-pose Gerwalk this model will look better than the other one. They come with smaller Hands, too. I don´t like their looks in Battroid Mode, but they make reasonable Gerwalks. The only drawback is that these kits (except for the -nearly impossible to find - first Arii issue). all come with FAST-Packs and have no parts for "backdating" them into plain VF-1s. Or sometimes you can find an old Revell Robotech Changers Max-Type VF-1J (blue) - this is the first issue with NO FAST Packs. For Battroid mode, avoid the old Ariis at all cost but have a look at the Bandai 1/100 VF-1 S Focker w/FAST Packs (frequently reissued, always available on eBay). The Patterns are from Imai and they are completely different from the Ariis - very good proportions, same drawback - they are FAST pack Versions. Overall I like 1/100 too but I found the IMAI kits are quite good while most of the ARII ones suck.
-
Thank you for all your support guys, I had never dreamed that several people are willing to ship these kits within the United States!!! Well Grayson72 was the first to PM me and he was so very supportive to the whole thing here and of course he is a long time member so I felt he is the right one to do it - without questioning the sincerety and reliability of any other member here who offered to do it, again THANK YOU ALL! By the way, Grayson72, thank you for putting up the list!! Now it´s my turn to get this kit done.... I´m not yet ready with all the molds, there are still three to make. Moreover, I still don´t like how the bow part comes out, maybe I can make it a one-piece mold...the engines still have some air bubbles on one side but I guess I just need more pressure here.. still some issues to solve, but all in all I´m quite happy with what came out so far, take a look.

-
Well once I know how many kits will go to the United States I will figure out how much an insured parcel with the complete batch will cost. I basically like the idea of all of them shipped at once, but unfortunately I have no friends or relatives in the U.S. so I wonder who´d be willing to do all the packing and shipping within the States - this is a job definitely not done in one hour I guess. The only thing I can offer is that the guy who does all the work will get his kit for free....
-
Great work Mechleader!! This is how I like it: you can see at all stages at once - much better than having to transform kits with all the fiddly parts and paint chipping (of course I LOVE looking at those masterpieces of engineering with all their scratchbuildt transforming features but I would not even dare to touch them!). By the way, did you use plain white on the 1-J or is this the very light grey recommended in the Hasegawa instructions? To me it looks quite white and perfectly right! I have a half-painted Hikaru-Fighter but did not go on because I was not too convinced of the light grey....
-
I hope to update this soon, Grayson72! Although the interest thread was not too succesful so far (14 people interested in 15 kits) I still decided to make molds and at the moment my workspace is a wretched mess of silicone! Some of the small parts´molds are ready and I made some test castings - turned out fine. At the moment I´m at the bigger molds for the body, front and engine - should all be ready by monday so I can begin with casting the parts. Of course I will take pictures and I want to completely finish a ship as soon as possible. Maybe some more people will be attracted to it when they see a built and painted model - so far there was only a couple of half finished bits to be seen so only hardcore modelers/scratchbuilders (the guys who already posted in the interest thread I assume ) can imagine what it will look like on the shelf!
-
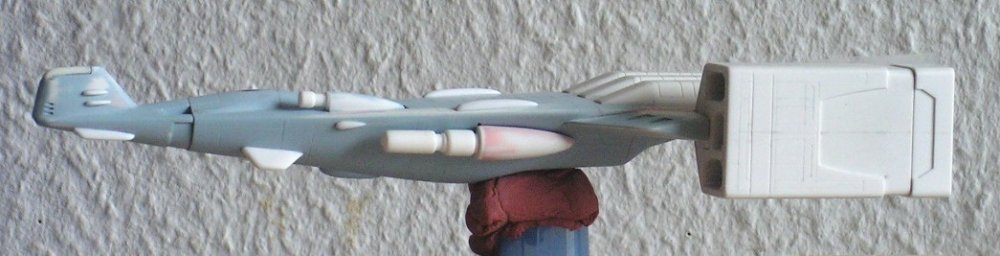
A shot of the auxiliary engines
-
Good idea anyway to have a size comparison here.

-
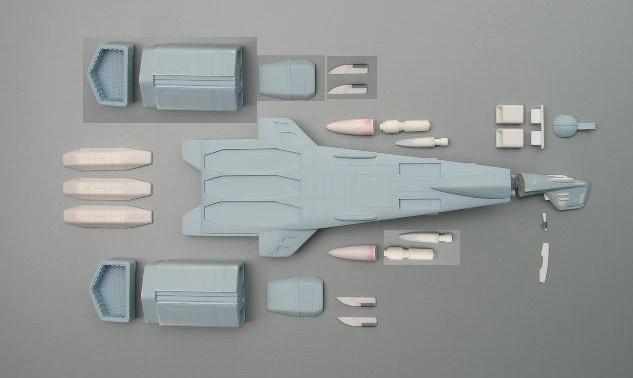
Thank you for your support guys! Here is a pic of what the kit will finally look like. Some of the parts are cut&paste cause I´ve only built them once so far. I just made it up to get you an idea what to expect. Some things might still change a bit but this is basically what you will get if all goes well. I hope to get the molds ready at the end of next week, so if I stay in schedule this kit might be shipping in about three weeks .
-
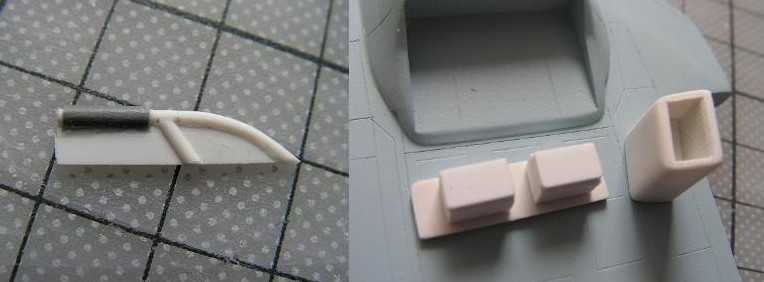
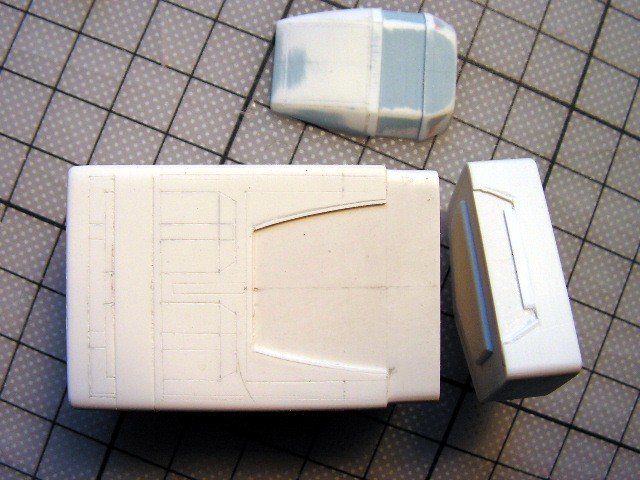
Some more parts... On the left you can see one of the strange looking tubes that are attached to the front outer edges of the engines. 4 are needed - I decided to multiply the one here so all of them will look exactly the same. The "skin" between the plastic rods will be needed for a proper casting, it is very thin and will be easy to remove I hope. This seems to be the most feasible way of casting these very fiddly parts. If they turn out well you will not need to scratchbuild any tiny parts when building the model The right pic shows a bulkhead with two tiny boxes (still not attached toit) - this will fit inside the recess behind the hangar. Two auxiliary engines (you can see one here) will be glued to the boxes. Strange, these parts were the last ones to build! Actually, I´m almost done now. The next step will be to cast all the parts I built only once but need two or more (most obviously, another engine!!!). If I have them I can show you the WHOLE model in all its glory!

-
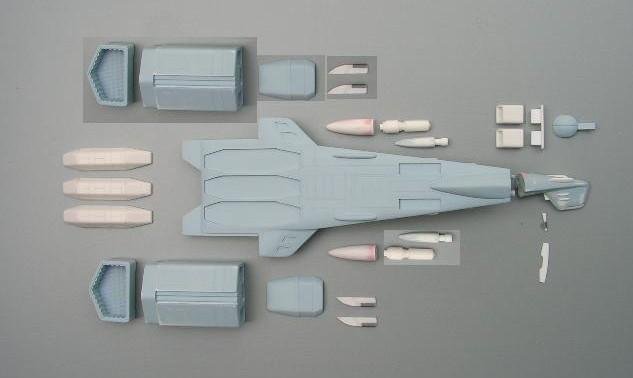
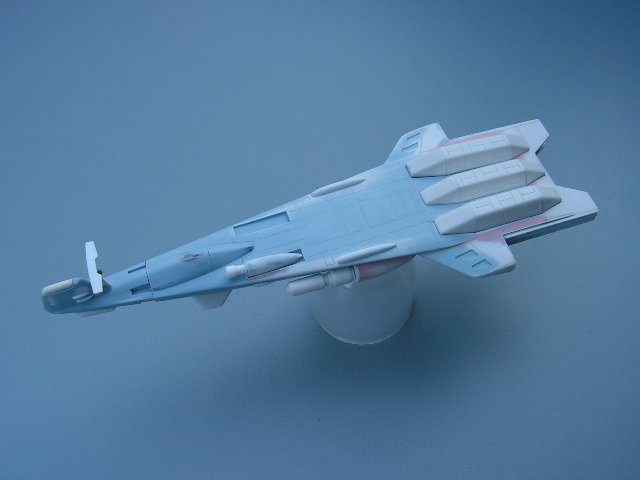
Another pic of the whole thing minus engines. I have now filled in the space between the missile banks and the engines.
-
Here is the whole thing assembled (not permanent of course). Looks cool but this will be tricky to cast I suppose....
-
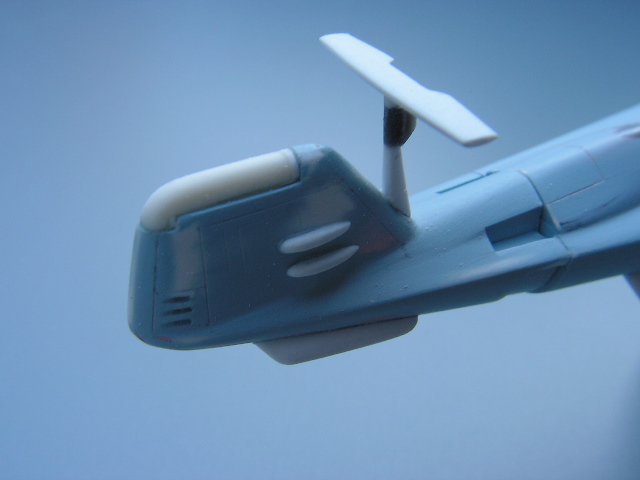
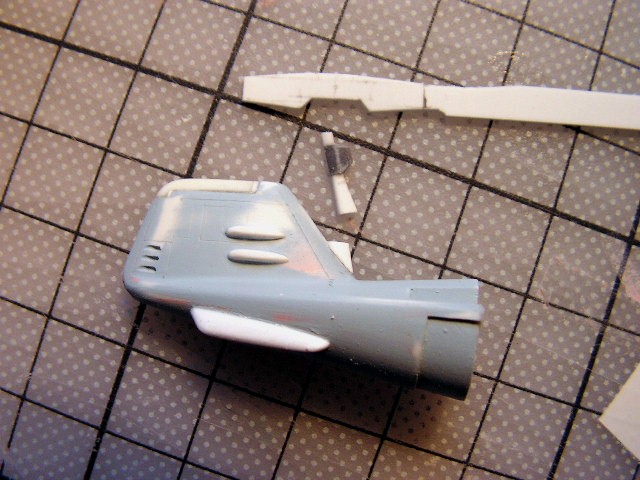
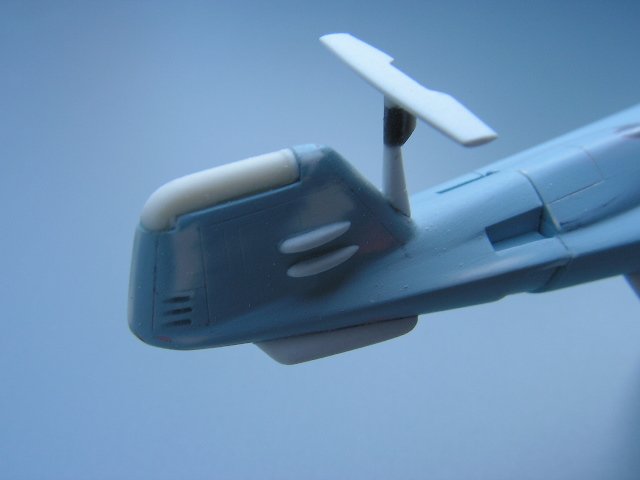
Finally my ship received its "radar mast"-or whatever it is carrying on top of this thing. I cut the main mast in two and glued the lower part to the bridge. Easier for building the kit I hope! To get the mast assembly I filed a styrene strip to the required "aerodynamic" shape. The dark part is a stryrene rod (profile built in) which came with an Aeroclub biplane kit (they provide these for the wing struts). The "wing antenna" is just sheet cut to shape, then sanded to get a profile as well. According to the front view in the Perfect Memory book, the wing should be 3cm wide, but this looked way too large to me so I went with only 2 cm since it looks better when compared to the other lineart.

-
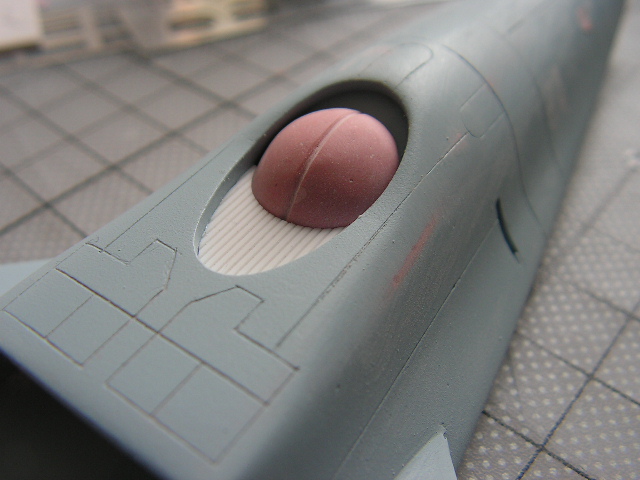
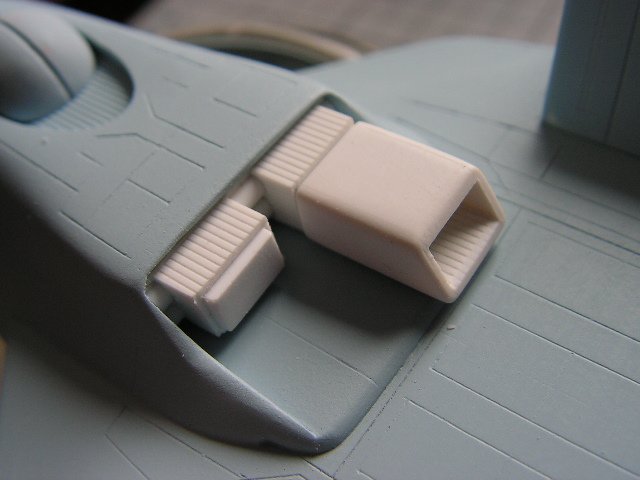
more progress...I actually got many things done yesterday but this is more in the small details section. One thing I´ve been working on is the "intake" which goes to each outer side of the engine. I made the part with two 1.5mm plates glued onto each other, then another 0.5mm in front and behind the recessed area. To get a good fit to the engine I made the cut out, depressed section in the engine side bigger than required, placed the intake in the middle, then glued very thin styrene stripes exactly around the part. I filled all remaining gaps with superglue, removed the intake and sanded the whole thing flat until I got a smooth surface. Now I have a real tight fit!
-
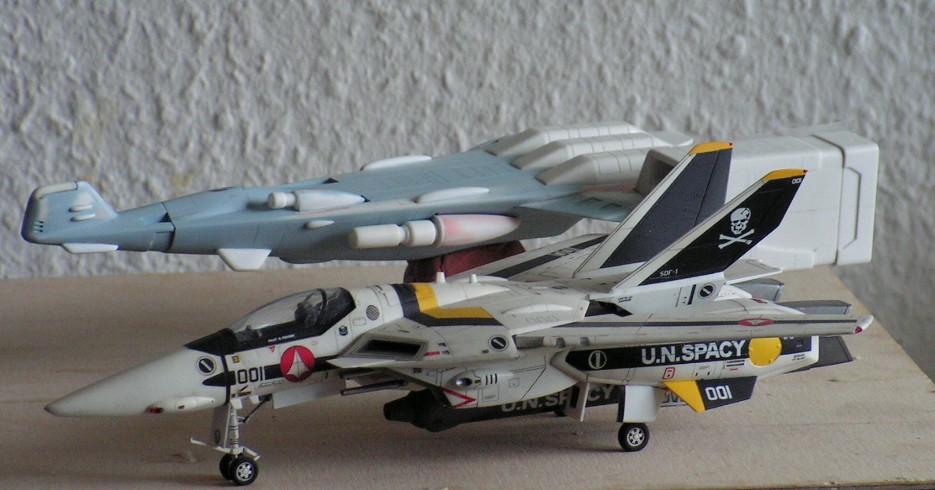
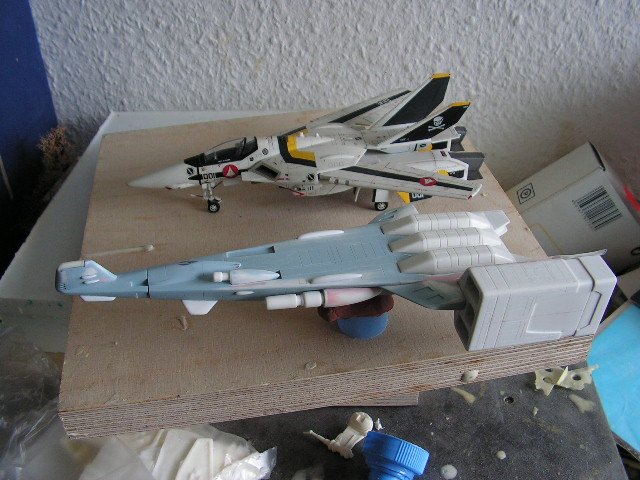
Sorry this pic is too long Here is a size comparison with a Hasegawa VF-1. The Oberth is not so tiny anymore. I really have to finish the engine to get it cast, this looks just plain stupid with only one attached<_<
-
I´ve built all the little fins and blisters now, after experimenting with more droptanks/bombs etc. from tiny aeroplane kits I finally went with "homebuilt" styrene bits because this was the only way to get the shape spot on.
-
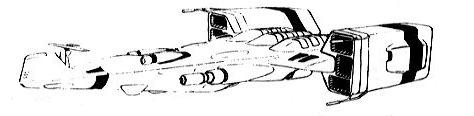
Just forgot to tell some basics about the model This kit is a 1/1000 model of the Oberth class spaceship as seen in the first episodes of SDF Macross TV series. I went with an estimated length of 215m so the kit will be about 21,5 cm long. There is not much lineart(see Perfect Memory book) and what there is is not too consistent. The main source I used (still use cause it is not finished yet ) is the perspective view you can see here. It is quite consistent with what you see on screen (the "blow up"scene in Ep.3) so I found this is the best reference. I used the side/front view as well but altered some proportions such as the length of the "hump" behind the bridge and the size/position of the missile banks (way too small/too much forward in the side view). So it is more "anime accurate" than "lineart accurate" but I hope you like it that way!!

-
Following my "scratchbuilding Oberth" thread, I am now pretty sure the little model I have made will finally look good enough to make a kit out of it, so it is time to start a new, dedicated interest thread to find out if there is enough demand to "mass-produce" this ship. I think if at least 20 people want one I´ll start making molds. I´ve been thinking about cost and ended up on an estimated 65-70 EURO each. My plans are to make the kit have (about) 28 parts. There will be one solid hull with a separate nose cone and separate three-piece engines. Smaller parts like the missile banks, auxiliary engines, guns and antenna mast will be cast separately to make painting easier and of course to give you something to assemble personally I don´t like those one-piece-chunks-of-resin that you only have to paint; this should be a real kit. I intent to make all rubber molds two-part with interlocking "pins" to prevent misaligned seams on the parts and I intend to use pressure casting to get rid of air bubbles. If you really want one (or more ) please post here to help me find out if there is enough demand. I am quite new to MW so I won´t ask anybody for a downpayment or anything. I will PM all of you when I definitely know that the molds are OK and the first full kits are right in front of me. Then you can of course still decide if this thing is worth your hard earned money! The shipping cost will be an estimated 18 EURO outside Europe, within the E.E.C. it will be cheaper. If you want more than one kit but don´t need separate boxes I can get two kits in it for the same shipping fee (same price from 500g to 1000g). For pics of the model in progress go to the Oberth thread. As soon as I have pics of the completed ship or the final parts I will of course post them here!!
-
Well guys this whole ARMD/ VF 1/1000 thing is really encouraging as there seems to be a real demand in Macross spaceship models. When I started this thread I only had a single step-by step scratchbuild in mind - I never even thought it would gain so much interest here as I considered the ships -apart from the SDF-1 of course- to be of only minor interest to most of the fans. Now it gets a bit scary - I even find myself making sketches of tiny Valks or figuring out a parts breakdown for the ARMD..... instead I should finish the Oberth in the first place! Well I hope to get the parts done in about a week. I am not sure but I guess it is time to start a new, dedicated interest thread to find out if there is enough demand to "mass-produce" this ship. I think if at least more than 20 people want one I´ll start making molds. I´ve been thinking about cost and ended up on an estimated 65-70 EURO each. If you´re definitely interested in a kit please post in the new thread so I can figure out how much demand there really is. As for the ARMD, of course I like to make one but only after I finished the Oberth and only if you all like the model of course!!!!. I´ll go for the TV version if there´s enough interest - and of course Valkyrie feel free to make the movie version or anything you like, I love to see more ships built here!!!!
-
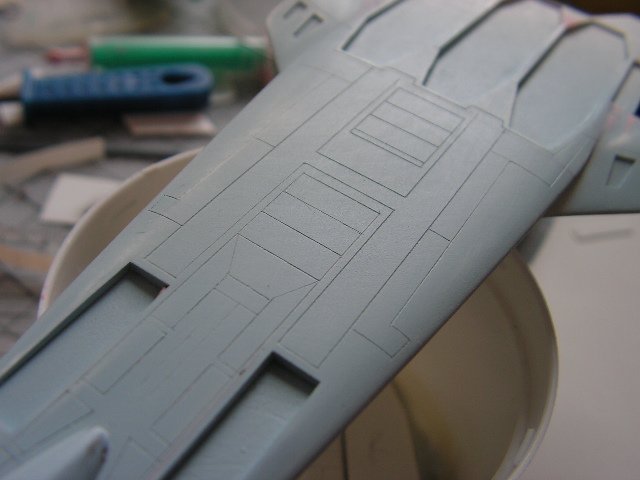
Birfday, Grayson72? same as birthday? well thanks, but that wasn´t taught at school and it´s not in my dictionary... Lo-Pan I use the scribing templates from Trimaster, now marketed under the Hasegawa label, and I do the scribing with a steel needle. Sometimes I use a dedicated panel scriber, don´t know the brand but it is like the one from squadron. This is great for long, straight lines on even surfaces but I found out the plain needle is better for small or rounded lines. The upper side was fun but it´s a pain to get the underside right, it´s all rounded and the surface material is not consistent ( styrene, filler, superglue). I´ve just sanded a big blob of filler to resemble the hangar doors, still needs some finishing but looks ok in shape I think. And yes, after a long look at various pics I say I like the TV ARMD better. Cleaner, more distinctive lines, not too many openings in the hull (the DYRL looks a bit like swiss cheese ). I just wonder how to make some 1/1000 Valks cause a carrier needs planes....

-
At the moment I´m working at all the small stuff that is still missing like the side intakes of the engines, the rounded hangar door at the bottom and the additional thrusters at the bottom. Not finished with these things so I´ll post pics later. Before I add any of the strakes and fins that need to be glued on, I take some time engraving some panel lines. They are not in the lineart but I think the larger areas of the ship will need them to give an impression of size. They will be very decent though, nothing to distract from the rather clear lines of the ship, just enough to avoid a too plain look. I hope to finish the build up next week and start making the molds then. For now I decided to do the casting myself, hope it turns out like I want it to be... Bromgrev, I think ARMD is a bit further away than a week even though I try to work as quick as I can, but I like this thing very much. I´ve already collected all the lineart I could gather. I´m just curious about which one to build... I´m more into the TV series and I like the "clean" version a lot, on the other hand the spiced up, cluttered-with-details DYRL version is most impressive....