honneamise
-
Posts
483 -
Joined
-
Last visited
Content Type
Profiles
Forums
Events
Gallery
Everything posted by honneamise
-
There seems to be a consensus to use acrylics here and I can only add some support. I´m using Tamiya and Gunze side by side for years now and I´m happy with these, much better for airbrushing than any laquer I´ve tried. Can´t comment on Vallejo but from what others told they are fine. In addition I use Citadel paints for small details and Citadel base colours in spraycans (black/white available) as a primer. For metal areas I use Testors Metalizer or Gunze or hand paint with Citadel. For finishing I like Tamiya clear+flat base or Gunze clear flat but for a glossy paint job I find a coat of Testors Metalizer sealer works best. Guess things like Future are great but since it is not available over here (Germany) I stick to the brands I find here. Just never mix different paint systems. I once did a 1/32 Williams Gee Bee race plane in acrylics but finished it with a Humbrol laquer coat. It was fine for about a year but then got sticky and dull and I was not able to remove any dust that gathered on it any more. Total loss . Since then I´ve never touched any non-acrylic paint again! As for airbrushing, I´d say go for a double action even it is more expensive. I´m happy with an Iwata bootleg (made in Poland, about 50$) for over ten years now. Just consider buying an air compressor - even if it is expensive it will pay off. Will save a lot of worrying about where to get constant air pressure!
-
Hi John, don´t get me wrong, I did not mean to criticise your casting technique at all - it is a matter of fact that sprue gates can´t be avoided - I only wanted to point out how well they are placed for easy removing. As you say, sanding away those gates is much less of a headache than filling tiny air bubbles - and there are NONE in any parts of my Regult! And thanks for posting the stencils, they are very welcome!!!
-
Well I have a machinist sqare but I don´t really use it that often because it is so heavy. For the most part I use those geometry triangles (hope this is the correct expression to use here) and even the plastic ones! You are not too wrong if you say that´s pretty stupid because cutting along a plastic ruler with a knive/cutter will of course kill the thing in about a week - if you work very careful! Still, this ship here demands very small parts and these see-thru-triangles come in handy and they are quite cheap. Making parallel or angled cuts is much easier if you can see the rest of the part through the triangle, gives you better control IMO. Grayson72, as for the "square and plump to each other" parts the magic is just to use the parts where I got it right and go on with these. I wish I could say I´d manage to get everything right at the first try but in fact it is all trial and error. You should see the amount of crappy discarded parts covering the floor and my workbench. I just didn´t take any photos of these . The other importand thing is to have file and sanding tools to fit all needs. I often glue sanding paper to bits of styrene in the oddest shapes to get a tool for a special angle I need. The usual tools are mostly oversize or have an unsuited shape for some tasks like say cutting a 3mm triangle out of a 0.5mm styrene piece, so I make my own styrene strip with sandpaper attached and filed to a triangular cross section. That way you can avoid distorted contours or rounded edges where none should be. And, well...the ARMD. I´d definitely love to make one, but it will be quite huge so I´m a bit afraid when I think about casting such a thing. And it will be quite expensive so I´d first have to check if there´s enough interest. After all I guess having more ships would be cool but when it comes to Macross most people will think of the mecha first. Maybe a Destroid or another VF will better suit the demand.... But first of all I have to get everything right with little ship here I think.
-
I´ve got my Regult!! Shipping took only about a week! What can I say? Overwhelming....the kit does look even better than on the pics. The sculpt is gorgeous, detailing is even better than I already expected from the various photos here in the thread, all parts are well cast - you really did an awesome job John!!! And I must mention how well thought out the whole kit is. Of course there are lots of pouring plugs to be removed but they are all on surfaces which are easy to sand without risking damage to the details or they are on the back/ hidden sides of the parts. Naturally a multi-part kit like this demands a lot of preparation to the many components, but this job will still be rather easy as far as I can see. I´d really like to begin construction at once, but I´ll have to finish my Oberth ship first. But of course the Regult (by the way in the German dub it is called a "Regator" don´t ask me why )will come next!
-
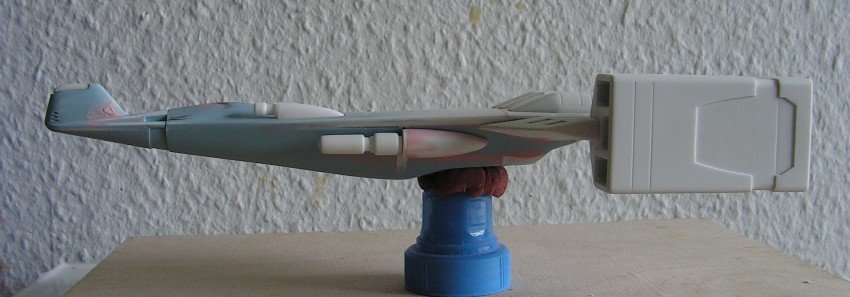
Side view
-
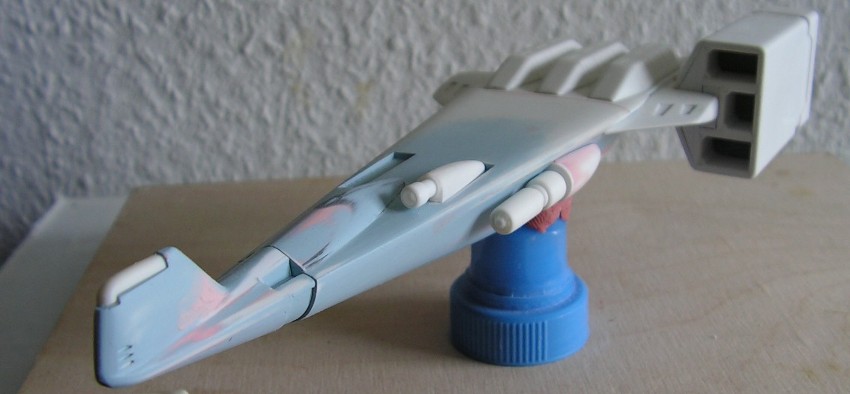
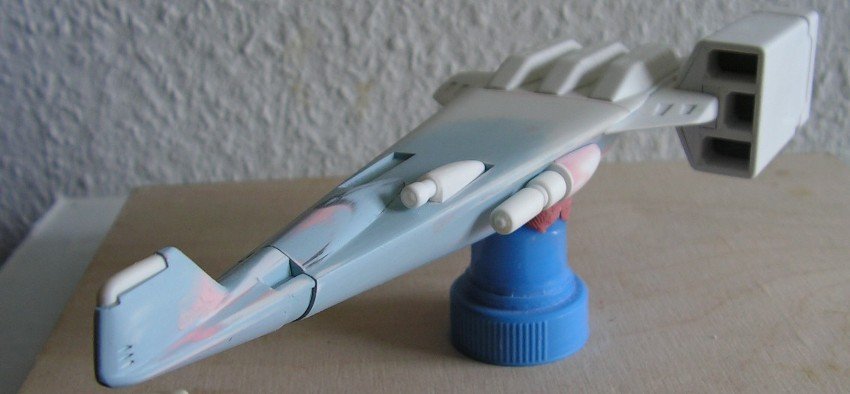
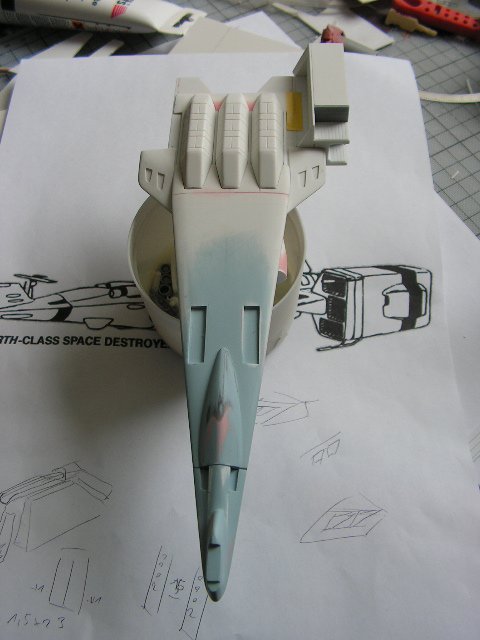
Now the ship is beginning to look a little more menacing...
-
I went on with the guns. Just glued tubes of different diameters into/onto each other.
-
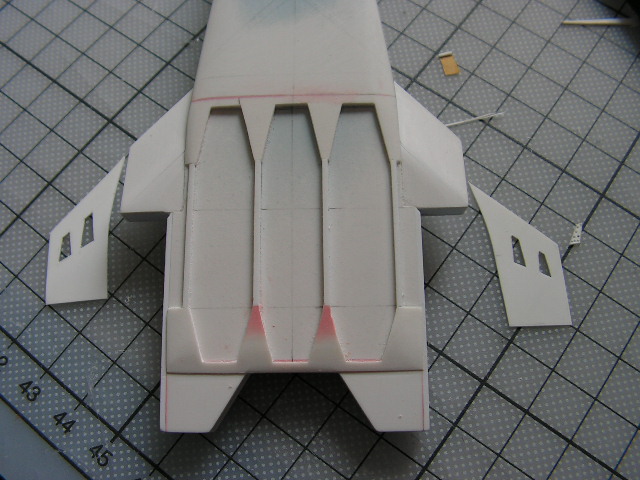
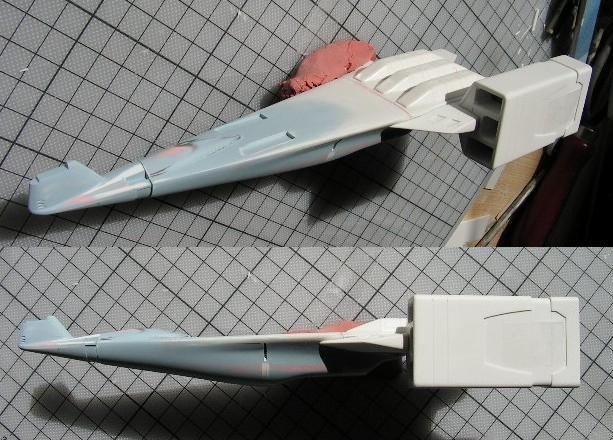
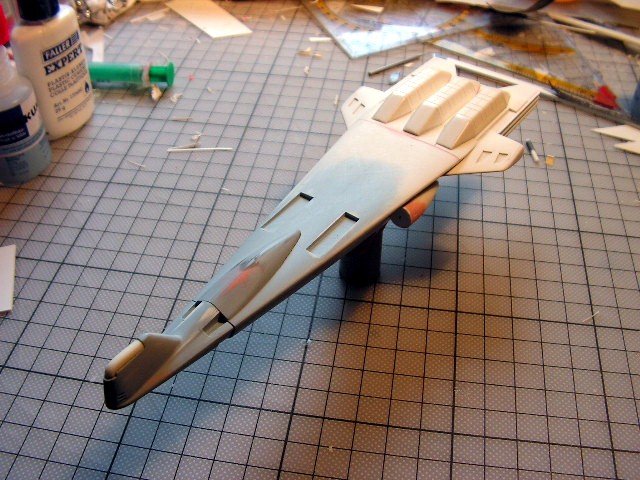
Here is the ship with its engine attached. Too bad I have only one but I´ll soon make a mold and cast the other one. With the added engines the whole model looks MUCH bigger and massive than before, it is quite a handful now and it will take slightly more shelf space than a 1/72 VF-1. I guess the 1/1000 scale is just right for this ship. An ARMD built to scale will be a different story then, BIG chunk or resin this will be...
-
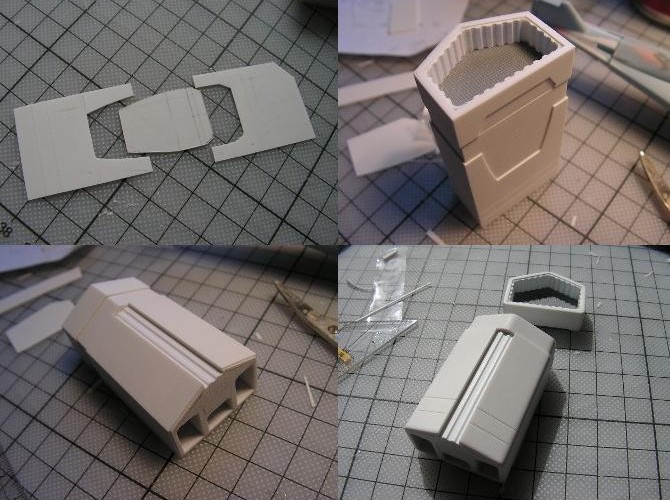
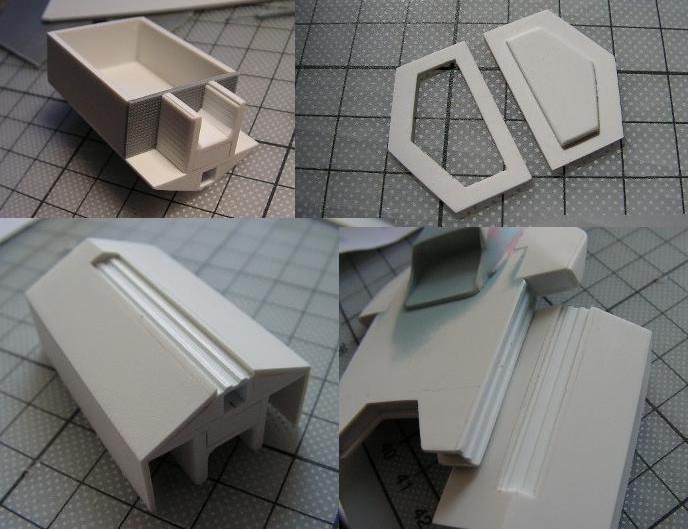
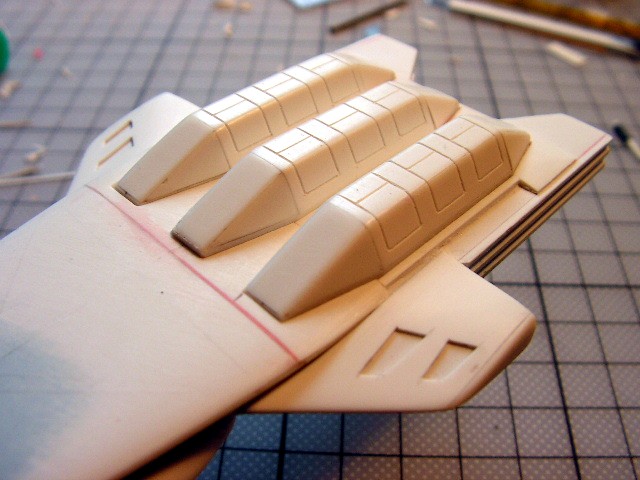
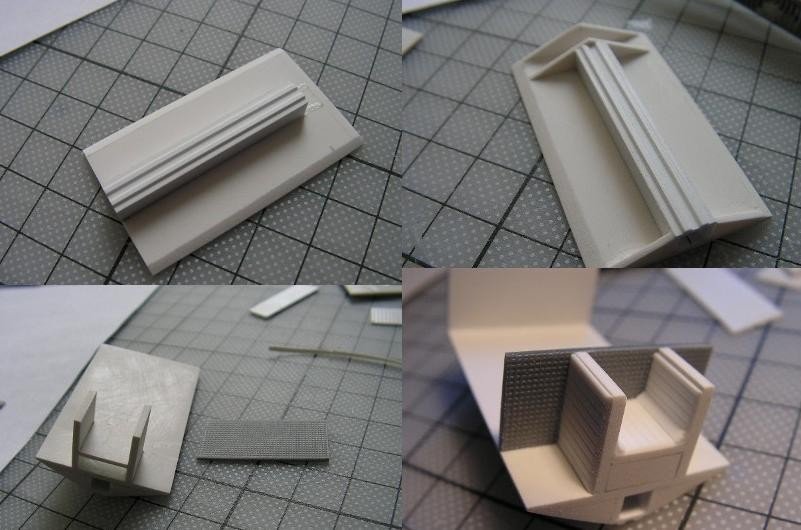
Now it is time for the final plating of the outside. I added 0.5mm styrene to all surfaces except for 7mm of the main part aft end. This will be the part that is shown black in the lineart and I thought it´ll look better recessed. The outside will have another recess as you can see in the first pic. This is where a big intake will be installed, but I will cast this as a separate part since it is not symmetrical like the rest of the engine and so I will need one for the left side snd one for the right. After all plating is done I left it to dry overnight. Then I sanded all of the edges to get a more rounded shape. While the engines still look enormous and quite boxy their appearance is now more adequate to the rest of the design.

-
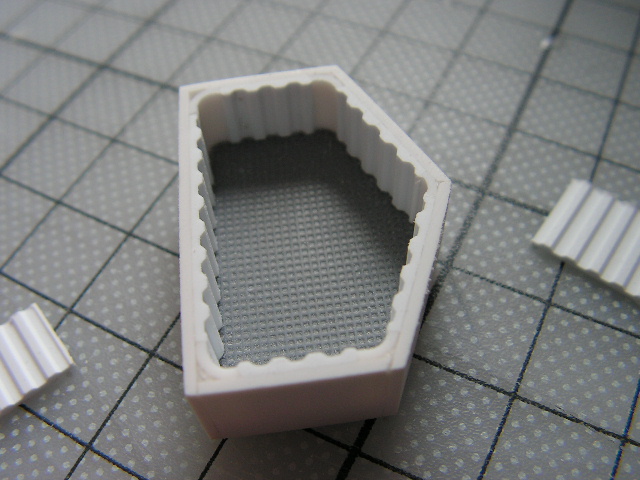
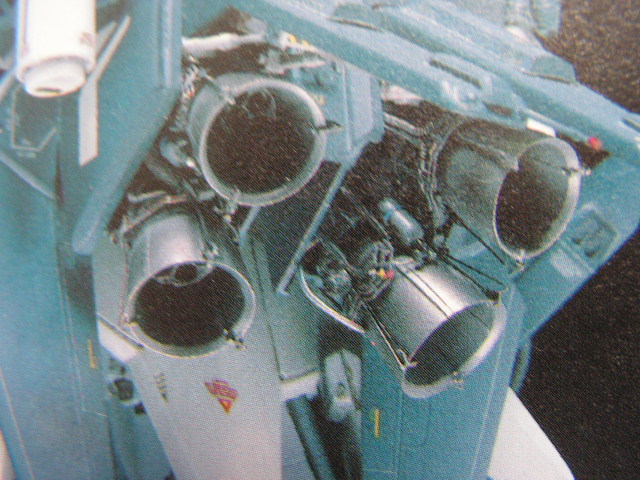
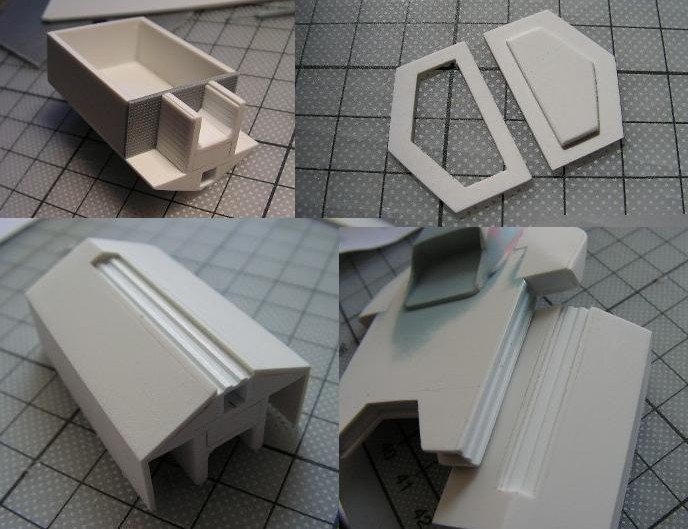
Next step is detailing the inside of the "exhaust". The lineart shows a ribbed inner surface similar to the intakes but with bigger ribs. I used Evergreen styrene plates for this but rounded the edges by using a section of tube. All the outside edges of the engine will be sanded smooth in the end so I want the insides to match.

-
With the heat wave over (lasted three days, hope the summer is not over now... ) I´ve been able to do some more work on the engine. I built a matching aft end and added the same grid structure that was already used on the front. Now I have a nice but very edgy box in front of me...
-
Thank you guys!!! And yes, the VF-0D is AWESOME!!!! You can´t say it´s "only" a kitbash, I guess it´s way more work to figure out a working transformation than to build an entire ship from scratch. I´m soo glad my Oberth doesn´t have to transform!
-
Strange I also got two with no problems and I remember HLJ still offering them a year later! And this one was the main mecha during the first two/three episodes! On the other hand I waited a little too long to order the VF-0A and the SV-51 Ivanov and stocks were gone within the first 2-3 months!! Are the Zero kits so much more popular or have they produced like only 100 of each then? No matter how many produced I´ll build them one day - I will probably keep the box art. By the way, the 1-D seems to be the only Hasegawa kit which did not get a cool Tenjin boxart. A pity!
-
Another pic of the ship with the engine. You may have noticed that I have built only ONE engine. Well I´ve noticed the two engines are completely symmetric so I´ll have to build only one!! Since I´m going to cast the whole ship anyway I will make two molds of the same engine. Quite a shortcut, but on the other hand quite a hell to build since this thing must be spot on on each side or it will be noticeable that one engine is mounted upside-down! I hope to get it right though. That´s the other reason why it takes so long.
-
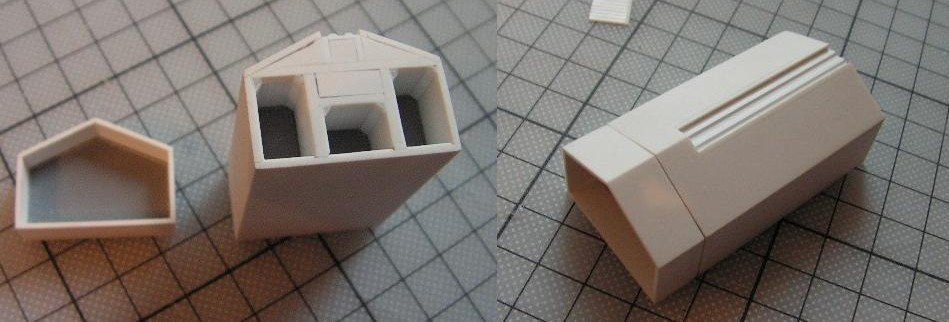
On these pics you can see the triangular section taking shape. I built a spar with a cut-out inside. The spar will be the end piece of the forward section of the engine while the inside piece will be mounted to the rear end - I will build that separately because it will be easier to cast that way. On one pic you can see the corresponding "rail" parts that form the engine/ship connection.
-
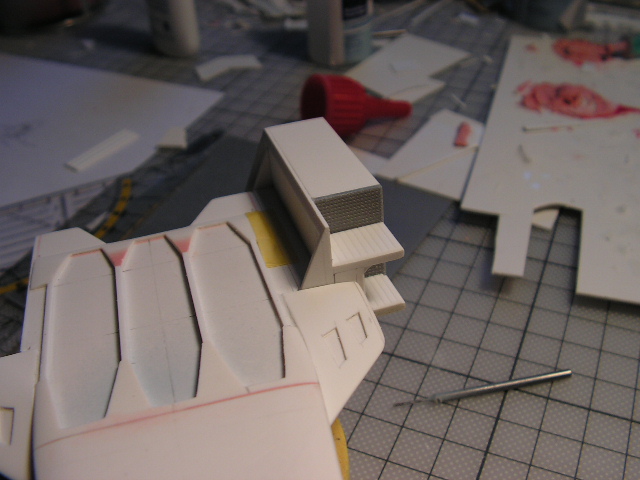
I added more styrene plates - the shape is beginning to look like an Oberth engine - but at this stage it´d make a nice little warehouse for a 1/700 naval diorama . To show where it actually belongs I´ve tacked it to the ship.

-
I´ve started with the engines. It is so hot in here I can hardly work but still there is some progress. First I prepared the counterpart to the styrene "rail" on the ship´s sides. This will be a slot on the final engine and should provide a perfect fit. I added some formers to provide the inner, triangular shape of the engine. More styrene pieces are glued to the other side to provide the shape for the three big intakes (front). The intakes are then covered with styrene ribbing (0.5mm) just to make them more detailed and of course to match the lineart. Then I added a backplate with a "grid" structure.
-
These are the coolest models I have ever seen in my life e.I dream of having a couple of these on my shelf when I´m like 60 . So all these models are made by the same guy? Judging from the style o painting/weathering etc I´d say this is definitely the case. But how can he build them so fast? I´d be glad to finish one of these within half a year .. GREAT!!!! Still, I´d rather have 3 different modes of the same model instead of one transforming model. I want to look at all three modes at once!! And I would hate to have scratches or chipping on a paint job like this
-
Zentrandude, the selfish speech stop you must or to the dark side it will lead. Patience you must seek and owning this model you will.
-
Grayson 72 I cut these pieces out with my cutter knive. These little dots you can see are little holes. I drilled them with the intention of making my first cut along these dots and then working to the final (bigger) outlines with a very little file (made of sandpaper glued to a very thin sheet of styrene). I did so with the first triangle but then I found out I was able to cut along the final outline and this reduced the amount of sanding I had to do. Still, I drilled holes into the other triangles as well because I found it much easier to cut against a "non-solid" portion of material. Have you ever noticed that is much easier to cut a thin strip from the edge of a styrene plate than making a cut in the middle of the plate? I´m not sure but I guess drilling little holes into a cut-out portion has a similar effect. Just found this out by accident or you could say by laziness because I actually wanted to avoid too much sanding. Sanding sucks, well at least it is not my favourite part of bulding a model!
-
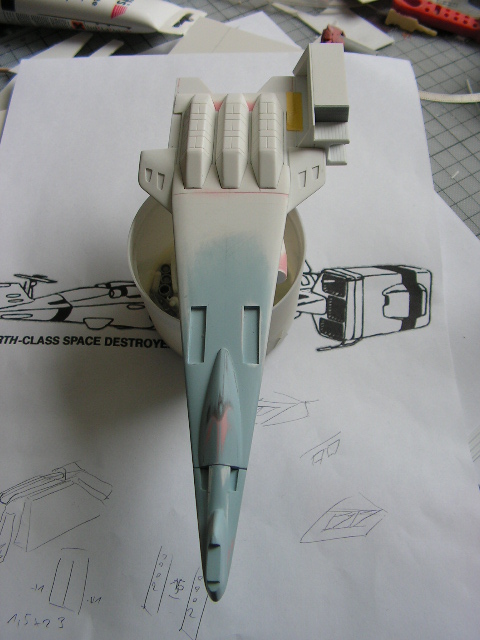
Whole ship with all the parts I built so far.
-
With the wings in place the upper portions were almost easy to install and align I glued an end plate to each wing and did some sanding to get rid of all the boxy edges and angles. Very aerodynamic looking now

-
Second wing added....always the same funny thing: I build two identical parts (well left and right - but if placed onto each other they look the same) and glue them onto exactly the same positions on each side - why are they always looking completely non-aligned? : I spent some hours just checking, sanding, aligning etc until I finally got it right Well enough of that, the Oberth has wings now. Next step is installing the upper panels with the intake slots added.

-
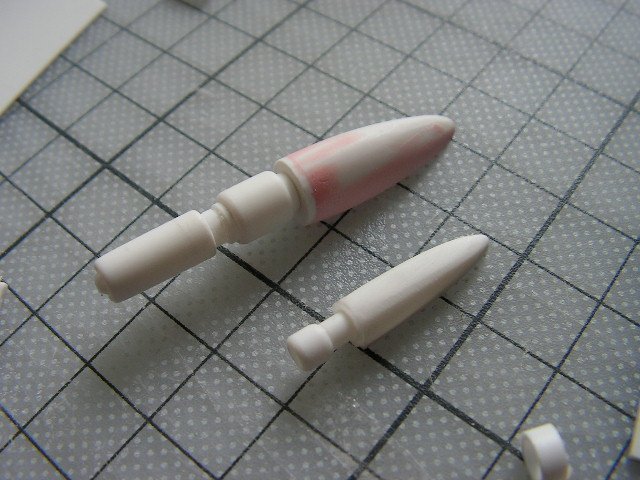
Hi jonn13! I think jardann is right, don´t forget the front ends! I guess painting the backplate black and highlighting the missile tips will help but if you really want to go into detail consider cutting away the back plate then making a new one further aft. Keep the missile tips, make them longer and glue to the new back plate. You could also add some styrene strips to simulate a kind of missile holding rack. The lineart for these guys is not very detailed and you won´t see too much of them in the anime so use your imagination! That´s why I like anime models more than "real" tank/plane kits. No need to count rivets! As for the thrusters, the first thing that came to my mind was a pic of a scratchbuilt Gundam in the Sentinel artbook. Maybe a bit over-engineered but it shows what CAN be done. Sorry for the bad pic had to photograph it since my scanner sucks, hope you still see what I mean.

-
Thank you Bromgrev - By the way that´s pretty perfect German - another German speaker on this thread?? Grayson72 I think you are completely right. I won´t glue the missile banks on and cast them as separate pieces. Better for casting and I guess model builders will like a little more assembly better than just glueing three big chunks of resin together. Since I´m one of them I will keep that in mind. Same thing with the engines. If I just wanted to scratchbuild them I´d build them in one piece(each), but since I´m taking the casting process into account I think it is better to go with three parts - front intake plate, middle section, exhaust plate at the end. I already have sleepless nights just figureing out how to produce the least visible mold seams...