
MechTech
-
Posts
4701 -
Joined
-
Last visited
Content Type
Profiles
Forums
Events
Gallery
Everything posted by MechTech
-
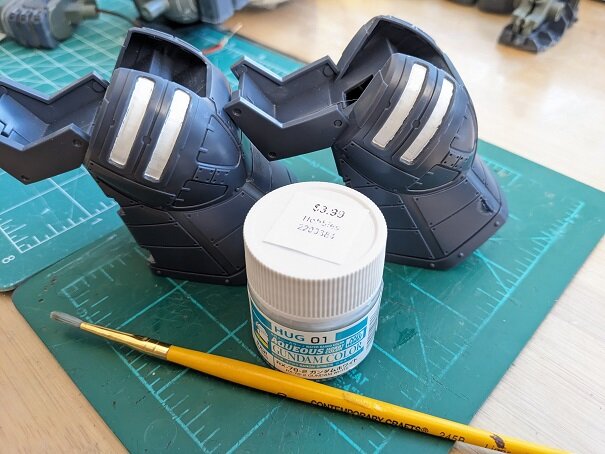
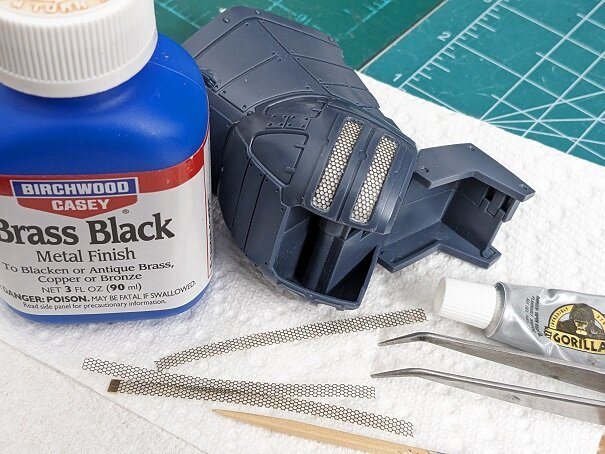
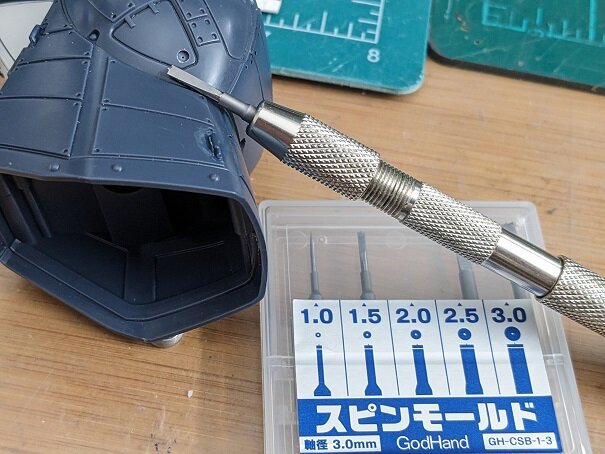
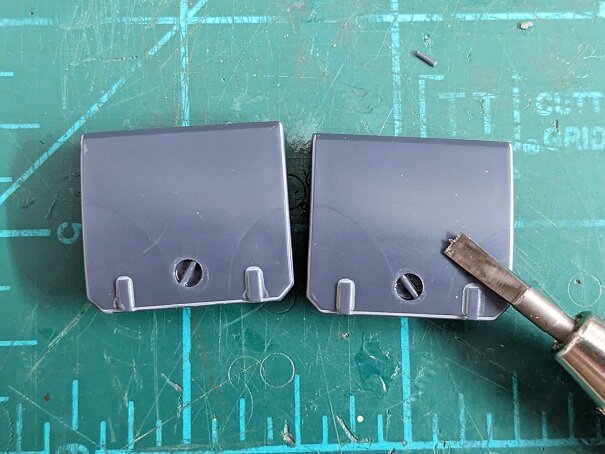
A little more progress on the 1/35th Dougram kit. The cooling vents (I think they are) in the legs would have nearly vanished if I merely scraped them off and covered over with the blackened brass mesh. So I scraped them off and coated them with a whitish-gray coat (actually three to get it solid - I hate white paints). The paint edges were later scraped clean (not shown here yet). Next came the fun part of custom cutting and blackening the strips of photo-etched brass mesh. Then gluing them into place. I think they stand-out better and give it more character. Next, I used the overly priced - but REALLY COOL God Hand bits to make handles in the leg hatches and "upper calve" hatches. You can see the difference in details. That and a fine Gundam marker. I also added all sorts of bolt heads around the leg pieces, but don't have photos yet. Thanks for checking in guys! -MT

-
AWESOME!!! - MT
-
@Cheese3 The first picture - "Oh no! The Zentraedi are coming down our street again!" The last picture - That's just tooo funny! Congrats on a beautifully finished model! - MT
-
@Thom, @wm cheng, @Gabe Q Thank you, guys; I appreciate it! I'm trying to make this a cool build for upcoming shows. A lot of people never even heard of Dougram, so this might inform them. The cockpit will be the fun part! - MT
-
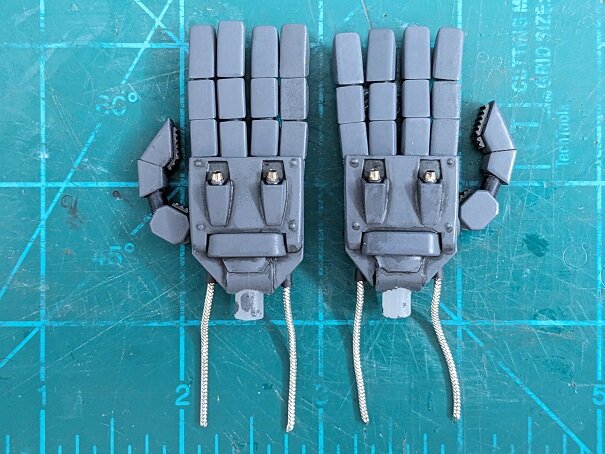
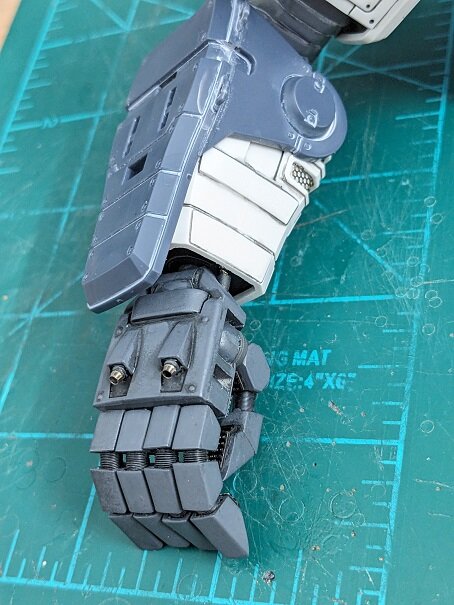
Thanks Thom! Here they are above and below. The only stock thing left is just part of the hand's back. - MT
-
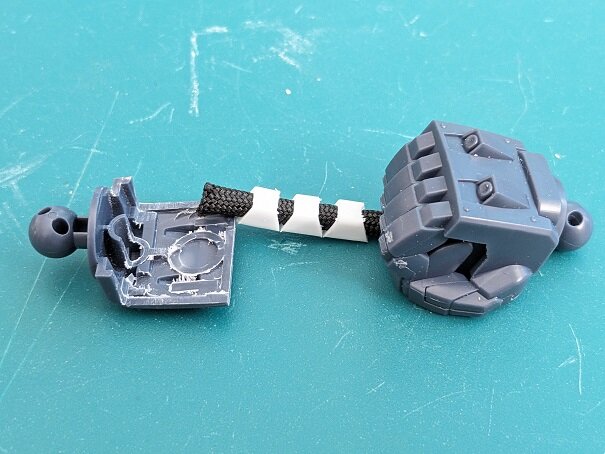
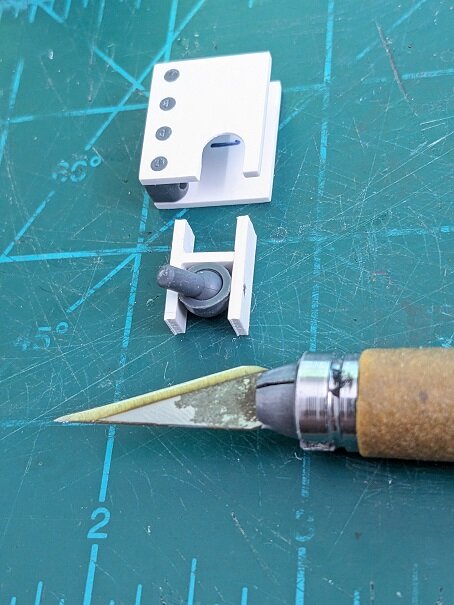
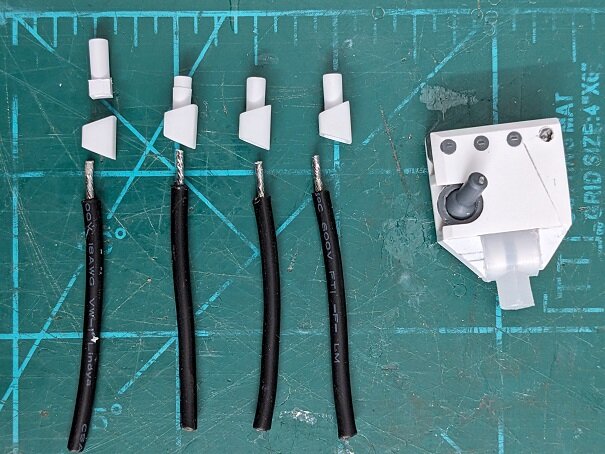
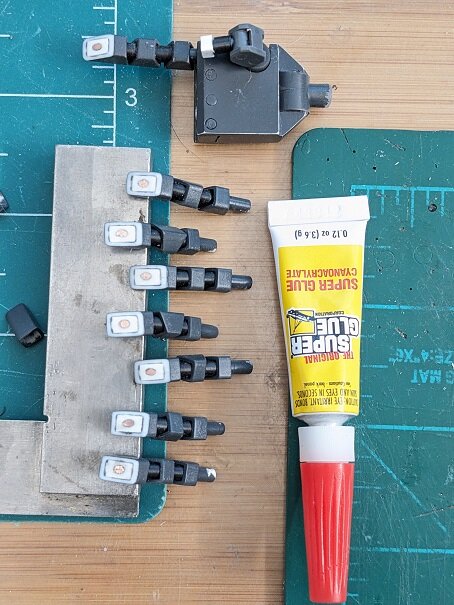
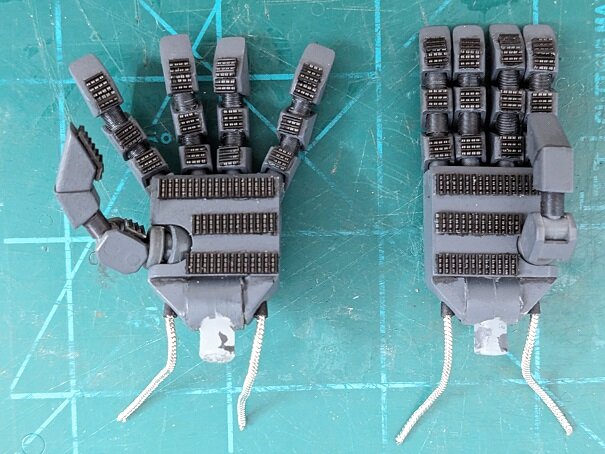
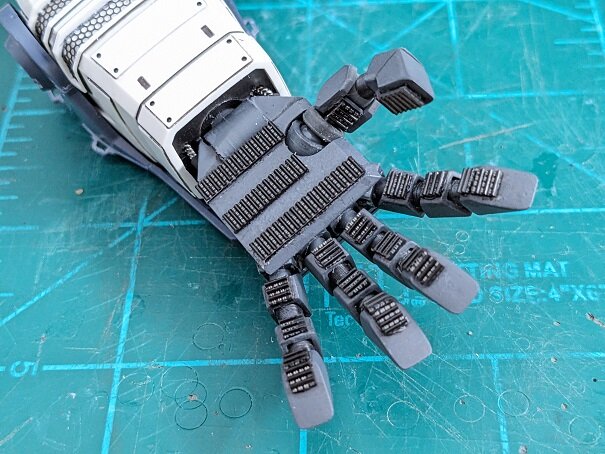
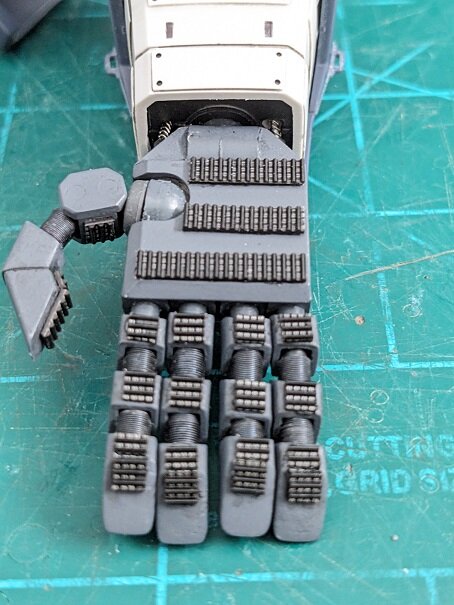
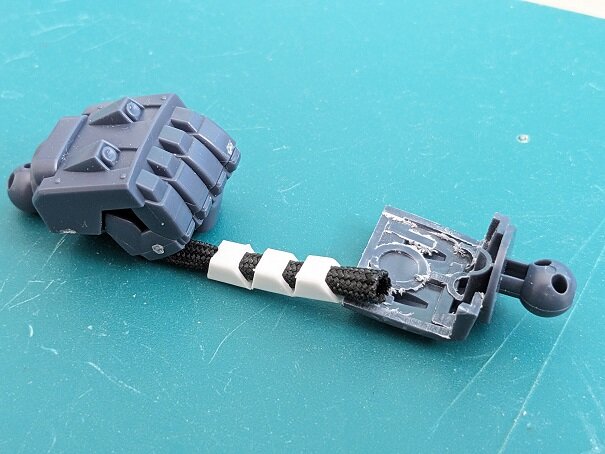
@Cheese3 That is a COOL and UNIQUE scheme! Unforgettable too! @electric indigo Looking good! I miss my ole' 1/100 scale vinyl kit of that I used to own. @joscasle Those fighter look BEAUTIFUL!!! The exhaust finishing is realistic too and tough to re-create. ANYBODY need a hand?!😁 My apologies for all the hand construction photos, but I thought they might help somebody out with scratch building or modifying their kit's. As you saw before, the stock hands that came with the 1/35th Dougram are lacking. Plus, they're only fists, so, no posability or second pose of hands comes with the kit. First I had to create the palm and thumb joints. The ball joint is on a hinge (you can hardly see it here). The finger bases are all leftover Gundam polycap pieces. The palms were two styrene pieces glued-together and cut/drilled out to ensure the finger joints line up. The bases of the fingers were cut from Evergreen square stock and square tube and lathed to make round ends. Thick wire was tinned on one end to be glued into the finger bases. How do you paint all those hollow finger joints without them moving around? I thought about it for a while. The answer, para-chord and a hack-saw frame. Here you can see how the pieces of finger went together in segments. The finger tips were solid, square stock, drilled out. Then they were filed to match the finger tip shape. Finally, they got two coats of CA glue to fill any cracks and smooth them over before a light sanding. I used Hi-Q 3.4mm springs to cover the mid-sections. They are SOFT and NOT springy at all. They almost feel like fabric, but ARE spring steel. And the fingers dry-fit to test them out. Then some paint to cover the dark primer color, a little panel liner, and Hi-Q 2mm gun barrel nozzles. The barrels are steal which meant I could heat them up and give them realistic heat wear. The final step was to take an old printer belt and cut segments out to fit the joint pieces. I used Gorilla Glue Clear Grip and CA to make them stick. Hopefully the added materials and colors add realism to the hands. The final photos are to show how the hand cables (costume jewelry "chain") or hydraulic lines fit into the arm to add details. The cables just fit loose so the hand can twist easily. No weathering yet. It would get rubbed off while I still continue to build the model and modify it. Again, sorry for all the photos, but I hope they inspire; and thank you for your feedback and ideas! - MT


-
@pengbuzz That's cool! I like the packaging label too! - MT
-
@pengbuzz That looks awesome! It almost sounds like the real thing too😁 Nice recovery and the rebuild is MUCH more reliable than stock - I'm sure! Nice score at the market too! @Goodman Models Thanks! Are you going to weather it at all (minor of course). @F18LEGIOSS2 Great restoration! Those old toys deserve the love😉 - MT
-
@Thom @SteveTheFish Thanks guys! I'm thinking the lighter panel liner on the blue maybe TOO much contrast myself. @Chronocidal Thanks! The paracord is only temporary, but I almost used it. I'll be using spring steel tube to go through the joints with a copper wire core. There will be fingertips of some type. I'm still working out the design. - MT
-
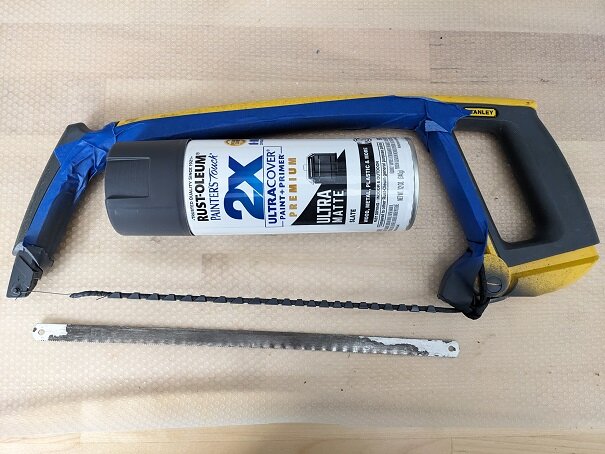
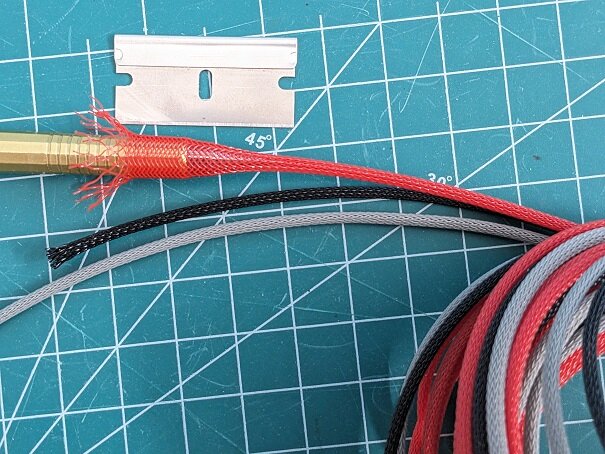
@Big s Thanks! You are absolutely right! People are SO distracted these days! EVERYONE! I thought you guys might like this. It's expandable sleeved tubing, or on models, meshed tubing. Perfect for details and builds. It comes in various thicknesses, the smallest being 1/8" or 3mm. It can expand to about 1/4" or more. The photo below shows my example over a mechanical pencil. It costs about .20 cents a foot and you have to buy at least ten feet, so about $2.00 - what a deal! Much cheaper than modeling accessories and you get WAY more! It comes in four colors. I should have gotten white, but didn't see a need for it. This stuff is awesome for mecha detailing and engine detailing. This tube is perfect with contrasting colored wire or tubing underneath it to add detail and depth. US Plastics sells it along with styrene sheets (and tons of other cool stuff) if you want them LARGE! They also trim the sheets down for a fee. Just thought I'd share this cool stuff! https://www.usplastic.com/catalog/item.aspx?itemid=133515&catid=1051 Working on the 1/35th Dougram hands now. I cut pieces for the finger joints and test fit with paracord for the core, but will substitute it with coiled springs. A copper wire core will make it posable. You can see the original fist has little detail in it. No other hand options either, so that why I'm making it new hands. Thanks for checking in guys! - MT

-
@wm cheng That indeed was a GREAT and patient save! I would have stripped the whole thing down and started over! @pengbuzz WOW!!! More flashbacks! I used to have that kit! The blimp used to fly over my house all the time back in California. My dad and I would hear those lumbering engines and run outside to see the cool animated graphics at night. I even remember the race car sequence in the photos above! - MT
-
Cooool! - MT
-
@pengbuzz Cool! An unusual subject too! - MT
-
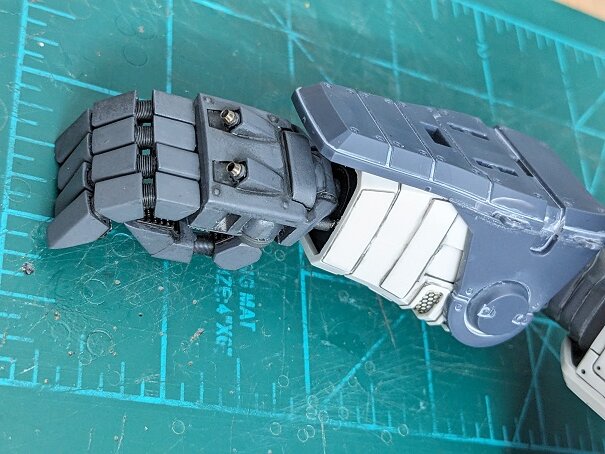
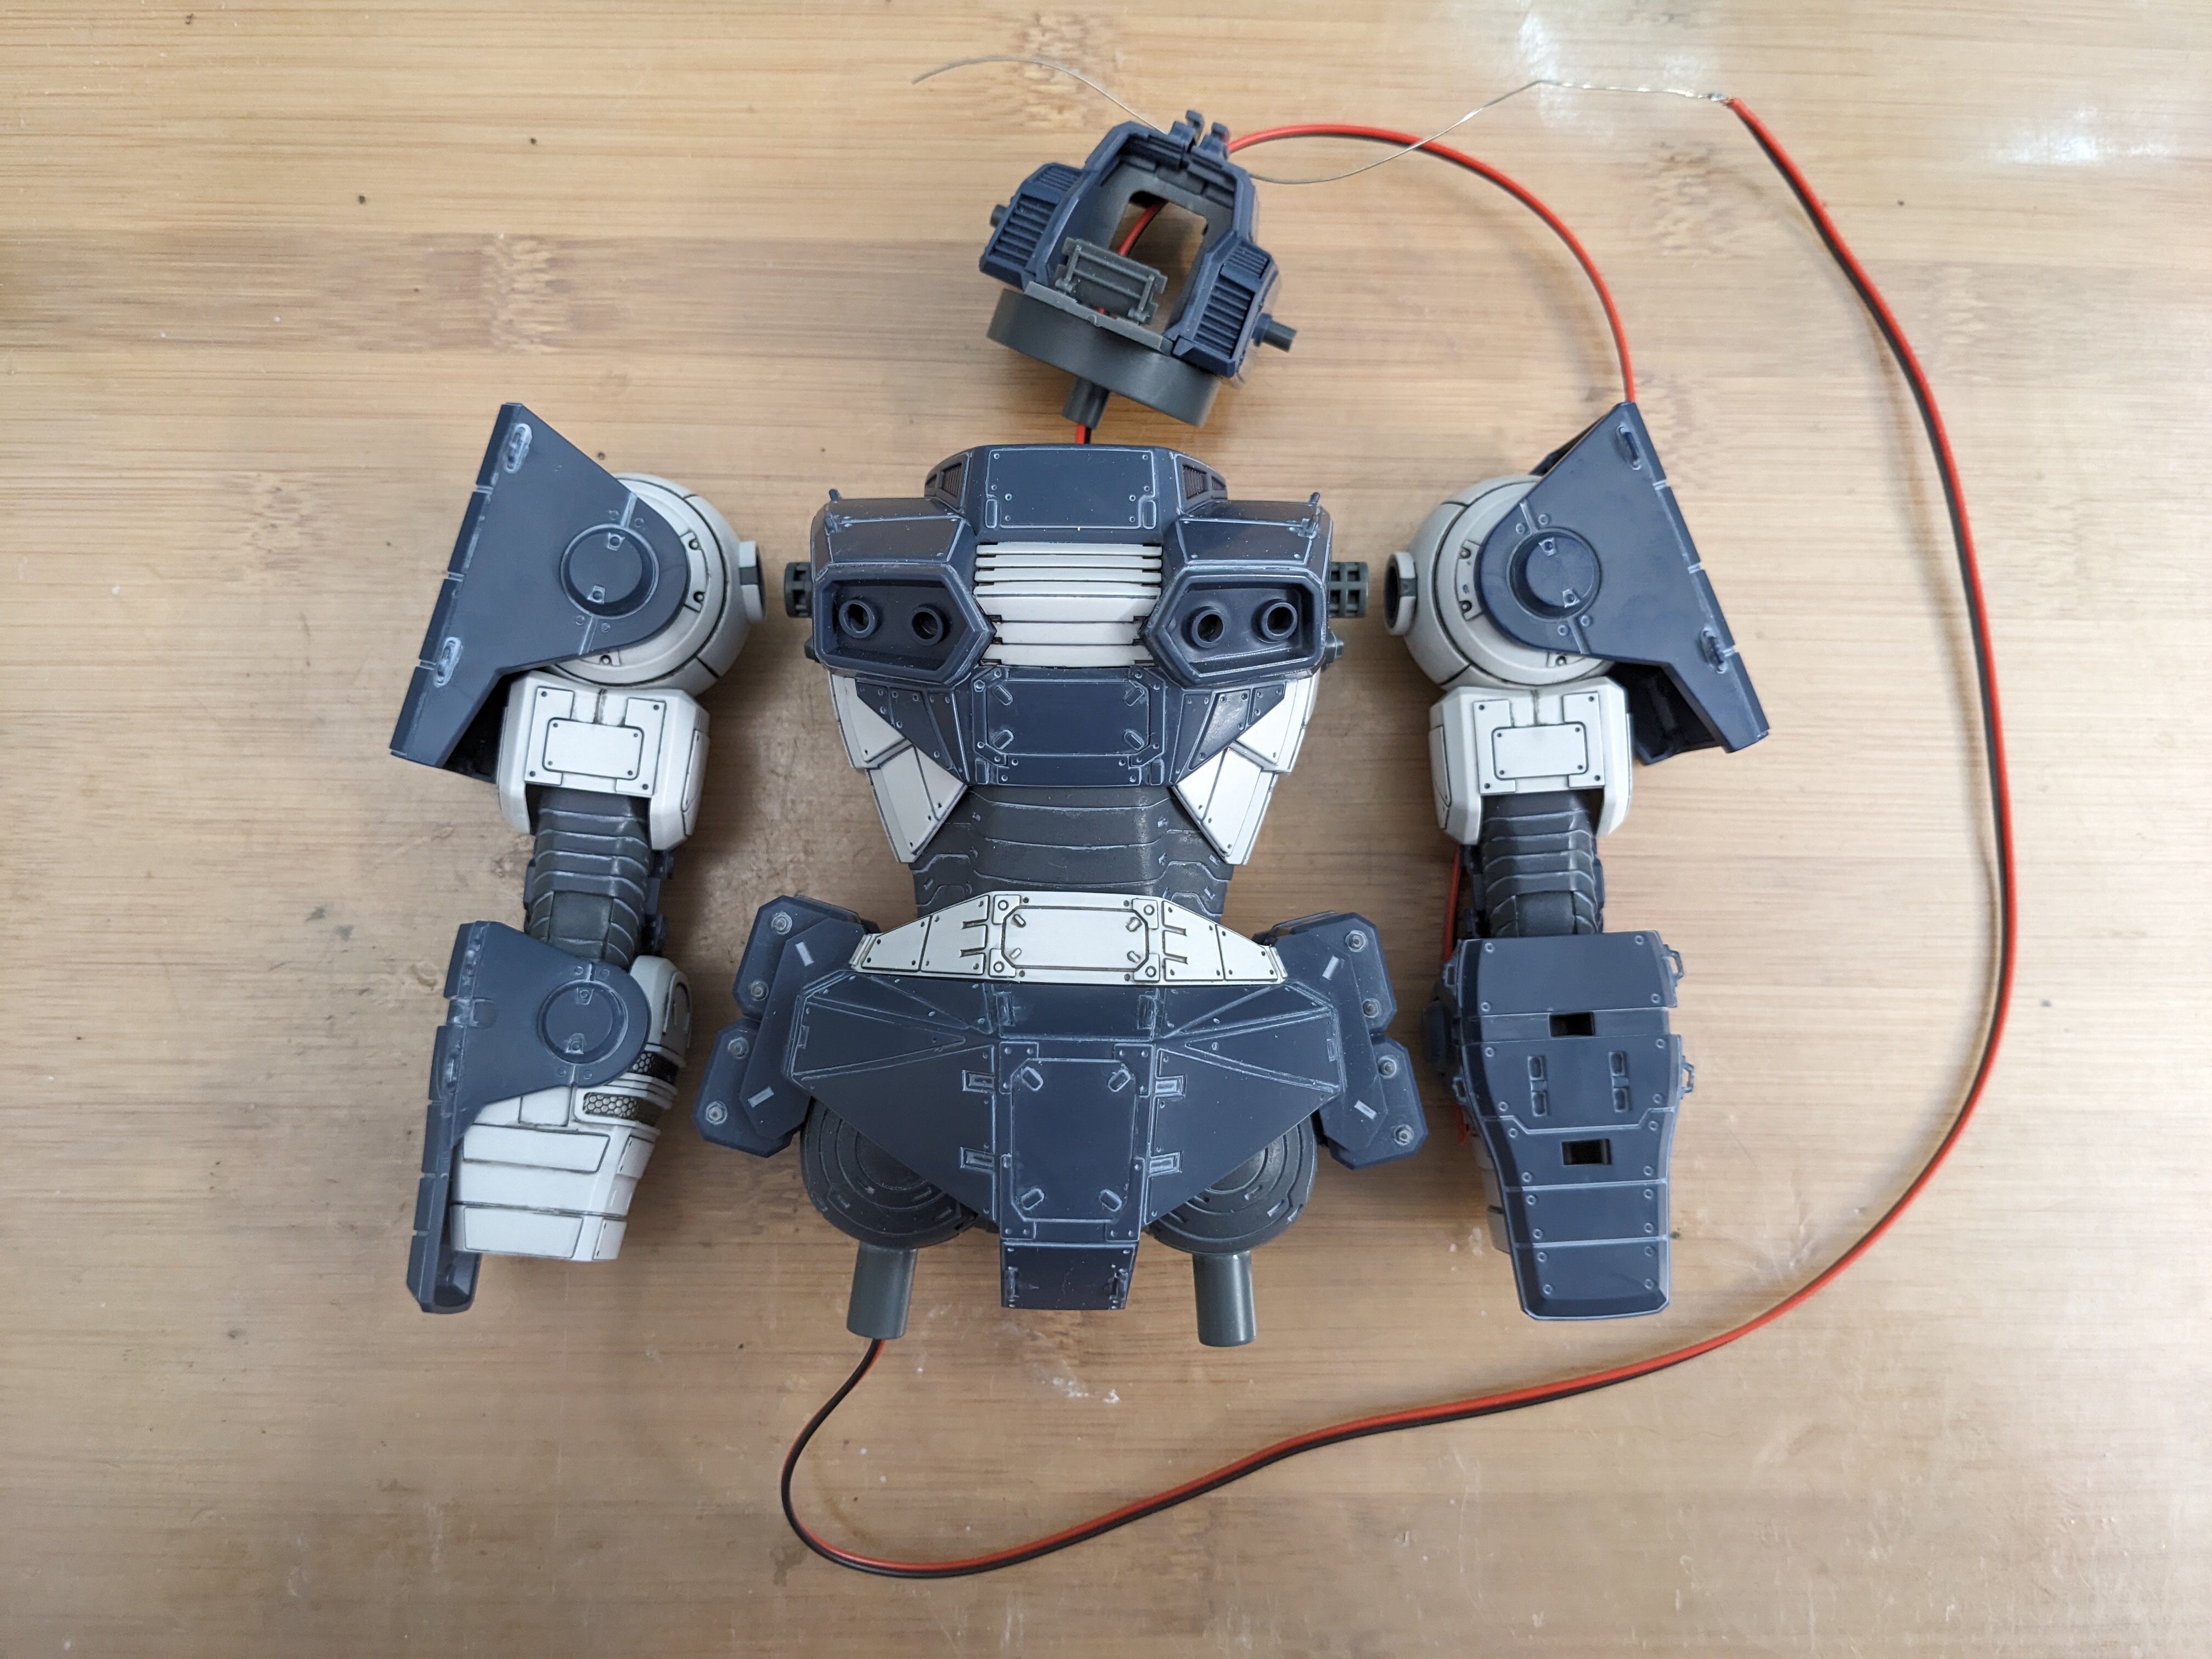
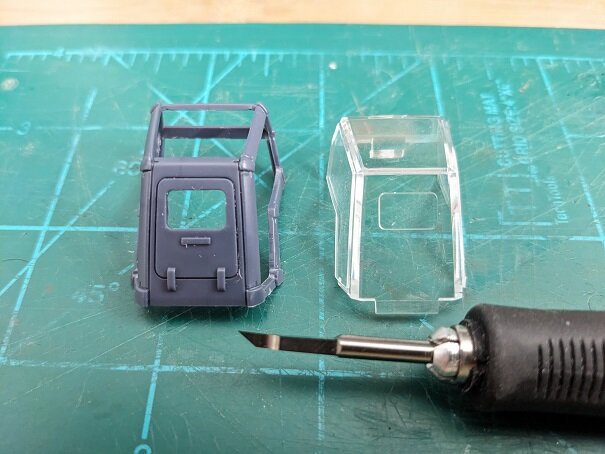
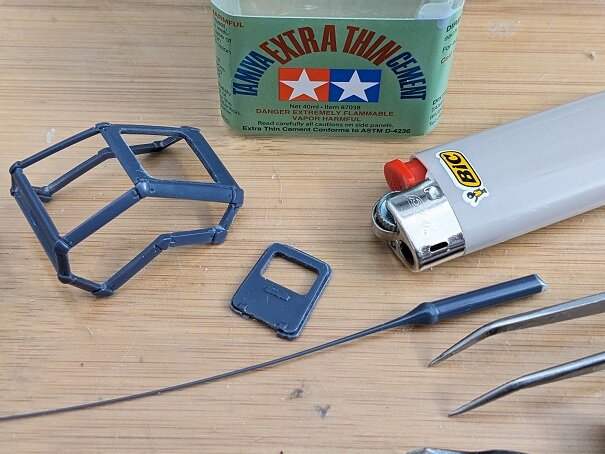
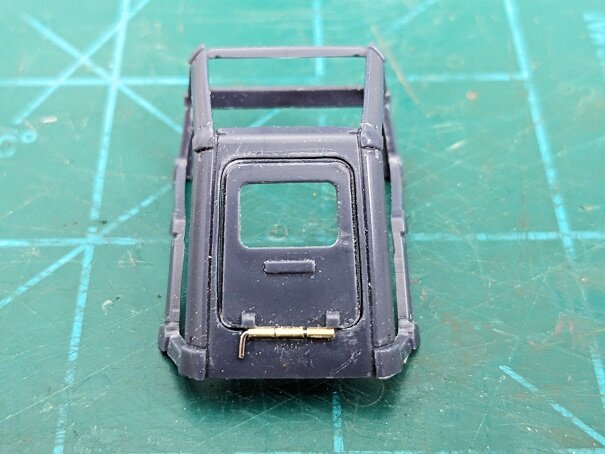
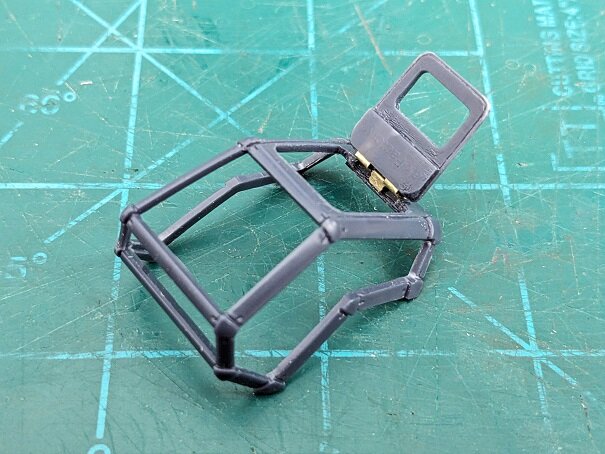
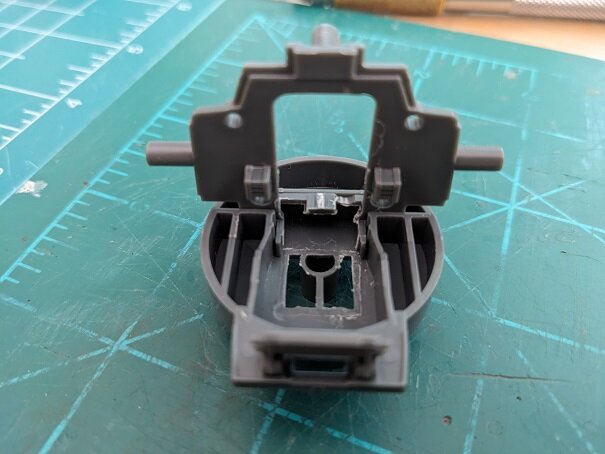
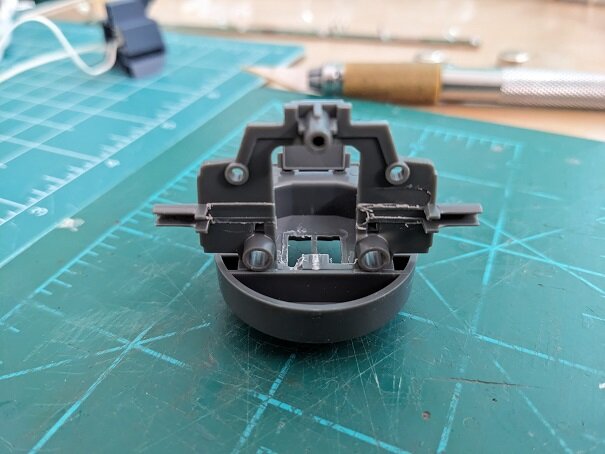
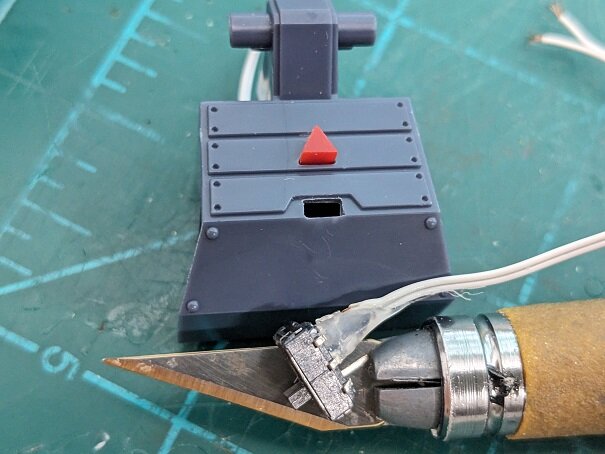
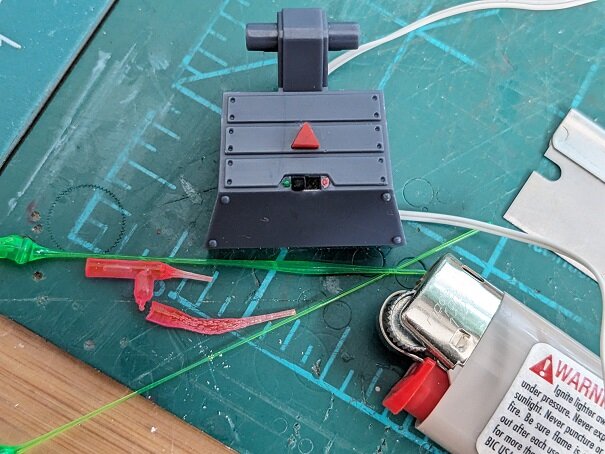
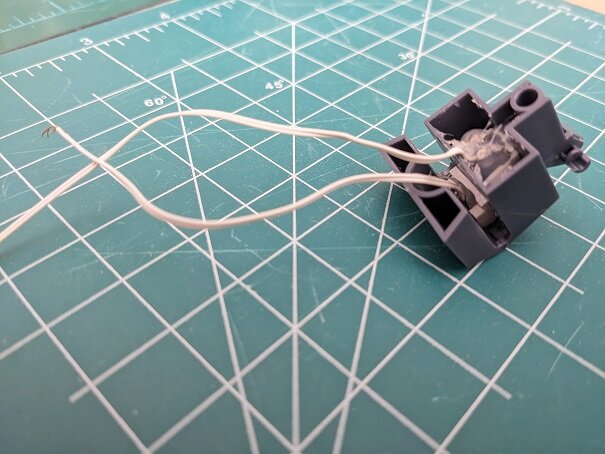
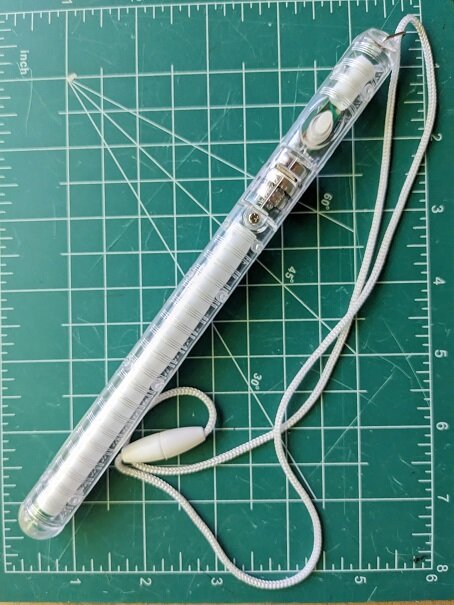
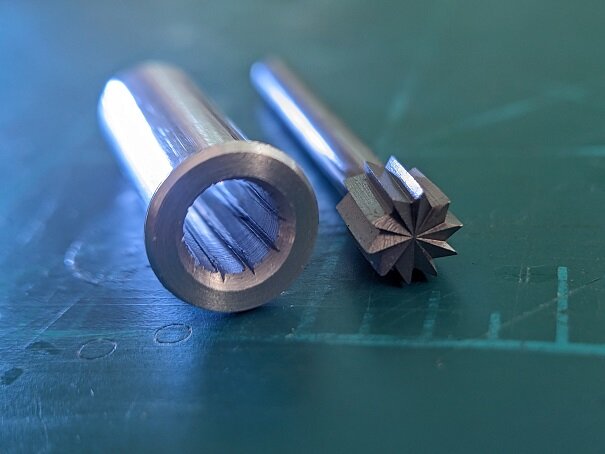
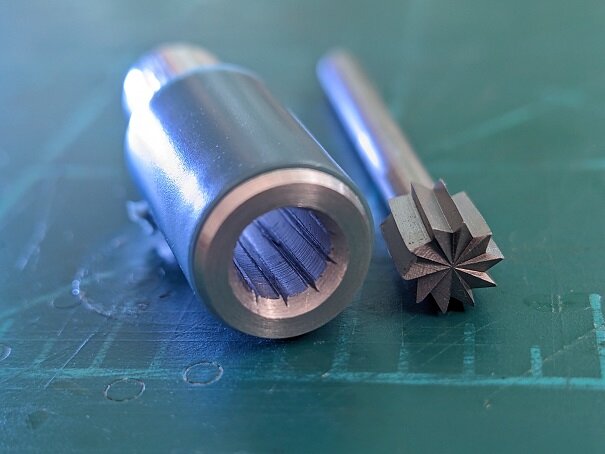
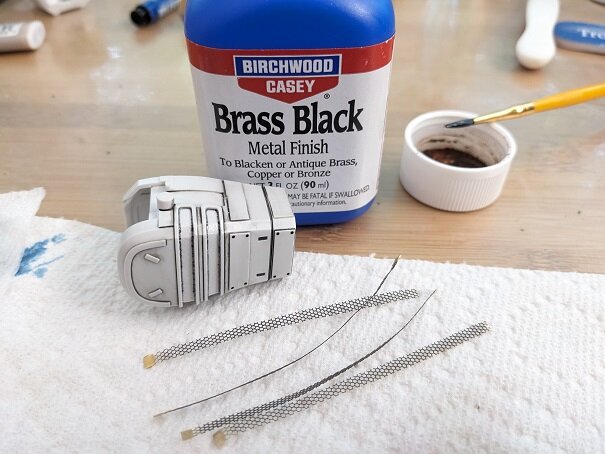
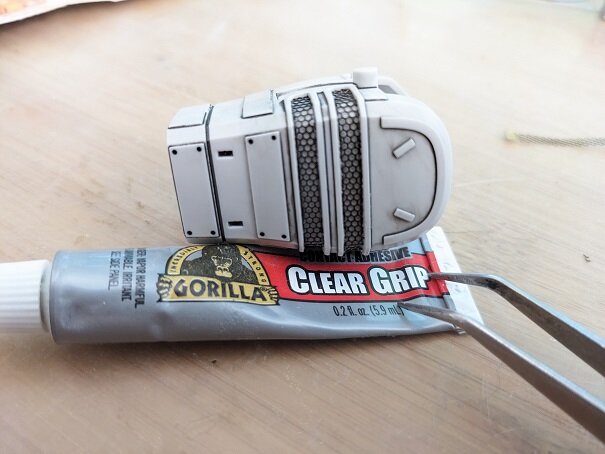
First off, my apologies for not posting any projects in a while. I've just had less time for modelling lately. Also, my apologies for making up for lost time with a lot of photos! I put the scratch-built aircraft you saw me working on earlier to the side for a while - I got distracted. Long story, but I was going to get one of the 1/48th Dougram "Blockheads" that were marked down at Wise Guys for box damage. But, I waited too long and they sold quick! While looking online, I forgot all about Max Factory's 1/35th "Dougram Version GT, DX Complete Edition." It's been released for awhile now. At first I wasn't interested because it's not canon to the original anime. It is revised (DX) after a newer comic. Also not canon means I can make slight changes without "screwing up" anything. But the DX Complete version has all the original main "Fang of the Sun" characters and everything is a BIG 1/35th scale! I saw it on sale fora GREAT price and got one! The kit is BEAUTIFUL and BIG! My only gripes so far is that a few pieces had slight fit issues making hiding the seams difficult. Also, for a large 1/35th kit, the cockpit is a bit sparse for details. Finally, several parts were molded with voids in them instead of making them two-pieces or molding them solid. A perfect example is that ALL of the red roll bars are hollow with voids in the underside. They aren't solid or completely round. They're about the same thickness as the sprues too! I'm sure they did that to minimize shrinkage in the plastic while cooling, but it's a bummer when you take a good look at the kit. There a few other parts made the same way. The great part is that they've done like Bandai and made most seams and sprue gates invisible or hidden. Some sprues are molded undercut to hide stress marks. And the whole thing is molded in the various colors of the design. You can get away without painting it if you just want a cool model for your display case. ***FIRST OFF - QUESTION***: With two main colors, I experimented with two colors of Tamiya Panel Line Accent Color, Light Gray on the Blue and Black on the Light Gray. Does it look overly contrasted, should I go with only one color - black? Or, does it look good as is? It will be pretty weathered. Dougram was ALWAYS getting shot up in the series. In fact, my son and I JUST finished watching it for the first time. You'll also see LOTS of hand-holds all over this thing. I had to drill them out and clean them up with an Xacto knife. The kit is AWESOME on may levels. One is that the cockpit window and frame are TWO pieces. NO MASKING! The downside, no opening top hatch. So I took a DSPIAE 0.1mm scribe and etched it completely through. Of course it wouldn't fit anymore, so I surrounded the door with sprue and sanded the edges to fit. Next, I made very simple hinges by cutting .015" brass sheet with scissors and folded it around .020" wire. Then crimped it with pliers. ANYONE can make these simple hinges! Then just to make it more rugged, covered the hinges with filed-down sprue sheet plastic to match colors. No scratching after painting here - there's only touch up paint needed! NEXT, I have to drill-out the window to match the hatch area and for the top hatch. My evil plan is to make animated cockpit displays with a strobing LED circuit. The board needs a place to fit, so I milled out the rudimentary seat and back wall to fit in a 1/32nd ejection seat with better details and fit the board in on the backside. The center tab was also drilled out to fit the battery wires through (as in the first photo). Here's the LED circuit, a $1.50 to $2.00 toy at most online shops. You've seen me use them MANY times here on the boards. It has multiple colors and 7-8 modes you can select. When the circuit board is cut up, it will fit here below: This will be the cockpit front. The circuit has to be close by, so I made the switches near it too. A power switch and a button to select the flashing modes. EVERYTHING got CRAMMED into the small back head piece. They were then glue-gunned in place to keep solid. Clear red and green were used for solid color "on - off" markers. The non-canon red button looks like it belongs and the switch is TINY. The LARGE shoulder cannon (Linear Gun) had a shallow indentation for the barrel muzzle. Again, for a kit this big and detailed, not cool! So, I machined a partial barrel liner sleeve out of aluminum. Then I "rifled" it with a Dremel bit by carefully ramming it through with my lathe drill section as a press. It does have a slight twist. Two had to be made before one looked alright. The sleeve on its own, and inserted into the barrel muzzle piece are below. The molded detailing on this kit beautiful!!! Since I'm thinking of entering this in a future modeling show, I'm adding extra details. The original screen mesh molded into the arms was replaced with photo etch screen. The original detail is alright, but the edges lose detail because of how the molds work in only 2 dimensions. I scraped them out and cut mesh to fit. Then colored the mesh with Brass Black and glued them in place with Gorilla contact cement. Now they stand out better too. Again, GREAT molded details on this kit! That's it for now. Thanks for your opinions and checking in! - MT
-
Oooh! !/20th! Thanks for posting! - MT
-
@pengbuzz WOW! Great modifications and COOL work on the stand! It looks great and is a nice touch to the project. I'm sure most people don't have a key either😎. @Urashiman DUDE! I'm like having 80's flashbacks with that Modela CO2 engine and shaped foam fuselage. I had a one of those engines, but never really used them. They were little gems. A lot of power for weight to power ratio too. That plane will run awesome with a brushless motor too! - MT
-
@F18LEGIOSS The decals look cool! @Goodman Models That Gundam Booster Unit brings back some 80's memories! The paint, especially the faded blue and custom colors with the extra details looks awesome! @Cheese3 Thanks for sharing! That looks like a great kit and pretty big too! @Urashiman WOW! Now that is OLD SCHOOL!😁 Also, REALLY COOL! I haven't seen a balsa and doped tissue kit in decades (we used to sell them too). - MT
-
I agree with keeping it original. In art, you should keep symmetry to some degree. Mixing angles with curves can backfire - not always - but it can. It does here. - MT
-
@Chas @wm cheng That's the stuff! Clears acrylics off in a short soak. Enamels may take longer, even a day or too. It only requires a cleaning with soap and water afterwards. I've used it on many things, even saved an old 80's kit I got that was already painted. No harm done in any way and its CHEAP! - MT
-
@pengbuzz Sorry to say this, but I'm GLAD it fell off the shelf. You're improvements have made it look much more realistic and COOL! @wm cheng Holy orange peels Batman! Wow, sorry your finish came out like that! That is agrovating! If you have it in Canada, "LA's Totally Awesome" is a cheap, general purpose cleaner that will safely strip styrene models. I've used it several times now with now harm to the plastic in any way. @SteveTheFish Your Y-wing looks great! I don't know about the gear though, I'm not that into the Force.😁 - MT
-
@tekering That's cool! The detail is pretty good too. @no3Ljm Thanks for posting! That is AWESOME! I like how the actuators are quiet. The motors don't sound like a garbage disposal running like some projects have had. - MT
-
@sketchley Honestly, I would do a little at a time and build it up - do a test. Sometimes some of the paint may not break down. That's an issue if you're going to airbrush. I hope it works out for you! The fighters came out great! Nice squadron going on there! - MT
-
@derex3592 That Super Hornet looks realistically weathered! GREAT job on the finish over all and congrats! @sketchley I have Tamiya paints about 30+ years old (plus means I don't remember HOW old - maybe 40 years)😁 I've revitalized them too. You just have to watch the goop in the bottom. Sometimes they don't always thin out right - especially for airbrushing. - MT
-
@sketchley Wow! Lots on your bench! It is COOL haw they designed the Gundam kit for beginners and then said, "For experts only" and added instructions for advanced articulation! The advantages of living in Japan... I couldn't live there. I'd be broke or lose too much weight from blowing my money on hobby stuff instead of food!😁 - MT
-
Cool and no problem! - MT
