MechTech
-
Posts
4691 -
Joined
-
Last visited
Content Type
Profiles
Forums
Events
Gallery
Everything posted by MechTech
-
@nightmareB4macross The landing gears look cool! If you want to go slimmer, you can use K&S Metals. Their brass or aluminum is easy to work with and is more durable and will last longer. - MT
-
@nightmareB4macross That '55 just keeps getting better and better!!! @pengbuzz YOU are an AWESOME sculpter! I cannot sculpt people to save my life! But your figures look AWESOME! Especially considering what they used to be! Congrats on expanding your ship's crew. - MT
-
@wm cheng I'm REALLY sorry to hear about your water heater and then the mess on your bench! I've seen the Mythbusters blow up some water heaters (and "houses"), so thankfully your wasn't worse! It also sounds like the water heater techs were not very professional. They should've covered everything up. Thank you very much for the compliment! No, I have not seen that Cobra. That is really AWESOME, especially the other stuff that guy did. @Mog Those mods really added a lot more character! The only thing I'd recommend would be to panel line it. There's so much surface detail on it showcase. Overall, it looks great! @cobywan That's cool! I'm just usually around the model building section due to a lack of time. - MT
-
@pengbuzz AWESOME job modifying that Bird of Prey! I was thinking of using good ole' K&S brass tubes, but @Chronocidal has a great idea for Lego hinges! BrickLink or similar may have them individually for cheap. If you do go that way, you'll need Acetone to melt the Lego ABS to the styrene, but it will work. @derex3592 That's a GREAT looking A-10! Sorry about the over under-spray on the canopy; that sucks! All the same, it looks great in "Beast Mode" with all the armaments! @Thom Thank you, Thom, I appreciate it! @Cheese3 Wow! You are mixing different genre - and with alcohol! That's asking for trouble🤣 Congrats on getting some great looking builds done before the end of the year! @The Original Cobywan Wow! you're still alive! I haven't seen a post from you in years! That's cool you created that conversion kit! @Big s Thank you, Big s, I appreciate it! @Nyankodevice That's a BEAUTIFUL sculpt and drawing! It's good to see you back on the boards too! - MT
-
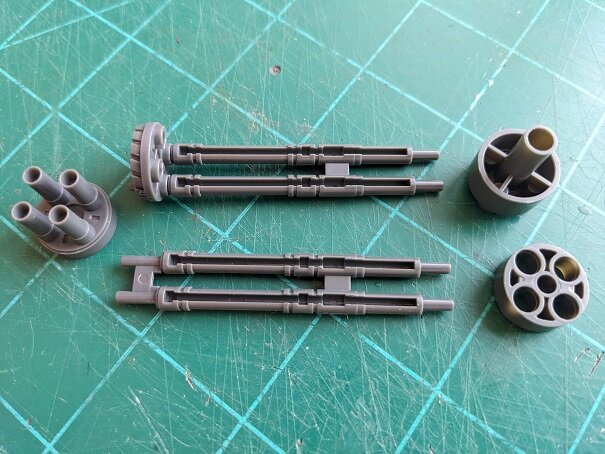
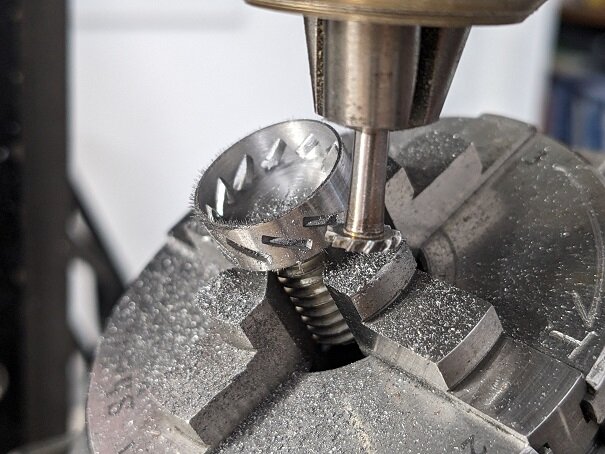
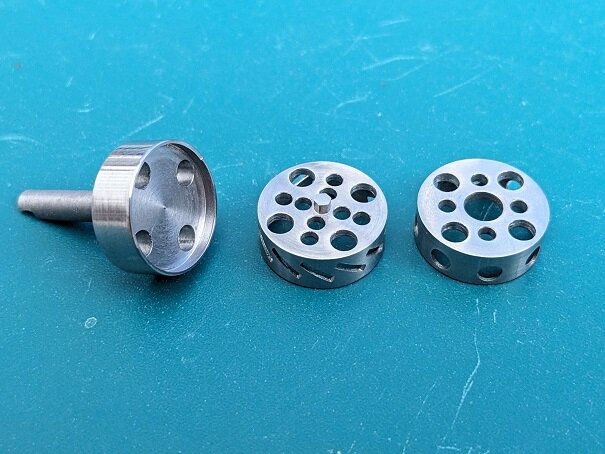
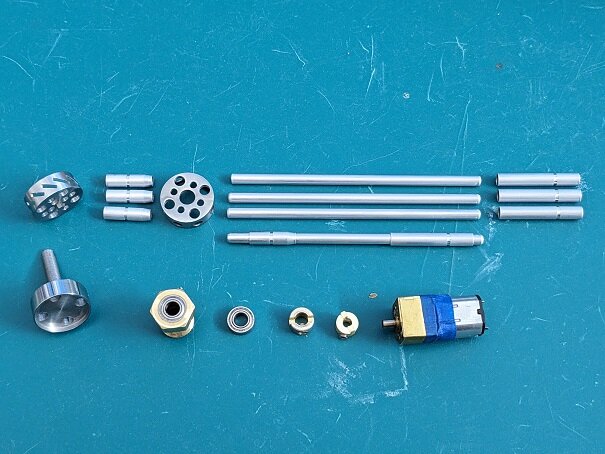
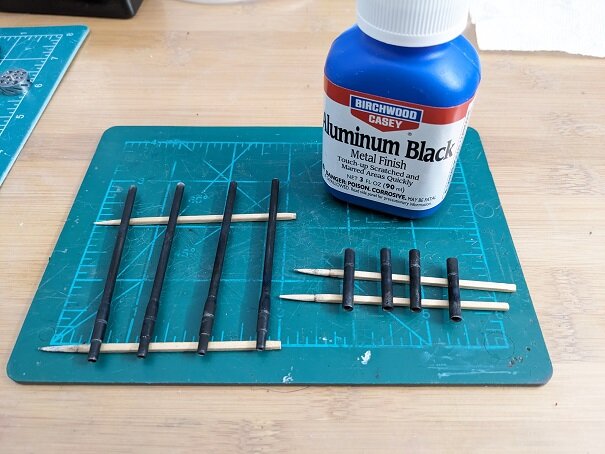
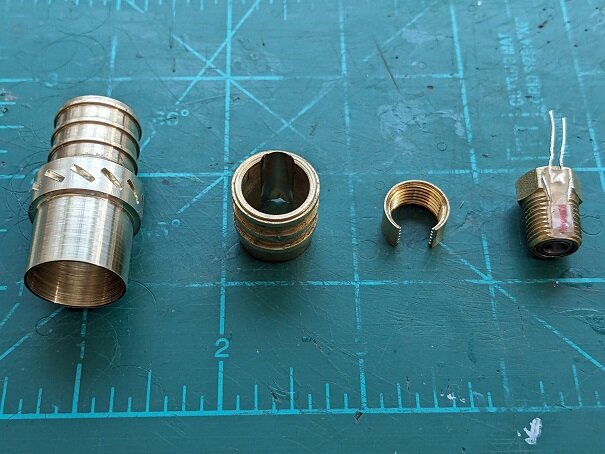
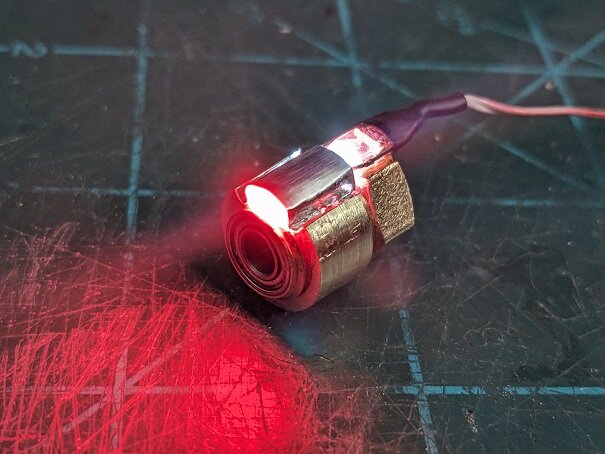
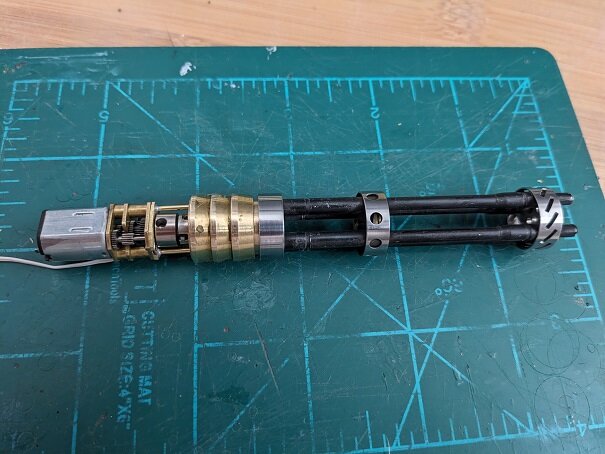
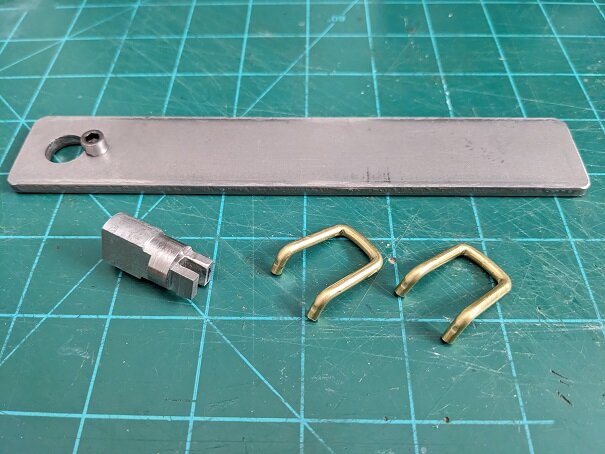
@derex3592 I LOVED building that kit with my son! The cannon are awesome how they progressively elevate. @electric indigo That Corsair is looking GREAT! There are some awesome molds from even 60 years ago! I guess its all in how much effort or skill was put into the mold. A lot of panel lines are too wide in scale, but current tech is limited to what can be done. @SteveTheFish I love the recon reconfig! It's cool that they made those conversion kits. @nightmareB4macross Those mods are looking GREAT! That is DEFINITELY going to be an improvement over the stock version - and then some! @pengbuzz GREAT change of paint on the kit! It does look like the scene you posted. I hope everyone had a Merry Christmas (and Hannakuh since it's still going on). I finally got some free time on the workbench and got somewhere on the Dougram kit. The first photo is from the stock Gatling gun barrels. You can see how all the voids molded into the parts REALLY detract from it! So I decided to rebuild it. Filling them neatly would take about as much work! The first step was to create the clamps and muzzle to hold the barrels together. Here's the muzzle getting hand machined - with a Dremel bit! Can you see how this was made from an old bolt head? See the threads? All three were to keep the colors the same. And all the pieces together including a center "nut" machined for the muzzle clamp. Then all the barrels were cut from simple K&S Metals aluminum tubing in two thicknesses. Old air line fittings were machined for various pieces including the bearing holder. A nice gear motor is what drives everything. It's quiet and has some torque. Then the barrels were blacked with acid. Which had to be redone since the first coat literally came right off!? Do you see the part on the left? It was an old garden hose fitting - now HEAVILY machined! The back part still has its barbs for the hose. All the parts fit inside of each other like those Russian dolls to keep the parts centered. Note the two LEDs in tandem for double the light output. And then covered to reduce the light. And everything connected together that slides into the "garden hose housing." The motor couplers were made as well because of the small size. The bench test (which actually rotates clockwise, but the GIF looks opposite). And with the light shining through the barrels... I can't emphasize enough how God was a HUGE help to me on this project! He even pointed out where I messed up with the main shaft. I couldn't figure out where I went wrong since it wobbled more than what you see. So many pieces just came together as I looked through my spare parts - it was no coincidence! I screwed something up, and it ended up working for the good! Especially with the brass pieces. There's still more to go on this. The handles and base with ammo cans are in the works. Thanks for checking in! - MT


-
@sketchley Those Death Star details are a vast improvement over the stock version. The red looks weird at first in assembly, but complete really pops for the right reasons. @Urashiman Great clean-up on the canopy and paint on the pilot! That's going to be a beautiful build! - MT
-
@pengbuzz WOW! That's a LOT of detail you put into the starship! It looks REALLY good and especially cool since it's a rare subject. - MT
-
Thanks guys! Yeah, the voids molded into the parts class as grand canyon gaps. I filled it way over the void to sand and it STILL had major shrinkage. The water evaporates and nothing is there to take its place in the formula. It's probably good for thin seam fills, but as Big s said, I just use CA myself. CA and Baking Soda for thicker expanses. Oh well, the voids are gone now😁 @electric indigo That is a BEAUTIFUL kit! Someone brought it in to our club meeting a little further along than yours and the cockpit details look awesome (out of the box). - MT
-
@Big s @Chas Thank you guys! I'm glad it's just not me! Whoever formulated that putty was on crack - or crack was part of the formula🤣 How are you supposed to sand rubber? That stuff would have been fine for calking tiny bathrooms, but not model building, that's for sure. - MT
-
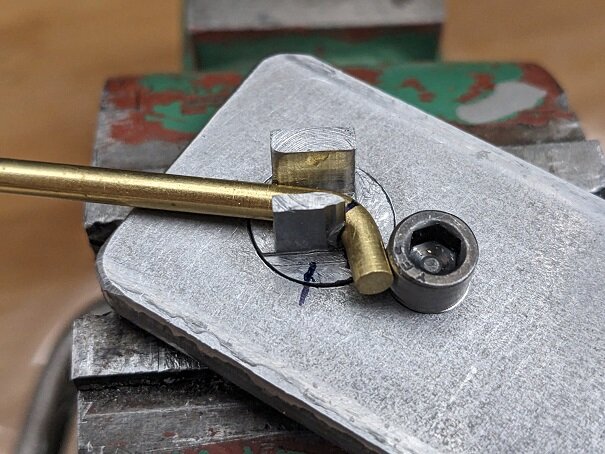
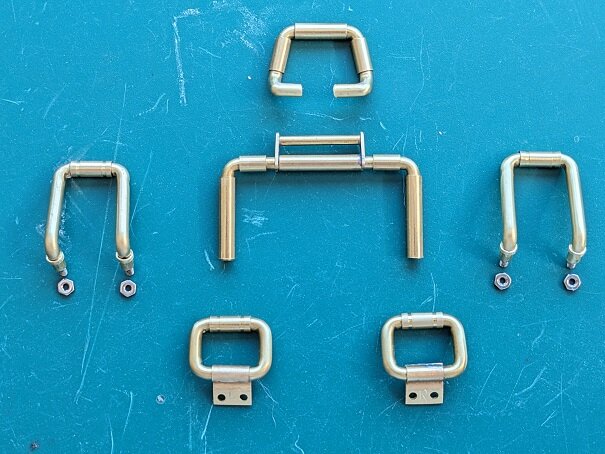
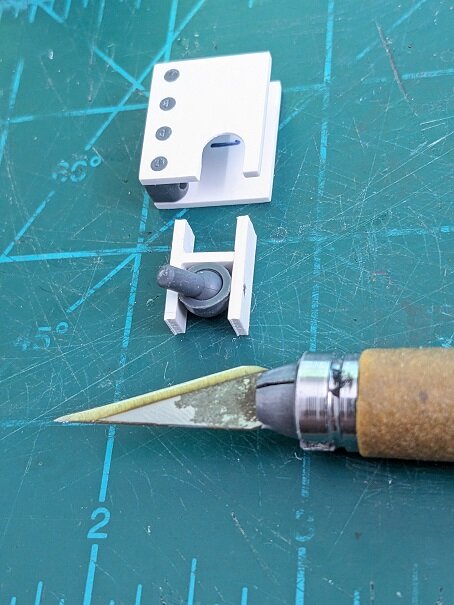
@pengbuzz That's cool! You continue to show that you are THE MASTER with a roll of tape! @electric indigo Beautiful looking paint and weathering on that SLUF! @Cheese3 For a second I thought you were building the Minerva and the related tank for Crusher Joe😁 You've also reminded me why I wouldn't let my children drink beer, play with guns, and ride German armor - all at the same time🤣 @derex3592 Great paint and panel lining! If you guys recall, I told you how the 1/35th Dougram kit has voids molded into a lot of parts. Roll bars or whatever you want to call them ALL were like that. What a pain. I tried filling them with the Vallejo filler and it SUCKS! I tossed it out since it dried like rubber and had MAJOR sinkage as it dried. So I've been trying to rebuild these dumb bars! I tried styrene. Its impossible to get the same temperature and bending radius. I litterally wasted several feet of styrene rod and sprue. I tried heavy electrical wire, but it wouldn't hold the paint with its flexible insulation. The only option was to bend 1/8" (3mm) thick brass rod. I encountered the same problems with it too. I finally realized I needed a wire bender. Sometimes you need a special tool for a special job. I watched some videos online and figured out the simplest version. Just three pieces for the whole thing! The base is a solid bolt body that the bottom half had filed away two sides so it would lock into a bech-top vice. Then that has a channel cut through it for the wire to go through. And finally, a socket head screw was threaded into it. Here's the parts with a couple of tests. And a close-up to see how simple it really is. You can see I filed away some of one side to work out the radius angles. Four weeks later, I FINALLY got a full set of roll bars! Thank God they came out OK and are done! This is where each roll bar goes... I think its on to the weapons back-pack next. Thanks for checking in guys! - MT
-
@derex3592 Paint looks smooth! Just watched one of those flying over and hitting targets in Syria. There's no replacement for that plane! - MT
-
@F18LEGIOSS2 Everything will scratch - sadly! However, Big s is absolutely right. In fact, sanding will give the paint more bite into the surface. I build a lot of parts like that and always try to get the correct color plastic so scratches won't show easily. But that's obviously not gonna work in your case. Like Big s said, try the lacquer paints. Maybe even an automotive rattle can if you can find them. Best wished with your paint! @pengbuzz Is that another masking masterpiece!? That looks cool and the detailing on the surface really adds to the depth of it! - MT
-
@derex3592 I loved that kit! My son and I built it years ago. I love how they engineered the guns to raise and lower sequentially. @electric indigo COOL! An Air Force Corsair! That cockpit looks great too! An Air Force livery Corsair is a rare bird. - MT
-
@pengbuzz@Thom @arbit Thank you guys! I hope to get more work done this weekend and post photos, but we'll see! - MT
-
Thanks for sharing! I'm not a toy guy, but these look great and have a lot of features that are accurate! - MT
-
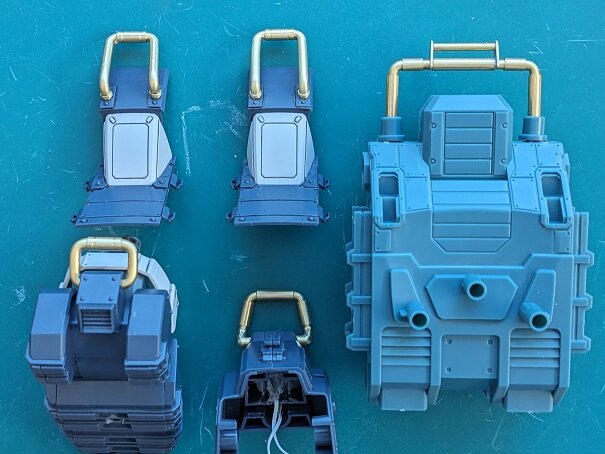
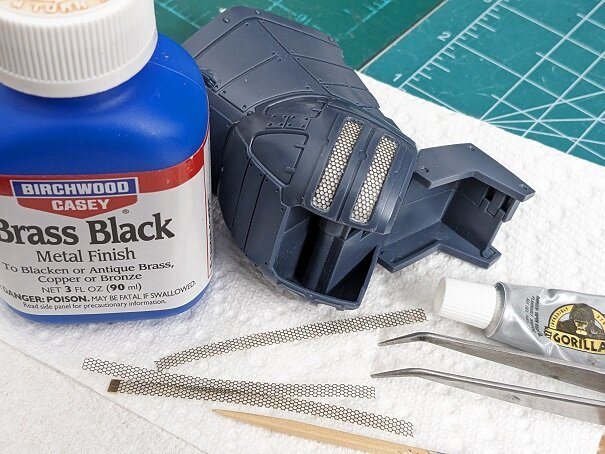
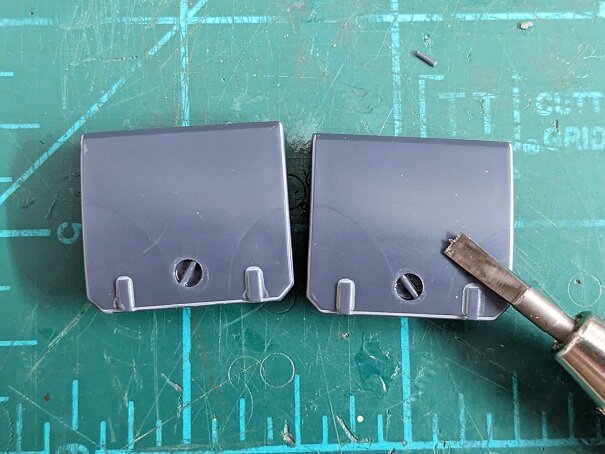
A little more progress on the 1/35th Dougram kit. The cooling vents (I think they are) in the legs would have nearly vanished if I merely scraped them off and covered over with the blackened brass mesh. So I scraped them off and coated them with a whitish-gray coat (actually three to get it solid - I hate white paints). The paint edges were later scraped clean (not shown here yet). Next came the fun part of custom cutting and blackening the strips of photo-etched brass mesh. Then gluing them into place. I think they stand-out better and give it more character. Next, I used the overly priced - but REALLY COOL God Hand bits to make handles in the leg hatches and "upper calve" hatches. You can see the difference in details. That and a fine Gundam marker. I also added all sorts of bolt heads around the leg pieces, but don't have photos yet. Thanks for checking in guys! -MT

-
AWESOME!!! - MT
-
@Cheese3 The first picture - "Oh no! The Zentraedi are coming down our street again!" The last picture - That's just tooo funny! Congrats on a beautifully finished model! - MT
-
@Thom, @wm cheng, @Gabe Q Thank you, guys; I appreciate it! I'm trying to make this a cool build for upcoming shows. A lot of people never even heard of Dougram, so this might inform them. The cockpit will be the fun part! - MT
-
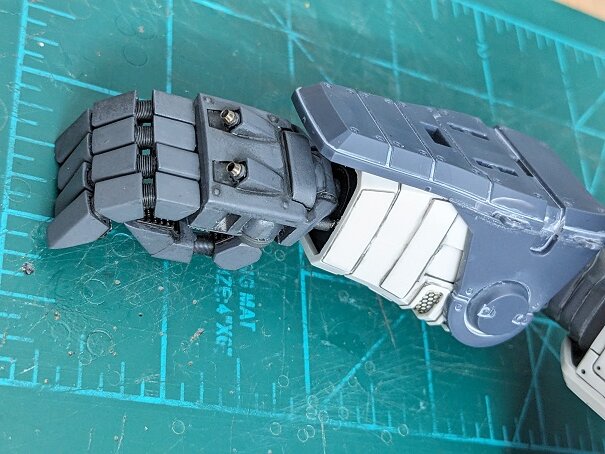
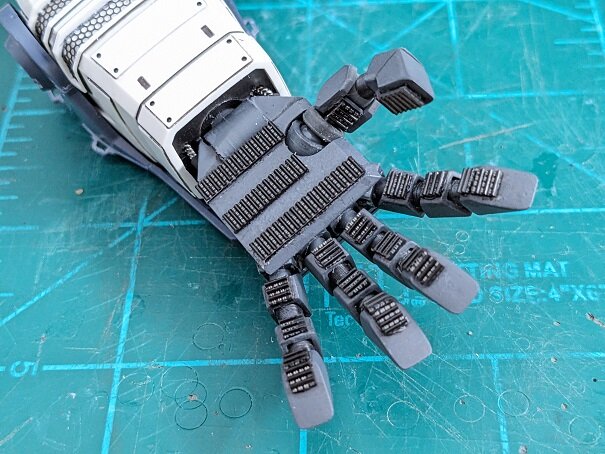
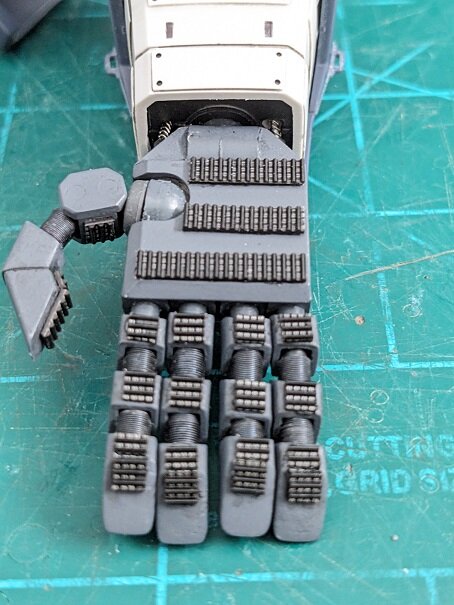
Thanks Thom! Here they are above and below. The only stock thing left is just part of the hand's back. - MT
-
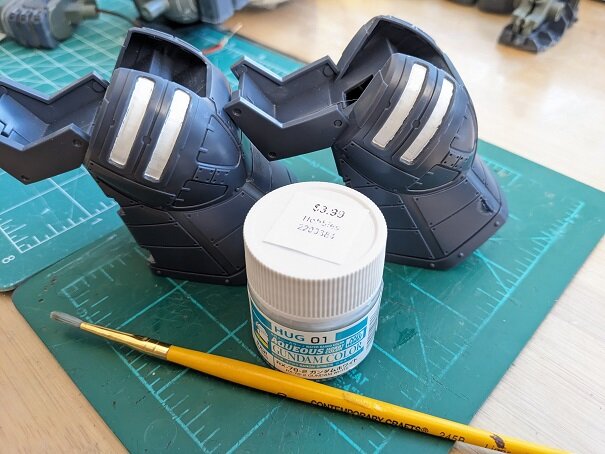
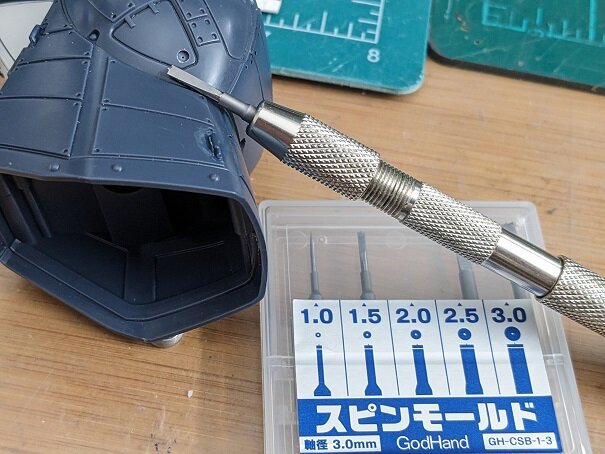
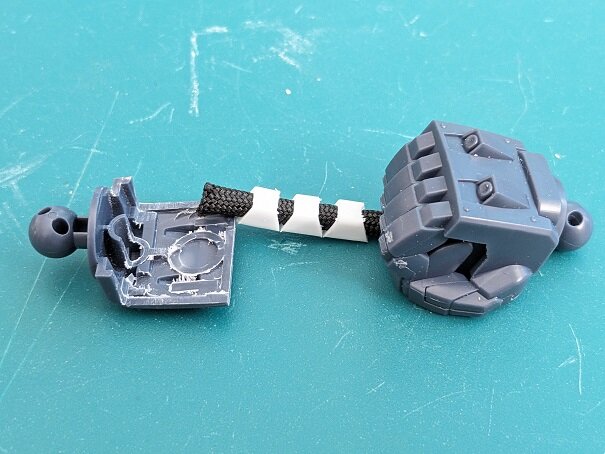
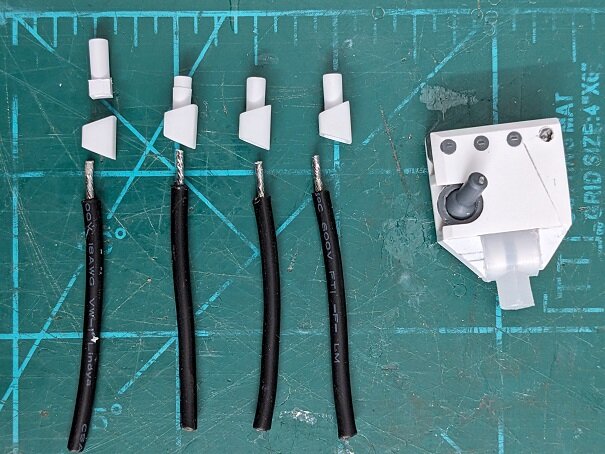
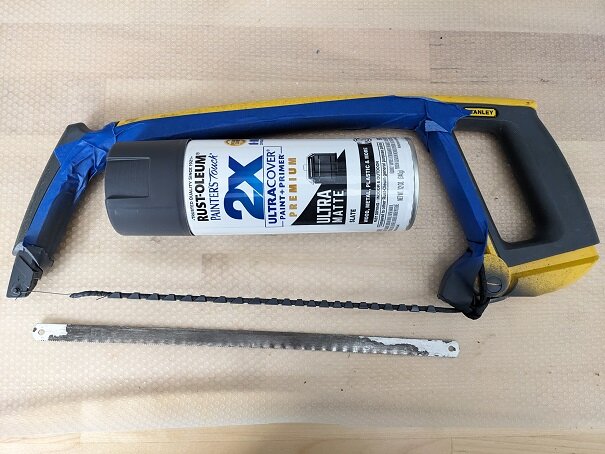
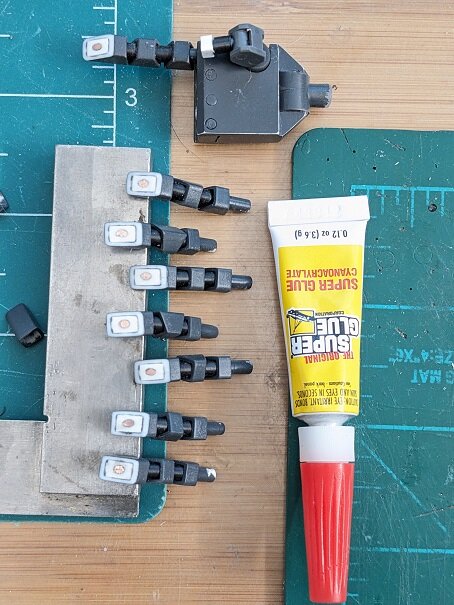
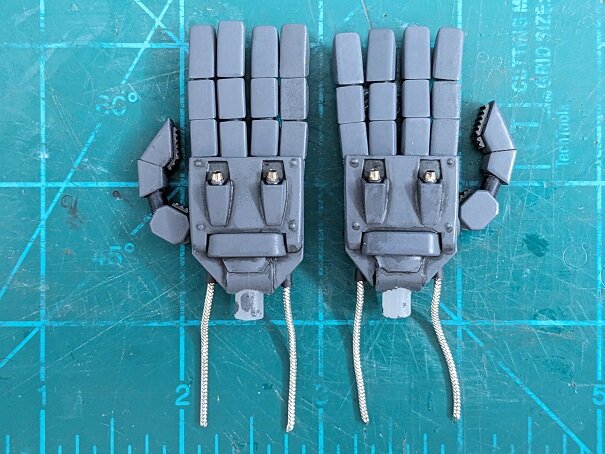
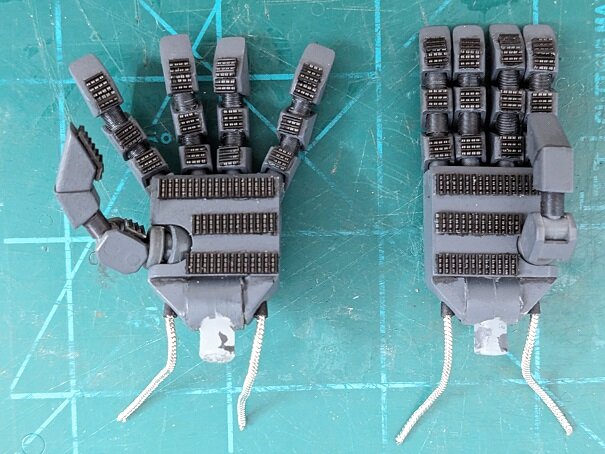
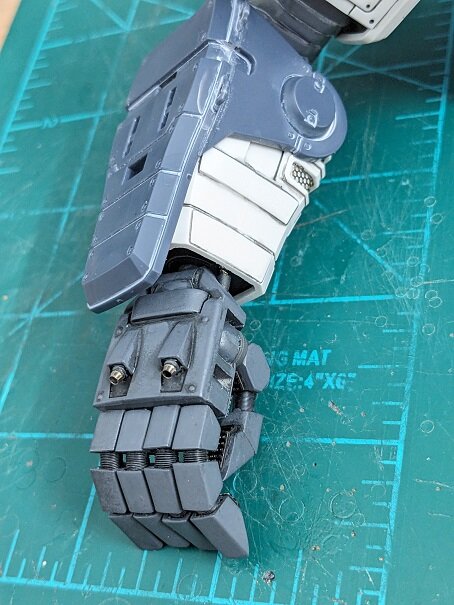
@Cheese3 That is a COOL and UNIQUE scheme! Unforgettable too! @electric indigo Looking good! I miss my ole' 1/100 scale vinyl kit of that I used to own. @joscasle Those fighter look BEAUTIFUL!!! The exhaust finishing is realistic too and tough to re-create. ANYBODY need a hand?!😁 My apologies for all the hand construction photos, but I thought they might help somebody out with scratch building or modifying their kit's. As you saw before, the stock hands that came with the 1/35th Dougram are lacking. Plus, they're only fists, so, no posability or second pose of hands comes with the kit. First I had to create the palm and thumb joints. The ball joint is on a hinge (you can hardly see it here). The finger bases are all leftover Gundam polycap pieces. The palms were two styrene pieces glued-together and cut/drilled out to ensure the finger joints line up. The bases of the fingers were cut from Evergreen square stock and square tube and lathed to make round ends. Thick wire was tinned on one end to be glued into the finger bases. How do you paint all those hollow finger joints without them moving around? I thought about it for a while. The answer, para-chord and a hack-saw frame. Here you can see how the pieces of finger went together in segments. The finger tips were solid, square stock, drilled out. Then they were filed to match the finger tip shape. Finally, they got two coats of CA glue to fill any cracks and smooth them over before a light sanding. I used Hi-Q 3.4mm springs to cover the mid-sections. They are SOFT and NOT springy at all. They almost feel like fabric, but ARE spring steel. And the fingers dry-fit to test them out. Then some paint to cover the dark primer color, a little panel liner, and Hi-Q 2mm gun barrel nozzles. The barrels are steal which meant I could heat them up and give them realistic heat wear. The final step was to take an old printer belt and cut segments out to fit the joint pieces. I used Gorilla Glue Clear Grip and CA to make them stick. Hopefully the added materials and colors add realism to the hands. The final photos are to show how the hand cables (costume jewelry "chain") or hydraulic lines fit into the arm to add details. The cables just fit loose so the hand can twist easily. No weathering yet. It would get rubbed off while I still continue to build the model and modify it. Again, sorry for all the photos, but I hope they inspire; and thank you for your feedback and ideas! - MT


-
@pengbuzz That's cool! I like the packaging label too! - MT
-
@pengbuzz That looks awesome! It almost sounds like the real thing too😁 Nice recovery and the rebuild is MUCH more reliable than stock - I'm sure! Nice score at the market too! @Goodman Models Thanks! Are you going to weather it at all (minor of course). @F18LEGIOSS2 Great restoration! Those old toys deserve the love😉 - MT
-
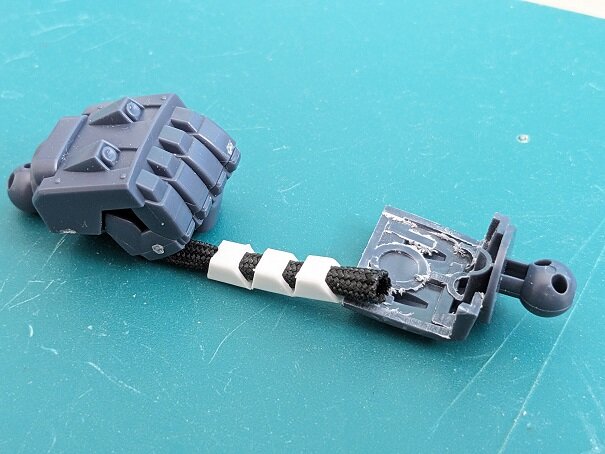
@Thom @SteveTheFish Thanks guys! I'm thinking the lighter panel liner on the blue maybe TOO much contrast myself. @Chronocidal Thanks! The paracord is only temporary, but I almost used it. I'll be using spring steel tube to go through the joints with a copper wire core. There will be fingertips of some type. I'm still working out the design. - MT
-
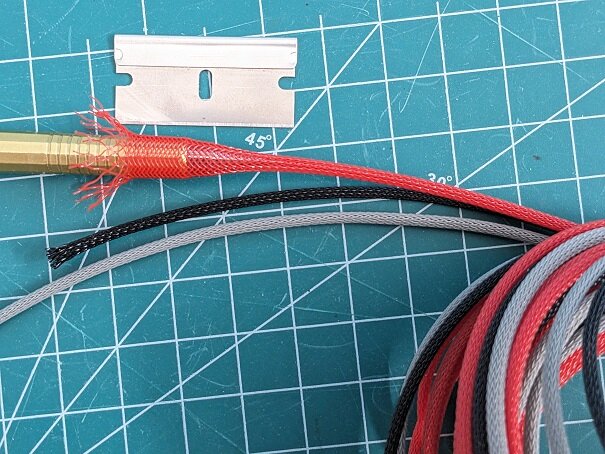
@Big s Thanks! You are absolutely right! People are SO distracted these days! EVERYONE! I thought you guys might like this. It's expandable sleeved tubing, or on models, meshed tubing. Perfect for details and builds. It comes in various thicknesses, the smallest being 1/8" or 3mm. It can expand to about 1/4" or more. The photo below shows my example over a mechanical pencil. It costs about .20 cents a foot and you have to buy at least ten feet, so about $2.00 - what a deal! Much cheaper than modeling accessories and you get WAY more! It comes in four colors. I should have gotten white, but didn't see a need for it. This stuff is awesome for mecha detailing and engine detailing. This tube is perfect with contrasting colored wire or tubing underneath it to add detail and depth. US Plastics sells it along with styrene sheets (and tons of other cool stuff) if you want them LARGE! They also trim the sheets down for a fee. Just thought I'd share this cool stuff! https://www.usplastic.com/catalog/item.aspx?itemid=133515&catid=1051 Working on the 1/35th Dougram hands now. I cut pieces for the finger joints and test fit with paracord for the core, but will substitute it with coiled springs. A copper wire core will make it posable. You can see the original fist has little detail in it. No other hand options either, so that why I'm making it new hands. Thanks for checking in guys! - MT