The_Major
-
Posts
326 -
Joined
-
Last visited
Content Type
Profiles
Forums
Events
Gallery
Everything posted by The_Major
-
thank you mechamaniac i knew there was something i was forgetting. thos can also usualy be purchased at youre local Radio shack
-
well i do most of my stwitch shoping at Radio shack, the "Micro Switch" is just a small switch like the one you have already, they come one size smaller but the one you have should be fine.
-
Just make sure you use heat tollerent plastic lined with electrical tape for the box as a precaution so you dont melt anything.
-
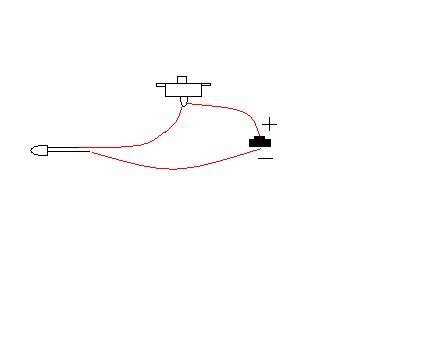
Well to177, i must say you have layed out everything and have given a good amount of thought and work to this already, i commend you, you are definatly acting like you have done this before and i like your positioning of the switch (which you should have no problem with), i dunno how the rau comes apart and or what its Inards look like but i have a feeling hiding the switch unter the booster might get complicated. anyway here is a super simplified diagram of how the LED is hooked up to the powersource. and my sugested wire path is to run the wires along the inside top of the opening Peice so that the wires wont be hanging visably when you open it up. If you feel like ive left anything out, sound like a compleat idiot (wouldnt be the first time ), or ya have any questions please let me know. i really wanna see this finished project. To Neova I feel Honored to get such praise from the likes of a MW member, i love to share my opinions and thoughts, and i also love to share what i know even if it makes people think im nuts (ala argument about the possibility of constructing a VF-0 with current technolgy wich is 150% possible, i can get into that one later but i will say this, i did not get into areospace engineering to design the newest line of passenger jets for virgin atlantic , i did it for two reasons, designing a new Shuttle and constructing a working VF and beyond.) anyway getting OT As for the Transforming SDF-1 i had to do so much to it that i cant remember everything i did, so i wont be able to do a walk through for it untill i can find another DYRL SDF-1 Crusier Mode Kit. hopefully ill be able to get my hands on the one thats apeared as Comming Soon on e2046. and as for pics of my 1/48 Focker Special, or as my GF likes to call it the Flying Christmas tree (she does that just to irritate me shes just as big of a macross fan as i am) ill have to wait untill i can get a new digital camera, my last one had an unexpected meeting with our pool about a year ago and i havent gotten it replaced yet mainly due to my current projects wich are as follows. 1/72 Scale replica of the Prometheus to use as a valk display stand wich once compleat will be something like 21 feet long and take the entire length of a wall in my basement. (USS FLAAG eat your heart out) Progress 25% have the Command Superstructure compleated and most of the forward flight deck done. Reasons for project, 1 Im friggen insane 2 I have a Custom Max DYRL VF-1A with flaps gear and twin tail hooks down and had now where to accuratly display him....... oh yeah did i mention im insane? My Custom 1/8 scale (if he were micronized) Figure of the DYRL Breetai its about 2% done, i suck at sculpting FIgures of "Humans" and i use the term loosly and right now his head looks like a deformed peice of fruit with a plate on it.... last project other than the HW2 mod is my 1/72 scale DYRL era Space Battle Diorama that has invaded my Workroom (modeling room) compleat with valks in all 3 forms custom made Regults N-Ger's Gnerl's and Rau's (this is where about 20% of my total 972 compleated valks are. this project is as of right now 99.9999999% done, i have the walls painted, Space black, with stars, jupiter can be seen on one wall the sun on another (In correct proportion to one another as well as painted fleets as there is no way in hell id fit a 1/72 sdf-1 anywhere but the astrodome... and i highly doubt that, but the only thing i have left to do is finish the soundtrack for when you flip on the lights it will start playing the battle sounds com chatter and pilot talk Oh yeah did i mention that i was insane, or maybe im just uber fanboy man! and yes my gf comes over to help me with my projects and yes i have somewhat of a life...... anyway sorry for Hijacking your thread,...... when i get to talkin i find it hard to stop sometimes.... like i said i love shareing.........okay thats enough outta me, if you have any more questions about the LED to177 or anything else please ask.
-
F/O is my abriviation for Fiber Optics, and now that i know what youre doing with it i can help ya out. Ok youre replacing the Eye on the Rau, i have yet to recive my rau so i dont know where it comes apart and what not, but i can give you the basics. First things first, Decide what size battey is needed for the LED, with my 1/48 i used watch batteries as they were small enough to fit into the nose and legs of the Valkyrie, and seeing as you are working on a 1/60 watch batteries will be your best bet for saving space, especialy if you want to still have the figure fit inside. Now once you decide what batteries to use you need to do two things see how many batteries it takes to run the LED and make the terminal to place the batteries in, i often custom make mine (because i use odd combinations of batteries) wich isnt too hard, you just take heat tolerent plastic make a box then line it with Black Electircal tape then you can lay in and fasten down the required wireing for the terminal. After that has been accomplished its time to work on the placing of the LED, first you need to mold a peice of clear plastic to fit into the "Eye Socket" over where the LED will be placed when in place this will create a more even flow of light across the eye. after having made the Clear Eye cover you can now do one of two things, Drill a hole for the LED "Bulb" to fit in without toucing plastic adding some Crome or silver paint to the hole to further deflect light outwards, or You can compleatly remove the Red section on the faceplate and give the back of the Clear Plastic a coat of Clear Red and fit it in so that the LED fits in then you can fill in the area around the "Bulb" itself with reflecting foil that can be found at most hobby stores, smooth houshold aluminimum foil works well to and chances are you already have some of that. Next step is to place the LED inside. Bets way to do this in your case is to fit the LED so that it appears in the Position where you want it ((Tip)) Tape it down, insert the figure and see how well it closes, you may want to pick up a smaller LED module. Once you have achived the desired Location attach the required power wire ((TIP)) do so in generous length so they can be cut to size later Then glue down the LED module once this is done it is Time to attach the connecting wires to the terminal and mount it, i would sugest trying to mount it in the "BackPack" like thruster pack on the rear of the rau once you have mounted the terminal and made sure everything still fits, its time to instal the switch, Now i for on hate switches that are obvious and out in the open thats why on my 1/48 i used a "MicroSwitch" so i could mount it in the cocpit of the Valk and easily decuise it as part of the control pannels, in the raus case its a lot harder to hide without a wireing system more complicated that of the alarm system at Fort Knox. so i would sugest geting a micro switch and doing a small amount of cutting, by removing the rau's antenna cutting a hole big enough for the switch handel to move back and forth and then attach the antenna ontop of the switch so the antenna is then the switch. you can touch up with paint and putty as well. Final step is to connect the wireing, and rather than trying to explain that at 3 am in the morning and then having you somehow detonating your rau and suing me , ill do a wireing diagram and post it here, also if anyone has some nice Side Front and top lineart views of the Rau i can use them for mounting instructions that can be printed off, also some closeup shots of the 1/60 rau's interrior including the back of the Faceplate area. Once the requested linart and rau pics are posted or found, i will then be able to post a full detailed set of fool proof instructions in both a basic guide for beginning customizers and an advanced set of instructions for the Advanced, this will include sugestion of making a new eyepeice and so on, Advanced will have sugestions on how to minimaly effect the outside of the Model, and final sets of intructions will, with the use of common sence be able to show you how to add LED's to other items, and dun worry ill post pix of the Customized 1/48, and a how to on F/Os
-
ehh what are you using the LED for that would help alot. Ive never worked much with LED's, i generaly stick to Fiber optics, as a matter of fact last LED i did was on a 1/48 VF-1S Now it has working landing and wing lights and a fiber optic detailed cocpit. LEDs arnt much different than the F/O system i work with, F/Os just work better in 1/72nd scale kits, but post what youre wanting to do and ill try and help ya.
-
Thank you now i never have to worry about oversleeping again... now that im not able to freakin sleep. wholy crap thats freaky!!!
-
I would have to say that my most valuable investment other than my collection is the display case i have. its full Anti-Child/Animal protection, Its a custom made Glass and metal case, its got staneless steel trim that holds it together and for handels for the doors and such, but its got a nifty surprise for anyone who touches the metal (wich you have to inorder to open the thing), upon touching any part of the metal you get a good 300,000 Volts of eletricity running through you (same as your average stungun) and on top of that the case has a lock too. the case was custom made and cost about 2k wich is not bad concidering the amount of glass in the thing, and it has a nice warning sticker to so im off the hook if someone touches it. After all when you own 6 Low viz's amongst other presious valks, as well as several cats, a sister, and little cousins you cant be too careful!
-
Actualy i have to agree with skull leader, id love to see tricked out valks compeating. Id love to see an SDP-1 Going up against the likes of a Modified VF-1S Doubble Strike, or for you melee freaks an Uber Rau fighting hand to hand with a 19, and ohh imagine the new paint jobs Oh oh oh i almost forgot the Meltrandi "Round Card" Girl in a Bikini
-
the freaking minuet i can find a box set im buying them, as long as the prices are reasonable, i wonder when TM or VE will get em in...
-
Um is it bad that My computer's name is Sharon Apple?? or the fact that im only 19.......... oh and for those who are wondering.
-
ta be quite honest, i dun even want the whole set, Focker, Misa, Hikaru, and Mylene are all i want out of the entire collection. that is untill the decide to release M&M providing the Second M has a decent sculpt
-
I would have to agree with Klump, the Title will be Macross DYRL? Space War One. and the logo will be simmiler to how he described it.
-
we're gonna work towards having a new macross class colony fleet at some point.
-
I dunno, im thinking maybe they should do something with Hikaru and Misa's kid, just so they can let everyone know that atleast the bloodline isnt dead.
-
i like to think they resemble this.

-
Thanks for all the complements guys
-

How to strip dried acrylic paint on Model Kits?
The_Major replied to dyowelb's topic in The Workshop!
I uses model master acryilcs almost exclusivly and both those methods work. -
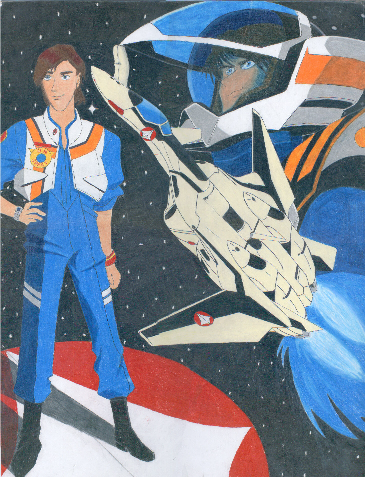
yeah i need to fix the face a little, it is shaded but not enough, plus when i scaned it, it got lightend, and its a whole lot smaller than it should be the original is on an 18x24 peice of art board
-
Thanks alot, that will help alot.
-
Okay, usualy i dont have too big of a problem with the clear peices in my kits but recently there are some wicked seam lines on the canopy that go right down the center how on earth do you get rid of them?! whats the best way?
-
Well at this point the only thing we have is the F-22 wich washington is trying to cancel. and in my opinion the F-35 would be chewed up and spit out like a mailman's leg after a rabid rotwiler got to it! Anyway the SU-35 is an amaizing piece if aircraft, ive had the pleasure of seeing the thing fly in person, and let me tell you the damn thing almost made me $h!t my self, in one manuver the thing pulled the tightest loop ive ever seen, and was literaly flying backwards and upside down for about 3 seconds before coming out of the loop and heading off in its original direction. Imagine what that would do for you in a dog fight, your enemy jets passed you, you pull that manuver, bam you've fired off a missile and are still flying in the same direction you were when you starded!!.
-
yeah my plan is to do Guld with the 21, Roy with the Strike 1S, Hikaru, Max and Kakizaki with Super 1As, the SDF-1 Bridge crew with the SDF-1 and so on. Anyone else want to share their thoughts?
-
Should SDF: Macross be reanimated?
The_Major replied to Jolly Rogers's topic in Movies and TV Series
It should SOOO be re animated, just as long as it doesnt turn out to be another M7 recycled pos -
This is my first ever attempt at drawing anything macross, what do you all think? good or bad? I used just colored pencels