kyekye
-
Posts
619 -
Joined
-
Last visited
Content Type
Profiles
Forums
Events
Gallery
Everything posted by kyekye
-
Lots of pics from the original sculpting contract company Heavy_Gauge Cran Cran Sheryl Ranka I have some problem with Sheryl's lipline and eyebrowse, but the others look pretty good.
-
If you are asking about the actual kit, i didn't do anything special. There are some new panel lines I made with engraver, but I'm not sure if you meant that. other lines, I guess, got thinner after layers of paints. If you're talking about the lines on the painting, that's just brush lines I use Cintiq, so I can draw on minitor with thin brushes in Photoshop. I hope this answers your question?
-
All Photoshop. With layers and my custom brushes I was using painter for a while, but switched to Photoshop a while ago. I heard Painter is pretty good nowadays.
-
I've been using this service for a while now. crescent They chatge you some fees and shipping (both domestic - ship to them- and international ship to you) So, Only use it when you think it's worth it.
-
Go here http://auctions.yahoo.co.jp/jp/0-category.html Use the following key words to search in マクロス : Macross ステッカー : Sticker シール : Seal デカール : Decal You might find something interesting. Good luck hunting.
-
For the Macross pin ups, top 3 are for... -Spartan Destroid personal markings with squadron and name ranks. (like sylvester stalion , Afred Watkins..etc) -Armored Valkyrie personal markings with squadron and name ranks. -Monster personal markings with squadron and name ranks.
-
Thanks for comment! I've used one of my VF-25 picture (one from the 1st page of this thread) as a template, but this is complete paint-over. I left some of the background (front circle and panel details) because I got lazy and circles are hard to do with correct perspective.
-
I had some time left and had urge to do some digital painting to use it as my computer desktop wallpaper. This is like 'I wish I had made my VF-25 this way' version. I think it came out O.K. so I'll share with Macross fans here for your viewing pleasure (or not... _)

-
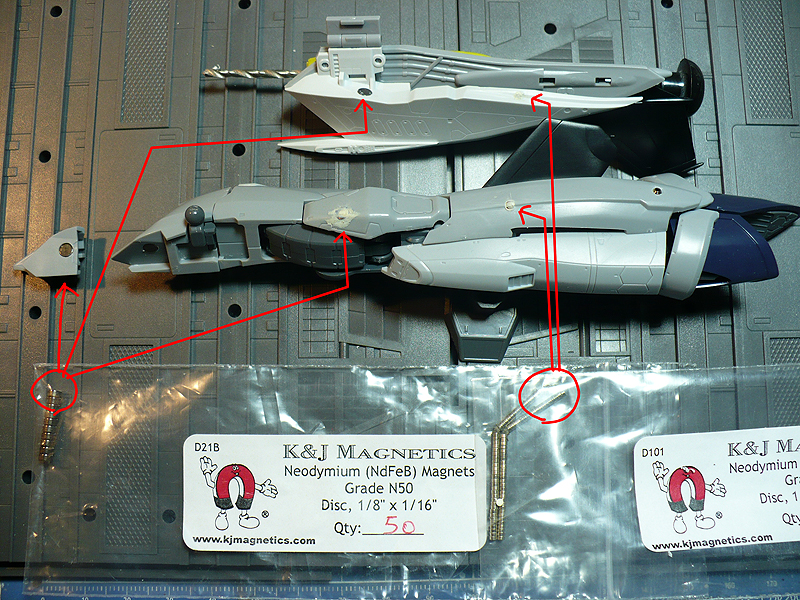
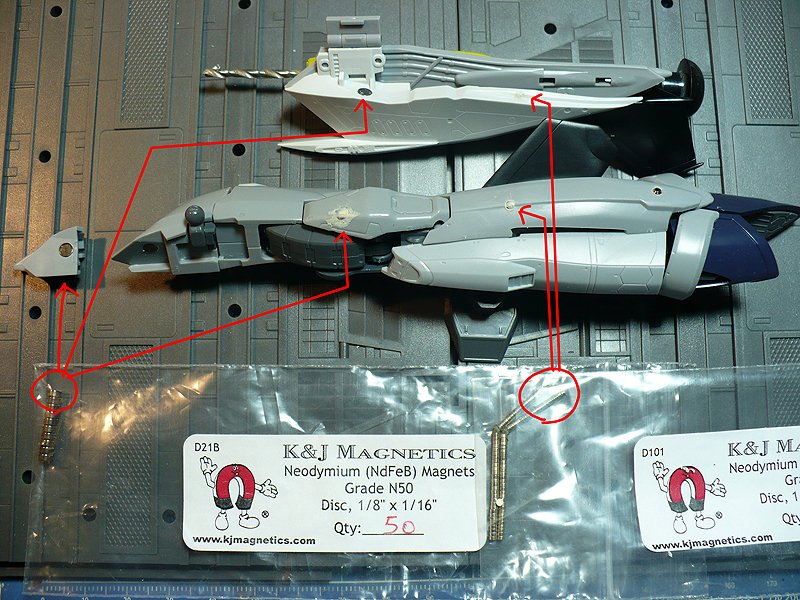
I'm using 'D21B-N52' for the most of parts.
-
Looks nice. What kind of material are you planning to use? 4mm is kinda almost touching the extension frame inside. You are planning to cut through 2 part pieces, but you will have to cap it with plastic sheet. The sample in model Graphix magazine shows a big surgery on the extension part to get enough space for landing gear and the cap sheet. Real challenge is though the front landing gear, I guess. I'd like to see the hands mod and landing gear mod. So get well and take some photos. I'll be done with my afterhour project in 3 days, so I can continue on Ozma from this weekend. Yay!! It is very discouraging though that the parts I moded will be replaecd by add-on parts from Super Pack (or Armored, if Bandai announce it ) I'm pretty sure there will be some people to mod those replacement parts to be clip-on parts!
-
 I believe it was 'store front' give away 'pack-in' deals. So it was NOT in the box, but you get it at the store.
 -
Hmmm. The pegs might help locking parts in position , but it feels like it will fall into 'toy' category as soon as I add them. Magnets are better choice for models in my opinion. DX does have some small panel line fitting idea which I'm going to use. Anyways, right now, I'm crazy busy with work, so I'll have to take 2 weeks break. Sorry about delay...
-
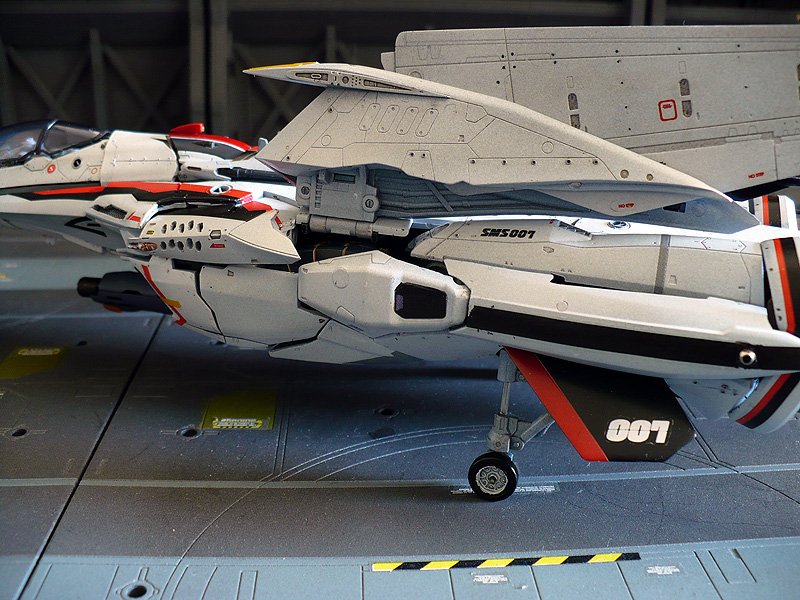
1/72 Bandai VF-25F Messiah build-up step-by-step (sort of)
kyekye replied to wm cheng's topic in The Workshop!
Yay! Happy New Year! -
Oh, i see now. That will require drilling through the aluminum rod. Sadly i don't have tool for that. Also I don't want to lock it in position yet. That will definitely improve the strength though. On the other hand, it is pretty solid on my mod so far, so I don't feel the need for extra lock.
-
Hmmm. I don't understand what you mean. Give me some visual images. It currently works and fits, but anything that can improve better fitting will be welcome. I just got DX toy version of Ozma. Man! the landing gears hurts my eyes... Well it's a toy, so I can transform it back and forth without worry too much about it There are a couple of things i can learn form it thou. the puzzle parts fitting IS much nicer on DX version.
-
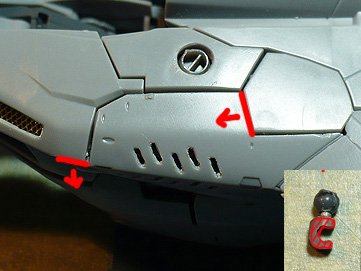
Man! I'm sorry to hear that.... Maybe i should have put more detail into the process. This is what I did. 1. With 1.5mm pinvice, I drill through completely. 2. Insert the 1.5mm aluminum rod. very tight fit. I don't trust glue/crazy glue on any small part with stress/force. 3. cut the rod at the tip of ball side and sand it clean. If you have a small hammer, you can flatten it like rivet head. This will prevent the ball from coming off. 4. sand a little bit on the C shape from the ball joint (image is for the left side) 5. sand 2 parts from the hipgun. (see image) The parts are small and slippery. Be extra careful... (too late i guess...... )
-
Man, some of these magnet type can actually hurt you.... Anyways, the best way to me is to drill the hole very tight using acurate size pinvice drill bits. All the magnet I put in places can stay without any use of glue. I might use 1/2 drop of crazy glue before painting. I only use dremel tool to increase the size of the hole just a little bit to fit magnet. In my opinion, actual hole should be drilled with manual pinvice very slowly. Also I use a small pinvice first to get the position right and move onto the bigger bits. I've been doing that for my other models and it's been error free so far.
-
Suprisingly no. Joints and transform parts are quite tight. Only place (I think) needs some attention is the fin on the bottom. This part fits into the 'I' shape hole to form the pelvis. Whatever you do, DO NOT try to sand it to make it look like sharp fin. It needs to be that dumb shape.
-
It seems like partially it IS due to the problem with the kit (specially Alto's). However, the thickness of the paint layers worsen the issue with that particular part piece. The joint mod I'm trying should fix the major fitting problem thou. Thanks for commenting on my defense Most pro-built hobby magazine images also show that particular problem. During multiple transform test I DID get the piece in right position a couple of times when the other pieces are perfectly fit in position. It happens somewhat random. The biggest issue i found was the length of hipgun joint. It's just 0.2-0.5mm short. The second problem (specially with Alto's) was that the joint pushes the part forward. Another 0.2-0.5mm. So I sanded the the parts in 2 places (the edge right above the gun and another edge where meets the shoulder diamond part) and extended out the joint using aluminum rod and pinvice drill (1.5mm). It does look like it can solve the problem . For now, I'll leave it un-glued so that the piece can slide a little bit up and down until I finish the pieces with decal and painting later.

-
O.K. I'm taking some WIP pictures and the topic is up now. Bandai 1/72 VF-25S Ozma WIP
-
The neodymium magnets have grade numbers which represents their strength. Here is quick info from the vender I buy from. Neodymium Magnet Physical Properties N50 and 52 are pretty strong and should be enough to hold the macross parts. They need to be aligned correctly (position-wise) to maximize the pull force. I recommend using 1/8" ones for the most parts. small ones (1/16") are only used for supporting. I've used them for my VF-25F (same position as VF-25S), and they worked great.
-
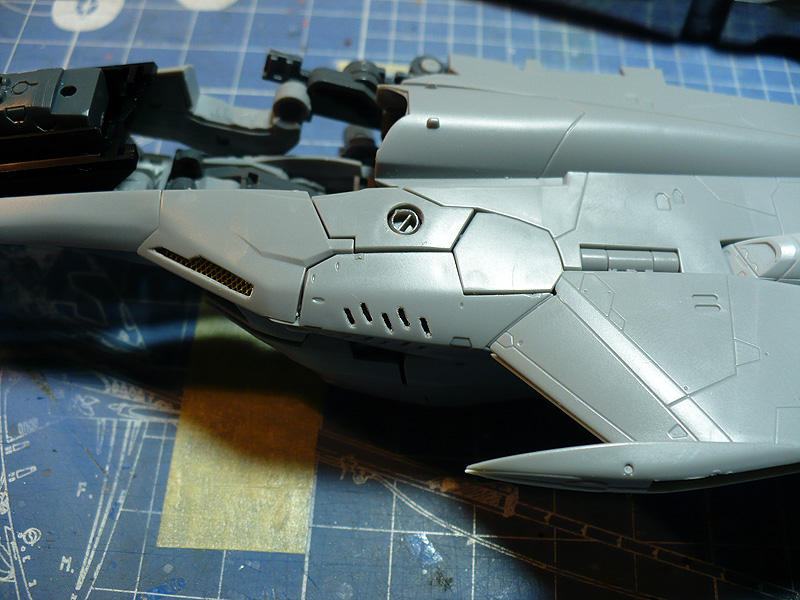
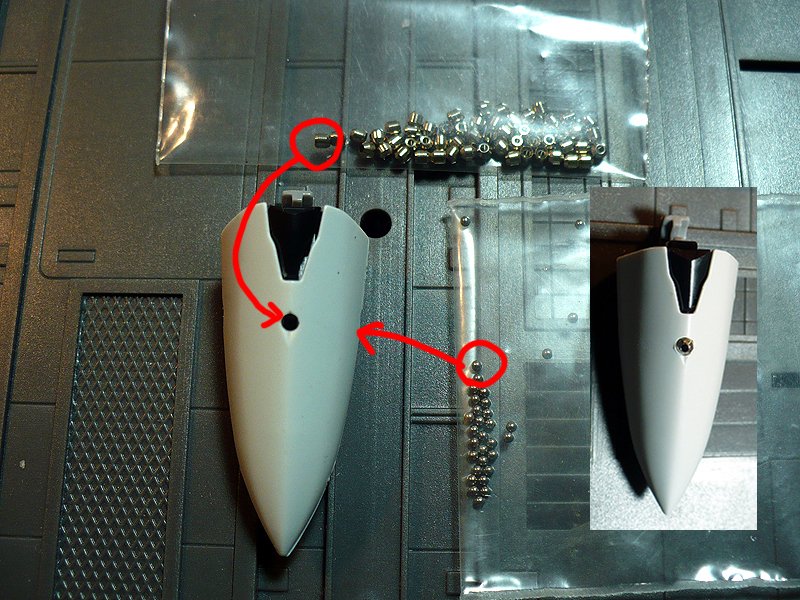
Adding nose sensor details with metal bead (for top) and metal balls (for the side). Cut holes for round Q parts detail upgrades and replace them with Kotobukiya option detail parts for deeper mold. Adding magnets for tighter transform in fighter mode. I still need to do the other side of legs to lock them with arms.
-
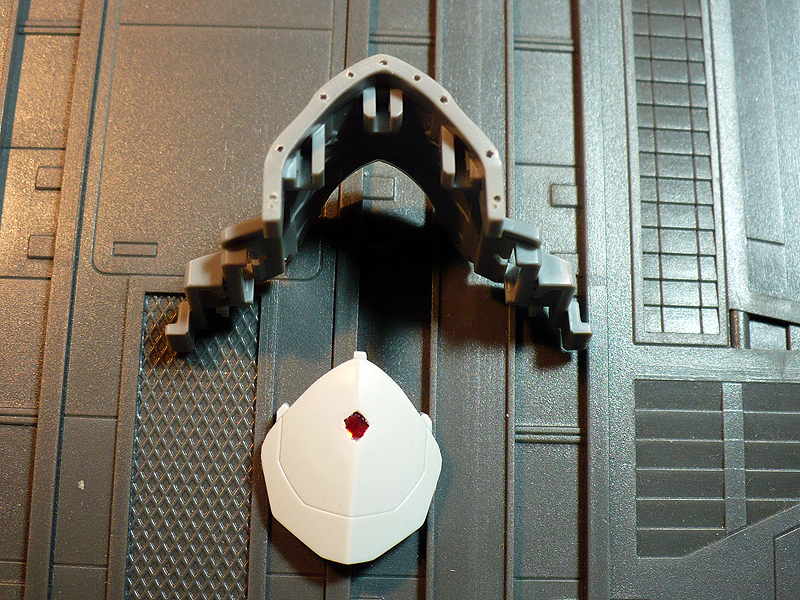
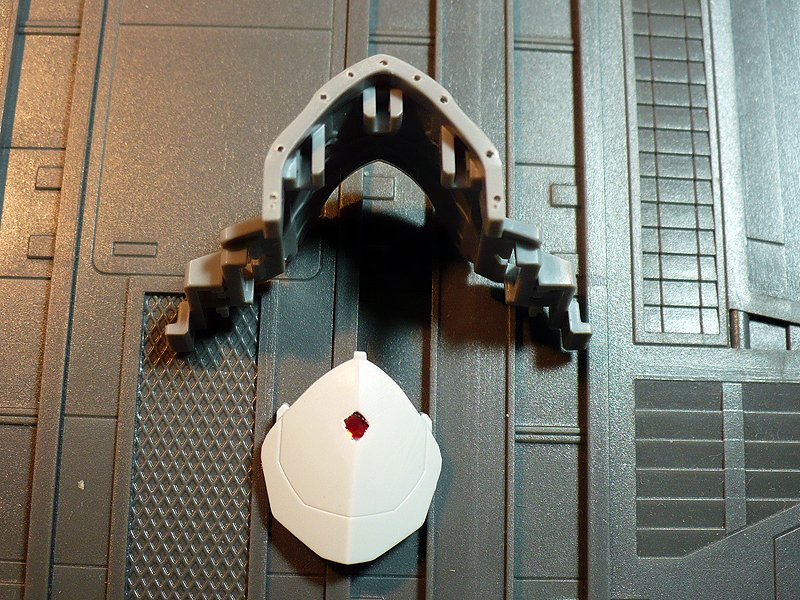
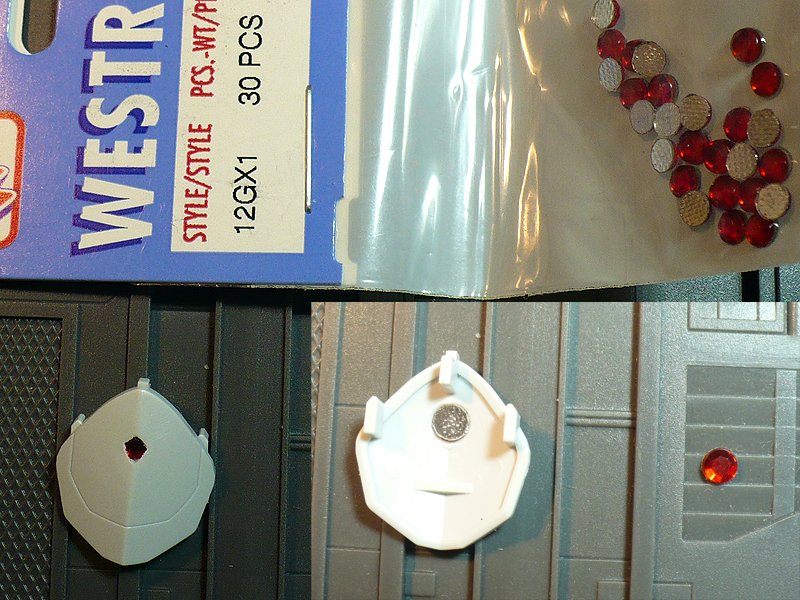
My next mod is 'red lens' parts. For Alto's, I only used it for chest piece, but Ozma's VF-25s, I used on 2 places. One is the same chest piece, and the sencond is the head sensor. First I cut out the shape and make a place for it from back of the parts using round dremel tip. It should be just enough for the lens to sit in but must not break the cut-out shape from outside. I found this mini red glass parts at the craft shop. (ones that's used for decorating dolls and other girly stuff , i guess..) Also this time, I added chest piece section detail with rivet holes (vs. edge line i had on my Alto's VF-25F ). I think this makes it more like airplane. Head canon (or sensor?) is also drilled out and replaced with metal bead. All the parts are not glued yet since I gotta paint the parts sepaartely.

-
Eventually, yes. Ozma VF-25S will look better with Armored Pack which is not announced yet. So I'll wait for that and prepare the kit for it. For my VF-25F, I didn't glue most of parts yet for super pack which will come out sometime next month. Also I left some parts un-modified (such as gaps between parts) because I was afraid those might needed for Super pack. We will see.
-
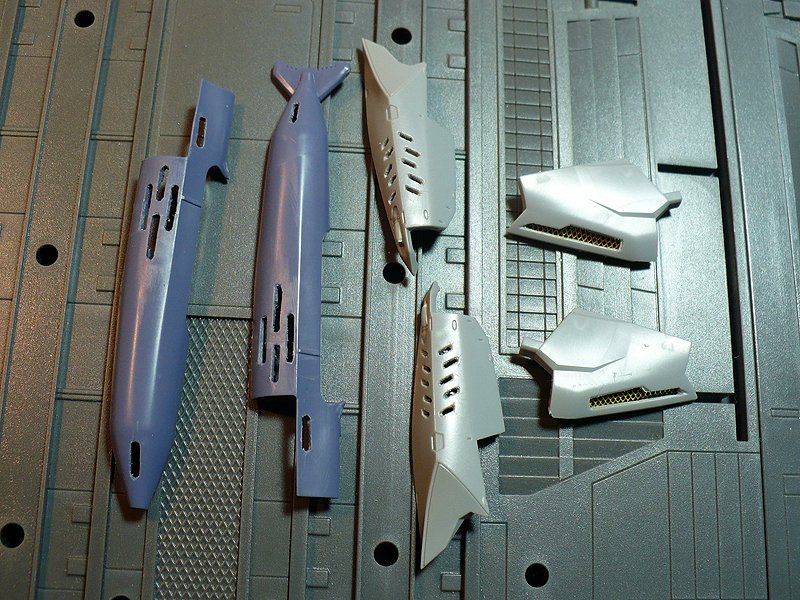
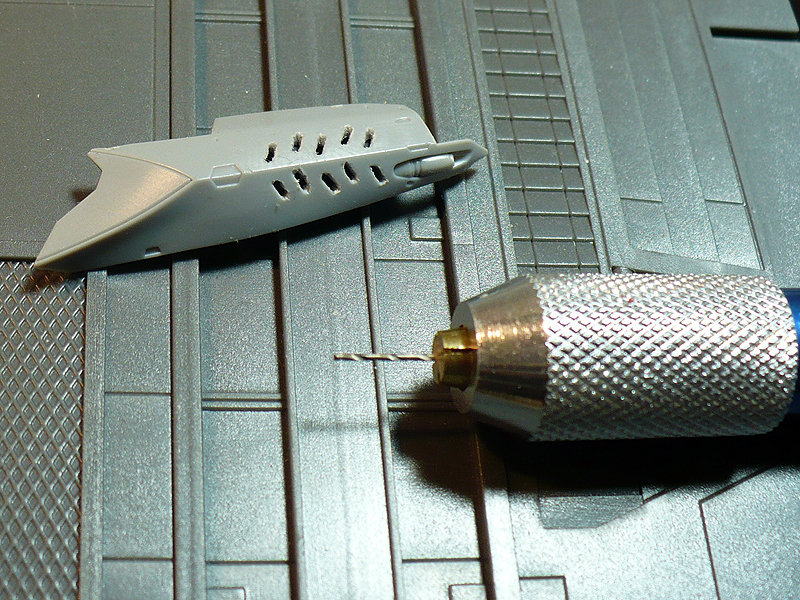
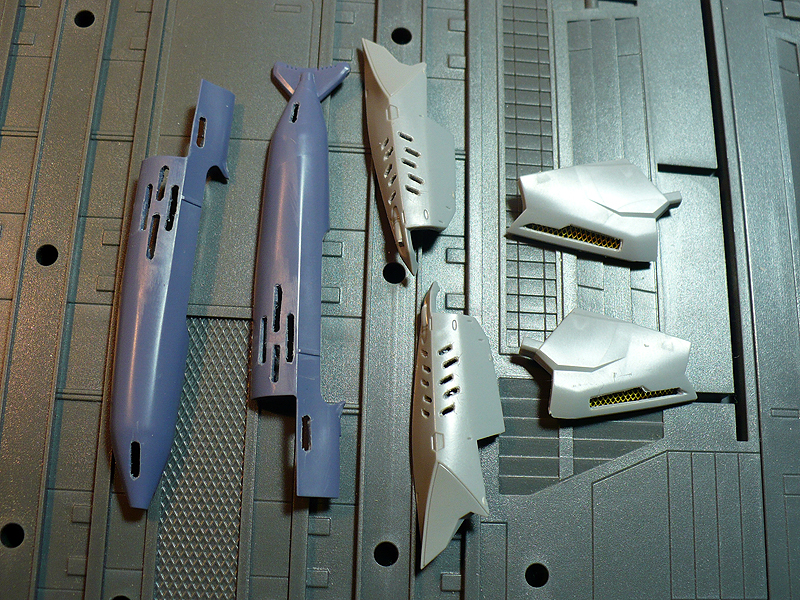
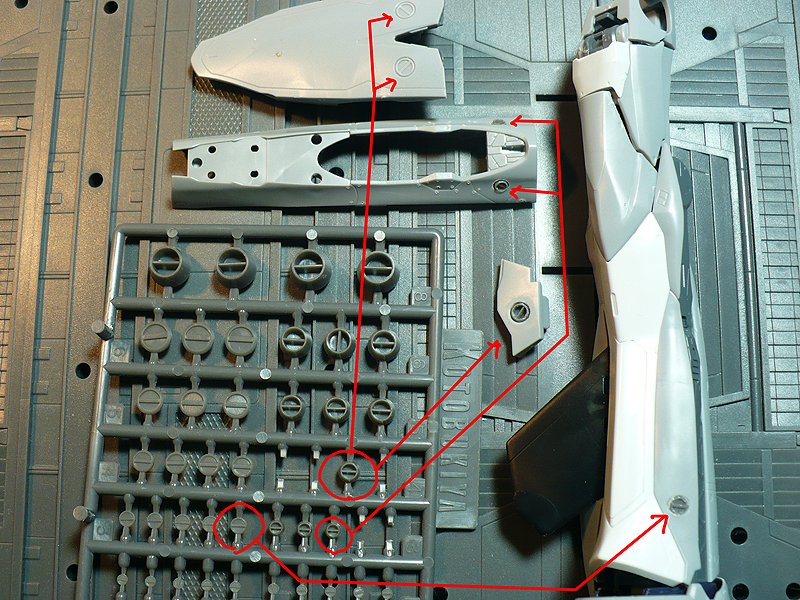
Actually I already spent a couple of days on this kit. So I took some pictures of my progress. Using the pinvice, I made the machinegun grill holes. These are angled, so you need to make holes at the each end and cut in between. I still need to sand them and make them clean, but these are quite small to sand nicely. I'll see what i can do.. I'm also going to replace the gun with metal parts. (I need some suggestion here. My last attempt with metal tube layers didn't look good enough) With the same method, continue with gunpod parts and chest intake parts. For the chest intake, I'm using the same photo etching parts i used on my VF-25F (Alto's). It's already primed with metal primer.